


User’s Manual
CAMILEO S20
Introduction
Welcome and thank you for choosing a TOSHIBA product.
For your convenience, your TOSHIBA product is furnished with two guides:
a)a Quick Start Guide, and
b)this comprehensive PDF User’s Manual.
Contents
Section 1 Getting to Know Your Camcorder........................................ |
6 |
Overview................................................................................. |
6 |
Check the Components........................................................ |
6 |
Safety Instructions................................................................ |
7 |
System Requirements........................................................... |
7 |
Front View.............................................................................. |
8 |
Rear View................................................................................ |
8 |
Side View................................................................................ |
9 |
Bottom View........................................................................... |
9 |
Section 2 Getting Started..................................................................... |
10 |
Loading the Battery............................................................. |
10 |
Inserting and Removing an SD Card (Optional)............... |
10 |
Turning the Camcorder On and Getting Started............... |
11 |
Turning the Camcorder Off................................................. |
11 |
Section 3 Record Mode........................................................................ |
12 |
Button Function................................................................... |
12 |
LCD Monitor Information.................................................... |
13 |
Movie Recording.................................................................. |
15 |
Using the Pre-Record Function.......................................... |
15 |
Picture Recording................................................................ |
16 |
Taking Close up Pictures/Movies....................................... |
16 |
Using Digital Light or Light Function................................ |
16 |
Using Digital Zoom.............................................................. |
16 |
Options for Record Menu................................................... |
17 |
Operations for Record Mode ............................................. |
17 |
Movie Resolution................................................................. |
18 |
Picture Resolution............................................................... |
18 |
White Balance ..................................................................... |
19 |
Scene ................................................................................... |
19 |
Movie Effect......................................................................... |
20 |
Picture Effect....................................................................... |
22 |
Contents
Section 4 Playback Mode..................................................................... |
23 |
|
|
Button Function................................................................... |
23 |
|
LCD Monitor Information.................................................... |
24 |
|
Operations for Playback Mode .......................................... |
25 |
|
Movie Playback.................................................................... |
26 |
|
Picture Playback.................................................................. |
27 |
Section 5 Setting Your Camcorder ..................................................... |
28 |
|
|
Setting Menu........................................................................ |
28 |
Section 6 |
Viewing Pictures and Movies on TV................................... |
32 |
|
Connecting to a High-Definition 16:9(Wide) TV................ |
32 |
|
Connecting to a non-high-definition 4:3 TV...................... |
32 |
Section 7 |
Viewing Movie & Picture on PC.......................................... |
33 |
|
Installing Bundled Software............................................... |
33 |
|
Transferring Pictures or Movies to a Computer............... |
33 |
Section 8 |
Burning the Recorded Clip into a DVD.............................. |
34 |
Section 9 |
Uploading Video Files to YouTube..................................... |
37 |
Section 10 Video File Converter.......................................................... |
42 |
|
Section 11 Specifications..................................................................... |
44 |
|
Section 12 Troubleshooting................................................................. |
45 |
|
Contents
Section 13 Other Information............................................................... |
46 |
TOSHIBA Support................................................................ |
46 |
Operating Environment Conditions................................... |
46 |
Regulatory Information....................................................... |
46 |
Additional Information........................................................ |
48 |
About the battery pack........................................................ |
48 |

Section 1
Getting to Know Your Camcorder
Overview
The camcorder with 5 Mega Pixel sensor can take H.264 movies. By way of using H.264 technology, more videos can be taken within certain amount of memory. High quality images with up to 16 megapixels can also be delivered smoothly. With a color LCD monitor, users can compose images and examine them easily.
The camcorder also features movie recording at an HD resolution of 1920x1080. You can also connect it to an HDTV via an HDMI cable, and easily playback the recorded high-definition videos on the wide screen HDTV.
Moreover, the camcorder has an advanced uploading feature. With the exclusive built-in YouTube Direct application, you can upload the videos captured by the camcorder to YouTube more effortlessly.
ISO sensitivity and color balance can either be adjusted automatically or changed manually. A 4x digital zoom helps you to control over the movies and pictures you take.
The varied effect options, such as Time Lapse and Slow Motion, make recording more fun.
The built-in memory allows you to take pictures and to record movies without a memory card. The memory card slot allows users to increase the storage capacity.
Note
Partial memory of the built-in memory is used for the camcorder’s Firmware code.
Check the Components
Unpack the |
listed are included: |
Camcorder |
USB Cable |
AV Cable |
HDMI Cable |
AC-Adaptor |
Lithium-ion |
|
Lithium-ion |
||||||
Camcorder |
USB Cable |
|
HDMI Cable |
|
r |
Rechargeable |
|
|
|
|
|
|
Rechargeable |
|
|
|
|
|
|
Battery * |
|
|
|
|
|
|
Battery* |
Quick StartGuide |
CD-ROM |
Pouch |
CleaningClothh |
Strap |
|
WWarranty LeafleLeaflet |
(Software & |
|
|||||
|
(Software & |
|
Strap |
TrTripod |
|
|
|
User’s Manual) |
|
|
|
|
|
|
User’s Manual) |
|
|
|
|
|
*preinstalled in camcorder device
Note
Please remove the lens protect film on lens before use.
EN
6

Safety Instructions
1.Do not drop, puncture or disassemble the camcorder; otherwise the warranty will be voided.
2.Avoid all contact with water, and dry hands before using.
3.Do not expose the camcorder to high temperature or leave it in direct sunlight. Doing so may damage the camcorder.
4.Use the camcorder with care. Avoid pressing hard on the camcorder body.
5.For your own safety, avoid using the camcorder when there is a storm or lightning.
6.Do not use batteries of different specifications. Doing so may lead to the potential for serious damage.
7.Remove the battery during long periods between usage, as a deteriorated battery may affect the functionality of the camcorder.
8.Remove the battery if it shows signs of leaking or distortion.
9.Use only the accessories supplied by the manufacturer.
10.Keep the camcorder out of the reach of infants.
11.Risk of explosion if battery is replaced by an incorrect type.
12.Dispose of used batteries according to the instructions.
System Requirements
•Microsoft Windows XP/Vista/7
•Intel Pentium 4 2.4GHz or above
•512 MB RAM
•CD-ROM Drive
•1 GB free HDD space
•Available USB port
•16-bit Color Display
Note
The LCD screen is manufactured using extremely high-precision technology. However, some tiny black and/or bright dots (white, red, blue or green) may appear on the LCD screen. These dots are a normal result of the manufacturing process, and do not affect the recording.
EN
7
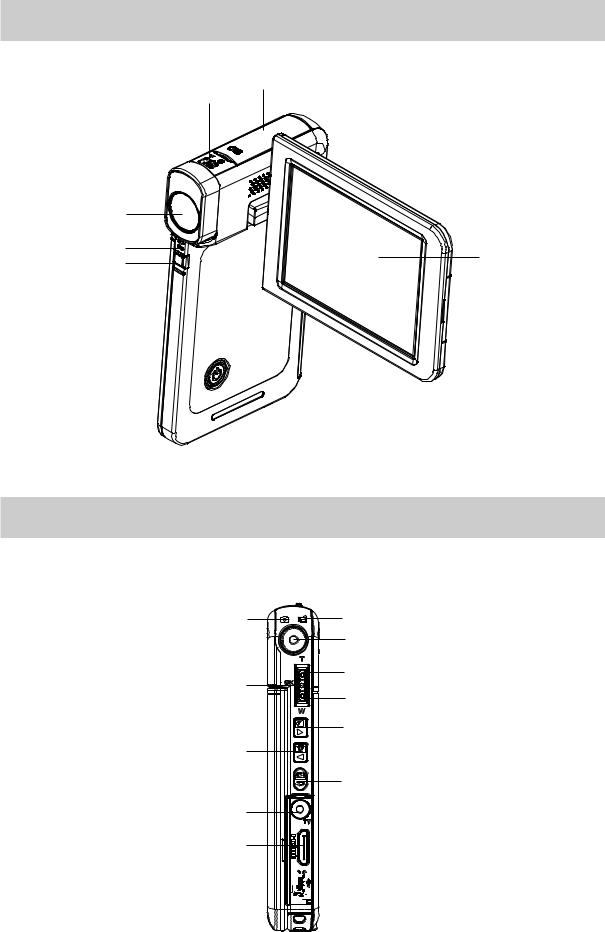
Front View
SD card Cover
Macro Switch
Lens |
|
Microphone |
LCD Panel |
Light |
Rear View
Picture Mode LED Indicator |
Movie Mode LED Indicator |
|
|
Record Button |
|
OK Button |
Tele Button (Up Button) |
|
Wide Button (Down Button) |
||
|
||
|
Right Button |
|
Left Button |
|
|
|
Playback Button |
TV Port
HDMI Port
Mini USB 2.0 Port 
EN
8
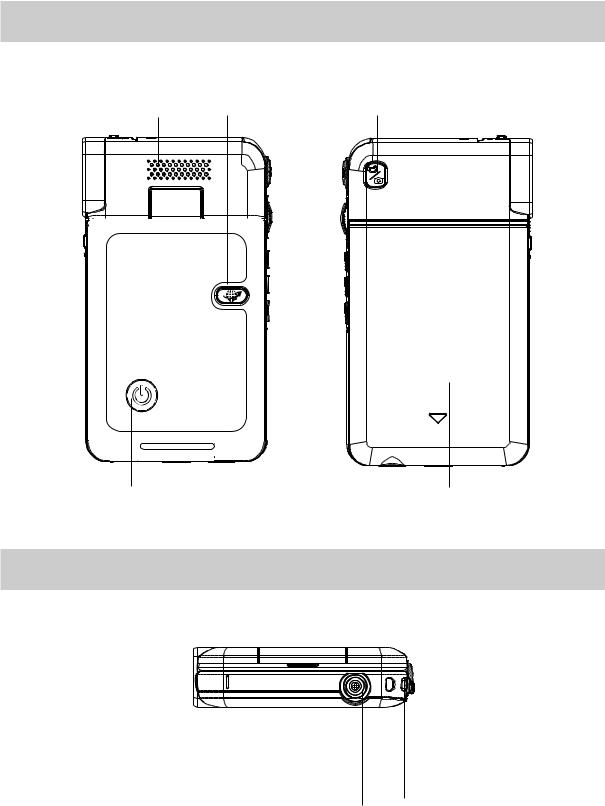
Side View
|
Pre-Record/YouTube |
|
Speaker |
Direct Button |
Mode Button |
Power Button |
Battery Cover |
Bottom View
Tripod Socket Strap Hook
EN
9
Section 2
Getting Started
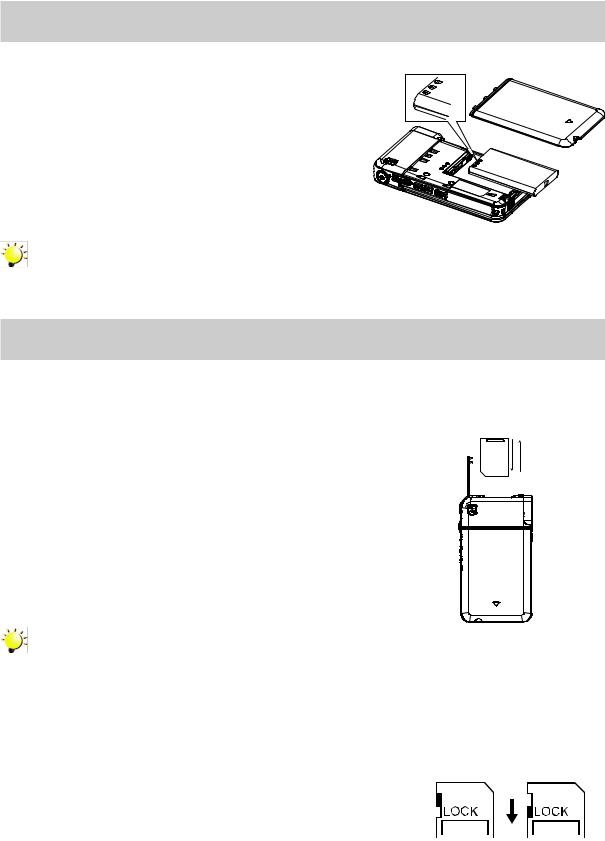
Loading the Battery
Before using the camcorder, users must load the Lithiumion rechargeable battery come within the package.
1. Insert the battery according to the correct polarity marks (+ or -).
2. Close the battery cover firmly.
Note
Please remove the insulator on battery connection before use.
Inserting and Removing an SD Card (Optional)
The camcorder comes with an internal memory which allows you to store pictures and movies. You can expand the memory capacity by using an optional SD/SDHC memory card.
1. Insert the memory card into the slot. Please refer to the figure on the right side.
2.To remove an installed SD card, press the card inwards to release it.
3.When the card pops out, gently remove it from its slot.
4.Recommended memory capacity: 1GB or above.
Note
•When a memory card is fitted, movies/pictures are saved on the card rather than on the builtin memory.
•Protecting Data on an SD Card: SD Card is read-only when it is locked. No pictures or movies can be recorded when the SD card is locked. Make sure the lock is on the writeable position before recording any media.
Writeable Write-Protected
position Position
EN
10
Turning the Camcorder On and Getting Started
•To turn on the camcorder:
1.Flip out the LCD panel; the camcorder will turn on automatically.
2.Or press Power Button for one second to turn it on.
•To record movies: Press Mode Button to switch to the Movie Record mode. (The Movie Mode LED Indicator 
 will light up.) Press Record Button to record movies.
•To take a picture: Press Mode Button to switch to the Picture Record mode. (The Picture Mode LED Indicator  will light up.) Press Record Button to take pictures.
•To take a picture during movie recording: When recording movies, press Mode Button (  ) to capture the image. The Dual record icon (
  ) appears on the LCD monitor.
•To view stored movies and pictures: Press Playback Button to switch to the Playback mode. Press Mode Button to switch between Movie Preview Screen and Picture Preview Screen.
Turning the Camcorder Off
•To turn off the camcorder: You can either press the Power Button for one second, or you can place the LCD panel back to its original position.
EN
11
Section 3
Record Mode
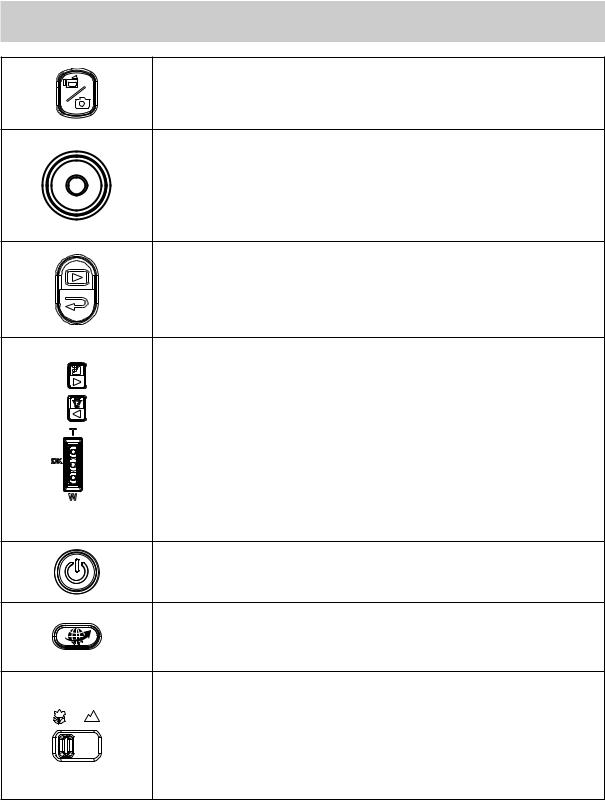
Button Function
Mode Button:
1.Switch between Movie Mode and Picture Mode.
2.When recording movies, press to capture the image.
Record Burron:
1.In Movie Record Mode, press to take movies. To stop recording, press it again.
2.In Picture Record Mode, press to take pictures.
Playback Button:
1.Switch between Record / Playback Mode.
2.For quick review, press it after recording.
3.In Record menu, press to exit.
Direction Button:
Right Button: Resolution Switch (FHD (1080p30)/WVGA 60) (High (16MP)/Std (5MP)). In Record menu, press to switch to the submenu.
Left Button: Digital Light ON/ Light ON/ Light OFF. In Record menu, press to return to the main menu.
Tele Button (Up Button):Zoom In. Move between the option items.
Wide Button (Down Button): Zoom out. Move between the option items.
OK Button: Menu On / Validate the setting.
Power Button: Press down for one second to turn on or turn off the camcorder.
Pre-Record/YouTube Direct Button:
In Record Mode, press to activate the Pre-Record function and the movies will be recorded 3 seconds before the Record Button is pressed.
Macro Switch: Switch between Macro Mode and Normal Mode.
EN
12

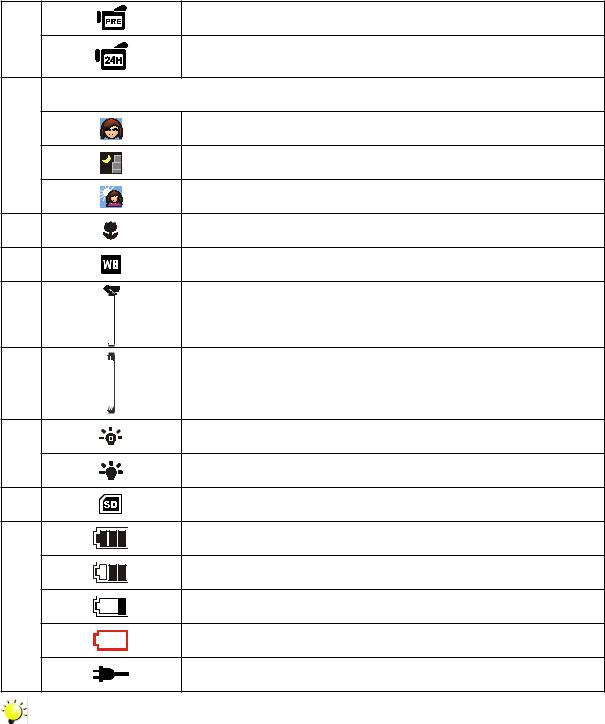
LCD Monitor Information
The indicators shown below may display on LCD when movies and pictures are recorded:
Movie Resolution
FHD (1080p 30)
HD (720p 30)
WVGA60
VGA (4:3)
(1)
Slow Motion (Record movies at 320x240(QVGA) resolution.)
Picture Resolution
|
High (16MP) |
|
|
Standard (5MP) |
|
|
Low (3MP) |
|
|
Recording time of the movie that can still be taken at current |
|
(2) |
resolution |
|
|
||
|
Number of images that can still be taken at current resolution |
|
(3) |
Self-timer enabled |
|
Dual Record |
||
|
||
(4) |
Stabilization |
EN
13
|
Pre-Record Mode |
|
(5) |
Time Lapse |
|
|
||
|
Scene |
|
(6) |
Skin |
|
Night |
||
|
||
|
Backlight |
|
(7) |
Macro Position Focusing |
|
(8) |
Manual White Balance |
|
(9) |
Motion Detection |
|
|
Zoom meter: |
|
(10) |
FHD (1080p 30): 1X (1X Digital zoom) |
|
|
Other video resolution: 1X~4X (4X Digital zoom) |
|
(11) |
Digital Light On |
|
Light On |
||
|
||
(12) |
SD Card Inserted |
|
|
Battery: full power |
|
|
Battery: medium power |
|
(13) |
Battery: low power |
|
|
Battery: empty power |
|
|
DC power mode |
Note
Scene: B/W / Classic / Negative effect can be previewed immediately without indicator on the LCD.
EN
14
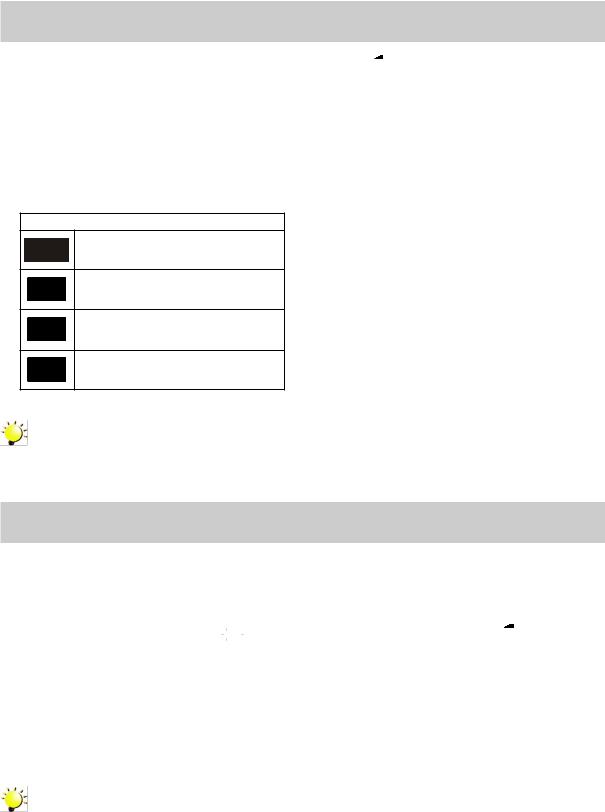
Movie Recording
•In Movie Record Mode (The Movie Record LED Indicator 
 lights up), press Record Button to start recording. When a movie is being recorded, a time indicator will display on the LCD monitor. To stop recording, press Record Button again.
•Optional function: Dual record: press Mode Button (  ) to capture the image. The Dual record icon (
  ) appears on the LCD monitor.
•Press Playback Button to view the recorded movies.
•Four resolution settings are available:
Video Quality
FHD (1080p 30)
HD (720p 30)
WVGA60
VGA (4:3)
Note
• The image resolution captured during movies recording is the same as the video resolution.
Using the Pre-Record Function
•The Pre-record function ensures that you will not miss any critical recording opportunities, The movies are recorded 3 seconds before the Record Button is pressed.
•To use the Pre-Record function:
1.Press the Pre-Record Button (  ) in Record Mode. The Pre-Record icon (

 ) appears on the LCD monitor.
2.Aim the camcorder at the subject and position it securely.
3.Press the Record Button to start recording. (The camcorder records 3 seconds before you actually press the Record Button.)
•To use the function again, set it again.
Note
• Time Lapse function can not be used when the Pre-Record function is activated.
EN
15
 Loading...