


IPSe, NVSPro
Network Video Recorder
Software Manual
model no. IPSe8-X
IPSe16-X
IPSe32-X NVSProX-2U-X NVSProX-4U-X
Please carefully read these instructions before using this product. |
|
Save this manual for future use. |
1 |
|
Surveillix™ IPSe / NVSPro
Software Manual (Version 5.1)
Manual Edition 32338AC – November 2014
Printed in USA
No part of this documentation may be reproduced in any means, electronic or mechanical, for any purpose, except as expressed in the Software License Agreement. Toshiba shall not be liable for technical or editorial errors or omissions contained herein. The information in this document is subject to change without notice.
THE INFORMATION IN THIS PUBLICATION IS PROVIDED “AS IS” WITHOUT WARRANTY OF ANY KIND. THE ENTIRE RISK ARISING OUT OF THE USE OF THIS INFORMATION REMAINS WITH RECIPIENT. IN NO EVENT SHALL TOSHIBA BE LIABLE FOR ANY DIRECT, CONSEQUENTIAL, INCIDENTAL, SPECIAL, PUNITIVE, OR OTHER DAMAGES WHATSOEVER (INCLUDING WITHOUT LIMITATION, DAMAGES FOR LOSS OF BUSINESS PROFITS, BUSINESS INTERRUPTION OR LOSS OF BUSINESS INFORMATION), EVEN IF TOSHIBA HAS BEEN ADVISED OF THE POSSIBILITY OF SUCH DAMAGES AND WHETHER IN AN ACTION OR CONTRACT OR TORT, INCLUDING NEGLIGENCE.
This software and documentation are copyrighted. All other rights, including ownership of the software, are reserved to DVR Support Center. TOSHIBA, and Surveillix are registered trademarks of TOSHIBA CORPORATION in the United States and elsewhere; Windows, and Windows 2000 are registered trademarks of Microsoft Corporation. All other brand and product names are trademarks or registered trademarks of the respective owners.
The following words and symbols mark special messages throughout this guide:
WARNING: Text set off in this manner indicates that failure to follow directions could result in bodily harm or loss of life.
CAUTION: Text set off in this manner indicates that failure to follow directions could result in damage to equipment or loss of information.
32338AC |
iii |
Table of Contents |
|
SURVEILLIX™ IPS ...................................................................................................................................... |
III |
SOFTWARE MANUAL (VERSION 5.1) ....................................................................................................... |
III |
MANUAL EDITION 32338AC – NOVEMBER 2014 ..................................................................................... |
III |
PRINTED IN USA......................................................................................................................................... |
III |
NVR BASICS ................................................................................................................................................ |
9 |
Setting the Time and Date......................................................................................................................................................... |
10 |
Accessing the DVR Utility.......................................................................................................................................................... |
10 |
Exporting Settings ................................................................................................................................................................ |
10 |
Importing NVR Settings........................................................................................................................................................ |
10 |
Changing Video Format ....................................................................................................................................................... |
10 |
Display Screen .......................................................................................................................................................................... |
11 |
CPU Meter ........................................................................................................................................................................... |
11 |
Live Camera Options ........................................................................................................................................................... |
12 |
Camera View ............................................................................................................................................................................. |
13 |
Recording Status Indicator................................................................................................................................................... |
13 |
Special Recording ................................................................................................................................................................ |
13 |
Edit Live View Channels............................................................................................................................................................ |
14 |
Screen Division Buttons ............................................................................................................................................................ |
14 |
64 Channel Screen Division................................................................................................................................................. |
15 |
Custom Live View Divisions ................................................................................................................................................. |
16 |
SETUP OPTIONS........................................................................................................................................ |
17 |
Setup Overview ......................................................................................................................................................................... |
18 |
Setup Menu Overview ............................................................................................................................................................... |
18 |
Network Camera Setup ............................................................................................................................................................. |
19 |
Connecting a Network Device.............................................................................................................................................. |
19 |
Connecting Manually...................................................................................................................... |
19 |
Connecting with Find Cameras...................................................................................................... |
20 |
Naming Camera Channels............................................................................................................. |
20 |
Assigning Dual Streams....................................................................................................................................................... |
20 |
Removing a Camera ............................................................................................................................................................ |
21 |
Assigning Audio Channels to a Network Device .................................................................................................................. |
21 |
Alarm Recording Mode ........................................................................................................................................................ |
22 |
Camera Status and Information ........................................................................................................................................... |
23 |
NVR Registration and Upgrade............................................................................................................................................ |
24 |
Locating the System ID .................................................................................................................. |
24 |
Obtaining the License Key ............................................................................................................. |
24 |
Unlocking the Upgrade................................................................................................................... |
25 |
Unlocking Additional Network Devices................................................................................................................................. |
25 |
PTZ Camera Setup.................................................................................................................................................................... |
26 |
Enabling an IP PTZ Camera ................................................................................................................................................ |
26 |
Using the Graphical PTZ Controller ....................................................................................... |
Error! Bookmark not defined. |
Motion DETECTION Setup........................................................................................................................................................ |
27 |
Create a Motion Area ........................................................................................................................................................... |
27 |
Enable Sabotage Detection ................................................................................................................................................. |
28 |
Etc. ....................................................................................................................................................................................... |
28 |
4
General Setup ........................................................................................................................................................................... |
28 |
Audio .................................................................................................................................................................................... |
29 |
Configure Audio Channels ............................................................................................................. |
29 |
System Volume.......................................................................................................................................................... |
29 |
Voice Warning................................................................................................................................ |
29 |
Audio Channels.............................................................................................................................. |
29 |
Display ................................................................................................................................................................................. |
30 |
Display Options .............................................................................................................................. |
30 |
General ................................................................................................................................................................................ |
30 |
Sequencing .......................................................................................................................................................................... |
31 |
Auto Sequence............................................................................................................................... |
31 |
Create Custom Auto Sequence ..................................................................................................... |
31 |
Alarms / Sensor ......................................................................................................................................................................... |
32 |
Alarms .................................................................................................................................................................................. |
32 |
Sensors ................................................................................................................................................................................ |
32 |
Configure Sensors ......................................................................................................................... |
32 |
Activate PTZ Preset ....................................................................................................................... |
32 |
Hybrid Sensor Setup ...................................................................................................................... |
33 |
Relays .................................................................................................................................................................................. |
33 |
Recording Schedule .................................................................................................................................................................. |
34 |
Default Schedules ................................................................................................................................................................ |
34 |
Day of the Week................................................................................................................................................................... |
35 |
Creating a Recording Schedule (Example).......................................................................................................................... |
35 |
Setting Daytime Motion Detection (Example) ................................................................................ |
35 |
Setting Nighttime Continuous Recording ....................................................................................... |
36 |
Setting Weekend Motion Recording .............................................................................................. |
36 |
Creating a Sensor Schedule (Example)............................................................................................................................... |
37 |
Special Day Schedule .......................................................................................................................................................... |
38 |
Creating/Editing a ‘Special Day’ Schedule..................................................................................... |
38 |
Deleting a ‘Special Day’ Schedule ................................................................................................. |
38 |
Alarm Options ...................................................................................................................................................................... |
39 |
Setting a Restart Schedule .................................................................................................................................................. |
40 |
Create System Restart Schedule................................................................................................... |
40 |
Network Setup ........................................................................................................................................................................... |
41 |
User Management ..................................................................................................................................................................... |
42 |
Add a New User ............................................................................................................................. |
42 |
User Rank ...................................................................................................................................... |
43 |
Changing the Administrator Password................................................................................................................................. |
43 |
Default Administrator Password..................................................................................................... |
43 |
Storage Management ................................................................................................................................................................ |
44 |
Status Check / Email............................................................................................................................................................ |
44 |
General........................................................................................................................................... |
44 |
Users.............................................................................................................................................. |
44 |
Storage Check ............................................................................................................................... |
45 |
Recording Data Check ................................................................................................................... |
45 |
SMART Alert .................................................................................................................................. |
46 |
Alarm Event.................................................................................................................................... |
46 |
MySurveillix .................................................................................................................................... |
47 |
SMART Information.............................................................................................................................................................. |
47 |
32338AC |
5 |
Data Management................................................................................................................................................................ |
48 |
Delete Recorded Data.................................................................................................................... |
48 |
File Management ........................................................................................................................... |
48 |
Storage Management..................................................................................................................... |
48 |
System Information .............................................................................................................................................................. |
49 |
Basic Information ........................................................................................................................... |
49 |
Program Management ................................................................................................................... |
50 |
Setting Up DDNS....................................................................................................................................................... |
50 |
Log Files............................................................................................................................................................................... |
51 |
Viewing Log Files ........................................................................................................................... |
51 |
Exporting Log Files ........................................................................................................................ |
51 |
Set Up Log Management Options.................................................................................................. |
52 |
UPGRADE INFORMATION....................................................................................................................................................... |
53 |
Remote Software Upgrade ............................................................................................................ |
53 |
Local Software Upgrade................................................................................................................. |
53 |
Manual Software Upgrade ............................................................................................................. |
53 |
SEARCH ..................................................................................................................................................... |
54 |
Search Overview ....................................................................................................................................................................... |
55 |
Play Controls........................................................................................................................................................................ |
55 |
Adjust the Brightness of an Image ....................................................................................................................................... |
56 |
Zooming in on an Image ...................................................................................................................................................... |
56 |
Zooming in on a Portion of an Image ................................................................................................................................... |
56 |
Open Video from a Saved Location ..................................................................................................................................... |
56 |
Sync ..................................................................................................................................................................................... |
56 |
Clean Image......................................................................................................................................................................... |
56 |
Instant recording........................................................................................................................................................................ |
57 |
Activate Instant Recording ................................................................................................................................................... |
57 |
Searching ‘Instant Recorded’ Video ..................................................................................................................................... |
57 |
Performing a Basic Search........................................................................................................................................................ |
57 |
Printing an Image ...................................................................................................................................................................... |
57 |
Daylight SAVIng Time ............................................................................................................................................................... |
58 |
exporting image or video files.................................................................................................................................................... |
59 |
Bookmarks ........................................................................................................................................................................... |
60 |
Modify Bookmarks.......................................................................................................................... |
60 |
Clip Backup .......................................................................................................................................................................... |
61 |
Single Clip Backup Using Bookmark Data..................................................................................... |
61 |
Index Search ............................................................................................................................................................................. |
62 |
Performing an Index Search ................................................................................................................................................ |
62 |
Index Search Results Display .............................................................................................................................................. |
62 |
Preview Search ......................................................................................................................................................................... |
63 |
Performing a Preview Search .............................................................................................................................................. |
64 |
Status Search ............................................................................................................................................................................ |
64 |
Performing a Status Search ................................................................................................................................................. |
64 |
Object Search............................................................................................................................................................................ |
65 |
Performing an Object Search............................................................................................................................................... |
65 |
Motion Search ........................................................................................................................................................................... |
66 |
Performing a Motion Search ................................................................................................................................................ |
66 |
Audio Playback.......................................................................................................................................................................... |
66 |
6
Search in Live............................................................................................................................................................................ |
67 |
advanced ptz setup ................................................................................................................................................................... |
68 |
PTZ Address Settings .......................................................................................................................................................... |
68 |
PTZ Presets/Tours ............................................................................................................................................................... |
69 |
Creating a Preset ........................................................................................................................... |
69 |
Viewing a Preset ............................................................................................................................ |
69 |
Accessing PTZ Menus............................................................................................................................................................... |
69 |
Controlling a PTZ Camera......................................................................................................................................................... |
69 |
Using the Graphical PTZ Controller ..................................................................................................................................... |
70 |
Using the On-Screen Compass ........................................................................................................................................... |
70 |
Understanding Tours............................................................................................................................................................ |
70 |
PTZ Tour Schedule .............................................................................................................................................................. |
71 |
BACKING UP VIDEO DATA....................................................................................................................... |
72 |
Backup Overview....................................................................................................................................................................... |
73 |
Nero® Express...................................................................................................................................................................... |
73 |
General Backup Overview ................................................................................................................................................... |
74 |
Performing a General Backup........................................................................................................ |
74 |
Clip Backup Overview .......................................................................................................................................................... |
75 |
Performing a Clip Backup .............................................................................................................. |
75 |
Scheduled Screen Overview................................................................................................................................................ |
76 |
Activating Scheduled Backup ........................................................................................................ |
76 |
Specifying Scheduled Backup Drives ............................................................................................ |
76 |
Performing a Scheduled Backup ................................................................................................... |
77 |
LAN / ISDN / PSTN CONNECTIONS.......................................................................................................... |
78 |
LAN Overview............................................................................................................................................................................ |
79 |
Connecting to a LAN Using TCP/IP........................................................................................................................................... |
79 |
Configuring TCP/IP Settings ................................................................................................................................................ |
79 |
LDAP INTEGRATION ................................................................................................................................. |
80 |
Features .................................................................................................................................................................................... |
81 |
Installing Active Directory .......................................................................................................................................................... |
81 |
WEB VIEWER ............................................................................................................................................. |
83 |
Web Viewer Overview ............................................................................................................................................................... |
84 |
Configuring the Recorder for Remote Connection ............................................................................................................... |
85 |
Connecting to a Recorder Using Web Viewer...................................................................................................................... |
85 |
Closing the Web Viewer....................................................................................................................................................... |
85 |
INCLUDED SOFTWARE SETUP................................................................................................................ |
86 |
The Surveillix App Overview...................................................................................................................................................... |
87 |
Emergency Agent Overview ...................................................................................................................................................... |
87 |
Configuring the Recorder ..................................................................................................................................................... |
87 |
Configuring the Client PC..................................................................................................................................................... |
88 |
Setup Window ...................................................................................................................................................................... |
88 |
Emergency Agent Window................................................................................................................................................... |
89 |
Filter Event List .............................................................................................................................. |
89 |
Add Items to Alarm Confirm List .................................................................................................... |
89 |
32338AC |
7 |
Search Alarm Window.......................................................................................................................................................... |
90 |
View Recorded Video..................................................................................................................... |
90 |
Export Video................................................................................................................................... |
90 |
Remote Software Overview....................................................................................................................................................... |
91 |
Remote Software Setup ....................................................................................................................................................... |
92 |
Installing Remote Software ............................................................................................................ |
92 |
Create a New Remote Connection ................................................................................................ |
92 |
Configuring the Recorder ............................................................................................................... |
93 |
Digital Verifier Overview ............................................................................................................................................................ |
94 |
Installing the Digital Verifier.................................................................................................................................................. |
94 |
Using the Digital Verifier....................................................................................................................................................... |
94 |
Backup Viewer Overview........................................................................................................................................................... |
95 |
Installing Backup Viewer ...................................................................................................................................................... |
95 |
Loading Video from DVD or Hard Drive ............................................................................................................................... |
95 |
ADDITIONAL SOFTWARE ......................................................................................................................... |
96 |
SCS Overview ........................................................................................................................................................................... |
97 |
Purchasing SCS Software Upgrade..................................................................................................................................... |
97 |
Connecting to a Recorder .................................................................................................................................................... |
97 |
8
NVR BASICS
This chapter includes the following information:
Becoming familiar with the Display screen
Defining Screen Divisions
32338AC |
9 |
SETTING THE TIME AND DATE
1.Exit to Windows by clicking Exit on the Display screen and then clicking Restart in Windows Mode.
2.Click OK.
3.Click the Start button  > Control Panel.
4.Click Date and Time inside Control Panel, and then click Change Date and Time.
5.Adjust the Date and Time.
6.When finished, click OK, and then OK again.
7.Close all open windows and restart the recorder.
8.Click Start, and ten click Shutdown.
9.Select Restart.
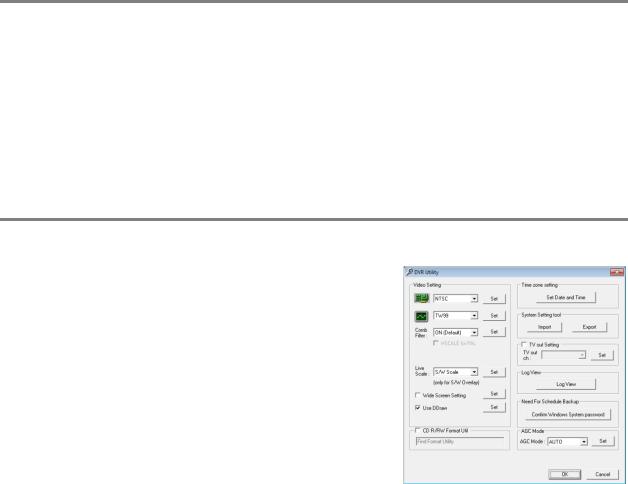
ACCESSING THE DVR UTILITY
Exporting Settings
Exporting settings can help configure multiple recorders quickly or reconfigure a unit that has been reset to factory defaults. Some things must be kept in mind when using this feature.
You cannot use this function on:
Recorders that are different models.
When upgrading from certain software versions. (This feature cannot be used when upgrading from v2.x to v3.x)
1.Exit to Windows by clicking Exit on the Display screen then and select
Restart in Windows Mode.
2.Click the Start button  > All Programs > Surveillix > vFormat.
3.Click Export in the System Setting tool section.
4.Select a location to save the settings file and click Save. The DVR Utility will export the NVR settings and automatically close.
Importing NVR Settings
1.Exit to Windows by clicking Exit on the Display screen then and select Restart in Windows Mode. (See the Display screen section later in this chapter)
2.Click the Start button  > All Programs > Surveillix > vFormat.
3.Click Import in the System Setting Tool section.
4.Select the location of the settings file to import and click Open.
5.Click Yes to import the data file.
Changing Video Format
1.Exit to Windows by clicking Exit on the Display screen then and select Restart in Windows Mode. (See the Display screen section later in this chapter)
2.Click the Start button  > All Programs > Surveillix > vFormat.
3.Select the appropriate video setting from the list in the Video Setting section—NTSC or PAL.
4.Click Set.
10
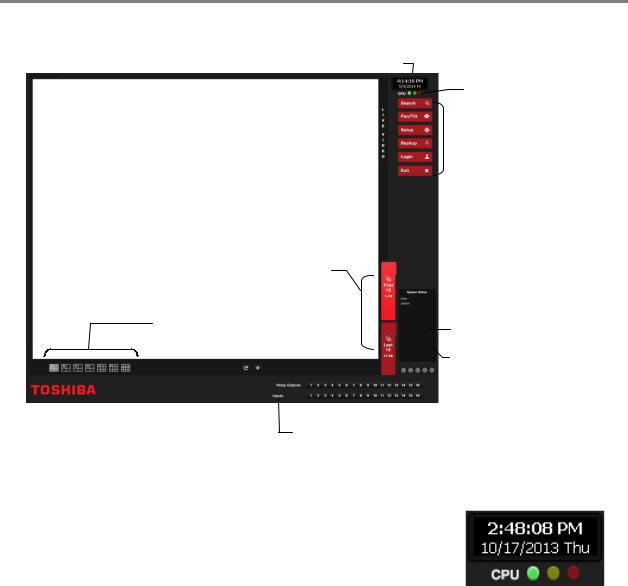
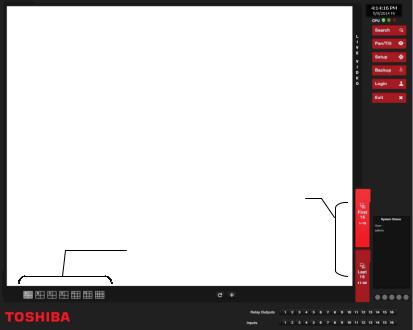
DISPLAY SCREEN
Each time the recorder starts, the program defaults to the Display screen. The following diagram outlines the buttons and features used on the Display screen. You should become familiar with these options as this is the screen that will be displayed the majority of the time.
Current Date / Time
CPU meter
Opens:
 Search
PTZ Controller
Setup
Backup
Login
Exit
Toggle between first and second 16-screen divisons
Screen Division buttons |
User Details |
|
Connected
Users
 Relay Outputs
Sensor Status
CPU Meter
Use the CPU meter to monitor the system resources on your recorder.
GREEN - System configuration OK
YELLOW - Caution; evaluate system configuration and consider decreasing system loading
RED - System configuration has been exceeded which may affect stability; decrease system loading or upgrade system with CPU performance package
32338AC |
11 |
Live Camera Options
Right-click a camera on the Display screen to display these options:
Full Screen – Expand the camera window to the full size of the screen.
Instant Recording – Begin Instant Recording for the selected camera channel.
Search In Live – Rewind or fast-forward video from that camera at the present date and time.
360 Setup – Configure settings for a 360 camera.
Enable 360 Camera – Enable the use of a 360 camera.
e-PTZ – Use the digital PTZ function on a 360 camera
View type – Select the view for a 360 camera
Mount Type – Select the type of mount that matches the location of your 360 camera.
Projection type – Dewarp your 360 camera image in Spherical or Flat view (Panogenics cameras only)
Oncam SDK – Select to dewarp video footage from an Oncam 360 IP camera
Panamorph SDK – Select to dewarp video footage from an Immervision 360 camera
Panogenics SDK – Select to dewarp video footage from an AMG Panogenics 360 IP camera.
Note 360 Setup, Enable 360 Camera, e-PTZ, View Type, Mount Type, Projection Type, all require a 360 camera to function. If you do not have a 360 camera, ignore these functions.
12
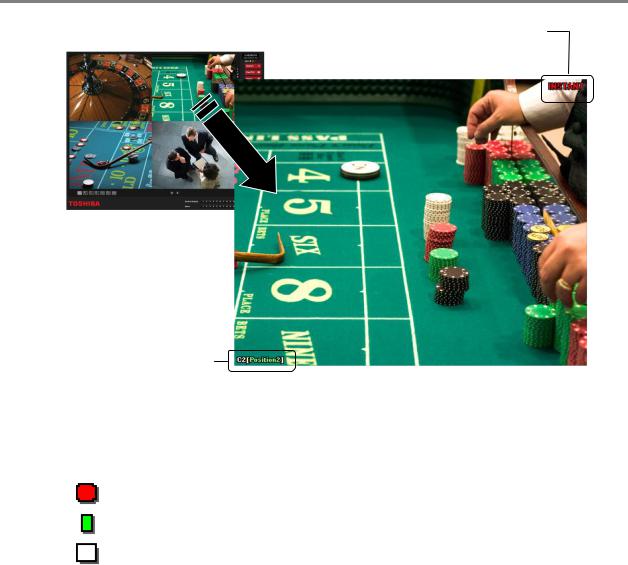
CAMERA VIEW
Recording Status
Camera Number and Name
Recording Status Indicator
The camera status for each camera is displayed in the upper right corner on the Video Display Area. The following are the different states for each camera:
Recording |
Displayed when the camera is currently being recorded to the recorder. |
Motion Detection Displayed when a camera (set up for motion detection) detects motion.
Display |
Displayed when the camera is currently not being recorded to the recorder. |
Special Recording
There are two types of Special Recording. Text is displayed on the camera display area, indicating what type of Special Recording is activated.
SENSOR
Sensor is displayed when a sensor associated with the camera is activated.
INSTANT
Instant Recording is a manual activation of the recording for the selected camera. Regardless of the recording method, Instant Recording will start the camera recording and also flag the video for future searches using the Index Search feature. INSTANT is displayed when a user activates the instant recording option. Double right-click the video display to activate and deactivate the Instant Recording option.
32338AC |
13 |
EDIT LIVE VIEW CHANNELS
By default, the recorder only allows live video from four network channels at one time on the local server. This protects the processor resources for recording data. The SCS software allows you to view live video from multiple recorders at once and with the same limitations that the recorder has on the number of live IP based video channels. If more than four channels of live video are required on the local server, you can enable the recorder to show up to 16 channels. Be aware that displaying 16 channels of live IP based video is resource intensive and may dramatically impact system performance.
To enable the recorder to view 16 channels of live video:
1.Click Exit on the Display screen, and then select Restart in Windows Mode.
2.Double-click the Edit Live View Channels icon on the desktop.
3.Click Yes, and then click OK.
4.The live view display will switch to 16 channel mode. To return the recorder to 4 channel mode, repeat steps 2 and 3.
5.Double-click Surveillix Server to restart the recorder software.
The live view display will switch to 16 channel mode. To return the recorder to 4 channel mode, run the utility again using the same instructions.
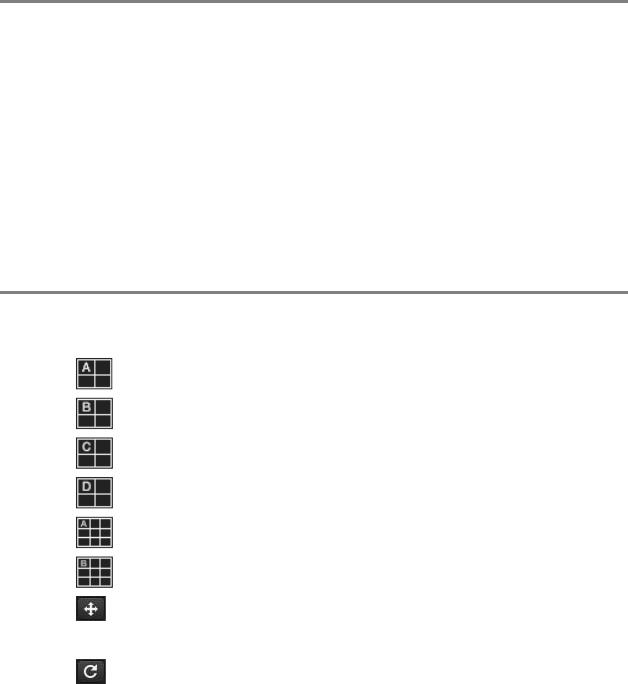
SCREEN DIVISION BUTTONS
Note When viewing live video from Network Cameras, only 4CH will display at one time. If more live view channels are required on the local server, see the Edit Live View Channels instructions.
1st Four Cameras View – Displays cameras 1-4 in the Video Display Area. To return to a different Multi-Camera View, select a different Screen Division option from the Screen Division menu.
2nd Four Cameras View – Displays cameras 5-8 in the Video Display Area. To return to a different Multi-Camera View, select a different Screen Division option from the Screen Division menu.
3rd Four Cameras View – Displays cameras 9-12 in the Video Display Area. To return to a different Multi-Camera View, select a different Screen Division option from the Screen Division menu.
4th Four Cameras View – Displays cameras 13-16 in the Video Display Area. To return to a different Multi-Camera View, select a different Screen Division option from the Screen Division menu.
1st Nine Cameras View – Displays cameras 1-9 in the Video Display Area. To return to a different Multi-Camera View, select a different Screen Division option from the Screen Division menu.
2nd Nine Cameras View – Displays cameras 10-18 in the Video Display Area. To return to a different MultiCamera View, select a different Screen Division option from the Screen Division menu.
Full Screen – The Full Screen Option allows you to view the Video Display Area using the entire viewable area on the monitor. When this is selected, no menu options are visible. You can activate the Full Screen Option by clicking on the Full Screen button within the Screen Division menu. You can deactivate Full Screen mode by right clicking on the screen.
Auto Sequence – Sequences through the Screen Divisions sets. For example, selecting the 1A and then the Loop button will sequence through 1A, 2A, 3A, 4A and then repeat.
Note Local screen division options are limited to ensure optimal encoding performance.
14
64 Channel Screen Division
To access channels 17-32, 33-48, and 49-64 on a 64-channel recorder follow these instructions.
Toggle between first and second 16-screen divisons
Screen Division buttons
1.On the Live screen, click the additional screen division buttons (First Sixteen, Last Sixteen, etc.)
2.Select your desired screen division for those sixteen channels.
3.Double-click a camera channel to enlarge it to full screen.
32338AC |
15 |
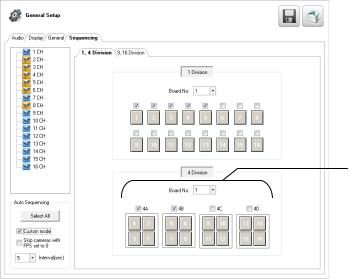
Custom Live View Divisions
Customize your Live View screen by changing the order of the cameras. Each screen division can be individually customized but a camera can only be displayed once in each group view.
Create custom live view divisions:
1.On the Display screen, click Setup, and then click General Setup.
2.Click the Sequencing tab.
3.Drag and drop cameras from the Channel List to the desired location within the Division Group.
Channel List 
Division Group
6.Select the screen intervals you want to display in each division area.
7.Set the Interval time (in seconds). This determines how long each sequence screen will appear on the Live display.
8.To save your settings, click Apply.
16
SETUP OPTIONS
This chapter includes the following information:
Setup Overview
Network Cameras
Motion Detection
PTZ Camera Setup
Alarms
Recording Schedule
Network Setup
Storage Management
Instant Recording
32338AC |
17 |
SETUP OVERVIEW
The Setup options allow you to optimize your recorder by adjusting things like camera names, restart schedules, recording schedules and more. It is extremely important that you setup your recorder correctly for several reasons.
Recording Schedules – Increase the amount of pertinent recorded video that is saved on the recorder by optimizing the recording schedule. Optimize the type of recording done by adding motion detection to this as well, again increasing the amount of useful video.
Camera Naming – Name each camera so the location can be easily identified and include any other pertinent information that may be helpful when viewing it on the Video Display Area.
Configure Network Cameras – Connect to and configure cameras that are available on the network the recorder is connected to.
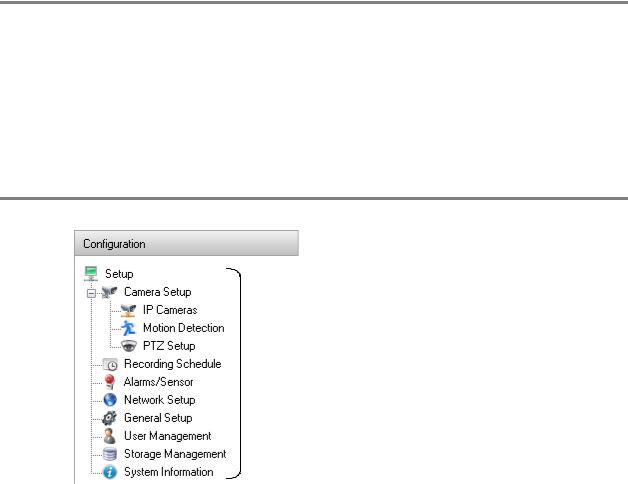
SETUP MENU OVERVIEW
 Setup Options
18

NETWORK CAMERA SETUP
Connect IP cameras to your recorder using a network switch, which is connected to the network port on your recorder. By default, your recorder can display 4 IP camera channels in the Display screen. To change this setting, see the Edit Live View Channels section.
Note Your recorder is a hybrid recorder and, by default, does not require licensing. If you apply an NVR upgrade to your recorder, the license tab will appear.
Connecting a Network Device
Connecting Manually
1.On the Display screen, click Setup.
2.Click Camera Setup, and then click IP Cameras.
3.Click Manually Add Camera.
4.Select the Vendor and Model of your network device from the Device Type list.
5.Type a Device Name.
6.Type the IP/URL address, Port#, User ID and Password of the device.
7.Click Add.
8.Double-click in the Channel field, and then select the Channel you want to assign to this camera.
9.Click Apply.
Note Audio is not supported when using ONVIF as the Driver/Type when connecting to IP cameras. If audio is needed, select the native integration method to connect the camera.
32338AC |
19 |
Connecting with Find Cameras
1.On the Display screen, click Setup.
2.Click Camera Setup, and then click IP Cameras.
3.Click Find Camera to automatically find all connected Network cameras.
4.Select the check box next to your desired camera.
5.Type the User ID and Password of the device.
6.Click Add Selected.
7.The camera will appear in the Camera Setup tab.
8.Double-click in the Channel field, and then select the Channel you want to assign this camera to.
9.Click Apply.
Naming Camera Channels
Surveillix recommends assigning a descriptive name to each camera channel for easy identification of where the camera is located. To name your IP camera channels, follow these instructions.
1.On the Display screen, click Setup.
2.Click Camera Setup, and then click IP Cameras.
3.Click the Camera Setup tab.
4.Double-click the Device Name column for the camera you want to name.
5.Type a name for your camera.
6.Click Apply to save the name.
Assigning Dual Streams
Dual stream support enables you to take advantage of two different streams from an IP camera. One stream can be high definition forensic video, while the other stream can be a lower resolution for live display. This allows SCS or Remote Viewer software to display more cameras while utilizing lower bandwidth and less CPU usage.
The second stream is used for motion detection in the server, which lightens the processing load for centrally-managed motion detection configurations
Dual streaming functions are limited to cameras that support this feature.
1.On the Display screen, click Setup.
2.Click Camera Setup, and then click IP Cameras.
3.Click the Camera Setup tab.
4.Choose which camera you want to configure, and double-click the Record Stream column.
5.Select which Stream you want to assign to be recorded.
6.Double-click the Transmit Stream column and choose the appropriate stream for remote viewing.
7.Click Apply to save your selections.
20
Removing a Camera
To remove a camera from your system, follow these instructions.
On the Display screen, click Setup.
1.Click Camera Setup, and then click IP Cameras.
2.Click the Camera Setup tab.
3.Right-click the camera you want to remove on the Network Cameras Currently in Use list, and then click Remove Device.
4.Click Yes to finish removing the camera.
5.Click Apply to save your settings.
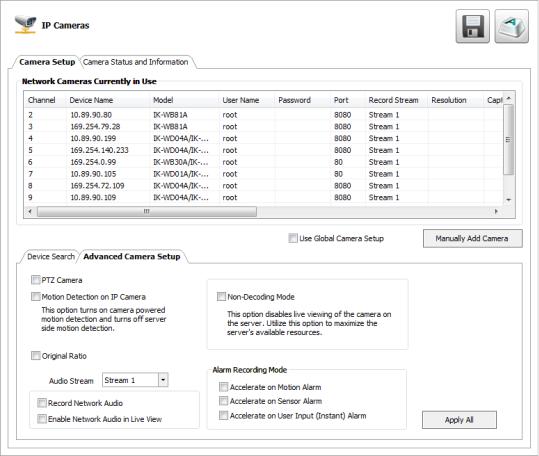
Assigning Audio Channels to a Network Device
1.In the Display screen, click Setup.
2.Click IP Cameras.
3.Click the Camera Setup tab.
4.Click the Advanced Camera Setup tab.
5.Select the camera you want to record audio from in the Network Cameras Currently in Use field.
6.Select Record Network Audio.
7.To be able to hear audio from the recorder, select Enable Network Audio in Live View.
8.Click Apply to save your settings.
32338AC |
21 |
Alarm Recording Mode
Set your camera to trigger Intensive Recording via Motion detection, Sensor Alarms, or user-instigated Instant Alarm.
1.On the Display screen, click Setup.
2.Click Motion Detection, and then click the Etc. tab.
3.Select your desired camera channel from the Select Channel list.
4.Select Enable Motion Detection on Continuous Recording.
5.On the Configuration menu tree, click IP Cameras.
6.Click the Camera Setup tab.
7.Click the Advanced Camera Setup tab.
8.Select the camera you want to record audio from in the Network Cameras Currently in Use field.
9.Select your desired Intensive Recording Mode (Accelerate on Motion Alarm, Accelerate on Sensor Alarm, or Accelerate on User Input (Instant) Alarm).
10.Click Apply to save your settings.
Note When using H.264 codec, your recorder will capture iFrames at a normal recording rate, and increase to full frames for Intensive Recording.
22
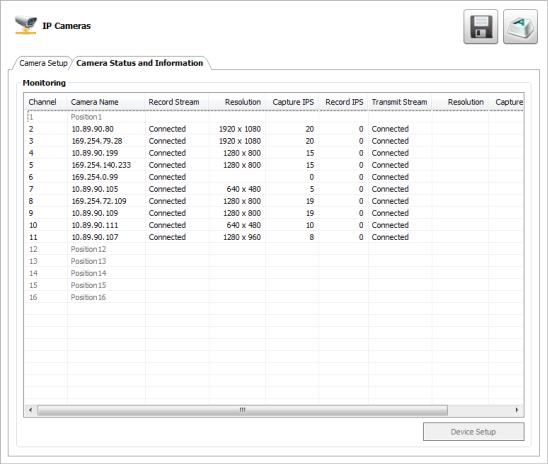
Camera Status and Information
The Camera Status and Information tab displays information on all cameras connected to the recorder.
1.In the Display screen, click Setup.
2.Click IP Cameras.
3.Click the Camera Status and Information tab.
32338AC |
23 |
NVR Registration and Upgrade
Note Your recorder is a hybrid recorder and, by default, does not require licensing. If you apply an NVR upgrade to your recorder, the license tab will appear.
Have the following information available before registering the NVR upgrade.
Product Serial Number: This may be the Product Serial Number displayed on the product sticker on the left side of the recorder; or the the unique Product Serial Number provided with the purchase of additional channel linceses.
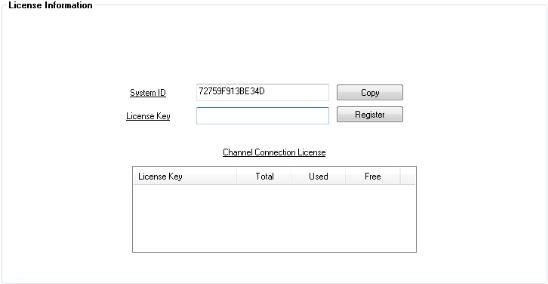
System ID: The System ID is a number that is generated by the recorder. This is a unique code generated using the MAC address of the recorder.
Locating the System ID
1.On the Display screen, click Setup.
2.Click IP Cameras.
3.Click the License tab.
Obtaining the License Key
1.Open an Internet browser and go to: http://register.surveillixdvrsupport.com
2.Enter the Product Serial Number and System ID.
3.Click Submit.
4.Verify the information, and click Next.
5.The Unlock Code provided will need to be entered into the License Key field on the recorder.
Note Both the System ID and the Unlock Code are case sensitive.
Note We recommend printing the registration page with the Unlock Code for later reference.
24
Unlocking the Upgrade
1.Return to Setup > Network Cameras > License.
2.Enter the Unlock Code generated by the Registration Site into the License Key box.
3.Click Register and confirm that the new License Key is listed in the Channel Connection License box.
4.Click OK.
5.Click Apply.
6.Click Exit Setup.
Unlocking Additional Network Devices
Follow the instructions above for Registration and Upgrade to unlock any additional network devices.
32338AC |
25 |

PTZ CAMERA SETUP
Note IPSe recorders support only select IP PTZ cameras.
Select PTZ cameras can be configured and controlled using the Surveillix recorder software. For instructions on configuring and installing your PTZ camera, refer to the camera manual.
Enabling an IP PTZ Camera
1.Ensure that you have properly connected your IP PTZ camera to the network.
2.On the Display screen, click Setup.
3.Click IP Cameras, and then click the Advanced Camera Setup tab.
4.Select the IP camera form the Network Cameras Currently in Use list.
5.Select PTZ Camera.
6.Click Apply to save your settings.
26
MOTION DETECTION SETUP
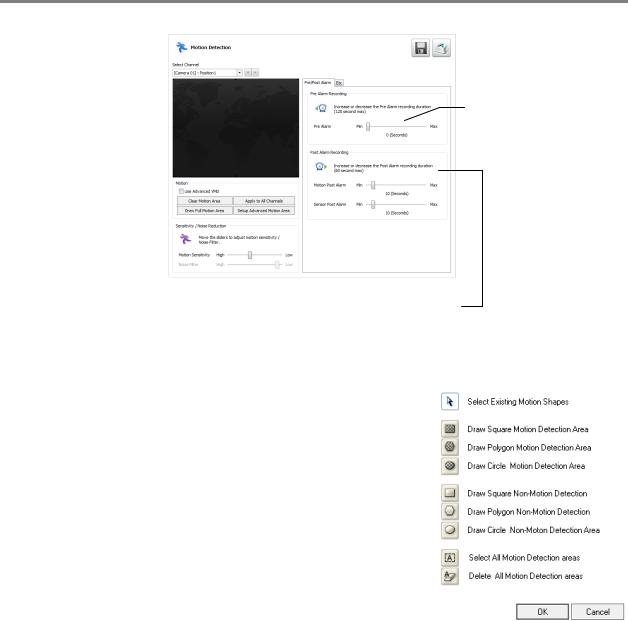
The recorder allows the user to adjust several different Motion Settings and create motion detection areas.
Set prealarm recording duration
Set up advanced motion area
Set post-alarm recording and sensor duration
Create a Motion Area
1.On the Display screen, click Setup.
2.Click Motion Detection.
3.Select a camera from the Select Channel list.
4.Select Detect Detail Motion Area.
5.Click Clear Motion Area.
6.Click Setup Advanced Motion Area.
7.Click a Motion Detection Area shape button.
8.Drag the mouse over the camera image.
Note To create a polygon shape, click the mouse at each point and double-click to close the shape.
9.Click OK.
10.Move the sliders to adjust motion sensitivity and the noise filter.
11.Define the pre-alarm and post-alarm recording time for a motion event.
Pre Alarm Recording – 0 - 120 Seconds [The number of seconds the recorder records before motion is detected—to ensure any motion occurring between I-frames is captured, set to a value greater than 0]
Post Alarm Recording – 0 - 120 Seconds [The number of seconds the recorder records after it stops detecting motion]
32338AC |
27 |
Enable Sabotage Detection
The Camera Sabotage Detection feature will notify users that the field of vision of a camera has been compromised, abruptly changed, or detects significant vibration.
To enable Sabotage Detection:
1.In the Motion Detection window, click the Sabotage Detection tab.
2.Select Enable Sabotage Detection.
3.Set the Pixel Change threshold to reduce false alarms
4.To activate an alarm relay on Sabotage Detection, click Activate Relay, and the select the appropriate relay number.
5.Select the Beep on Detect check box to enable the recorder to emit an audible beep on Sabotage Detection.
6.Click Apply to save your settings.
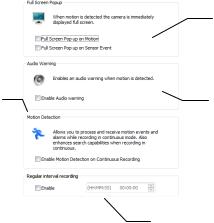
Etc.
Additional motion detection configuration options are found on the Etc. tab. Use this tab to set a camera channel to appear at full screen in the Display screen when a motion or sensor event is detected. You can also set your recorder to enable motion detection even during continuous recording, or play an audio warning when an alarm event is detected.
Set a camera channel to be immediately displayed full
screen
Enable motion detection |
Enable an audio warning |
|
during continuous recording |
||
during an alarm event |
||
|
Set to record a single image at a specified interval (1 sec ~ 24 hr)
Note It is not recommended to enable Full Screen Pop Up on Motion for all channels (either manually, or by clicking Apply to All Channels). This will cause performance problems.
28
GENERAL SETUP
To access the General Setup window, click Setup in the Live screen, and then click General Setup.
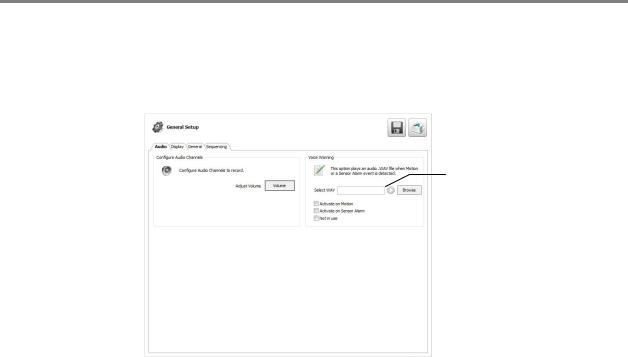
Audio
The Audio tab allows you to configure audio channels, audio playback, and set a voice warning.
Select an audio for use with alarm or sensor event
Adjust Volume
Configure Audio Channels
System Volume
1.Click Volume to adjust the volume of your system.
2.Use the slider, enter a value, or click Mute to disable audio playback.
3.Click OK.
Voice Warning
The recorder allows users to play a sound file when either a Motion event or Sensor event occurs. This file can be a custom created sound file that is unique to the application. The selected WAV file is played through speakers attached to the recorder.
1.Click Browse, and then locate your .wav file.
2.Click Play to test the file.
3.Select Activate on Motion or Activate on Sensor Alarm to activate this warning whenever that event occurs.
4.Click Apply to save your settings.
Audio Channels
1.Select an Audio Channel.
2.Select Record and Use Live Audio, as desired.
3.Adjust the gain and Live Volume for each channel, depending on your desired output and microphone sensitivity.
4.Click Apply to save your settings.
32338AC |
29 |
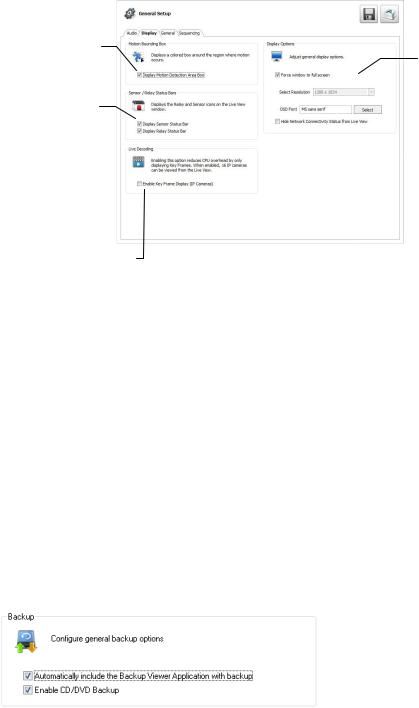
Display
The Display tab allows you to control the on-screen appearance of your recorder, including the resolution and configuration of multiple monitors.
|
Set monitor |
|
Display motion box |
resolution and |
|
the font for the |
||
|
||
|
On Screen |
|
|
Display |
|
Show Sensor / Relay |
|
|
status bars on display |
|
|
screen |
|
Enable live decoding
Motion Bounding Box – Select Display Motion Detection Area Box to see a colored boundary highlighting the area motion occurs.
Sensor / Relay Status Bars – Select Display Sensor Status Bar or Display Relay Status Bar to see icons when sensors or relays are activated.
Live Decoding – Select Enable Key Frame Display for IP Cameras to reduce the processing load by only displaying key frames.
Display Options
1.To allow the display resolution to automatically adjust to the resolution of any monitor, select Force Window to Full Screen.
2.To manually select a resolution, clear Force Window to Full Screen, and then click Select Resolution.
3.To change the font of your On Screen Display, click Select.
4.Select your desired Font and Size. Select Bold if desired.
5.When you have selected your font, click OK.
6.Select Hide Network Connectivity Status from Live View if desired.
7.Click Apply to save your settings.
General
Use the General tab to configure your overall backup options.
Automatically Include the Backup Viewer Application with Backup – Disabling this option will require Backup Viewer to be manually installed on a computer before viewing the video.
Enable CD/DVD Backup – Disabling this option will allow only USB backup from this recorder.
30
 Loading...