


Network Camera
NETWORK CAMERA
Model: IK-WP41A
User’s Manual
For information on our latest products and peripheral devices, refer to the following
Website:
http://www.toshibasecurity.com
If the URL changes, refer to the Toshiba website (http://www.toshiba.com).

Table of Contents
Introduction ......................................................................................................................................... 2
FCC (USA)-INFORMATION .................................................................................................... 2
Important Safeguards ....................................................................................................................... 4
Important Safeguards (Cont.) .......................................................................................................... 6
Notes on Use and Installation ......................................................................................................... 7
Precautions for Use .......................................................................................................................... 8
Package Contents ............................................................................................................................. 9
Physical Description.......................................................................................................................... 9
Installation ........................................................................................................................................ 11
Accessing the Network Camera.................................................................................................... 12
Using Web Browsers .............................................................................................................. 12
Using RTSP Players ............................................................................................................... 14
Live Video ................................................................................................................................. 15
MENU ................................................................................................................................................ 15
PTZ Control .............................................................................................................................. 16
Snapshot ................................................................................................................................... 18
Resize OFF/ON ....................................................................................................................... 18
Close ......................................................................................................................................... 19
Configuration .................................................................................................................................... 19
Camera Settings ...................................................................................................................... 20
Basic Settings .................................................................................................................. 20
Auto Patrol ........................................................................................................................ 26
Privacy Zone Mask.......................................................................................................... 26
Video Codec ..................................................................................................................... 28
Alarm ................................................................................................................................. 30
SD Recording ................................................................................................................... 33
FTP Recording ................................................................................................................. 35
E-mail ................................................................................................................................ 38
Audio ................................................................................................................................. 40
Network Settings ..................................................................................................................... 41
Basic .................................................................................................................................. 41
DDNS ................................................................................................................................ 42
FTP Server ....................................................................................................................... 43
Administrator ............................................................................................................................ 44
Password .......................................................................................................................... 44
Date/Time ......................................................................................................................... 45
FW Update ....................................................................................................................... 46
Maintenance ..................................................................................................................... 46
Event Log.................................................................................................................................. 47
Specification ..................................................................................................................................... 49
Technology License Notice ............................................................................................................ 51
1

Introduction
FCC (USA)-INFORMATION
NOTE: This equipment has been tested and found to comply with the limits for a
Class A digital device, pursuant to Part 15 of the FCC Rules.
These limits are designed to provide reasonable protection against harmful
interference when the equipment is operated in a commercial environment. This
equipment generates, uses, and can radiate radio frequency energy and, if not
installed and used in accordance with the instruction manual, may cause harmful
interference to radio communications. Operation of this equipment in a residential
area is likely to cause harmful interference in which case the user will be required
to correct the interference at his own expense.
USER-INSTALLER CAUTION: Your authority to operate this FCC verified
equipment could be voided if you make changes or modifications not expressly
approved by the party.
This device complies with Part 15 of the FCC Rules. Operation is subject to the
following two conditions:
(1) This device may not cause harmful interference, and
(2) this device must accept any interference received, including interference that
may cause undesired operation.
This Class A digital apparatus complies with Canadian ICES-003.
Cet appareil numé rique de la classe A est conforme à la norme
NMB-003 du Canada
2

Thank you for purchasing the IK-WP41A Network Camera. Before using the
camera, read this User’s Manual carefully to ensure correct usage. After reading
this User’s Manual, save it for future reference.
The design, specifications, software, and manual contents are subject to change
without prior notice.
Terms and Trademarks
The term "OS" is used in this manual to indicate operating systems compatible
with this product.
-- Windows XP: Microsoft Windows XP operating system
-- Windows Vista: Microsoft Windows Vista Business operating system
-- Windows 7: Microsoft Windows 7 Professional operating system
The formal name of Windows is Microsoft Windows Operating System.
Microsoft, Windows and Windows Vista are trademarks or registered trademarks
of Microsoft Corporation in the United States and other countries.
Intel and Intel Core are trademarks or registered trademarks of
Intel Corporation or its subsidiaries in the United States and other
countries.
Adobe is a registered trademark and Adobe Reader is a trademark of Adobe
Systems Incorporated.
Other product names appearing in this manual may be trademarks or
registered trademarks of their respective holders.
NOTE
The performance of the network camera may vary depending on the network
en
vironment.
When using multiple network cameras, the appropriate network switch and PC are
required.
This camera does not support MAC-PC.
3

Important Safeguards
1. Read Instructions
Read all the safety and operating instructions before operating the product.
2. Retain Instructions
Retain the safety instructions and user's manual for future reference.
3. Warnings
Comply with all warnings on the product and in the user's manual.
4. Follow Instructions
Follow all operating and use instructions.
5. Cleaning
Disconnect this camera from the power supply before cleaning.
6. Attachments
Do not use attachments not recommended by the camera manufacturer as they may pose
safety risks.
7. Accessories
Do not place this camera on an unstable cart, stand, tripod, bracket or table. The camera
may fall, causing serious injury to a person, or serious damage to the product. Use only
with stand, tripod, bracket, or table recommended by the manufacturer, or sold with the
camera. Any mounting of the product should follow the manufacturer's instructions, and
should use a mounting accessory recommended by the manufacturer.
8. Ventilation
This camera should never be placed near or over a radiator or heat register. If this product
is placed in a built-in installation, verify that there is proper ventilation so that the camera
temperature operates within the recommended temperature range.
9. Power Sources
This camera should be operated only from the type of power source indicated on the
information label. If you are not sure of the type of power supply at your location, consult
your product dealer.
10. Power-Cord Protection
Power cords should be routed so that they are not likely to be walked on or pinched by
items placed upon or against them. Pay particular attention to cords at plugs, screws and
the point where they exit the product.
11. Installation
Install this camera on a secure part of the ceiling or wall. If installed on an unsecured
location, the camera could fall causing injury and damage.
4

12. Lightning
For additional protection on this camera during a lightning storm, or when it is left
unattended and unused for long periods of time, unplug it from the wall outlet and
disconnect the power supply and cable system. This will prevent damage to the camera
due to lightning and power-line surges. If lightning occurs, do not touch the unit or any
connected cables in order to avoid electric shock.
13. Overloading
Do not overload the power supply or extension cords as this can result in a risk of fire or
electric shock.
14. Object and Liquid Entry
Never push objects of any kind into this camera through openings as they may touch
dangerous electrical points or short-out parts that could result in a fire or electrical shock.
Never intentionally spill liquid of any kind on the camera.
15. Servicing
Do not attempt to service this camera yourself as opening or removing covers may expose
you to dangerous electrical or other hazards. Refer all servicing to qualified service
personnel.
16. Damage Requiring Service
Disconnect this camera from the power supply and refer servicing to qualified service
personnel under the following conditions.
a. When the power-supply cord or plug is damaged.
b. If liquid has been spilled, or objects have fallen into the camera.
c. If the camera has been submerged in water.
d. If the camera does not operate normally by following the operating instructions in the
user's manual. Adjust only those controls that are covered by the user's manual as
an improper adjustment of other controls may result in damage and will often require
extensive work by a qualified technician to restore the camera to its normal operation.
e. If the camera has been dropped or the cabinet has been damaged.
f. When the camera exhibiting a distinct change in performance which indicates a need for
service.
g. Other trouble.
17. Replacement Parts
When replacing parts, be sure the service technician uses parts specified by the
manufacturer or have the same characteristics as the original part. Unauthorized
substitutions may result in fire, electric shock or other hazards.
18. Safety Check
Upon completion of any service or repairs to this camera, ask the service technician to
perform safety checks to determine that the camera is in proper operating condition.
5
Important Safeguards (Cont.)
CAUTION TO REDUCE THE RISK OF ELECTRIC SHOCK.
DO NOT REMOVE COVER. NO USER SERVICEABLE PARTS INSIDE. REFER
SERVICING TO QUALIFIED SERVICE PERSONNEL.
The lightning flash with arrowhead symbol, within an equilateral
triangle, is intended to alert the user to the presence of uninsulated
"dangerous voltage" within the product's enclosure that may be of
sufficient magnitude to constitute a risk of electric shock to persons.
The exclamation point within an equilateral triangle is intended to
alert the user to the presence of important operating and
maintenance(servicing) instructions in the literature accompanying
the appliance.
WARNING:
TO REDUCE THE RISK OF FIRE OR ELECTRIC SHOCK, DO NOT SUBMARGE THIS
CAMERA IN WATER.
FIELD INSTALLATION MARKING:
WORDED: “THIS INSTALLATION SHOULD BE MADE BY A QUALIFIED SERVICE
PERSON AND SHOULD CONFORM TO ALL LOCAL CODES.”
NOTICE
The product is intended to be supplied by a Listed Power Unit marked "Class 2" or
"L.P.S." (or "Limited Power Source") and rated output 24Vac, 50-60Hz, 2.25A minimum
or 48Vdc, 0.6A minimum.
The product shall be installed by a qualified service person and the installation shall
conform to all local codes.
The product is to be connected to only PoE+ networks without routing to the outside
plant.
6

Notes on Use and Installation
Do not aim the camera at the sun
Never aim the camera at the sun even with the camera power off.
Do not shoot intense light
Intense light such as a spotlight may cause a bloom or smear. A vertical stripe
may appear on the screen. However, this is not a malfunction.
Treat the camera with care
Dropping or subjecting the camera to intense vibration may cause it to
malfunction.
Never touch internal parts
Do not touch the internal parts of the camera other than the parts specified.
Do not submerge in water
The camera has some protection to water (see IP rating), and can be used
indoors or outdoors. If the camera was submerged in water, turn off the power
and contact your dealer.
Keep the camera installation away from video noise
If cables are wired near electric lighting wires or a TV set, noise may appear in
images. In this event relocate cables or reinstall equipment.
Check the ambient temperature and humidity
Avoid using the camera where the temperature is hotter or colder than the
specified operating range. Doing so could affect the internal parts or cause the
image quality to deteriorate. Special care is required to use the camera at high
temperature and humidity.
Should you notice any trouble
If any trouble occurs while you are using the camera, turn off the power and
contact your dealer. If you continue to use the camera when there is something
wrong with it, the trouble may get worse and an unpredictable problem may
occur.
7

Precautions for Use
Disclaimer
We disclaim any responsibility and shall be held harmless for any damages or losses
incurred by the user in any of the following cases:
1. Fire, earthquake or any other act of God; acts by third parties; misuse by the user, whether
intentional or accidental; use under extreme operating conditions.
2. Malfunction or non-function resulting in indirect, additional or consequential damages,
including but not limited to loss of expected income and suspension of business activities.
3. Incorrect use not in compliance with instructions in this user's manual.
4. Malfunctions resulting from misconnection to other equipment.
5. Repairs or modifications made by the user or caused to be made by the user and carried out
by an unauthorized third party.
Notwithstanding the foregoing, Toshiba's liabilities shall not, in any circumstances, exceed the
purchase price of the product.
Copyright and Right of Portrait
There may be a conflict with the Copyright Law and other laws when a customer uses, displays,
distributes, or exhibits an image picked up by the camera without permission from the copyright
holder. Please also note that transfer of an image or file covered by copyright is restricted to use
within the scope permitted by the Copyright Law.
Protection of Personal Information
Images taken by the camera that reveal the likeness of an individual person may be considered
personal information. To disclose, exhibit or transmit those images over the internet or otherwise,
consent of the person may be required.
Usage Limitation
The product is not designed for any "critical applications." "Critical applications" means life
support systems, exhaust or smoke extraction applications, medical applications, commercial
aviation, mass transit applications, military applications, homeland security applications, nuclear
facilities or systems or any other applications where product failure could lead to injury to
persons or loss of life or catastrophic property damage.
Accordingly, Toshiba disclaims any and all liability arising out of the use of the product in any
critical applications.
8
Package Contents
IK-WP41A ---- 1
Allen wrench ---- 1
Torx wrench ---- 1
Screw (1/4-20UNC, 12mm) ---- 1
RJ45 Coupler ---- 1
Silica-gel ---- 1
CD-ROM ---- 1
Quick Start guide and Important Safeguards ---- 1
Warranty ---- 1
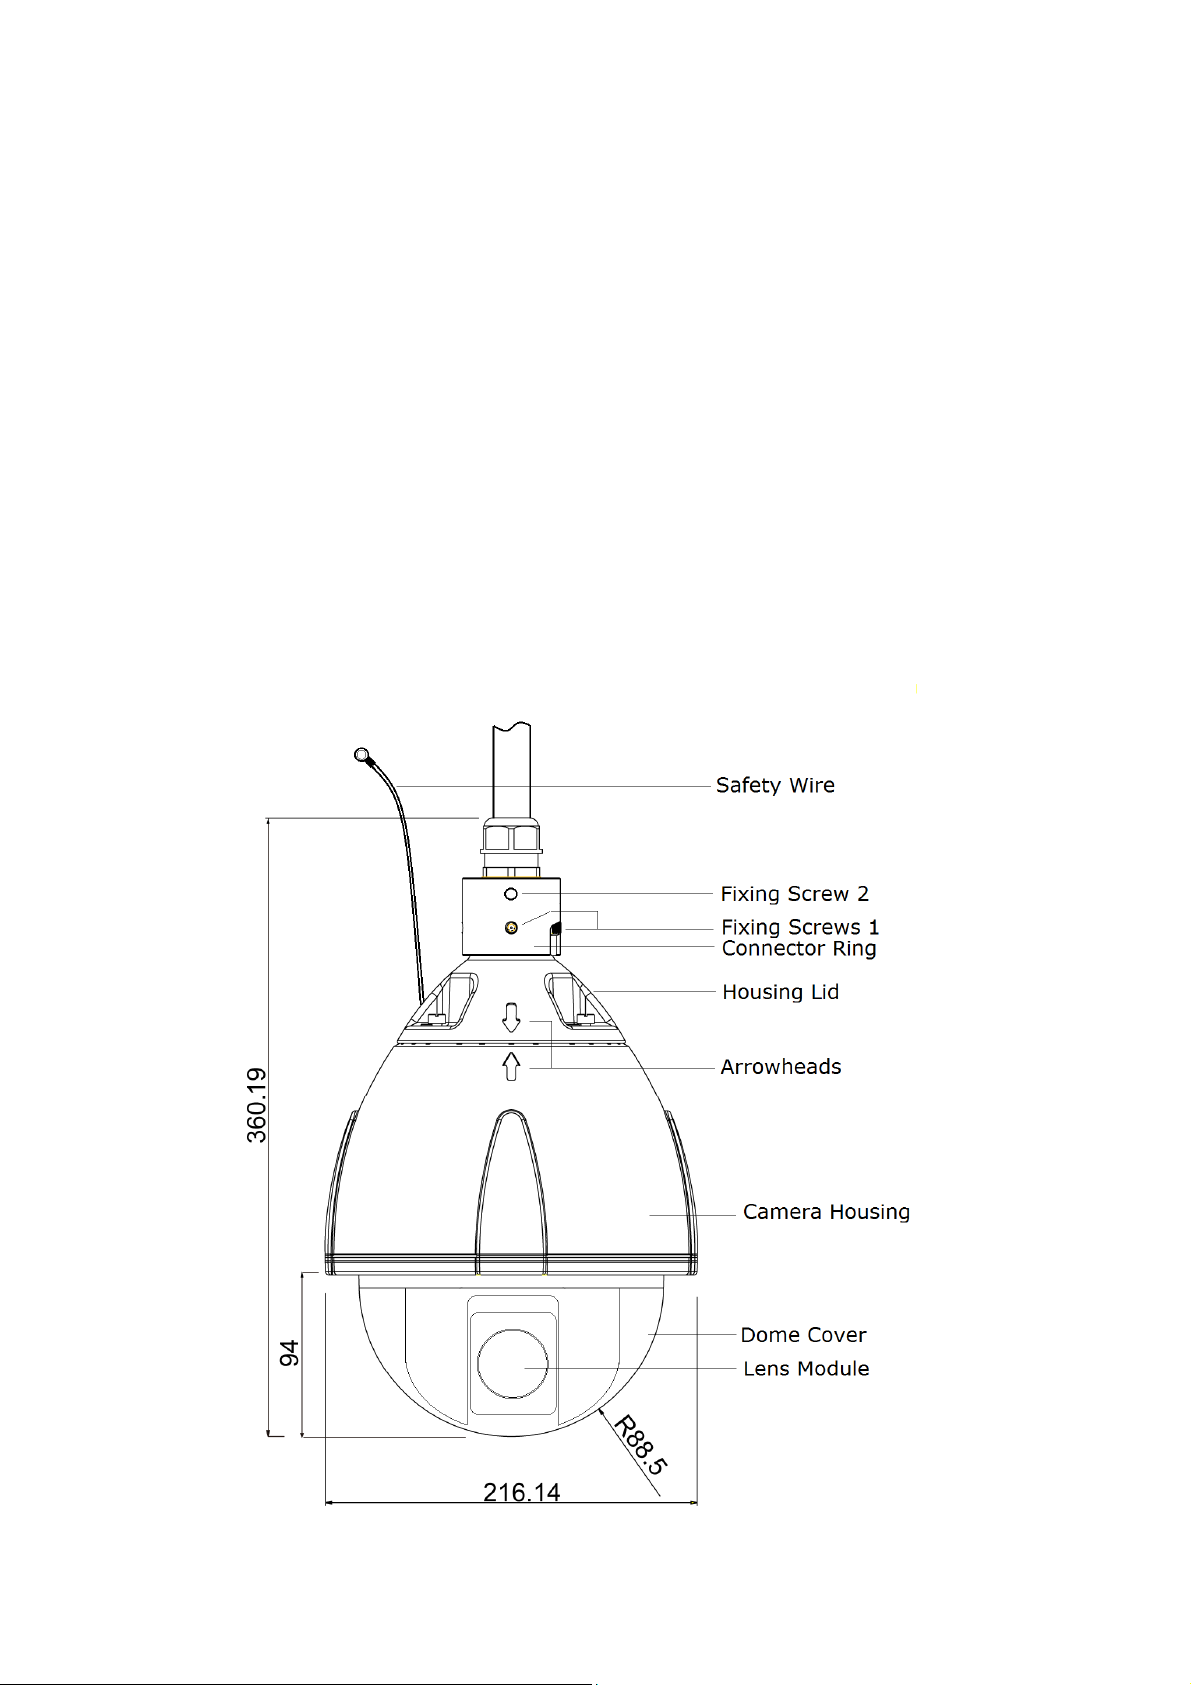
Physical Description
Unit:mm
9

Hardware Reset
Occasionally resetting the system can return the camera to normal operation. If the system
problems remain after resetting, restore the factory settings and install again.
The IK-WP41A has a reset terminal and default terminal. (See QSG on page 17)
Reset: Using a pointed object, short both terminals of “Reset”. Wait for the Network Camera
to reboot.
Restore: Using a pointed object, short both terminals of “Default” for about 5 seconds to
restart the camera. Note that all settings will be restored to factory default.
NOTE
Restoring the factory defaults will erase any previous settings such as IP address, ID and
Password.
Micro SD/SDHC Card and Capacity
This network camera is compliant with Micro SD/SDHC 32GB and other preceding
standard
Micro SD cards for local storage.
● There is a limit to the number of rewrites that is possible with the SD memory card.
Replacing
the SD memory card when performing periodic maintenance of the camera is
recommended.
● Do not use 512MB and below SD memory cards.
● The Camera system reserves approximately 100MB in SD memory cards. Any
images are not recordable on this space.
● Carefully read the User’s guide, precautions on use, and any other information
supplied with a purchased memory card.
● An SD memory card can be used for repeated storage. The lifespan (number of
rewrites possible) of an SD memory card is greatly affected by the capacity of the SD
memory card.
● Do not use a memory card containing the data recorded by another device with the
camera as this may result in the camera not functioning correctly.
● Do not modify, overwrite the data, or change the folder name of an SD memory
card. It may result in the camera not to function correctly.
● If you unmount or remove the SD memory card from camera, you have to turn OFF
the power of camera.
10

Installation
Hardware Installation
Please verify that your product package contains all the accessories listed in the
Package Contents listed on page 7. Depending on the user’s application, an Ethernet
cable may be needed. The Ethernet cable should meet the specs of UTP Category 5e
or higher.
Hardware Installation is shown in the Quick Start Guide(QSG). Please refer to page
10 of the QSG.
Network Deployment
In this user’s manual, “User” refers to whoever has access to the Network Camera,
and “Administrator” refers to the person who can configure the Network Camera and
grant user access to the camera.
Network Deployment is shown in the Quick Start Guide(QSG). Please refer to page
19 of the QSG.
Micro SD/SDHC Card Installation
NOTE:
Card slot is in the inside of a camera. You should turn off all power before
installation.
When installing the SD/SDHC card, be careful not to generate static electricity at
the time.
When installing the SD/SDHC card, don’t touch the internal wiring.
Check if the silica-gel also needs to be exchanged.
Refer to 10 pages of QSG for details.
1. The dome cover and the internal black cover are removed.( Refer to 10 pages of
QSG.)
When you remove the internal black cover, remove the two screws indicated by
the arrows.
11
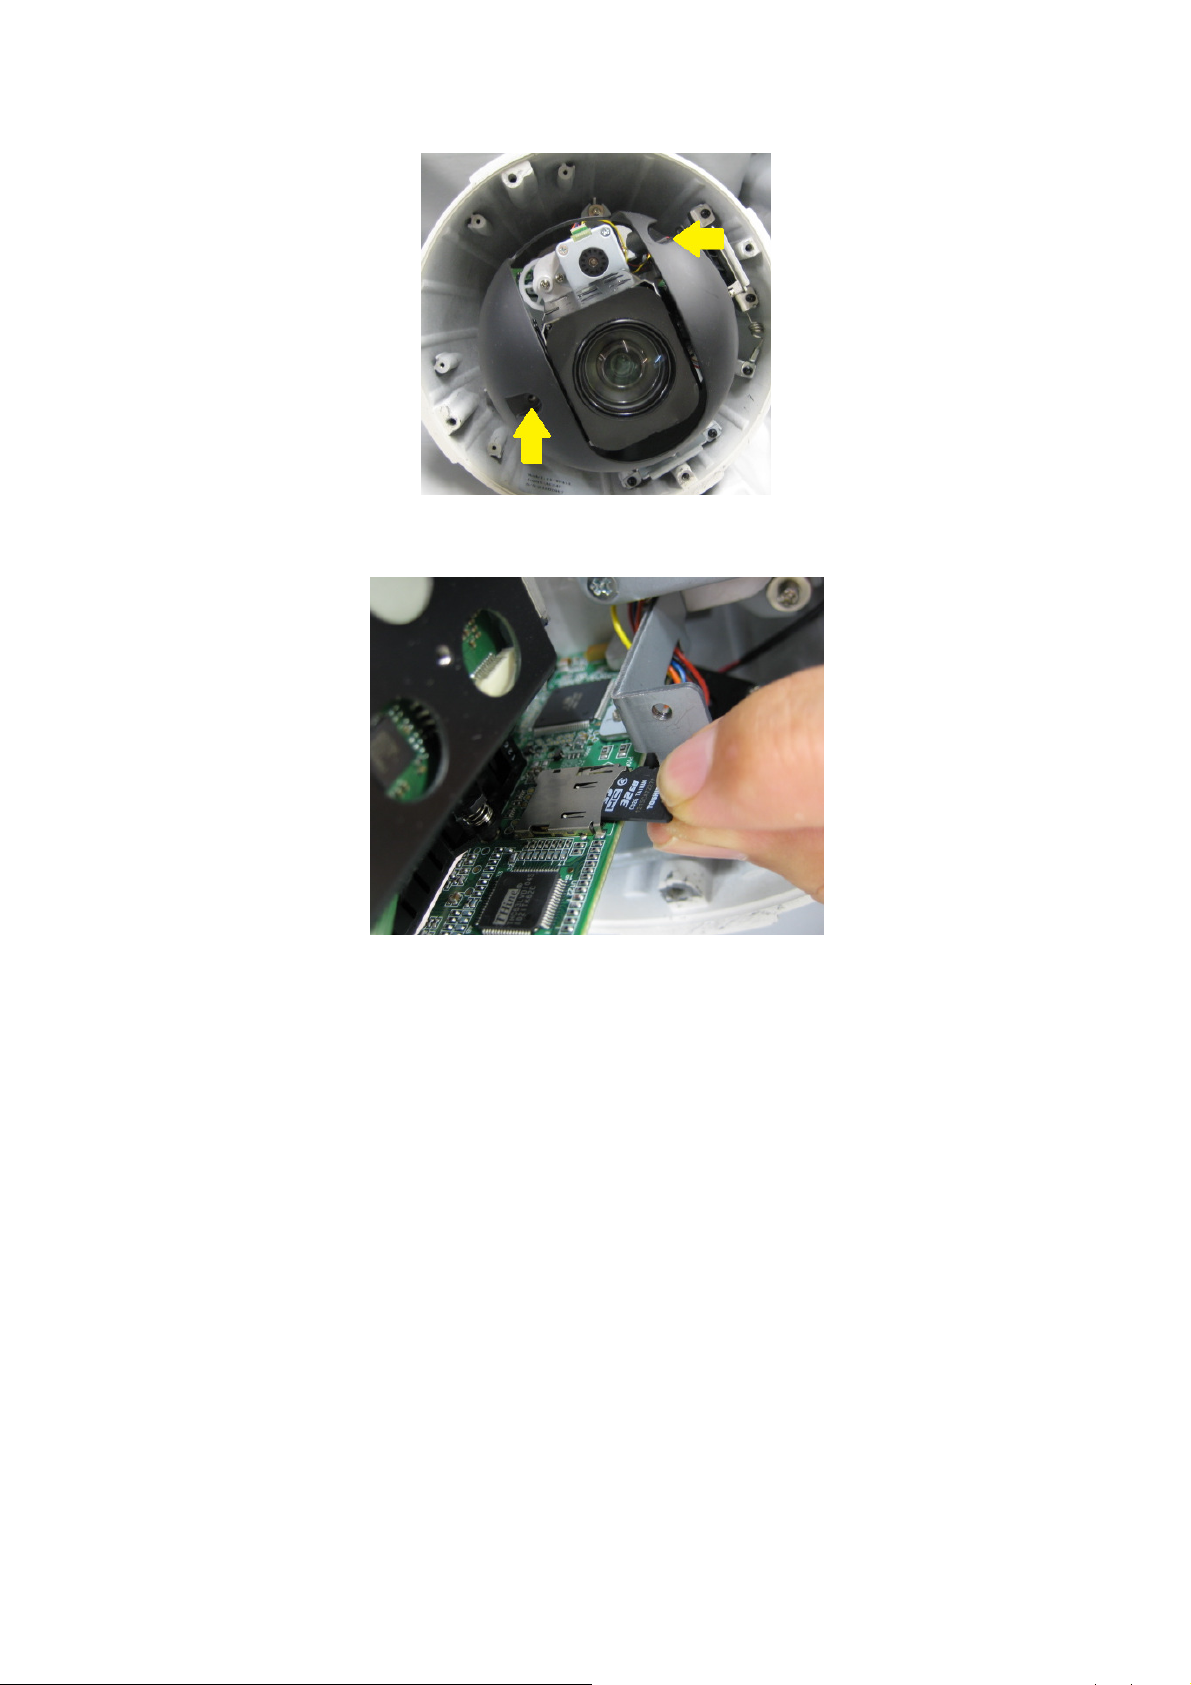
2. The micro SD/SDHC card is inserted in direction of the following picture.( The
contacts face downward.)
Accessing the Network Camera
This chapter explains how to access the Network Camera through web browsers or
RTSP players.
Using Web Browsers
Use IP Camera Finder to access the Network Cameras on the LAN. See QSG on 19.
If your network environment is not a LAN, follow these steps to access the Network
Camera:
1. Launch your web browser (Microsoft® Internet Explorer).
2. Enter the IP address of the Network Camera in the address field. Press Enter.
3. The live video will be displayed in your web browser.
12
4. If it is the first time installing the network camera, an information bar will pop up as
shown below. Follow the instructions to install the required plug-in on your computer.
NOTE:
The administrator log-in ID and password are set to "admin" and to "1234"
respectively by default.
To prevent unauthorized access, it is highly recommended to set a new password
for the Network Camera.
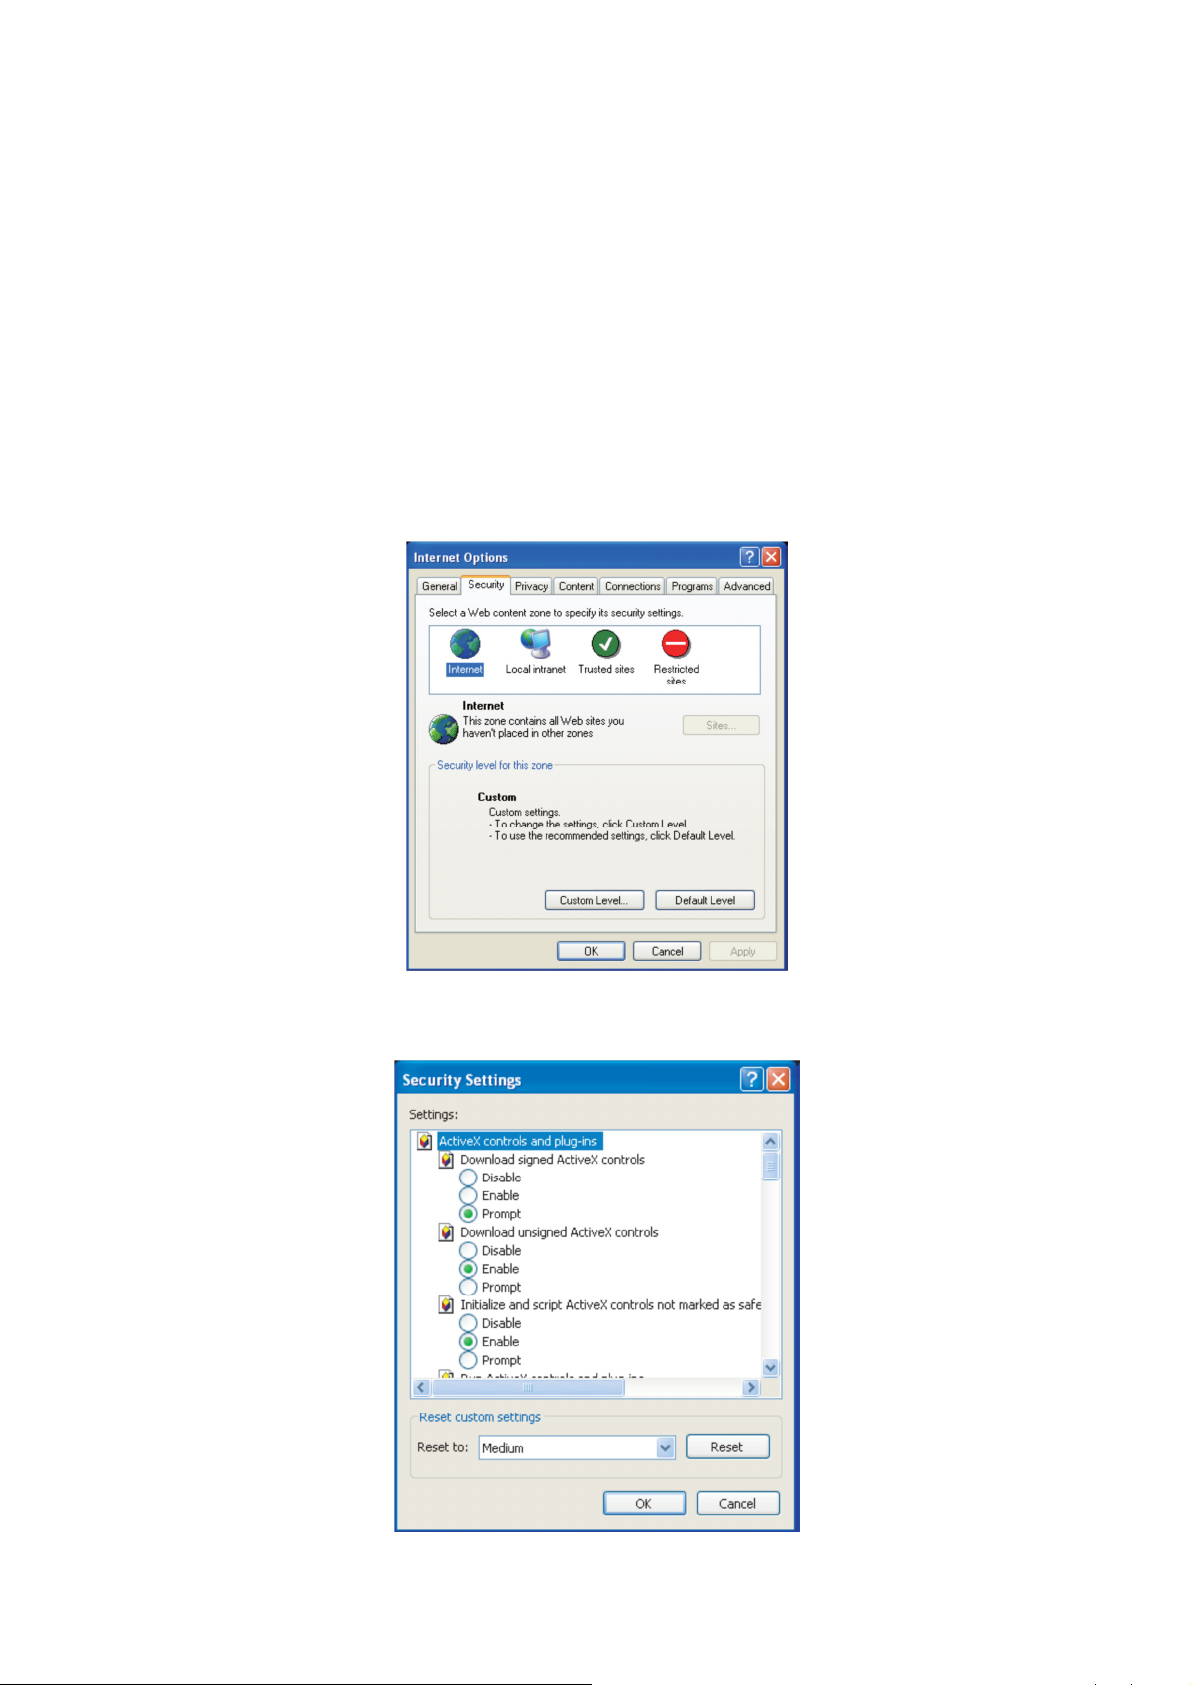
► If you see a dialog box indicating that your security settings prohibit running
ActiveX® Controls, please enable the ActiveX® Controls for your browser.
1. Choose Tools > Internet Options > Security > Custom Level.
2. Look for Download signed ActiveX® controls; select Enable or Prompt. Click OK.
13

3. Refresh your web browser, then install the Active X® control. Follow the
instructions to complete installation.
Using RTSP Players
To view the H.264 streaming media using RTSP player, you can use VLC media
player. And set the RTSP port to 554.
1. Launch the RTSP player (VLC media player).
2. Choose File > Open network URL. A URL dialog box will pop up.
3. The address format is rtsp://<ip address>:<rtsp port>/<RTSP streaming access
name>. For example, rtsp://192.168.0.194:554/livestream
14
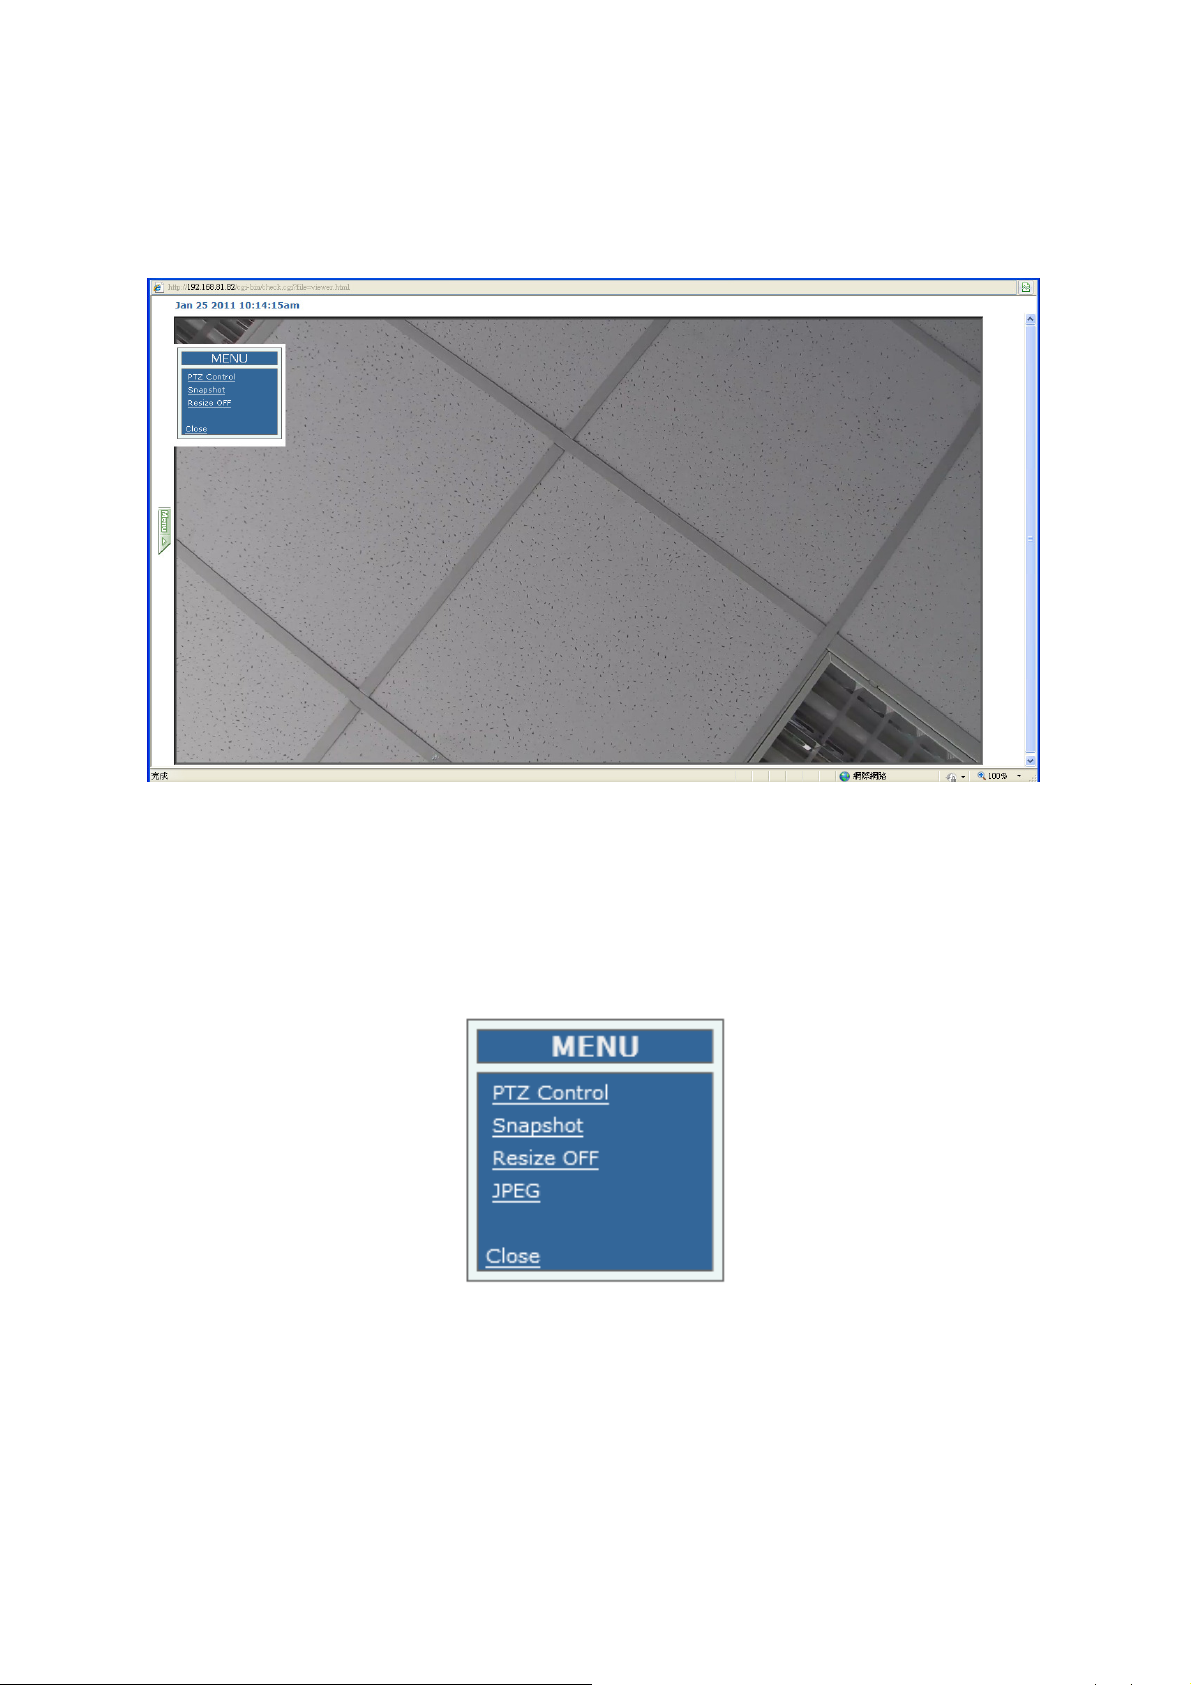
Live Video
A click of the Menu button on the left of a screen displays MENU.
MENU
PTZ Control, Snapshot, Resize ON/OFF, JPEG, and Close are displayed.
15
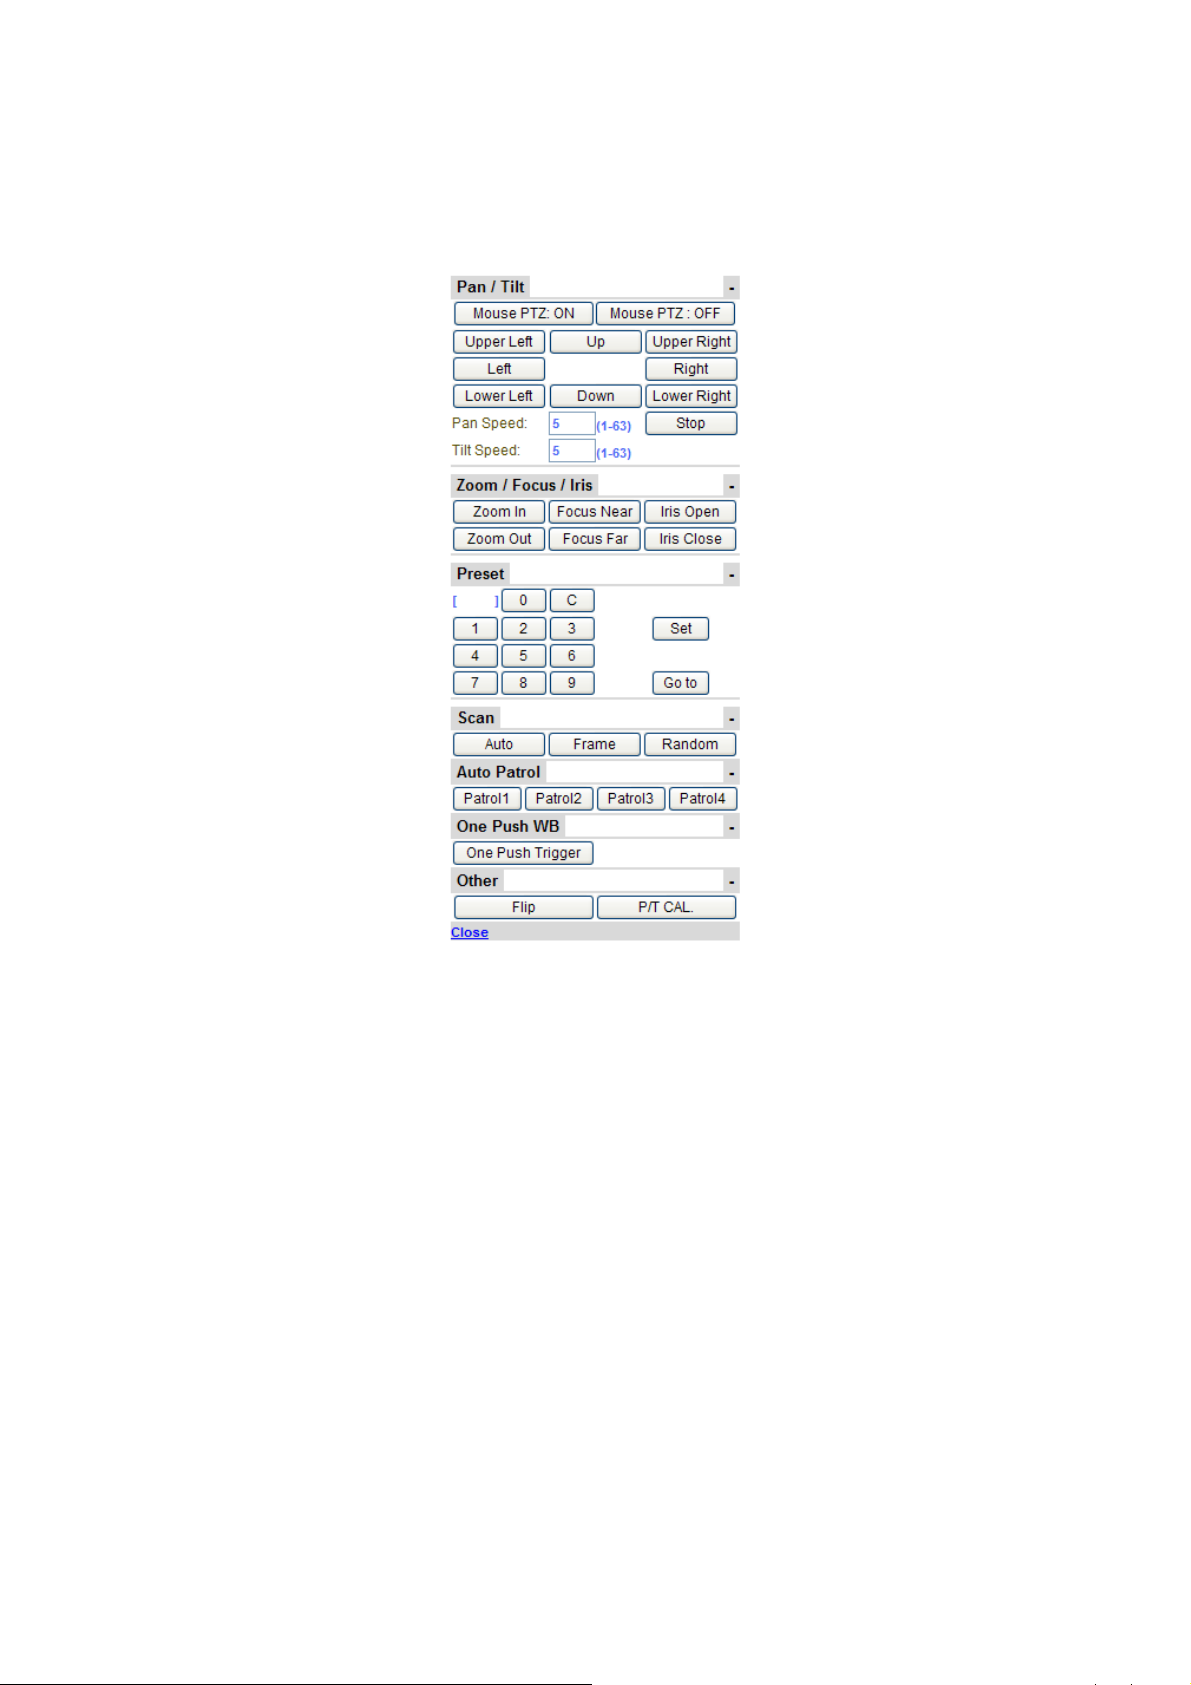
PTZ Control
Pan/Tilt
Mouse PTZ:
Use Mouse PTZ to control the camera PTZ by clicking the screen and sliding the
mouse in that direction
Zoom IN/OUT is controlled by the mouse scroll wheel.
Up/Down / Left/Right / Upper Left / Upper Right / Lower Left / Lower Right:
Click these buttons to move the camera in the intended direction. Click and hold
to continuously move the camera.
Pan Speed / Tilt Speed:
Adjust the pan and tilt speed. The higher value indicates faster speed.
STOP:
This is the button to stop ‘Scan’ and ‘Auto Patrol’.
16

Zoom / Focus / Iris
Zoom In / Zoom Out:
Zoom In expands the view and Zoom Out reducesthe view. Click and hold to
continuously zoom the camera.
Focus Near / Focus Far:
When clicked, focus will be set to manual mode and the lens focus will be adjusted.
If the Pan/Tilt/Zoom button is clicked, it will return to Auto Focus.
NOTE: In a wide angle, the manual focus increments increase.
Iris Open / Iris Close:
When clicked, iris will be set to manual mode and the iris will be adjusted. If the
Pan/Tilt/Zoom button is clicked, it will return to Auto Iris.
Preset
Setup method:
1. Move the camera to the desired position.
2. Input the preset position number.
3. Click the ‘Set’ button.
Move method:
1. Input the preset position number.
2. Click ‘Go to’ button.
NOTE:
Manual focus cannot be set as preset position.
Scan
To set the scan speed, refer to Camera Settings Basic Pan / Tilt Scan
Speed.
Auto :
The camera will pan continuously until a manual pan, tilt, zoom, or Stop operation is
performed.
(Zoom) At power-up, the zoom is fully zoomed out. When an auto scan is started
directly, the zoom will maintain the last magnification.
(Tilt) At power-up, the tilt is set up by the Configuration. To set the tilt angle, refer to
Camera Settings Basic Tilt Angle.
17
 Loading...