


 Loading...
MULTIFUNCTIONAL DIGITAL SYSTEMS
Troubleshooting Guide

©2009 TOSHIBA TEC CORPORATION All rights reserved
Under the copyright laws, this manual cannot be reproduced in any form without prior written permission of TTEC. No patent liability is assumed, however, with respect to the use of the information contained herein.
Preface
Thank you for purchasing TOSHIBA Multifunctional Digital Systems. This manual describes how to troubleshoot the problems that could occur while you are using the equipment. Keep this manual within easy reach, and use it to configure an environment that makes the best use of the e-STUDIO’s functions.
This equipment provides the scanning function as an option. However, this optional scanning function is already installed in some models.
How to read this manual
Symbols in this manual
In this manual, some important items are described with the symbols shown below. Be sure to read these items before using this equipment.
Indicates a potentially hazardous situation which, if not avoided, could result in death, serious injury, or serious damage, or fire in the equipment or surrounding objects.
Indicates a potentially hazardous situation which, if not avoided, may result in minor or moderate injury, partial damage to the equipment or surrounding objects, or loss of data.
Indicates information to which you should pay attention when operating the equipment.
Other than the above, this manual also describes information that may be useful for the operation of this equipment with the following signage:
Describes handy information that is useful to know when operating the equipment.
Pages describing items related to what you are currently doing. See these pages as required.
Screens
y Screens on this manual may differ from the actual ones depending on how the equipment is used, such as the status of the installed options.
y The illustration screens used in this manual are for paper in the A/B format. If you use paper in the LT format, the display or the order of buttons in the illustrations may differ from that of your equipment.
Trademarks
yThe official name of Windows 2000 is Microsoft Windows 2000 Operating System.
yThe official name of Windows XP is Microsoft Windows XP Operating System.
yThe official name of Windows Vista is Microsoft Windows Vista Operating System.
yThe official name of Windows Server 2003 is Microsoft Windows Server 2003 Operating System.
yThe official name of Windows Server 2008 is Microsoft Windows Server 2008 Operating System.
yMicrosoft, Windows, Windows NT, and the brand names and product names of other Microsoft products are trademarks of Microsoft Corporation in the US and other countries.
yApple, AppleTalk, Macintosh, Mac, Mac OS, Safari, TrueType, and LaserWriter are trademarks of Apple Inc. in the US and other countries.
yAdobe, Adobe Acrobat, Adobe Reader, Adobe Acrobat Reader, and PostScript are trademarks of Adobe Systems Incorporated.
yMozilla, Firefox and the Firefox logo are trademarks or registered trademarks of Mozilla Foundation in the U.S. and other countries.
yIBM, AT and AIX are trademarks of International Business Machines Corporation.
yNOVELL, NetWare, and NDS are trademarks of Novell, Inc.
yTopAccess is a trademark of Toshiba Tec Corporation.
yOther company names and product names in this manual are the trademarks of their respective companies.
Preface 1

CONTENTS |
|
Preface....................................................................................................................................... |
1 |
Chapter 1 TROUBLESHOOTING FOR THE HARDWARE |
|
Messages Displayed on the Touch Panel .............................................................................. |
8 |
Clearing a Paper Jam ............................................................................................................. |
11 |
Locating a paper jam........................................................................................................... |
11 |
Clearing a paper jam ........................................................................................................... |
12 |
Paper jam in the Reversing Automatic Document Feeder (Lower) ..................................... |
13 |
Paper jam in the Reversing Automatic Document Feeder (Upper) ..................................... |
14 |
Paper jam in the bypass tray............................................................................................... |
15 |
Paper jam in the External Large Capacity Feeder (optional)............................................... |
16 |
Paper jam in the Finisher, Hole Punch Unit and Inserter (all optional)................................ |
17 |
Paper jam inside of the equipment ...................................................................................... |
22 |
Clearing paper jams caused by a wrong paper size setting ................................................ |
26 |
Clearing a Staple Jam ............................................................................................................ |
31 |
Staple jam in the Finisher MJ-1027 / Saddle Stitch Finisher MJ-1028 ................................ |
31 |
Staple jam in the Saddle Stitch Finisher MJ-1029............................................................... |
32 |
Staple jam in the saddle stitch unit ...................................................................................... |
34 |
Replacing a Toner Cartridge ................................................................................................. |
37 |
Replacing a “Near Empty” toner cartridge ........................................................................... |
40 |
Refilling With Staples............................................................................................................. |
42 |
Refilling Finisher MJ-1027 / Saddle Stitch Finisher MJ-1028 staples.................................. |
42 |
Refilling Saddle Stitch Finisher MJ-1029 staples ................................................................ |
43 |
Refilling saddle stitch unit staples........................................................................................ |
45 |
Cleaning the Hole Punch Dust Bin ....................................................................................... |
47 |
Chapter 2 TROUBLESHOOTING FOR COPYING |
|
Copying Problems.................................................................................................................. |
50 |
Chapter 3 TROUBLESHOOTING FOR PRINTING |
|
Print Job Problems................................................................................................................. |
54 |
Clearing print job errors....................................................................................................... |
54 |
Cannot remember the document password for a Private Print job...................................... |
56 |
Printer Driver Problems ......................................................................................................... |
57 |
Cannot print (port setting problems).................................................................................... |
57 |
Command line options not processed ................................................................................. |
57 |
Retrieval of printer configuration failed................................................................................ |
57 |
Cannot print a job as expected using PS3 printer driver ..................................................... |
58 |
Cannot change settings on the [Fonts] tab and the [Configuration] tab .............................. |
58 |
Network Connection Problems ............................................................................................. |
59 |
Cannot print with the equipment (network connection problems)........................................ |
59 |
Cannot print with SMB print................................................................................................. |
59 |
Cannot print properly with AppleTalk print........................................................................... |
59 |
Client Problems ..................................................................................................................... |
60 |
Checking the client status.................................................................................................... |
60 |
Hardware Problems................................................................................................................ |
61 |
Startup page not printed...................................................................................................... |
61 |
CONTENTS 3

Print jobs not output ............................................................................................................ |
61 |
Chapter 4 TROUBLESHOOTING FOR SCANNING |
|
Scanning Problems ................................................................................................................ |
64 |
Cannot E-mail my scans...................................................................................................... |
64 |
Cannot find the data saved in the shared folder.................................................................. |
64 |
Chapter 5 TROUBLESHOOTING FOR e-Filing |
|
e-Filing Web Utility Problems................................................................................................ |
66 |
e-Filing Web Utility terminates the session.......................................................................... |
66 |
Numerous sub windows repeatedly appear ........................................................................ |
66 |
Displaying the items in the Contents Frame takes a long time............................................ |
66 |
Error messages ................................................................................................................... |
67 |
Chapter 6 TROUBLESHOOTING FOR NETWORK CONNECTIONS |
|
Locating the Equipment in the Network............................................................................... |
70 |
Cannot locate the equipment in the network ....................................................................... |
70 |
Cannot locate the equipment with Local Discovery............................................................. |
71 |
Equipment does not respond to ping command .................................................................. |
72 |
LDAP Search and Authentication Problems........................................................................ |
73 |
Network shutdown occurs or touch panel disabled after LDAP search............................... |
73 |
LDAP authentication takes a long time................................................................................ |
73 |
Printing Problems (Network Related) ................................................................................... |
74 |
SMB print and Point&Print in a Windows operating system environment ........................... |
74 |
Raw TCP or LPR print in a Windows operating system environment ................................. |
74 |
IPP print in a Windows operating system environment ....................................................... |
75 |
Novell print in a NetWare environment................................................................................ |
75 |
Macintosh environment ....................................................................................................... |
76 |
UNIX/Linux environment...................................................................................................... |
76 |
Network Fax (N/W-Fax) Driver Problems.............................................................................. |
77 |
N/W-Fax Driver Installation Error Messages ....................................................................... |
77 |
N/W-Fax Driver General Errors ........................................................................................... |
78 |
Chapter 7 CHECKING THE EQUIPMENT STATUS WITH TopAccess |
|
Hardware Status Icons on TopAccess [Device] Tab........................................................... |
80 |
Error Messages ...................................................................................................................... |
82 |
Error Codes............................................................................................................................. |
86 |
Error codes on print jobs ..................................................................................................... |
86 |
Error codes on transmission and reception ......................................................................... |
88 |
Error codes on scan jobs..................................................................................................... |
91 |
Chapter 8 WHEN SOMETHING IS WRONG WITH THE EQUIPMENT |
|
When You Think Something Is Wrong With the Equipment............................................... |
96 |
General operations.............................................................................................................. |
96 |
Originals and paper ............................................................................................................. |
97 |
4 CONTENTS

Regular Maintenance ............................................................................................................. |
98 |
INDEX ..................................................................................................................................................................... |
99 |
CONTENTS 5

6 CONTENTS

TROUBLESHOOTING FOR THE |
|
HARDWARE |
|
This chapter describes how to troubleshoot problems with paper, toner and other finishing processes. |
|
This chapter also describes how to supply the paper, toner and staples. |
|
Messages Displayed on the Touch Panel .............................................................................. |
8 |
Clearing a Paper Jam............................................................................................................. |
11 |
Locating a paper jam............................................................................................................................................ |
11 |
Clearing a paper jam ............................................................................................................................................ |
12 |
Paper jam in the Reversing Automatic Document Feeder (Lower) ...................................................................... |
13 |
Paper jam in the Reversing Automatic Document Feeder (Upper) ...................................................................... |
14 |
Paper jam in the bypass tray ................................................................................................................................ |
15 |
Paper jam in the External Large Capacity Feeder (optional)................................................................................ |
16 |
Paper jam in the Finisher, Hole Punch Unit and Inserter (all optional)................................................................. |
17 |
Paper jam inside of the equipment....................................................................................................................... |
22 |
Clearing paper jams caused by a wrong paper size setting ................................................................................. |
26 |
Clearing a Staple Jam ............................................................................................................ |
31 |
Staple jam in the Finisher MJ-1027 / Saddle Stitch Finisher MJ-1028 ................................................................. |
31 |
Staple jam in the Saddle Stitch Finisher MJ-1029 ................................................................................................ |
32 |
Staple jam in the saddle stitch unit ....................................................................................................................... |
34 |
Replacing a Toner Cartridge ................................................................................................. |
37 |
Replacing a “Near Empty” toner cartridge............................................................................................................ |
40 |
Refilling With Staples............................................................................................................. |
42 |
Refilling Finisher MJ-1027 / Saddle Stitch Finisher MJ-1028 staples................................................................... |
42 |
Refilling Saddle Stitch Finisher MJ-1029 staples.................................................................................................. |
43 |
Refilling saddle stitch unit staples......................................................................................................................... |
45 |
Cleaning the Hole Punch Dust Bin ....................................................................................... |
47 |

1 TROUBLESHOOTING FOR THE HARDWARE
Messages Displayed on the Touch Panel
When a message appears on the touch panel, see the table below to solve the problem.
Message |
Problem Description |
|
|
Corrective Action |
|
|
|
|
|
|
|
||
Misfeed in *** |
Paper jam has occurred inside the |
|
Remove the jammed paper following the guidance |
|
||
|
equipment. |
|
displayed on the touch panel. |
|
||
|
|
|
P.11 “Clearing a Paper Jam” |
|
||
|
|
|
|
|
||
Check paper size setting on control |
Paper jam has occurred because of |
|
Just removing the jammed paper does not prevent |
|
||
panel for drawer N |
the mismatch between the paper size |
|
another paper jam. Be sure to correctly register the |
|
||
|
placed in drawer N and the size |
|
paper size in the equipment. |
|
||
|
registered for the drawer N in the |
|
P.26 “Clearing paper jams caused by a wrong |
|
||
|
equipment. |
|
paper size setting” |
|
||
|
|
|
|
|
||
Wait (Performing Self-check) |
The equipment is undergoing |
|
Wait until the adjustment is completed and the |
|
||
|
maintenance to keep its imaging |
|
message disappears. |
|
||
|
quality. |
|
|
|
|
|
|
|
|
|
|
||
Check the original and set it again |
The original is jammed inside of the |
|
Remove the jammed original following the guidance |
|
||
|
Reversing Automatic Document |
|
on the touch panel. |
|
||
|
Feeder. |
|
P.13 “Paper jam in the Reversing Automatic |
|
||
|
|
|
Document Feeder (Lower)” |
|
||
|
|
|
|
|
||
|
The direction or the size of the |
|
Check the direction and the size of the original and |
|
||
|
original placed on the Reversing |
|
then replace it on the Reversing Automatic Document |
|
||
|
Automatic Document Feeder is |
|
Feeder. Then reattempt the operation. |
|
||
|
incorrect. |
|
|
|
|
|
|
|
|
|
|
||
Change direction of original |
The orientation of the original placed |
|
Change the orientation of the original by 90 degrees |
|
||
|
on the original glass is incorrect. |
|
and place it on the original glass. |
|
||
|
|
|
|
|
||
Change from this mode |
The number of originals to be |
|
Reduce the number of originals to be scanned to less |
|
||
Count over, cannot store anymore |
scanned has reached the limit of |
|
than 2000 sheets, and try again. |
|
||
|
2000 sheets during scanning. (The |
|
|
|
|
|
|
magazine sort or page number |
|
|
|
|
|
|
function is used.) |
|
|
|
|
|
|
|
|
|
|
||
READY (CHECK SADDLE STITCH |
Staple jam has occurred in the stapler |
|
Remove the jammed staples. |
|
||
STAPLER) |
of the saddle stitch unit. |
|
P.34 “Staple jam in the saddle stitch unit” |
|
||
|
|
|
|
|
||
READY (CHECK SADDLE STITCH |
No staples are left in the stapler of the |
|
Refill the staples. |
|
||
STAPLER) |
saddle stitch unit. |
|
P.45 “Refilling saddle stitch unit staples” |
|
||
|
|
|
|
|
||
READY (CHECK STAPLER) |
Staple jam has occurred in the stapler |
|
Remove the jammed staples. |
|
||
|
of the finisher. |
|
P.31 “Clearing a Staple Jam” |
|
||
|
|
|
|
|
||
READY (CHECK STAPLER) |
No staples are left in the stapler of the |
|
Refill the staples. |
|
||
|
finisher. |
|
P.42 “Refilling With Staples” |
|
||
|
|
|
|
|
||
READY (HOLE PUNCH DUST BIN IS |
Hole punch dust bin is full of paper |
|
Remove the paper punchings. |
|
||
FULL) |
punchings. |
|
P.47 “Cleaning the Hole Punch Dust Bin” |
|
||
|
|
|
|
|
||
READY (INNER TRAY FULL) |
The exit tray of the equipment is full of |
|
Remove the paper from the exit tray of the equipment. |
|
||
|
paper. |
|
|
|
|
|
|
|
|
|
|
||
Add paper |
No paper is left in a drawer or on the |
|
Set paper in the drawer or on the bypass tray. The |
|
||
|
bypass tray. |
|
touch panel indicates which drawer (or the bypass |
|
||
|
|
|
tray) has no paper. |
|
||
|
|
|
To set paper, refer to the Copying Guide. |
|
||
|
|
|
|
|
||
Call for service |
The equipment requires adjusting by |
|
Contact your service representative with the error |
|
||
|
a service technician. |
|
code displayed on the right side of the touch panel. |
|
||
|
|
|
|
|
|
|
|
|
|
|
|
|
|
|
|
|
Never attempt to repair, disassemble or modify |
|
||
|
|
|
the equipment by yourself. |
|
||
|
|
|
You could cause a fire or get an electric shock. |
|
||
|
|
|
Always contact your service representative for |
|
||
|
|
|
maintenance or repair of the internal parts of the |
|
||
|
|
|
equipment. |
|
||
|
|
|
|
|
||
|
|
|
|
|
||
Examine stapler in the Saddle Stitch |
Staple jam has occurred in the stapler |
|
Remove the jammed staples. |
|
||
unit |
of the saddle stitch unit. |
|
P.34 “Staple jam in the saddle stitch unit” |
|
||
|
|
|
|
|
||
Check staple cartridge in the Saddle |
No staples are left in the stapler of the |
|
Refill the staples. |
|
||
Stitch unit |
saddle stitch unit. |
|
P.42 “Refilling With Staples” |
|
||
|
|
|
|
|
||
Check staple cartridge |
No staples are left in the stapler of the |
|
Refill the staples. |
|
||
|
finisher. |
|
P.42 “Refilling With Staples” |
|
||
|
|
|
|
|
||
Examine Stapler |
Staple jam has occurred in the stapler |
|
Remove the jammed staples. |
|
||
|
of the finisher. |
|
P.31 “Clearing a Staple Jam” |
|
||
|
|
|
|
|
|
|
8 Messages Displayed on the Touch Panel
1 TROUBLESHOOTING FOR THE HARDWARE
Message |
Problem Description |
|
|
Corrective Action |
|
|
|
||
Saving energy Press START button |
The equipment has entered into the |
Press any of the [START], [COPY], [e-FILING], |
||
|
energy saving mode since it has not |
[SCAN], [PRINT], [FAX] and [ENERGY SAVER] |
||
|
been used for a certain time. |
buttons to clear the energy saving mode. |
||
|
|
|
||
CHANGE DRAWER TO CORRECT |
No paper suitable for the original is |
Place the suitable size paper for the original in the |
||
PAPER SIZE |
set. |
drawer. |
||
|
|
|
||
|
The size of the original is not detected |
Replace the original while aligning the side guides of |
||
|
correctly because the original is sent |
the Reversing Automatic Document Feeder to its |
||
|
from the Reversing Automatic |
width so that it will be placed straight. |
||
|
Document Feeder at a skew. |
If you do not want the equipment strictly to distinguish |
||
|
|
A4 and LT, or A3 and LD at the scanning of the |
||
|
|
original, contact your service technician or service |
||
|
|
representative. |
||
|
|
|
||
Time for periodic maintenance |
The equipment requires inspection |
Contact your service representative for maintenance. |
||
|
and maintenance by a service |
|
|
|
|
technician. |
|
|
|
|
|
|
||
POWER FAILURE |
A job was interrupted by a power |
The print or fax job may be incomplete. Press [JOB |
||
|
failure or some other reason. |
STATUS] to check whether any jobs are unfinished. |
||
|
|
To clear the messages, press the [FUNCTION |
||
|
|
CLEAR] button twice. |
||
|
|
|
||
ERASING DATA |
The Data Overwrite Enabler is |
This message is displayed if the Data Overwrite |
||
|
clearing the data. |
Enabler (optional) is installed. You can operate the |
||
|
|
equipment while the message is displayed. |
||
|
|
|
||
Check paper size setting on control |
Paper jam has occurred because of a |
Register the paper size correctly. Just releasing the |
||
panel for Bypass |
mismatch between the paper size |
paper jam does not prevent another paper jam. |
||
|
placed in the bypass tray and the size |
P.26 “Clearing paper jams caused by a wrong |
||
|
registered for the bypass tray in the |
paper size setting” |
||
|
equipment. |
|
|
|
|
|
|
||
Set the paper on the bypass tray |
The paper placed on the bypass tray |
Remove the jammed paper and set the paper again. |
||
again. |
jammed. |
|
|
|
|
|
|
||
Check the direction or size of the |
The direction or the size of the paper |
Check the direction and the size of the paper and then |
||
paper on the bypass tray and press |
placed on the bypass tray is incorrect. |
replace it on the bypass tray. |
||
START |
|
|
|
|
|
|
|
||
Reboot the machine |
An error has occurred in the |
Rebooting the equipment may correct the error. To |
||
|
equipment and it stopped normal |
reboot the equipment, turn the main power switch off |
||
|
operation. |
and then on. |
||
|
|
|
||
Toner near Empty |
Toner is running out. |
Prepare a new toner cartridge. |
||
|
|
|
|
|
|
|
|
|
|
|
|
|
y Replace a toner cartridge after the message |
|
|
|
|
“Install new toner cartridge” is displayed. |
|
|
|
|
y If you replace a toner cartridge with a new one |
|
|
|
|
while some toner is still left, make sure to |
|
|
|
|
clear the counter. This is necessary for the |
|
|
|
|
equipment to display the next “Toner near |
|
|
|
|
Empty” message at the proper time. For the |
|
|
|
|
procedure, see below. |
|
|
|
|
P.40 “Replacing a “Near Empty” toner |
|
|
|
|
cartridge” |
|
|
|
|
||
Open the toner cover |
No toner is left. |
Open the toner cover and replace the toner cartridge |
||
Install new toner cartridge |
|
with a new one. |
||
|
|
(About another 2000 copies can be made after this |
||
|
|
message appears. The number varies depending on |
||
|
|
the conditions of copying.) |
||
|
|
P.37 “Replacing a Toner Cartridge” |
||
|
|
|
||
Please Empty Hole Punch Waste |
The Hole Punch Unit dust bin is full. |
Remove the paper punchings. |
||
|
|
P.47 “Cleaning the Hole Punch Dust Bin” |
||
|
|
|
||
The number of originals exceeds the |
The number of image scanning |
To print out the data for the originals stored (scanned) |
||
limit |
exceeded the maximum (about 2000 |
until the message appeared, press [YES] on the touch |
||
Will you copy stored originals? |
in A4 or LT). |
panel. To delete the stored data, press [NO]. |
||
|
|
|
||
Not enough Work Space to store |
Internal memory available ran out |
To print out the data for the originals stored (scanned) |
||
originals |
while scanning. |
until the message appeared, press [YES] on the touch |
||
Will you print out stored originals? |
|
panel. To delete the stored data, press [NO]. |
||
|
|
|
|
|
Messages Displayed on the Touch Panel 9

1 TROUBLESHOOTING FOR THE HARDWARE
Error Codes
The error codes indicating the status of the equipment may appear on the touch panel. You can find the listings of these error codes in Chapter 7.
P.86 “Error Codes”
10 Messages Displayed on the Touch Panel
1 TROUBLESHOOTING FOR THE HARDWARE
Clearing a Paper Jam
Locating a paper jam
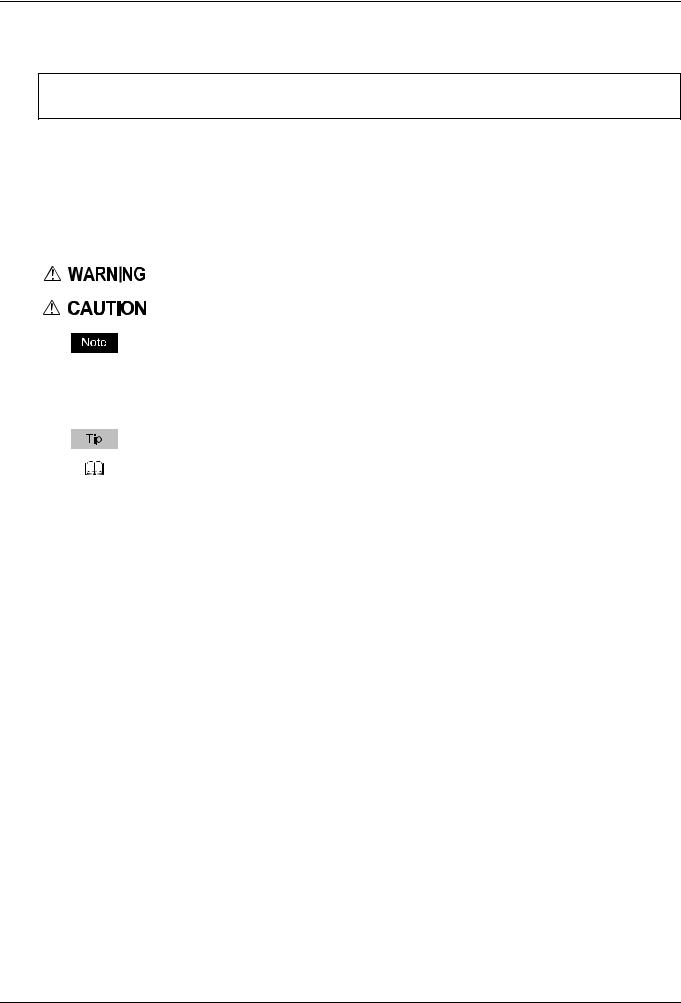
The equipment stops copying when the original or copy paper is jammed. Paper jams are notified on the touch panel as follows:
 Error code
Error message
Guidance for clearing paper jams
 Paper jam symbols
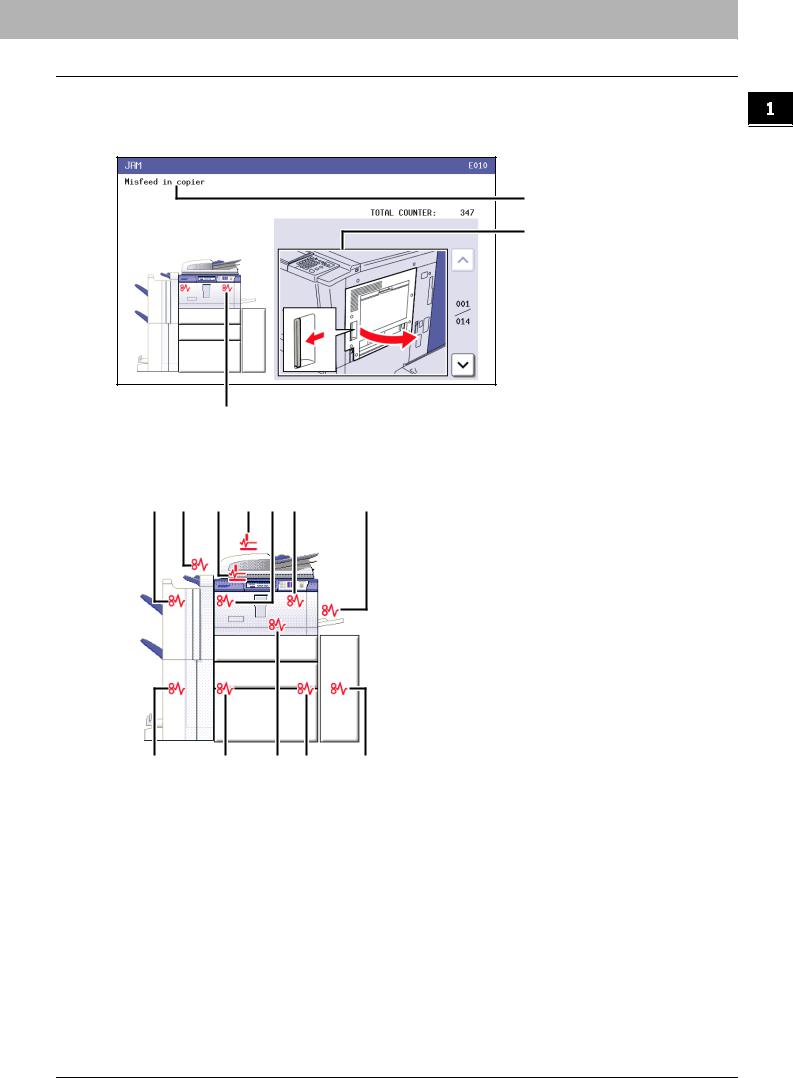
The paper jam symbol helps you locate the paper jam.
1 |
2 |
3 |
4 |
5 |
6 |
7 |
12 |
11 |
10 |
9 |
8 |
1. |
Finisher and Hole Punch Unit (both optional) ( |
P.17) |
|
2. |
Inserter (optional) ( P.17) |
|
|
3. |
Reversing Automatic Document Feeder (lower) ( |
P.13) |
|
4. |
Reversing Automatic Document Feeder (upper) ( |
P.14) |
|
5. |
Inside of the equipment (paper exit area) ( |
P.22) |
|
6. |
Inside of the equipment (paper transport area) ( |
P.22) |
|
7. |
Bypass tray ( P.15) |
|
|
8. |
External Large Capacity Feeder (optional) ( |
P.16) |
|
9. |
Inside of the equipment (paper feed area) ( |
P.22) |
|
10. Inside of the equipment (duplexing unit area) ( |
P.22) |
||
11. |
Inside of the equipment (reversing area) ( |
P.22) |
|
12. Saddle stitch unit (optional) ( P.17) |
|
|
|
The picture of the hardware device shown on the touch panel differs depending on the finisher options installed.
Clearing a Paper Jam 11
1 TROUBLESHOOTING FOR THE HARDWARE
Clearing a paper jam
Remove paper jammed inside the equipment after you have cleared all other jams. If you fail to clear all other jams first, the jammed paper may be torn and left inside the equipment.
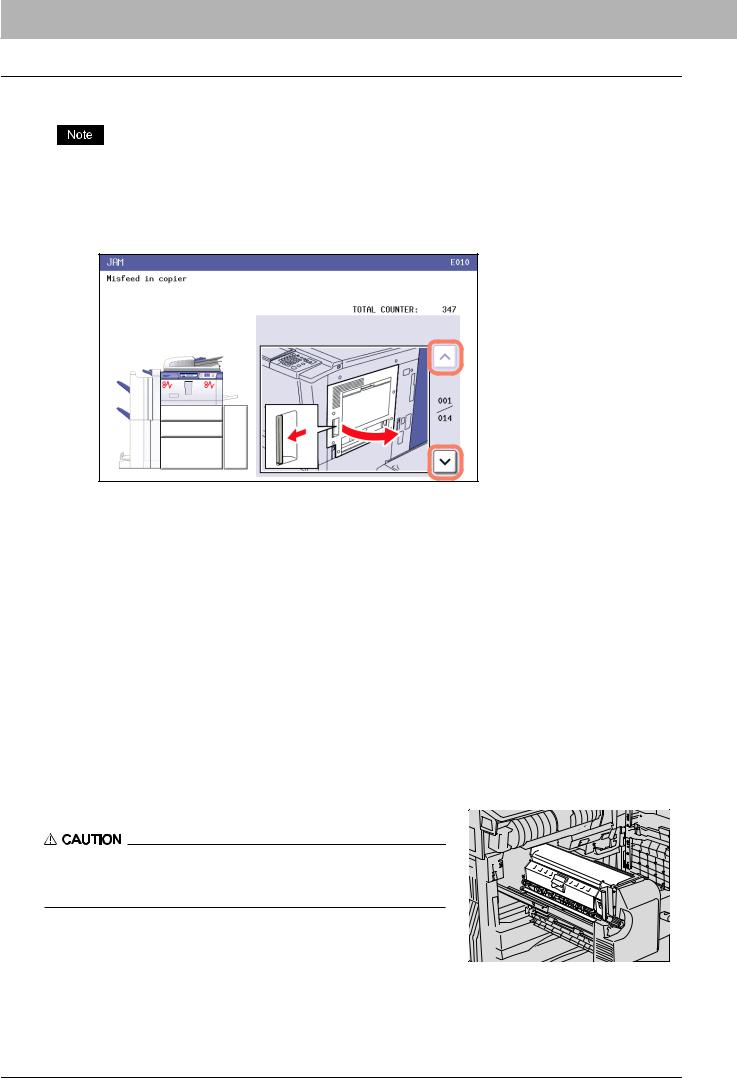
1 Clear the paper jam
Clear the paper jam following the guidance shown on the touch panel. Press  or
or  to scroll the pages.
2 After clearing the jam, close all the opened covers.
The equipment starts the warm-up. Follow the guidance on the touch panel.
Tips on removing the jammed paper
Note the following points in removing the jammed paper.
Remove paper jammed inside the equipment after you have cleared all other jams.
If you fail to clear all other jams first, the jammed paper may be torn and left inside the equipment. Remove paper jammed inside the equipment after you have cleared all other jams.
Remove the jammed paper carefully so as not to tear it.
To avoid tearing the jammed paper, remove the paper slowly with both hands. Using force may tear the paper, making it more difficult to remove. See also that no pieces of torn paper are left inside the equipment.
When the paper jam sign remains after removing the jammed paper;
Depending on the timing of the occurrence, no jammed paper may be found where the paper jam sign indicates. If the sign does not disappear after you have removed the jammed paper, follow the steps as instructed on the touch panel.
Do not touch the fuser unit or the metal portion around it.
Do not touch the fuser unit or the metal portion around it when removing the paper jammed inside the equipment. This could burn you or the shock could cause you to get your hand injured in the machine.
12 Clearing a Paper Jam
1 TROUBLESHOOTING FOR THE HARDWARE
Do not touch the transfer belt.
Do not touch the transfer belt when you removing the paper jammed inside the equipment. Doing so may cause damage on the equipment or result in a poor output.
If paper jams occur frequently
The following are the common causes of paper jams. If the problem persists, check for the following situations.
yAn unsuitable original is placed on the Reversing Automatic Document Feeder.
yUnavailable paper with the equipment is used.
yPaper sizes are not consistent between the size in a drawer or the bypass tray and the size registered in the equipment.
yAll the jammed paper has not been removed.
yThere is too little or too much of a gap between the paper and the side guide in the drawer.
yThe amount of paper placed in a drawer exceeds the limit indicated on the side guide of the drawer.
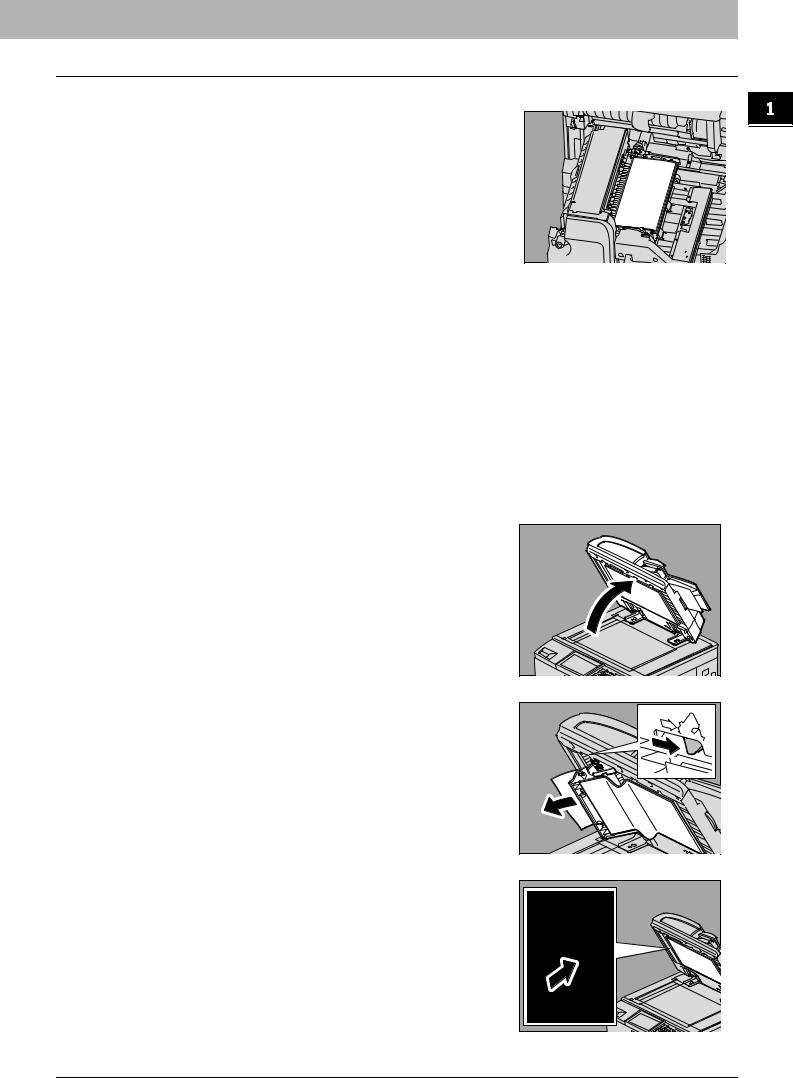
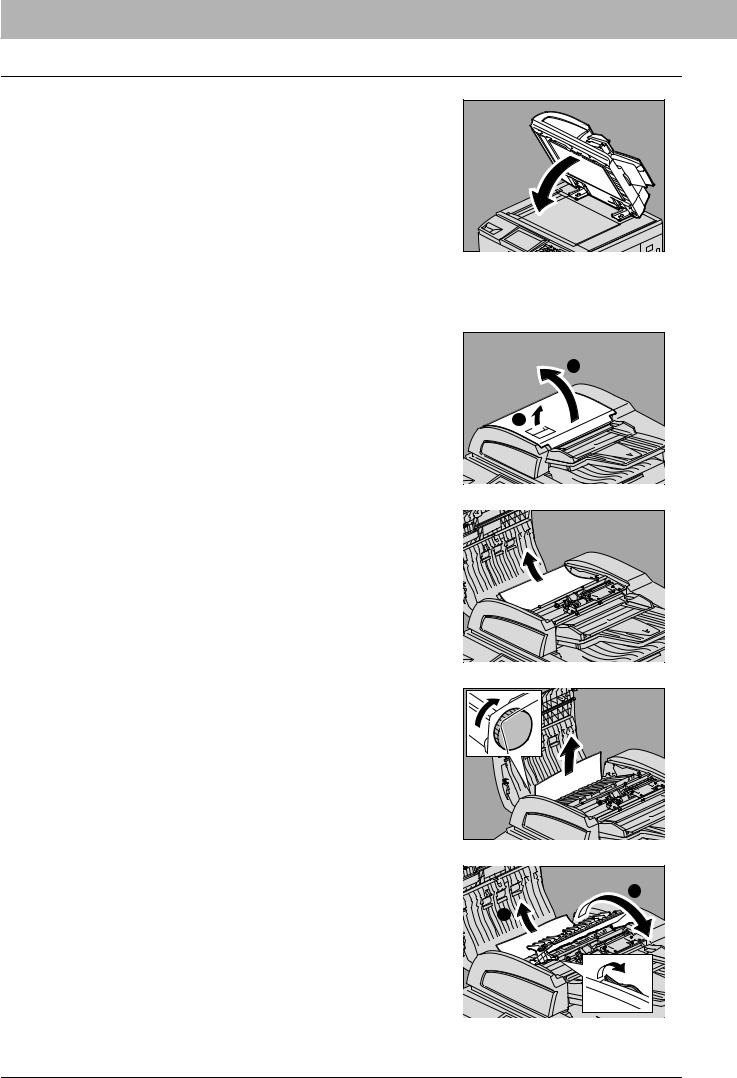
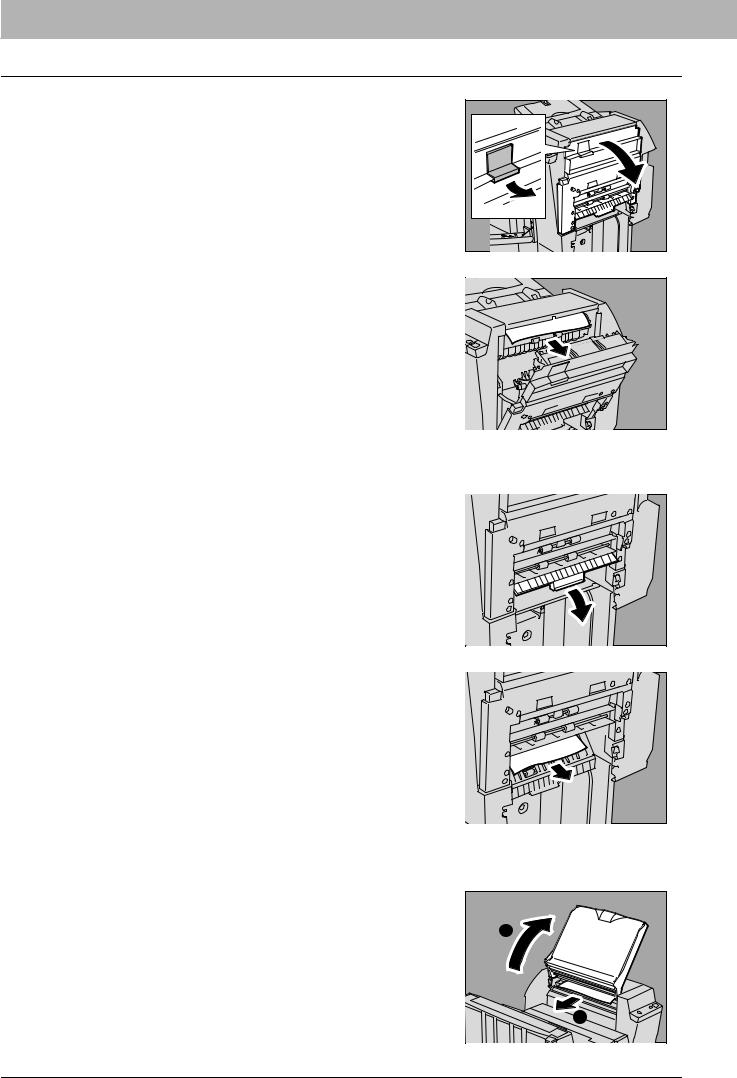
Paper jam in the Reversing Automatic Document Feeder (Lower)
1 Open the Reversing Automatic Document Feeder.
2 Open the reverse cover and remove the original.
3 Close the reverse cover.
Clearing a Paper Jam 13
1 TROUBLESHOOTING FOR THE HARDWARE
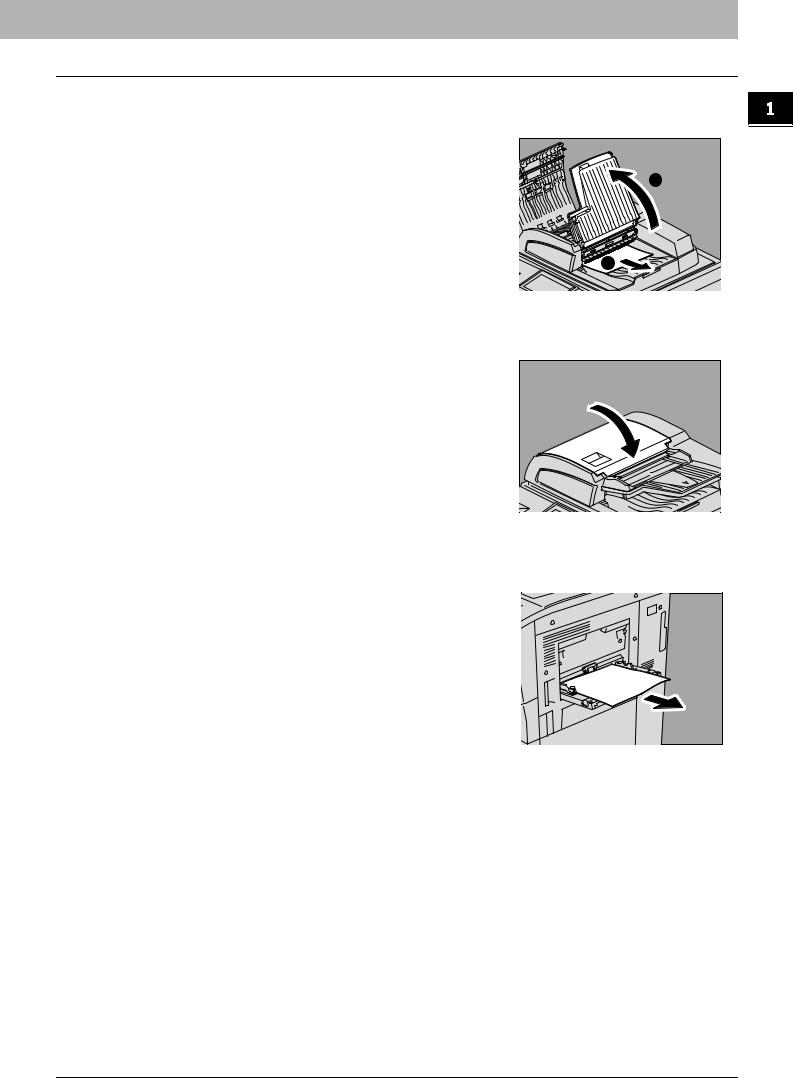
4 Close the Reversing Automatic Document Feeder.
Paper jam in the Reversing Automatic Document Feeder (Upper)
1 Raise the lever and open the upper cover.
2
1 
2
3
Remove the original.
Turn the dial to remove the original.
4 Open the transport guide and remove the original.
1
2
14 Clearing a Paper Jam
1 TROUBLESHOOTING FOR THE HARDWARE
5 |
Close the transport guide. |
6 |
Raise the original feeder tray, and remove the original |
under the guide plate. |
7 Lower the original feeder tray.
8 Close the upper cover.
1 |
2 |
Paper jam in the bypass tray
1 Pull out the jammed paper in the bypass tray.
Clearing a Paper Jam 15
1 TROUBLESHOOTING FOR THE HARDWARE
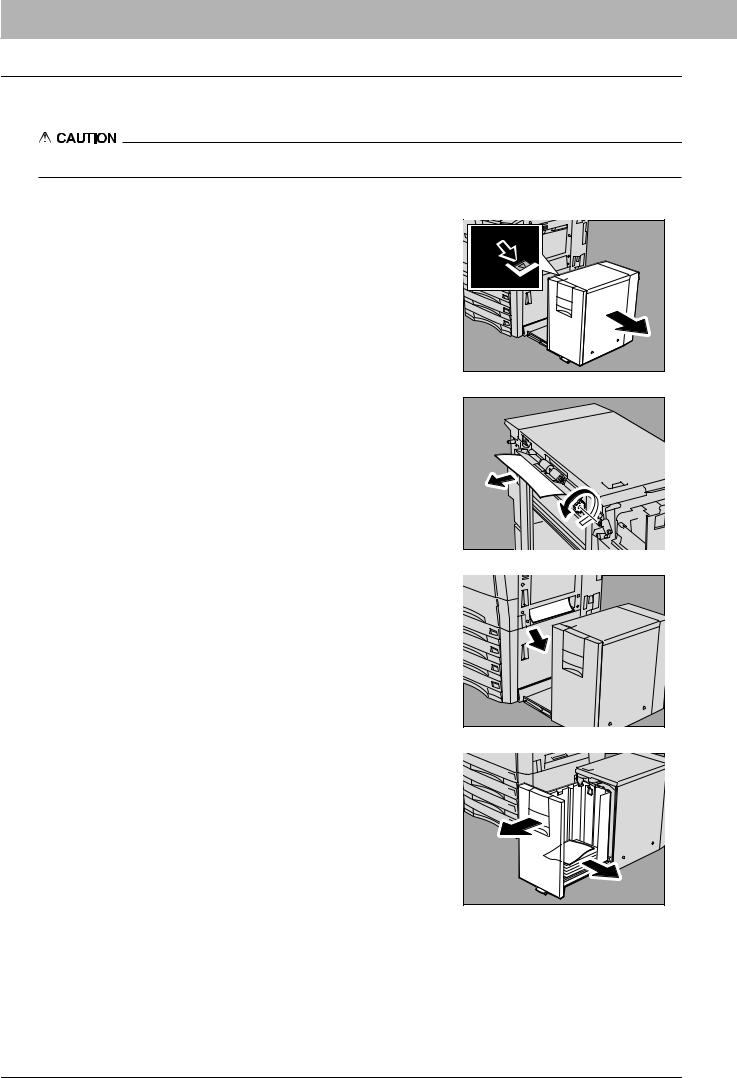
Paper jam in the External Large Capacity Feeder (optional)
Be careful not to let your fingers be caught between the equipment and the External Large Capacity Feeder.
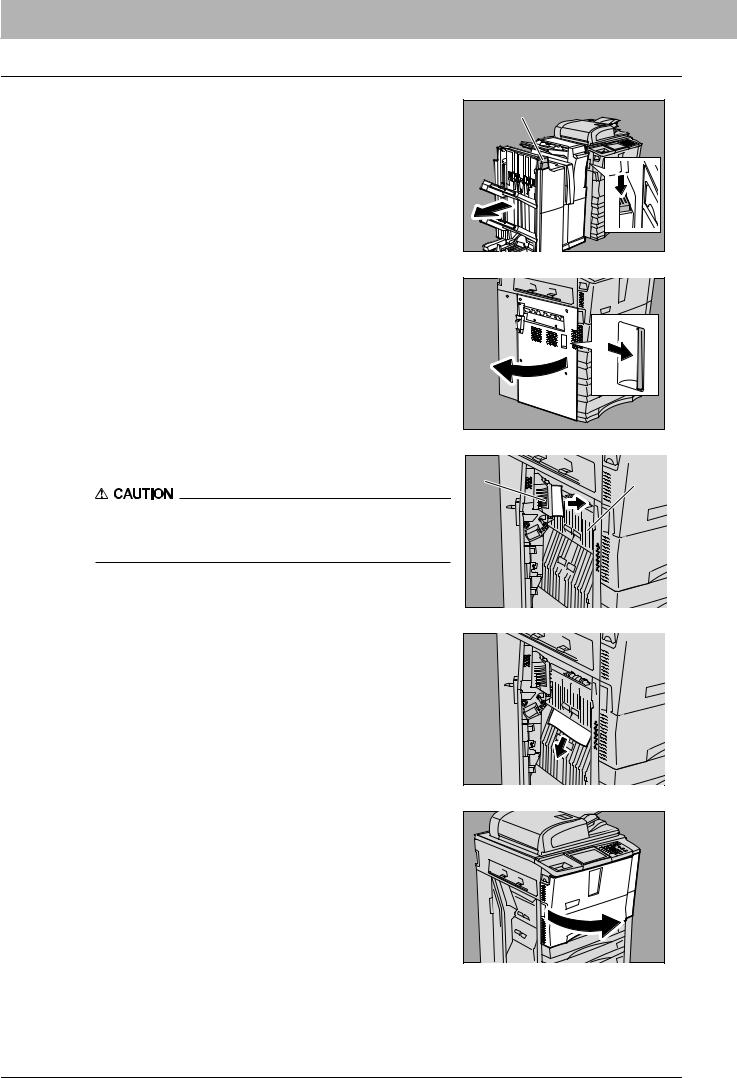
1 Separate the External Large Capacity Feeder (optional) from the equipment.
Move it slowly while pushing the lock lever.
2 Remove the jammed paper by turning the green dial.
3 Remove the jammed paper from the equipment.
4 Pull out the feeder tray and remove the jammed paper.
16 Clearing a Paper Jam
1 TROUBLESHOOTING FOR THE HARDWARE
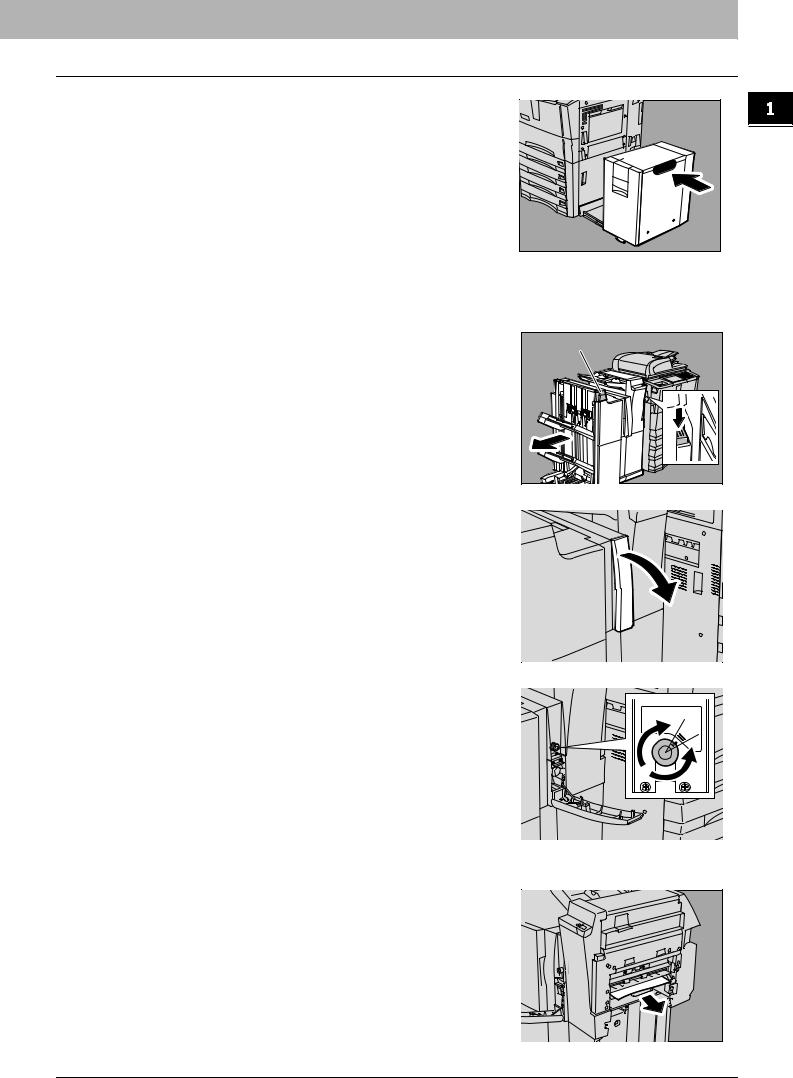
5 Close the feeder tray and connect the External Large Capacity Feeder to the equipment.
Slowly move the External Large Capacity Feeder placing your hands on the positions shown in the figure.
Paper jam in the Finisher, Hole Punch Unit and Inserter (all optional)
1 |
Separate the finisher from the equipment. |
A |
Separate the finisher from the equipment while pressing the lock lever. |
||
|
Place your hand on portion A in the figure and then move the finisher |
|
|
carefully. |
|
2 When the Hole Punch Unit is installed, open the Hole Punch Unit cover.
3 Turn the green knob until the triangle mark ( ) falls within the designated area of the label.
4 Close the Hole Punch Unit cover.
5 Removeside. paper that sticks out from the paper feeding
Clearing a Paper Jam 17
1 TROUBLESHOOTING FOR THE HARDWARE
6 When the Inserter is installed, pull out the lever to open its jam access cover.
7 Remove the jammed paper.
8 Close the jam access cover of the Inserter.
9 Open the lower cover of the Inserter.
10 Remove the jammed paper.
11 Close the lower cover.
12 Raise the paper feeding tray of the Inserter, and then remove the jammed paper.
1 |
2 |
18 Clearing a Paper Jam
1 TROUBLESHOOTING FOR THE HARDWARE
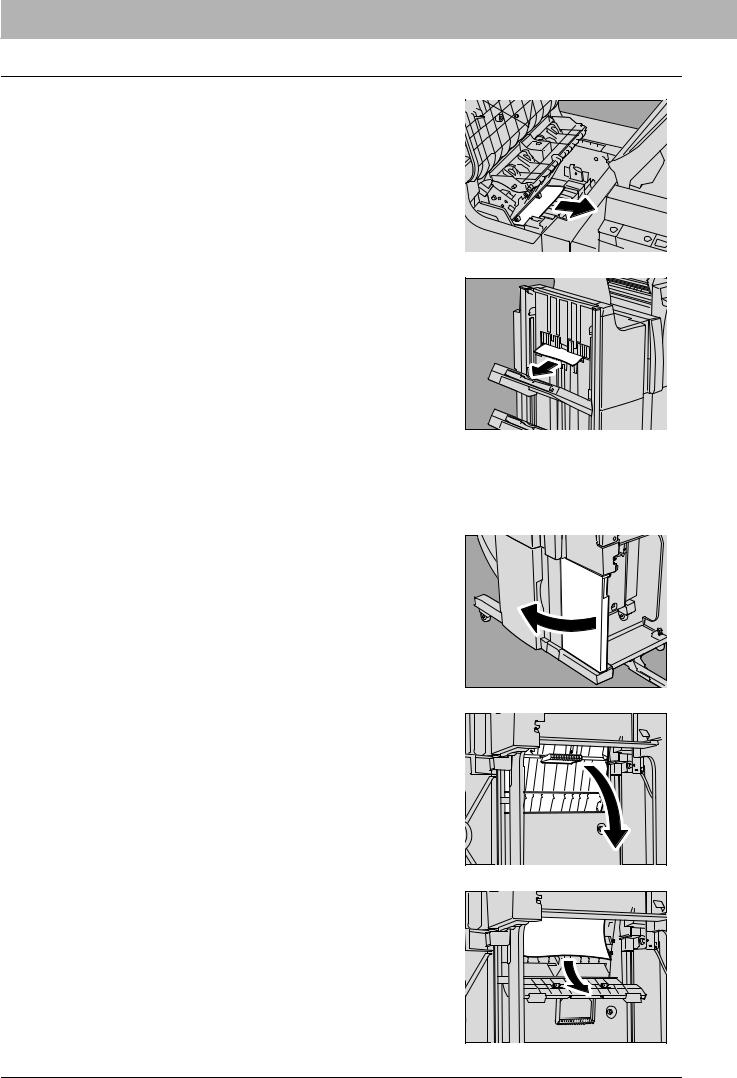
13 Open the upper cover of the finisher.
14 Pull the knob 1 to open the buffer roller cover, and then remove the jammed paper.
1 |
1 |
2 |
15 Pull the knob up in the rear side of the finisher to open the guide.
16 Remove the jammed paper.
17 Close the guide.
18 Pull the knob 2 up to open the buffer roller.
2 |
Clearing a Paper Jam 19
1 TROUBLESHOOTING FOR THE HARDWARE
19 Remove the jammed paper.
20 Remove paper that sticks out from the paper exit side of the finisher.
21 Close the upper cover of the finisher.
22 Return the paper feed tray of the Inserter to its original position.
23 When the Saddle Stitch Finisher and the Inserter are installed together, open the front cover of the Inserter.
24 Open the guide plate of the saddle stitch unit.
25 Remove the jammed paper.
20 Clearing a Paper Jam
1 TROUBLESHOOTING FOR THE HARDWARE
26 Close the guide plate.
27 When the Saddle Stitch Finisher and the Inserter are installed together, close the lower cover of the Inserter.
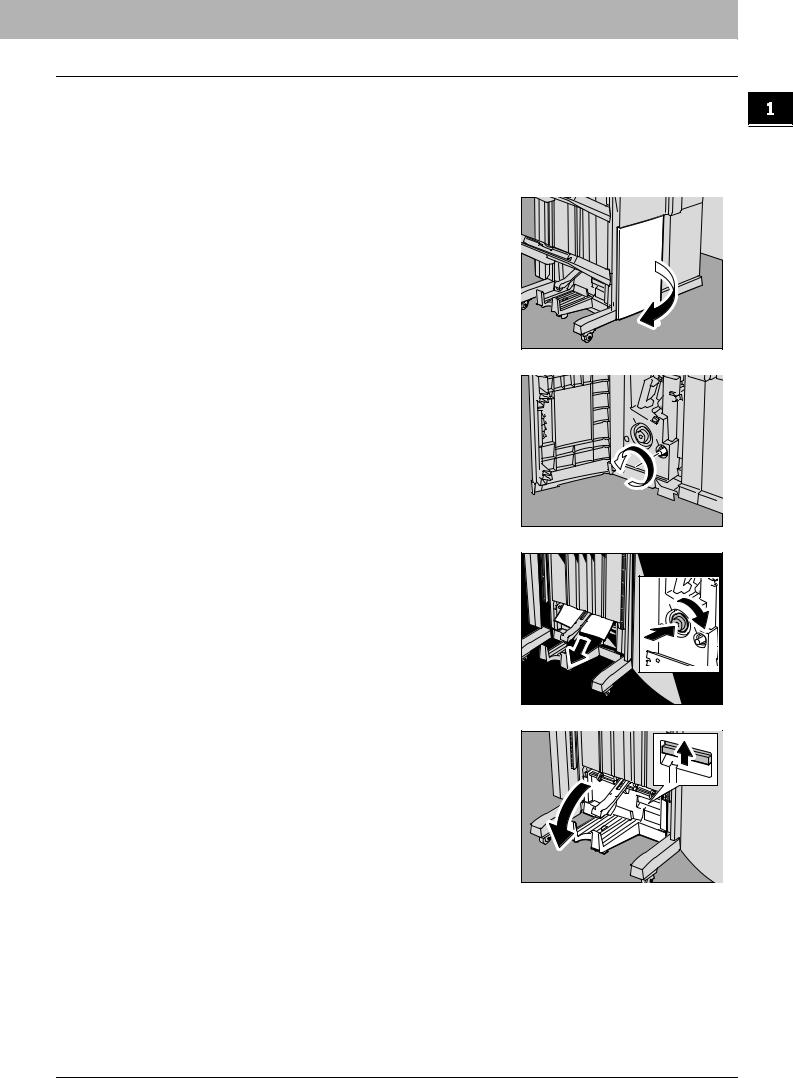
28 When the Saddle Stitch Finisher is installed, open the lower cover of the Saddle Stitch Finisher.
29 Turn the right-hand knob counterclockwise until it stops.
30 While pushing the left-hand knob, turn it clockwise to remove the jammed paper.
31 Open the paper exit cover of the saddle stitch unit.
Clearing a Paper Jam 21
1 TROUBLESHOOTING FOR THE HARDWARE
32 Remove the jammed paper.
33 Close the paper exit cover of the saddle stitch unit and the lower cover of the Saddle Stitch Finisher.
34 |
Connect the finisher to the equipment. |
A |
Connect the finisher with the equipment while pressing the lock lever. |
||
|
Place your hand on portion A in the figure and then move the finisher |
|
|
carefully. |
|
|
Be careful not to let your fingers be caught between the |
|
|
finisher and the equipment. |
|
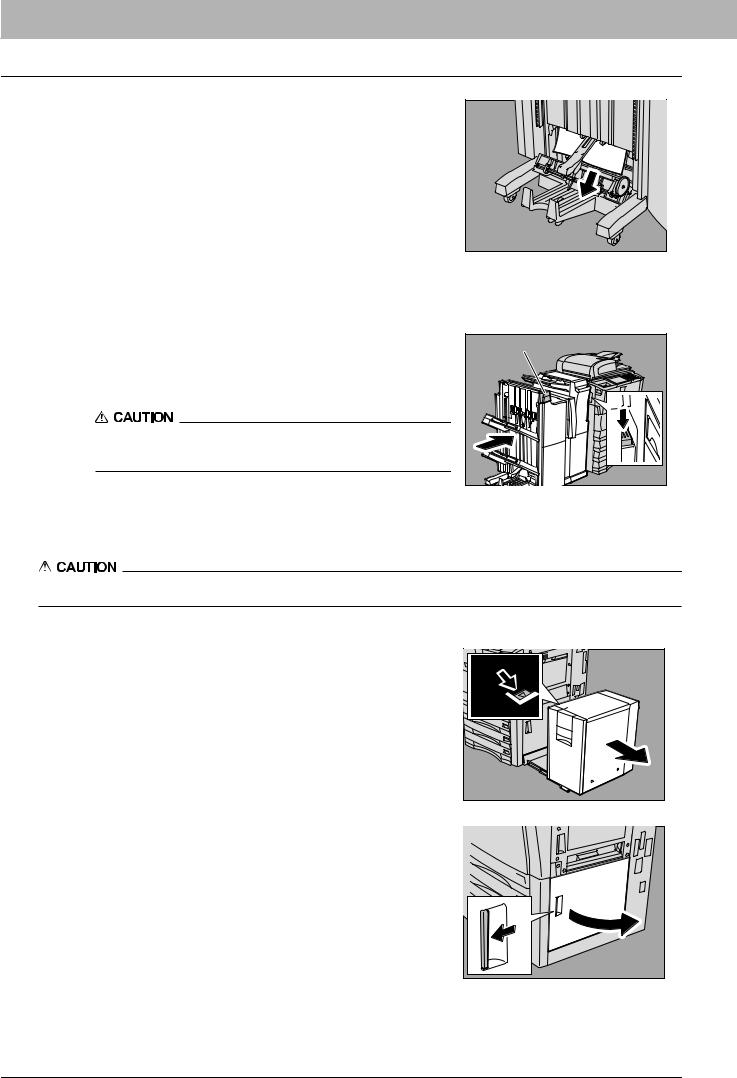
Paper jam inside of the equipment
Be careful not to let your fingers be caught between the equipment and the External Large Capacity Feeder.
1 Separate the External Large Capacity Feeder (optional) from the equipment when the External Large Capacity Feeder is attached.
Move it slowly while pushing the lock lever.
2 Open the paper feed cover.
22 Clearing a Paper Jam

1 TROUBLESHOOTING FOR THE HARDWARE
3 Remove the jammed paper from the drawer.
4 Open the paper source drawer and remove the jammed paper.
5 Close the drawer and the paper feed cover.
6 Open the bypass cover.
7 Remove the jammed paper.
8 |
Close the bypass cover. |
9 |
When the External Large Capacity Feeder is installed, |
connect it with the equipment. |
Move it slowly placing your hands on the point shown in the figure.
Clearing a Paper Jam 23
1 TROUBLESHOOTING FOR THE HARDWARE
10 When the finisher is installed, separate it from the equipment.
Separate the finisher from the equipment while pressing the lock lever. Place your hand on portion A in the figure and then move the finisher carefully.
11 Open the exit cover.
12 Remove the jammed paper on the exit cover side.
Do not touch the metal portion of the reverse unit (A in the figure) or the guide plate (B in the figure).
It could burn or injure you.
13 Remove the jammed paper from the middle of the reverse unit.
14 Open the front cover of the equipment.
A |
B |
A |
24 Clearing a Paper Jam

1 TROUBLESHOOTING FOR THE HARDWARE
15 Turn the green knob of the fuser unit counterclockwise to remove the jammed paper.
16 Close the exit cover.
17 When the finisher is installed, connect it with the equipment.
Connect the finisher with the equipment while pressing the lock lever. Place your hand on portion A in the figure and then move the finisher carefully.
Be careful not to let your fingers be caught between the finisher and the equipment.
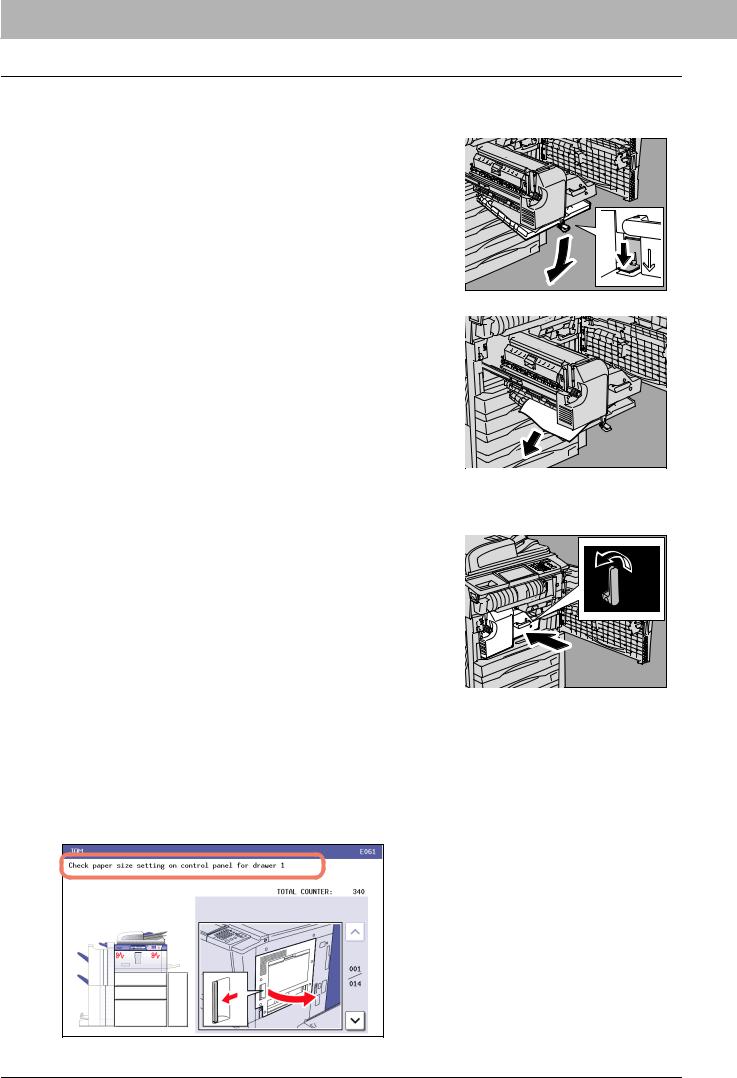
18 Turn the lever of the transfer/transport unit clockwise by 90 degrees to unlock it. Then pull out the transfer/ transport unit.
Pull out the transfer/transport unit until it stops.
A |
19 Open the fuser unit cover.
Do not touch the fuser unit and around the metal area around it.
It could burn or injure you.
20 Turn the green knob of the fuser unit counterclockwise to remove the jammed paper.
Clearing a Paper Jam 25
1 TROUBLESHOOTING FOR THE HARDWARE
21 Close the fuser unit cover slowly.
22 Open the duplexer guide.
23 Remove the jammed paper.
24 Close the duplexer guide.
25 Push the transfer/transport unit into the equipment carefully while holding its lever. Then turn the lever counterclockwise by 90 degrees to lock it.
26 Close the front cover of the equipment.
Clearing paper jams caused by a wrong paper size setting
Paper jams occur when there is a mismatch between the size of the paper in a drawer or the bypass tray and the size registered for the corresponding drawer or the bypass tray in the equipment. The message “Check paper size setting on control panel for drawer N” or “Check paper size setting on control panel for Bypass” appears on the touch panel.
26 Clearing a Paper Jam
1 TROUBLESHOOTING FOR THE HARDWARE
In this case, just clearing the jammed paper does not prevent another paper jam. Be sure to follow the procedure below. During the operation, the guidance for clearing the paper jam on the touch panel is not displayed. Take notes of the following before operation: where the paper jam occurred and for which drawer the paper size setting is incorrectly registered.
Troubleshooting differs depending on how the paper jam has occurred:
P.27 “Jam when making copies or prints (using a drawer)”
P.29 “Jam when making copies or prints (using the bypass tray)”
P.29 “Jam when printing from the FAX”
Jam when making copies or prints (using a drawer)
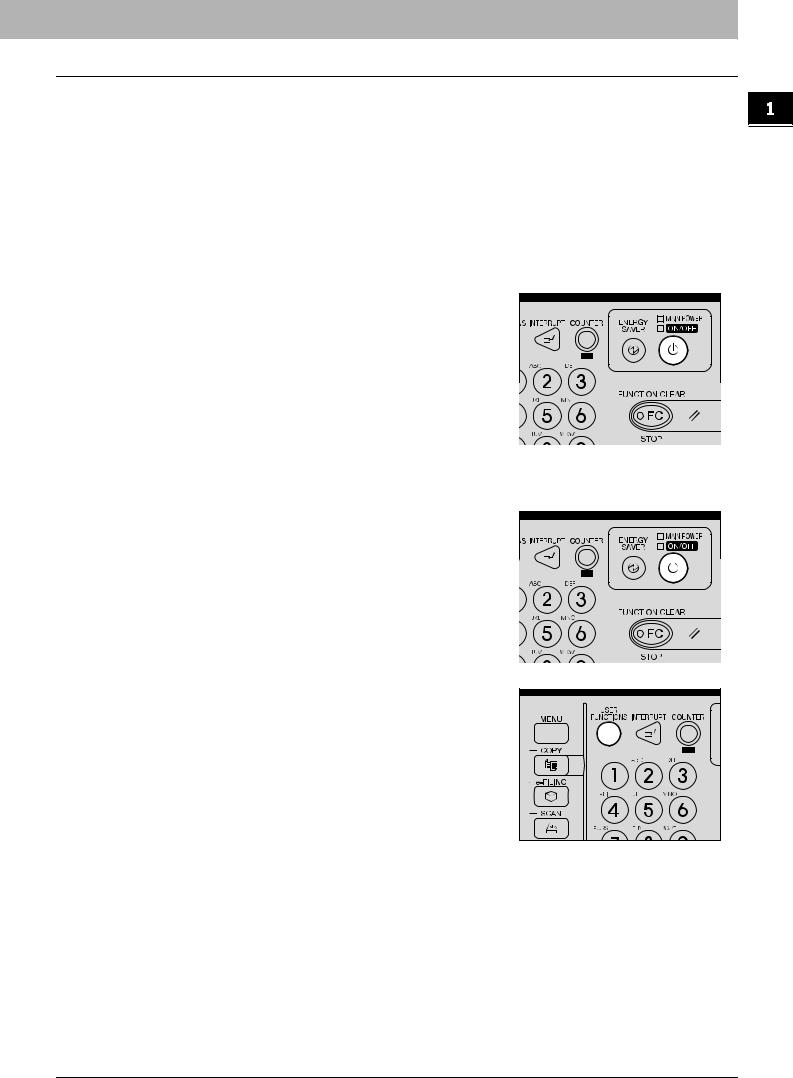
1Press the [POWER] button on the control panel until a sound is heard.
“Shutdown in progress” appears on the menu. After a while, the power of the equipment is turned OFF.
2 Remove the jammed paper.
3 Press the [POWER] button on the control panel.
The equipment starts warming-up.
4 Presspanel. the [USER FUNCTIONS] button on the control
Clearing a Paper Jam 27
1 TROUBLESHOOTING FOR THE HARDWARE
5
6
7
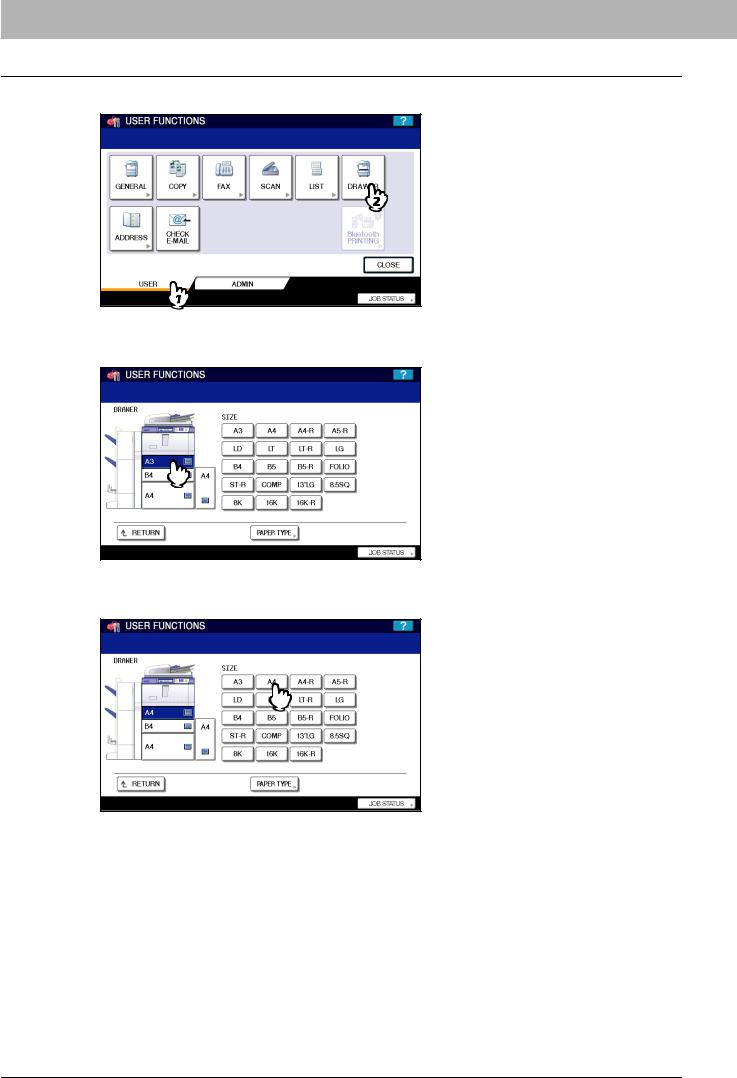
Press the [USER] tab to enter the [USER] menu and press [DRAWER].
Press the drawer button indicated in the message.
Press the paper size button for the paper that is set in the drawer.
8 Press the [USER FUNCTIONS] button to return to the basic menu and try copying or printing again.
28 Clearing a Paper Jam
Loading...