


230

User Guide
Set Up & Start Up
Basic Copier Operations
Key Operator Functions
Toshiba America Business Solutions, Inc. © 2004
Toshiba America Business Solutions, Inc. © 2004
Training and Dealer Development
Training and Dealer Development


SET UP & START UP
Turning the System On
Turning the System Off
Overview of Copier Components
Overview of Operator Panel
Touch Panel
Page 1

Turning the System On
1. Open the switch cover, and then turn ON the power switch.
“Wait Warming Up” appears on the Basic screen on the
touch panel.
2. About 25 seconds later, the equipment will be ready.
“READY” appears on the Basic screen.
TIPS:
y While the copier is warming up, you can use the Auto Job Start function.
y POWER FAILURE message: When restarting the equipment due to power failure, etc.,
“POWER FAILURE” appears at the upper right of the screen. To clear it, press the
FUNCTION CLEAR button twice. The job in progress at the time of the power failure
is deleted.
Turning the System Off
When turning off the power of the equipment, perform the following shutdown procedure.
DO NOT turn off the power by switching off the power switch of the equipment as it can cause
the failure of the hard disk
Before turning off the power, be sure that the following 3 conditions are satisfied:
y No jobs are left in the printing job list.
y None of PRINT DATA, MEMORY RX and Fax communication lamps is blinking.
y No PCs access the equipment via network.
1. Press the USER FUNCTIONS button on the control panel.
Page 2
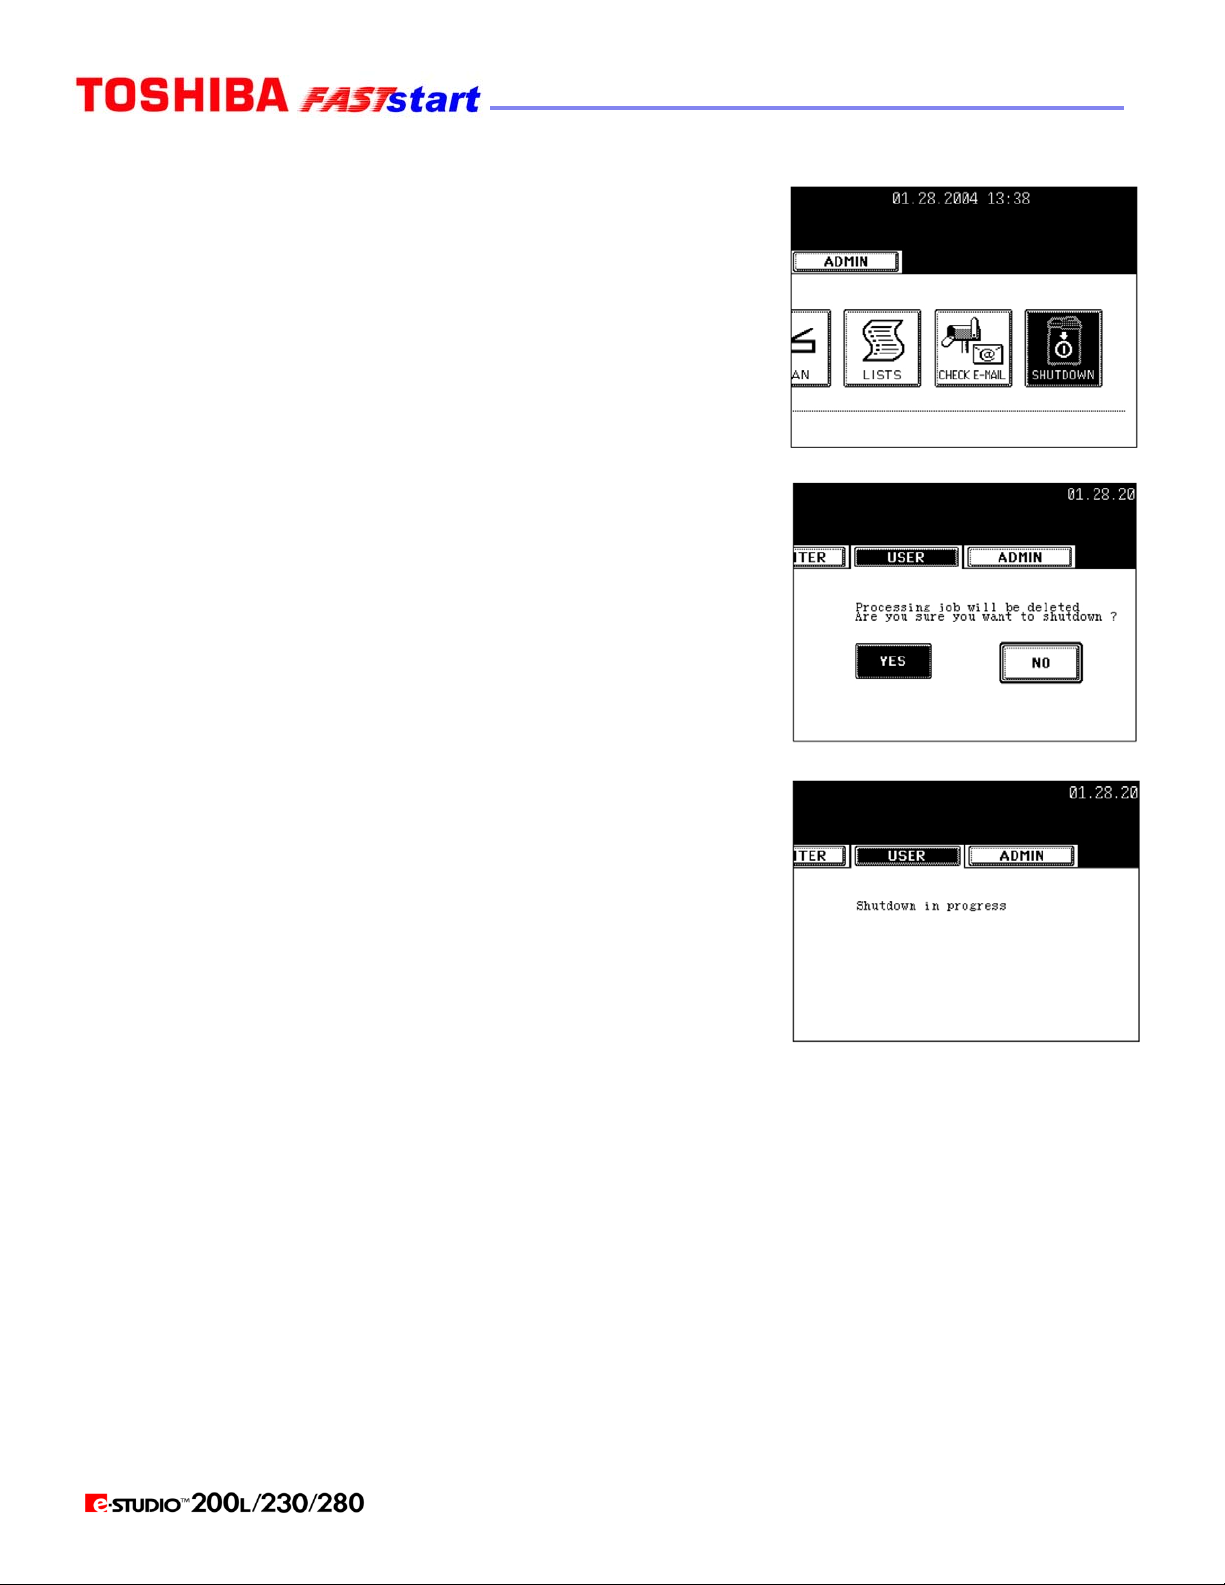
Turning the System Off (Cont’d.)
2. Press the USER button to enter the user setting menu, and
then press the SHUTDOWN button.
3. “Processing job will be deleted. Are you sure you want
to shutdown?” appears on the screen. Press the YES button.
To cancel the shutdown operation, press the NO button.
4. “Shutdown in progress” appears on the screen, and then the
equipment is shut down. The power switch automatically
returns to the OFF position.
Page 3
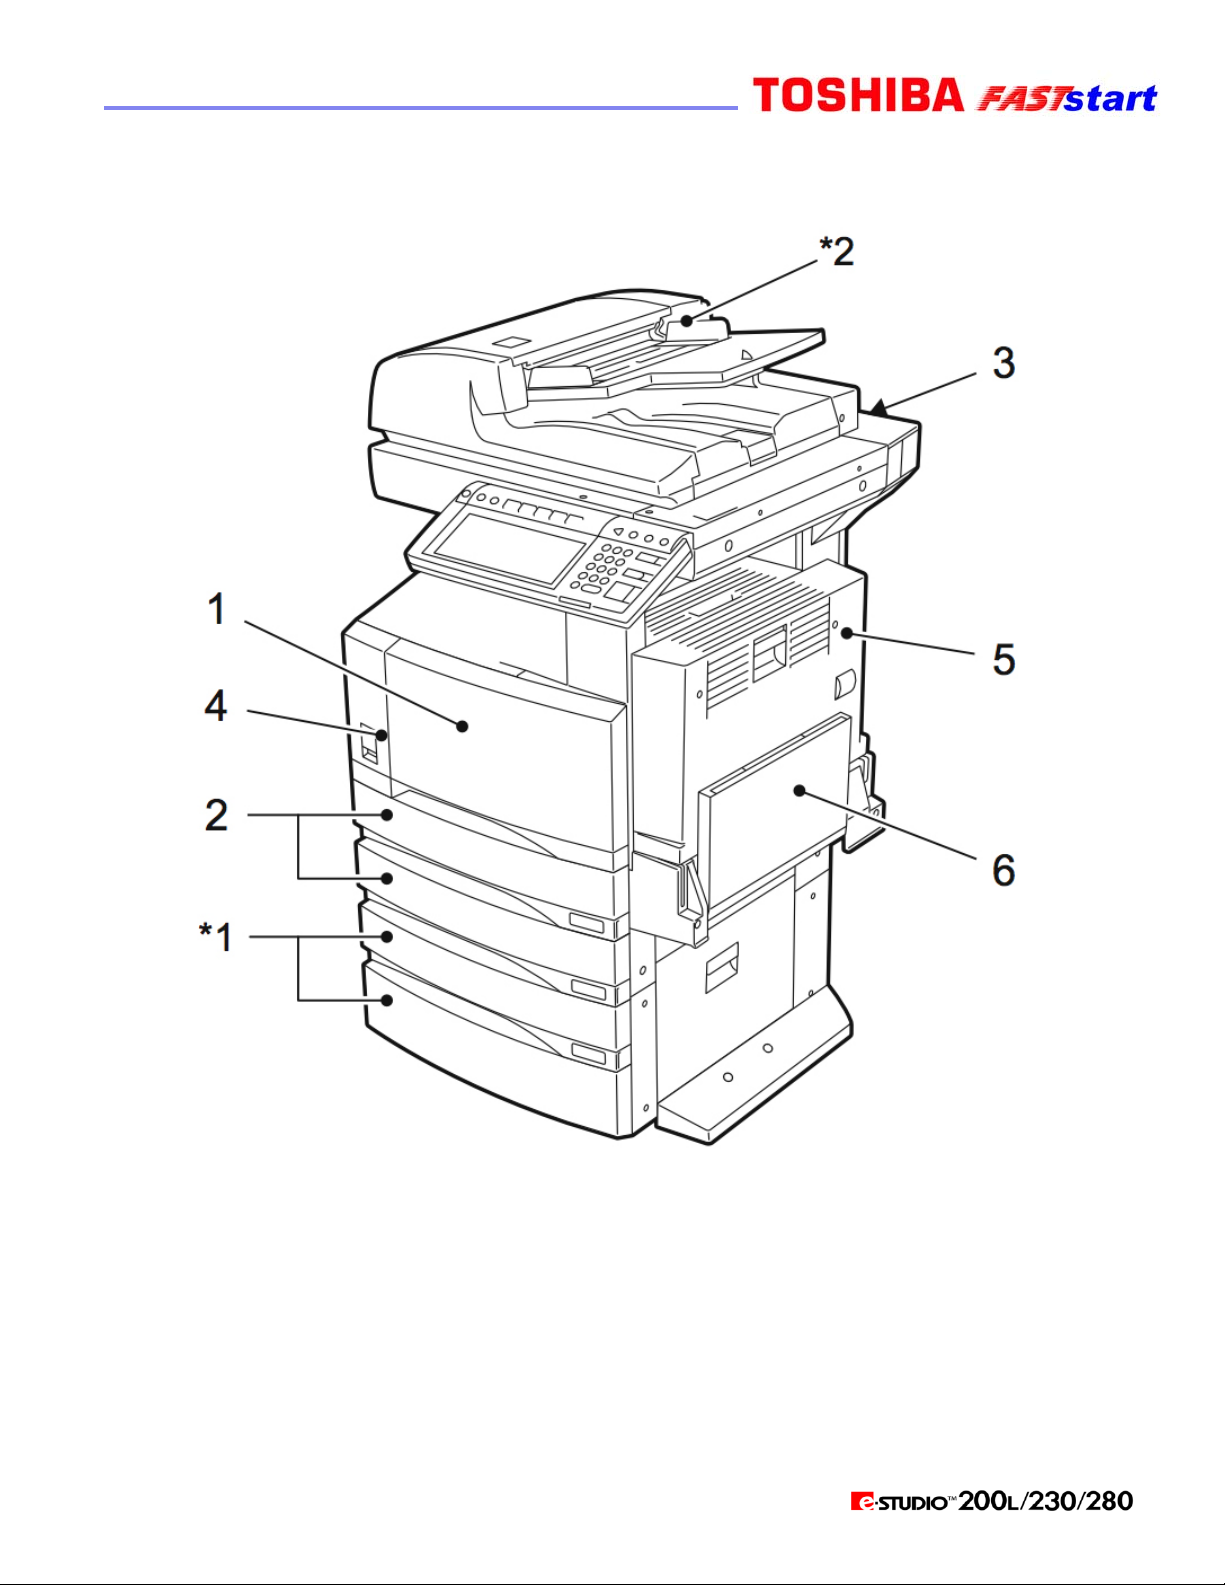
Overview of Copier Components
1. Front cover
2. Drawers
3. Operator’s Manual Pocket (back side)
4. Power switch
5. Automatic duplexer
6. Bypass tray
*1, *2: Optional
Page 4
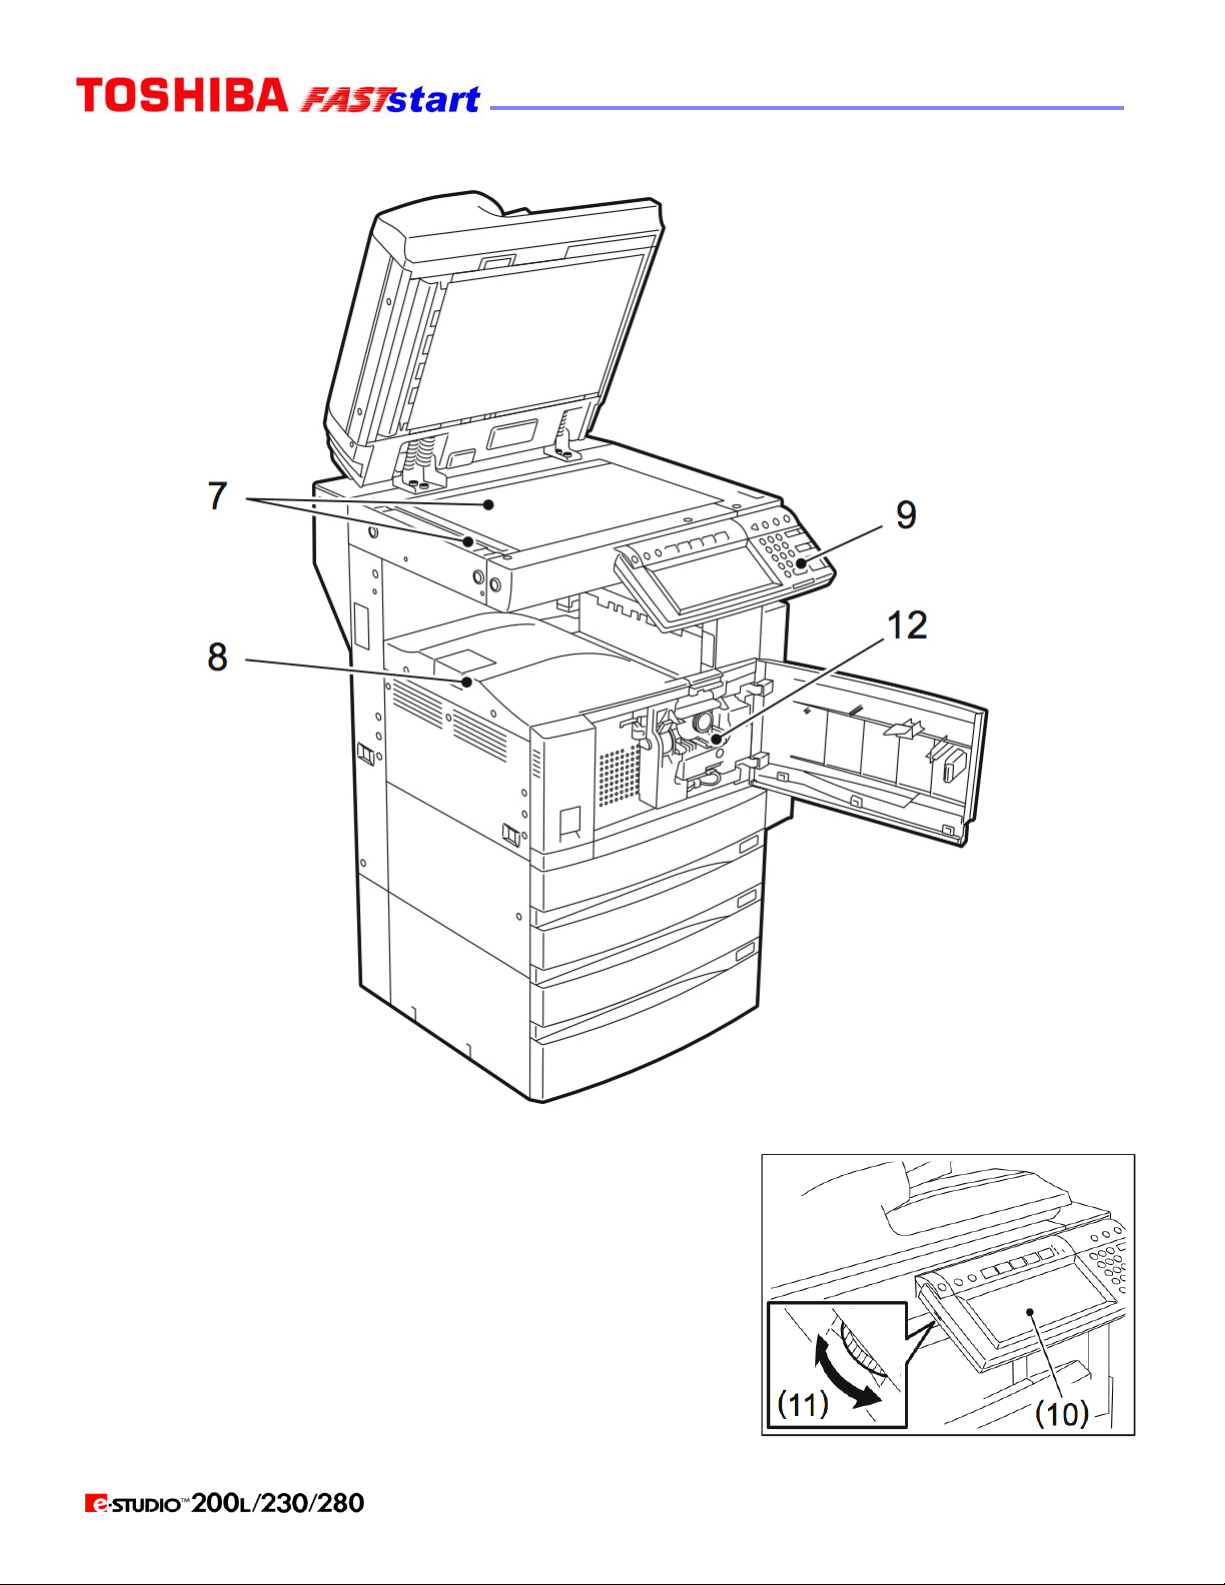
7. Original scale
8. Inner tray
9. Control panel
10. Touch panel
11. Touch panel contrast adjustment volume
12. Toner
Page 5

Overview of Operator Panel
OUCH PANL
1. HELP button
When pressing this button, appropriate operation procedures are displayed.
2. USER FUNCTIONS button
Press this button to set the paper size of the drawer, the drawer for special use, or to
set/register the settings including such as the change of the default setting of the copy,
scan and Fax functions.
3. TEMPLATE button
Use this button to store and recall the various settings that are frequently used for copy,
scan and Fax functions
4. EXTENSION button
This is the button to extend functions in the future. It is invalid at present.
5. e-FILING button
Use this button to access the saved image data.
6. SCAN button
Press this button to use the scanning function. (Optional printer/scanner kit or both printer
kit and scanner upgrade kit is required.)
7. COPY button
Press this button to use the copy function.
Page 6

8. FAX button
Press this button to use the Fax/Internet Fax function. (Optional FAX board, printer/scanner
kit, or both printer kit and scanner upgrade kit is required.)
9. PRINT DATA/MEMORY RX/FAX communication
If these lamps light, they show the status of receiving data, receiving original(s) standing by to
be printed and currently used telephone line (1 or 2).
10. INTERRUPT button
Use this button to interrupt the copying job in process and to perform another copying job. You
can resume the interrupted copying job by pressing this button again.
11. JOB STATUS button
Use this button to confirm each status of print or scan or Fax, and journal for TX or RX of Fax.
12. ACCESS button
Use this button when the department codes have been set. If this button is pressed after
copying, the next user cannot use the copy function without keying in the registered
department code.
13. ENERGY SAVER button
If you are not going to use the equipment for a while, press this button. The equipment enters
the energy saving mode and all the display lamps are turned off.
14. FUNCTION CLEAR button
When this button is pressed, all selected functions are cleared and returned to the default
settings. Even if you do not press the FUNCTION CLEAR button, within the specified period
of time after copying is finished or after the last button is pressed in a copy procedure, the
automatic function clear mode will clear all settings to defaults, and the basic screen will be
displayed. While the department management function is being operated, the display returns
to the access code input screen.
15. STOP button
Use this button to stop an ongoing scan and copy operation.
16. START button
Press this button to start copying, scanning and Fax operation.
17. Digital keys
Use these keys to enter the number of copies you want to make and so on.
18. CLEAR button
Use this button to correct numbers entered with digital keys such as an incorrect copy quantity.
19. ERROR lamp
ERROR lamp lights in red when an error occurs and the equipment needs some actions.
20. MONITOR/PAUSE button
This button is used when the copier is used as a Fax (optional).
21. Touch panel
The state of the copier and directions for its operation, expressed as characters and illustrations.
Page 7
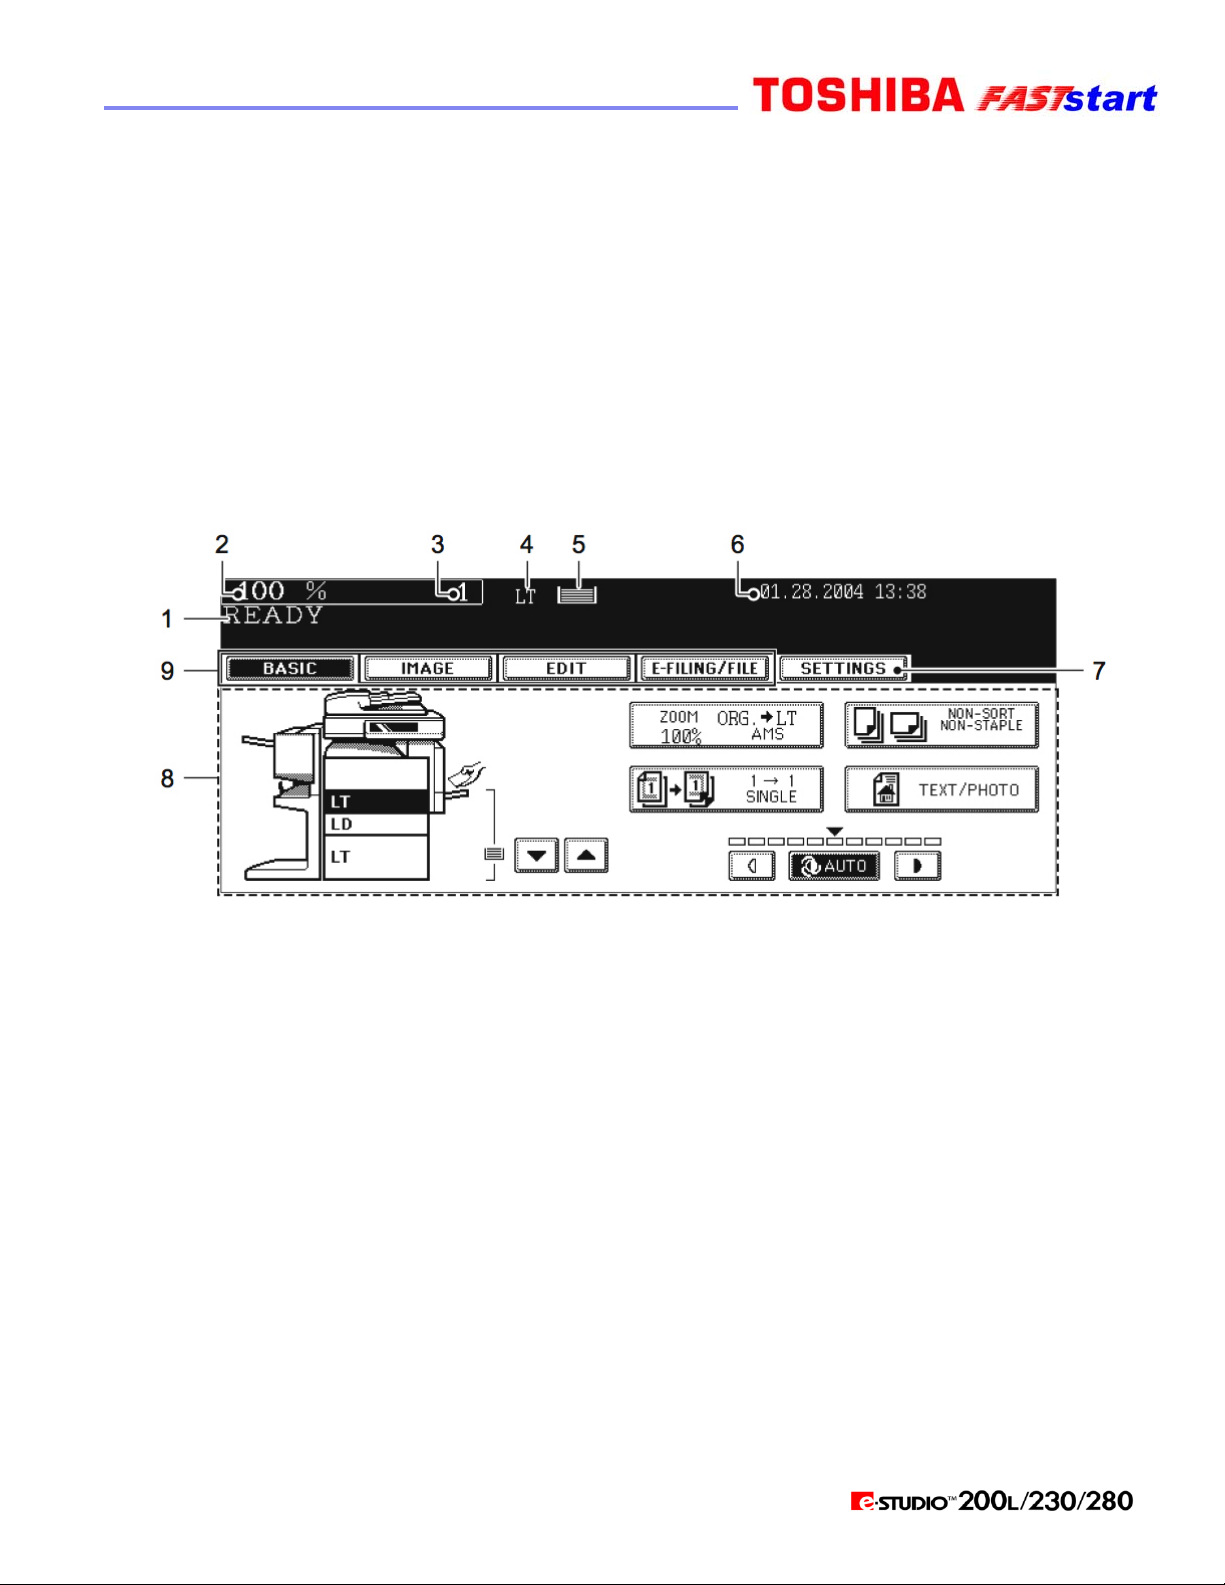
Touch Panel
When the power is turned on, and “READY” is displayed, the BASIC screen of the copy
function is shown on the touch panel. On the screen, currently set functions, selected functions
and the copier status are shown via messages and illustrations.
NOTE: The contents of touch panel screens in this manual show the equipment with all options.
(1) Message (6) Date and time
(2) Reproduction ratio (7) Set functions confirmation button
(3) Total copy quantity (8) Function setting area
(4) Currently selected drawer size (9) Index buttons
(5) Remaining paper level
MESSAGE DISPLAY
The following information is shown on the touch panel:
Equipment status, operational instructions, cautionary messages, reproduction ratios, total
copy quantity, paper size of a selected drawer, amount of paper in a selected drawer and the
date and time.
Page 8
Touch Panel (Cont’d.)
TOUCH-BUTTONS
The various function items are touch-button selectable. Press any button lightly with
your finger.
Index buttons — These buttons are used for switching the menu. The type and the
number of the index buttons varies depending on each function of Copy, Scan and Fax.
Function setting area — This is an area for selecting and setting each function.
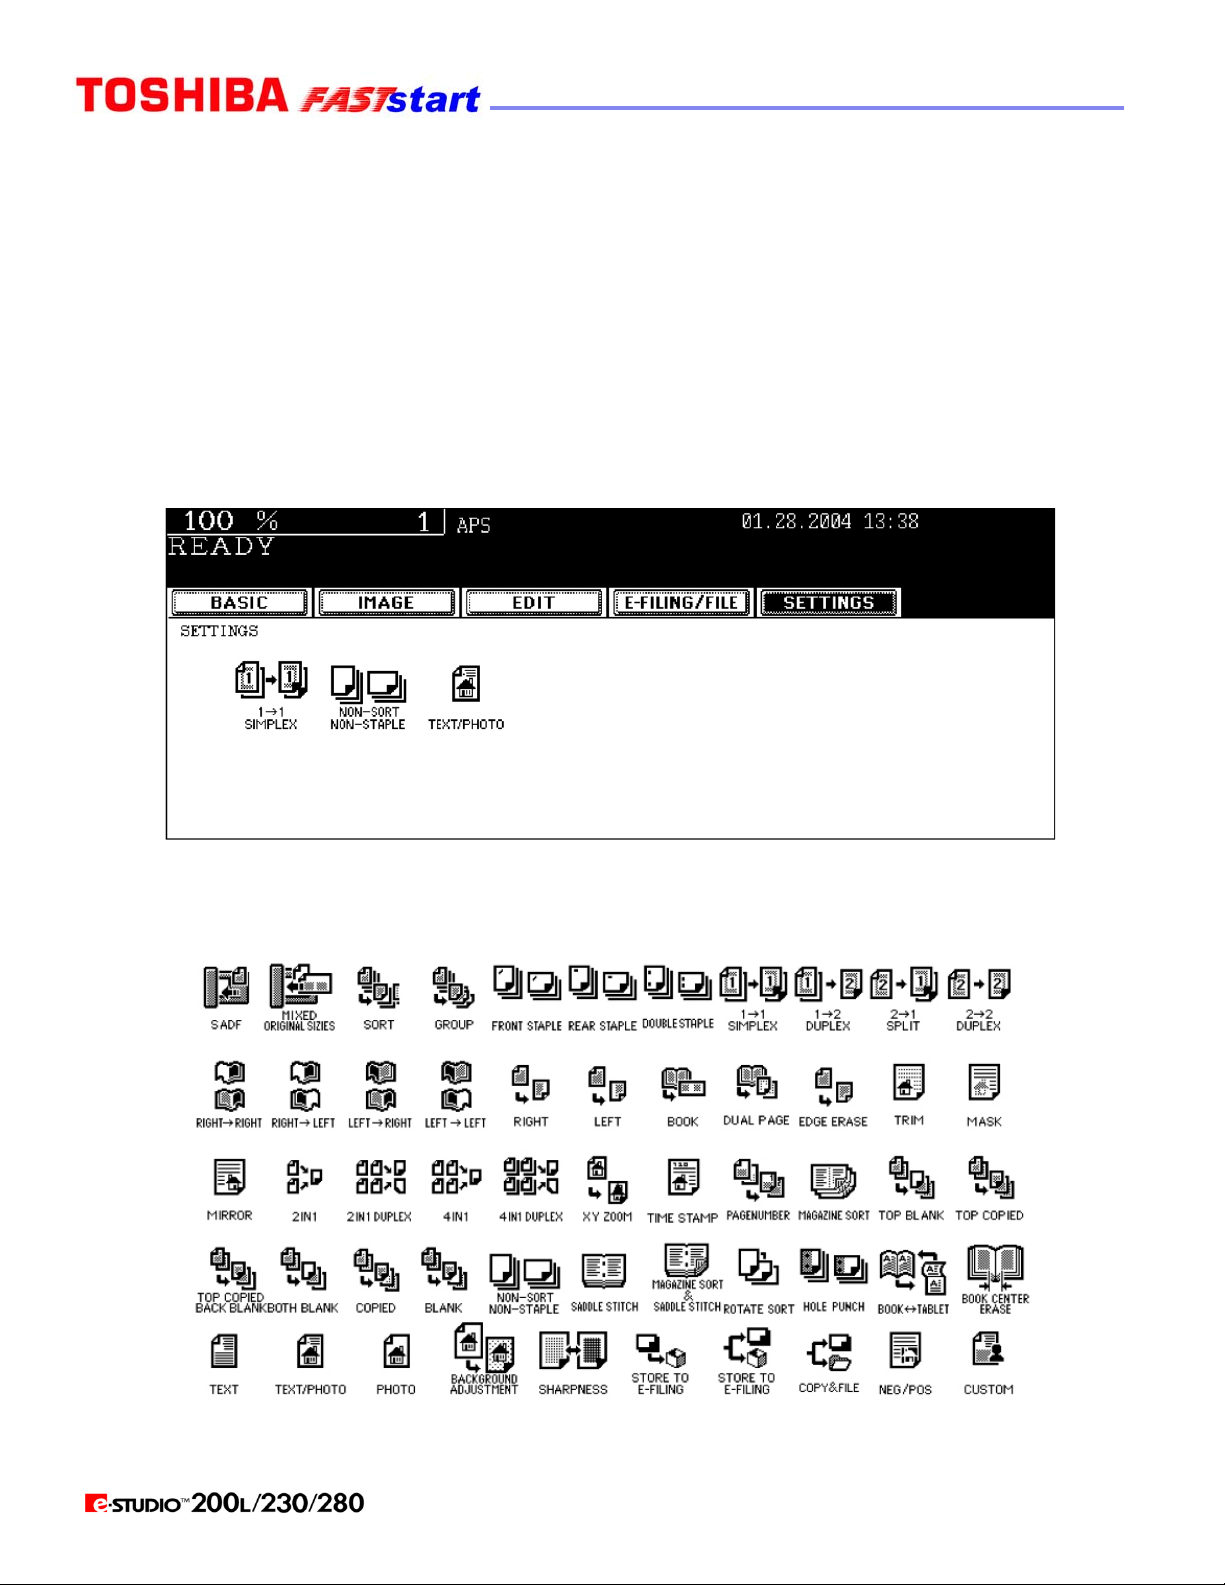
SETTINGS (setting functions confirmation) button — This button allows you to
confirm the functions that have been set. (An example is shown below.)
Icons displayed on the screen (some icons may not appear on the screen):
Page 9
 Loading...