


 Loading...
Toshiba e-STUDIO200L, e-STUDIO230, e-STUDIO3511, e-STUDIO350, e-Studio 230L User Manual
...MULTIFUNCTIONAL DIGITAL SYSTEMS
Network
Operator’s Guide

SOFTWARE LICENSE AGREEMENT
INSTALLING OR OTHERWISE USING THIS SOFTWARE PRODUCT CONSTITUTES YOUR ACCEPTANCE OF THE FOLLOWING TERMS AND CONDITIONS (UNLESS A SEPARATE LICENSE IS PROVIDED BY THE SUPPLIER OF APPLICABLE SOFTWARE IN WHICH CASE SUCH SEPARATE LICENSE SHALL APPLY). IF YOU DO NOT ACCEPT THESE TERMS, YOU MAY NOT INSTALL OR USE THIS SOFTWARE, AND YOU MUST PROMPTLY RETURN THE SOFTWARE TO THE LOCATION WHERE YOU OBTAINED IT.
THE SOFTWARE INSTALLED ON THIS PRODUCT INCLUDES NUMEROUS INDIVIDUAL SOFTWARE COMPONENTS, EACH HAVING ITS OWN APPLICABLE END USER LICENSE AGREEMENT (“EULA”). INFORMATION RELATING TO THE EULAS MAY BE FOUND IN AN ELECTRONIC FILE INCLUDED ON THE USER DOCUMENTATION CD-ROM INCLUDED HEREWITH; HOWEVER, ALL SOFTWARE AND DOCUMENTATION DEVELOPED OR CREATED BY OR FOR TOSHIBA TEC CORPORATION (“TTEC”) ARE PROPRIETARY PRODUCTS OF TTEC AND ARE PROTECTED BY COPYRIGHT LAWS, INTERNATIONAL TREATY PROVISIONS, AND OTHER APPLICABLE LAWS.
Grant of License
This is a legal agreement between you, the end-user (“You”), and TTEC and its suppliers. This software, fonts (including their typefaces) and related documentation (“Software”) is licensed for use with the system CPU on which it was installed (“System”) in accordance with the terms contained in this Agreement. This Software is proprietary to TTEC and/or its suppliers.
TTEC and its suppliers disclaim responsibility for the installation and/or use of this Software, and for the results obtained by using this Software. You may use one copy of the Software as installed on a single System, and may not copy the Software for any reason except as necessary to use the Software on a single System. Any copies of the Software shall be subject to the conditions of this Agreement.
You may not, nor cause or permit any third party to, modify, adapt, merge, translate, reverse compile, reverse assemble, or reverse engineer the Software. You may not use the Software, except in accordance with this license. No title to the intellectual property in the Software is transferred to you and full ownership is retained by TTEC or its suppliers. Source code of the Software is not licensed to you. You will be held legally responsible for any copyright infringement, unauthorized transfer, reproduction or use of the Software or its documentation.
Term
This license is effective until terminated by TTEC or upon your failure to comply with any term of this Agreement. Upon termination, you agree to destroy all copies of the Software and its documentation.
You may terminate this license at any time by destroying the Software and its documentation and all copies.
Disclaimer of Warranty
THIS SOFTWARE IS PROVIDED “AS IS” WITHOUT WARRANTY OF ANY KIND, EITHER EXPRESS OR IMPLIED, INCLUDING, BUT NOT LIMITED TO, THE IMPLIED WARRANTIES OF MERCHANTABILITY, FITNESS FOR A PARTICULAR PURPOSE, TITLE, AND NON-INFRINGE- MENT. TTEC AND ITS SUPPLIERS DISCLAIM ANY WARRANTY RELATING TO THE QUALITY AND PERFORMANCE OF THE SOFTWARE. IF THE SOFTWARE PROVES DEFECTIVE, YOU (AND NOT TTEC OR ITS SUPPLIERS) SHALL BE RESPONSIBLE FOR THE ENTIRE COST OF ALL NECESSARY SERVICING, REPAIR OR CORRECTION. TTEC AND ITS SUPPLIERS DO NOT WARRANT THAT THE FUNCTIONS CONTAINED IN THE SOFTWARE WILL MEET YOUR REQUIREMENTS OR THAT THE OPERATION OF THE SOFTWARE WILL BE UNINTERRUPTED OR ERROR FREE.
ALL INFORMATION CONTAINED HEREIN THAT IS PROVIDED BY TTEC AND ITS AFFILIATES PURSUANT TO A EULA IS PROVIDED “AS IS” WITHOUT WARRANTY OF ANY KIND, EITHER EXPRESS OR IMPLIED.
Limitation of Liability
IN NO EVENT WILL TTEC OR ITS SUPPLIERS BE LIABLE TO YOU FOR ANY DAMAGES, WHETHER IN CONTRACT, TORT, OR OTHERWISE (EXCEPT PERSONAL INJURY OR DEATH RESULTING FROM NEGLIGENCE ON THE PART OF TTEC OR ITS SUPPLIERS), INCLUDING WITHOUT LIMITATION ANY LOST PROFITS, LOST DATA, LOST SAVINGS OR OTHER INCIDENTAL, SPECIAL OR CONSEQUENTIAL DAMAGES ARISING OUT OF THE USE OR INABILITY TO
2 |
Network Operator’s Guide — SOFTWARE LICENSE AGREEMENT |

USE THE SOFTWARE, EVEN IF TTEC OR ITS SUPPLIERS HAVE BEEN ADVISED OF THE POSSIBILITY OF SUCH DAMAGES, NOR FOR THIRD PARTY CLAIMS.
U.S. Government Restricted Rights
The Software is provided with RESTRICTED RIGHTS. Use, duplication or disclosure by the U.S. Government is subject to restrictions set forth in subdivision (b) (3) (ii) or (c) (i) (ii) of the Rights in Technical Data and Computer Software Clause set forth in 252.227-7013, or 52.227-19 (c) (2) of the DOD FAR, as appropriate. Contractor/Manufacturer is TOSHIBA TEC Corporation, 6-78, Minami-cho, Mishima-shi, Shi- zuoka-ken, 411-8520, Japan.
General
You may not sublicense, lease, rent, assign or transfer this license or the Software. Any attempt to sublicense, lease, rent, assign or transfer any of the rights, duties or obligations hereunder is void. You agree that you do not intend to, and will not ship, transmit (directly or indirectly) the Software, including any copies of the Software, or any technical data contained in the Software or its media, or any direct product thereof, to any country or destination prohibited by the United States Government. This license shall be governed by the laws of Japan or, at the election of a Supplier of TTEC concerned with a dispute arising from or relating to this Agreement, the laws of the Country designated from time to time by the relevant Supplier of TTEC. If any provision or portion of this Agreement shall be found to be illegal, invalid or unenforceable, the remaining provisions or portions shall remain in full force and effect.
YOU ACKNOWLEDGE THAT YOU HAVE READ THIS LICENSE AGREEMENT AND THAT YOU UNDERSTAND ITS PROVISIONS. YOU AGREE TO BE BOUND BY ITS TERMS AND CONDITIONS. YOU FURTHER AGREE THAT THIS LICENSE AGREEMENT CONTAINS THE COMPLETE AND EXCLUSIVE AGREEMENT BETWEEN YOU AND TTEC AND ITS SUPPLIERS AND SUPERSEDES ANY PROPOSAL OR PRIOR AGREEMENT, ORAL OR WRITTEN, OR ANY OTHER COMMUNICATION RELATING TO THE SUBJECT MATTER OF THIS LICENSE AGREEMENT.
TOSHIBA TEC Corporation, 6-78, Minami-cho, Mishima-shi, Shizuoka-ken, 411-8520, Japan.
Network Operator’s Guide — SOFTWARE LICENSE AGREEMENT |
3 |

TRADEMARKS AND COPYRIGHT
Trademarks
•The official name of Windows 98 is Microsoft Windows 98 Operating System.
•The official name of Windows Me is Microsoft Windows Me Operating System.
•The official name of Windows 2000 is Microsoft Windows 2000 Operating System.
•The official name of Windows XP is Microsoft Windows XP Operating System.
•The official name of Windows Server 2003 is Microsoft Windows Server 2003 Operating System.
•Microsoft, Windows, Windows NT, and the brand names and product names of other Microsoft products are trademarks of Microsoft Corporation in the US and other countries.
•Apple, AppleTalk, Macintosh, Mac, TrueType, and LaserWriter are trademarks of Apple Computer Inc. in the US and other countries.
•Postscript is a trademark of Adobe Systems Incorporated.
•Netscape is a trademark of Netscape Communications Corporation.
•IBM, AT and AIX are trademarks of International Business Machines Corporation.
•NOVELL, NetWare, and NDS are trademarks of Novell, Inc.
•Other company names and product names in this manual are the trademarks of their respective companies.
Copyright
© 2003 TOSHIBA TEC CORPORATION All rights reserved
Under the copyright laws, this manual cannot be reproduced in any form without prior written permission of TTEC. No patent liability is assumed, however, with respect to the use of the information contained herein.
4 |
Network Operator’s Guide — TRADEMARKS AND COPYRIGHT |

Preface
Thank you for purchasing e-STUDIO4511 Series, e-STUDIO450 Series, or e-STUDIO280 Series Multifunctional Digital Systems. This Guide provides instructions on how to use TopAccess in user mode for remote device management. Read this guide before operating the e-STUDIO4511 Series, e-STUDIO450 Series, or e-STUDIO280 Series and keep it within easy reach to aid you in configuring a system environment that makes best of the e-STUDIO’s functions.
About This Guide
This manual describes how to operate the remote device management functions using the TopAccess user functions.
Conventions
•The term “this equipment” in this manual refers to the e-STUDIO4511 Series, e-STUDIO450 Series, or e-STUDIO280 Series.
•The term “e-Filing” in this manual is an abbreviation of “electronic filing”.
About Other Manuals
Other guides are included in the User Documentation CD-ROM provided with this system:
Printing Guide— explains how to install user software for the printer functions, including how to set up and manage print jobs from Microsoft Windows, Apple Mac OS, and UNIX computers.
Network Administrator’s Guide— explains the basic configuration and administration of the equipment in supported platform and network environments. It also includes guidelines for setting up network servers to provide various network services.
e-Filing Guide—explains how to operate the e-Filing features by using the TWAIN driver, File Downloader and e-Filing web utility.
Network Fax Guide—explains how to use the network fax features that enable users to operate fax and internet fax sending from a client computer via network.
Network Operator’s Guide — Preface |
5 |

Table of Contents
SOFTWARE LICENSE AGREEMENT ........................................................... |
2 |
TRADEMARKS AND COPYRIGHT................................................................ |
4 |
Preface ........................................................................................................... |
5 |
About This Guide .................................................................................................... |
5 |
Conventions ...................................................................................................... |
5 |
About Other Manuals.............................................................................................. |
5 |
Table of Contents ........................................................................................... |
6 |
1. Overview ........................................................................................................... |
9 |
Features and Functions................................................................................ |
10 |
2. TopAccess End-User Mode........................................................................... |
11 |
TopAccess Overview.................................................................................... |
12 |
Accessing TopAccess End-User Mode ........................................................ |
13 |
TopAccess Web Site ............................................................................................ |
14 |
Checking Device Status ............................................................................... |
16 |
Managing Jobs ............................................................................................. |
17 |
Managing Print Jobs ............................................................................................. |
17 |
Displaying Print Jobs....................................................................................... |
17 |
Deleting a Print Job......................................................................................... |
18 |
Releasing a Print Job...................................................................................... |
18 |
Managing Fax/Internet Fax Jobs .......................................................................... |
19 |
Displaying Fax/Internet Fax Jobs.................................................................... |
19 |
Deleting a Fax Transmission Job.................................................................... |
20 |
Managing Scan Jobs ............................................................................................ |
21 |
Displaying Scan Jobs...................................................................................... |
21 |
Deleting a Scan Job........................................................................................ |
22 |
Displaying Job Logs ..................................................................................... |
23 |
Displaying Print Job Logs ..................................................................................... |
23 |
Displaying Transmission Journals ........................................................................ |
24 |
Displaying Reception Journals ............................................................................. |
25 |
Displaying Scan Job Logs .................................................................................... |
26 |
Managing Templates .................................................................................... |
27 |
Registering Private Template Groups................................................................... |
27 |
Setting Group Information............................................................................... |
27 |
Setting Group Password ................................................................................. |
29 |
Resetting Group Information........................................................................... |
31 |
Registering Private Templates.............................................................................. |
33 |
Registering or Editing Private Templates........................................................ |
33 |
Panel Setting ............................................................................................. |
40 |
Destination Setting .................................................................................... |
41 |
Internet Fax Setting ................................................................................... |
47 |
Fax Setting ................................................................................................ |
48 |
Email Setting ............................................................................................. |
50 |
Save as file Setting.................................................................................... |
51 |
Box Setting ................................................................................................ |
53 |
Scan Setting .............................................................................................. |
53 |
Setting Template Password ............................................................................ |
55 |
Resetting Private Templates........................................................................... |
58 |
Displaying Public Templates................................................................................. |
61 |
Managing Address Book .............................................................................. |
63 |
Managing Contacts in the Address Book.............................................................. |
63 |
6 |
Network Operator’s Guide — Table of Contents |

Adding, Editing, or Deleting Contacts Manually .............................................. |
63 |
Adding New Contact from the LDAP Server ................................................... |
67 |
Managing Groups in the Address Book ................................................................ |
69 |
Managing Mailboxes..................................................................................... |
72 |
Setting Up an Open Mailbox................................................................................. |
73 |
MailBox Setting ............................................................................................... |
76 |
Destination Setting.......................................................................................... |
77 |
Internet Fax Setting......................................................................................... |
77 |
Relay End Terminal Report............................................................................. |
77 |
Email Setting................................................................................................... |
78 |
Save as file Setting ......................................................................................... |
78 |
Box Setting...................................................................................................... |
78 |
Deleting an Open Mailbox .................................................................................... |
79 |
Managing Counters ...................................................................................... |
81 |
Displaying the Total Counter ................................................................................ |
81 |
Displaying the Department Counter...................................................................... |
81 |
3. Troubleshooting............................................................................................. |
85 |
TopAccess Errors ......................................................................................... |
86 |
TopAccess Error Messages.................................................................................. |
86 |
Print Job Status Messages ............................................................................. |
86 |
Transmission/Reception Journal Status Messages ........................................ |
86 |
Scan Job Status Messages............................................................................. |
91 |
4. INDEX .............................................................................................................. |
97 |
Network Operator’s Guide — Table of Contents |
7 |

8 |
Network Operator’s Guide — Table of Contents |

1. OVERVIEW
Network Operator’s Guide — 1. Overview |
9 |

Features and Functions
TopAccess, a web-based job and device management tool, allows you to access device information over the Internet.
TopAccess, in user mode, allows you to:
•Display device information and status.
•Manage print jobs, fax and Internet Fax jobs, and scan jobs.
•Display print job logs, transmission journals, reception journals, and scan job logs.
•Create Private templates for general and specific use.
•Add contacts or groups to the address book.
•Create ITU-T compatible mailboxes (Optional Fax unit is required).
•Display counters.
NOTE: • TopAccess is available only when the Network Interface Card is installed.
10 |
Network Operator’s Guide — Features and Functions |
2. TOPACCESS END-USER MODE
Network Operator’s Guide — 2. TopAccess End-User Mode |
11 |

TopAccess Overview
TopAccess is a web-based job and device management tool that allows you to access information about this equipment over the Internet.
TopAccess has two web sites available. One site is designed for end users and the other is for the administrators.
•The end-user site displays the equipment and job status and enables you to create and maintain private template groups and private templates.
•The administrator site enables network administrators to configure device settings, conduct maintenance, and update the address book, public template group and public templates.
NOTE: • For instructions on how to use TopAccess in the administrator mode, refer to the
Network Administrator’s Guide.
End users can:
•Display general device information including the status, drawer/accessory configuration, and paper supply information.
•Display and manage the status of print jobs, fax/internet fax transmit jobs, and scan jobs submitted by the user. (Optional Fax unit is required for displaying and managing the fax transmit jobs)
•Display the job logs for print, fax/internet fax transmit, fax/internet fax reception, and scan. (Optional Fax unit is required for displaying the fax transmit and fax reception job log.)
•Register and modify the templates.
•Add or modify the contacts and groups in the address book.
•Register and modify the mailboxes. (Optional Fax unit is required.)
•Display the counters logs
•Download client software.
NOTES: • Because TopAccess uses cookies to store information on the user’s system, users must have cookies enabled in the browser.
•When TopAccess does not work properly, delete cookies and try again.
•On Netscape 7.1, the Confirm dialog box that asks whether you want Password Manager to remember the logon may appear when you save any changes in TopAccess. If the dialog box appears, click [No] to disable the memory of Password Manager. If enabled, unexpected values may automatically be entered when you open the page next time.
12 |
Network Operator’s Guide — TopAccess Overview |
Accessing TopAccess End-User Mode
To operate TopAccess, this equipment should be connected to the network and be configured with the TCP/IP settings. After you complete the TCP/IP setup, you can access to TopAccess web site to operate various functions from your computer using a web browser such as Netscape Navigator and Internet Explorer.
You can use the TopAccess web-based utility from a Windows, Macintosh or Unix operating system environment. The following browsers are supported:
Windows
•Internet Explorer 5.5 or later
•Netscape Navigator 7.02 or later
Macintosh
•Internet Explorer 5.5 or later
•Netscape Navigator 7.02 or later
Unix
•Netscape Navigator 7.02 or later
Accessing TopAccess in end-user mode
1.To navigate to TopAccess, enter the following URL on the address box of your Internet browser.
http://<IP Address> or http://<Device Name>
For example
When the IP address of the equipment is “10.10.70.105”: http://10.10.70.105
When the device name of this equipment is “mfp-00c67861”: http://mfp-00c67861
2. The TopAccess web page for end users opens.
SUPPLEMENT: • You can also access TopAccess using the TopAccessDocMon link. For instructions on accessing TopAccess from TopAccessDocMon, see the Printing Guide.
Network Operator’s Guide — Accessing TopAccess End-User Mode |
13 |

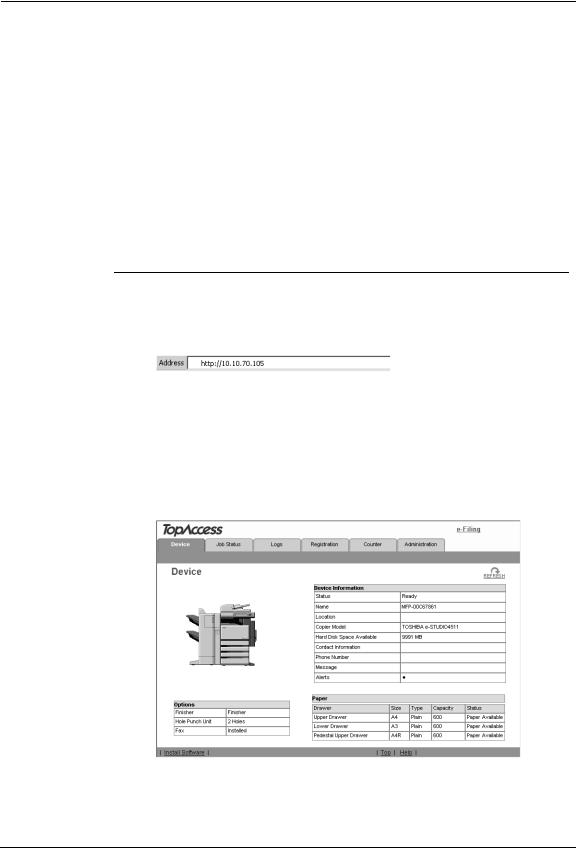
TopAccess Web Site
When you access TopAccess, the general information page of the TopAccess web site is displayed.
From here, you can initiate most device monitoring and management functions.
The basic TopAccess page contains following items:
1
2
3
4 |
5 |
6 |
1)Function Tab
This provides access to main pages of TopAccess for each function.
2)Menu Bar
This provides access to each menu page under the selected function tab.
3)Submenu Bar
This provides access to each submenu page under the selected menu and function tab.
4)Install Software link
Click this to open the Install Client Software page to download the client software from TopAccess.
14 |
Network Operator’s Guide — Accessing TopAccess End-User Mode |

5)Top link
Click this to display the top of the page that is currently displayed.
6)Help link
Click this to display the Online Help.
Network Operator’s Guide — Accessing TopAccess End-User Mode |
15 |
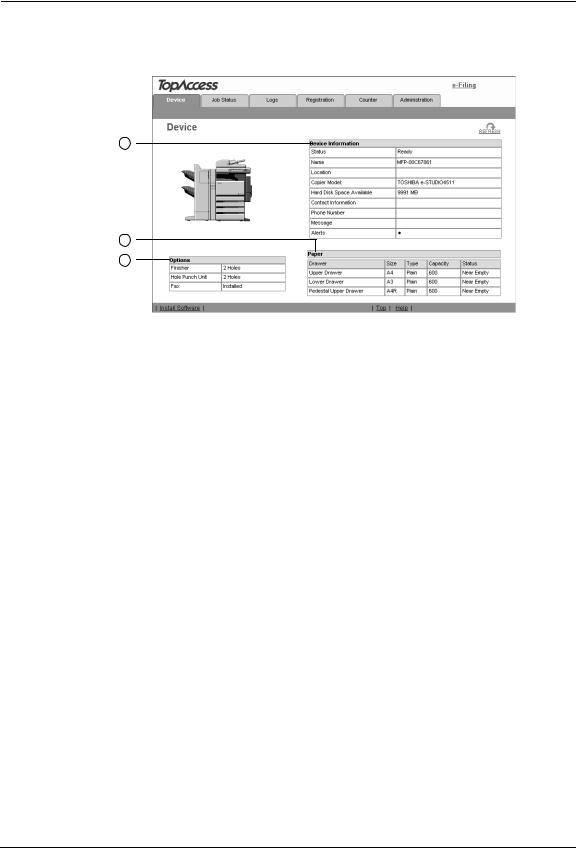
Checking Device Status
TopAccess opens with the end-user Device tab, which includes a picture of the device. At any time, the end-user may click Refresh to update the TopAccess status information.
This tab shows the following information about the device:
1
2
3
1)Device Information
•Status — Displays the device status.
•Name — Displays the name of this equipment.
•Location — Displays the equipment’s location.
•Copier Model — Displays the model name of this equipment.
•Hard Disk Space Available — Displays the available size to store the Save as file and Store to e-Filing documents.
•Contact Information — Displays the contact name of the person responsible for managing this device.
•Phone Number — Displays the phone number of the person responsible for managing this device.
•Message — Displays the administrative message.
•Alerts — Displays the alert message. Errors are in red and warnings are in yellow.
2)Paper
•Drawer — Lists the installed drawers.
•Size — Displays the paper size set in each drawer.
•Type — Displays the paper type set in each drawer.
•Capacity — Displays the maximum paper capacity that can be set in each drawer.
•Status — Displays the consumption status in each drawer.
3)Options
•Finisher — Displays the type of finisher installed.
•Hole Punch Unit — Displays whether the hole punch unit is installed.
•Fax — Displays whether the fax unit is installed.
•Optional Function — Displays whether the optional function kit is installed (for e-STUDIO450 Series and e-STUDIO280 Series only).
•Auto Duplex Unit — Displays whether the auto duplex unit is installed (for e-STUDIO280 Series only).
16 |
Network Operator’s Guide — Checking Device Status |
Managing Jobs
Using TopAccess, end users can display and delete print jobs, fax transmission jobs, and scan jobs released by end users.
Managing Print Jobs
Using TopAccess, you can display, delete and release print jobs that are currently in the queue.
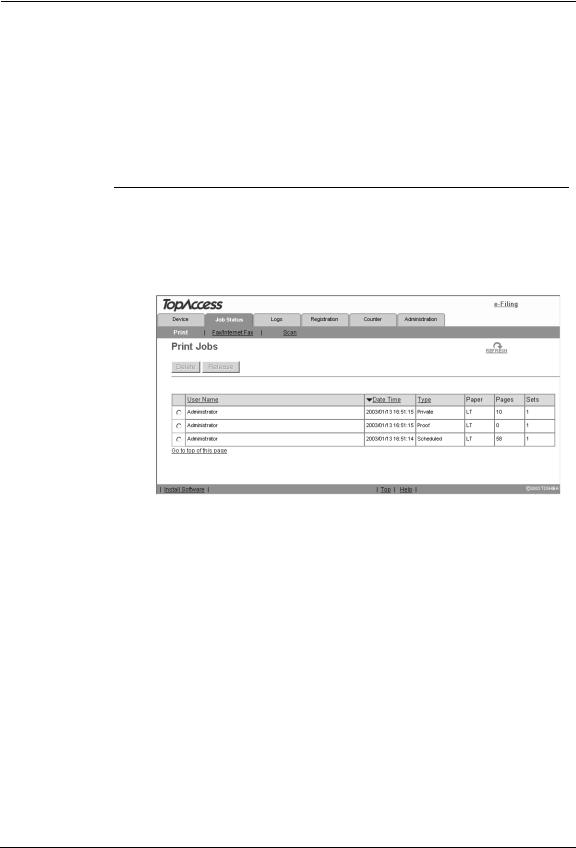
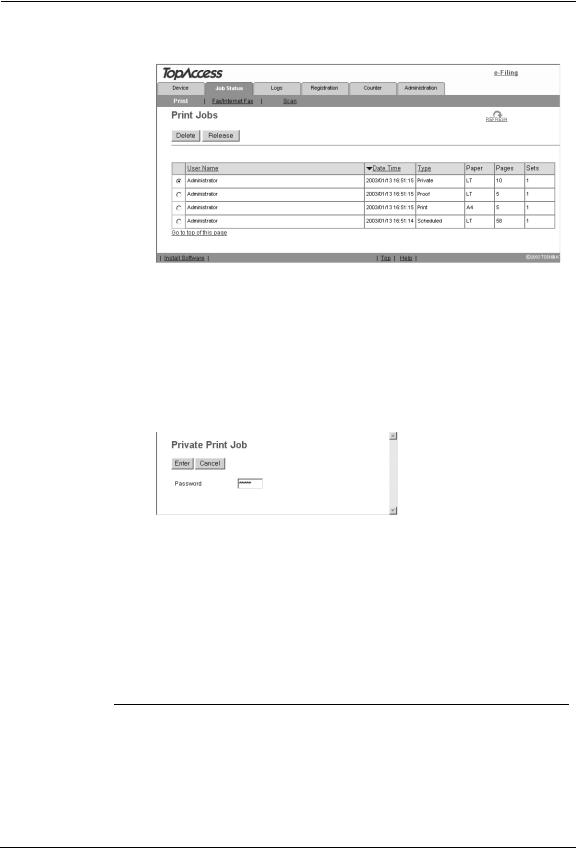
Displaying Print Jobs
Accessing the Print menu page in the Job Status tab
1.Click the Job Status tab and click the Print menu.
• The Print menu page is displayed.
2.If your print job previously released is not displayed in the list, click the [REFRESH] icon at the upper right in the page.
SUPPLEMENTS: • The print jobs that had finished printing are displayed in the Log tab.
•To sort the print jobs list so that a particular job is easier to be found, click the appropriate table heading. The page refreshes to display the information in the order you requested.
The Print menu page displays following information for each print job.
1)User Name
Displays the computer name that released the print job.
2)Date Time
Displays the date and time when the print job was released from the client computers.
3)Type
Displays the print job type.
4)Paper
Displays the paper size of the print jobs.
5)Pages
Displays the number of pages the print job contains.
6)Sets
Displays the number of copies set in the print jobs.
Network Operator’s Guide — Managing Jobs |
17 |
Deleting a Print Job
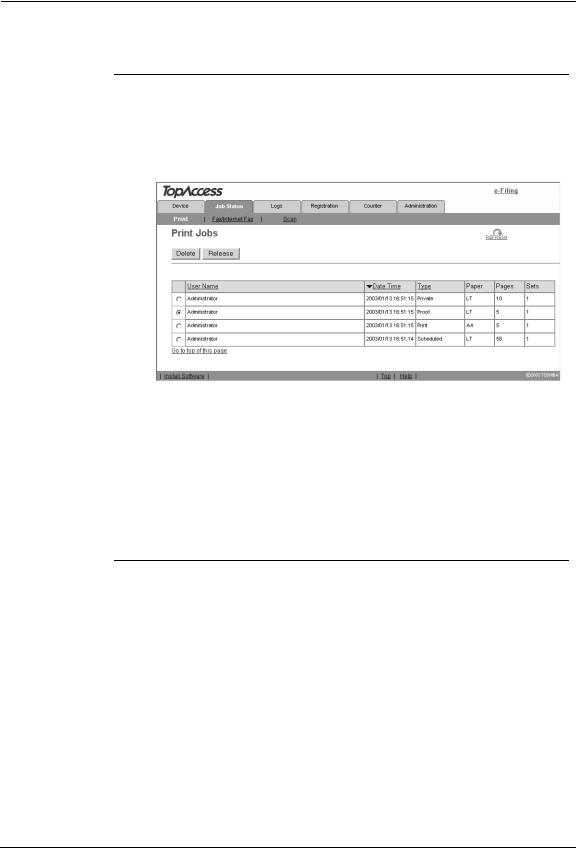
Deleting a print job
1.Click the Job Status tab and click the Print menu.
• The Print menu page is displayed.
2.Select an option button at the left of the print job that you want to delete.
•You can select only one print job at a time.
3.Click [Delete].
•Selected print job is deleted.
Releasing a Print Job
You can print jobs that are stored in the queue.
Releasing a print job
1.Click the Job Status tab and click the Print menu.
• The Print menu page is displayed.
18 |
Network Operator’s Guide — Managing Jobs |
2.Select an option button at the left of the print job that you want to release.
•You can select only one print job at a time.
3.Click [Release].
•When you select other than a private job, the selected print job is immediately printed.
•When you select a private job, the Private Print Job window appears.
4.When the Private Print Job window appears, enter the password for the private job and click [Enter].
•The selected private job is immediately printed.
Managing Fax/Internet Fax Jobs
Using TopAccess, you can display and delete fax transmission jobs including fax transmission and Internet Fax transmission.
Displaying Fax/Internet Fax Jobs
Accessing the Fax/Internet Fax menu page in the Job Status tab
1.Click the Job Status tab and click the Fax/Internet Fax menu.
• The Fax/Internet Fax menu page is displayed.
Network Operator’s Guide — Managing Jobs |
19 |
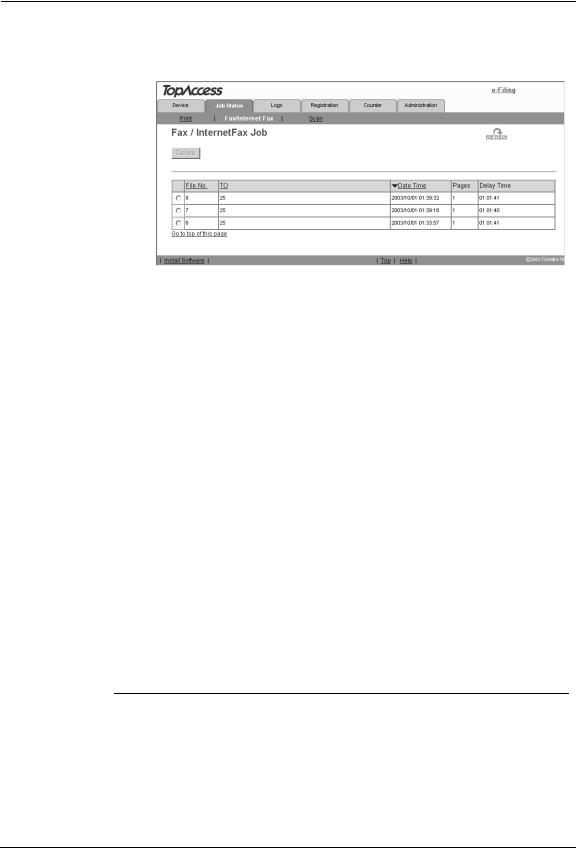
2.If your fax transmission job previously released is not displayed in the list, click the [REFRESH] icon at the upper right in the page.
SUPPLEMENTS: • The transmission jobs that had finished the transmission are displayed in the Log tab.
•To sort the fax transmission jobs list so that a particular job is easier to be found, click the appropriate table heading. The page refreshes to display the information in the order you requested.
The Fax/Internet Fax menu page displays following information for each fax transmission job.
1)File No.
Displays the file number to identify the fax transmission job.
2)TO
Displays the destinations set to the fax transmission job.
3)Date Time
Displays the date and time when the fax transmission job is released from the Touch Panel Display or client computer using the N/W-Fax driver.
4)Pages
Displays the number of pages the fax transmission job contains.
5)Delay Time
Displays the delayed time set to the fax transmission job.
Deleting a Fax Transmission Job
You can delete a fax transmission job.
Deleting a fax transmission job
1.Click the Job Status tab and click the Fax/Internet Fax menu.
• The Fax/Internet Fax menu page is displayed.
20 |
Network Operator’s Guide — Managing Jobs |
2.Select an option button at the left of the fax transmission job that you want to delete.
•You can select only one fax transmission job at a time.
3.Click [Delete].
•Selected fax transmission job is deleted.
Managing Scan Jobs
Using TopAccess, you can display and delete scan jobs that are currently in the queue.
Displaying Scan Jobs
Accessing the Scan menu page in the Job Status tab
1.Click the Job Status tab and click the Scan menu.
• The Scan menu page is displayed.
2.If your scan job previously released is not displayed in the list, click the [REFRESH] icon at the upper right in the page.
SUPPLEMENTS: • The scan jobs that had finished scanning are displayed in the Log tab.
Network Operator’s Guide — Managing Jobs |
21 |
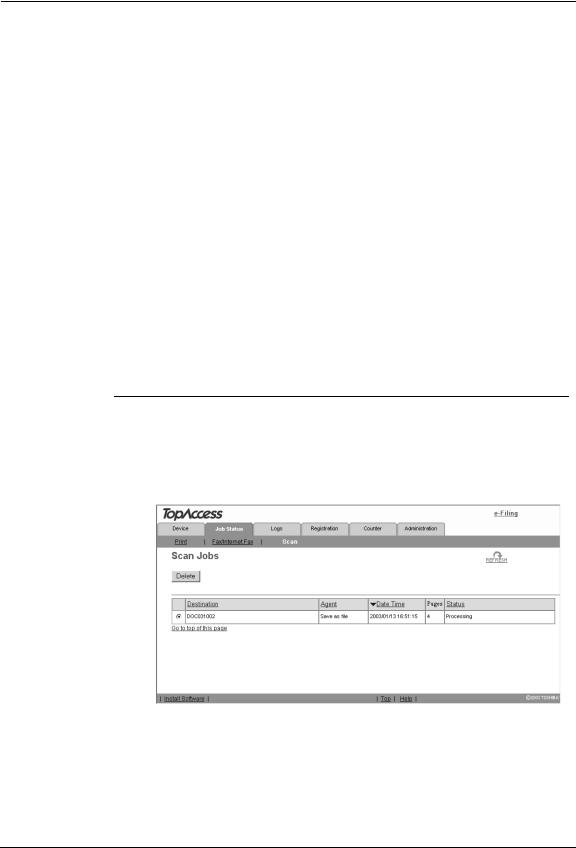
•To sort the scan jobs list so that a particular job is easier to be found, click the appropriate table heading. The page refreshes to display the information in the order you requested.
The Scan menu page displays following information for each scan job.
1)Destination
When the job performs the Scan to File or Scan to e-Filing, it displays the document name to be stored. When the job performs the Scan to Email, it displays the destinations where the scanned document will be sent.
2)Agent
Displays the agent of the scan job.
3)Date Time
Displays the date and time when the scan job is released from the Touch Panel Display.
4)Pages
Displays the number of pages the scan job contains.
5)Status
Displays the detailed status of the scan job.
Deleting a Scan Job
You can delete a scan job.
Deleting a scan job
1.Click the Job Status tab and click the Scan menu.
• The Scan menu page is displayed.
2.Select an option button at the left of the scan job that you want to delete.
•You can select only one scan job at a time.
3.Click [Delete].
•Selected scan job is deleted.
22 |
Network Operator’s Guide — Managing Jobs |
Displaying Job Logs
Using TopAccess, end users can display print job logs, transmission journals, reception journals, and scan job logs.
Displaying Print Job Logs
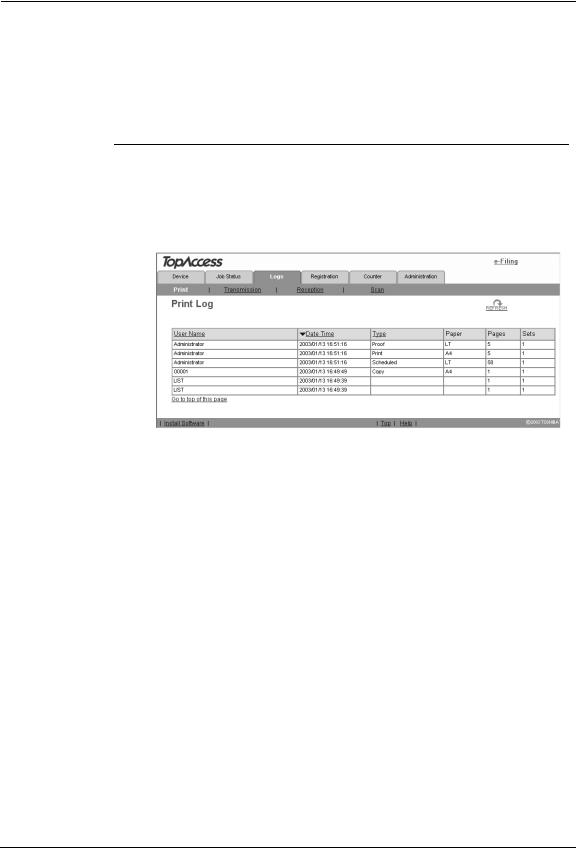
Using TopAccess, you can display the print job logs printed on this equipment.
Accessing the Print menu page in the Logs tab
1.Click the Logs tab and click the Print menu.
• The Print menu page is displayed.
2.Click the [REFRESH] icon at the upper right in the page to obtain the update information.
SUPPLEMENT: • To sort the print job logs list so that a particular job log is easier to be found, click the appropriate table heading. The page refreshes to display the information in the order you requested.
The Print menu page displays following information for each print job log.
1)User Name
Displays the computer name that released the print job. Click the header link to sort the print job list by user name.
2)Date Time
Displays the date and time that the print job was released from the client computers. Click the header link to sort the print job list by Date and Time.
3)Type
Displays the print job type. Click the header link to sort the print job list by print job type.
4)Paper
Displays the paper size of the print jobs.
5)Pages
Displays the number of pages the print job contains.
6)Sets
Displays the number of copies set in print jobs.
Network Operator’s Guide — Displaying Job Logs |
23 |
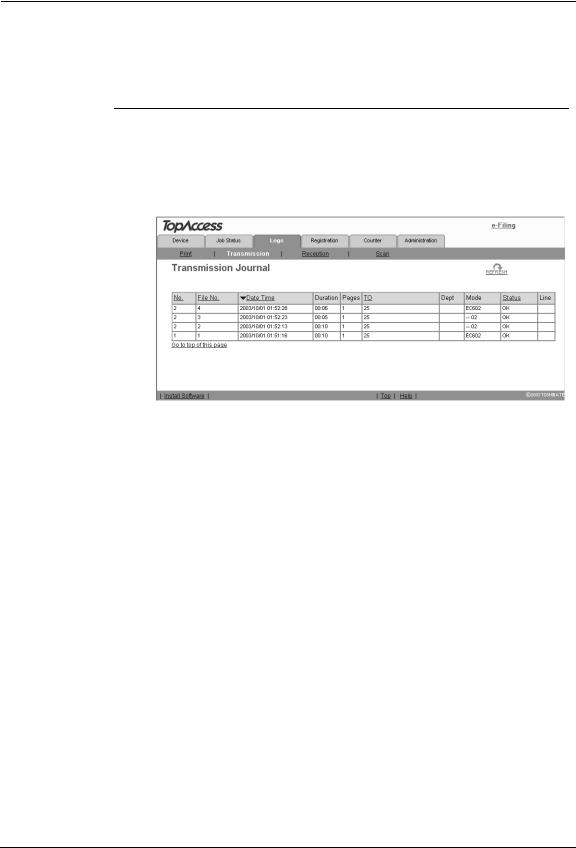
Displaying Transmission Journals
Using TopAccess, you can display the transmission journals that this equipment sent by fax and Internet Fax transmission.
Accessing the Transmission menu page in the Logs tab
1.Click the Logs tab and click the Transmission menu.
• The Transmission menu page is displayed.
2.Click the [REFRESH] icon at the upper right in the page to obtain the update information.
SUPPLEMENT: • To sort the transmission journals list so that a particular transmission journal is easier to be found, click the appropriate table heading. The page refreshes to display the information in the order you requested.
The Transmission menu page displays following information for each transmission journal.
1)No.
Displays the serial number of the journals.
2)File No.
Displays the file number to identify the transmission job.
3)Date Time
Displays the date and time the transmission job was performed.
4)Duration
Displays the time length taken for the transmissions. If it takes more than 1 hour, “59:59” is indicated.
5)Pages
Displays the number of pages the transmission job contains.
6)TO
Displays the destinations set to the transmission job.
7)Dept
Displays the department name.
8)Mode
Displays the transmission mode.
9)Status
Displays the result of the transmission.
24 |
Network Operator’s Guide — Displaying Job Logs |
10)Line
Displays the line used.
Displaying Reception Journals
Using TopAccess, you can display the reception journals that this equipment received by fax and Internet Fax transmission.
Accessing the Reception menu page in the Logs tab
1.Click the Logs tab and click the Reception menu.
• The Reception menu page is displayed.
2.Click the [REFRESH] icon at the upper right in the page to obtain the update information.
SUPPLEMENT: • To sort the reception journals list so that a particular reception journal is easier to be found, click the appropriate table heading. The page refreshes to display the information in the order you requested.
The Reception menu page displays following information for each reception journal.
1)No.
Displays the serial number of the journals.
2)File No.
Displays the file number to identify the received job.
3)Date Time
Displays the date and time of receiving the job.
4)Duration
Displays the time length taken for the receptions. If it takes more than 1 hour, “59:59” is indicated.
5)Pages
Displays the number of pages the received job contains.
6)From
Displays the sender’s email address or fax number of the received job.
7)Dept
Displays the department number.
Network Operator’s Guide — Displaying Job Logs |
25 |
8)Mode
Displays the reception mode.
9)Status
Displays the result of the reception.
10)Line
Displays the line used.
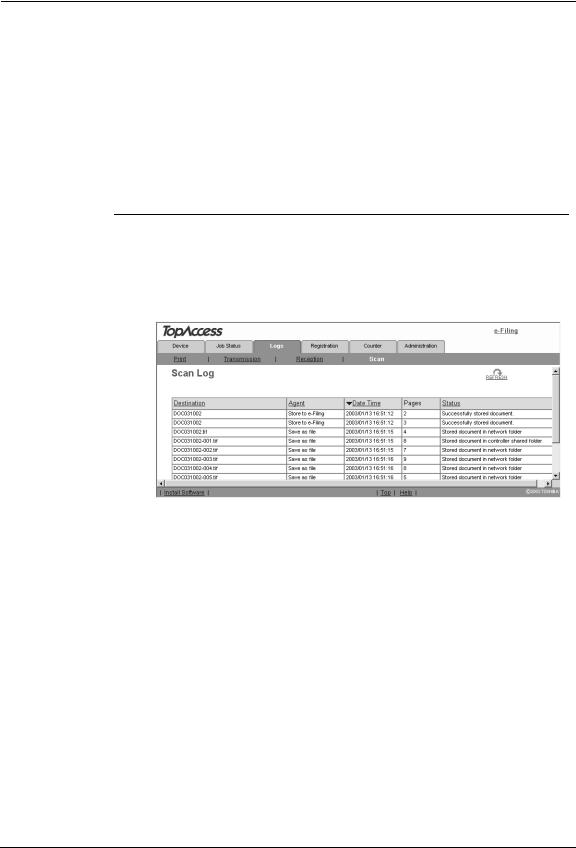
Displaying Scan Job Logs
Using TopAccess, you can display scan job logs that this equipment performed.
Accessing the Scan menu page in the Logs menu
1.Click the Logs tab and click the Scan menu.
• The Scan menu page is displayed.
2.Click the [REFRESH] icon at the upper right in the page to obtain the update information.
SUPPLEMENT: • To sort the scan job logs list so that a particular scan job log is easier to be found, click the appropriate table heading. The page refreshes to display the information in the order you requested.
The Scan menu page displays following information for each scan job log.
1)Destination
When the job performed the Scan to File or Scan to e-Filing, it displays the document name that was stored. When the job performed the Scan to Email, it displays the destinations where the scanned document was sent.
2)Agent
Displays the agent of the scan job.
3)Date Time
Displays the date and time when the scan job was released from the Control Panel.
4)Pages
Displays the number of pages the scan job contains.
5)Status
Displays the detailed result status of the scan job.
26 |
Network Operator’s Guide — Displaying Job Logs |

Managing Templates
Templates contain preset information for the operation of the copiers, scans, and fax and Internet Fax transmissions so that users can perform these operations easily by selecting the template button on the Touch Panel Display.
Templates are stored in groups. There are up to 200 private template groups and one public group. Each group can contain up to 60 templates.
Templates in the public group are created and maintained by the administrator. The public group can be accessed by all users, but some of the templates may be designed for specific purposes and have passwords assigned to them. For more information about setting up the public templates, see the Network Administrator’s Guide.
Templates in private template groups are based on particular group profiles. Private groups can be assigned passwords. You can also assign passwords to individual templates. If it has no password assigned at either the template or group level, a “private” template is accessible to all users.
In practice, you may not need to create templates or groups yourself. The administrator and other users may have set up all the templates you need for your work. Before creating any template, look on your system to see what templates are available.
When users set up the templates and template group for the first time, you must first create a template group according to how templates are grouped, and then register the template that you require.
P.27 "Registering Private Template Groups"
P.33 "Registering Private Templates"
In addition, you can also display the templates list registered in the public group. P.61 "Displaying Public Templates"
SUPPLEMENT: • Templates can be managed using the Touch Panel Display. For managing templates from the Touch Panel Display, please see the Operator’s Manual for Basic Function.
Registering Private Template Groups
Before registering private templates, you have to register the private template group. You can classify the private templates according to every department, every user, and a use by registering the private template groups.
Also each private template group can be protected by the password. P.27 "Setting Group Information"
P.29 "Setting Group Password"
P.31 "Resetting Group Information"
Setting Group Information
You can define up to 200 private template groups. To define the private template groups, you can specify the group name, owner, and email notification setting.
Setting a private template group information
1.Click the Registration tab and the Template menu.
• The Template menu page is displayed.
Network Operator’s Guide — Managing Templates |
27 |
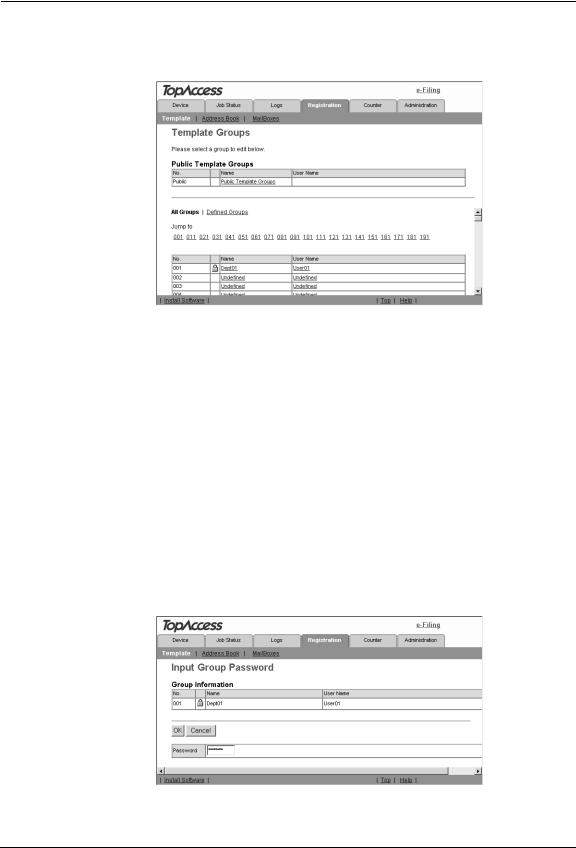
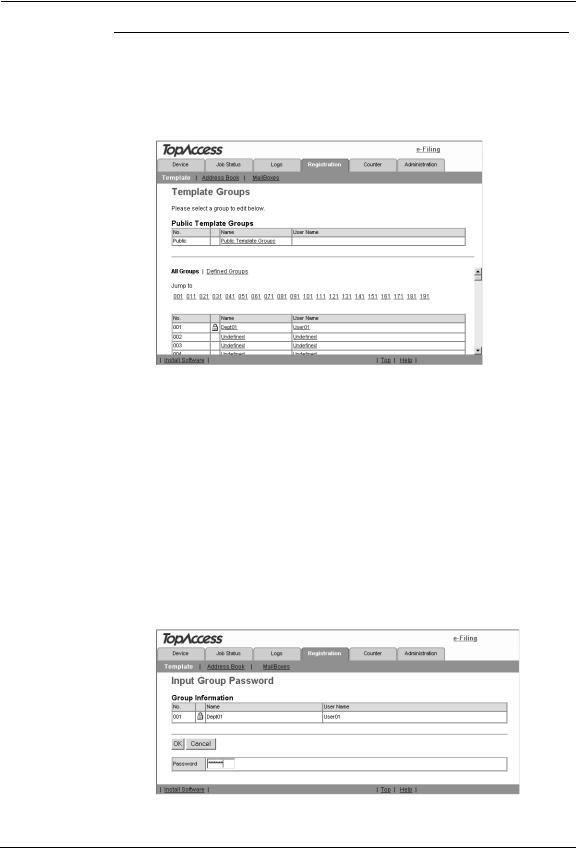
2.Click the “Undefined” group name link to define a new private template group, or click the group name link that has been defined to edit the private template group information.
•If you select the private template group that has not been defined, the Group Properties page is displayed. Skip to step 5.
•If you select the defined private template group that is not protected by a password, the Private Templates page is displayed. Skip to step 4.
•If you select the defined private template group that is protected by a password, the Input Group Password page is displayed. Go to the next step.
SUPPLEMENTS: • You can display only defined private template groups by clicking on the “Defined Groups” link. The page displays all 200 private template groups in default page view.
•If you know which private template group you want to define or edit, click the number of the private template group in the “Jump to” links.
3.When the Input Group Password page is displayed, enter the 5-digit password for the selected private template group and click [OK].
•The Private Templates page is displayed.
28 |
Network Operator’s Guide — Managing Templates |
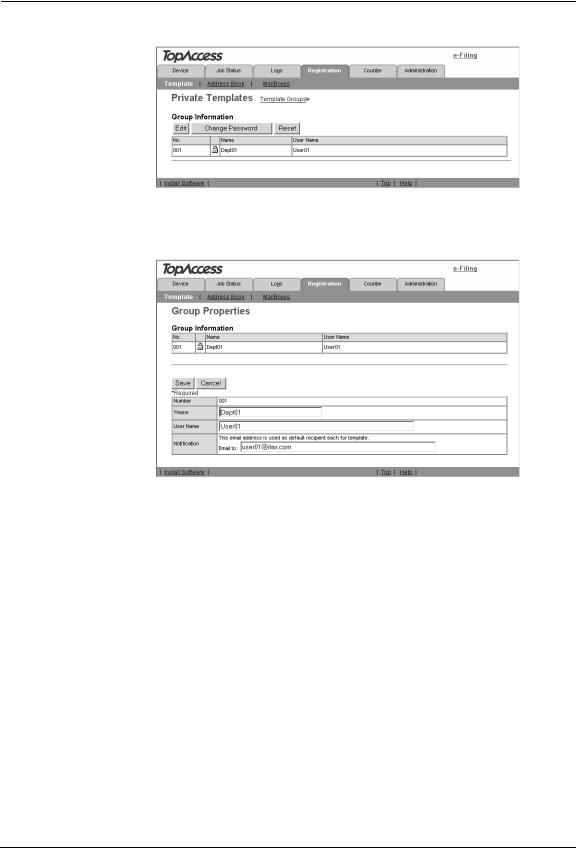
4. Click [Edit] to define or edit the group information.
• The Group Properties page is displayed.
5.Enter the items below as desired.
Number — Displays the number of the private template group. Name — Enter the name of the private template group.
User Name — Enter the owner name of the private template group.
Notification — Enter the default email address where the notification will be sent. The email address entered here will be displayed in the Panel Settings page and can be selected for the destination of the notifications when creating a private template in this group.
6.Click [Save] to apply changes.
7.You can continue setting the group password, or registering
or editing templates in the group, as required.
P.29 "Setting Group Password"
P.33 "Registering Private Templates"
Setting Group Password
To set the group password, you must register the private template group first. You can set the password for the group that you have already registered.
Network Operator’s Guide — Managing Templates |
29 |
Setting the group password
1.Click the Registration tab and the Template menu.
• The Template menu page is displayed.
2.Click the group name link that you want to set or to modify the group password.
•If you select the private template group that is not protected by a password, the Private Templates page is displayed. Skip to step 4.
•If you select the private template group that is protected by a password, the Input Group Password page is displayed. Go to the next step.
SUPPLEMENTS: • You can display only defined private template groups by clicking on the “Defined Groups” link. The page displays all 200 private template groups in default page view.
•If you know which private template group you want to define or edit, click the number of the private template group in the “Jump to” links.
3.When the Input Group Password page is displayed, enter the 5-digit password for the selected private template group and click [OK].
•The Private Templates page is displayed.
30 |
Network Operator’s Guide — Managing Templates |
Loading...