


TOSHIBA
WL66/67
EL66/67
DL66/67
Series
Owner's manual

Contents
SETTING UP
Remember |
|
? |
… |
|
|
For television |
|
operation |
|
queries, |
|
please |
|
ring the |
|
helpline… |
|
Safety precautions – Some do’s and don’ts for you to be aware of |
3 |
Installation and important information |
4 |
The remote control – an at-a-glance guide |
5 |
Connecting external equipment – a guide to connecting external equipment to the back of |
|
the television |
6 |
Connecting a computer – connecting a computer to the back of the television |
7 |
Controls and input connections – switching on the television, standby, using the controls, |
|
headphone socket, connecting equipment to the side input sockets |
8 |
Tuning the television using Quick Setup – language, country |
9 |
Sorting programme positions |
9 |
Manual tune – an alternative to Quick Setup, direct entry of channels, tuning a programme |
|
position for a media recorder |
10 |
Programme skip |
11 |
Auto tune |
12 |
CONTROLS AND FEATURES |
|
General controls – changing programme position |
12 |
Sound controls – volume, sound mute, bass/treble/balance |
12 |
Sound controls – bass boost, dual, stable sound® |
13 |
SRS WOW™ sound effects – SRS 3D, FOCUS, TruBass |
13 |
Widescreen viewing |
14 |
Picture controls – picture position, back light |
16 |
Picture controls – picture preferences (contrast, brightness, colour, tint, sharpness), black stretch, |
|
MPEG noise reduction (MPEG NR), digital noise reduction (DNR) |
17 |
Picture controls – colour temperature, 3D colour management, base colour adjustment |
18 |
Picture controls – cinema mode, automatic format (widescreen), blue screen, |
|
side panel adjustment |
19 |
Panel lock – disabling the buttons on the television |
20 |
Time display |
20 |
Stereo and bilingual transmissions – stereo/mono or dual language broadcasts |
20 |
The timer – setting the television to turn on and off |
20 |
PC Setting – picture position, clock phase, sampling clock, reset |
21 |
Input selection and AV connections – input and output sockets for connected equipment |
22 |
TEXT SERVICES |
|
Setting up, general information, Auto. and LIST modes |
24 |
Control buttons |
25 |
PROBLEM SOLVING |
|
Questions and Answers – answers to some of the more common queries including |
|
manual fine tuning and colour system |
26 |
INFORMATION |
|
Specifications and Accessories – technical information about the television, supplied accessories |
28 |
2

Safety Precautions
This equipment has been designed and manufactured to meet international safety standards but, like any electrical equipment, care must be taken to obtain the best results and for safety to be assured. Please read the points below for your own safety. They are of a general nature, intended to help with all electronic consumer products and some points may not apply to the goods you have just purchased.
Air Circulation
Heat Damage
DO NOT REMOVE ANY FIXED COVERS AS THIS WILL EXPOSE DANGEROUS AND 'LIVE' PARTS.
THE MAINS PLUG IS USED AS A DISCONNECTING DEVICE AND THEREFORE SHOULD BE READILY OPERABLE.
Do not
Mains Supply
Do
3
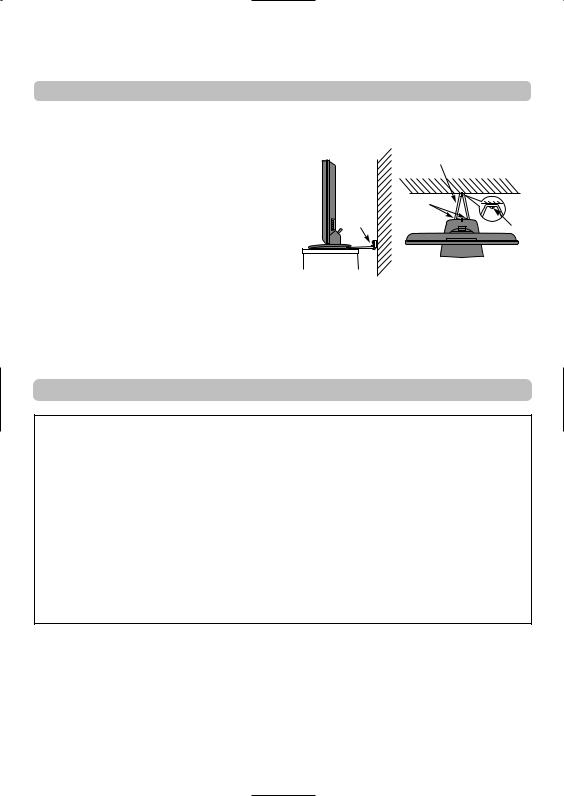
Installation and important information
Where to install
Please take note
EXCLUSION CLAUSE
Toshiba shall under no circumstances be liable for loss and/or damage to the product caused by:
i)fire;
ii)earthquake;
iii)accidental damage;
iv)intentional misuse of the product;
v)use of the product in improper conditions;
vi)loss and/or damage caused to the product whilst in the possession of a third party;
vii)any damage or loss caused as a result of the owner’s failure and/or neglect to follow the instructions set out in the owner’s manual;
viii)any loss or damage caused directly as a result of misuse or malfunction of the product when used simultaneously with associated equipment;
Furthermore, under no circumstances shall Toshiba be liable for any consequential loss and/or damage including but not limited to the following, loss of profit, interruption of business, the loss of recorded data whether caused during normal operation or misuse of the product.
If stationary images generated by text services, channel identification logos, computer displays, video games, on screen menus, etc. are left on the television screen for any length of time they could become conspicuous, it is always advisable to reduce both the brightness and contrast settings.
4

The remote controlUP
Simple at-a-glance reference of your remote control.
To mute the sound
When using a TOSHIBA pressm/llrto PAUSE/STEP press rto PLAY
press qto REWIND
presssto FAST FORWARD presswto EJECT
presspto STOP
press lqto SKIP-REWIND presssl to SKIP-FORWARD

 For On/Standby mode
To select input from external sources
Selectable picture preferences
To exit Menus
Navigation Ring:
Use P fand P eto change programme positions and text pages
Use j– and j+ to alter the volume
When using menus press up, down, left and right to move the cursor on the screen. OK to confirm your selection

 Text control buttons
To display on-screen information
 Stereo/bilingual transmissions
When in TV mode:
8/9 Time display 6/ /7To call up text
When in Text mode:
r To reveal concealed text q To hold a wanted page s To enlarge text display size
8/9 To select a page whilst viewing a normal picture
Inserting batteries and effective range of the remote
5

Connecting a computer
Before connecting any external equipment, turn off all main power switches. If there is no switch remove the mains plug from the wall socket.
7
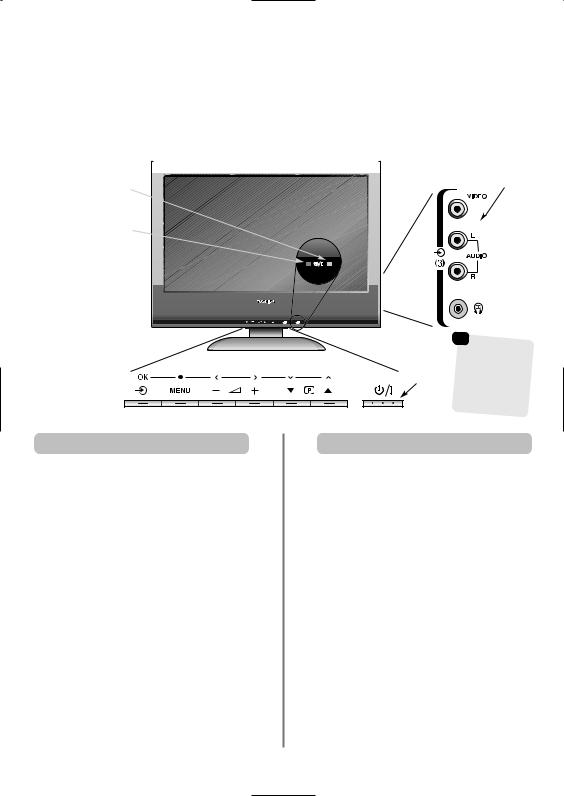
Controls and input connections
A wide variety of external equipment can be connected to the input sockets on the side of the television.
Whilst all the necessary adjustments and controls for the television are made using the remote control, the buttons on the television may be used for some functions.
|
INPUT 3 |
GREEN LED – On timer |
(EXT3) |
|
|
RED LED – Power on |
|
Standby
will take over (back) if
connections used at the time.
Switching on |
Using the controls and connections |
To alter the volume press – j+.
To alter the programme position press eFf.
Press MENU and S, R, P or Q to control the sound and picture options.
Press MENU to finish.
When connecting sound equipment to EXT3, connect the audio output of the equipment to the phono sockets on the television.
To select the Input, press Buntil the display shows EXT3 as described on page 22. The television will automatically sense the type of signal.
Please always refer to the owner’s manual of the equipment to be connected for full details.
Please note: Inserting the headphone plug will mute the sound from all speakers.
detail throughout the manual.
8
Tuning the television using Quick Setup, sorting programme positions
Before switching on the television put your decoder and media recorder to Standby if they are connected. To set up the television use the buttons on the remote control as detailed on page 5.
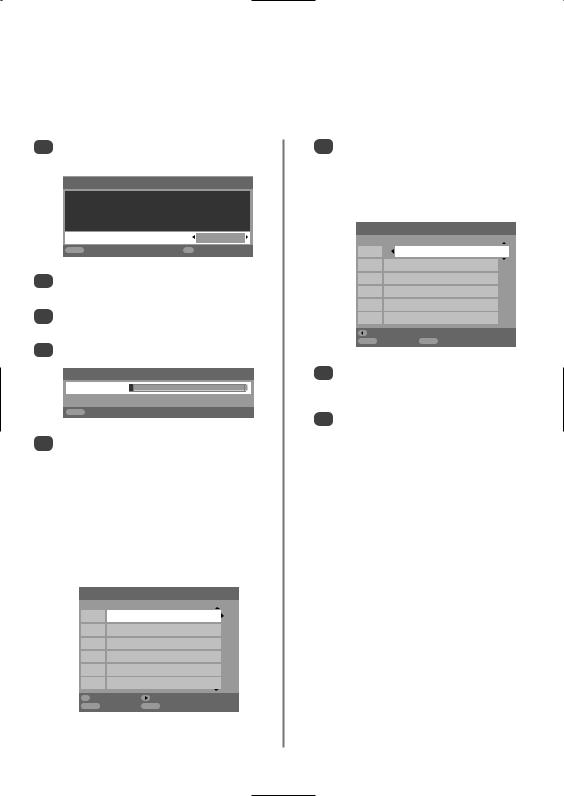
1Connect the television to the mains power. The Quick Setup screen will appear.
Quick Setup |
|
Select your language. |
|
Language |
English |
EXIT Watch TV |
OK Next |
2Using left or right select your language, then press OK.
3Then press left or right to select your country and press OK.
4To start Auto tuning press OK.
Auto tuning
Searching
Channel : C22 |
Station : BBC1 |
EXIT Stop
5The search will begin for all available stations. The slide bar will move along the line as the search progresses.
You must allow the television to complete the search.
When the search is complete the television will automatically select programme position 1. This may not be a clear picture or the signal may be weak, so the station order can be changed using Manual tuning which will appear on the screen.
Manual tuning
Prog. |
Channel |
Station |
1 |
C22 |
BBC1 |
2 |
C28 |
BBC2 |
3 |
C25 |
ITV |
4 |
C32 |
CH4 |
5

 C69
C69
6

 C69
C69
OK Select |
Sort |
MENU Back |
EXIT Watch TV |
6With the list of stations now showing use up or down to highlight the station you want to move and press right.
The selected station will be moved to the right of the screen.
Manual tuning
Prog. |
Channel |
Station |
1 |
C22 |
BBC1 |
2 |
C28 |
BBC2 |
3 |
C25 |
ITV |
4 |
C32 |
CH4 |
5

 C69
C69
6

 C69
C69
Store |
|
MENU Back |
EXIT Watch TV |
7Use up or down to move through the list to your preferred position. As you do so the other stations will move to make room.
8Press right to store your move. Repeat as necessary, then press EXIT.
If the television cannot be connected to a media recorder/decoder with a SCART lead or if a station on another system is required, use Manual tuning to allocate a programme position, see page 10.
9
 Loading...