


DVD RECORDER-VCR
D-VR3SB
OWNER’S MANUAL
Read this booklet first.
I / ON/STANDBY |
DUBBING |
TO DVD TO VCR
PAL
C 2004 Toshiba Corporation
Getting Started
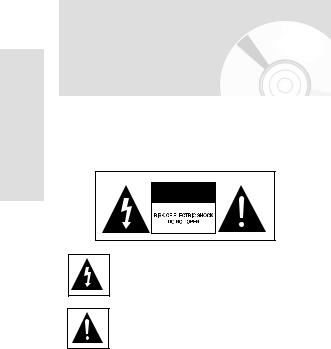
Warning
TO REDUCE THE RISK OF ELECTRIC SHOCK, DO NOT REMOVE THE COVER(OR BACK).
NO USER-SERVICEABLE PARTS ARE INSIDE. REFER SERVICING TO QUALIFIED SERVICE PERSONNEL.
This symbol indicates “dangerous voltage” inside the product that presents a risk of electric shock or personal injury.
This symbol indicates important instructions accompanying the product.
Do not install this equipment in a confined space such as a bookcase or similar unit.
WARNING : To prevent damage which may result in fire or electric shock hazard, do not expose this appliance to rain or moisture.
CAUTION : DVD Recorder-VCRS USE AN INVISIBLE LASER BEAM WHICH CAN CAUSE HAZARDOUS RADIATION EXPOSURE IF DIRECTED.
BE SURE TO OPERATE RECORDER CORRECTLY AS INSTRUCTED.
CAUTION
THIS PRODUCT UTILIZES A LASER.
USE OF CONTROLS OR ADJUSTMENTS OR PER- FOR-MANCE OF PROCEDURES OTHER THAN THOSE SPECIFIED HEREIN MAY RESULT IN HAZARDOUS RADIATION EXPOSURE.
DO NOT OPEN COVERS AND DO NOT REPAIR YOUR-SELF. REFER SERVICING TO QUALIFIED PERSONNEL.
CAUTIONS
Caution: To prevent electric shock, match wide blade of plug to wide slot, fully insert.
Attention: Pour éviter les chocs électriques, introduíre la lame la plus large de la fiche dans la borne correspondante de la prise et pousser jusqu au fond.
This product satisfies FCC regulations when shielded cables and connectors are used to connect the unit to other equipment. To prevent electromagnetic interfer-ence with electric appliances, such as radios and televi-sions, use shielded cables and connectors for connections.
2 - English
IMPORTANT NOTE
The mains lead on this equipment is supplied with a moulded plug incorporating a fuse. The value of the fuse is indicated on the pin face of the plug. If it requires replacing, a fuse approved to BS1362 of the same rating must be used.
Never use the plug with the fuse cover omitted if the cover is detachable. If a replacement fuse cover is required, it must be of the same colour as the pin face of the plug. Replacement covers are available from your dealer.
If the fitted plug is not suitable for the power points in your house or the cable is not long enough to reach a power point, you should obtain a suitable safety approved extension lead or consult your dealer for assistance.
However, if there is no alternative to cutting off the plug, remove the fuse and then safely dispose of the
plug. Do not connect the plug to a mains socket, as there is a risk of shock hazard from the bared flexible cord.
•It is permissible to record television programs, film, video tapes and other material only in the event that third party copyrights and other rights are not violated.
•It is prohibited by law to copy, broadcast, show, broadcast on cable, play in public, and rent copyrighted material without permission.
•Some DVD video discs are copy protected, and any recordings made from these discs will be distorted.
•Toshiba is not liable for any damage caused by fires, natural disaster (such as thunder, earthquake, etc...) acts by third parties, accidents, owner's intentional or unintentional misuse, or uses in other improper conditions.
•Toshiba is not liable for incidental damages (such as profit loss or interruption in business, modification or erasure of recorded data, etc.) caused by use or inability to use of this product.
•Toshiba is not liable for any damage caused by neglect of the instructions described in the owner's manual.
•Toshiba is not liable for any damage caused by misuse malfunction through simultaneous use of this product and the connected equipment or software that Toshiba is not concerned with.
•Toshiba does not dimpensate for contents which were not recorded/edited because of some malfunctions of this product or discs during operation, and is not liable for incidental damages (such as profit loss or interruption in business, etc.) produced by such conditions.
The product unit accompanying this user manual is licensed under certain intellectual property rights of certain third parties. This license is limited to private noncommercial use by end-user consumers for licensed contents. No rights are granted for commercial use. The license does not cover any product unit other than this product unit and the license does not extend to any unlicensed product unit or process conforming to ISO/IEC 11172-3 or ISO/IEC 13818-3 used or sold in combination with this product unit. The license only covers the use of this product unit to encode and/or decode audio files conforming to the ISO/IEC 11172-3 or ISO/IEC 13818-3. No rights are granted under this license for product features or functions that do not conform to the ISO/IEC 11172-3 or ISO/IEC 13818-3.

Precaution
Important Safety Instructions
CAUTION : PLEASE READ AND OBSERVE ALL WARNINGS AND INSTRUCTIONS GIVEN IN THIS OWNER’S MANUAL AND THOSE MARKED ON THE UNIT. RETAIN THIS BOOKLET FOR FUTURE REFERENCE.
This set has been designed and manufactured to assure personal.safety Improper use can result in electric shock or fire hazard. The safeguards incorporated in this unit will protect you if you observe the following procedures for installation, use and servicing. This unit is fully transistorized and does not contain any parts that can be repaired by the user.
DO NOT REMOVE THE CABINET COVER, OR YOU MAY BE EXPOSED TO DANGEROUS VOLTAGE. REFER SERVICING TO QUALIFIED SERVICE PERSONENEL ONLY.
1)Read these instructions.
2)Keep these instructions.
3)Heed all warnings.
4)Follow all instructions.
5)Do not use this apparatus near water.
6)Clean only with dry cloth.
7)Do not block any ventilation openings, Install in accordance with the manufacturer's instructions.
8)Do not install near any heat sources such as radiators, heat registers, stoves, or other apparatus (including amplifiers) that produce heat.
9)Do not defeat the safety purpose of the polarized or groundingtype plug. A polarized plug has two blades with one wider than the other. A grounding type plug has two blades and a third grounding prong. The wide
blade or the third prong are provided for your safety. if the provided plug does not fit into your outlet, consult an electrician for replacement of the obsolete outlet.
10)Protect the power cord from being walked on or pinched particularly at plugs, convenience receptacles, and the point where they exit from the apparatus.
11)Only use attachments/accessories specified by the manufacturer.
12)Use only with the cart, stand, tripod, bracket, or table specified by the manufacturer, or sold with the apparatus. When a cart is used, use caution when moving the cart/apparatus combination to avoid injury from tip-over.
13)Unplug this apparatus during lightning storms or when unused for long periods of time.
14)Refer all servicing to qualified service personnel. Servicing is required when the apparatus has been damaged in any way, such as power-supply cord or plug is damaged, liquid has been spilled or objects have fallen into the apparatus, the apparatus has been exposed to rain or moisture, does not operate normally, or has been dropped.
15)When you use headphones, keep the volume at a moderate level. If you use the headphones continuously with high volume sound, it may cause hearing damage.
16)Do not overload wall outlets : extension cords, or integral convenience receptacles as this can result in a risk of fire or electric shock.
17)Apparatus should not be exposed to dripping or splashing and no objects filled with liquids, such as vases, should be placed on the apparatus.
18)Keep your fingers well clear of the disc tray as it is closing. Neglecting to do so may cause serious personal injury.
19)Do not place a heavy object on or step on the apparatus. The object may fall, causing serious personal injury and serious damage to the apparatus.
20)Do not place the apparatus on amplifiers or equipment that may produce heat.
21)Do not cover the ventilating holes for the inside cooling fan.
22)Do not use a cracked, deformed, or repaired disc. These discs are easily broken and may cause serious personal injury and apparatus malfunction.
23)If the apparatus should smoke or smell, immediately disconnect the power cord from the wall outlet. Wait until the smoke or smell stops, then ask your dealer for a check and repair. Neglecting to do so may cause fire.
24)While it is thundering, do not touch the connecting cables or the apparatus.
25)The apparatus includes lead, an ingredient of solder human and the environment. When disposing of this apparatus, follow the rules and regulations in your area.
Started ettingG
English - 3
Getting Started
Handling Cautions
•Before connecting other components to this recorder, be sure to turn them all off.
•Do not move the recorder while a disc is being played, or the disc may be scratched or broken, and the recorder’s internal parts may be damaged.
•Do not put a flower vase filled with water or any small metal objects on the recorder.
•Be careful not to put your hand into the disc tray.
•Do not place anything other than the disc in the disc tray.
•Exterior interference such as lightning and static electricity can affect normal operation of this recorder. If this occurs, turn the recorder off and on again with the ON/STANDBY button, or disconnect and then reconnect the AC power cord to the AC power outlet. The recorder will operate normally.
•Be sure to remove the disc and turn off the recorder after use.
•Disconnect the AC power cord from the AC outlet when you don’t intend to use the recorder for long periods of time.
•Clean the disc by wiping in a straight line from the inside to the outside of the disc.
Maintenance of Cabinet
For safety reasons, be sure to disconnect the AC power cord from the AC outlet.
•Do not use benzene, thinner, or other solvents for cleaning.
•Wipe the cabinet with a soft cloth.
Disc Handling
• Use discs with regular shapes. If an irregular disc (a disc with a special shape) is used, this DVD RecorderVCR may be damaged.
Holding discs
• Avoid touching the surface of a disc where recording is performed.
Cartridge
•This is used to prevent damage by dirt, scratches, ets.when using a DVD-RAM/DVD-RW/DVD-R disc.
DVD-RAM, DVD-RW and DVD-R
•Clean with an optional DVD-RAM/PD disc cleaner.Do not use cleaners or
cloths for CDs to clean DVD- RAM/DVD-RW/DVD-R discs.
DVD-Video, CD
•Wipe off dirt or contamination on the disc with a soft cloth.
Cautions on handling discs
•Do not write on the printed side with a ball-point pen or pencil.
•Do not use record cleaning sprays or antistatic. Also, do not use volatile chemicals, such as benzene or thinner.
•Do not apply labels or stickers to discs. (Do not use discs fixed with exposed tape adhesive or leftover peeled-off stickers.)
•Do not use scratch-proof protectors or covers.
•Do not use discs printed with label printers available on the market.
•Do not load warped or cracked discs.
Disc Storage
Be careful not to harm the disc because the data on these discs is highly vulnerable to the environment.
•Do not keep under direct sunlight.
•Keep in a cool ventilated area.
•Store vertically.
•Keep in a clean protection jacket.
•If you move your DVD Recorder-VCR suddenly from a cold place to a warm place, condensation may generate on the operating parts and lens and cause abnormal disc playback. If this occurs, remove the disc and wait for one to two hours with the power on before attempting playback.
VIDEO Plus+ and PlusCode are registered trademarks of Gemstar Development Corporation. The VIDEO Plus+ system is manufatured under license from Gemstar Development Corporation.
4 - English

Notes on recording and editing
•When you record/edit important content, make trial operations beforehand to confirm the recorder can function properly.
Toshiba does not compensate for content which was not recorded/edited because of some malfunction of this product or discs during operation, and is not liable for incidental damages (such as profit loss or interruption of business, etc.) produced in such conditions.
•When the power cord is disconnected or when a power failure occurs during any operation of this product, all contents recorded in this recorder may be erased.
•Depending on the channel or program, an excessive sound. Adjust the initial setting of the recording level when necessary.
•If a program you have set a timer recording includes copy restriction signals, it may not be recorded. When programming a recording, confirm that a program you want to record is not copyrestricted.
Notes on copyright
•It is prohibited law to copy, broadcast, show, broadcast on cable, play in public, and rent copyrighted material without permission.
•Some DVD video discs are copy protected,and any recordings made from these discs will be distorted.
•This product incorporates copyright protection technology that is protected by method claims of certain U.S, patents and other intellectual property rights owned by Macrovision Corporation and other rights owners. Use of this copyright protection technology must be authorized by Macrovision Corporation, and is intended for home and other limited viewing uses only unless otherwise authorized by Macrovision Corporation. Reverse engineering of disassembly is prohibited.
•This unit incorporates CPRM (Content Protection for Recording Media) technology for copyright protection. Recording and copying on this recorder depend on the contents as described next page.
Exemptions
•Toshiba is not liable for any damage caused by fires, natural disaster (such as thunder, earthquake, etc.), acts by third parties, accidents, owner's intentional or unintentional misuse, or uses in other improper conditions.
•Toshiba is not liable for incidental damages (such as profit loss or interruption in business, modification or erasure of recorded data, etc.) caused by use or inability to use of this product.
•Toshiba is not liable for any damage caused by neglect of the instructions described in the owner's manual.
•Toshiba is not liable for any damage caused by misuse or malfunction through simultaneous use of this product and the connected equipment or software that Toshiba is not concerned with.
•Toshiba does not compensate for contents which were not recorded/edited because of some malfunctions of this product or discs during operation, and is not liable for incidental damages (such as profit loss or interruption in business, etc.) produced by such conditions.
Power Outage
•After a power outage the clock display will flash. Set the clock to the correct time.
Disc Specifications
DVD-Video
•A digital versatile disc (DVD) can contain up to 135minutes of images, 8-language audio and 32 subtitle languages. It is equipped with MPEG-2 picture compression and Dolby 3D surround, allowing you to enjoy vivid and clear theater quality images in the comfort of your own home.
•When switching from the first layer to the second layer of a double-layered DVD Video disc, there may be momentary distortion in the image and sound.
This is not a malfunction of the unit.
•Once a DVD-RW/DVD-R recorded in Video Mode is finalised, it becomes DVD-Video.
Audio CD
•An audio disc on which 44.1kHz PCM Audio is recorded.
•Plays CDDA format audio CD-R and CD-RW discs. This unit may not be able to play some CD-R or CD-RW discs due to the condition of the recording.
Started ettingG
English - 5

Getting Started
CD-R/-RW
MP3 CD-R/-RW
•Only CD-R discs with MP3 files recorded with ISO9660 or JOLIET format can be played back
•Only MP3 files with the "mp3", and "MP3" extension can be used.
•For MP3 files recorded with a VBR(Variable Bit Rates), from 32 Kbps to 320 Kbps, the sound may cut in out.
•Playable bitrate range is from 56Kbps to 320Kbps.
•The unit can handle a maximum of 1000 files and folders.
JPEG CD-R/-RW
•Only JPEG files with the ".jpg", ".JPG" extension can be used.
•The unit can handle a maximum of 1000 files and folders.
•Maximum size of progressive JPEG is 3M pixels.
•MOTION JPEG is not supported.
Using CD-R/-RW
•Use a 700MB(80 minutes) CD-R/-RW disc.
If possible, do not use a 800MB(90 minutes) or above disc, as the disc may not play back.
•If the CD-R/-RW disc was not recorded as a closed ses-sion, you may experience a delay in the early play-back time, and all recorded files may not play.
•Some CD-R/-RW discs may not be playable with this unit, depending on the device which was used to burn them.
For contents recorded on CD-R/-RW media from CDs for your personal use, playability may vary depending on contents and discs.
DVD-R Disc Playback and Recording
•Once a DVD-RW/DVD-R recorded in Video Mode is finalised, it becomes DVD-Video.
•You can record onto the available space on the disc and perform editing functions such as giving titles to discs and programs and erasing programs before finalising.
•When programming is erased from a DVD-R, that space does not become available. Once an area on a DVD-R is recorded on, that area is no longer available for recording, whether the recording is erased or not.
•It takes about 30 seconds for the unit to complete recording management information after recording finishes.
•This product optimizes the DVD-R for each recording. Optimizing is carried out when you start recording after inserting the disc or turn on the unit.
Recording onto the disc may become impossible if optimizing is carried out too many times.
•Playback may be impossible in some cases due to the condition of recording.
•This unit can play back DVD-R discs recorded and finalised with a Toshiba DVD recorder. It may not be able to play some DVD-R discs depending on the disc and the condition of the recording.
DVD-RW Disc Playback and Recording
•Recording and playback can be performed on DVDRW discs in both Video and VR Modes.
•Once a DVD-RW recorded in VR Mode is finalised, you cannot perform additional recording.
•Once a DVD-RW recorded in Video Mode is finalised, it becomes DVD-Video.
•In both modes, playback can be performed before and after finalization, but additional recording, deleting and editing can not be performed after finalization.
•If you want to record the disc in VR Mode and then record in V Mode, be sure to execute Format. Be careful when executing Format because all the recorded data may be lost.
•A DVD-RW blank disc is initialized to VR Mode when first initialized.
•DVD-RW (VR mode)
-This is a format that is used for recording data on a DVD-RAM or DVD-RW disc. You can repeat recording, editing, deleting, partial deletion, creation of playlist, and etc.
-A disc that is recorded in this mode may not be played by existing DVD players.
• DVD-RW (Video mode)
-This is a format that is used for recording data on a DVD-RW or DVD-R disc. The disc can be played by an existing DVD player once it has been finalised.
-If a disc that has been recorded in Video mode by a different manufacturer's recorder but has not been finalised it cannot be played or additionally be recorded by this recorder.
6 - English

DVD-RAM Disc Playback and Recording
•DVD-RAM discs come with or without a cartridge. For this product, we recommend DVD-RAM discs that come with cartridges.
•Some cartridges are able to eject the disc inside. Even if you are able to eject the disc, always use the disc with the cartridge to ensure correct operation.
•DVD-RAM discs have a Write Protect tab in order to avoid accidental erasure of recorded data. With the Write Protect tab set to PROTECT, you can play the disc, but recording or erasing will not work. Set the Write Protect tab to UNPROTECT to format the disc or erase data.
•Ensure that the recording mode is set to VR mode. Otherwise, this product will not be able to play the recording.
•You cannot play a DVD-RAM in most DVD players due to compatibility issues.
•Only DVD-RAM standard Version 2.0 discs can be played in this unit.
•DVD-RAM recorded on this unit may not work with other DVD Players. To determine compatibility with these DVD-RAM discs, refer to the user’s manual for the player.
•This unit is compatible with both non-cartridge and cartridge DVD-RAM, but the write-protect tabs on car- tridge-type discs give better protection to your recordings.
Protection
This DVD Recorder-VCR can allow you to protect the contents of your discs, as described below.
•Cartridge-protected:
With the write-protect tab set in the protect posi-
tion, the contents of the disc cannot be recorded, edited, or erased.
•Program-protected: See page 89 “Locking the title List Entry”
•Disc-protected: See page 100 “Disc Protection”
DVD-RAM/DVD-RW/DVD-R discs that are incompatible with the DVD-VIDEO format can not be played with this product.
For more information on recording a DVD, consult your DVD-RAM/DVD-RW/DVD-R manufacturer.
If poor quality DVD-RAM/DVD-RW/DVD-R discs are used, your recordings may fail.
Do not use the following discs!
•LD, CD-G, CD-I, CD-ROM, DVD-ROM, DVD+R and DVD+RW discs should not be used in this product.
[Note]
Disc types that can be played : CD/CD-R/CD-RW/MP3/ JPEG/DVD-Video/DVD-RAM/DVD-RW/DVD-R. However, if your DVD-RW disc was recorded with another device, it can be played only if it was recorded and finalised in video mode.
•Some commercial discs and DVD discs purchased outside your region may not be playable with this product. When these discs are played, either “No disc.” or “Please check the regional code.” will be displayed.
•If your DVD-RW disc is an illegal copy or is not in DVD video format, it may also not be playable.
COPY PROTECTION
•Many DVD discs are encoded with copy protection. Because of this, you should only connect your DVD Recorder-VCR directly to your TV, not to a VCR.
Connecting to a VCR results in a distorted picture from copy-protected DVD discs.
•This product incorporates copyright protection technology that is protected by methods claims of certain U.S. patents and other intellectual property rights owned by Macrovision Corporation and other rights owners. Use of this copyright protection technology must be authorized by Macrovision Corporation, and is intended for home and other limited viewing uses only unless otherwise authorized by Macrovision Corporation. Reverse engineering or disassembly is prohibited.
•It is permissible to record television programs, film, video tapes and other material only in the event that third party copyrights and other rights are not violated.
Started ettingG
English - 7

Getting Started
Contents |
|
Getting Started |
|
Warning . . . . . . . . . . . . . . . . . . . . . . . . . |
2 |
Precaution . . . . . . . . . . . . . . . . . . . . . . . |
3 |
General Features . . . . . . . . . . . . . . . . . . |
11 |
Before Reading the User’s Manual . . . . . |
12 |
How to use the DVD Recorder-VCR . . . . |
12 |
Description . . . . . . . . . . . . . . . . . . . . . . |
14 |
Front Panel . . . . . . . . . . . . . . . . . . . . . . . . . . . |
14 |
Front Panel Display . . . . . . . . . . . . . . . . . . . . . . |
14 |
Rear Panel . . . . . . . . . . . . . . . . . . . . . . . . . . . . |
15 |
Tour of the Remote Control . . . . . . . . . . . . . . . . |
16 |
Connecting & Setting Up |
|
Quick Overview . . . . . . . . . . . . . . . . . . . . |
17 |
Unpacking . . . . . . . . . . . . . . . . . . . . . . . . |
18 |
Accessories . . . . . . . . . . . . . . . . . . . . . . . . . . . . |
18 |
Connecting DVD Recorder-VCR to the TV using the RF Cable . . . . . . . . . . . . . . . . . 18 Connecting the Scart Cable . . . . . . . . . . . 19
Connection DVD Recorder-VCR to the |
|
TV using the SCART Cable . . . . . . . . . . . . . . . . |
19 |
Connecting DVD Recorder-VCR to a |
|
Satellite Receiver or Other Equipment . . . . . . . . . |
19 |
Connecting the Video Cable . . . . . . . . . . |
20 |
Connecting to a video input jack . . . . . . . . . . . . . |
20 |
Connecting to an S-video input jack . . . . . . . . . . |
21 |
Connecting the Audio Cable . . . . . . . . . . . |
21 |
Connecting to your TV . . . . . . . . . . . . . . . . . . . . |
21 |
Connecting to a stereo amplifier with |
|
analog input jacks . . . . . . . . . . . . . . . . . . . . . . . |
22 |
Connecting to a an AV amplifier with |
|
the digital input jack . . . . . . . . . . . . . . . . . . . . . . |
22 |
Connecting External Devices . . . . . . . . . . |
23 |
Connecting a extemal devices to the |
|
AUX kacks . . . . . . . . . . . . . . . . . . . . . . . . . . . . |
23 |
Connecting a Camcorder to the DV IN jack . . . . . . . . . |
23 |
Preparing the Remote Control . . . . . . . . . |
24 |
Seting the Remote Control . . . . . . . . . . . . . . . . |
24 |
System Setup |
|
On-Screen Menu Navigation . . . . . . . . . . |
26 |
Plug & Auto Setup . . . . . . . . . . . . . . . . . |
27 |
Setting the Date and Time . . . . . . . . . . . |
28 |
Presetting the Stations Automatically . . . |
29 |
Presetting the Stations Manually . . . . . . . |
30 |
Clearing a Preset Station . . . . . . . . . . . . |
31 |
Changing the Preset Manual Setup Table |
32 |
Setting the VCR Output Channel . . . . . . . . . . |
33 |
Setting Up the Language Features . . . . . |
34 |
Audio . . . . . . . . . . . . . . . . . . . . . . . . . . . . . . . . |
34 |
Subtitle . . . . . . . . . . . . . . . . . . . . . . . . . . . . . . . |
35 |
Disc Menu . . . . . . . . . . . . . . . . . . . . . . . . . . . . . |
36 |
On-Screen Menu . . . . . . . . . . . . . . . . . . . . . . . . |
37 |
Setting Up the Audio Options . . . . . . . . . . |
38 |
Digital Output . . . . . . . . . . . . . . . . . . . . . . . . . . . |
38 |
DTS . . . . . . . . . . . . . . . . . . . . . . . . . . . . . . . . . |
38 |
Dynamic Compression . . . . . . . . . . . . . . . . . . . |
38 |
Setting Up the Display(Video) Options . . . |
39 |
Display(Video) Options . . . . . . . . . . . . . . . . . . . . |
39 |
Setting Up the Parental Control . . . . . . . . |
40 |
About the Change Password; . . . . . . . . . . . . . . |
41 |
VCR Setting . . . . . . . . . . . . . . . . . . . . . . |
41 |
Intelligent Picture Control(IPC) . . . . . . . . |
43 |
Selection the Colour Mode . . . . . . . . . . . |
44 |
Front Display . . . . . . . . . . . . . . . . . . . . . |
45 |
NICAM . . . . . . . . . . . . . . . . . . . . . . . . . . |
46 |
AV1 Output . . . . . . . . . . . . . . . . . . . . . . |
46 |
8 - English

Playback
*DVD Playback
Before Playing . . . . . . . . . . . . . . . . . . . . . 47
Region code (DVD-Video only) . . . . . . . . . . . . . |
47 |
Disc types that can be played . . . . . . . . . . . . . . . |
47 |
Discs that cannot be played . . . . . . . . . . . . . . . . |
48 |
Playing a Disc . . . . . . . . . . . . . . . . . . . . . 48 Using the Search & Skip Functions . . . . . 50
Searching through a Chapter or Track . . . . . . . . |
50 |
Skipping Chapters or Tracks . . . . . . . . . . . . . . . |
50 |
Skipping ahead 30 seconds . . . . . . . . . . . . . . . . |
50 |
Slow Motion Play / Step Motion Play . . . . 50
Slow Motion Play (DVD-VIDEO/DVD-RAM/
DVD-RW/DVD-R) . . . . . . . . . . . . . . . . . . . . . . . 50
Step Motion Play(DVD-VIDEO/DVD-RAM/
DVD-RW/DVD-R) . . . . . . . . . . . . . . . . . . . . . . . 50
About QUICK . . . . . . . . . . . . . . . . . . . . . |
51 |
DVD-VIDEO . . . . . . . . . . . . . . . . . . . . . . . . . . . |
51 |
DVD-RAM/DVD-RW . . . . . . . . . . . . . . . . . . . . . |
51 |
DVD-R . . . . . . . . . . . . . . . . . . . . . . . . . . . . . . . |
51 |
Repeat Play . . . . . . . . . . . . . . . . . . . . . . |
52 |
Using Repeat Play(For DVD-VIDEO/ |
|
DVD-RAM/DVD-RW/DVD-R) . . . . . . . . . . . . . . . |
52 |
Using Repeat Play |
|
(For Audio CD/MP3) . . . . . . . . . . . . . . . . . . . . . |
52 |
Using the A-B Repeat Function . . . . . . . . 53
For DVD-VIDEO/DVD-RAM/DVD-RW/ |
|
DVD-R . . . . . . . . . . . . . . . . . . . . . . . . . . . . . . . |
53 |
To return to normal playback . . . . . . . . . . . . . . . |
53 |
Moving to a Scene Directly . . . . . . . . . . . 53
Selecting the Subtitle & Audio Language . 54
Selecting the subtitle language . . . . . . . . . . . . . |
54 |
Selecting the Audio language . . . . . . . . . . . . . . |
55 |
Changing the Camera Angle . . . . . . . . . . 55
Using Bookmarks . . . . . . . . . . . . . . . . . . 56
Setting a book mark . . . . . . . . . . . . . . . . . . . . . |
56 |
Bookmarking with DVD-RAM/DVD-RW(VR) disc |
56 |
Playing Back a Bookmark . . . . . . . . . . . . . . . . . . |
56 |
Clearing a Bookmark . . . . . . . . . . . . . . . . . . . . . |
57 |
Zooming-In . . . . . . . . . . . . . . . . . . . . . . . 57 Check Remaining Time . . . . . . . . . . . . . 58 Using the Disc and Top Menu . . . . . . . . . 58
For DVD-VIDEO disc . . . . . . . . . . . . . . . . . . . . . |
58 |
For DVD-RAM/DVD-RW/DVD-R disc . . . . . . . . . |
58 |
Playing Back an Audio CD (CDDA) . . . . . 59 |
|
Audio CD (CDDA) Screen Elements . . . . . . . . . |
59 |
Play Option Mode . . . . . . . . . . . . . . . . . . |
60 |
To change repeat mode . . . . . . . . . . . . . . . . . . . |
60 |
To Programme Tracks . . . . . . . . . . . . . . . |
61 |
Photo CD Playback . . . . . . . . . . . . . . . . . |
62 |
When using a combination MP3/JPEG disc . . . . . . . . |
62 |
Playing back an MP3 CD . . . . . . . . . . . . . |
63 |
Buttons on the Remote Control . . . . . . . . . . . . . |
63 |
When using a combination |
|
MP3/JPEG disc . . . . . . . . . . . . . . . . . . . . . . . . . |
63 |
Using PIP . . . . . . . . . . . . . . . . . . . . . . . . |
64 |
Switching between the PIP and main |
|
screens . . . . . . . . . . . . . . . . . . . . . . . . . . . . . . . |
64 |
Deactivating PIP . . . . . . . . . . . . . . . . . . . . . . . . |
64 |
*VCR Playback |
|
Playing the VCR . . . . . . . . . . . . . . . . . . . |
65 |
Tracking . . . . . . . . . . . . . . . . . . . . . . . . . |
65 |
Special VCR Playback Features . . . . . . . |
66 |
Variable Search System . . . . . . . . . . . . . |
67 |
Go to [0:00:00] stop . . . . . . . . . . . . . . . . . . . . . . |
67 |
End search . . . . . . . . . . . . . . . . . . . . . . . . . . . . |
67 |
Scan and play . . . . . . . . . . . . . . . . . . . . . . . . . . |
67 |
Recording |
|
*DVD Recording |
|
Before Recording . . . . . . . . . . . . . . . . . . |
68 |
Recordable discs . . . . . . . . . . . . . . . . . . . . . . . . |
68 |
Recording Formats . . . . . . . . . . . . . . . . . . . . . . |
69 |
Unrecordable pictures . . . . . . . . . . . . . . . . . . . . |
69 |
Recording the current programme you are |
|
watching . . . . . . . . . . . . . . . . . . . . . . . . . |
70 |
Pausing/Resuming . . . . . . . . . . . . . . . . . . . . . . . |
70 |
Making a One Touch Recording(OTR) . . . |
71 |
Using the Videoplus+ Feature . . . . . . . . . |
71 |
Modifying Videoplus+ Programming . . . . . |
73 |
Using the Timer Programming Feature . . |
74 |
Editing Timer Programming Feature . . . . |
75 |
Editing the settings for a timer recording . . . . . . . |
75 |
Deleting a Timer Programming . . . . . . . . |
76 |
Started ettingG
English - 9

|
Videoplus+ Extended . . . . . . . . . . . . . . . |
77 |
|
Watching the Images Being Recorded |
|
|
(Time Slip) . . . . . . . . . . . . . . . . . . . . . . . . . . |
78 |
|
Recording From External Devices . . . . . . |
78 |
Started |
*VCR Recording |
|
|
Recording through a DV jack . . . . . . . . . . |
79 |
ettingG |
|
|
|
Basic VCR Recording . . . . . . . . . . . . . . . |
79 |
|
Special Recording Features . . . . . . . . . . |
80 |
|
Record Speed . . . . . . . . . . . . . . . . . . . . . |
80 |
|
Copy to DVD or VCR . . . . . . . . . . . . . . . |
81 |
|
DVD to VCR . . . . . . . . . . . . . . . . . . . . . . . . . . . |
81 |
|
Direct copy DVD to VCR . . . . . . . . . . . . . . . . . . |
81 |
|
VCR to DVD . . . . . . . . . . . . . . . . . . . . . . . . . . . |
82 |
|
Direct copy VCR to DVD . . . . . . . . . . . . . . . . . . |
82 |
Editing
Viewing the Menu Functions for a Disc . . 83
No Disc . . . . . . . . . . . . . . . . . . . . . . . . . . . . . . . |
83 |
DVD-VIDEO . . . . . . . . . . . . . . . . . . . . . . . . . . . |
83 |
CD . . . . . . . . . . . . . . . . . . . . . . . . . . . . . . . . . . |
84 |
JPEG+MP3 . . . . . . . . . . . . . . . . . . . . . . . . . . . . |
84 |
DVD-RAM(VR) . . . . . . . . . . . . . . . . . . . . . . . . . . |
84 |
DVD-RW(VR) . . . . . . . . . . . . . . . . . . . . . . . . . . |
84 |
DVD-R(V) . . . . . . . . . . . . . . . . . . . . . . . . . . . . . |
84 |
Viewing Title List . . . . . . . . . . . . . . . . . . . |
85 |
Record List edit items . . . . . . . . . . . . . . . . . . . . |
85 |
Playing a Title List Entry . . . . . . . . . . . . . |
86 |
Renaming a Title List Entry . . . . . . . . . . . |
87 |
Deleting a Title List Entry . . . . . . . . . . . . |
88 |
Locking a Title List Entry . . . . . . . . . . . . |
89 |
Deleting a Section from a Title List Entry |
90 |
Creating a Playlist Entry . . . . . . . . . . . . . |
91 |
Editing a Playlist Entry . . . . . . . . . . . . . . . |
93 |
Playing Playlist Entries . . . . . . . . . . . . . . . . . . . |
93 |
Renaming Playlist Entries . . . . . . . . . . . . . . . . . |
94 |
Editing Scene for a Playlist Entry . . . . . . . 94
A. Playing a Desired Scene . . . . . . . . . . . |
. . . . . 95 |
B. Modifying a Scene |
|
(Replacing a Scene) . . . . . . . . . . . . . . . . . |
. . . . 95 |
C. Modifying a Scene |
|
(Changing the Position of a Scene) . . . . . . |
. . . . 96 |
D. Adding Scene . . . . . . . . . . . . . . . . . . . . |
. . . . 96 |
E. Deleting a Scene from the Playlist . . . . . |
. . . . 97 |
Copying a Playlist Entry to the VCR |
. . . . 98 |
Deleting a Playlist Entry from the Playlist . 98 |
|
Disc Manager . . . . . . . . . . . . . . . . . . |
. . . 99 |
Editing Disc Name . . . . . . . . . . . . . . . . . . . |
. . . . 99 |
Disc Protection . . . . . . . . . . . . . . . . . . . . . |
. . . . 100 |
Formatting a DVD-RAM/DVD-RW Disc . . . |
. . . . 101 |
Deleting All Title Lists . . . . . . . . . . . . . . . . |
. . . . 102 |
Cartridge Protect Info (DVD-RAM) . . . . . . . |
. . . . 102 |
Finalising a disc . . . . . . . . . . . . . . . . . . . . |
. . . . 103 |
Unfinalising a disc (V/VR mode) . . . . . . . . |
. . . . 104 |
Reference
Troubleshooting (DVD-VIDEO/DVD-RAM/
DVD-RW/DVD-R) . . . . . . . . . . . . . . . . . . 106
Troubleshooting . . . . . . . . . . . . . . . . . . . 107
Problems and Solutions (VCR) . . . . . . . . 108
Specifications . . . . . . . . . . . . . . . . . . . . . 109
10 - English
General Features
The D-VR3 allows you to record and playback high quality digital images on a DVD-RAM/DVD-RW/ DVD-R disc. You can also edit digital images on DVD-RAM/DVD-RW discs.
High quality digital audio and video recording and playback
Record up to about 12-hours of video with a double side 9.4 GB DVD-RAM disc, and up to about 6-hour of video with a 4.7 GB DVD-RAM disc, depending on the recording mode.
Creating DVD-Video title using DVD-RW/DVD-R disc
With D-VR3, create your own DVD-Video title on 4.7 GB DVD-RW/DVD-R discs.
A Variety of Recording Options(DVD)
Select an appropriate recording mode between XP, SP, LP and EP to meet your recording needs. (See page 75)
•XP mode - High quality, about 1 hour
•SP mode - Standard quality, about 2 hours
•LP mode - Low quality, about 4 hours
•EP mode - Lower quality, about 6 hours
Copying digital camcorder content using DV input jack
Record digital camcorder images onto DVD-RAM/DVD-RW/DVD-R discs or Video tape using the DV input jack (IEEE 1394-4pin/4pin). (See page 79.)
Time Slip and Picture In Picture (PIP)
Use the Time Slip function to playback the recorded images while a recording is proceeding (DVD-RAM only).
Use the PIP function to view the playback and recording screens at the same time.
A variety of functions with easy-to-use user interface
Integrated menu system and messaging functionality allow you to perform the desired operations easily and conveniently. With a DVD-RAM/DVD-RW(VR mode) disc, you can edit recorded images, create playlist, and edit images in specific sequence according to your needs.
Started ettingG
English - 11

Getting Started
Before Reading the
User’s Manual
Make sure to read the following terms before reading the user’s manual.
Icons that will be used in manual
Icon |
Term |
Definition |
|
|
This involves a function avail- |
|
DVD |
able in DVD or Video Mode |
|
|
DVD-R |
|
|
|
|
RAM |
This involves a function avail- |
|
able in DVD-RAM |
|
|
|
|
|
|
|
|
RW |
This involves a function avail- |
|
able in DVD-RW |
|
|
|
|
|
|
|
|
R |
This involves a function avail- |
|
able in DVD-R |
|
|
|
|
|
|
|
|
CD |
This involves a function avail- |
|
able in a data CD (CD-R or |
|
|
|
CD-RW) |
|
JPEG |
This involves a function avail- |
|
able in a data picture CD |
|
|
|
(CD-R or CD-RW) |
|
|
|
|
|
This involves a function avail- |
|
MP3 |
able in a data CD (CD-R or |
|
CD-RW on which MP3 is |
|
|
|
|
|
|
recorded) |
|
|
|
|
|
This involves tips or instruc- |
|
NOTE |
tions on the page that help |
|
|
each function operation |
|
|
|
|
Preliminary |
Check items before operating |
|
each function. |
|
|
|
|
|
|
|
About the use of this user’s manual
1)Be sure to be familiar with Safety Instructions before using this product. (See pages 2~7)
2)If a problem occurs, check for Troubleshooting.
Copyright
©2004 Toshiba Corporation.
All rights reserved; No part or whole of this user’s manual may be reproduced or copied without the prior written permission of Toshiba Corporation.
How to use the DVD Recorder-VCR
Step 1 Select the disc type
This unit can record on the following types of discs. If you want to repeatedly record on the same disc or you want to edit the disc after recording, select a rewritable DVD-RW or DVD-RAM type disc. If you want to save a recording without any changes, choose a non-rewritable DVD-R.
Step 2 Format the disc to start recording
Unlike a VCR, the recorder automatically starts formatting when an unused disc is inserted. This is required for the preparation of recording on a disc.
Using a DVD-RAM
This type of disc can be formatted in DVD-Video Recording format (VR mode). You can edit recorded images and create a playlist in a specific sequence according to your requirements.
Using a DVD-RW
This type of disc can be formatted in either DVD-Video format (Video mode) or DVD-Video Recording format (VR mode). For an unused disc, a message that asks whether to format in VR Mode or not is displayed. You can play a video mode disc on various DVD components. A VR mode disc allows more varied editing.
Using a DVD-R
This type of disc can be formatted in DVD Video format. After formatting is complete, you can record on the disc. You can play this type of disc on various DVD components only when they have been finalised.
You can only use one format on a DVD-RW.
Note You can change the DVD-RW format to another format. It should be noted that the data of
the disc may be lost when changing formats.
12 - English

Step 3 |
Recording |
There are two different recording methods: Direct Recording and Timer Recording. Timer recording is classified as recording type : Once, Daily or Weekly or recording mode : XP (high quality mode), SP (standard quality mode), LP (long recording mode), and EP (extended mode) according to the recording mode.
You can select the title you want to play in a displayed menu and then immediately start playback.
A DVD consists of sections, called titles, and sub sections, called chapters.
During recording, a title is created between two points where you start and stop recording, DVD-RW/DVD-R discs(in Video mode) can automatically create chapters according to the recording mode when finalised.
Step 6 |
Finalising & Playing on |
|
other DVD components |
||
|
To play your DVD on other DVD components, finalsing may be necessary. First, finish all editing and recording operations, then finalise the disc.
When using a DVD-RW disc in VR Mode
Although finalising is generally unnecessary when playing the disc on a VR Mode compatible component, a finalised disc should be used for playback on that type of component.
When using a DVD-RW disc in Video Mode
The disc should be finalised first to enable playback on anything other than this recorder. No more editing or recording can be made on the disc once it has been finalised.
To enable recording on the disc again, Disc should be unfinalised.
When using a DVD-R disc
You should finalise the disc to play it on a component other than this recorder. You cannot edit or record on the disc once it has been finalised.
Started ettingG
Step 5 Editing a recorded disc
Editing on discs is easier than conventional video tapes. The recorder supports many different edit functions, possible only with DVDs.
With a simple and easy edit menu, you can operate various edit functions, such as delete, copy, rename, lock, etc., on a recorded title.
Creating a playlist (DVD-RAM/DVD-RW in VR mode)
With this recorder, you can create a new playlist on the same disc and edit it without the change of the original recording.
English - 13
Getting Started
Description
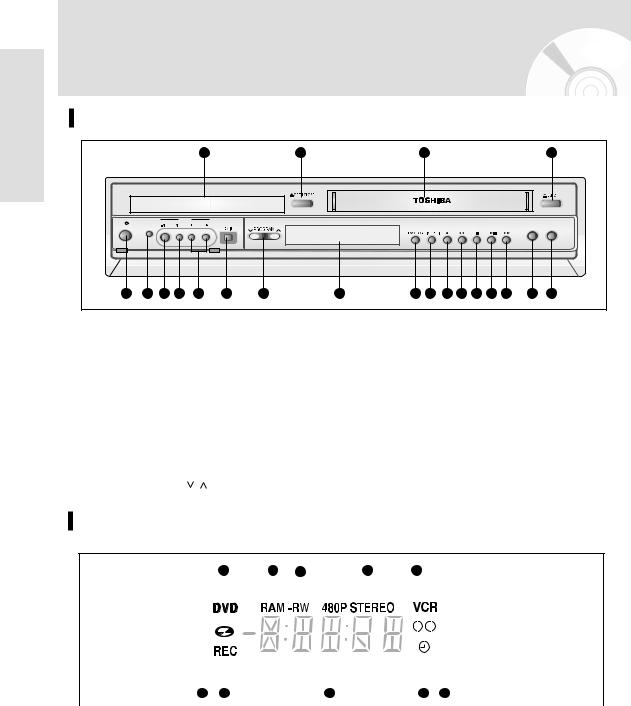
Front Panel
|
|
2 |
|
|
|
|
|
|
|
4 |
AUX |
|
|
|
|
|
|
|
|
|
|
ON/STANDBY INPUT SELECT |
|
|
|
|
|
|
|
|
DUBBING |
|
|
|
|
|
|
|
|
|
|
TO DVD |
TO VCR |
10 |
11 |
12 |
13 |
15 |
16 |
17 |
18 |
19 |
20 |
21 |
1. |
DVD DECK |
12. |
FRONT PANEL DISPLAY |
2. |
DVD OPEN/CLOSE BUTTON |
13. DVD/VCR SELECT BUTTON |
|
3. |
VCR DECK |
14. |
TIME SLIP BUTTON |
4. |
VCR EJECT BUTTON |
15. RECORD BUTTON |
|
5. |
ON/STANDBY BUTTON |
16. |
REW/SKIP BUTTON (VCR/DVD) |
6. |
INPUT SELECT BUTTON |
17. |
STOP BUTTON |
7. |
S-VIDEO INPUT JACK |
18. |
PLAY/STILL BUTTON |
8. |
VIDEO INPUT JACK |
19. |
F.F/SKIP BUTTON (VCR/DVD) |
9. |
AUDIO L.R INPUT JACK |
20. |
TO DVD BUTTON |
10. |
DV IN JACK |
21. |
TO VCR BUTTON |
11. |
PROGRAM / BUTTON |
|
|
Front Panel Display
5
|
|
|
|
|
|
|
|
|
|
|
|
|
|
|
|
|
|
|
|
|
|
|
|
|
|
|
|
|
|
|
|
|
|
|
|
|
|
|
|
|
|
|
|
|
|
|
|
|
|
|
|
|
|
|
|
|
|
|
|
|
|
|
|
|
|
|
|
|
|
|
|
|
|
|
|
|
|
|
|
|
|
|
|
|
|
|
|
|
|
|
|
|
|
|
|
|
|
|
|
|
|
|
|
|
|
|
|
|
|
|
|
|
|
|
|
|
|
|
|
|
|
|
|
|
|
|
|
|
|
|
|
|
|
|
|
|
|
|
|
|
|
|
|
|
|
|
|
|
|
|
|
|
|
|
|
|
|
|
|
|
|
|
|
|
|
|
|
|
|
|
|
|
|
|
|
|
|
|
|
|
|
|
10 |
|
|||||
|
|
|
|
|
|
|
|
|
|
|
|
|
|
|
|
|
|
|
1. |
When the indicator is on, DVD is activated. |
7. |
Record function is working. |
|||||||||||||||
2. |
DVD-RAM is activated. |
8. |
The time, counter position or current deck |
|||||||||||||||
3. |
DVD-RW or DVD-R is activated. |
|
|
status is indicated. |
||||||||||||||
4. |
When you watch STEREO channel or playback |
9. |
When you set a Timer recording, it or cur- |
|||||||||||||||
|
Hi-Fi VCR tapes, STEREO indicator lights. |
|
|
rentdeck status is indicated. this indicator is |
||||||||||||||
5. |
VCR is activated. |
|
|
light. |
||||||||||||||
6. |
DVD or CD media is loaded. |
10. |
VHS Videotape is loaded. |
|||||||||||||||
14 - English
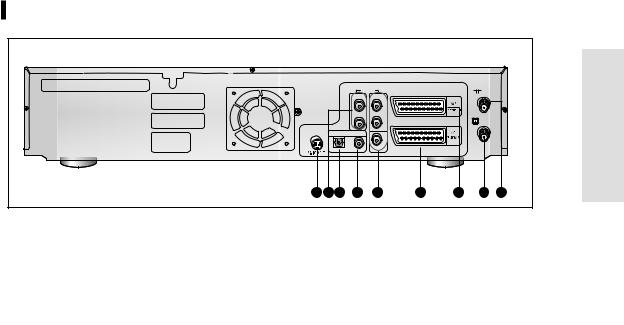
Rear Panel |
|
|
|
|
|
|
|
|
G |
|
AUDIO OUT |
|
etting |
|
|
R |
|
R |
|
|
L |
|
L |
Started |
DIGITAL AUDIO OUT |
|
|
||
OPTICAL |
COAXIAL |
VIDEO |
|
|
2 |
|
|
|
7 |
1. |
S-VIDEO OUT JACK |
6. |
AV1 (EURO AV) IN/OUT SCART |
2. |
AUDIO OUT L,R JACK |
|
(EURO-21) SOCKET |
3. |
DIGITAL AUDIO OUT JACK (OPTICAL) |
7. |
AV2 (DEC./EXT.) SCART |
4. |
DIGITAL AUDIO OUT JACK (COAXIAL) |
|
(EURO-21) SOCKET |
5. |
AUDIO/VIDEO JACK |
8. |
OUT TO TV CONNECTOR |
|
|
9. |
AERIAL IN CONNECTOR |
English - 15
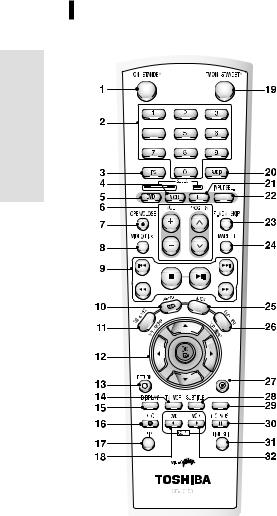
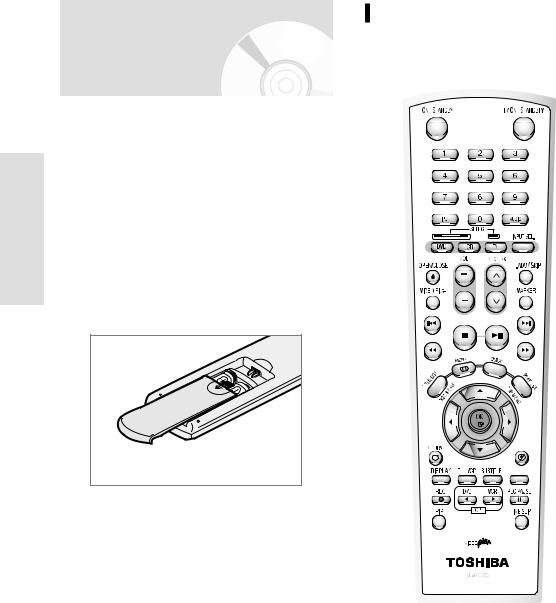
Tour of the Remote Control
Getting Started
CLEAR
REC SPEED
1.ON/STANDBY Button
2.NUMBER Button
3.IPC Button
4.VCR Button
5.DVD Button
Press this when you use a DVD.
6.TV Control Buttons
•VOLUME Button
TV volume adjustment
•PROG/TRK Button
Use this to select a TV programme.
7.OPEN/CLOSE Button
To open and close the disc and Video cassettes.
8.VIDEO Plus+ Button
Press this when you use video plus+.
9.Playback-related Buttons
Search, Skip, Stop, Play/Still
10.MENU Button
Brings up the DVD Recorder-VCR’s setup menu.
11.TITLE LIST/DISC MENU Button
Use this to enter the View Recoding list/disc menu.
12.OK/DIRECTION Buttons
(UP/DOWN or LEFT/RIGHT Buttons)
13.RETURN Button
14.TV/VCR Button
15.DISPLAY Button
This will display current setting or disc status.
16.REC Button
Use to make a recording on DVD-RAM/- RW/-R discs and Video tape.
17.PIP Button
Use to watch a subprogram on the PIP screen while watching the main program on the main screen.
18.DVD COPY Button
Press this when you copy VCR to DVD.
19.TV ON/STANDBY Button
20.AUDIO Button
Use this to access various audio functions on a disc (DVD mode).
21.TV Button
Press this to operate TV.
22.INPUT SEL. Button
Select input signal in external input mode(Tuner or AV 1, AV 2 or AUX)
23.F.ADV/SKIP Button
24.MARKER Button
Use this to bookmark a position while playing a disc.
25.QUICK Button
Use this to view the status of the disc that is being played.
26.PLAY LIST/TOP MENU Button
Use this to return to the TOP MENU, or to view the recorded files list.
27.CLEAR Button
28.SUBTITLE Button
Press this to switch the DVD’s subtitle language.
29.REC SPEED Button
30.REC PAUSE Button
Use this to pause during recording.
31.TIME SLIP Button
32.VCR COPY Button
Press this when you copy DVD to VCR.
16 - English

Connecting &
Setting Up
• |
Quick Overview . . . . . . . . . . . . . . . . . . |
17 |
• |
Unpacking . . . . . . . . . . . . . . . . . . . . . . . |
18 |
• |
Connecting DVD Recorder-VCR to the TV |
|
|
using the RF Cable . . . . . . . . . . . . . . . . |
18 |
• |
Connecting the Scart Cable . . . . . . . . . . |
19 |
• |
Connecting the Video Cable . . . . . . . . . . |
20 |
• |
Connecting the Audio Cable . . . . . . . . . |
21 |
• |
Connecting External Devices . . . . . . . . . |
23 |
• |
Preparing the Remote Control . . . . . . . . |
24 |
Quick Overview
A Quick overview presented in this guide will give you enough information to start using the recorder.
Step 1 : Unpacking
Step 2 : Connecting DVD Recorder-VCR to the TV using the RF Cable
Step 3 : Connecting the Scart Cable
Step 4 : Connecting the Video Cable
Step 5 : Connecting the Audio Cable
Step 6 : Connecting External Devices
Step 7 : Preparing the Remote Control
onnectionsC
English - 17
Step 1: Unpacking
Accessories
|
Check for the supplied accessories below. |
|
• Audio/Video Cable |
onnectionsC |
• RF Cable for TV |
• Remote Control |
|
|
• Batteries for Remote Control (AA Size)
• User’s Manual
* Dispose of batteries according to local environmental regulations. Do not put them in the household trash.
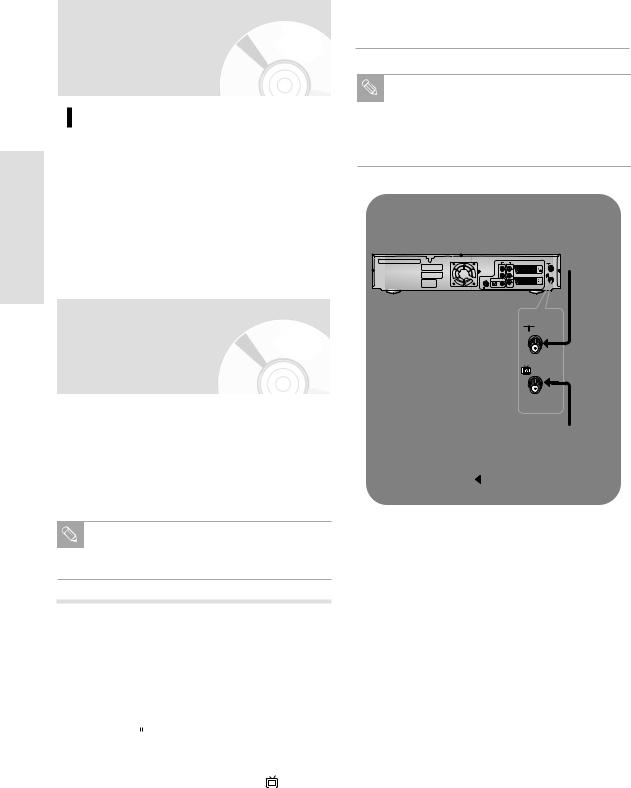
Step 2: Connecting DVD Recorder-VCR to the TV using the RF Cable
To receive television programmes a signal must be received from one of the following sources:
•An outdoor aerial
•An indoor aerial
•A cable television network
•A satellite receiver
Make sure that both the television and the
DVD Recorder-VCR are switched off before
Note
connecting the cables.
Plug the other end of the RF cable into the con- 4 nector previously used for the aerial on the televi-
sion.
To obtain better quality pictures and sound on your television, you can also connect your
Note
DVD Recorder-VCR to the television via the SCART cable (see next page) if your television is equipped with this type of connection.
Aerial
AUDIO OUT
TV
ANT
RF cable
1 |
Remove the aerial or network input cable from |
||||||||
the television. |
|||||||||
|
|
|
|
|
|
|
|
|
|
2 |
Connect this cable to the 75Ω coaxial socket |
||||||||
marked |
|
|
|
on the rear of your DVD Recorder- |
|||||
|
|
||||||||
|
VCR. |
||||||||
|
|
|
|
|
|
|
|
|
|
3 |
Plug the RF cable supplied into the |
|
|
|
socket on |
||||
TV |
|||||||||
|
|||||||||
your DVD Recorder-VCR. |
|||||||||
|
|
|
|
|
|
|
|
|
|
18 - English
Step 3: Connecting the
Scart Cable
Method 1 : Connecting DVD RecorderVCR to the TV using the SCART Cable
You can connect your DVD Recorder-VCR to the television using the SCART cable if the appropriate input is available on the television. You thus:
•Obtain better quality sound and pictures
•Simplify the setting up procedure of your DVD Recorder-VCR
•Regardless of the type of connection chosen, you must always connect the RF cable supplied. Otherwise, no picture will be visible on the screen when the DVD Recorder-VCR is switched off.
•Make sure that both the television and the DVD Recorder-VCR are switched off before connecting the cables.
1.Connect the RF cable as indicated in the previous section.
2.Connect one end of the SCART cable to the AV1 (EURO AV) socket on the rear of the DVD RecorderVCR.
3.Plug the other end into the appropriate connector on the television.
Aerial
AUDIO OUT
 1
1
2 SCART Cable
TV
ANT
RF cable
Method 2 : Connecting DVD RecorderVCR to a Satellite Receiver or Other Equipment
You can connect your DVD Recorder-VCR to a Satellite receiver or other DVD Recorder-VCR using the SCART cable if the appropriate outputs are available on the equipment chosen. The following illustrations give a few examples of the connection possibilities.
1.AV1(EURO AV): By means of 21-pin Scart Cable
Plug the SCART Cable with satellite receiver or other equipment into the AV1 (EURO AV) socket on
the rear of the DVD Recorder-VCR.
After making this connection, select the source by pressing the INPUT SEL. button for the AV1 input sources.
2.By means of RF Cable
After making this connection, you must preset the station received through the satellite tuner.
RF output channel of the satellite receiver should be adjusted away from channel 60, which is used by the DVD Recorder-VCR, e.g. re-adjust to channel 65.
Satellite Receiver or other
Equipment
Aerial Connector
AUDIO OUT
 1
1 
 2
2
TV
ANT
RF cable
onnectionsC
English - 19
Connections
1.AV2 IN: By means of 21-pin Scart Cable
Plug the SCART Cable with satellite receiver or other equipment into the AV2 (DEC./EXT.) socket on the rear of the DVD Recorder-VCR.
After making this connection, select the source by pressing the INPUT SEL. button for the AV2 input sources.
2.By means of RF Cable
After making this connection, you must preset the station received through the satellite tuner.
RF output channel of the satellite receiver should be adjusted away from channel 60, which is used by the DVD Recorder-VCR, e.g. re-adjust to channel 65.
Satellite Receiver or other Equipment
Aerial Connector
AUDIO OUT
2
 1
1 


SCART
Cable
TV
ANT
RF cable
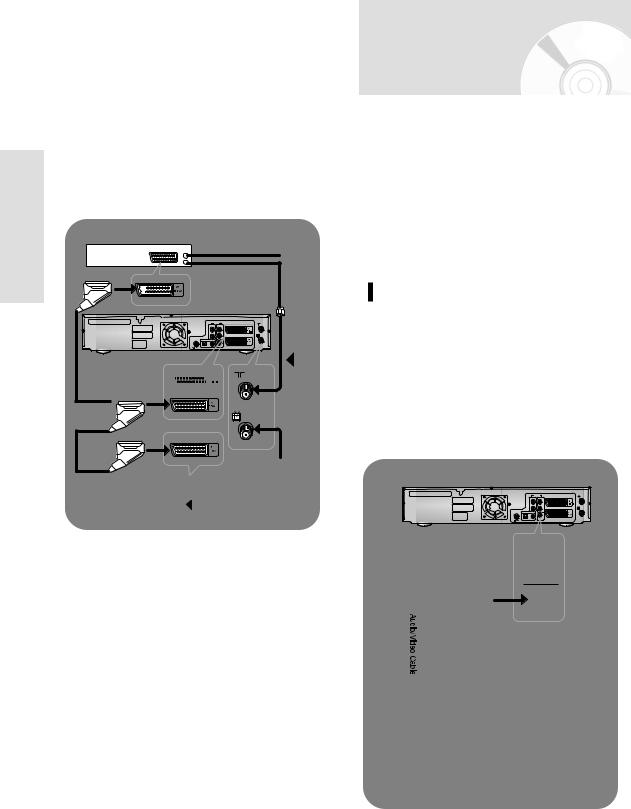
Step 4: Connecting the
Video Cable
There are several ways to connect your DVD RecorderVCR. Select one of the following video connecting methods that best suits you below.
•Method 1 : Connecting to a Video input jack
•Method 2 : Connecting to an S-video input jack
S-Video Modes
•S-Video is available only if your TV supports S-Video input. If S-Video output does not work, check the TV connections and the TV input selection settings.
Method 1 : Connecting to a video input jack
Connect a video(yellow) cable between the VIDEO (yellow) OUT jack on DVD Recorder-VCR and VIDEO(yellow) IN jack on the TV(or AV amplifier).
•You will enjoy regular quality images.
•Connect audio cables (white and red) between the ANALOG AUDIO OUT jack on the DVD Recorder-VCR and AUDIO IN jack on TV (or AV amplifier).
AUDIO OUT
R
L
VIDEO
INPUT
L
AUDIO
R
20 - English
Method 2 : Connecting to an S-video input jack
Connect an S-video cable(not supplied) between the S- VIDEO OUT jack on DVD Recorder-VCR and S-VIDEO IN jack on the TV (or AV amplifier).
•You will enjoy high quality images. S-Video separates the picture element into black and white (Y) and color
(C) signals to present clearer images than regular video input mode.
Step 5 : Connecting
the Audio Cable
There are several ways to connect your DVD RecorderVCR. Select the audio connection that best suits you below.
•Method 1 : Connecting to your TV
•Method 2 : Connecting to a stereo amplifier (analog
audio out / digital audio out)
• Method 3 : Connecting to an AV amplifier with a digital input jack.
Method 1 : Connecting to your TV
This connection will use your TV’s speakers.
onnectionsC
English - 21
Connections
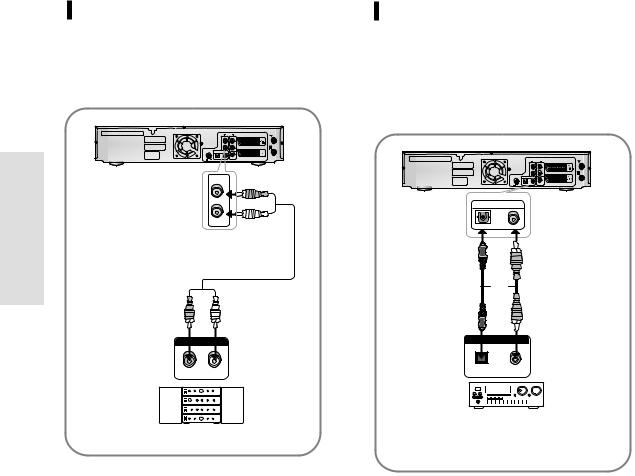
Method 2 : Connecting to a stereo amplifier with analog input jacks
If your stereo amplifier only has audio input jacks (L and R), use the analog audio out jacks.
AUDIO OUT
R |
red |
L |
|
|
white |
red |
white |
ANALOG AUDIO IN
R1 |
L1 |
Front(L)speaker Front(R)speaker
Method 3 : Connecting to an AV amplifier with the digital input jack
If your AV amplifier only has a Dolby Digital or DTS decoder and a digital input jack, use this connection. To enjoy Dolby Digital or DTS sound, you must set up the audio settings. (See page 38)
AUDIO OUT
DIGITAL AUDIO OUT
OPTICAL COAXIAL
or
DIGITAL AUDIO IN |
OPTICAL COAXIAL
|
|
|
|
|
|
|
|
|
|
|
|
|
|
|
|
|
|
|
|
|
|
|
|
|
|
|
|
|
|
|
|
|
|
|
|
|
|
|
|
|
|
|
|
|
|
|
|
|
|
|
|
|
|
|
|
|
|
|
|
|
|
|
|
|
|
|
|
|
|
|
|
|
|
|
|
|
|
Rear(L) |
|
|
|
|
|
|
|
|
|
|
|
|
|
|
|
|
Rear(R) |
||||||||
|
|
|
|
|
|
|
|
|
|
|
|
|
|
|
|
|
|
|
|
|
|
|
|
|
|
|
|
|
Front(L) |
|
|
|
|
|
|
|
|
|
|
|
Front(R) |
||||||||||
|
|
|
|
|
|
|
Subwoofer |
Center |
|||||||||||||||||
22 - English
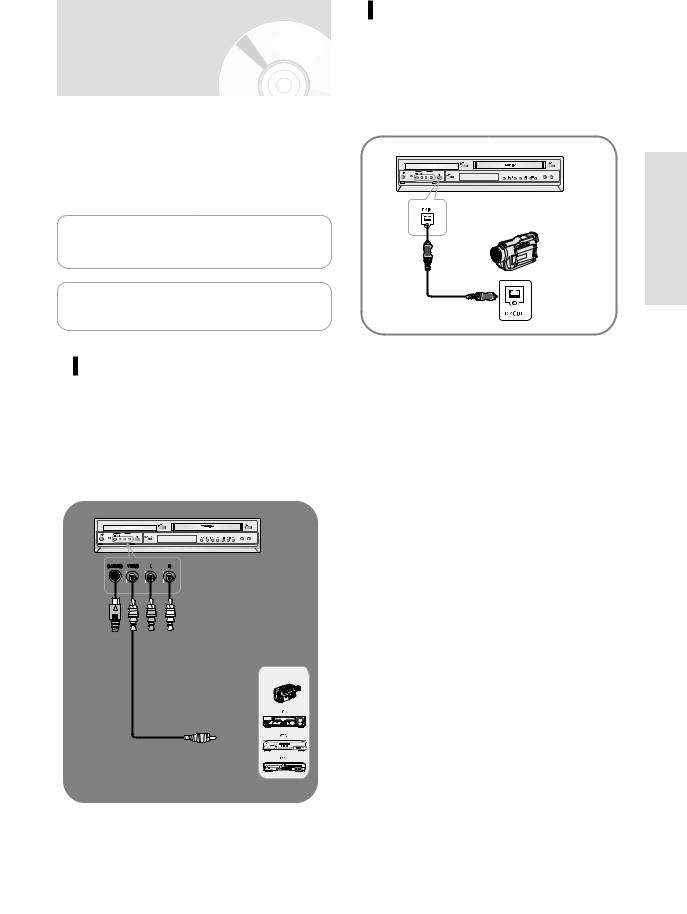
Step 6 : Connecting
External Devices
This allows you to connect your DVD Recorder-VCR to other external devices and view or record their outputs.
• Method 1 : Connecting a extemal devices to the AUX in jacks.
• Method 2 : Connecting a Camcorder to the DV IN jack.
Manufactured under license from Dolby Laboratories. “Dolby” and the double-D symbol are trademarks of Dolby Laboratories.
“DTS” and “DTS Digital Out” are trademarks of Digital Theater Systems, Inc.
Method 1 : Connecting a extemal devices to the AUX jacks
You can use the AUX jacks on the front panel of the DVD Recorder-VCR. You can record from connected equipment.
When an input source is inserted into AUX while viewing TV, the input will be switched to AUX automatically.
I / |
AUX |
ON/STANDBY INPUT SELECT |
DUBBING |
TO DVD TO VCR
or
OUTPUT
CAMCORDER
L
R
S-VIDEO
Method 2 : Connecting a
Camcorder to the DV IN jack
If your camcorder has a DV output jack, connect it to the DV input jack of your DVD Recorder-VCR.
•If your camcorder has a DV output jack, see page 79 for more information.
I / |
AUX |
ON/STANDBY INPUT SELECT |
DUBBING |
TO DVD TO VCR
•Some models of DV format digital video cameras may support a different compression format. From such equipment, recording is not possible.
•Depending on the models of DV format digital video cameras, recording may not work properly or some functions may be disabled.
onnectionsC
English - 23
Step 7 : Preparing the
Remote Control
|
Install Batteries in the Remote Control |
|
• Open the battery cover on the back of the remote. |
|
• Insert two AA batteries. Make sure that the polarities |
|
(+ and -) are aligned correctly. |
onnectionsC |
• Replace the battery cover. |
• Check if there is any fluorescent lighting nearby. |
If remote does not operate properly:
• Check the polarity + - of the batteries (Dry-Cell)
• Check if the batteries are drained.
• Check if remote sensor is blocked by obstacles.
Dispose of batteries according to local environmental regulations. Do not put them in the household trash.
Setting the Remote Control
Your DVD Recorder-VCR remote control will work with Toshiba televisions and compatible brands.
CLEAR
REC SPEED
• Do not expose the remote sensor of the recorder to a strong light source such as direct sunlight or other illumination. If you do so, you may not be able to operate the recorder via the remote control.
To determine whether your television is compatible, follow the instructions below.
1. Switch your television on.
2. Point the remote control towards the television. 3. Hold down the TV button and enter the four-figure
code corresponding to the brand of your television, by pressing the appropriate numeric buttons.
24 - English

Controllable TV Codes
|
Brand name |
Brand code |
|
|
|
|
|
|
|
TOSHIBA |
0001 |
0071 |
0211 |
0571 |
|
|
|
|
AIWA |
0921 |
|
|
|
|
|
|
|
AKAI |
0201 |
0241 |
0311 |
0431 |
0501 |
0521 |
0641 |
|
BAIRD |
0171 |
0241 |
|
|
|
|
|
|
BANG & OLUFSEN |
0471 |
|
|
|
|
|
|
|
BEKO |
0181 |
|
|
|
|
|
|
|
BLAUPUNKT |
0071 |
0321 |
0331 |
|
|
|
|
|
BRIONVEGA |
0461 |
0471 |
0651 |
|
|
|
|
|
BUSH |
0071 |
0501 |
0551 |
0571 |
|
|
|
|
CROWN |
0111 |
0131 |
0411 |
0491 |
0501 |
0661 |
|
|
DANSAI |
0501 |
|
|
|
|
|
|
|
DEAWOO |
0401 |
0411 |
0501 |
|
|
|
|
|
DECCA |
0091 |
0141 |
0171 |
0441 |
0451 |
0501 |
|
|
FERGUSON |
0031 |
0071 |
0131 |
0191 |
0291 |
0311 |
0381 |
|
|
0541 |
0601 |
|
|
|
|
|
|
FINLUX |
0021 |
0041 |
0071 |
0081 |
0091 |
0111 |
0271 |
|
|
0281 |
0291 |
0301 |
0341 |
0471 |
|
|
|
FISHER |
0041 |
0121 |
0181 |
0201 |
0281 |
0471 |
0571 |
|
|
0651 |
|
|
|
|
|
|
|
FUNAI |
0001 |
0191 |
0481 |
0491 |
0891 |
|
|
|
GEC |
0171 |
0221 |
|
|
|
|
|
|
GOLDSTAR |
0201 |
0251 |
0281 |
0411 |
0501 |
|
|
|
GOODMANS |
0171 |
0281 |
0501 |
0571 |
|
|
|
|
GRANADA |
0171 |
0241 |
0271 |
0501 |
0571 |
0651 |
0671 |
|
GRUNDIG |
0011 |
0071 |
0271 |
0321 |
0331 |
|
|
|
HINARI |
0241 |
0411 |
0571 |
0631 |
|
|
|
|
HITACHI |
0021 |
0221 |
0251 |
0351 |
0371 |
0381 |
0431 |
|
|
0571 |
0641 |
0751 |
|
|
|
|
|
INNO HIT |
0171 |
0281 |
0411 |
0501 |
0631 |
0661 |
|
|
ITT |
0231 |
0241 |
0261 |
0271 |
0401 |
0611 |
|
|
ITT-NOKIA |
0231 |
0241 |
0261 |
0271 |
0401 |
0611 |
|
|
JVC |
0311 |
0431 |
0521 |
0571 |
|
|
|
|
LOEWE OPTA |
0471 |
0501 |
0571 |
0651 |
|
|
|
|
LUXOR |
0241 |
0261 |
0271 |
0281 |
0351 |
|
|
|
MAGNAVOX |
0501 |
0071 |
0191 |
0221 |
0461 |
0471 |
0591 |
|
|
0611 |
0651 |
|
|
|
|
|
|
MARANTZ |
0201 |
0501 |
|
|
|
|
|
|
MATSUI |
0001 |
0171 |
0191 |
0231 |
0411 |
0441 |
0451 |
|
|
0501 |
0551 |
0571 |
|
|
|
|
|
METZ |
0041 |
0331 |
0361 |
0461 |
0471 |
0651 |
|
|
MITSUBISHI |
0201 |
0321 |
0331 |
0451 |
0501 |
0511 |
0571 |
|
|
0651 |
0771 |
|
|
|
|
|
|
NATIONAL |
0371 |
0501 |
0511 |
0531 |
0761 |
0841 |
0911 |
|
|
1061 |
|
|
|
|
|
|
|
NOKIA |
0231 |
0241 |
0261 |
0271 |
0401 |
0611 |
|
|
NORDMENDE |
0281 |
0351 |
0381 |
0421 |
0431 |
0461 |
0521 |
|
|
0541 |
0641 |
0671 |
|
|
|
|
|
OCEANIC |
0481 |
|
|
|
|
|
|
|
ORION |
0001 |
0191 |
0231 |
0361 |
0411 |
0441 |
0451 |
|
|
0501 |
0551 |
0611 |
|
|
|
|
|
PANASONIC |
0371 |
0501 |
0511 |
0531 |
0761 |
0841 |
0911 |
|
|
1061 |
|
|
|
|
|
|
|
PHILCO |
0071 |
0111 |
0181 |
0201 |
0271 |
0301 |
0461 |
|
|
0501 |
0651 |
|
|
|
|
|
|
PHILIPS |
0071 |
0191 |
0221 |
0461 |
0471 |
0501 |
0591 |
|
|
0611 |
0651 |
|
|
|
|
|
|
PIONEER |
0381 |
0431 |
0501 |
0831 |
1051 |
|
|
|
PROSCAN-THOMSON |
0971 |
1041 |
0201 |
0501 |
|
|
|
|
RCA |
0971 |
1071 |
1081 |
1091 |
0201 |
1041 |
0501 |
|
REALISTIC |
0631 |
1001 |
1011 |
1021 |
1031 |
0851 |
0201 |
|
|
0501 |
0481 |
0321 |
0331 |
0501 |
0651 |
0771 |
SABA |
0281 |
0351 |
0381 |
0421 |
0431 |
0471 |
0541 |
|
|
|
0641 |
0651 |
0661 |
0671 |
|
|
|
|
|
SAISHO |
0231 |
0411 |
0441 |
0451 |
0551 |
|
|
|
|
SALORA |
0231 |
0241 |
0351 |
|
|
|
|
|
|
SAMSUNG |
0171 |
0181 |
0251 |
0281 |
0411 |
0491 |
0501 |
|
|
|
0631 |
0661 |
0791 |
|
|
|
|
|
|
SANYO |
0021 |
0041 |
0081 |
0121 |
0171 |
0181 |
0201 |
|
|
|
0231 |
0241 |
0451 |
0571 |
0651 |
0671 |
0701 |
|
|
|
0711 |
0721 |
|
|
|
|
|
|
|
SCHNEIDER |
0011 |
0051 |
0061 |
0281 |
0461 |
0501 |
0581 |
|
|
|
0591 |
|
|
|
|
|
|
|
|
SEG |
0091 |
0121 |
0151 |
|
|
|
|
|
|
SELECO |
0031 |
0051 |
0061 |
0351 |
0501 |
0561 |
|
|
onnectionsC |
SHARP |
0851 |
0511 |
0571 |
0201 |
0501 |
|
|
|
|
SIEMENS |
0071 |
0321 |
0331 |
0571 |
0631 |
|
|
|
|
|
|
|
|
||||||
SINGER |
0091 |
0471 |
0651 |
|
|
|
|
|
|
SINUDYNE |
0001 |
0091 |
0101 |
0131 |
0191 |
0231 |
0361 |
|
|
|
0471 |
0501 |
0551 |
0581 |
0651 |
|
|
|
|
SONY |
0441 |
0451 |
0571 |
0681 |
|
|
|
|
|
TANDBERG |
0041 |
0301 |
0351 |
0431 |
0461 |
0571 |
0651 |
|
|
TATUNG |
0091 |
0141 |
0171 |
0441 |
0451 |
0501 |
|
|
|
TECHNICS |
0371 |
0501 |
0511 |
0531 |
0761 |
0841 |
0911 |
|
|
|
|||||||||
|
1061 |
|
|
|
|
|
|
|
|
TELEFUNKEN |
0071 |
0281 |
0381 |
0421 |
0431 |
0521 |
0601 |
|
|
|
0621 |
0671 |
|
|
|
|
|
|
|
TENSAI |
0041 |
|
|
|
|
|
|
|
|
THOMSON |
0281 |
0351 |
0371 |
0381 |
0391 |
0421 |
0461 |
|
|
|
0521 |
0541 |
0641 |
0971 |
1041 |
|
|
|
|
THORN |
0041 |
0071 |
0281 |
0291 |
0341 |
0421 |
0491 |
|
|
|
0601 |
0671 |
|
|
|
|
|
|
|
UNIVERSUM |
0021 |
0491 |
|
|
|
|
|
|
|
YAMAHA |
0201 |
0501 |
0321 |
0331 |
0451 |
0511 |
0571 |
|
|
|
0651 |
0771 |
|
|
|
|
|
|
|
ZANUSSI |
0031 |
0051 |
0061 |
0351 |
0501 |
0561 |
|
|
|
ZENITH |
0931 |
|
|
|
|
|
|
|
|
Result: If your television is compatible with the remote control, it will switch off.
It is now programmed to operate with the remote control.
If several codes are indicated for your television
|
brand, try each one in turn until you find one |
|
Note |
||
that works. |
||
|
||
|
Please note if TV manufacturer may change their remote control code without notice, this function may not work.
You can then control the television using the following buttons.
Button |
Function |
|
TV ON/STANDBY |
Used to switch the television on and off. |
|
|
|
|
INPUT SEL. |
Used to select an external source. |
|
|
|
|
VOL + or - |
Used to adjust the volume of the televi- |
|
|
sion. |
|
PROG/TRK ( or |
) Used to select the required channel. |
|
|
|
|
|
|
|
The various functions will not necessarily work
|
on all televisions. If you encounter problems, |
|
Note |
||
operate the television directly. |
||
|
||
|
||
|
|
English - 25
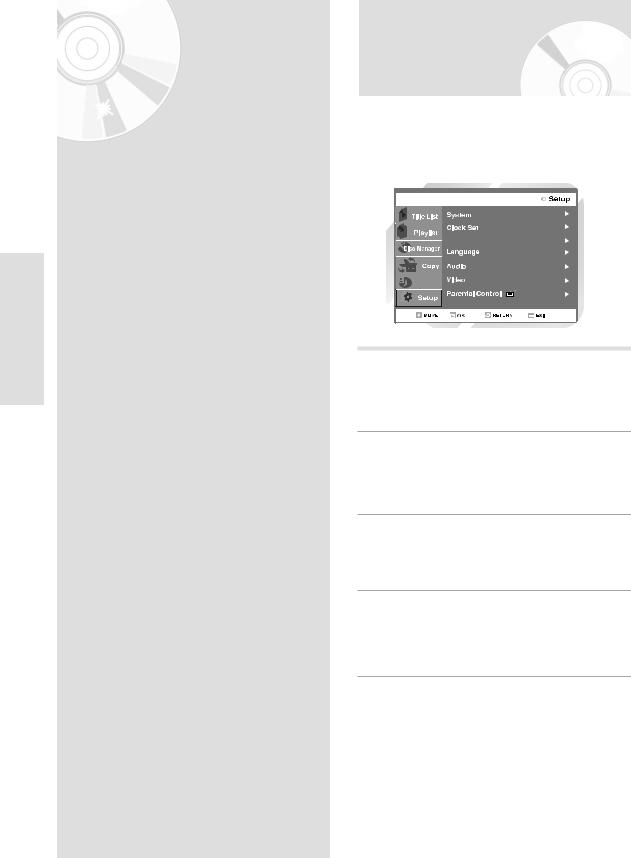
System Setup
System Setup
• |
On-Screen Menu Navigation . . . . . . . |
. .26 |
• |
Plug & Auto Setup . . . . . . . . . . . . . . |
. .27 |
• |
Setting the Date and Time . . . . . . . . |
. .28 |
• |
Presetting the Stations Automatically |
. .29 |
• |
Presetting the Stations Manually . . . . . |
.30 |
• |
Clearing a Preset Station . . . . . . . . . . . |
.31 |
• |
Changing the Preset Manual Setup Table 32 |
|
• |
Setting the VCR Output Channel . . . . . |
.33 |
• |
Setting Up the Language Features . . . . .34 |
|
• |
Setting Up the Audio Options . . . . . . . |
.38 |
• |
Setting Up the Display(Video) Options . |
.39 |
• |
Setting Up the Parental Control . . . . . . |
.40 |
• |
VCR Setting . . . . . . . . . . . . . . . . . . . . |
.41 |
• |
Intelligent Picture Control(IPC) . . . . . . |
.43 |
• |
Selection the Colour Mode . . . . . . . . . |
.44 |
• |
Front Display . . . . . . . . . . . . . . . . . . . |
.45 |
• |
NICAM . . . . . . . . . . . . . . . . . . . . . . . |
.46 |
• |
AV1 Output . . . . . . . . . . . . . . . . . . . . |
.46 |
On-Screen Menu
Navigation
The on-screen menus allow you to enable or disable various functions on your DVD Recorder-VCR. Use the following buttons to open and navigate through the onscreen menus.
DVD-RAM(VR)
Install
Programme |
1 while the open the
2 bar options.
3 |
to con- |
4 Press this button on the remote control to return to the last MENU screen displayed or to exit the on-screen MENU all together.
26 - English

Plug & Auto Setup
The when TV
a ready
Connect the RF cable as indicated on page 19. 1 • Connecting Your DVD Recorder-VCR to the TV
using the RF Cable.
2 |
Plug the DVD Recorder-VCR into the mains. |
• “Auto” in the front panel display flickers. |
3
4 Start the auto scanning.
Wait current time and date are displayed 5 automatically.
Setup ystemS
6 |
Check the date and time. |
• if it is: Correct |
time
•
date
English - 27
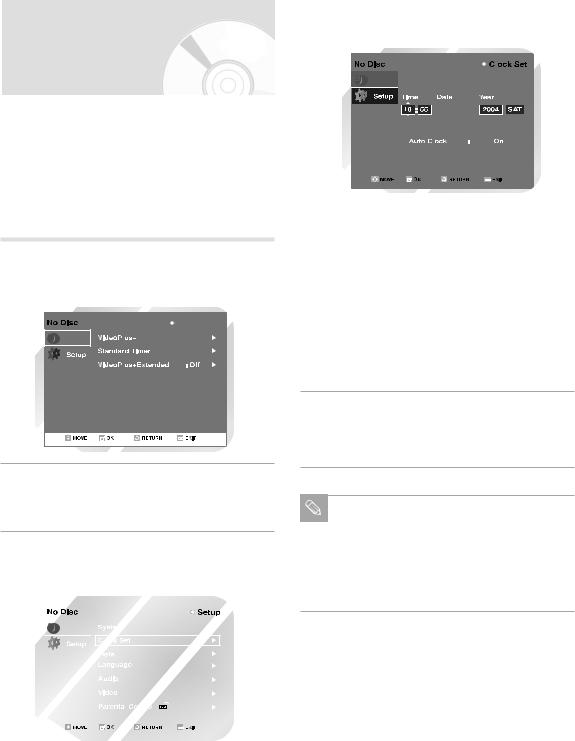
Setting the Date
Your
•
•
•You
•Do not forget to reset the time when you change clocks from winter to summer time and vice versa.
Setup |
With the unit in Stop mode, press the MENU |
|||||||
1 button. |
||||||||
|
||||||||
ystemS |
|
|
|
|
|
Programme |
|
|
|
|
Programme |
|
|
|
|
||
|
|
|
|
|
|
|||
|
|
|
|
|
|
|
||
|
|
|
|
|
|
|
|
|
|
|
|
|
|
|
|
|
|
|
|
|
|
|
|
|
|
|
|
|
|
|
|
|
|
|
|
4 |
Press to select the hour, minutes, day, |
|||
|
||||
|
month and year. |
|||
|
• The option selected highlight. |
|||
|
|
|
|
|
|
|
|
|
|
|
|
|
|
|
|
|
|
|
|
Programme
 /
/ 
|
|
|
|
|
|
|
|
|
|
|
|
|
|
|
|
|
|
|
|
|
|
|
|
|
|
|
|
|
|
|
|
|
|
|
|
|
|
|
|
5 |
Press the button to increase or decrease the |
||||||
|
|||||||
|
value. |
||||||
|
• The day of the week is displayed automatically. |
||||||
|
• You can hold the buttons down to scroll |
||||||
|
more quickly through the values. |
||||||
|
|
||||||
6 |
Press OK button, then the date and time will be |
||||||
saved. If you don’t press OK button, it will not be |
|||||||
saved.
2 |
Using the |
buttons, move the selection bar |
|
to “Setup” then press OK to select.
3 |
|
|
|
|
|
then |
|
|
|
|
|
|
|
|
|
|
|
|
|
|
|
|
|
|
|
|
|
|
|
|
|
|
|
|
|
|
Programme |
|
|
|
|
|
|
|
|
|
|
|
|
|
|
|
|
|
|
|
|
|
|
|
|
|
|
|
|
|
|
|
|
|
|
|
|
|
|
|
|
|
|
|
|
|
|
|
|
|
|
|
|
|
|
|
|
|
|
|
|
7 On completion, press RETURN to exit the menu.
You must have the aerial connected to set the Auto Clock. Connecting the RF Cable on
Note
page 19.
Auto Clock : The DVD Recorder-VCR sets the clock automatically by searching for a channel that carries a time signal.
28 - English
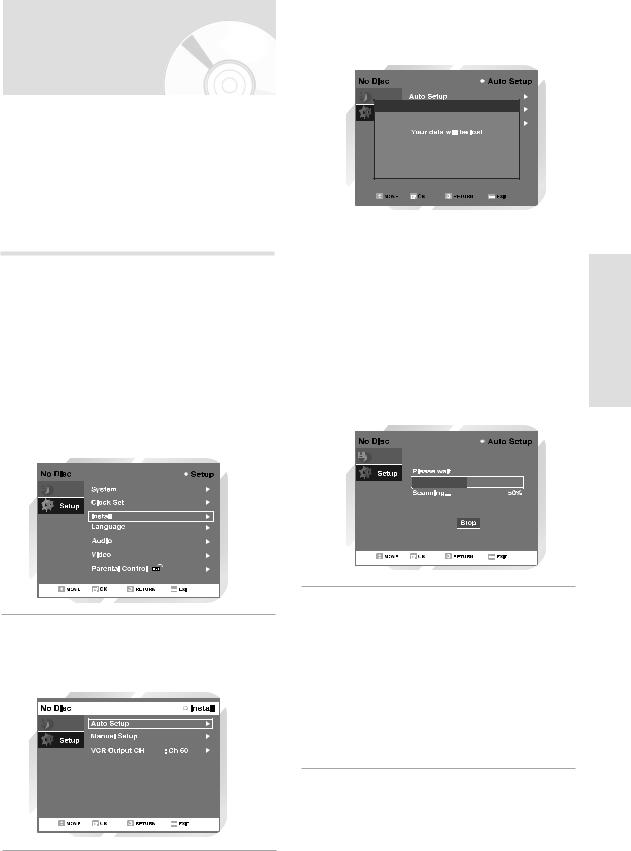
Presetting the Stations |
5 Press or OK button. |
channels |
||
|
|
|
|
will be |
|
|
|
|
|
|
|
|
|
|
You do not need to preset the stations if you have already set them automatically (see Plug & Auto Set Up on page 27).
Your DVD Recorder-VCR contains a built-in tuner used to receive television broadcasts.
You must preset the stations received through the tuner. This can be done:
•Plug & Auto Set up (see page 27)
•Automatically
•Manually (see page 30)
1 |
. |
|
|
|
|
2 |
|
bar to |
|
|
|
3 |
|
bar |
|
. |
|
|
|
|
|
|
|
Programme
Programme
Press [OK] to continue [Menu] to exit
|
|
|
|
|
|
|
|
|
|
|
|
6 |
Press OK to start the auto |
|
|
scaning. |
|
||
|
• |
first |
|
|
|
|
the |
|
• |
has |
|
|
• |
by |
|
|
|
|
num- |
|
|
|
|
|
|
|
|
|
|
|
|
Programme
Setup ystemS
4 Select “Auto Setup”
Setup”
the
Programme
7 |
If you wish to cancel the auto scanning before the |
end, press the OK button. |
• The time and date are set automatically from the broadcast signal. If the signal is weak or ghosting occurs, the time and date may not be set automatically.
• Once the auto scanning procedure has finished, some stations may have been stored more than once; select the stations with the best reception and delete the ones no longer required.
English - 29
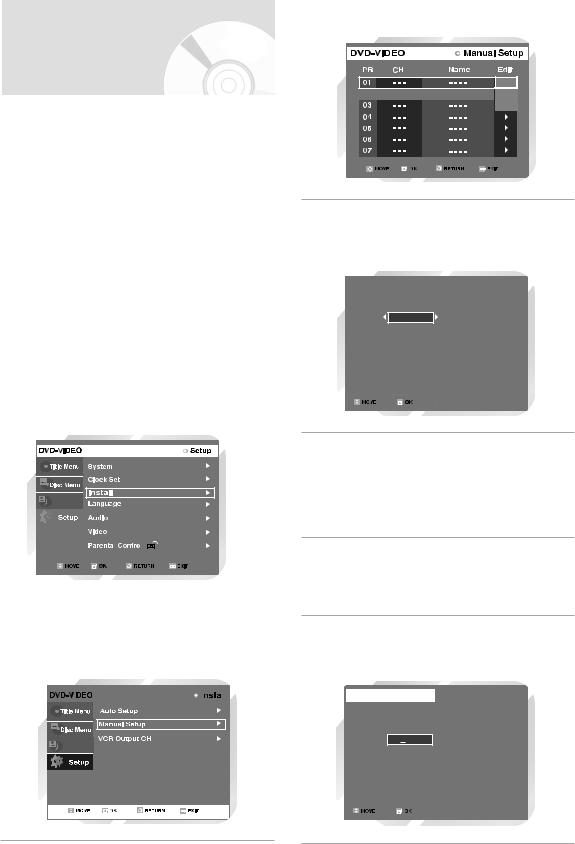
Presetting the Stations |
5 |
Press the buttons to select a PR number |
as required then press or OK button to select. |
Manually
Edit |


 Delete
Swap
If you have already set then automatically, you do not need to preset the stations manually.
|
|
1 |
Open “MENU” |
|
|
|
|
|
|
|
|
|
|
|
|
|
|
|
|
|
|
|
|
|
|
||||
|
With the DVD in Stop mode, press the MENU |
|
|
|
|
|
|
|
|
|
|
|||
|
|
6 |
|
|
|
|
|
|
|
|
||||
|
|
|
button. |
|
|
|
|
|
|
|
|
|
|
|
|
|
|
|
|
|
|
|
|
|
|
|
|
|
|
|
|
|
|
|
|
|
|
|
|
|
|
|
|
|
Setup |
2 |
Select “Setup” |
|
|
|
|
|
|
|
|
|
|
||
|
|
|
|
|
|
|
|
|
|
|||||
|
|
|
|
|
|
|
|
|
|
|||||
|
|
|
|
|
|
|
|
|
|
|
||||
|
Using the |
buttons, |
|
|
|
|
|
|
|
|
|
|
||
|
|
|
|
|
|
|
|
|
|
|
||||
System |
|
|
to “Setup” then press or |
|
|
|
|
|
|
|
|
|
|
|
|
|
|
|
|
|
|
|
|
|
|
|
|||
|
|
|
|
|
|
|
|
|
|
|
|
|
|
|
|
|
|
|
|
|
|
|
|
|
|
|
|
|
|
|
|
|
|
|
|
|
|
|
|
|
|
|
|
|
|
|
|
|
|
|
|
|
|
|
|
|
|
|
|
3 |
Select “Install” |
|
|
|
|
|
|
|
|
|
|
|||
|
|
|
|
|
|
|
|
|
|
|||||
|
|
|
|
|
|
|
|
|
|
|||||
|
|
|
|
|
|
|
|
|
|
|
||||
|
Using the |
buttons, |
|
|
|
|
|
|
|
|
|
|
||
|
|
|
|
|
|
|
|
|
|
|
||||
|
|
|
|
|
|
|
|
|
|
|
|
|
|
|
to “Install”, then press or
Programme |
|
|
|
|
|
|
|
|
|
|
|
|
|
|
|
|
|
|
|
|
|
|
|
|
|
|
|
|
|
|
|
|
|
|
|
|
|
|
|
|
|
|
|
|
|
|
|
|
|
|
|
|
|
|
|
|
|
|
|
|
|
|
|
|
|
|
|
|
|
|
|
|
|
|
|
|
|
|
|
|
|
|
|
|
|
|
|
|
|
|
|
|
|
|
|
|
4 |
Select “Manual Setup” |
|
|||||||||||||
Move the selection bar to “Manual Setup”, using |
9 |
||||||||||||||
|
the buttons then press or OK button to |
||||||||||||||
|
select. |
||||||||||||||
|
|
|
|
|
|
|
|
|
|
|
|
|
|
|
|
|
|
|
|
|
|
|
|
|
|
|
|
|
|
|
|
|
|
|
|
|
|
|
|
|
|
|
|
|
|
|
|
Programme |
Manual Setup
PR |
|
01 |
|
|
|||
|
|
|
|
|
|
|
|
CH |
|
5 |
|
|
|
||
Name |
|
|
A - - - |
||||
MFT |
- - - |
|
- - - |
|
|||
|
|
||||||
|
|
|
|
|
|
|
|
|
|
|
Done |
|
|||
|
|
|
|
|
|
|
|
|
|
|
|
|
|
|
|
the
first sta-
selectfrom
the
.
30 - English
 Loading...