


TOSHIBA AMERICA INFORMATION SYSTEMS STORAGE DEVICE DIVISION
IRVINE, CALIFORNIA
SD-M1712
DVD-ROM DRIVE
USER MANUAL

CONTENTS |
|
Introduction.............................................................................. |
1 |
Setup ........................................................................................ |
3 |
Using the DVD-ROM Drive ...................................................... |
6 |
Troubleshooting....................................................................... |
8 |
Specifications .......................................................................... |
9 |
Drive Connectors................................................................... |
13 |

INTRODUCTION – SD-M1712 DVD-ROM Drive
General Features
Tray Loading Mechanism
3-way Disc Eject (eject button, software, emergency eject hole)
Average Random Access Time |
|
CD-ROM |
85ms |
DVD |
95ms |
DVD-RAM |
170ms |
DAE (Digital Audio Extraction) Audio Capability
MPC3 Compatibility
Multi-Read Capability
Regionalization (RPC2 compliance) (DVD)
ATAPI BUS Interface
Drive Speed |
|
|
DVD |
16X |
Single Layer |
|
10X |
Dual Layer |
CD |
48X |
|
DVD-RAM |
2X (ver 1.0) |
|
|
2X (ver 2.1) |
|
Types of Disc Formats Supported
DVD
•DVD-ROM
DVD-5 - Single-sided/Single Layer DVD-9 - Single-sided/Dual Layer DVD-10 - Double-sided/Single Layer DVD-18 - Double-sided/Dual Layer
•DVD-R, DVD-RW, DVD-RAM (Read)
1
CD
•CD-DA
•CD+(E)G
•CD-MIDI
•CD-TEXT
•CD-ROM
•CD-ROM-XA
•CD-I Bridge (Photo-CD, Video CD)
•CD-I
•Multi-session (Photo-CD, CD Extra, CD-RW, CD-R)
•CD-R (Read)
•CD-RW (Read)
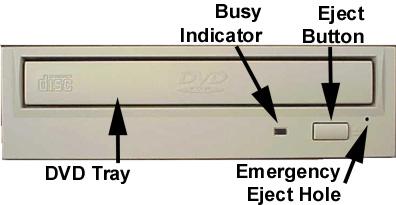
Front Panel
Figure 1.SD-M1712 DVD-ROM Drive Front Panel
Loading Tray
Busy Indicator
Eject
Button
Emergency
Eject Hole
Load disc using tray.
When you install a disc into the DVD-ROM drive, the BUSY light flashes slowly as it attempts to locate the disc. One of the following will occur:
•BUSY light goes out. The DVD-ROM drive is ready to read data from the disc.
•BUSY light flashes slowly. The disc may be dirty.
•BUSY light remains ON. The DVD-ROM is accessing data.
•BUSY light remains ON indefinitely. The DVD-ROM is experiencing an error
The Eject button is used to open the disc tray so you can install or remove a disc.
The emergency eject hole is to be used only when the Loading Tray will not open when Eject button is pressed.

SETUP – SD-M1712 DVD-ROM
The following steps must be performed to properly install your drive:
•Set Drive Jumper Settings
•Connect Audio Cable (optional)
•Attach IDE BUS Cable
•Attach Power Cable
•Mount Drive
Jumper Settings
The mode select jumpers are 6 straight angle pins located on the rear of the DVD-ROM drive. By placing a jumper on the pins, you can select the following functions:
CS |
Drive is configured using host interface signal CSEL |
SL |
Configures drive as Slave |
MA |
Configures drive as Master (default mode) |
|
Figure 1.Mode Select Jumper |
In most installations, jumper should remain in the MA position (factory default). It is recommended that you install your DVD-ROM drive only on the secondary IDE BUS. If you are installing on primary IDE BUS, your hard drive would then be the Master, and you should set your DVD-ROM drive to the Slave position (SL)
Figure 2.Jumper Locations
3
 Loading...