


 Loading...
43" 2160p (4K), 60Hz, LED Google Cast™ TV 49" 2160p (4K), 60Hz, LED Google Cast™ TV 55" 2160p (4K), 60Hz, LED Google Cast™ TV 65" 2160p (4K), 60Hz, LED Google Cast™ TV
43L621U / 49L621U / 55L621U / 65L621U
Before using your new product, please read these instructions to prevent any damage.

Contents
CHILD SAFETY . . . . . . . . . . . . . . . . . . . . . . . . . . . . . . . . . . . . . . . . . . . . . . . . . . . . . . . . . . . . . . . 1
Important Safety Instructions . . . . . . . . . . . . . . . . . . . . . . . . . . . . . . . . . . . . . . . . . . . . . . . . 2
WARNING . . . . . . . . . . . . . . . . . . . . . . . . . . . . . . . . . . . . . . . . . . . . . . . . . . . . . . . . . . . . . . . . . . . . . . . . . . 2 CAUTION . . . . . . . . . . . . . . . . . . . . . . . . . . . . . . . . . . . . . . . . . . . . . . . . . . . . . . . . . . . . . . . . . . . . . . . . . . 3
Introduction . . . . . . . . . . . . . . . . . . . . . . . . . . . . . . . . . . . . . . . . . . . . . . . . . . . . . . . . . . . . . . . . . 5
Google Cast . . . . . . . . . . . . . . . . . . . . . . . . . . . . . . . . . . . . . . . . . . . . . . . . . . . . . . . . . . . . . . . . . . . . . . . . 5
HDMI®CEC Control . . . . . . . . . . . . . . . . . . . . . . . . . . . . . . . . . . . . . . . . . . . . . . . . . . . . . . . . . . . . . . . . . 5
DTS Studio Sound® . . . . . . . . . . . . . . . . . . . . . . . . . . . . . . . . . . . . . . . . . . . . . . . . . . . . . . . . . . . . . . . . . 5
GameTimer™ . . . . . . . . . . . . . . . . . . . . . . . . . . . . . . . . . . . . . . . . . . . . . . . . . . . . . . . . . . . . . . . . . . . . . . . 5
Installing the stands or wall-mount bracket . . . . . . . . . . . . . . . . . . . . . . . . . . . . . . . . . . . 6
Installing the stands (43" or 65" model) . . . . . . . . . . . . . . . . . . . . . . . . . . . . . . . . . . . . . . . . . . . . . . 6 Installing the stands (49" or 55" model) . . . . . . . . . . . . . . . . . . . . . . . . . . . . . . . . . . . . . . . . . . . . . . 7 Installing a wall-mount bracket . . . . . . . . . . . . . . . . . . . . . . . . . . . . . . . . . . . . . . . . . . . . . . . . . . . . . 9
TV components . . . . . . . . . . . . . . . . . . . . . . . . . . . . . . . . . . . . . . . . . . . . . . . . . . . . . . . . . . . . 12
Package contents . . . . . . . . . . . . . . . . . . . . . . . . . . . . . . . . . . . . . . . . . . . . . . . . . . . . . . . . . . . . . . . . . 12 Front . . . . . . . . . . . . . . . . . . . . . . . . . . . . . . . . . . . . . . . . . . . . . . . . . . . . . . . . . . . . . . . . . . . . . . . . . . . . . 12 Power/INPUT button . . . . . . . . . . . . . . . . . . . . . . . . . . . . . . . . . . . . . . . . . . . . . . . . . . . . . . . . . . . . . . 13 Side jacks . . . . . . . . . . . . . . . . . . . . . . . . . . . . . . . . . . . . . . . . . . . . . . . . . . . . . . . . . . . . . . . . . . . . . . . . . 14 Back jacks . . . . . . . . . . . . . . . . . . . . . . . . . . . . . . . . . . . . . . . . . . . . . . . . . . . . . . . . . . . . . . . . . . . . . . . . . 15 Remote control . . . . . . . . . . . . . . . . . . . . . . . . . . . . . . . . . . . . . . . . . . . . . . . . . . . . . . . . . . . . . . . . . . . 16 Virtual Remote control . . . . . . . . . . . . . . . . . . . . . . . . . . . . . . . . . . . . . . . . . . . . . . . . . . . . . . . . . . . . 17
What connection should I use? . . . . . . . . . . . . . . . . . . . . . . . . . . . . . . . . . . . . . . . . . . . . . . 19 Connecting a cable or satellite box . . . . . . . . . . . . . . . . . . . . . . . . . . . . . . . . . . . . . . . . . . 20
HDMI (best) . . . . . . . . . . . . . . . . . . . . . . . . . . . . . . . . . . . . . . . . . . . . . . . . . . . . . . . . . . . . . . . . . . . . . . 20 DVI (same as HDMI but requires an audio connection) . . . . . . . . . . . . . . . . . . . . . . . . . . . . . 21 AV (good) . . . . . . . . . . . . . . . . . . . . . . . . . . . . . . . . . . . . . . . . . . . . . . . . . . . . . . . . . . . . . . . . . . . . . . . . 22 Coaxial (good). . . . . . . . . . . . . . . . . . . . . . . . . . . . . . . . . . . . . . . . . . . . . . . . . . . . . . . . . . . . . . . . . . . . 23
Connecting an antenna or cable TV (no box) . . . . . . . . . . . . . . . . . . . . . . . . . . . . . . . . . 24 Connecting a DVD or Blu-ray player . . . . . . . . . . . . . . . . . . . . . . . . . . . . . . . . . . . . . . . . . 25
HDMI (best) . . . . . . . . . . . . . . . . . . . . . . . . . . . . . . . . . . . . . . . . . . . . . . . . . . . . . . . . . . . . . . . . . . . . . . 25
AV (good) . . . . . . . . . . . . . . . . . . . . . . . . . . . . . . . . . . . . . . . . . . . . . . . . . . . . . . . . . . . . . . . . . . . . . . . . 26
Connecting a game console . . . . . . . . . . . . . . . . . . . . . . . . . . . . . . . . . . . . . . . . . . . . . . . . 27
HDMI (best) . . . . . . . . . . . . . . . . . . . . . . . . . . . . . . . . . . . . . . . . . . . . . . . . . . . . . . . . . . . . . . . . . . . . . . 27 AV (good) . . . . . . . . . . . . . . . . . . . . . . . . . . . . . . . . . . . . . . . . . . . . . . . . . . . . . . . . . . . . . . . . . . . . . . . . 28
Connecting a network router . . . . . . . . . . . . . . . . . . . . . . . . . . . . . . . . . . . . . . . . . . . . . . . 29
ii |
www.tv.toshiba.com |

Contents
Connecting a computer . . . . . . . . . . . . . . . . . . . . . . . . . . . . . . . . . . . . . . . . . . . . . . . . . . . . . 30
HDMI (best) . . . . . . . . . . . . . . . . . . . . . . . . . . . . . . . . . . . . . . . . . . . . . . . . . . . . . . . . . . . . . . . . . . . . . . 30 DVI (same as HDMI but requires an audio connection) . . . . . . . . . . . . . . . . . . . . . . . . . . . . . 31
Connecting a USB flash drive . . . . . . . . . . . . . . . . . . . . . . . . . . . . . . . . . . . . . . . . . . . . . . . . 32 Connecting headphones . . . . . . . . . . . . . . . . . . . . . . . . . . . . . . . . . . . . . . . . . . . . . . . . . . . . 33 Connecting external speakers or a soundbar . . . . . . . . . . . . . . . . . . . . . . . . . . . . . . . . 34
Digital audio . . . . . . . . . . . . . . . . . . . . . . . . . . . . . . . . . . . . . . . . . . . . . . . . . . . . . . . . . . . . . . . . . . . . . 34 Analog audio . . . . . . . . . . . . . . . . . . . . . . . . . . . . . . . . . . . . . . . . . . . . . . . . . . . . . . . . . . . . . . . . . . . . . 35
Connecting a home theater system with multiple devices . . . . . . . . . . . . . . . . . . . . 36 Connecting power . . . . . . . . . . . . . . . . . . . . . . . . . . . . . . . . . . . . . . . . . . . . . . . . . . . . . . . . . . 37 Using the remote control . . . . . . . . . . . . . . . . . . . . . . . . . . . . . . . . . . . . . . . . . . . . . . . . . . . 38
Installing remote control batteries . . . . . . . . . . . . . . . . . . . . . . . . . . . . . . . . . . . . . . . . . . . . . . . . . 38 Aiming the remote control . . . . . . . . . . . . . . . . . . . . . . . . . . . . . . . . . . . . . . . . . . . . . . . . . . . . . . . . 38 Programming universal remote controls . . . . . . . . . . . . . . . . . . . . . . . . . . . . . . . . . . . . . . . . . . . 39
Turning on your TV for the first time . . . . . . . . . . . . . . . . . . . . . . . . . . . . . . . . . . . . . . . . . 40
Using an Android mobile device . . . . . . . . . . . . . . . . . . . . . . . . . . . . . . . . . . . . . . . . . . . . . . . . . . 40 Using an iOS (Apple) mobile device . . . . . . . . . . . . . . . . . . . . . . . . . . . . . . . . . . . . . . . . . . . . . . . 47
Casting a video, movie, or TV show . . . . . . . . . . . . . . . . . . . . . . . . . . . . . . . . . . . . . . . . . . 54 Setting up the ANT / CABLE IN jack . . . . . . . . . . . . . . . . . . . . . . . . . . . . . . . . . . . . . . . . . . 55 Understanding the basics . . . . . . . . . . . . . . . . . . . . . . . . . . . . . . . . . . . . . . . . . . . . . . . . . . . 55
Turning your TV on or off . . . . . . . . . . . . . . . . . . . . . . . . . . . . . . . . . . . . . . . . . . . . . . . . . . . . . . . . . . 55 Selecting the video input source . . . . . . . . . . . . . . . . . . . . . . . . . . . . . . . . . . . . . . . . . . . . . . . . . . . 56 On-screen menu overview . . . . . . . . . . . . . . . . . . . . . . . . . . . . . . . . . . . . . . . . . . . . . . . . . . . . . . . . 57 Navigating the menus . . . . . . . . . . . . . . . . . . . . . . . . . . . . . . . . . . . . . . . . . . . . . . . . . . . . . . . . . . . . . 58 Adjusting the volume . . . . . . . . . . . . . . . . . . . . . . . . . . . . . . . . . . . . . . . . . . . . . . . . . . . . . . . . . . . . . 58 Selecting a channel . . . . . . . . . . . . . . . . . . . . . . . . . . . . . . . . . . . . . . . . . . . . . . . . . . . . . . . . . . . . . . . 58 Viewing channel information . . . . . . . . . . . . . . . . . . . . . . . . . . . . . . . . . . . . . . . . . . . . . . . . . . . . . . 59
Controlling CEC-compatible devices . . . . . . . . . . . . . . . . . . . . . . . . . . . . . . . . . . . . . . . . 59
Turning HDMI-CEC Control on or off . . . . . . . . . . . . . . . . . . . . . . . . . . . . . . . . . . . . . . . . . . . . . . . 60 Turning TV Auto Power on or off . . . . . . . . . . . . . . . . . . . . . . . . . . . . . . . . . . . . . . . . . . . . . . . . . . . 60 Turning Auto Standby on or off . . . . . . . . . . . . . . . . . . . . . . . . . . . . . . . . . . . . . . . . . . . . . . . . . . . . 61 Turning Amplifier Control on or off . . . . . . . . . . . . . . . . . . . . . . . . . . . . . . . . . . . . . . . . . . . . . . . . 61 Selecting the audio output . . . . . . . . . . . . . . . . . . . . . . . . . . . . . . . . . . . . . . . . . . . . . . . . . . . . . . . . 62 Using the TV remote to control CEC-compatible devices . . . . . . . . . . . . . . . . . . . . . . . . . . . . 62 Using the TV menu to control CEC-compatible devices . . . . . . . . . . . . . . . . . . . . . . . . . . . . . 62 Selecting the HDMI Input mode . . . . . . . . . . . . . . . . . . . . . . . . . . . . . . . . . . . . . . . . . . . . . . . . . . . 63
Using the Media Player . . . . . . . . . . . . . . . . . . . . . . . . . . . . . . . . . . . . . . . . . . . . . . . . . . . . . 64
Supported photo file formats . . . . . . . . . . . . . . . . . . . . . . . . . . . . . . . . . . . . . . . . . . . . . . . . . . . . . . 64 Opening the Photos viewer . . . . . . . . . . . . . . . . . . . . . . . . . . . . . . . . . . . . . . . . . . . . . . . . . . . . . . . 64 Viewing photos . . . . . . . . . . . . . . . . . . . . . . . . . . . . . . . . . . . . . . . . . . . . . . . . . . . . . . . . . . . . . . . . . . . 64
www.tv.toshiba.com |
iii |

Contents
Viewing photos in a slideshow . . . . . . . . . . . . . . . . . . . . . . . . . . . . . . . . . . . . . . . . . . . . . . . . . . . . |
65 |
Adjusting the picture . . . . . . . . . . . . . . . . . . . . . . . . . . . . . . . . . . . . . . . . . . . . . . . . . . . . . . . 65
Adjusting the TV picture . . . . . . . . . . . . . . . . . . . . . . . . . . . . . . . . . . . . . . . . . . . . . . . . . . . . . . . . . . . 65 Adjusting the picture size . . . . . . . . . . . . . . . . . . . . . . . . . . . . . . . . . . . . . . . . . . . . . . . . . . . . . . . . . 67 Scrolling the TheaterWide™ picture . . . . . . . . . . . . . . . . . . . . . . . . . . . . . . . . . . . . . . . . . . . . . . . . 68 Automatically adjusting the aspect ratio . . . . . . . . . . . . . . . . . . . . . . . . . . . . . . . . . . . . . . . . . . . 69 Using the 4:3 Stretch . . . . . . . . . . . . . . . . . . . . . . . . . . . . . . . . . . . . . . . . . . . . . . . . . . . . . . . . . . . . . . 69
Adjusting the sound . . . . . . . . . . . . . . . . . . . . . . . . . . . . . . . . . . . . . . . . . . . . . . . . . . . . . . . . 70
Adjusting sound settings . . . . . . . . . . . . . . . . . . . . . . . . . . . . . . . . . . . . . . . . . . . . . . . . . . . . . . . . . . 70 Playing TV audio only . . . . . . . . . . . . . . . . . . . . . . . . . . . . . . . . . . . . . . . . . . . . . . . . . . . . . . . . . . . . . 71
Changing channel settings . . . . . . . . . . . . . . . . . . . . . . . . . . . . . . . . . . . . . . . . . . . . . . . . . . 71
Automatically scanning for channels . . . . . . . . . . . . . . . . . . . . . . . . . . . . . . . . . . . . . . . . . . . . . . . 71 Manually adding channels to the channel list . . . . . . . . . . . . . . . . . . . . . . . . . . . . . . . . . . . . . . 72 Hiding channels . . . . . . . . . . . . . . . . . . . . . . . . . . . . . . . . . . . . . . . . . . . . . . . . . . . . . . . . . . . . . . . . . . 73
Setting parental controls . . . . . . . . . . . . . . . . . . . . . . . . . . . . . . . . . . . . . . . . . . . . . . . . . . . . 73
Setting a new PIN . . . . . . . . . . . . . . . . . . . . . . . . . . . . . . . . . . . . . . . . . . . . . . . . . . . . . . . . . . . . . . . . . 74 Changing or deleting the PIN . . . . . . . . . . . . . . . . . . . . . . . . . . . . . . . . . . . . . . . . . . . . . . . . . . . . . . 74 Blocking TV programs and movies (for USA region) . . . . . . . . . . . . . . . . . . . . . . . . . . . . . . . . 75 Downloading rating information (for USA region) . . . . . . . . . . . . . . . . . . . . . . . . . . . . . . . . . . 76 Temporarily unlocking programs . . . . . . . . . . . . . . . . . . . . . . . . . . . . . . . . . . . . . . . . . . . . . . . . . . 78 Locking video inputs . . . . . . . . . . . . . . . . . . . . . . . . . . . . . . . . . . . . . . . . . . . . . . . . . . . . . . . . . . . . . . 78 Locking channels . . . . . . . . . . . . . . . . . . . . . . . . . . . . . . . . . . . . . . . . . . . . . . . . . . . . . . . . . . . . . . . . . 78 Setting the GameTimer™ . . . . . . . . . . . . . . . . . . . . . . . . . . . . . . . . . . . . . . . . . . . . . . . . . . . . . . . . . . 79
Using closed captioning . . . . . . . . . . . . . . . . . . . . . . . . . . . . . . . . . . . . . . . . . . . . . . . . . . . . 79
Turning closed captioning on or off . . . . . . . . . . . . . . . . . . . . . . . . . . . . . . . . . . . . . . . . . . . . . . . . 80 Selecting the analog closed captioning mode . . . . . . . . . . . . . . . . . . . . . . . . . . . . . . . . . . . . . . 80 Selecting the closed captioning mode with the CCD button . . . . . . . . . . . . . . . . . . . . . . . . 81 Customizing digital closed captioning settings . . . . . . . . . . . . . . . . . . . . . . . . . . . . . . . . . . . . . 81
Adjusting time settings . . . . . . . . . . . . . . . . . . . . . . . . . . . . . . . . . . . . . . . . . . . . . . . . . . . . . 82
Setting the time zone and Daylight Saving Time status . . . . . . . . . . . . . . . . . . . . . . . . . . . . . 82 Setting the sleep timer . . . . . . . . . . . . . . . . . . . . . . . . . . . . . . . . . . . . . . . . . . . . . . . . . . . . . . . . . . . . 82
Adjusting menu settings . . . . . . . . . . . . . . . . . . . . . . . . . . . . . . . . . . . . . . . . . . . . . . . . . . . . 83
Selecting the menu language . . . . . . . . . . . . . . . . . . . . . . . . . . . . . . . . . . . . . . . . . . . . . . . . . . . . . 83 Labeling a video input source . . . . . . . . . . . . . . . . . . . . . . . . . . . . . . . . . . . . . . . . . . . . . . . . . . . . . 83 Turning the input sensor on or off . . . . . . . . . . . . . . . . . . . . . . . . . . . . . . . . . . . . . . . . . . . . . . . . . 84
Maintaining . . . . . . . . . . . . . . . . . . . . . . . . . . . . . . . . . . . . . . . . . . . . . . . . . . . . . . . . . . . . . . . . 84
Cleaning the TV cabinet . . . . . . . . . . . . . . . . . . . . . . . . . . . . . . . . . . . . . . . . . . . . . . . . . . . . . . . . . . . 84 Cleaning the TV screen . . . . . . . . . . . . . . . . . . . . . . . . . . . . . . . . . . . . . . . . . . . . . . . . . . . . . . . . . . . . 84
Troubleshooting . . . . . . . . . . . . . . . . . . . . . . . . . . . . . . . . . . . . . . . . . . . . . . . . . . . . . . . . . . . . 84
Viewing support information . . . . . . . . . . . . . . . . . . . . . . . . . . . . . . . . . . . . . . . . . . . . . . . . . . . . . . 85 Restoring settings to the defaults . . . . . . . . . . . . . . . . . . . . . . . . . . . . . . . . . . . . . . . . . . . . . . . . . . 85 Turning off the automatic power-off feature . . . . . . . . . . . . . . . . . . . . . . . . . . . . . . . . . . . . . . . 86
iv |
www.tv.toshiba.com |

Contents
Making your TV turn on faster . . . . . . . . . . . . . . . . . . . . . . . . . . . . . . . . . . . . . . . . . . . . . . . . . . . . . 86 Cast TV FAQ . . . . . . . . . . . . . . . . . . . . . . . . . . . . . . . . . . . . . . . . . . . . . . . . . . . . . . . . . . . . . . . . . . . . . . . 87 Video and audio . . . . . . . . . . . . . . . . . . . . . . . . . . . . . . . . . . . . . . . . . . . . . . . . . . . . . . . . . . . . . . . . . . 88 Remote control . . . . . . . . . . . . . . . . . . . . . . . . . . . . . . . . . . . . . . . . . . . . . . . . . . . . . . . . . . . . . . . . . . . 90 General . . . . . . . . . . . . . . . . . . . . . . . . . . . . . . . . . . . . . . . . . . . . . . . . . . . . . . . . . . . . . . . . . . . . . . . . . . . 91 CEC-compatible devices . . . . . . . . . . . . . . . . . . . . . . . . . . . . . . . . . . . . . . . . . . . . . . . . . . . . . . . . . . . 92
Specifications . . . . . . . . . . . . . . . . . . . . . . . . . . . . . . . . . . . . . . . . . . . . . . . . . . . . . . . . . . . . . . 94
43" model (43L621U) . . . . . . . . . . . . . . . . . . . . . . . . . . . . . . . . . . . . . . . . . . . . . . . . . . . . . . . . . . . . . . 94 49" model (49L621U) . . . . . . . . . . . . . . . . . . . . . . . . . . . . . . . . . . . . . . . . . . . . . . . . . . . . . . . . . . . . . . 95 55" model (55L621U) . . . . . . . . . . . . . . . . . . . . . . . . . . . . . . . . . . . . . . . . . . . . . . . . . . . . . . . . . . . . . . 96 65" model (65L621U) . . . . . . . . . . . . . . . . . . . . . . . . . . . . . . . . . . . . . . . . . . . . . . . . . . . . . . . . . . . . . . 97
Legal notices . . . . . . . . . . . . . . . . . . . . . . . . . . . . . . . . . . . . . . . . . . . . . . . . . . . . . . . . . . . . . . . 98 One-year limited warranty - Toshiba Televisions . . . . . . . . . . . . . . . . . . . . . . . . . . . . . 99
www.tv.toshiba.com |
v |
CHILD SAFETY
PROPER TELEVISION PLACEMENT MATTERS
THE CONSUMER ELECTRONICS INDUSTRY CARES
•Manufacturers, retailers and the rest of the consumer electronics industry are committed to making home entertainment safe and enjoyable.
•As you enjoy your television, please note that all televisions - new and old - must be supported on proper stands or installed according to the manufacturer's recommendations. Televisions that are inappropriately situated on dressers, bookcases, shelves, desks, speakers, chests, carts, etc., may fall over, resulting in injury.
TUNE IN TO SAFETY
•ALWAYS follow the manufacturer’s recommendations for the safe installation of your television.
•ALWAYS read and follow all instructions for proper use of your television.
•NEVER allow children to climb on or play on the television or the furniture on which the television is placed.
•NEVER place the television on furniture that can easily be used as steps, such as a chest of drawers.
•ALWAYS install the television where it cannot be pushed, pulled over or knocked down.
•ALWAYS route cords and cables connected to the television so that they cannot be tripped over, pulled or grabbed.
WALL OR CEILING MOUNT YOUR TELEVISION
•ALWAYS contact your retailer about professional installation if you have any doubts about your ability to safely mount your television.
•ALWAYS use a mount that has been recommended by the television manufacturer and has a safety certification by an independent laboratory (such as UL, CSA, ETL).
•ALWAYS follow all instructions supplied by the television and mount manufacturers.
•ALWAYS make sure that the wall or ceiling where you are mounting the television is appropriate. Some mounts are not designed to be mounted to walls and ceilings with steel studs or cinder block construction. If you are unsure, contact a professional installer.
•Televisions can be heavy. A minimum of two people is required for a wall or ceiling mount installation.
MOVING AN OLDER TELEVISION TO A NEW PLACE IN YOUR
HOME
•Many new television buyers move their older CRT televisions into a secondary room after the purchase of a flat-panel television. Special care should be made in the placement of older CRT televisions.
•ALWAYS place your older CRT television on furniture that is sturdy and appropriate for its size and weight.
•NEVER place your older CRT television on a dresser where children may be tempted to use the drawers to climb.
•ALWAYS make sure your older CRT television does not hang over the edge of your furniture.
https://www.cta.tech/Consumer-Resources.aspx |
1 |
Important Safety Instructions
CAUTION
RISK OF ELECTRIC SHOCK
DO NOT OPEN
CAUTION: TO REDUCE THE RISK OF ELECTRIC SHOCK, DO NOT REMOVE COVER (OR BACK). NO USER-SERVICEABLE PARTS INSIDE. REFER SERVICING TO QUALIFIED SERVICE PERSONNEL.
The lightning flash with arrowhead symbol within an equilateral triangle is intended to alert the user to the presence of uninsulated “hazardous voltage” within the product's enclosure, which may be of sufficient magnitude to induce a risk of electric shock to persons.
The exclamation point within an equilateral triangle is intended to alert the user to the presence of important operating and maintenance (servicing) instructions in the literature accompanying the appliance.
1 Read these instructions.
2 Keep these instructions.
3 Heed all warnings.
4 Follow all instructions.
5 Do not use this apparatus near water.
6 Clean only with dry cloth.
7Do not block any ventilation openings. Install in accordance with the manufacturer's instructions.
8Do not install near any heat sources such as radiators, heat registers, stoves, or other apparatus (including amplifiers) that produce heat.
9Do not defeat the safety purpose of the polarized or grounding-type plug. A polarized plug has two blades with one wider than the other. A grounding type plug has two blades and a third grounding prong. The wide blade or the third prong are provided for your safety. If the provided plug does not fit into your outlet, consult an electrician for replacement of the obsolete outlet.
10Protect the power cord from being walked on or pinched particularly at plugs, convenience receptacles, and the point where they exit from the apparatus.
11Only use attachments/accessories specified by the manufacturer.
12Use only with the cart, stand, tripod, bracket, or table specified by the manufacturer, or sold with the apparatus. When a cart is used, use caution when moving the cart/apparatus combination to avoid injury from tip-over.
13Unplug this apparatus during lightning storms or when unused for long periods of time.
14Refer all servicing to qualified service personnel. Servicing is required when the apparatus has been damaged in any way, such as power-supply cord or plug is damaged, liquid has been spilled or objects have fallen into the apparatus, the apparatus has been exposed to rain or moisture, does not operate normally, or has been dropped.
15The wall plug is the disconnecting device. The plug must remain readily operable.
16Remote control batteries should not be exposed to excessive heat such as sunshine, fire, or the like.
17The apparatus should not be exposed to dripping or splashing, and no objects filled with liquids, such as vases, should be placed on the apparatus.
18Your TV has four VESA mounting holes on the back. If you attach a wall-mount bracket or TV stand to the back of your TV, the bracket or stand must be securely attached using all four holes.
If you do not use all four mounting holes, your TV may fall and cause property damage or personal injury. See the documentation that came with your wall mount or TV stand for complete mounting instructions.
WARNING
Electric shock hazard
To reduce the risk of fire or electric shock, do not remove any cover or expose the device to rain or moisture. No user-serviceable parts are inside. Refer servicing to qualified service technicians.
Lightning
For added protection for your device receiver during a lightning storm, or when it is left unattended and unused for long periods of time, unplug it from the power outlet and disconnect any antenna or cable system. This helps prevent property damage and personal injury from lightning and power line surges.
Power lines
An outside antenna system should not be located in the vicinity of overhead power lines or other electric light or power circuits, or where it can fall into such power lines or circuits. When installing an outside antenna system, take extreme care to keep from touching such power lines or circuits as contact with them might be fatal.
2 |
www.tv.toshiba.com |
43L621U / 49L621U / 55L621U / 65L621U
Handling the LCD panel
•Your TV’s screen is made of glass. Do not drop your TV or hit, jolt, or press hard against the LCD panel. If the screen breaks, be careful of broken glass.
•If the LCD panel is broken, make absolutely sure that you do not touch the liquid in the panel. This may cause skin inflammation.
•If the liquid gets in your mouth, immediately gargle, rinse, and consult with your doctor. Also, if the liquid gets in your eyes or touches your skin, consult with your doctor after rinsing for at least 15 minutes or longer in clean water.
Replacement parts
When replacement parts are required, make sure that the service technician uses replacement parts specified by the manufacturer that have the same characteristics as the original part. Unauthorized substitutions may result in fire, electric shock, personal injury, or other hazards.
Safety check
After completing any service or repair to this device, ask the service technician to perform routine safety checks to determine that your TV is in correct operating condition.
Power source
Operate your TV only from the type of power source indicated on the marking label. If you are not sure of the type of power supplied to your home, consult an electrician or your local power company.
Servicing
These servicing instructions are for use by qualified service personnel only. To reduce the risk of electric shock, do not perform any servicing other than that contained in the operating instructions unless you are qualified to do so.
CAUTION
Damage requiring service
Unplug this TV from the power outlet and refer servicing to qualified service personnel under the following conditions:
•When the power supply cord or plug is damaged or frayed.
•If liquid has been spilled or objects have fallen into your TV.
•If your TV has been exposed to rain or water.
•If your TV does not operate normally by following the operating instructions. Adjust only those controls covered by the operating instructions because incorrect adjustment of other controls may result in damage and will often require extensive work by a qualified technician to restore your TV to its normal operation.
•If your TV has been dropped or damaged in any way.
•When your TV exhibits a distinct change in performance.
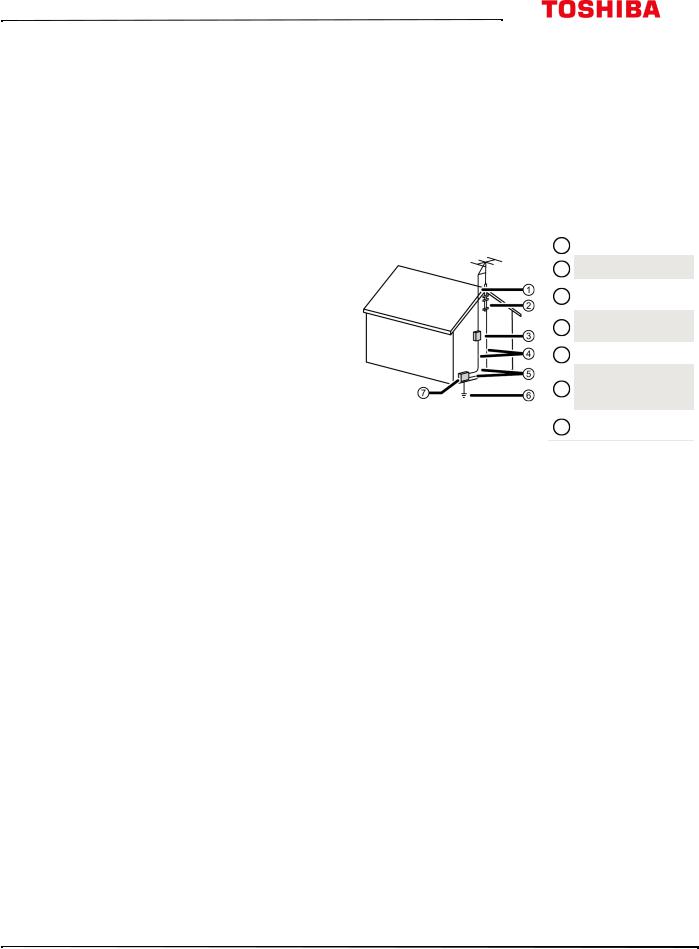
Outdoor antenna grounding
If an outside antenna or cable system is connected to your TV, make sure that the antenna or cable system is grounded to provide some protection against voltage surges and built-up static charges. Article 810 of the National Electrical Code, ANSI/NFPA No. 70, provides information with respect to correct grounding of the mast and supporting structure, grounding of the lead-in wire to an antenna discharge unit, size of grounding conductors, location of the antenna-discharge unit, connection to grounding electrodes, and requirements for the grounding electrode.
1 Antenna lead-in wire
2 Grounding clamp
Antenna discharge 3 unit
Grounding 4 conductors
5 Ground clamps
Power service
6 grounding electrode system
Electric service 7 equipment
Note to CATV system installer
Article 820 of the National Electrical Code, ANSI/NFPA No. 40 provides guidance for correct grounding. Specifically, it states that the cable ground must be connected to the grounding system of the building as close to the point of cable entry as practical.
Condensation
Moisture will form on the TV if the TV is brought from cool surroundings into a warm room or if the temperature of the room rises suddenly. When this happens, the TV's performance may be impaired. To prevent this, let the TV stand in its new surroundings for about an hour before switching it on, or make sure that the room temperature rises gradually.
Condensation may also form during the summer if the TV is exposed to the breeze from an air conditioner. In such cases, change the location of the TV.
Mobile telephone warning
To avoid interference with your TV picture and sound, operating problems, or even damage, keep your cordless and cellular telephones away from the TV.
www.tv.toshiba.com |
3 |

End of life directives
Your TV may contain materials that are regulated for environmental reasons. Your TV also contains materials that can be recycled and reused. To help protect the environment, contact your local authorities for information about disposal or recycling and about finding a recycler in your area before you dispose of your TV.
Non-active pixels
The LCD panel contains almost 3 million thin film transistors, which provide exceptionally sharp video quality. Occasionally, a few non-active pixels may appear on the screen as a fixed blue, green, or red point. These non-active pixels do not adversely affect the performance of your TV, and are not considered defects.
4 |
www.tv.toshiba.com |

43L621U / 49L621U / 55L621U / 65L621U 43" / 49" / 55" / 65" 2160p 60Hz LED Google Cast™ TV
43" / 49" / 55" / 65" 2160p 60Hz LED
Google Cast™ TV
Introduction
Congratulations on your purchase of a high-quality Toshiba product. Your 43L621U, 49L621U, 55L621U, or 65L621U represents the state of the art in LED TV design and is designed for reliable and trouble-free performance.
HDMI®CEC Control
Enjoy the benefit of having HDMI CEC-compatible products plug and play! No setup is needed! CEC technology lets different devices discover and communicate with each other. (See page 59 for instructions on how to use HDMI® CEC Control.)
DTS Studio Sound®
Google Cast
UNLIMITED ENTERTAINMENT, ALL ON YOUR SCHEDULE
•With Google Cast™, you are in command. Access more than 200,000 TV shows and movies, millions of songs and more through apps like Netflix, YouTube, and Google Play. Discover new content, with more apps being added all the time at g.co/castapps.
USE YOUR PHONE AS A REMOTE
DTS Studio Sound is an advanced surround sound solution suite that accurately extracts and places audio cues for an immersive surround experience over the TV’s built-in speakers. To complete the audio experience, post processing and psychoacoustic techniques are implemented to provide 3D audio rendering to match 3D video content, for bass and dialog enhancement and to deliver consistent and level volume across content.
GameTimer™
•By using your phone, there's nothing new to learn—cast your apps, your playlists, your TV shows—without new log-ins or downloads. It's simple to search, browse, queue, and control from anywhere in the home.
MULTI-TASK WITHOUT INTERRUPTING WHAT’S PLAYING
Use the GameTimer™ to set a time limit for playing a video game (from 30 to 120 minutes). When the GameTimer expires, your TV locks out the input source for the video game device.
•While you are casting, you can keep using your phone for other things without disrupting what is playing on the TV.
www.tv.toshiba.com |
5 |

43" / 49" / 55" / 65" 2160p 60Hz LED Google Cast™ TV
Installing the stands or wall-mount bracket
•If you want to place your TV on a table or in an entertainment center, go to Installing the stands (43" or 65" model) or Installing the stands (49" or 55" model).
•If you want to mount your TV on a wall, go to Installing a wall-mount bracket.
Notes
•If you plan to wall-mount your TV, do not install the stands.
•Store the stands and stand screws in case you decide to use the stands in the future.
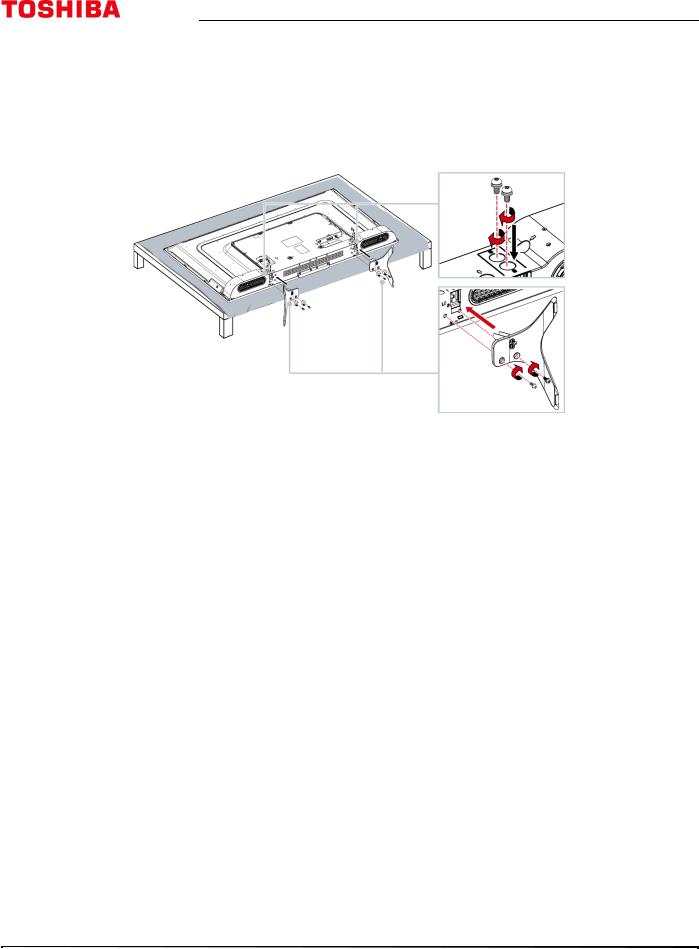
Installing the stands (43" or 65" model)
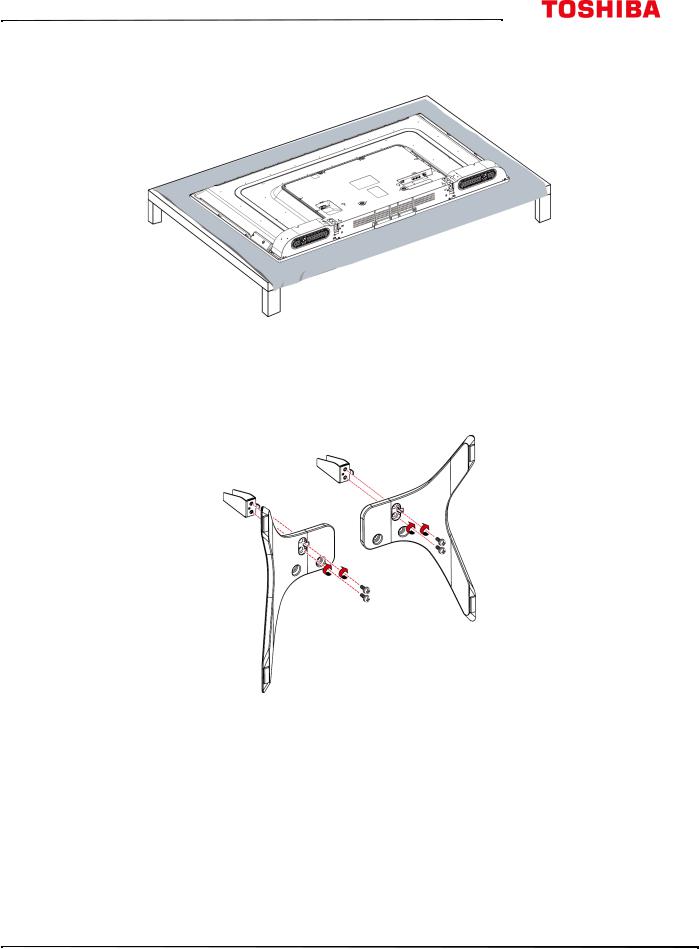
1 Carefully place your TV face-down on a cushioned, clean surface to protect the screen from damages and scratches.
2 Secure each TV stand leg to the back of your TV with two of the provided screws.
|
Screw type |
Screw length |
# of screws |
43" |
M5 |
27 mm |
4 |
|
|
|
|
65" |
M5 |
20 mm |
4 |
|
|
|
|
6 |
www.tv.toshiba.com |
43L621U / 49L621U / 55L621U / 65L621U 43" / 49" / 55" / 65" 2160p 60Hz LED Google Cast™ TV
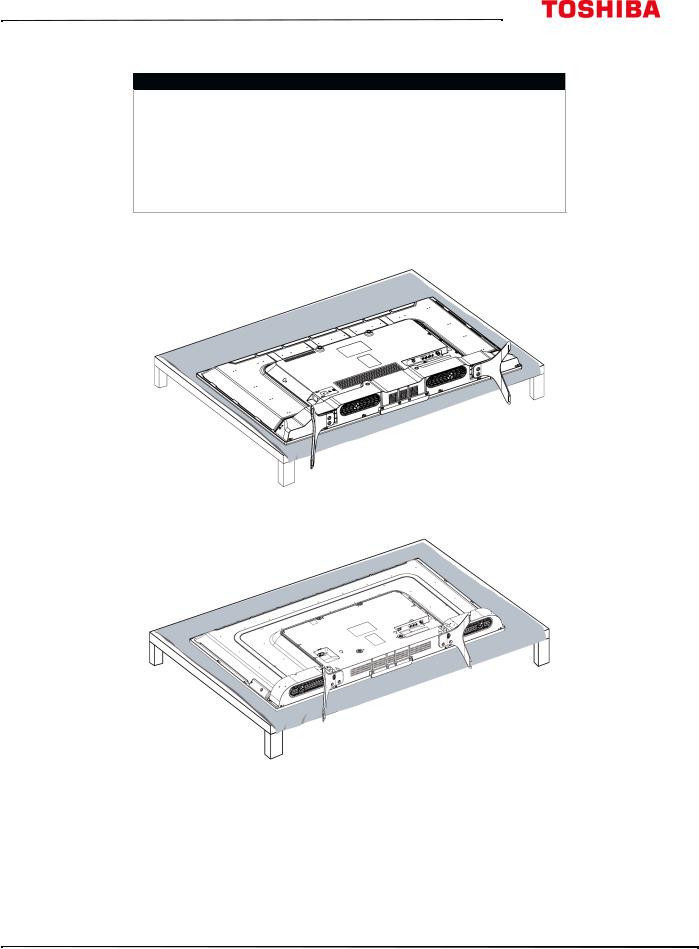
Installing the stands (49" or 55" model)
1 Carefully place your TV face-down on a cushioned, clean surface to protect the screen from damages and scratches.
2 Attach a stand neck to each of the stand legs with two of the provided 12 mm screws (the long screws).
Screw type |
Screw length |
# of screws |
M4 |
12 mm |
4 |
|
|
|
www.tv.toshiba.com |
7 |
43" / 49" / 55" / 65" 2160p 60Hz LED Google Cast™ TV
3Slide the stand necks into the slots on the bottom of your TV. Secure the necks to the back of your TV using two of the provided 10 mm screws (the short screws) and to the bottom of your TV using two of the 12 mm screws.
Screw type |
Screw length |
# of screws |
M4 |
12 mm |
4 |
|
|
|
M5 |
10 mm |
4 |
|
|
|
8 |
www.tv.toshiba.com |
43L621U / 49L621U / 55L621U / 65L621U 43" / 49" / 55" / 65" 2160p 60Hz LED Google Cast™ TV
Installing a wall-mount bracket
Warning
• Your TV has four VESA mounting holes on the back. If you attach a wall-mount bracket to the back of your TV, the bracket must be securely attached, using all four holes. If you do not use all four mounting holes, your TV may fall and cause property damage or personal injury. See the documentation that came with your wall mount for complete mounting instructions.
• This TV is intended to be supported by a UL Listed wall mount bracket with suitable weight/load. (See Miscellaneous on page 94, 95, 96, or 97.)
1 Carefully place your TV face-down on a cushioned, clean surface to protect the screen from damages and scratches.
43" or 65" model
49" or 55" model
www.tv.toshiba.com |
9 |
43" / 49" / 55" / 65" 2160p 60Hz LED Google Cast™ TV
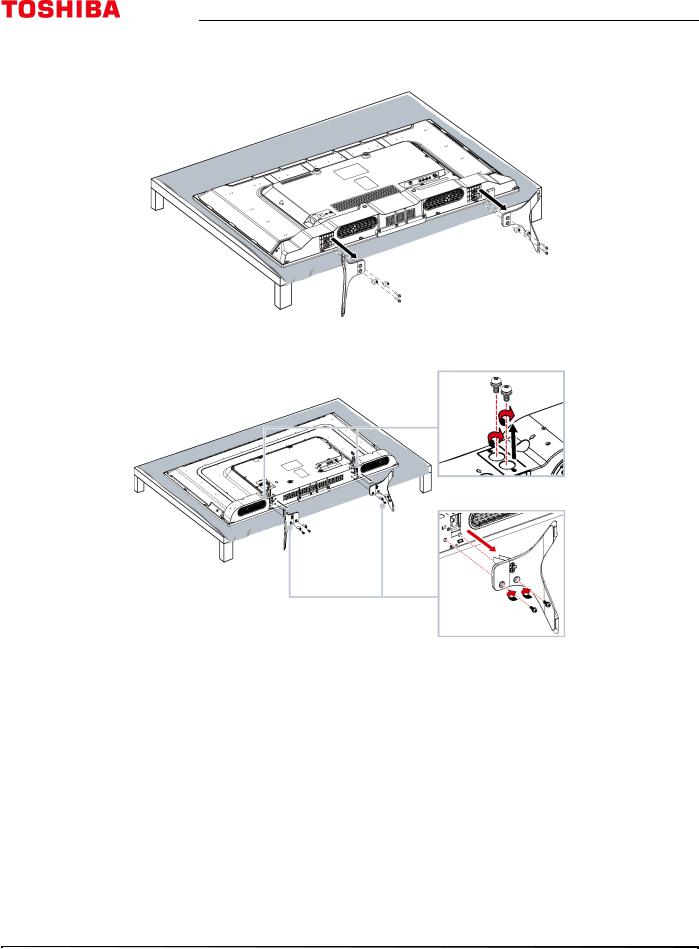
2 If the stands are installed, remove the screws that secure each stand to your TV, then remove the stand.
43"or 65" model
49" or 55" model
10 |
www.tv.toshiba.com |
43L621U / 49L621U / 55L621U / 65L621U 43" / 49" / 55" / 65" 2160p 60Hz LED Google Cast™ TV
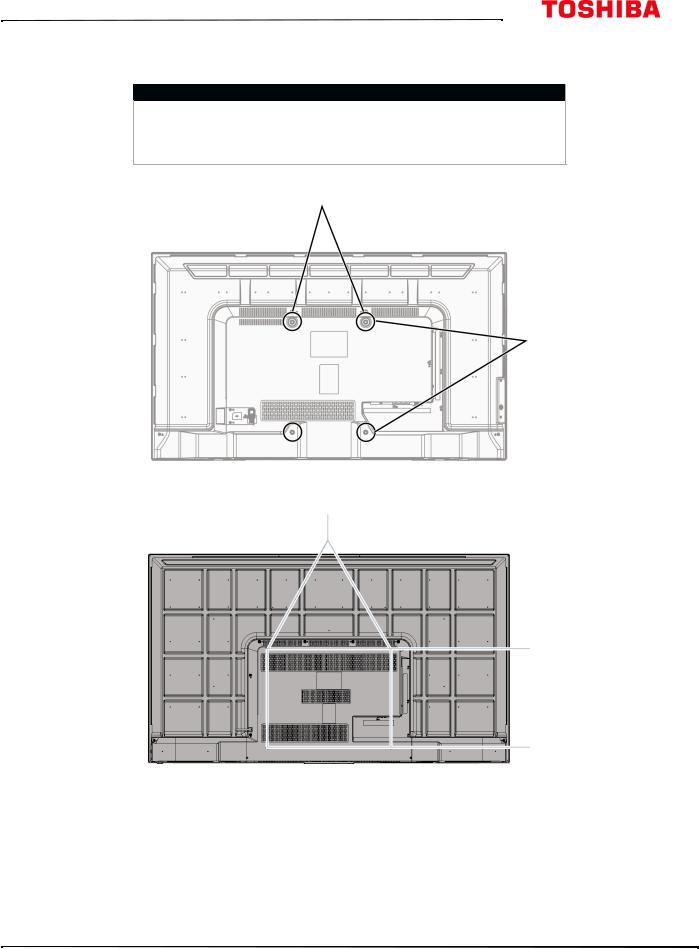
3See the instructions that came with the wall-mount bracket for information about which screws to use and how to correctly hang your TV.
Notes
•The length of the wall-mount screws vary depending on the wall-mount bracket you purchased. See the instructions that came with the wall-mount bracket for screw lengths.
•The mounting holes on the back of all the models take type M6 screws.
43" 49" or 55" model
7.87 in. (200 mm)
11.81 in. (300 mm)
65"model
19.69 in. (500 mm)
15.74 in. (400 mm)
www.tv.toshiba.com |
11 |
43" / 49" / 55" / 65" 2160p 60Hz LED Google Cast™ TV
TV components
This section contains information about:
•Package contents
•Front
•Power/INPUT button
•Side jacks
•Back jacks
•Remote control
Package contents
•43", 49", 55", or 65"LED Google Cast™ TV
•Remote control and batteries (2 AAA)
•43"/65" models: TV stands (2) and screws (4)
•49"/55" models: TV stands (2), stand necks (2), M4 screws (8), and M5 screws (4)
•49"/55" models: Power cord
•Quick Setup Guide
•Important Information
Front
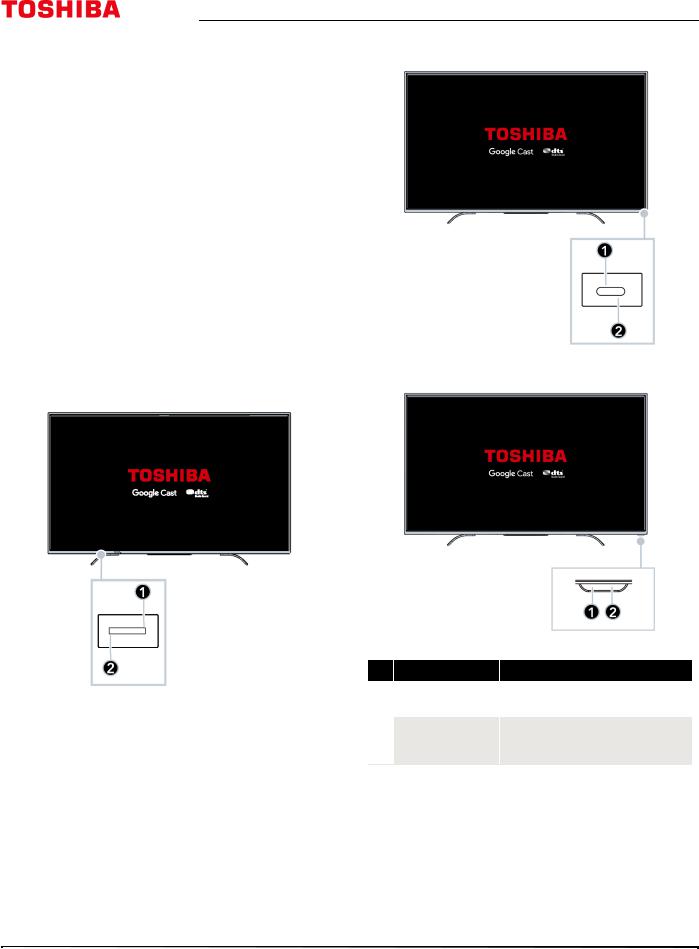
43" model
49"/55" models
65" model
#Item
1 Remotesensor control
2 Power indicator
Description
Receives signals from the remote control. Do not block.
Turns off when your TV is on.
Lights red when your TV is off (standby mode).
12 |
www.tv.toshiba.com |
43L621U / 49L621U / 55L621U / 65L621U 43" / 49" / 55" / 65" 2160p 60Hz LED Google Cast™ TV
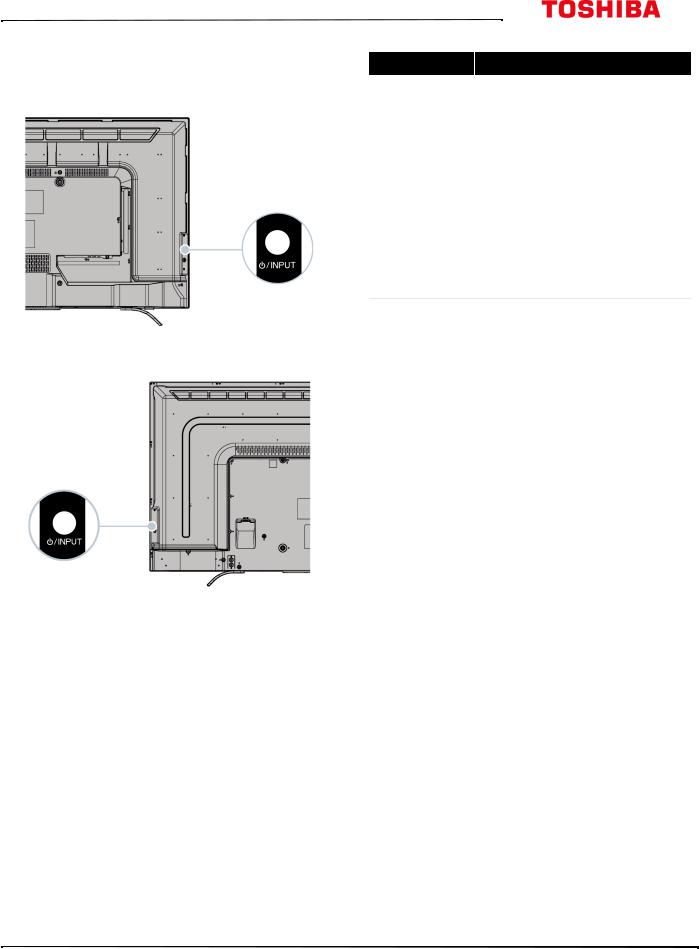
Power/INPUT button
Item
43" model
 /INPUT
Description
 —Press to turn on your TV when your TV is off (in standby mode). Press and hold to turn off your TV when your TV is on.
Warning: When your TV is off, power still flows through it. To completely disconnect power, unplug the power cord.
INPUT—When your TV is on, quickly press and release to open the Input Selection list, press one or more times to select a video input source, then wait a few seconds. Your TV switches to the source you selected. For more information, see Selecting the video input source on page 56.
49"/55"/65" models
www.tv.toshiba.com |
13 |
43" / 49" / 55" / 65" 2160p 60Hz LED Google Cast™ TV
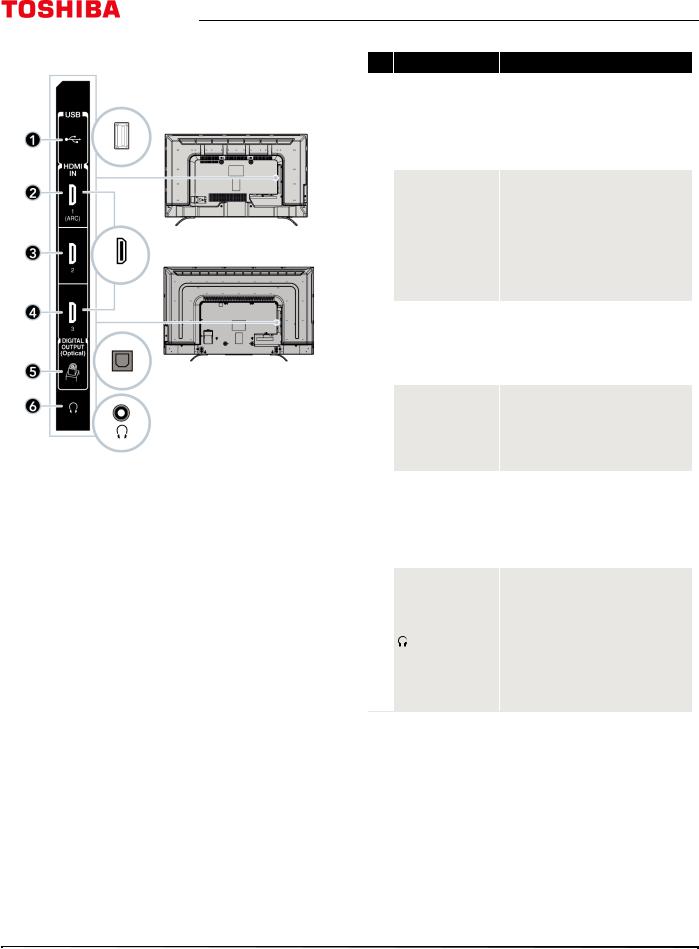
Side jacks
43"/65" models
49"/55" models
# Item
1 USB
2 HDMI IN 1 (ARC)
3 HDMI IN 2
4 HDMI IN 3
5DIGITAL OUTPUT (Optical)
6
Description
Connect a USB flash drive to this jack to view compatible JPEG picture files. For more information, see Connecting a USB flash drive on page 32 and Using the Media Player on page 64.
Connect an HDMI or DVI device to this jack. For more information, see HDMI (best) on page 20, 25, 27, or 30 or DVI (same as HDMI but requires an audio connection) on page 21 or 31.
OR
Connect an ARC-enabled home theater receiver to this jack.
Connect an HDMI or DVI device to this jack. For more information, see HDMI (best) on page 20, 25, 27, or 30 or DVI (same as HDMI but requires an audio connection) on page 21 or 31.
Connect an HDMI or DVI device to this jack. For more information, see HDMI (best) on page 20, 25, 27, or 30 or DVI (same as HDMI but requires an audio connection) on page 21 or 31.
Connect a soundbar, digital speaker system, or home theater system to this jack to listen to TV audio through external speakers. For more information, see Connecting external speakers or a soundbar on page 34.
Connect headphones to this jack. See Connecting headphones on page 33.
OR
Connect an analog soundbar, speaker system, or home theater system to this jack to listen to TV audio through external speakers. For more information, see Analog audio on page 35.
14 |
www.tv.toshiba.com |
43L621U / 49L621U / 55L621U / 65L621U 43" / 49" / 55" / 65" 2160p 60Hz LED Google Cast™ TV
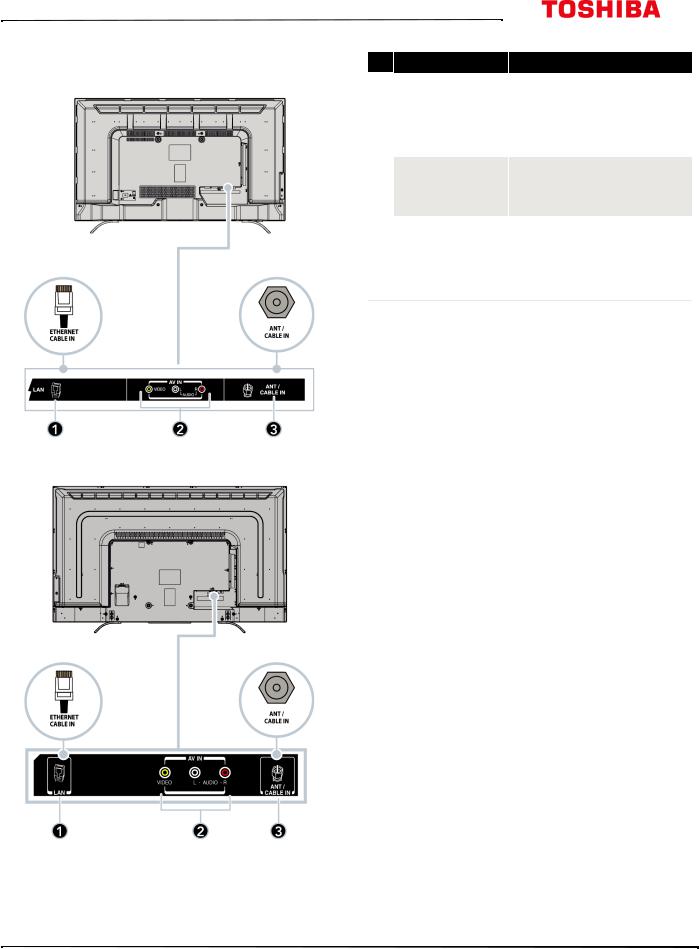
Back jacks |
# |
Item |
|
||
43" model |
|
|
|
1 |
LAN |
2 VIDEO and
AUDIO L and R
3 ANT / CABLE IN
Description
Connect a network router to this jack to use a wired network connection to access your Google Cast account. For more information, see Connecting a network router on page 29.
Connect the video and audio for an AV device to these jacks. For more information, see AV (good) on page 22, 26, or 28.
Connect an antenna or cable TV to this jack. For more information, see Coaxial (good) on page 23 or Connecting an antenna or cable TV (no box) on page 24.
49"/55"/65" models
www.tv.toshiba.com |
15 |
Remote control
43" / 49" / 55" / 65" 2160p 60Hz LED Google Cast™ TV
# |
Button |
Press to... |
||||
|
|
|
|
|
Turn your TV on or off (standby mode). When your TV is off, |
|
1 |
|
|
(power) |
the power indicator lights red. |
||
|
|
Warning: When your TV is off, power still flows through it. |
||||
|
|
|
|
|
||
|
|
|
|
|
To disconnect power, unplug the power cord. |
|
|
|
|
|
|
|
|
|
|
|
|
|
Set the sleep timer. You can select Off, 5 min, 10 min, |
|
2 |
SLEEP |
15 min, 30 min, 60 min, 90 min, 120 min, 150 min, |
||||
180 min, or 240 min. See Setting the sleep timer on |
||||||
|
|
|
|
|
||
|
|
|
|
|
page 82. |
|
3 |
|
|
|
|
Open the Input Selection list. Press INPUT one or more times |
|
INPUT |
or press Sor Tto select the video input source, then press |
|||||
|
|
|
|
|
OK. See Selecting the video input source on page 56. |
|
4 |
|
|
|
|
Select the sound mode. You can select Standard, Music, |
|
Sound |
Movie, Clear Voice, or Enhanced Bass. See the Sound |
|||||
|
|
|
|
|
Mode option in Adjusting sound settings on page 70. |
|
5 |
|
|
|
(back) |
Return to the previous level or channel. |
|
|
|
|
|
|
|
|
6 |
MUTE |
Mute the sound or un-mute the sound. See Adjusting the |
||||
volume on page 58. |
||||||
|
|
|
|
|
||
7 |
|
|
|
|
TV: Change to the next higher channel in the channel list. |
|
CH+/S |
TV menu: Navigate up. |
|||||
|
|
|
|
|
USB: Rotate a photo counter-clockwise in a slideshow. |
|
|
|
|
|
|
|
|
8 |
|
|
|
|
TV: Decrease the volume. |
|
VOL–/W |
TV menu: Navigate left. |
|||||
|
|
|
|
|
USB: Go to the previous photo in a slideshow. |
|
9 |
OK |
Confirm selections or changes in TV menus. |
||||
10 |
|
|
|
|
|
|
|
|
|
|
Switch to Google Cast. |
||
|
|
|
|
|
Turn closed captioning on or off. Select the language (like |
|
11 |
CCD |
English) to turn on closed captioning or Off to turn off |
||||
closed captioning. See Turning closed captioning on or off on |
||||||
|
|
|
|
|
||
|
|
|
|
|
page 80. |
|
|
|
|
|
|
|
|
12 |
|
|
|
|
Select the picture mode. You can select Dynamic, |
|
Picture |
Standard, Natural, Movie, Game, or PC. See the Picture |
|||||
|
|
|
|
|
Mode option in Adjusting the TV picture on page 65. |
|
13 |
MENU |
Open the on-screen menu. |
||||
|
|
|
|
|
|
|
14 |
|
|
|
|
Display TV status information, such as the channel number, |
|
INFO |
channel name (if available), or signal source. See Viewing |
|||||
|
|
|
|
|
channel information on page 59. |
|
15 |
EXIT |
Close the on-screen TV menu. |
||||
|
|
|
|
|
|
|
16 |
|
|
|
|
TV: Increase the volume. |
|
VOL+/X |
TV menu: Navigate right. |
|||||
|
|
|
|
|
USB: Go to the next photo in a slideshow. |
|
17 |
|
|
|
|
TV: Change to the next lower channel in the channel list. |
|
CH–T |
TV menu: Navigate down. |
|||||
|
|
|
|
|
USB: Rotate a photo clockwise in a slideshow. |
|
18 |
|
|
|
|
|
|
|
|
|
(play/pause) |
Start or stop playback. |
||
|
|
|||||
|
|
|
|
|
|
|
16 |
www.tv.toshiba.com |
43L621U / 49L621U / 55L621U / 65L621U 43" / 49" / 55" / 65" 2160p 60Hz LED Google Cast™ TV
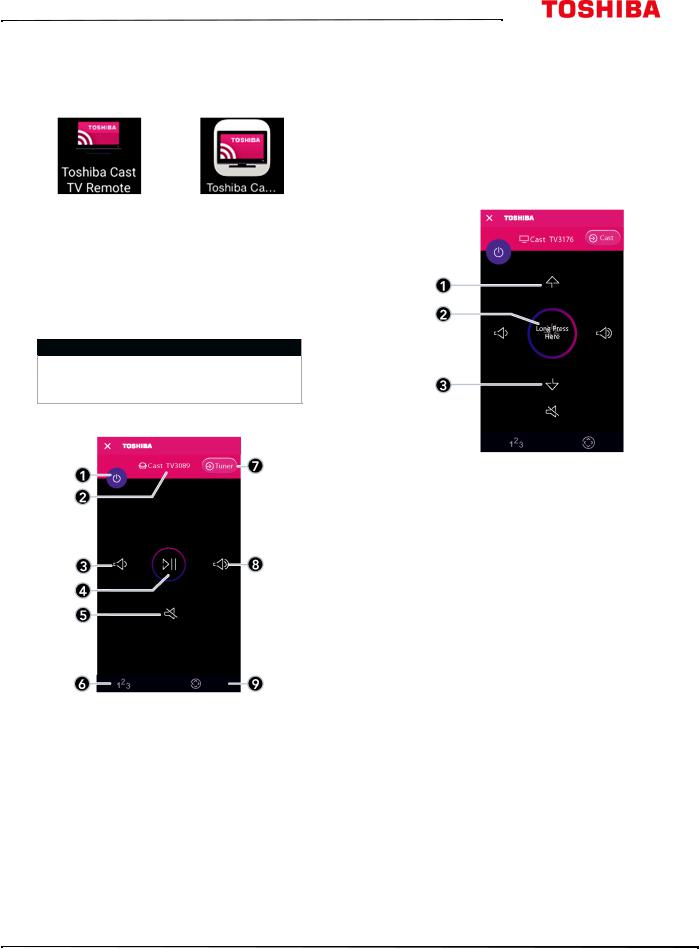
Virtual Remote control
To download the Toshiba Cast TV Remote App on your mobile phone or tablet, search for the app in your device's store app and install it.
Toshiba TV |
Toshiba TV |
Remote icon on |
Remote icon on |
Android device. |
iOS device. |
The buttons on the Toshiba TV remote function the same as the corresponding buttons on the remote control that came with your TV. For more information, see Remote control on page 16.
Note
When performing tasks, you can use either your physical remote control or the virtual remote control.
Main page
# |
Item |
Description |
|
|
|
Tap to turn your TV on or off (standby mode). When your TV |
|
1 |
Power |
is off, the power indicator lights red. |
|
Warning: When your TV is off, power still flows through it. |
|||
|
|
||
|
|
To disconnect power, unplug the power cord. |
|
2 |
|
|
|
TV name |
Displays your TV’s name and icon. |
||
3 |
Volume down |
Tap to decrease the volume one step. Touch and hold to |
|
continuously decrease the volume. |
|||
|
|
||
4 |
Play/Pause |
Tap to pause casting video. Tap again to resume playback. |
|
5 |
Mute |
Tap to mute the sound or un-mute the sound. |
|
6 |
|
|
|
Number |
Tap to go to the Number page and enter channel numbers. |
||
|
|
|
# |
Item |
Description |
|
7 |
Input source |
Tap to switch to the video input source to the TV tuner and |
|
go to the Channel and Long Press page. |
|||
|
|
||
8 |
Volume up |
Tap to increase the volume one step. Touch and hold to |
|
continuously increase the volume. |
|||
|
|
||
9 |
D-Pad |
Tap to got to the D-Pad page. See D-Pad page on page 18. |
|
|
|
|
Channel and Long Press page
# |
Item |
Description |
1 |
Channel up |
Tap to go to the next channel in the channel list. |
|
|
|
|
|
Touch and hold this button, then tilt your mobile device to |
|
|
continuously change a value continuously. |
2 |
Long Press |
For example, to decrease the volume, press and hold this |
|
|
button then tilt your mobile device to the left (volume down |
|
|
button). Or to change channels, press and hold this button, |
|
|
then tilt your mobile device toward your TV. |
3 |
Channel down |
Tap to go to the previous channel in the channel list. |
|
|
|
www.tv.toshiba.com |
17 |

43" / 49" / 55" / 65" 2160p 60Hz LED Google Cast™ TV
Number page |
D-Pad page |
#Item
1Close
2Channel number
3Number pad
4Dash
5Return
6OK
Description
Tap to close this page and return to the Main page.
Displays the channel or sub-channel numbers (up to three numbers) you enter with the number buttons.
Tap numbers to enter channel numbers.
Tap to enter a sub-channel number.
Tap to return to the previous channel.
Tap to confirm the channel number you entered and go to that channel.
#Item
1Input source
2Arrows
3OK
4Back
5Menu
6Game
7Closed captioning
8Sound mode
9Info
10Exit
11Sleep
12Picture mode
Description
Tap to open the Input Selection list. Press this button one or more times or press Sor Tto select the video input source, then press OK.
Use these buttons to browse through on-screen menus.
Tap to confirm selections or changes in TV menus.
Tap to go to the previous channel or go back to the previous step.
Tap to open on-screen menus.
Tap to turn Game mode on or off.
Tap to turn closed captioning on or off.
Tap to select the sound mode. You can select Standard,
Music, Movie, Clear Voice, or Enhanced Bass. See the
Sound Mode option in Adjusting sound settings on page 70.
Tap to display information on your TV about the currently selected channel.
Tap to exit the on-screen menus.
Tap to set the sleep timer.
Tap to select the picture mode. You can select Dynamic,
Standard, Natural, Movie, Game, or PC. See the Picture Mode option in Adjusting the TV picture on page 65.
18 |
www.tv.toshiba.com |

43L621U / 49L621U / 55L621U / 65L621U 43" / 49" / 55" / 65" 2160p 60Hz LED Google Cast™ TV
What connection should I use?
Your TV has several connection types for connecting devices to your TV.
For the best video quality, you should connect a device to the best available connection.
Use the following tables to identify cables:
Video |
Connection |
|
|
type and |
Cable connector |
||
quality |
|||
jack |
|
||
|
|
||
Best (use this |
HDMI |
|
|
video/audio |
|
||
if your devices |
|
||
|
|
||
have HDMI) |
|
|
AV (requires an
audio
connection)
Good
Coaxial video/audio
Good
Connection
type and Cable connectors jack
Optical digital audio output
Analog audio input
3.5mm analog audio output
You can use an HDMI IN jack on your TV to connect a DVI device to your TV. For more information, see DVI (same as HDMI but requires an audio connection) on page 21 or 31.
Cautions
•Check the jacks for position and type before making any connections.
•Loose connections can cause poor audio or video quality. Make sure that all connections are tight and secure.
•The external audio/video equipment shown may be different from your equipment. If you have questions, refer to the documentation that came with your equipment.
•Always unplug the power cord when connecting external equipment.
www.tv.toshiba.com |
19 |
43" / 49" / 55" / 65" 2160p 60Hz LED Google Cast™ TV
Connecting a cable or satellite box
Many cable or satellite TV boxes have more than one connection type. To get the best video, you should use the best connection type available. For more information, see What connection should I use? on page 19.
You can connect a cable or satellite box using:
•HDMI (best)
•DVI (same as HDMI but requires an audio connection)
•AV (good)
•Coaxial (good)
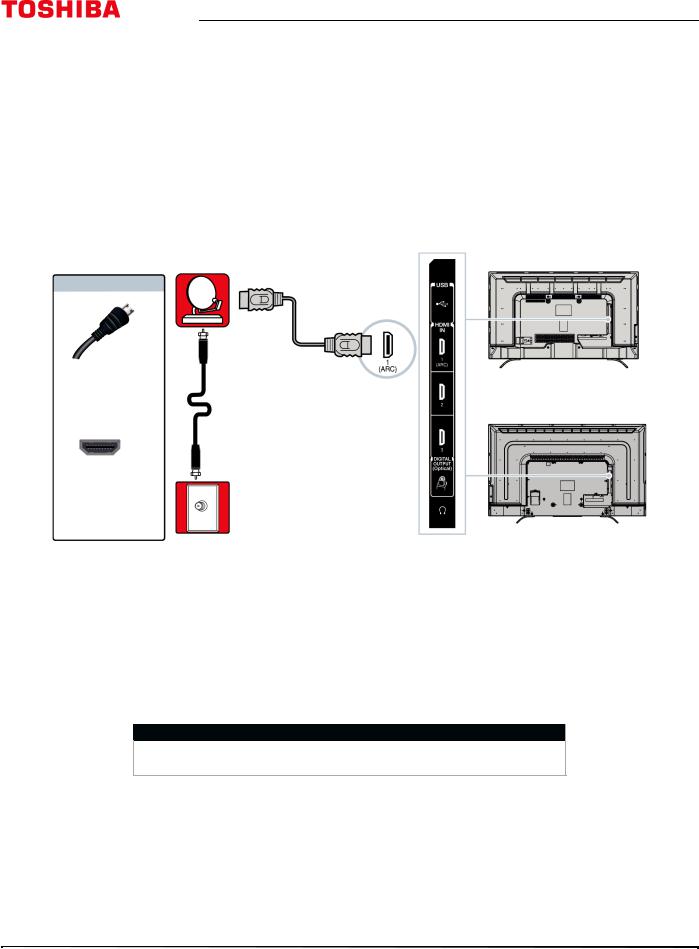
HDMI (best)
Cable or |
Side of TV |
|
43"/65" models |
||
satellite box |
On your TV
HDMI cable
HDMI cable connector
49"/55" models
HDMI IN jack
Cable wall jack
1 Make sure that your TV’s power cord is unplugged and all connected equipment is turned off.
2 Connect the incoming cable from the cable wall jack to the cable-in jack on the cable or satellite box.
3Connect an HDMI cable (not provided) to one of the HDMI IN jacks on the side of your TV and to the HDMI OUT jack on the cable or satellite box.
4 Plug your TV’s power cord into a power outlet, turn on your TV, then turn on the cable or satellite box. 5 Press INPUT to open the Input Selection list.
6 Press S or T to highlight HDMI 1, HDMI 2, or HDMI 3, then press OK.
Note
An HDMI cable carries both audio and video. You do not need to use any audio cables.
20 |
www.tv.toshiba.com |

43L621U / 49L621U / 55L621U / 65L621U 43" / 49" / 55" / 65" 2160p 60Hz LED Google Cast™ TV
DVI (same as HDMI but requires an audio connection)
Note
Your TV supports DVI video only. To add sound for a DVI connection, connect external speakers or a soundbar to the cable or satellite box.
Cable or |
Side of TV |
|
|
satellite box |
43"/65" models |
|
On your TV
HDMI cable with HDMI cable HDMI-DVI adapter connector
49"/55" models
HDMI IN jack
Cable wall jack
1 Make sure that your TV’s power cord is unplugged and all connected equipment is turned off.
2 Connect the incoming cable from the cable wall jack to the cable-in jack on the cable or satellite box.
3Connect an HDMI-DVI adapter (not provided) to one end of an HDMI cable (not provided), then connect the adapter to the DVI OUT jack on the cable or satellite box.
4 Connect the other end of the cable to one of the HDMI IN jacks on the side of your TV.
5 Plug your TV’s power cord into a power outlet, turn on your TV, then turn on the cable or satellite box. 6 Press INPUT to open the Input Selection list.
7 Press S or T to highlight HDMI 1, HDMI 2, or HDMI 3, then press OK.
www.tv.toshiba.com |
21 |
43" / 49" / 55" / 65" 2160p 60Hz LED Google Cast™ TV
AV (good)
Notes
Cables are often color-coded to match color-coded jacks.
|
Cable |
|
|
wall jack |
Cable or |
|
|
|
On your TV |
|
satellite box |
|
|
AV cable |
Audio cable |
43" model |
49"/55"/65" models |
connector |
connectors |
|
|
AV cable
AV jack |
Analog |
|
audio jacks |
Back of TV
1 Make sure that your TV’s power cord is unplugged and all connected equipment is turned off.
2 Connect the incoming cable from the cable wall jack to the cable-in jack on the cable or satellite box.
3Connect an AV cable (not provided) to the VIDEO jack and AUDIO L and R jacks on the back of your TV and to the AV and audio out jacks on the cable or satellite box.
Important
When you connect the audio using the AUDIO L and R jacks, the audio output is analog.
4 Plug your TV’s power cord into a power outlet, turn on your TV, then turn on the cable or satellite box. 5 Press INPUT to open the Input Selection list.
6 Press S or T to highlight AV, then press OK.
22 |
www.tv.toshiba.com |

43L621U / 49L621U / 55L621U / 65L621U 43" / 49" / 55" / 65" 2160p 60Hz LED Google Cast™ TV
Coaxial (good)
|
Cable |
On your TV |
wall jack |
|
|
|
Cable or |
49"/55"/65" models |
satellite box |
43" model |
|
Coaxial cable |
|
connector |
|
|
Coaxial |
ANT / CABLE IN |
cable |
|
|
jack |
|
Back of TV |
|
1 Make sure that your TV’s power cord is unplugged and all connected equipment is turned off.
2 Connect the incoming cable from the cable wall jack to the cable-in jack on the cable or satellite box.
3Connect a coaxial cable (not provided) to the ANT / CABLE IN jack on the back of your TV and to the coaxial out jack on the cable or satellite box.
4 Plug your TV’s power cord into a power outlet, turn on your TV, then turn on the cable or satellite box. 5 Press INPUT to open the Input Selection list.
6 Press S or T to highlight ANT / CABLE, then press OK.
7If you cannot tune to channels you know exist, scan for channels. See Automatically scanning for channels on page 71.
Notes
•Use a coaxial cable to eliminate interference and noise from radio waves.
•Do not bundle the coaxial cable with the power cord or other cables.
www.tv.toshiba.com |
23 |
43" / 49" / 55" / 65" 2160p 60Hz LED Google Cast™ TV
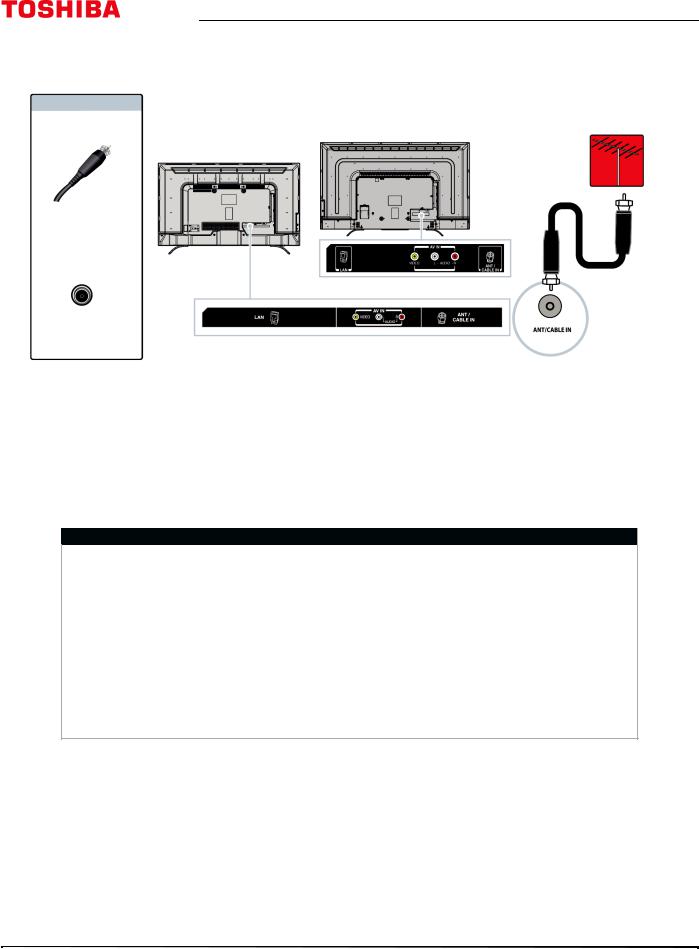
Connecting an antenna or cable TV (no box)
On your TV |
|
Antenna or cable TV |
|
49"/55"/65" models |
(no box) |
|
|
|
|
43" model |
|
Coaxial cable connector
Coaxial
cable
ANT / CABLE IN
jack
Back of TV
1 Make sure that your TV’s power cord is unplugged and all connected equipment is turned off.
2Connect a coaxial cable (not provided) to the ANT / CABLE IN jack on the back of your TV and to the antenna or cable TV wall jack.
3 Plug your TV’s power cord into a power outlet, then turn on your TV. 4 Press INPUT to open the Input Selection list.
5 Press S or T to highlight ANT / CABLE, then press OK.
6If you cannot tune to channels you know exist, scan for channels. See Automatically scanning for channels on page 71.
Notes
•Use a coaxial cable to eliminate interference and noise from radio waves.
•Do not bundle the coaxial cable with the power cord or other cables.
•If the antenna is not installed correctly, contact qualified service personnel to correct the problem.
•If the signal level for a channel is weak, the picture may be distorted. Adjust the antenna or use a highly directional outdoor or set-top antenna with a built-in amplifier.
•If the picture quality is good on some channels and poor on others, the problem may be caused by a poor or weak signal from the broadcaster or cable TV provider.
•If you connect to cable TV without a set-top box and experience poor picture quality, you may need to install a set-top box to improve signal reception and picture quality. Contact your cable TV provider about upgrading to a set-top box.
•Many high-definition (HD) channels upscale standard-definition (SD) content. The picture displayed on your TV is still displayed as SD, thus the picture quality will not be as clear or crisp as it would be if the content was originally recorded in HD.
24 |
www.tv.toshiba.com |
43L621U / 49L621U / 55L621U / 65L621U 43" / 49" / 55" / 65" 2160p 60Hz LED Google Cast™ TV
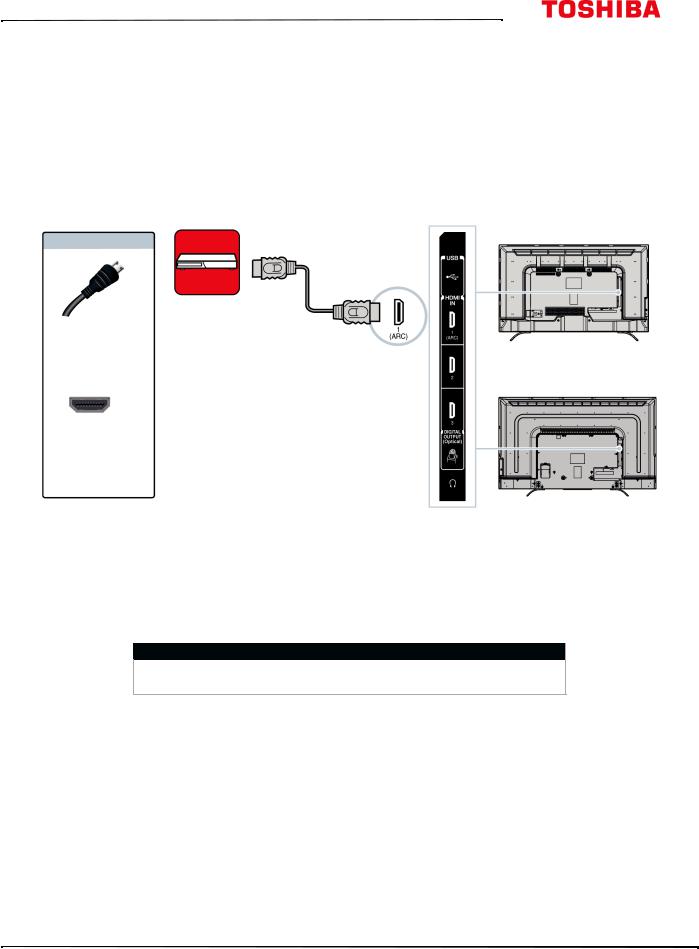
Connecting a DVD or Blu-ray player
Many DVD or Blu-ray players have more than one connection type. To get the best video, you should use the best connection type available. For more information, see What connection should I use? on page 19.
You can connect a DVD or Blu-ray player using:
•HDMI (best)
•AV (good)
HDMI (best)
DVD or Blu-ray |
Side of TV |
|
player |
||
|
43"/65" models
On your TV
HDMI cable |
HDMI cable |
connector |
|
49"/55" models
HDMI IN jack
1 Make sure that your TV’s power cord is unplugged and the DVD or Blu-ray player is turned off.
2Connect an HDMI cable (not provided) to one of the HDMI IN jacks on the side of your TV and to the HDMI OUT jack on the DVD or Blu-ray player.
3 Plug your TV’s power cord into a power outlet, then turn on your TV and DVD or Blu-ray player. 4 Press INPUT to open the Input Selection list.
5 Press S or T to highlight HDMI 1, HDMI 2, or HDMI 3, then press OK.
Note
An HDMI cable carries both audio and video. You do not need to use any audio cables.
www.tv.toshiba.com |
25 |
Loading...