


English
User Manual
DIGITAL Series
“Register your TV online at: www.toshiba.co.uk/registration”
English - 1 -
32&40BV801B_MB38_[GB]_(IB_INTERNET)_DVB-T2_(3910UK)_10073217 |
_10073218.indd 1 |
03.10.2011 18:52:35 |
|
|
|
English
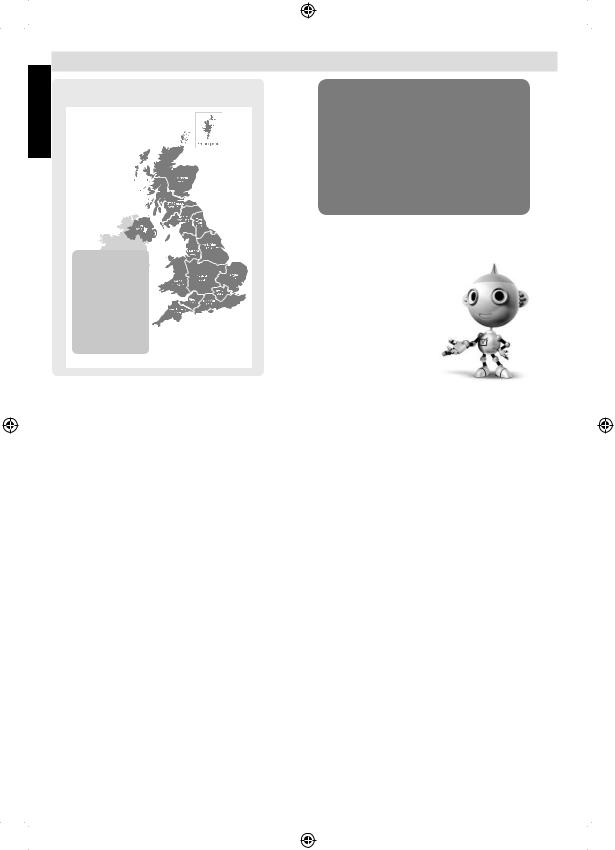
Digital Switchover
8IFO EPFT TXJUDIPWFS IBQQFO
$PQFMBOE TXJUDIFT PO 0DUPCFS
5IF FYBDU EBUF ZPV TXJUDI EFQFOET PO UIF USBOTNJUUFS ZPV BSF TFSWFE CZ 5P DIFDL XIFO ZPV TXJUDI HP UP %JHJUBM 6,µT QPTUDPEF DIFDLFS PO XXX EJHJUBMVL DP VL
$IFDL ZPVS *57 OFXT TFSWJDF PS MPPL BU 5FMFUFYU QBHF UP TFF XIBU 57 SFHJPO ZPVµSF JO
Television in the UK is going digital, bringing us all more choice and new services. Starting in late 2007 and ending in 2012, television services in the UK will go completely digital, TV region by TV region.
Please see above to find out when your area switches to digital. Digital UK is the independent, non-profit organisation leading the process of digital TV switchover in the UK.
Digital UK provides impartial information on what people need to do to prepare for the move to digital, and when they need to do it.
How the switchover affects your TV equipment:
Your new TV has a digital tuner built in, which means it is ready to receive the Freeview signal by simply plugging it into your aerial socket (check if you can get digital TV through your aerial now, or whether you’ll have to wait until switchover, at www.digitaluk. co.uk).
When the TV switchover happens in your area, there are at least two occasions when you will need to re-tune your TV in order to continue receiving your existing TV channels, and also to pick up new ones,
Digital UK, the body leading the digital TV switchover, will advise you when you need to re-tune during the switchover.
If you choose to connect your TV to satellite or cable with a digital box then it will not be affected by
English - 2 -
32&40BV801B_MB38_[GB]_(IB_INTERNET)_DVB-T2_(3910UK)_10073217 |
_10073218.indd 2 |
03.10.2011 18:52:37 |
|
|
|
Re-tuning: TOSHIBA Freeview Products
Toshiba Digital TV
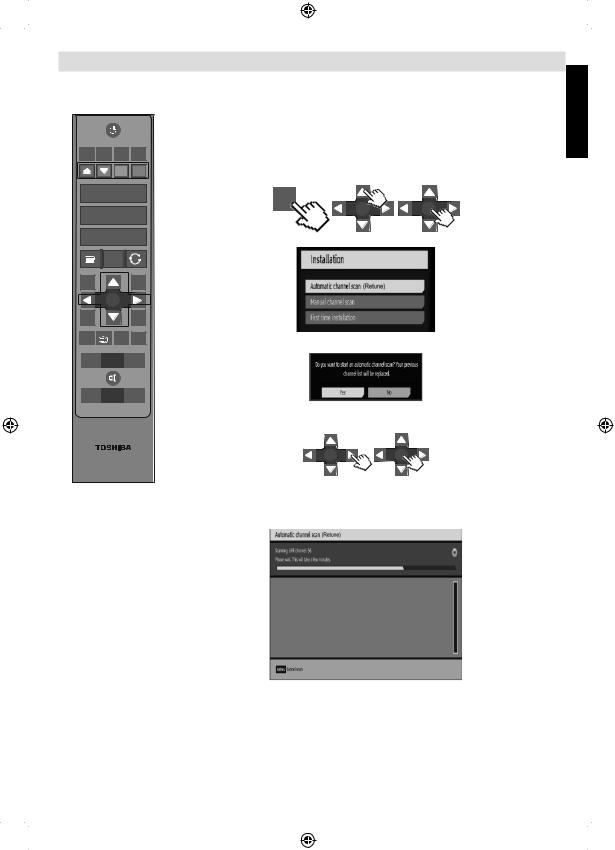
This guide can be used to help you re-tune the following product with the remote control below. Make sure your TV is on and press 80 for the BBC News channel
SCREEN LANG SUBTTL PIP
1 
 2
2  3
3
4 
 5
5  6
6
7 
 8
8  9
9
|
0 |
BACK |
MENU |
|
OK |
EPG |
FAV |
SOURCE |
INFO |
PRESETS SLEEP |
- V +
- P +
1 ) While in DTV mode, press MENU and press Up or Down to select Setup and press
OK. Press ▲ or ▼ to select Installation and press OK. Select Automatic Channel Scan (Retune) and press OK to start the process.
MENU
OK |
OK |
2 ) The following message will be displayed
3 ) To start installation process, select Yes by using ◄ or ► and OK button.
English
RC-3910 |
OK |
OK |
4 ) Installation process will start and progress bar will move along. The television will start to search for all available stations. You must allow the television to complete the search.
* This process may affect any saved information stored on your product. Please consult your instruction manual or contact the manufacturer using the details above.
TOSHIBA Customer Helpline: 0844 856 0730 TOSHIBA Online Support: www.toshiba.co.uk/tv-dvd-support
English - 3 -
32&40BV801B_MB38_[GB]_(IB_INTERNET)_DVB-T2_(3910UK)_10073217 |
_10073218.indd 3 |
03.10.2011 18:52:38 |
|
|
|
Manual Re-tuning
English
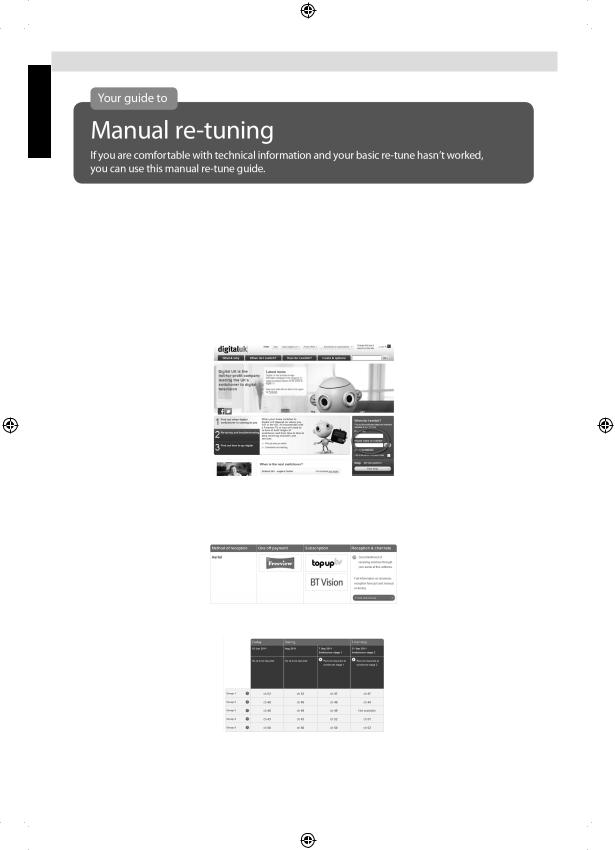
If your Freeview TV or box picks up a different regional service to your preferred service (e.g. BBC England instead of BBC Scotland, or ITV Central instead of ITV Anglia), you can use this manual re-tune If you are missing some services you may find they have moved to channel 800 or above, this guide will help you put them in your preferred position. If you find manual re-tuning too difficult, contact your local electrical retailer or installer. This is a guide only, Freeview models operate slightly differently. Some early models do not oer a manual re-tune facility
– check your instruction book. Please note: Every time you re-tune, you will need to go through this process.
1 ) Go to the Postcode Checker at digitaluk.co.uk Enter your postcode on the right hand side of the web page.
Remember to include your house number or name. If you do not have internet access, contact the Digital UK helpline on 08456 50 50 50* and ask for manual re-tune guide support.
2 ) Once you have entered your address details, the next page gives you an indication of which TV services you should receive, based on your most likely transmitter. You may be able to receive television services from more than one transmitter and you can check alternatives, where available. On the results page click on the pink button to see your full reception forecast and channel information for switchover.
3 ) Click on the How do I re-tune? pink banner. Scroll down to the manual re-tune table where you will see the relevant “RF Channel” numbers for the digital services that can be received at your home.**
*Calls are free for BT customers within inclusive calling plans. Call charges from other providers may vary. The standard business hours for Digital UK’s contact centre are 9am to 7pm Monday to Friday and 10am to 4pm on a Saturday. Opening hours will be extended during switchover in each area. Digital UK, PO Box 26833, Kirkcaldy,KY2 9AG . **Please note that the Freeview channel line-up is subject to change.
English - 4 -
32&40BV801B_MB38_[GB]_(IB_INTERNET)_DVB-T2_(3910UK)_10073217 |
_10073218.indd 4 |
03.10.2011 18:52:38 |
|
|
|
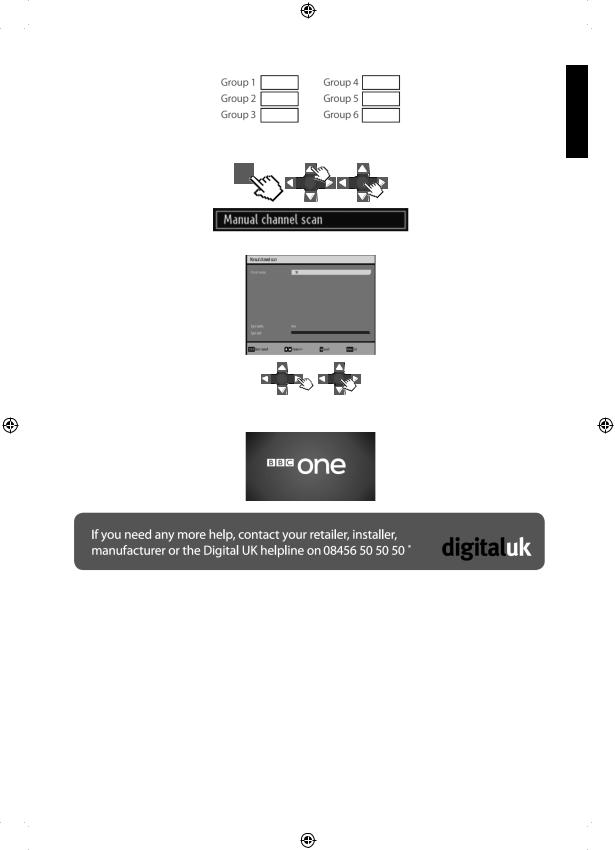
4 ) Write down the “RF Channel” numbers for your transmitter using the Group boxes here:
5 ) While in DTV mode, press MENU and use Up or Down to select Installation. 6 ) Select Manual Channel Scan from the Installation menu and press OK.
MENU
OK |
OK |
7 ) Use Up or Down to change the channel number.
OK |
OK |
8 ) Press OK to start search.
9 ) Press MENU button. You should find that you now have your preferred service installed.
English - 5 -
English
32&40BV801B_MB38_[GB]_(IB_INTERNET)_DVB-T2_(3910UK)_10073217 |
_10073218.indd 5 |
03.10.2011 18:52:39 |
|
|
|
English
Contents |
|
Digital Switchover................................................... |
2 |
Re-tuning: TOSHIBA Freeview Products................ |
3 |
Manual Re-tuning ................................................... |
4 |
Safety Precautions ................................................. |
8 |
Air Circulation ..................................................... |
8 |
Heat Damage...................................................... |
8 |
Mains Supply ...................................................... |
8 |
Warning ............................................................. |
8 |
Do ....................................................................... |
8 |
Do not ................................................................. |
8 |
Installation and Important Information .................... |
9 |
EXCLUSION CLAUSE........................................ |
9 |
Important safety information ................................ |
10 |
Removing the pedestal stand............................... |
12 |
The Remote Control ............................................. |
13 |
Inserting Batteries and Effective Range of the |
|
Remote Control................................................. |
13 |
Connecting External Equipment........................... |
14 |
Connecting an HDMI® or DVI Device to the HDMI |
|
Input...................................................................... |
15 |
To Connect an HDMI Device ............................ |
15 |
To Connect a DVI Device.................................. |
15 |
Connecting a Computer........................................ |
16 |
To Connect a Computer.................................... |
16 |
Connecting a USB Disk, USB stick, USB device, |
|
USB MEMORY... .................................................. |
16 |
To Connect a USB Disk .................................... |
16 |
USB Memory Connection ................................. |
16 |
Using Other Connectors ................................... |
16 |
Power Save Mode ................................................ |
17 |
Environmental Information ............................... |
17 |
Controlling the TV................................................. |
18 |
Switching on ..................................................... |
18 |
Using the Remote Control ................................ |
18 |
Using the control buttons of the TV .................. |
18 |
Initial Installation .................................................. |
19 |
Auto Tuning .......................................................... |
20 |
Auto Tuning....................................................... |
20 |
Digital Manual Tuning, Analogue Fine Tuning ...... |
21 |
Digital Manual Tuning ....................................... |
21 |
Analogue Manual Tuning.................................. |
21 |
Analogue Fine Tune.......................................... |
21 |
Analogue APS and Programme Sorting ............... |
22 |
APS (Automatic Programming System)............ |
22 |
Sorting Programme Positions - Analogue......... |
22 |
General Operation................................................ |
23 |
Stereo and Bilingual Transmissions.................. |
23 |
Viewing Main Menu .......................................... |
23 |
Controlling Volume and Muting Sound ............. |
23 |
Selecting Programme Positions........................ |
23 |
Input Selection.................................................. |
23 |
English |
|
Channel List, Sorting Programmes, Programme |
24 |
Locking ................................................................. |
|
Viewing Channel List ........................................ |
24 |
Moving a Channel............................................. |
24 |
Deleting a Channel ........................................... |
24 |
Renaming a Channel........................................ |
24 |
Locking a Channel............................................ |
24 |
Viewing Info Banner, Electronic Programme |
25 |
Guide.................................................................... |
|
Viewing Info Banner - DTV Mode ..................... |
25 |
Electronic Programme Guide - DTV mode ....... |
25 |
Displaying Subtitles and Language Selection ...... |
26 |
Displaying Subtitles .......................................... |
26 |
Language Settings............................................ |
26 |
Preferred........................................................... |
26 |
Current.............................................................. |
26 |
Digital Settings - Parental Control, Menu Lock, Set |
|
PIN........................................................................ |
27 |
Viewing Parental Control Menu ........................ |
27 |
Menu Lock ........................................................ |
27 |
Set PIN ............................................................. |
27 |
Digital Settings - Configuration............................. |
28 |
Viewing Configuration Menu............................. |
28 |
Active Channels................................................ |
28 |
Scan Encrypted ............................................... |
28 |
Output Settings................................................. |
28 |
AC3 Audio..................................................... |
28 |
SPDIF Delay ................................................. |
28 |
SPDIF Audio ................................................. |
28 |
Digital Settings - Configuration, continued ........... |
29 |
Receiver Upgrade............................................. |
29 |
Note on Analogue switch-off ............................. |
29 |
Audio Description (optional).............................. |
29 |
Changing Picture Format...................................... |
30 |
General Picture Controls ...................................... |
31 |
Configuring Picture Settings ............................. |
31 |
Picture Mode..................................................... |
31 |
Picture Adjustments.......................................... |
31 |
Colour Temperature .......................................... |
31 |
Noise Reduction ............................................... |
31 |
General Picture Controls ...................................... |
32 |
Film Mode......................................................... |
32 |
Game Mode...................................................... |
32 |
Picture Zoom .................................................... |
32 |
Resetting Picture Settings ................................ |
32 |
Configuring PC Picture Settings........................... |
33 |
Autoposition...................................................... |
33 |
H Position ......................................................... |
33 |
V Position.......................................................... |
33 |
Dot Clock .......................................................... |
33 |
Phase................................................................ |
33 |
Dot Clock ...................................................... |
33 |
PC Picture controls........................................... |
33 |
- 6 - |
|
32&40BV801B_MB38_[GB]_(IB_INTERNET)_DVB-T2_(3910UK)_10073217 |
_10073218.indd 6 |
03.10.2011 18:52:40 |
|
|
|
Other Controls ...................................................... |
34 |
Child Lock......................................................... |
34 |
Default Zoom .................................................... |
34 |
Blue Background .............................................. |
34 |
Menu Background............................................. |
34 |
Backlight ........................................................... |
34 |
Menu Timeout................................................... |
34 |
HDMI PC Full Mode (optional).......................... |
34 |
Full Mode (optional).......................................... |
34 |
TXT Language .................................................. |
34 |
Conditional Access ............................................... |
35 |
Conditional Access ........................................... |
35 |
USB Media Browser ............................................. |
36 |
Starting Media Browser .................................... |
36 |
Operation.......................................................... |
36 |
Playing .mp3 Files ............................................ |
36 |
Playing .jpg Files............................................... |
36 |
To Close the Media Player................................ |
36 |
Digital and Analogue Text Services ...................... |
37 |
Digital Text and Interactive Services................. |
37 |
Using Digital Interactive Services ..................... |
37 |
Analogue Text Services (if available)................ |
37 |
Using Text Button - ..................................... |
37 |
Acessing Sub-Pages ........................................ |
37 |
Revealing Concealed Text ................................ |
37 |
Holding a Page ................................................ |
37 |
Enlarging the Text Display Size ........................ |
37 |
Appendix A: PC Input Typical Display Modes....... |
38 |
Appendix B: AV and HDMI Signal Compatibility |
|
(Input Signal Types).............................................. |
39 |
Appendix C: Supported File Formats for USB |
|
Mode..................................................................... |
40 |
Appendix D: PIN Information ............................... |
40 |
Specifications and Accessories ............................ |
41 |
License Information .............................................. |
42 |
Questions and Answers........................................ |
43 |
Toshiba One (1) Year Limited Warranty For TV’s |
|
(the “Products”)..................................................... |
45 |
English - 7 -
English
32&40BV801B_MB38_[GB]_(IB_INTERNET)_DVB-T2_(3910UK)_10073217 |
_10073218.indd 7 |
03.10.2011 18:52:40 |
|
|
|
English
Safety Precautions
This equipment has been designed and manufactured to meet international safety standards but, like any electrical equipment, care must be taken to obtain the best results and for safety to be assured. Please read the points below for your own safety. They are of a general nature, intended to help with all electronic consumer products and some points may not apply to the goods you have just purchased.
Air Circulation
Leave more than 10cm clearance around the television to allow adequate ventilation. This will prevent overheating and possible damage to the television. Dusty places should also be avoided.
Heat Damage
Damage may occur if the television is left in direct sunlight or near a heater. Avoid places subject to extremely high temperatures or humidity, or locations where the temperature is likely to fall below 5°C (41°F).
Mains Supply
The set should be operated only from a 220-240 V AC 50 Hz outlet. DO ensure that the television is not standing on the mains lead. DO NOT cut off the mains plug from this equipment, this incorporates a special Radio Interference Filter, the removal of which will impair its performance. In the UK, the fuse fitted in this plug is approved by ASTA or BSI to BS1362. It should only be replaced by a correctly rated and approved type and the fuse cover must be refitted.
IF IN DOUBT PLEASE CONSULT A COMPETENT
ELECTRICIAN.
Warning
To prevent the spread of fire, keep candles or other open flames away from this product at all times.
Do
DO read the operating instructions before you attempt to use the equipment.
DO ensure that all electrical connections (including the mains plug, extension leads and interconnections between pieces of equipment) are properly made and in accordance with the manufacturers’ instructions. Switch off and withdraw the mains plug before making or changing connections.
DO consult your dealer if you are ever in doubt about the installation, operation or safety of your equipment.
DO be careful with glass panels or doors on equipment.
Do not
DON’T remove any fixed cover as this may expose dangerous voltages.
DON’T obstruct the ventilation openings of the equipment with items such as newspapers, tablecloths, curtains, etc. Overheating will cause damage and shorten the life of the equipment.
DON’T allow electrical equipment to be exposed to dripping or splashing or objects filled with liquids, such as vases, to be placed on the equipment.
DON’T place hot objects or naked flame sources, such as lighted candles or nightlights on, or close to equipment. High temperatures can melt plastic and lead to fires.
DON’T use makeshift stands and NEVER fix legs with wood screws. To ensure complete safety, always fit the manufacturers’ approved stand, bracket or legs with the fixings provided according to the instructions.
DON’T leave equipment switched on when it is unattended, unless it is specifically stated that it is designed for unattended operation or has a standby mode. Switch off by withdrawing the plug, make sure your family know how to do this. Special arrangements may need to be made for people with disabilities.
DON’T continue to operate the equipment if you are in any doubt about it working normally, or it is damaged in any way - switch off, withdraw the mains plug and consult your dealer.
WARNING - excessive sound pressure from earphones or headphones can cause hearing loss.
ABOVE ALL - NEVER let anyone, especially children, push or hit the screen, push anything into holes, slots or any other openings in the case.
NEVER guess or take chances with electrical equipment of any kind - it is better to be safe than sorry.
THE MAINS PLUG IS USED AS A DISCONNECTING DEVICE AND THEREFORE SHOULD BE READILY OPERABLE.
Note : Interactive video games that involve shooting a “gun” type of joystick at an on-screen target may not work with this TV.
English - 8 -
32&40BV801B_MB38_[GB]_(IB_INTERNET)_DVB-T2_(3910UK)_10073217 |
_10073218.indd 8 |
03.10.2011 18:52:40 |
|
|
|
Installation and Important Information
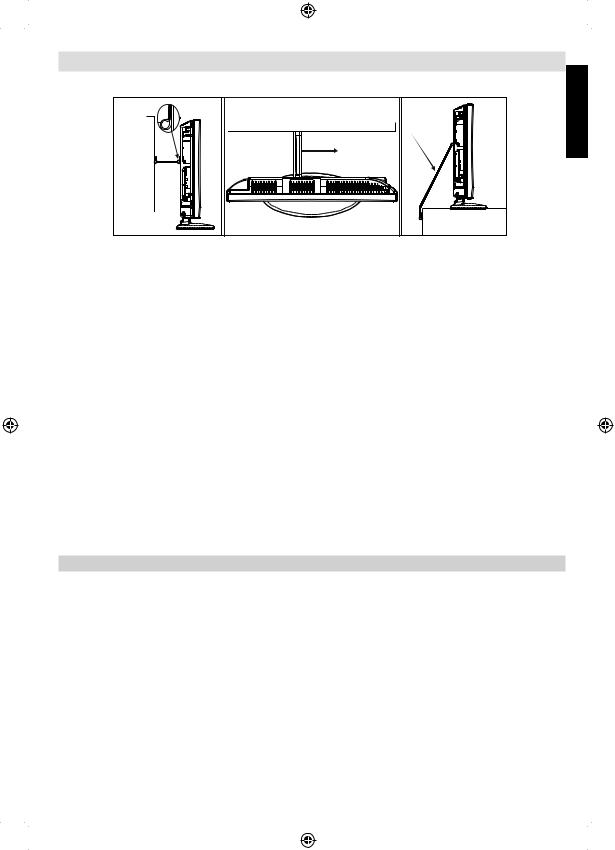
Where to install
P Clip |
Sturdy tie (as short
as possible)
Fixing |
Strap |
Fixing |
English |
Strap |
|
''P' Clip position on TV is dependent on model
* Button and stand style is dependent on model.
Locate the television away from direct sunlight and strong lights. Soft, indirect lighting is recommended for comfortable viewing. Use curtains or blinds to prevent direct sunlight falling on the screen.
Place the TV on a stable, level surface that can support the weight of the TV. In order to maintain stability and prevent it falling over, secure the TV to a wall using a sturdy tie to the clip on TV. Install the P clip under the stand as shown in the above illustration.
The LCD display panels are manufactured using an extremely high level of precision technology; however, sometimes
some parts of the screen may be missing picture elements or have luminous spots. This is not a sign of a malfunction.
Make sure the television is located in a position where it cannot be pushed or hit by objects, as pressure will break or damage the screen. Also, please be certain that small items cannot be inserted into slots or openings in the case.
Cleaning the screen and cabinet…
Turn off the power, and clean the screen and cabinet with a soft, dry cloth. We recommend that you do not use any proprietary polishes or solvents on the screen or cabinet as this may cause damage.
Please take note
The digital reception function of this television is only effective in the countries listed in the “Country” section during the first time installation menu. Depending on country/area, some of this television’s functions may not be available. Reception of future additional or modified services can not be guaranteed with this television.
If stationary images generated by 4:3 broadcasts, text services, channel identification logos, computer displays, video games, on screen menus, etc. are left on the television screen for any length of time, they could become conspicuous. It is always advisable to reduce both the brightness and contrast settings.
Very long, continuous use of the 4:3 picture on a 16:9 screen may result in some retention of the image at the 4:3 outlines. This is not a defect of the LCD TV and is not covered under the manufacturer’s warranty.
Regular use of other size modes will prevent permanent retention.
EXCLUSION CLAUSE
Toshiba shall under no circumstances be liable for loss and/or damage to the product caused by:
i)fire;
ii)earthquake;
iii)accidental damage;
iv)intentional misuse of the product;
v)use of the product in improper conditions;
vi)loss and/or damage caused to the product whilst in the possession of a third party;
vii)any damage or loss caused as a result of the owner’s failure and/or neglect to follow the instructions set out in the owner’s manual;
viii)any loss or damage caused directly as a result of misuse or malfunction of the product when used simultaneously with associated equipment;
Furthermore, under no circumstances shall Toshiba be liable for any consequential loss and/or damage including but not limited to the following, loss of profit, interruption of business, the loss of recorded data whether caused during normal operation or misuse of the product.
Note: A Toshiba wall bracket or stand, where available, must be used.
English - 9 -
32&40BV801B_MB38_[GB]_(IB_INTERNET)_DVB-T2_(3910UK)_10073217 |
_10073218.indd 9 |
03.10.2011 18:52:40 |
|
|
|

English
Important safety information
USE OF CONTROLS OR ADJUSTMENTS OR PERFORMANCE OF PROCEDURES OTHER THAN THOSE SPECIFIED HEREIN MAY RESULT IN HAZARDOUS RADIATION EXPOSURE.
DO NOT OPEN COVERS AND DO NOT REPAIR YOURSELF. REFER SERVICING TO QUALIFIED PERSONNEL.
Headphone Warning
Loud music can damage your hearing irreversibly. Do not set the volume to a high level when listening through headphones, particularly for extended listening periods.
Information for the DVB-T function
•Any function relative to the digital television (with the DVB logo) is available only within the country or area where such signals are transmitted. Verify with the salesperson if it is possible to receive a DVB-T signal in the zone where you live.
•Even if the television conforms to the DVB-T specifications, the compatibility to future digital DVB-T transmissions is not guaranteed.
•Some digital television functions may not be available in some countries.
•The DVB-T system present in this device is FTA (Free to air).
•DVB is a registered trademark of the DVB Project. This logo indicates that the product is compliant with
European Digital Broadcasting.
Possible Adverse Effects on LCD Screen
If a fixed (non-moving) pattern remains on the LCD screen for long periods of time, the image can become permanently retained on the LCD TV panel and cause subtle but permanent ghost images. This type of damage is NOT COVERED BY YOUR WARRANTY. Never leave your TV on for long periods of time while it is displaying the following formats or images:
•Fixed Images, such as stock tickers, video game patterns, TV station logos, and websites.
•Special Formats that do not use the entire screen. For example, viewing letterbox style (16:9) media on a normal (4:3) display (Black bars at top and bottom of screen); or viewing normal style (4:3) media on a widescreen (16:9) display (Black bars on left and right sides of screen).
IMPORTANT INFORMATION
TV Installation
If a television is not positioned in a sufficiently stable location, it can be potentially hazardous due to falling. Many injuries, particularly to children, can be avoided by taking simple precautions such as:
•Using stands recommended by the manufacturer of the television.
•Only using furniture that can safely support the television.
•Ensuring the television is not overhanging the edge of the supporting furniture.
•Not placing the television on tall furniture (for example, cupboards or bookcases) without anchoring both the furniture and the television to a suitable support.
•Not standing the televisions on cloth or other materials placed between the television and supporting furniture.
•Educating children about the dangers of climbing on furniture to reach the television or its controls.
Place the TV on a stable, level surface that can support the weight of the TV. In order to maintain stability and prevent it from falling over, secure the TV to a wall using a sturdy tie to the clip on the back of the table top stand.
This unit has been produced according to all current safety regulations. The following safety tips should safeguard users against careless use and the dangers related to such use.
•Although this unit has been carefully manufactured and rigorously checked prior to leaving the factory as with all electrical appliances, it is possible for problems to develop. If you notice smoke, an excessive build-up of heat or any other unexpected phenomena, you should disconnect the plug from the mains power socket immediately.
•Ensure that the unit is sufficiently ventilated! Never place it next to or underneath curtains!
English - 10 -
32&40BV801B_MB38_[GB]_(IB_INTERNET)_DVB-T2_(3910UK)_10073217 |
_10073218.indd 10 |
03.10.2011 18:52:42 |
|
|
|
Important safety information (continued) |
|
|
• This set should only be connected to an 220-240V AC 50Hz |
• The unit becomes warm when in operation. Do not place |
|
mains power supply. Do not attempt to connect it to any other |
any covers or blankets on the unit in order to prevent |
|
type of supply. |
overheating. |
|
• The socket outlet must be installed near the equipment and |
The ventilation holes should not be blocked. Do not set up |
|
is easily accessible. |
near radiators. Do not place in direct sunshine. |
|
• Do not open this unit. An attempt to repair the unit by a |
• When placing on a shelf, allow at least 10 cm clearance |
|
non-expert could be dangerous and potentially cause a fire |
space around the whole unit. |
|
hazard. All repairs must be carried out by qualified service |
• The unit shall not be exposed to dripping or splashing, and |
|
personnel only. |
||
no objects filled with liquids, such as vases, shall be placed |
||
• Keep away from rodents. Rodents (and also cockatiels) |
||
on the apparatus. |
||
enjoy biting electric flexes. They can cause a short circuit |
• Liquids spilled into the unit can cause serious damage. |
|
(fire hazard!) and receive a fatal electric shock. |
||
Switch the set off and disconnect the mains power supply, |
||
• Always hold the plug when disconnecting the unit from |
||
then consult a qualified service person before attempting to |
||
the socket outlet. Do not pull on flex. The flex can become |
use the unit again. |
|
overloaded and cause a short circuit. |
• Moisture condensation occurs, for example, when you pour |
|
• Use a soft, dry cloth to clean the unit. |
||
a cold drink into a glass on a warm day and drops of water |
||
• Set up unit so that no one will trip over the flex. |
form on the outside of the glass. In the same way, moisture |
|
may condense on this unit’s internal optical pick-up lens, one |
||
• This unit is recommended to be installed on shock-free |
||
of the most crucial internal parts of the unit. |
||
benches in order to avoid any danger from falling. |
||
• Moisture condensation occurs in the following situations: |
||
• Take note that toddlers can pull the unit down from a table or |
||
- When you move the unit from a cold place to a warm |
||
cupboard by means of its flex. Children can hurt themselves |
||
place. |
||
when doing this. |
||
- When you use the unit in a room where the heater was |
||
• Do not use the unit near heat sources. The casing and flex |
||
just turned on. |
||
could be damaged by the intensity of the heat. |
||
- When you use the unit in an area where cold air from an air |
||
• The screen is made of glass and can break if damage is done |
||
conditioner directly hits the unit. |
||
to it. Be careful when collecting sharp edged glass splitters. |
||
- When you use the unit in a humid place. |
||
• If you intend to wall mount the unit, contact the shop where |
||
|
||
you purchased the unit for advice, and leave the installation |
• Never use the unit when moisture condensation may |
|
work to professionals. Improper installation can cause |
occur. |
|
damage and/or injuries. |
• Using the unit when moisture condensation exists may |
|
• When installing the set on a wall, allow at least 10 cm |
||
damage its own internal parts and discs. Connect the power |
||
clearance between the rear of the set and the wall. Clearance |
cord of the unit to the wall outlet, turn on the unit, remove the |
|
of less than 10 cm will obstruct the vents and cause |
disc, and leave it for two or three hours. After two or three |
|
overheating to the interior of the set, resulting in faults or |
hours, the unit will warm up and moisture will be evaporated. |
|
damage to the set. |
Leaving the TV connected to the wall outlet will help prevent |
|
• Taking fall-prevention measures |
moisture condensation in the unit. |
|
• Never place hot objects or open flame sources, such as |
||
- If these measures are not taken, the unit can fall and cause |
||
lighted candles or night lights, on or close to the TV. High |
||
damage and/or injuries. |
||
temperatures can melt plastic and lead to fires. |
||
- Contact the shop where you purchased the unit to obtain |
||
|
||
full details of the measures. |
|
|
• When a TV stand is used, |
|
|
- Ensure the unit is fully on the stand and placed in the |
|
|
centre. |
|
|
- Do not leave the stand doors open. You could be hurt as |
|
|
a result of the unit falling or breaking, or your fingers being |
|
|
caught or jammed. Take extra precautions if you have |
|
|
children. |
|
|
• Avoid placing the unit on any surfaces that may be subject |
|
|
to vibrations or shocks. |
|
|
• To protect the unit during a thunder storm, unplug the AC |
|
|
power cord and disconnect the aerial. |
|
|
Caution: Do not touch the aerial connector. |
|
|
• When you leave your home for a long period of time, unplug |
|
|
the AC power cord for safety. |
|
|
|
|
English - 11 -
English
32&40BV801B_MB38_[GB]_(IB_INTERNET)_DVB-T2_(3910UK)_10073217 |
_10073218.indd 11 |
03.10.2011 18:52:42 |
|
|
|
English
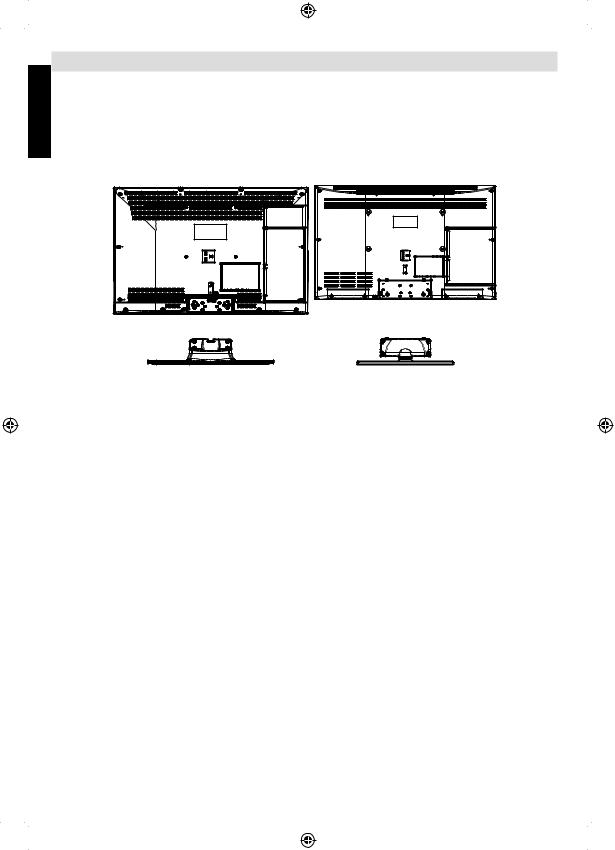
Removing the pedestal stand
(1) Carefully lay the front of the TV face down on a flat, cushioned surface such as a quilt or blanket. Leave the stand protruding over the edge of the surface.
Note: Extreme care should always be taken when removing the pedestal stand to avoid damage to the LCD panel.
(2)Remove the two screws on the stand. This will allow removal of the pedestal stand.
(3)Once you have removed two screws holding the pedestal stand in place, remove the pedestal stand from the TV by sliding the pedestal stand away from the TV.
*For 32BV801B model |
* For 40BV801B model |
English - 12 -
32&40BV801B_MB38_[GB]_(IB_INTERNET)_DVB-T2_(3910UK)_10073217 |
_10073218.indd 12 |
03.10.2011 18:52:42 |
|
|
|
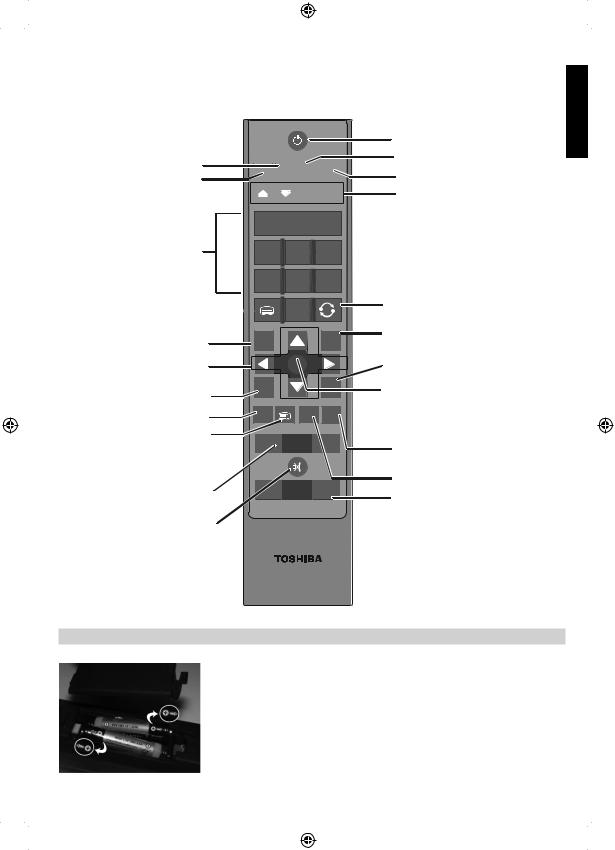
The Remote Control
Simple at-a-glance reference of your remote control.
|
|
|
|
|
|
|
|
Standby / On mode |
Sound Selection |
|
|
To switch your TV to standby mode. |
|||||
|
|
Subtitle On/Off |
||||||
Mono/Stereo Dual I-II |
SCREEN |
|
LANG |
|
SUBTTL |
|
PIP |
To enable the displaying of subtitles. |
|
|
|
||||||
Image size |
|
|
|
First Time Installation |
||||
|
|
|
|
|
|
|
||
Sets the screen image size. |
|
|
|
|
|
|
|
Colour buttons |
|
|
|
|
|
|
|
|
Red/Green/Yellow/Blue |
1 
 2
2  3
3
To select TV |
4 5 6 |
programme number |
Direct number entry.
7 8 9
TEXT button
To call up text services in analogue broadcasts and interactive services  0
0
in digital mode.
Return |
BACK |
MENU |
|
To return to the previous level |
|
|
|
of the on-screen menu. |
|
|
|
Navigation Buttons |
|
OK |
|
To move up, down, left or right |
|
|
|
in the on screen menu. |
EPG |
FAV |
|
Programme guide |
|||
|
|
||
To display the programme guide. |
|
INFO |
|
SOURCE |
|
||
SOURCE |
PRESETS SLEEP |
||
|
To change the current source.
Previous programme
Returns to the previous programme.
MENU On/Off
To display the on screen menu.
No function
OK
IN TV Mode: For selecting or confirming an option.
IN Text Mode: To hold a page.
INFO
IN TV Mode: To display on-screen information.
IN Text Mode: To access index page.
To alter the volume
For changing volume setting level.
- |
V |
+ |
Sleep Timer |
|
|
|
To activate sleep timer. |
|
|
|
PRESETS |
|
P |
+ |
Picture mode selection. |
- |
To change channels |
||
|
|
|
To move up/down between |
|
|
|
the channels. |
To mute the sound
Press once to mute sound. Press again to disable mute mode.
RC-3910
English
Inserting Batteries and Effective Range of the Remote Control
Remove the back cover to reveal the battery compartment and make sure the batteries are inserted the right way round. Suitable battery types for this remote are AAA, IEC R03 1.5V.
Do not combine a used, old battery with a new one or mix battery types. Remove dead batteries immediately to prevent acid from leaking into the battery compartment. Dispose of them in a designated disposal area.
Warning: Batteries must not be exposed to excessive heat such as sunshine, fire or the like.
The performance of the remote control will deteriorate beyond a distance of five metres or outside an angle of 30 degrees from the centre of the television. If the operating range becomes reduced the batteries may need replacing.
English - 13 -
32&40BV801B_MB38_[GB]_(IB_INTERNET)_DVB-T2_(3910UK)_10073217 |
_10073218.indd 13 |
03.10.2011 18:52:47 |
|
|
|
English
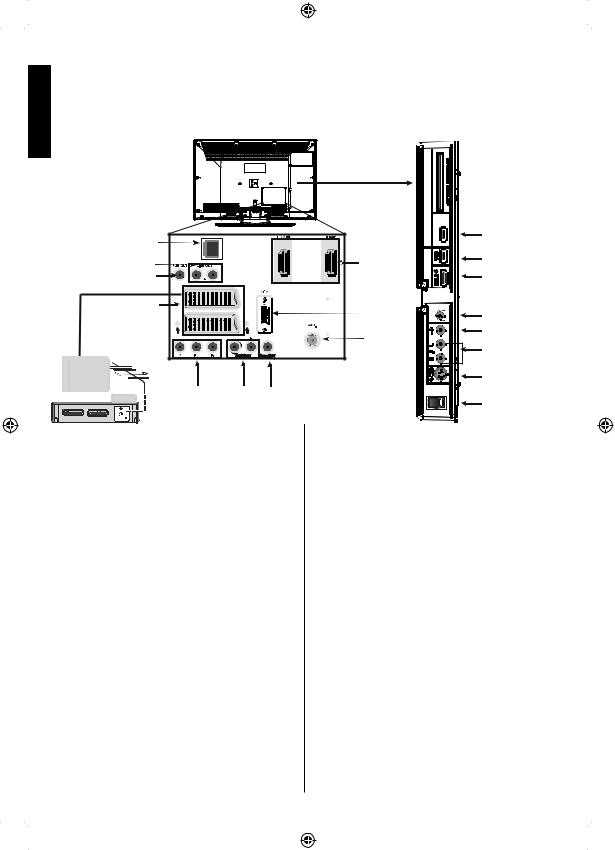
Connecting External Equipment
Before connecting any external equipment, remove the mains plug from the wall socket.
LAN |
Ethernet input
Line Out |
|
|
|
HDMI Input |
|
|
|
Sockets |
|
Subwoofer Out |
|
|
|
|
|
EXT2 |
|
|
|
SCART |
|
|
|
|
Sockets |
|
|
|
VGA |
|
|
|
|
Input |
|
EXT1 |
|
SPDIF |
ANT. (Aerial) |
|
|
|
|
Input |
* a decoder |
|
|
|
|
could be Digital |
|
|
|
|
Satellite, Free to |
|
|
|
|
Air or any other |
|
|
|
|
compatible |
|
|
|
|
decoder. |
Component |
Component |
SPDIF |
|
decoder* |
Video (YPbPr) |
Audio |
Coaxial Out |
|
TV |
Inputs |
Inputs |
|
|
Side View
COMMON INTERFACE

 The Common Interface is
for a Conditional Access Module (CAM).
SERVICE |
Max500mA-5Vdc |
For service use only. |
|
|
|
|
-Max500mA |
USB Input |
|
5Vdc |
|
|
|
HDMI Input 3 |
|
|
Headphone |
|
|
SIDE AV Video Input |
|
|
SIDE AV Audio Inputs |
|
|
S-VHS Input |
|
|
On/Off Switch |
Aerial cable:...........................................................
Connect the aerial to the ANT. socket on the rear of the television.
SCART lead:..........................................................
If you use a decoder* or a media recorder, it is essential that the scart cable is connected to the television.
Before running first time installation, any connected devices need to be set to standby mode.
The SPDIF Coax. OUT socket enables the connection of a suitable surround sound system.
Ethernet (LAN) Input is used for MHEG return channel (future service, currently under development by broadcaster).
HDMI® (High-Definition Multimedia Interface) is for using with a DVD decoder or other equipment with digital audio and video output. It is designed for best performance with 1080i and 1080p high-definition video signals but will also accept and display VGA, 480i, 480p, 576i, 576p and 720p signals. PC format signals will also be displayed.
NOTE: Although this television is able to connect to HDMI equipment, it is possible that some equipment may not operate correctly.
A wide variety of external equipment can be connected to the television; therefore, the relevant owner’s manuals for all additional equipment must be referred to for exact instructions.
If the television automatically switches over to monitor external equipment, return to normal television by pressing the desired programme position button. To recall external equipment, press SOURCE button repeatedly to switch between sources.
Important Notice: Side USB Input 1 is for service use only. Note that this USB connector does not have any other functions such as playing audio or picture files.
Side USB input 2 is available in analogue TV mode. You can use Media Browser screen to browse a connected USB disk.
English - 14 -
32&40BV801B_MB38_[GB]_(IB_INTERNET)_DVB-T2_(3910UK)_10073217 |
_10073218.indd 14 |
03.10.2011 18:52:48 |
|
|
|
 Loading...