


TOSHIBA
The power to open people’s eyes
32ZP18P
36ZP18P
colour television
owner’s manual

Contents
SETTING UP
For your safety – Some do’s and don’ts for you to be aware of and other points to follow |
3 |
Your new television’s remote control – an at-a-glance guide |
4 |
Connecting the speakers |
5 |
Connecting and turning on your new TV |
6 |
Choosing the language and system, Auto tune |
7 |
Auto tune continued |
8 |
Manually tuning your TV – an alternative to Auto tune |
9 |
Swapping programme positions and programme skip |
10 |
USING YOUR TV |
|
General controls – changing programme position, sound control, bass/treble/balance |
11 |
Widescreen viewing – Superlive, Cinema, Subtitle, 14:9, Wide, 4:3 |
12 |
Picture adjustments – picture size/position, WSS – Widescreen Signalling |
13 |
Picture adjustments – picture preferences, scan mode, digital noise reduction, |
|
picture still, blue screen |
14 |
Dolby Digital |
15 |
Dolby Pro Logic – Surround Test Mode |
16 |
Digital Surround Processor– Surround Sound Features |
17 |
Teletext – setting up |
18 |
Teletext – Auto and List modes |
19 |
Teletext – control buttons |
20 |
The timer and time display – informing the TV to turn on/off and time display |
21 |
Panel lock – disabling the buttons on the front of the TV |
21 |
Stereo and bilingual transmissions – stereo or dual language broadcasts |
21 |
AV connections and input selection – input and output sockets for connected equipment |
22 |
Back connections |
23 |
Front connections and controls |
24 |
The Menus – a display of the main on-screen menus for your reference |
25 |
Questions and Answers |
26 |
Index, Specifications and Accessories – information on your television |
28 |
2

SETTING UP
For your safety
This equipment has been designed and manufactured to meet international safety standards but, like any electrical equipment, care must be taken if you are to obtain the best results and safety is to be assured. So, please read the points below for your own safety. They are of a general nature, intended to help you with all your electronic consumer products and some points may not apply to the goods you have just purchased.
Air Circulation…
Heat Damage…
Mains Supply…
Do…
Do not…
DON'T remove any fixed cover as this may expose dangerous voltages.
DON'T obstruct the ventilation of the equipment, for example, with curtains or soft furnishings.
shorten the life
DON'T allow electrical equipment to be exposed to rain or moisture.
DON’T place hot objects such as candles or nightlights on, or close to, the equipment. High temperatures can melt plastic and lead to fires.
DON'T use makeshift stands and NEVER fix legs with wood screws. To ensure complete safety, always fit the manufacturer’s approved stand or legs with the fixings provided according to the instructions.
DON'T listen to headphones at high volume, as such use can permanently damage your hearing.
DON'T leave equipment switched on when it is unattended, unless it is specifically stated that it is designed for unattended operation or has a standby mode. Switch off using the switch on the equipment and make sure your family know how to do this. Special arrangements may need to be made for infirm or handicapped people.
DON'T continue to operate the equipment if you are in any doubt about it working normally, or it is damaged in any way – switch off, withdraw the mains plug and consult your dealer.
ABOVE ALL – NEVER let anyone, especially children, push anything into holes, slots or any other openings in the case – this could result in a fatal electric shock.
NEVER guess or take chances with electrical equipment of any kind – it is better to be safe than sorry.
3
SETTING UP
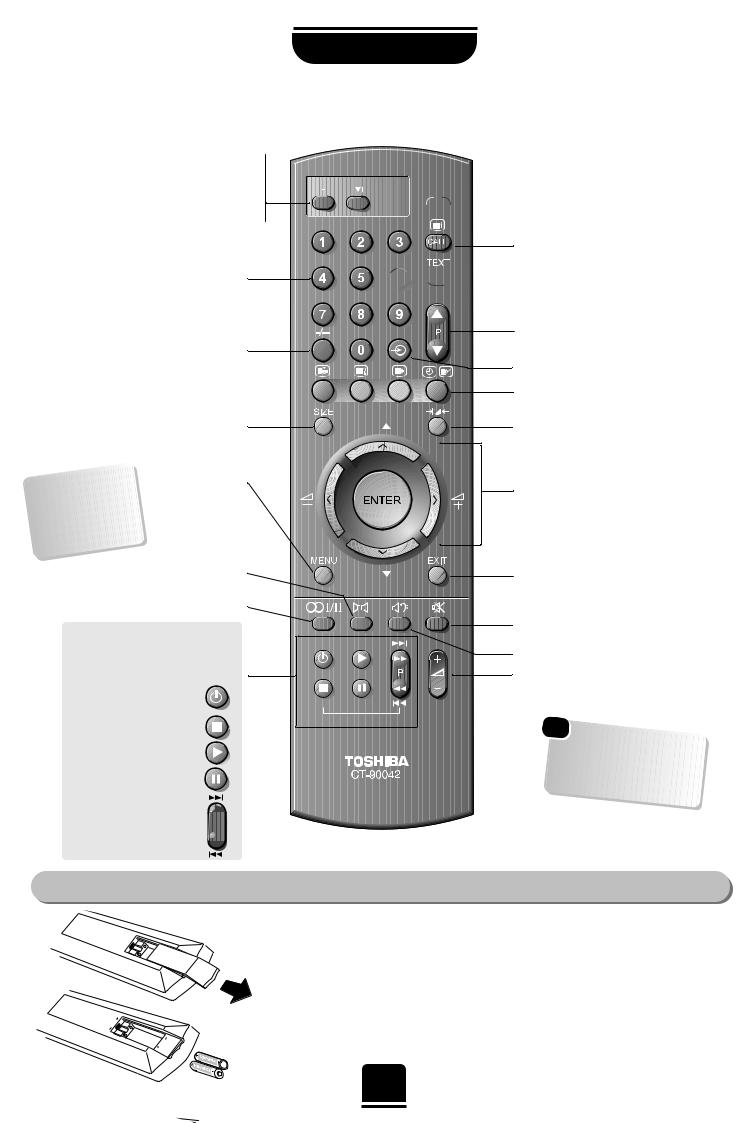
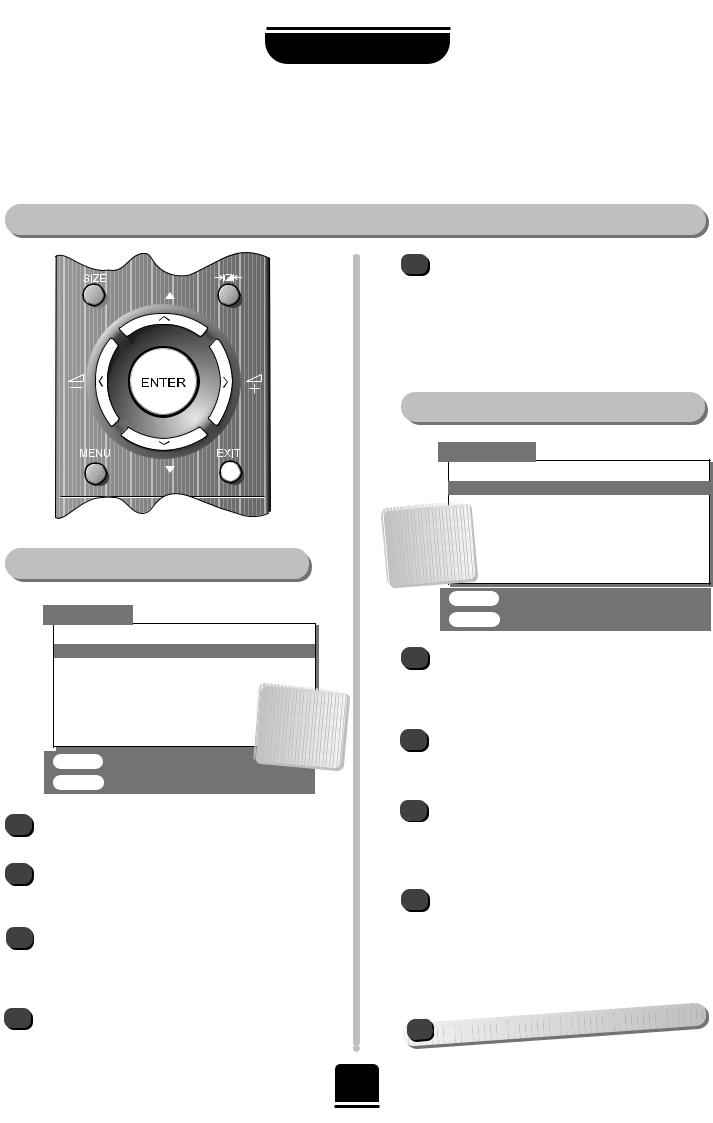
Your new television’s |
control |
Simple, at-a-glance reference of your remote control’s buttons… |
|
F button – use with the colour buttons to 
 select additional teletext features
and with the VTR buttons for a TOSHIBA DVD player.
It also increases the speed of most functions. 

Please |
see |
||||||
|
|
for |
|||||
page |
25 |
||||||
|
|
|
of |
the |
|||
details |
|||||||
|
-screen |
||||||
|
|
|
|
|
|||
main |
on |
|
|||||
|
|
|
|
|
|||
menus |
|
|
|||||
will operate your
VIDEO and DVD. must press the the same time…
press
to PLAY, press
to PAUSE, press
to FAST FORWARD/SKIP, press  to REWIND/SKIP, press

 For On/Standby mode
To |
on-screen information and |
for |
teletext initial/index function. |


 To teletext
To change programme positions |
|
and |
pages |
To |
input from external sources |
control buttons
P |
Selectable picture preferences |
To change programme positions and teletext pages
To alter the volume
When using menus the arrows move the cursor on the screen up, down, left or right. ENTER to confirm your selection.
P |
To |
reference see
the end of
The batteries... and the effective range of the remote…
back cover downwards to reveal the battery compartment and make sure you insert batteries the right way round.
All Toshiba batteries are Cadmium and Mercury free. Suitable battery types for this remote are R03 or AAA.
Do not throw your old batteries into a fire, dispose of them in a designated disposal area. Do not combine a used, old battery with a new one or mix battery types.
performance of the remote control will deteriorate beyond a distance of metres or outside an angle of 30 degrees from the centre of the TV.
4
!
|
do |
to |
share |
|
|
speakers |
|
your |
|
Hi |
|
|
-Fi as |
damage |
|
occur. |
|
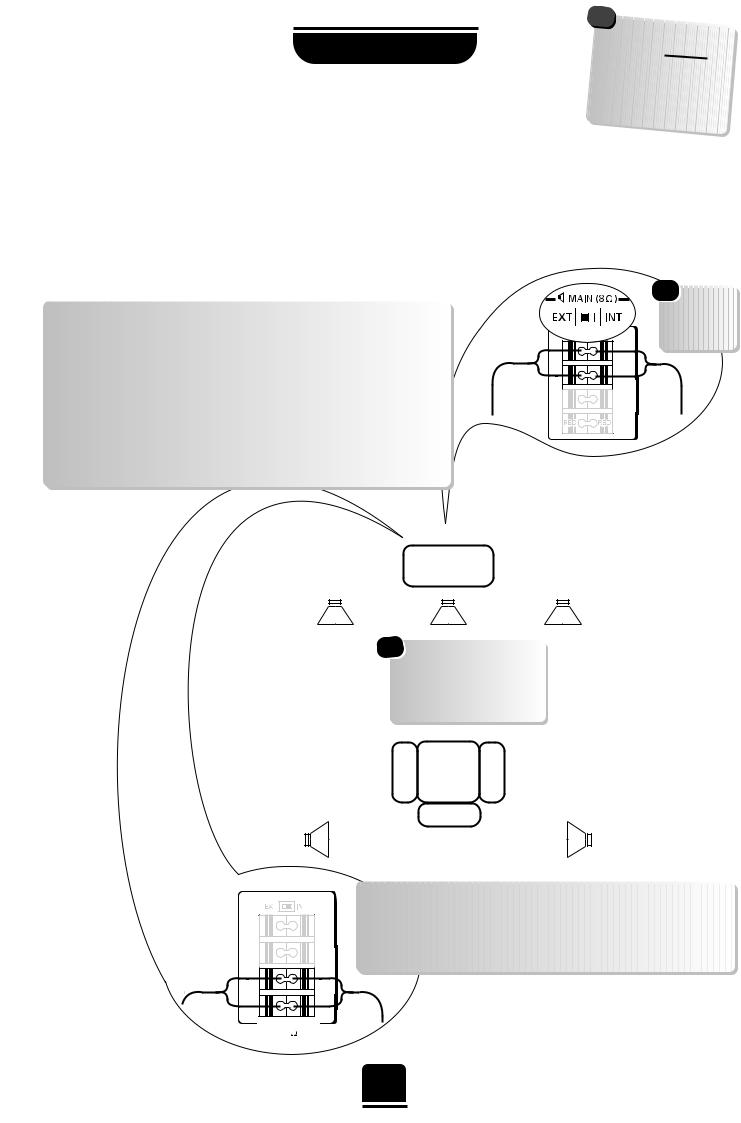
not
to connect two rear
10W minimum right sound. The
is OFF.
Extension Front Speaker connections
To connect extension front speakers simply connector and insert the cable. You must now
to EXT as shown.
Always make sure that the lead with the stripe edge) is connected to the RED terminal and (smooth) lead is connected to the BLACK
Main
Speaker
Surround
Speaker
to set switch to
Surround Speaker connections
To connect surround speakers simply press the connector and insert the cable. These speakers should be sited in line with the normal viewing position
KSURROUND
8
5
SETTING UP
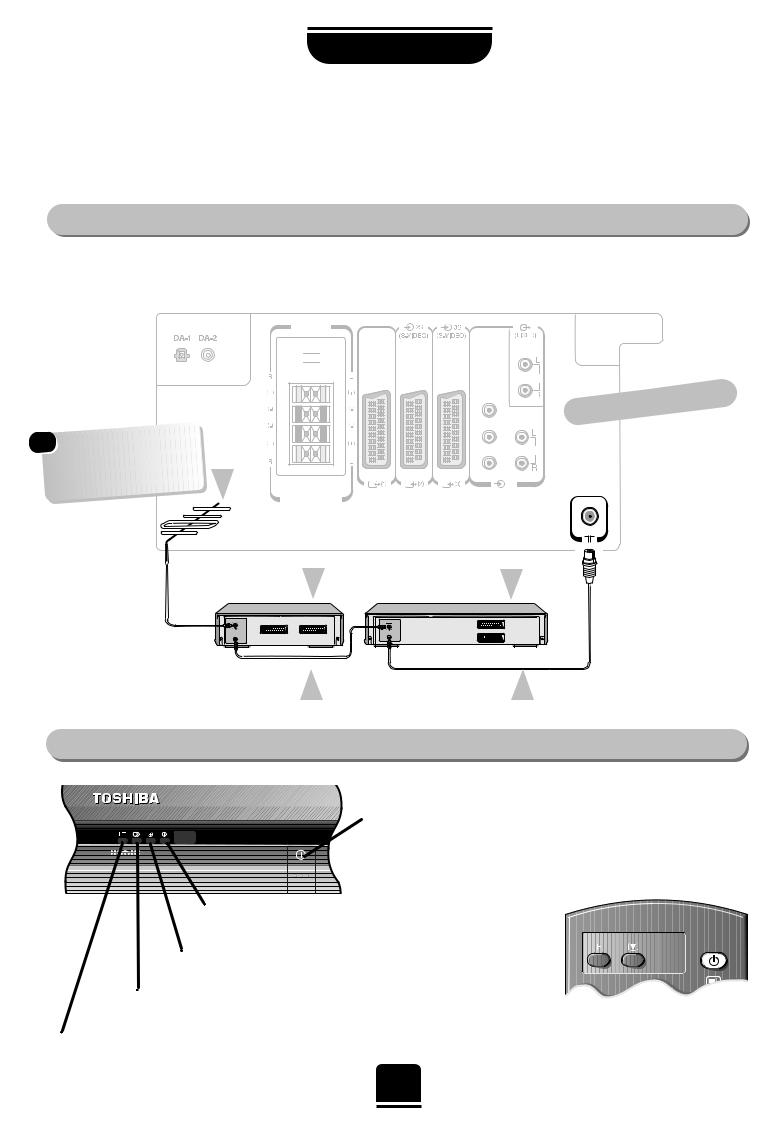
Connecting and turning on your new TV
To conserve energy it is best to turn your TV off and not to leave it in Standby, unless the timer has been set.
The TV back connections…
Connect the aerial to the socket on the rear of the television. If you use a Set Top Box and/or a video recorder it is essential that the aerial cable is connected through the Set Top Box and/or through the video recorder to the television.
DO NOT CONNECT SCART LEADS UNTIL THE TELEVISION IS FULLY TUNED.
OPTICAL COAXIAL
|
|
be: |
|
|
Analogue |
|
|
|
|
|
|
|
or any other |
AERIAL |
|
|
|
. |
|
|
|
|
|
|
compatible |
decoder |
|
|
|
|
|
KMAIN 8
EXT 

 INT
INT
COMPONENT VIDEO INPUT
Y
PB/C
PR/CR AUDIO
|
(4) |
(AUDIO/VIDEO) (AUDIO/VIDEO) |
(AUDIO/VIDEO) |
K


the |
back |
of your |
TV |
|
|||
|
|
||
|
|
|
SET TOP BOX* |
VIDEO RECORDER |
IN
…and switching your new TV on…
RED = Power On
GREEN = On Timer is set
GREEN = Stereo transmission being received
ORANGE = Bilingual transmission being received
On the front of the TV…
 If the red power-on light is unlit, press the POWER button on the front of the TV to switch the set on and then press a number button on the remote control to see the screen.
with the remote control:
Press the Standby Button i: This allows you to put the set
into standby mode when leaving
the TV unattended for short periods of time.
To return to TV mode press the ibutton, or any of the
numbered buttons on the remote control. The picture may take a few seconds to appear.
6
SETTING UP
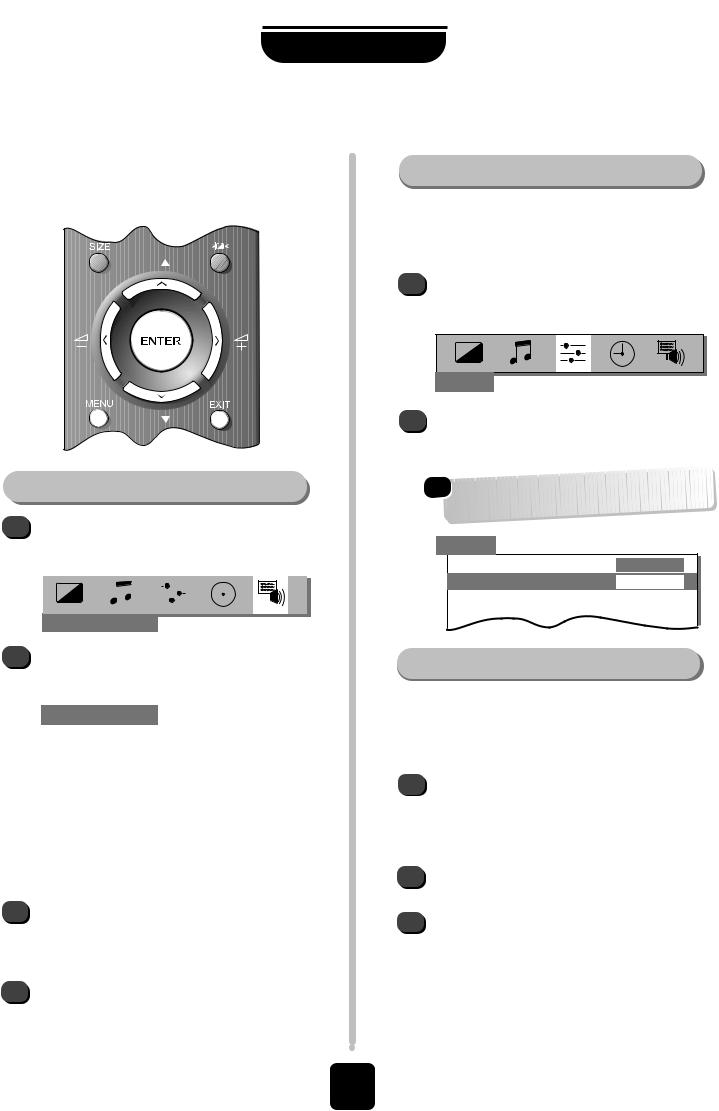
Choosing the language and system, Auto tune
The
system necessary for where you live.
To select your system… Continental Europe only
Before running Auto tune it is important that you select your desired System as described here. Should you also wish to tune to alternative Systems this must be done manually, after using Auto tune. See page 9.
SET UP
To select your language…
1 |
|
|
|
|
|
|
|
|
|
|
the |
||
S R |
|
|
|
|
|
MENU |
|||||||
from the top bar. |
|
|
|
|
|
|
|
|
|||||
|
|
|
|
|
|
|
|
|
|
|
|
|
|
|
|
|
|
|
|
|
|
|
|
|
|
|
|
|
|
|
|
|
|
|
|
|
|
|
|
|
|
|
|
|
|
|
|
|
|
|
|
|
|
|
|
FEATURE MENU
2 |
Now repeatedly press the Qbutton until |
|
Language is highlighted in the FEATURE |
MENU options.
FEATURE MENU
|
|
|
AV connection |
|
|
|
|
▼ |
|
|
|
|
Picture size/position |
|
|
|
▼ |
|
|
|
|
|
Teletext |
|
|
|
▼ |
|
|
|
|
|
Surround set up |
|
|
|
▼ |
|
|
|
|
|
|
|
|
|
|
|
|
|
|
|
Language |
|
▼ |
ENGLISH |
▼ |
|
|
|
|
|
Panel lock |
|
▼ |
|
|
|
|
|
|
|
|
OFF |
▼ |
|
|||
|
|
|
WSS |
|
▼ |
|
|
|
|
|
|
|
▼ |
ON |
▼ |
|
|||
|
|
|
|
|
|
|
|
|
|
|
|
|
|
|
|
|
|
|
|
|
|
|
|
|
|
|
|
|
|
|
|
|
EXIT : To exit |
|
|
|
|
|
|
3 |
Press the Sor Rbutton to view the language |
|
|
||||||
|
options available. As you view each language, the |
||||||||
|
wording on the menus will automatically change |
||||||||
|
for you. |
|
|
|
|
|
|||
4 |
When you have got the right language, press the |
||||||||
|
EXIT button. All the displays will now appear in |
||||||||
that language.
|
– Eastern Europe, |
|
|
|
I – UK, L1(12) |
* |
* |
First of channel. Standby allocate
1 |
you are in the |
menu. Press the R button. |
||||||
|
You will be informed that all previous |
|||||||
|
|
|
|
settings will be lost. |
||||
2 |
|
|
|
|
|
|
|
to |
3 |
x x x x x will flash and each station found will |
|||||||
|
appear in succession on the screen. |
|||||||
|
Allow the television to complete the search. |
|||||||
|
|
|
|
|
|
|||
|
|
AUTO TUNE |
|
|
|
|
||
|
|
|
|
SEARCHING |
|
|||
|
|
|
|
▼ ▼ |
▼ |
▼ ▼ |
|
|
|
|
|
|
Channel : |
21 |
|
||
|
|
|
|
Station |
: |
– – – – – – – |
|
|
|
|
|
|
|
|
|
|
|
|
|
|
|
|
|
|
|
|
7 |
|
|
EXIT : To exit |
|
|
|
|
* Continental Europe only |
|||
|
|
|
|
|
|
|
|
|
|
|
|
SETTING UP
Auto tune continued
UK and Continental Europe settings
P |
P |
For the UK only…
AUTO TUNE
Prog. Station
1BBC1
BBC1
ENTER : To store
EXIT : To exit
Channel
22
39
…Your TV
may display different
Channel numbers…
When the search is complete, the screen will display a list of all the available BBC1 signals.
If more than one is shown press the Qor P button to highlight and view the choices.
Choose the best picture and sound.
Press the ENTER button to store BBC1 on programme position 1.
Note: You can only choose one BBC1 station at this stage.
4
signal.
Repeat for all the remaining programme positions you wish to tune including a Set Top Box, if connected. If there are no signals for any programme positions, simply press the ENTER button to move on to the next one. Press EXIT to finish and one of the number buttons to view the TV.
For Continental Europe only…
AUTO TUNE
…Your |
TV |
|
may |
display |
|
|
|
|
different |
||
Channel |
||
|
|
… |
numbers |
||
Prog. |
Station |
Channel |
1 |
– – – – – – – |
01 |
|
|
02 |
|
|
05 |
|
|
07 |
|
|
08 |
|
|
12 |
ENTER : To store
EXIT : To exit
When the search is complete press the Q or P button to move through the list to select the
you wish to allocate toprogramme 1.
ENTER to store.
use the Programme swap facility later if required, see page 10.
Repeat the procedure for all the programme positions you wish to store including the Set Top Box. If you wish to leave a programme position free, for use in the future, store an unwanted channel on it.
Press the EXIT button when you have finished and press the number buttons to view a channel of your choice, e.g. 01. To tune any stations on different SYSTEMS, use the Manual tune facility from the SET UP menu, as described on page 9.
8
SETTING UP
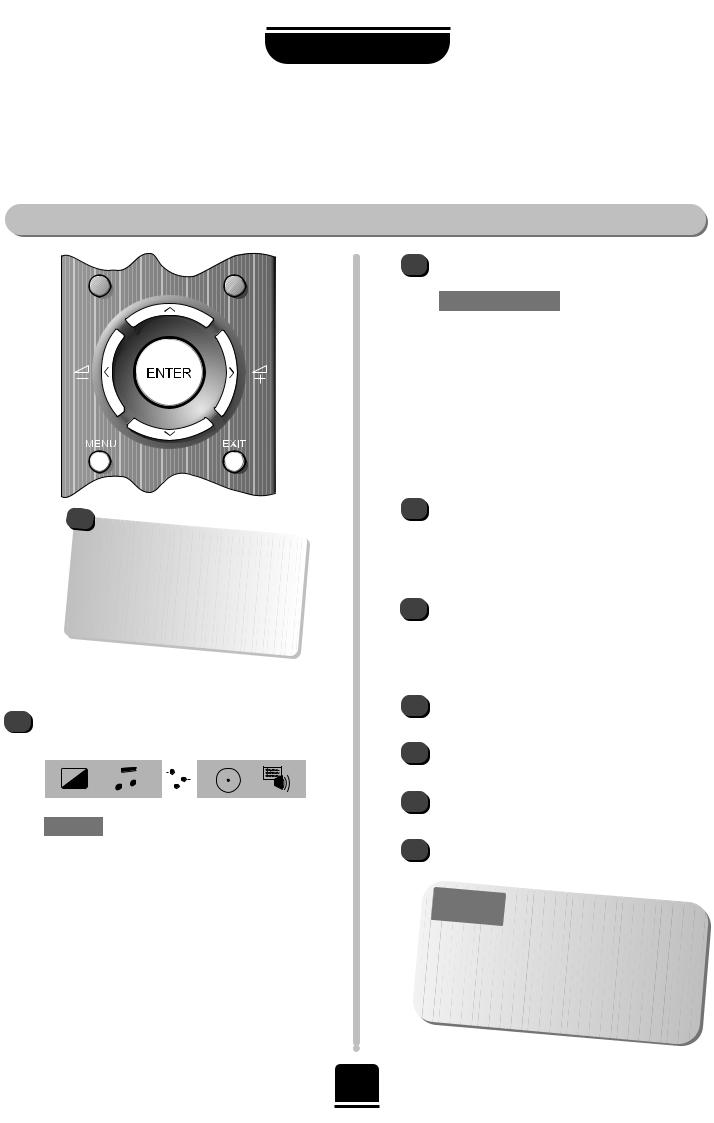
Manually tuning your TV
As an alternative to Auto tune, you can tune-in your Toshiba television manually using Manual tune. For example: if you have used Auto tune but wish to tune-in a station on another SYSTEM (see page 7) or, you are unable to connect the TV to your video with a Scart lead.
!
Manual tune…
2
P
P
3
Press the R button twice to start the search.
MANUAL TUNE
|
▼ Back |
|
|
|
|
|
|
|
|
|
|
|
|
|
|
|
Search |
|
|
▼ |
>>> |
▼ |
|
|
|
|
|
|
|
||
|
Programme no. |
▼ |
01 |
▼ |
|
||
|
Channel |
|
|
|
|
||
|
▼ |
024 |
▼ |
|
|||
|
|
|
|||||
|
Station |
▼ |
– – – – – – – |
▼ |
|
||
|
|
|
|
|
|
|
|
|
|
|
|
|
|
|
|
ENTER |
: To store |
|
|
|
|
||
|
EXIT |
: To exit |
|
|
|
|
|
|
|
|
|
|
|
|
|
|
|
your |
|
|
|
to the video |
|
|
|||
leads you |
recorder |
using |
|||
will need to |
|||||
|
|
|
|
||
|
|
allocate a |
|||
position on |
|
|
|||
video |
|
the television |
|||
recorder. |
|
|
|||
|
|
Insert a pre- |
|||
tape and |
|
|
|||
control, |
|
press PLAY on |
the |
||
then Manual |
|
||||
|
|
|
|||
|
|
tune… |
|||
progressing.
On finding a station it will show on the television.
4 If you do not wish to store it, press the R button to continue the search. If you do wish to store it press Q to highlight the Programme no. and then press Sor Rto select the number you wish to store it on. (We suggest 0 for the video recorder.)
1 |
From the top menu bar select SET UP and with |
|||||||||||||
|
the Q button select Manual tune. |
|||||||||||||
|
|
|
|
|
|
|
|
|
|
|
|
|
|
|
|
|
|
|
|
|
|
|
|
|
|
|
|
|
|
|
|
|
|
|
|
|
|
|
|
|
|
|
|
|
|
|
|
|
|
|
|
|
|
|
|
|
|
|
|
|
|
|
|
|
|
|
|
|
|
|
|
|
|
|
|
|
|
|
|
|
|
|
|
|
|
|
|
|
|
SET UP
* |
Colour |
|
|
|
|
|
|
▼ ▼ |
AUTO |
▼ ▼ |
|
||||
* |
System |
|
|
||||
I |
|
||||||
|
|
Auto tune |
|
|
▼ |
|
|
|
|
|
|
|
|
|
|
|
|
Manual tune |
|
|
▼ |
|
|
|
|
Programme swap |
|
|
▼ |
|
|
|
|
Manual fine tuning |
|
|
▼ |
|
|
|
|
Programme skip |
|
|
|
|
|
|
|
▼ |
OFF |
▼ |
|
||
|
|
|
|
|
|
|
|
|
|
|
|
|
|
|
|
|
|
EXIT : To exit |
|
|
|
|
|
|
|
|
|
|
|
|
|
5 |
Press Q to highlight Station andSor Rto select |
||||||||||||
6 |
Press ENTER if you wish to store the |
|
|
||||||||||
|
broadcast displayed. |
|
|
|
|
|
|
|
|||||
7 |
To repeat the process, highlight Search and press |
||||||||||||
|
the R button to look for the next station. |
||||||||||||
8 |
Press EXIT when you have finished. |
|
|
||||||||||
|
P |
|
This TV has |
|
|
|
channel |
|
|||||
|
LEASE NOTE |
|
|
|
direct |
entry if |
|||||||
|
|
|
the channel |
|
|
|
|
|
|||||
|
|
|
|
|
|
numbers |
|
|
|||||
Select the |
|
|
|
|
|
|
|
are known. |
|||||
Enter |
Manual tune |
screen. |
|
|
|
||||||||
the required |
|
|
|
|
|||||||||
enter |
|
|
programme |
number, |
then |
||||||||
the appropriate |
channel |
|
|||||||||||
Select |
number. |
||||||||||||
the station |
|
|
|
||||||||||
|
|
|
|
|
|||||||||
to |
|
name and press |
ENTER |
||||||||||
store. |
|
||||||||||||
|
|
|
|
|
|
|
|
||||||
* Continental Europe only
 Loading...