


Contents |
|
For your safety ........................................................ |
18 |
Installation of TV Set .............................................. |
19 |
Preparation ..................................................................... |
19 |
Before Switching on your TV ................................ |
19 |
Power connection............................................................ |
19 |
Aerial Connections .......................................................... |
19 |
How to connect the external equipments ......................... |
19 |
Inserting batteries in the remote control handset ............. |
19 |
Control Panel Buttons............................................ |
20 |
Antenna Connections ............................................. |
20 |
Remote Control Buttons ........................................ |
21 |
Features ................................................................... |
22 |
Switching the TV ON/OFF ...................................... |
22 |
To switch the TV on ......................................................... |
22 |
To switch the TV off ......................................................... |
22 |
Initial Settings ......................................................... |
22 |
Operating with the onset buttons ..................................... |
22 |
Operating with Remote Control ........................................ |
23 |
Menu System ........................................................... |
23 |
Sound menu .................................................................... |
23 |
Picture menu .................................................................. |
25 |
Feature menu .................................................................. |
26 |
Installation Menu ............................................................. |
26 |
Other Functions ...................................................... |
28 |
Sound Mute .................................................................... |
28 |
Stereo / Bilingual ............................................................. |
28 |
Information on Screen ..................................................... |
28 |
Manual Selection of External Source............................... |
28 |
Screen Format ................................................................ |
28 |
Previous Program Selection ............................................ |
28 |
Sound Standard Selection ............................................... |
28 |
To Display the Time ......................................................... |
28 |
Picture Mode .................................................................. |
28 |
Still Picture ..................................................................... |
29 |
Teletext .................................................................... |
29 |
To operate Teletext .......................................................... |
29 |
To select a page of Teletext ............................................. |
29 |
To Select Index Page ...................................................... |
29 |
Searching for a page while watching TV .......................... |
29 |
To Select Double Height Text .......................................... |
29 |
To Reveal “concealed” Information ................................... |
29 |
To Stop Automatic Page Change ..................................... |
29 |
Split Screen .................................................................... |
29 |
To exit Teletext ................................................................ |
29 |
Fastext ........................................................................... |
29 |
Connect the External Equipments ........................ |
30 |
Connect the External Equipments ........................ |
31 |
Via the Euroconnector..................................................... |
31 |
RGB mode ...................................................................... |
31 |
S-VHS ............................................................................ |
31 |
S-VHS EXT2 Mode .......................................................... |
31 |
Via the RCA jacks ........................................................... |
31 |
Via the ANT (aerial) socket .............................................. |
31 |
TV and Video Recorder (VCR) ......................................... |
31 |
NTSC Playback .............................................................. |
31 |
Copy Facility ................................................................... |
31 |
Connecting Headphones ................................................. |
31 |
Tips........................................................................... |
31 |
Exclusion Clause .................................................... |
32 |
Specifications.......................................................... |
32 |
For your safety
This equipment has been designed and manufactured to meet international safety standards but, like any electrical equipment, care must be taken if you are to obtain the best results and safety is to be assured. So, please read the points below for your own safety. They are of a general nature, intended to help you with all your electronic consumer products and some points may not apply to the goods you have just purchased.
Some “DOs” and “DON’Ts” for you
Air Circulation…
Leave at least 10cm clearance around the television to allow adequate ventilation. This will prevent the TV from overheating and consequential possible damage to the TV. Dusty places should also be avoided.
Heat Damage…
Damage may occur if you leave the TV in direct sunlight or near a heater. Avoid places subject to extremely high temperatures or humidity, or locations where the temperature is likely to fall below 5ºC (41ºF).
Hot / Moderate Climate Conditions
This device is suitable for working in hot and moderate climate conditions.
Mains Supply…
The mains supply required for this equipment is 230V AC, 50 Hz. Never connect to a DC supply or any other power source. DO ensure that the TV is not standing on the mains lead. DO NOT cut off the mains plug from this equipment, this incorporates a special Radio Interference Filter, the removal of which will impair its performance.
IF IN DOUBT PLEASE CONSULT A COMPETENT ELECTRICIAN.
DO…
DO read the operating instructions before you attempt to use the equipment.
DO ensure that all electrical connections (including the mains plug, extension leads and inter-connections between pieces of equipment) are properly made and in accordance with the manufacturers’ instructions.
Switch off and withdraw the mains plug before making or changing connections.
DO consult your dealer if you are ever in doubt about the installation, operation or safety of your equipment.
DO be careful with glass panels or doors on equipment.
DO NOT…
DON’T remove any fixed cover as this may expose dangerous voltages.
DON’T obstruct the ventilation openings of the equipment with items such as newspapers, table-cloths,
curtains etc. Overheating will cause damage and shorten the life of the equipment.
DON’T allow electrical equipment to be exposed to dripping or splashing or objects filled with liquids, such as vases, to be placed on the equipment.
ENGLISH - 18 -
02-2841&ENG-2143-AK53-ST10P-50051436.p6518 |
07.12.2005, 17:11 |

DON’T place hot objects or naked flame sources, such as lighted candles or nightlights on, or close to the equipment. High temperatures can melt plastic and lead to fires.
DON’T use makeshift stands and NEVER fix legs with wood screws. To ensure complete safety, always fit the manufacturer’s approved stand or legs with the fixings provided according to the instructions.
Place on a sturdy platform, the mounting surface should be flat and steady, it should then be secured to the wall with a sturdy tie using the hook on the back of the TV, this will prevent it from falling over.
DON’T listen to headphones at high volume, as such use can permanently damage your hearing.
DON’T leave equipment switched on when it is unattended, unless it is specifically stated that it is designed for unattended operation or has a standby mode. Switch off using the switch on the equipment and make sure your family know how to do this. Special arrangements may need to be made for infirm or handicapped people.
DON’T continue to operate the equipment if you are in any doubt about it working normally, or it is damaged in any way
– switch off, withdraw the mains plug and consult your dealer.
DON'T put the empty batteries into garbage instead of recycle bin to reduce harmfull effects to the environment.
ABOVE ALL – NEVER let anyone, especially children, push anything into holes, slots or any other openings in the case – this could result in a fatal electric shock.
NEVER guess or take chances with electrical equipment of any kind – it is better to be safe than sorry.
TO FULLY DISCONNECT THE TV, SWITCH OFF THE MAINS SOCKET AND REMOVE THE POWER PLUG.
Installation of TV Set
Preparation
Place the TV on a solid surface.
For ventilation, leave a space of at least 100mm. Free all around the set.
To prevent any fault and unsafe situations, please do not place any objects on top of the set.
Before Switching on your TV
Power connection
Important: The TV set is designed to operate on 230 V AC, 50 Hz.
•After unpacking, allow the TV set to reach the ambient room temperature before you connect the set to the mains.
Aerial Connections
•Connect the aerial plug to the aerial input socket located at the back of the TV.
:
 &$%/( 79
9+) 8+)
79 5($5 3$1(/
How to connect the external equipments
See “Connect the External Equipments” on page 30.
•See the instruction manuals provided with the external devices too.
Inserting batteries in the remote control handset
•Remove the battery cover located on the back of the handset by gently pulling upwards from the indicated part.
•Insert two AAA (R03) or equivalent type batteries inside.
•Replace the battery cover.
NOTE: Remove batteries from remote control handset when it is not to be used for a long period. Otherwise it can be damaged due to any leakage of batteries.
Dispose of them in a designated disposal area.
ENGLISH - 19 -
02-2841&ENG-2143-AK53-ST10P-50051436.p6519 |
07.12.2005, 17:11 |
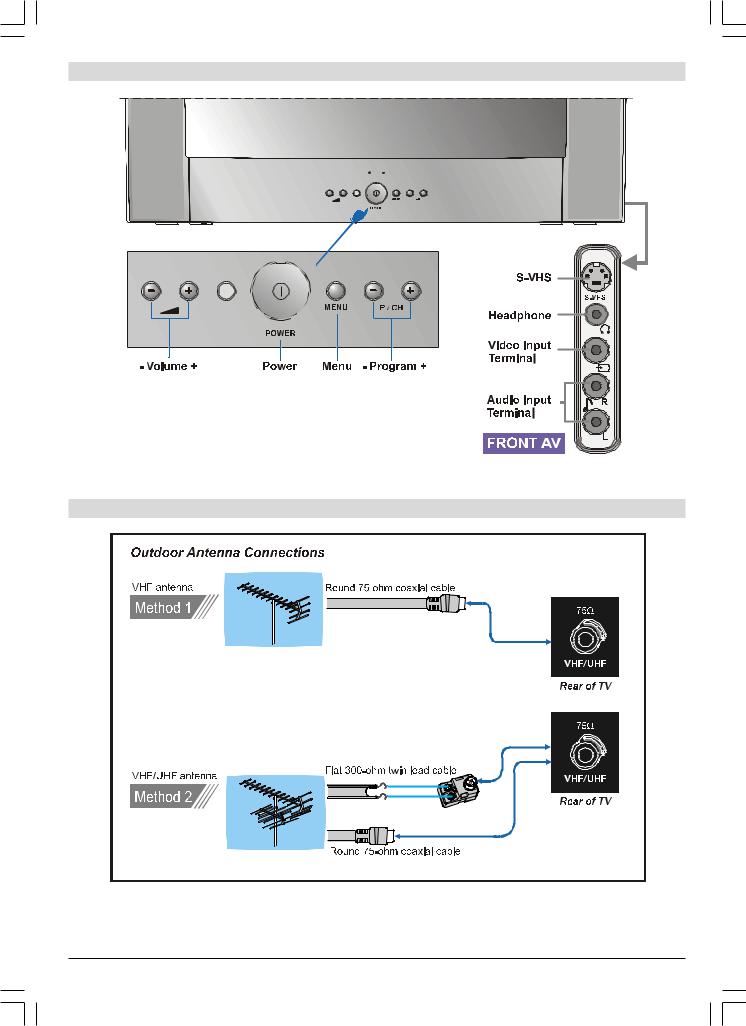
Control Panel Buttons
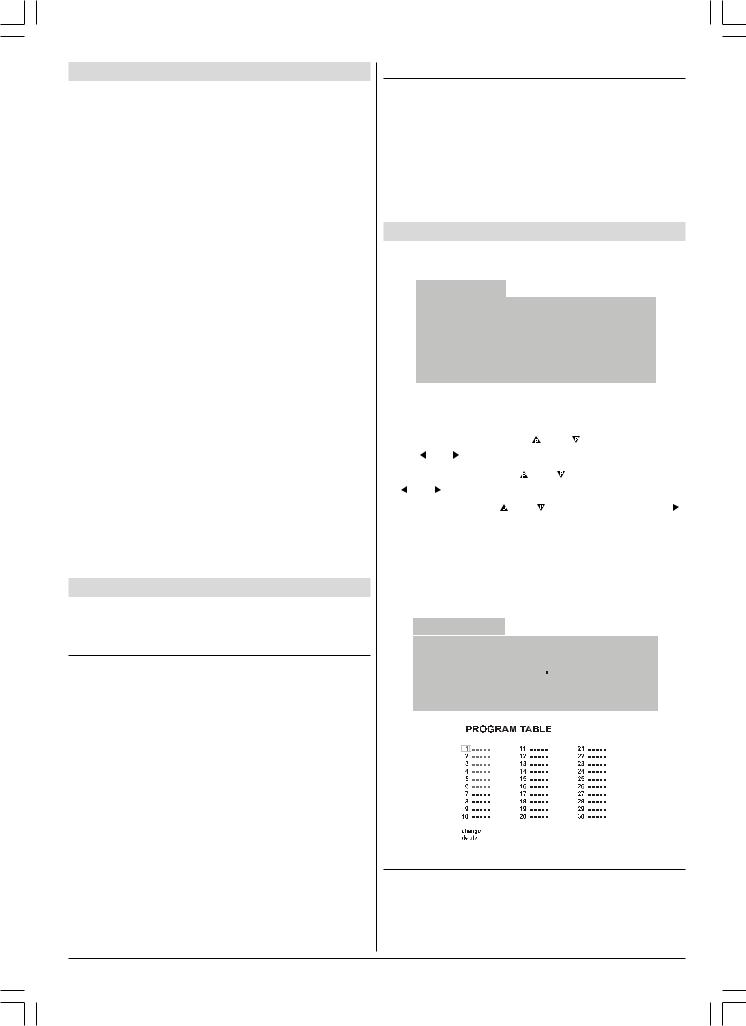
Antenna Connections
ENGLISH - 20 -
02-2841&ENG-2143-AK53-ST10P-50051436.p6520 |
07.12.2005, 17:11 |

|
Remote Control Buttons |
|
|
= Stand By |
|
0 - 9 = Direct Program |
|
|
|
= External Source |
|
|
(EXT-1, EXT-2, EXT-3, S-VHS, S-VHS EXT2, FRONT-AV) |
|
|
= Picture Mode Selection |
|
EXIT = TV / AV / TEXT / MENU Quit |
|
|
|
= Programme Up / Cursor Up |
|
|
= Volume Up / Cursor Right |
|
|
= Programme Down / Cursor Down |
|
|
V - / V + = Volume Down / Volume Up |
|
|
Cursor Left / Cursor Right |
|
|
Yellow = Feature Menu |
|
|
Blue = Install Menu |
|
|
= Teletext / Mix / Teletext Quit |
|
|
= Time / Update |
|
|
= Hold |
|
|
= Index Page |
|
|
= TV Status |
|
|
= No Function |
|
|
= No Function |
|
|
= Reveal |
|
|
= Expand |
|
|
= Picture Mode (Auto, 4:3, 16:9) |
|
|
= Stereo / Mono / Dual I-II |
|
|
Red = Sound Menu |
|
|
Green = Picture Menu |
|
= Volume Down / Cursor Left |
|
|
|
OK = Ok |
|
|
MENU = Menu |
|
|
= Programme Swap |
|
|
= Mute |
|
|
*Functions of the “ ” / “ ” and “-V / V+” buttons are the same. |
|
|
ENGLISH |
- 21 - |
02-2841&ENG-2143-AK53-ST10P-50051436.p6521 |
07.12.2005, 17:11 |
Features
•Infra red remote control
•100Hz flicker free
•User friendly menu system
•On-screen functional display
•Frequency synthesis tuning
•Comb filter
•Sleep timer
•100 program storage locations
•S-band (S1-S20)
•Hyper band reception (S21-S41)
•Digital-CTI (Color Transient Improvement)
•Digital noise reduction
•Auto, 4:3, 16:9
•Built-in 2 speakers
•Volume controlled Headphone output, and headphone terminals (jacks)
•Balance control
•5-Band equaliser
•3 x Euro AV plug (Scart)
•75 Ohm Aerial socket
•Fastext
•German + Nicam Stereo
•S-VHS (via SCART or SVHS connector)
•Front-AV
•Multi system reception (PAL SECAM B/G D/K L/L’)
•NTSC Playback
•Automatically switch off after 5 minutes when no signal.
•Automatic VCR detection
•Digital Scan
Switching the TV ON/OFF
You can operate your TV either using the remote control handset or directly using the TV onset buttons.
To switch the TV on
Your TV will switch on in two steps:
1- Press the power button located on the front of the TV. Then the TV switches itself to standby mode and the LED located below becomes RED.
2- To switch on the TV from stand-by mode either:
Press a digit button on the remote control so that a programme number is selected,
or,
Press Standby / Power Button or Programme Up and Down buttons on the front of the TV or on the remote control respectively, so that last switched off programme is selected.
By either ways the TV will switch on and the LED will turn off.
IMPORTANT:
•If no aerial signal is received at the selected program for a period of 5 minutes then your TV automatically switches into stand-by mode.
To switch the TV off
•Press the stand-by button on the remote control, so the TV will switch to stand-by mode and the LED will become Red,
or,
Press the power button located on the front of the TV, so the TV will switch off.
NOTE: If you have switched of the TV set from the power button instead of the remote control, next time you press the power button, the TV set will switch on without going to the stand-by mode.
Initial Settings
The message “PLEASE CHECK ANTENNA CABLE!” will be displayed when you turn on your TV for the first time.
(;(&87,21 $36
3/($6( &+(&. $17(11$ &$%/(
/$1*8$*( |
(1*/,6+ |
&28175< |
8. |
67$57 |
|
(;,7 &$1&(/
Note: If you connect Video Recorder to your TV via antenna input (ANT socket); to tune the VCR channel automatically you must set the VCR in play mode before you start APS.
1- Select LANGUAGE with “ “ or “
 ” button, then press the “
 ” or “
 ” button to select a menu language.
2- Select COUNTRY with “ “ or “
 ” button, then press the “
 ” or “
 ” button to select the correct country.
3- Select START with “ “ or “
 ” button, then press the “
 ” button to start APS.
APS, (Automatic Programming System) automatically programmes the received channels in your TV’s programme numbers. During APS, “APS IS RUNNING PLEASE WAIT” message will be displayed. After APS is finalized, the “PROGRAM TABLE” appears.
To cancel APS, press the “EXIT” button.
(;(&87,21 $36
$36 ,6 5811,1* 3/($6( :$,7
352*5(66 |
|
|
|
|
|
||
|
|
|
|
|
|||
&+$11(/ |
|
||||||
(;,7 &$1&(/ |
|
|
|
|
|
||
|
|
|
|
|
|
|
|
|
|
|
|
|
|
|
|
|
|
|
|
|
|
|
|
|
|
|
|
|
|
|
|
|
|
|
|
|
|
|
|
|
|
|
|
|
|
|
|
Operating with the onset buttons
Volume setting and programme selection can be made using the buttons on the front panel.
ENGLISH - 22 -
02-2841&ENG-2143-AK53-ST10P-50051436.p6522 |
07.12.2005, 17:11 |
 Loading...