


LCD TV/DVD COMBINATION
19DV665DB
19DV667DB
22DV665DB
22DV667DB
26DV665DB
OWNER’S MANUAL
©2009 Toshiba Corporation
Before operating the unit, please read this manual thoroughly.
Owner’s Record
The model number and serial number are on the back of your TV/DVD. Record these numbers in the spaces below. Refer to these numbers whenever you communicate with your Toshiba dealer about this TV/DVD.
Model number: _________________
Serial number: _________________
Precautions
CAUTION:
THIS UNIT IS A CLASS 1 LASER PRODUCT. HOWEVER THIS UNIT USES A VISIBLE LASER BEAM WHICH COULD CAUSE HAZARDOUS RADIATION EXPOSURE IF DIRECTED. BE SURE TO OPERATE THE PLAYER CORRECTLY AS INSTRUCTED.
THE FOLLOWING CAUTION LABEL IS LOCATED ON THE REAR PANEL OF THE UNIT.
CLASS 1
LASER PRODUCT
WHEN THIS UNIT IS PLUGGED INTO THE WALL OUTLET, DO NOT PLACE YOUR EYES CLOSE TO THE OPENINGS TO LOOK INTO THE INSIDE OF THIS UNIT.
USE OF CONTROLS OR ADJUSTMENTS OR PERFORMANCE OF PROCEDURES OTHER THAN THOSE SPECIFIED HEREIN MAY RESULT IN HAZARDOUS RADIATION EXPOSURE.
DO NOT OPEN COVERS AND DO NOT REPAIR YOURSELF. REFER SERVICING TO QUALIFIED PERSONNEL.
Headphone Warning
Loud music can damage your hearing irreversibly, therefore do not set the volume to a high level when listening through headphones, particularly for extended listening periods.
Information for the DVB-T function
•Any function relative to the digital television (with the DVB logo) is available only within the country or area where such signals are transmitted. Verify with the salesman if it is possible to receive a DVB-T signal in the zone where you live.
•Even if the television conforms to the DVB-T specifications, the compatibility to future digital DVB-T transmissions is not guaranteed.
•Some digital television functions may not be available in some countries.
•The DVB-T system present in this device is FTA (Free to air).
•The “HD ready” logo is a trademark of EICTA.
•DVB is a registered trademark of the DVB Project. This logo indicates that the product is compliant with European Digital Broadcasting.
Possible Adverse Effects on LCD Screen: If a fixed (non-moving) pattern remains on the LCD screen for long periods of time, the image can become permanently engrained in the LCD TV panel and cause subtle but permanent ghost images. This type of damage is NOT COVERED BY YOUR WARRANTY. Never leave your TV on for long periods of time while it is displaying the following formats or images:
•Fixed Images, such as stock tickers, video game patterns, TV station logos, and websites.
•Special Formats that do not use the entire screen. For example, viewing letterbox style (16:9) media on a normal (4:3) display (Black bars at top and bottom of screen); or viewing normal style (4:3) media on a widescreen (16:9) display (Black bars on left and right sides of screen).
The examples used throughout this manual are based on the 26DV665DB model.
IMPORTANT INFORMATION
If a television is not positioned in a sufficiently stable location, it can be potentially hazardous due to falling. Many injuries, particularly to children, can be avoided by taking simple precautions such as:
•Using stands recommended by the manufacturer of the television.
•Only using furniture that can safely support the television.
•Ensuring the television is not overhanging the edge of the supporting furniture.
•Not placing the television on tall furniture (for example, cupboards or bookcases) without anchoring both the furniture and the television to a suitable support.
•Not standing the televisions on cloth or other materials placed between the television and supporting furniture.
•Educating children about the dangers of climbing on furniture to reach the television or its controls.
Place the TV on a stable, level surface that can support the weight of the TV. In order to maintain stability and prevent it falling over, secure the TV to the level surface using the strap located under the table top stand, or, to a wall using a sturdy tie to the clip on the back of the table top stand.
2

|
Contents |
Precautions ................................................................................................................................................................................ |
2 |
Important safety information ........................................................................................................................................................ |
4 |
Location of controls ..................................................................................................................................................................... |
6 |
Remote control ............................................................................................................................................................................ |
7 |
Aerial connection ......................................................................................................................................................................... |
9 |
Auto setup ................................................................................................................................................................................. |
10 |
Quick guide for menu operation ................................................................................................................................................ |
11 |
Selecting the video input source ................................................................................................................................................ |
13 |
Automatic station presetting with the built-in Tuner ................................................................................................................... |
14 |
Changing the order of stored channels ..................................................................................................................................... |
15 |
Manual TV station presetting ..................................................................................................................................................... |
16 |
Basic operation .......................................................................................................................................................................... |
17 |
Teletext ...................................................................................................................................................................................... |
19 |
Stereo reception with the built-in analogue tuner ...................................................................................................................... |
20 |
Picture format ............................................................................................................................................................................ |
21 |
Other convenience functions ..................................................................................................................................................... |
22 |
Display setup/Timer setting (DTV mode only) ........................................................................................................................... |
24 |
Password setup (Parental lock) (DTV mode only) ..................................................................................................................... |
25 |
Version ...................................................................................................................................................................................... |
26 |
Software upgrade (DTV mode only) .......................................................................................................................................... |
27 |
Common interface (DTV mode only) ......................................................................................................................................... |
28 |
Multi audio (DTV mode only) ..................................................................................................................................................... |
29 |
DVB-Subtitle/Using the Digital Service (DTV mode only) .......................................................................................................... |
30 |
EPG (Electronic Program Guide) (DTV mode only) .................................................................................................................. |
31 |
EPG Timer (DTV mode only) ..................................................................................................................................................... |
32 |
Disc ............................................................................................................................................................................................ |
33 |
Playing a disc ............................................................................................................................................................................ |
34 |
Zooming/Locating desired scene ............................................................................................................................................... |
37 |
Marking desired scenes ............................................................................................................................................................. |
38 |
Repeat playback/A-B playback .................................................................................................................................................. |
39 |
Changing angles/Title selection/DVD menu .............................................................................................................................. |
40 |
Changing soundtrack language/Subtitles/Disc status ................................................................................................................ |
41 |
MP3/JPEG/DivX® and Audio CD operation .............................................................................................................................. |
42 |
Program playback/Random playback ........................................................................................................................................ |
48 |
Customizing the function settings .............................................................................................................................................. |
49 |
Temporary cancel the rating level by DVD disc ......................................................................................................................... |
55 |
PC connection ........................................................................................................................................................................... |
56 |
Connecting an HDMI or a DVI device to the HDMI input ........................................................................................................... |
57 |
Connecting TV to other equipment ............................................................................................................................................ |
58 |
Status message ......................................................................................................................................................................... |
60 |
Troubleshooting table ................................................................................................................................................................ |
61 |
Specifications ............................................................................................................................................................................ |
62 |
The GNU General Public License (GPL) ................................................................................................................................... |
63 |
3

Important safety information
This unit has been produced according to all current safety regulations. The following safety tips should safeguard users against careless use and the dangers connected with such use.
•Although this appliance has been carefully manufactured and rigorously checked prior to leaving the factory, as with all electrical appliances it is possible for problems to develop. If you notice smoke, an excessive build-up of heat or any other unexpected phenomena, you should disconnect the plug from the mains power socket immediately.
•Ensure that the unit is sufficiently ventilated! Never place next to or underneath curtains!
•This set should only be connected to an AC 110 ~ 240V/50Hz mains power supply - do not attempt to connect it to any other type of supply.
•The socket-outlet must be installed near the equipment and easily accessible.
•Any repairs must be carried out by qualified service personnel only.
•Do not open this unit. A non-expert attempting to repair the unit could be dangerous and potentially cause a fire hazard.
•Keep away from rodents. Rodents (and also cockatiels) enjoy biting into electric flexes.
•The animal can cause a short cut (fire hazard!) and receive a fatal electric shock.
•Always hold plug when pulling out plug from power mains supply system. Do not pull on flex. The flex can become overloaded and cause a short cut.
•Never wet clean. Only use a damp cloth, the same as when cleaning furniture.
•Set up unit so that no one is able to trip over the flex.
•This unit is recommended to be installed on shock-free benches in order to avoid any danger from falling.
•Take note that toddlers can pull the unit down from the table or cupboard by means of its flex. Children can hurt themselves when doing this.
•Do not use the unit near heat sources. The casing and flex could be damaged by the impact of heat.
•The screen is made of plastic and can break if damage is done to it. Be careful when collecting sharpedged plastic splitters.
•You could be hurt or the unit could be damaged.
•If the unit is mounted on the wall, contact the shop where you purchased the unit for advice, and leave the installation work to experts. Incomplete installation work can cause you injuries.
•When installing the set on a wall, allow at least 10 cm clearance between the rear of the set and the wall.
•Clearance of less than 10 cm will obstruct the vents and cause the interior of the set to overheat, resulting in faults or damage to the set.
•Taking fall-prevention measures
-If these measures are not taken, the unit can fall and you could be injured.
-Contact the shop where you purchased the unit to obtain full details of the measures.
•When a TV stand is used,
-Ensure the unit is fully on the stand and placed in the centre.
-Do not leave the stand doors open.
-You could be hurt as a result of the unit falling or breaking, or your fingers being caught or jammed. Take extra precautions if you have children.
•Avoid placing the unit on any surfaces that may be subject to vibrations or shocks.
•To protect the unit during a thunder storm unplug the AC power cord and disconnect the aerial. Caution: Do not touch the aerial connector.
•When you leave your home for a long period of time, unplug the AC power cord for safety reasons.
•The unit becomes warm when in operation. Do not place any covers or blankets on the unit in order to prevent overheating. The ventilation holes are not to be blocked. Do not set up near radiators. Do not place in direct sunshine. When placing on a shelf leave 10 cm free space around the whole unit.
•Make some space around TV (correct shelf assembly).
•The apparatus shall not be exposed to dripping or splashing and that no objects filled with liquids, such as vases, shall be placed on the apparatus.
•Liquids spilled into the unit can cause serious damage. Switch the set OFF and disconnect the mains power supply, then consult a qualified service person before attempting to use the unit again.
•Moisture condensation occurs, for example, when you pour a cold drink into a glass on a warm day. Drops of water form on the outside of the glass. In the same way, moisture may condense on the optical pick-up lens inside this unit, one of the most crucial internal parts of the unit.
•Moisture condensation occurs during the following cases.
-When you bring the unit directly from a cold place to a warm place.
-When you use the unit in a room where you just turned on the heater, or a place where the cold wind from the air conditioner directly hits the unit.
-In summer, when you use the unit in a hot and humid place just after you move the unit from an air conditioned room.
-When you use the unit in a humid place.
•Do not use the unit when moisture condensation may occur.
•If you use the unit in such a situation, it may damage discs and internal parts. Remove the disc, connect the mains lead of the unit to the mains power outlet, turn on the unit, and leave it for two or three hours. After two or three hours, the unit will have warmed up and evaporated any moisture. Keep the unit connected to the mains power outlet and moisture condensation will seldom occur.
•Never place hot objects of open flame sources, such as lighted candles or nightlights, on or close to the TV.
•High temperatures can melt plastic and lead to fires.
4

Important safety information (continued)
Where to install
Locate the television away from direct sunlight and strong lights, soft, indirect lighting is recommended for comfortable viewing. Use curtains or blinds to prevent direct sunlight falling on the screen.
Place on a sturdy platform, the mounting surface should be flat and steady. It should then be secured to the wall with a sturdy tie using the clip on the back of the stand, or secured to the platform using the fixing strap located underneath the table top stand, this will prevent it from falling over.
The LCD display panels are manufactured using an extremely high level of precision technology, however sometimes some parts of the screen may be missing picture elements or have luminous spots. This is not a sign of a malfunction.
Sturdy tie (as short as possible)
|
Clip |
Hooks |
|
Screw |
|
hole |
Screw |
Band |
|
Side View |
Top View |
Make sure the television is located in a position where it cannot be pushed or hit by objects, as pressure will break or damage the screen, and that small items cannot be inserted into slots or openings in the case.
Retractable pedestal stand and locating the LCD TV
Observe the following safety precautions:
(1) Ensure that unpacking and transfer of the unit is carried out by two or more people.
(2)Put the LCD TV on a large level area in a recumbent posture.
(3)Grab the pedestal stand and lift the display up. Confirm the pivot is locked.
(4)Place the TV on a sturdy, level surface that can support the weight of the TV.
(5) Be sure to secure the TV to a wall stud, pillar, surface, or other immovable structure. To secure the TV in this manner: (1) attach a clip to an immovable structure, then (2) pass a sturdy strap through the clip and attach each end to the hooks located at the back of the TV. Be sure to leave at least 10 cm between the TV and the wall or similar structure for ventilation.
To fold the pedestal stand
(1)Slide the lever on the back side of the pedestal stand to the left.
(2)Lay the display down.
Slide the lever to the left
Back side of the pedestal stand
Note: Do not operate the LCD TV when the pedestal stand is folded. The pedestal stand should not be folded at any time except for packing purposes.
Please take note
EXCLUSION CLAUSE
Toshiba shall under no circumstances be liable for loss and/or damage to the product caused by:
i)fire;
ii)earthquake;
iii)accidental damage;
iv)intentional misuse of the product;
v)use of the product in improper conditions;
vi)loss and/or damage caused to the product whilst in the possession of a third party;
vii)any damage or loss caused as a result of the owner’s failure and/or neglect to follow the instructions set out in the owner’s manual;
viii)any loss or damage caused directly as a result of misuse or malfunction of the product when used simultaneously with
associated equipment;
Furthermore, under no circumstances shall Toshiba be liable for any consequential loss and/or damage including but not limited to the following, loss of profit, interruption of business, the loss of recorded data whether caused during normal operation or misuse of the product.
If stationary images generated by text services, channel identification logos, computer displays, video games, on-screen menus, etc. are left on the television screen for any length of time they could become conspicuous, it is always advisable to reduce both the brightness and contrast settings.
5
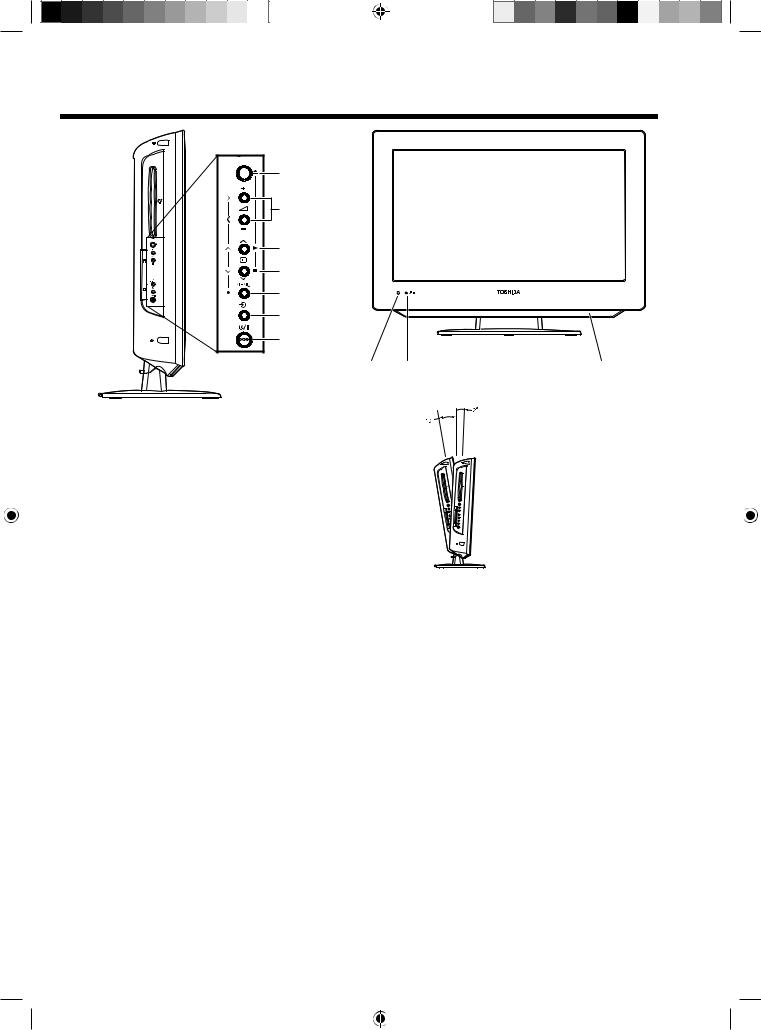
Location of controls
Disc slot 
C.I. slot 


4
5
6
7
8
9
10
1 |
2 |
3 |
Adjusting the screen angle
You can adjust the angle of the TV-screen for 2º forward or for 10º backward from vertical angle. Hold the base of the TV while adjusting the angle.
Applicable to the following models:
19DV665DB, 19DV667DB, 22DV665DB, 22DV667DB
Description of indicators and controls
1.Remote sensor
2. POWER indicator: The Power indicator lights up red in standby mode, orange in standby mode when the timer is activated, and green when TV is powered on.
3.Loudspeakers
4. EJECT button: Ejects a disc.
5. VOLUME + / - buttons: Adjust the volume level. In Menu: Setting.
6. PLAY button/
  CHANNEL
  button: Press
  to change to a higher numbered channel set into memory. In DVD mode: Playback. In Menu: Setting. In Standby mode: Turns the TV on.
7. STOP button/
  CHANNEL
  button: Press
  to change to a lower numbered channel set into memory. In DVD mode: Stop. In Menu: Setting. In Standby mode: Turns the TV on.
8.MENU button: Displays the Main Menu screen.
9. INPUT/ENTER button: Select video input source. In Menu: Use as an ENTER button to confirm selection.
10. TV button: Preparation: Connect the power cable to 230V/50Hz AC outlet.
a)If standby-LED is red, you may turn-off. To turn-off, press TV button 1x and release. For confirmation, standby-LED will turn off.
b)If standby-LED is off, you may turn-on. To turn-on, press TV button 1x and release. For confirmation, standby-LED will change to red and about 1 second later to green.
c)If the TV is currently working, press TV button 1x and release to turn-off. For confirmation, standby-LED will turn off.
In TV-off-condition, the unit cannot be power-on by pressing  on the remote control. In TV-off-condition, the TV’s power-consumption is approx. 1 Watt.
If total disconnection from the mains power is required, please unplug the mains lead.
6
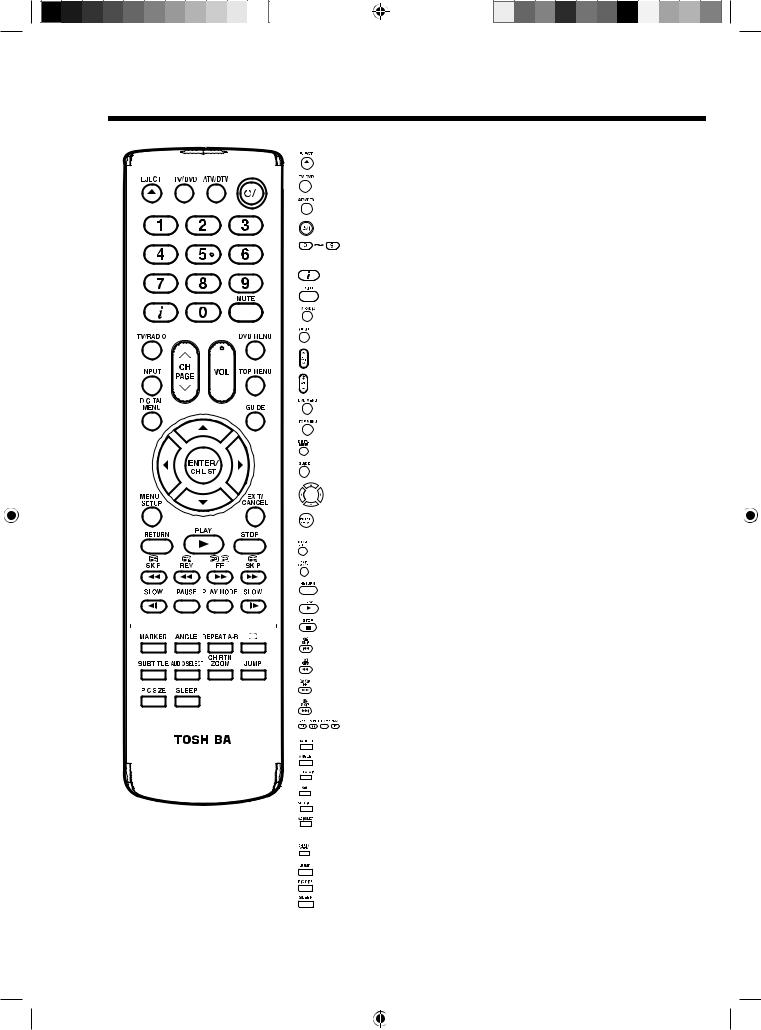
Remote control
|
|
|
|
|
|
|
|
|
|
|
|
|
|
|
|
|
|
|
|
|
|
|
|
|
Function |
Page |
|
|
|
|
|
|
|
|
|
|
|
|
|
|
|
|
|
|
|
|
|
|
|
|
|
|
|
|
|
|
|
|
|
|
|
|
|
|
|
|
|
|
|
|
|
|
|
|
|
|
|
|
Eject a disc |
35 |
|
|
|
|
|
|
|
|
|
|
|
|
|
|
|
|
|
|
|
|
|
|
|
|
|
|
|
|
|
|
|
|
|
|
|
|
|
|
|
|
|
|
|
|
|
|
|
|
|
|
|
|
|
|
|
|
|
|
|
|
|
|
|
|
|
|
|
|
|
|
|
|
|
|
|
|
|
|
|
Select to operate TV/DVD |
11, 34 |
|
|
|
|
|
|
|
|
|
|
|
|
|
|
|
|
|
|
|
|
|
|
|
|
|
|
|
|
|
|
|
|
|
|
|
|
|
|
|
|
|
|
|
|
|
|
|
|
|
|
|
|
|
|
|
|
|
|
|
|
|
|
|
|
|
|
|
|
|
|
|
|
|
|
|
|
|
|
|
Switches between the analogue TV and the digital TV |
11 |
|
|
|
|
|
|
|
|
|
|
|
|
|
|
|
|
|
|
|
|
|
|
|
|
|
|
|
|
|
|
|
|
|
|
|
|
|
|
|
|
|
|
|
|
|
|
|
|
|
|
|
|
Enter standby mode or turn on the power |
10 |
|
|
|
|
|
|
|
|
|
|
|
|
|
|
|
|
|
|
|
|
|
|
|
|
|
|
|
|
|
|
|
|
|
|
|
|
|
|
|
|
|
|
|
|
|
|
|
|
|
|
|
|
Select channel |
17 |
|
|
|
|
|
|
|
|
|
|
|
|
|
|
|
|
|
|
|
|
|
|
|
|
|
Select Teletext page |
19 |
|
|
|
|
|
|
|
|
|
|
|
|
|
|
|
|
|
|
|
|
|
|
|
|
|
Enter password |
25, 55 |
|
|
|
|
|
|
|
|
|
|
|
|
|
|
|
|
|
|
|
|
|
|
|
|
|
Display source information |
18, 32 |
|
|
|
|
|
|
|
|
|
|
|
|
|
|
|
|
|
|
|
|
|
|
|
|
|
|
|
|
|
|
|
|
|
|
|
|
|
|
|
|
|
|
|
|
|
|
|
|
|
|
|
|
Turn the sound on/off |
17 |
|
|
|
|
|
|
|
|
|
|
|
|
|
|
|
|
|
|
|
|
|
|
|
|
|
|
|
|
|
|
|
|
|
|
|
|
|
|
|
|
|
|
|
|
|
|
|
|
|
|
|
|
Toggle between TV, Radio, and Data mode |
17 |
|
|
|
|
|
|
|
|
|
|
|
|
|
|
|
|
|
|
|
|
|
|
|
|
|
|
|
|
|
|
|
|
|
|
|
|
|
|
|
|
|
|
|
|
|
|
|
|
|
|
|
|
Select an input source |
13 |
|
|
|
|
|
|
|
|
|
|
|
|
|
|
|
|
|
|
|
|
|
|
|
|
|
|
|
|
|
|
|
|
|
|
|
|
|
|
|
|
|
|
|
|
|
|
|
|
|
|
|
|
|
|
|
|
|
|
|
|
|
|
|
|
|
|
|
|
|
|
|
|
|
|
|
|
|
|
|
Change the TV channel or Teletext page up or down |
17, 19 |
|
|
|
|
|
|
|
|
|
|
|
|
|
|
|
|
|
|
|
|
|
|
|
|
|
In Standby: Turn on the power |
11 |
|
|
|
|
|
|
|
|
|
|
|
|
|
|
|
|
|
|
|
|
|
|
|
|
|
|
|
|
|
|
|
|
|
|
|
|
|
|
|
|
|
|
|
|
|
|
|
|
|
|
|
|
Volume |
17 |
|
|
|
|
|
|
|
|
|
|
|
|
|
|
|
|
|
|
|
|
|
|
|
|
|
|
|
|
|
|
|
|
|
|
|
|
|
|
|
|
|
|
|
|
|
|
|
|
|
|
|
|
|
|
|
|
|
|
|
|
|
|
|
|
|
|
|
|
|
|
|
|
|
|
|
|
|
|
|
Select menu of a DVD disc |
40 |
|
|
|
|
|
|
|
|
|
|
|
|
|
|
|
|
|
|
|
|
|
|
|
|
|
||
|
|
|
|
|
|
|
|
|
|
|
|
|
|
|
|
|
|
|
|
|
|
|
|
|
|
|
|
|
|
|
|
|
|
|
|
|
|
|
|
|
|
|
|
|
|
|
|
|
|
|
|
|
|
|
|
|
|
|
|
|
|
|
|
|
|
|
|
|
|
|
|
|
|
|
|
|
|
|
|
|
|
|
|
|
|
|
|
|
|
|
|
|
|
|
|
|
|
|
|
|
|
|
|
|
|
Select title of a DVD disc |
40 |
|
|
|
|
|
|
|
|
|
|
|
|
|
|
|
|
|
|
|
|
|
|
|
|
|
|
|
|
|
|
|
|
|
|
|
|
|
|
|
|
|
|
|
|
|
|
|
|
|
|
|
|
Activate the Digital Main Menu |
11 |
|
|
|
|
|
|
|
|
|
|
|
|
|
|
|
|
|
|
|
|
|
|
|
|
|
|
|
|
|
|
|
|
|
|
|
|
|
|
|
|
|
|
|
|
|
|
|
|
|
|
|
|
Display the EPG (Electronic Program Guide) |
31 |
|
|
|
|
|
|
|
|
|
|
|
|
|
|
|
|
|
|
|
|
|
|
|
|
|
|
|
|
|
|
|
|
|
|
|
|
|
|
|
|
|
|
|
|
|
|
|
|
|
|
|
|
|
|
|
|
|
|
|
|
|
|
|
|
|
|
|
|
|
|
|
|
|
|
|
|
|
|
|
Cursor buttons |
10 |
|
|
|
|
|
|
|
|
|
|
|
|
|
|
|
|
|
|
|
|
|
|
|
|
|
|
|
|
|
|
|
|
|
|
|
|
|
|
|
|
|
|
|
|
|
|
|
|
|
|
|
|
|
|
|
|
|
|
|
|
|
|
|
|
|
|
|
|
|
|
|
|
|
|
|
|
|
|
|
|
|
|
|
|
|
|
|
|
|
|
|
|
|
|
|
|
|
|
|
|
|
|
|
|
|
|
Memorize |
10 |
|
|
|
|
|
|
|
|
|
|
|
|
|
|
|
|
|
|
|
|
|
|
|
|
|
Teletext page 100 |
19 |
|
|
|
|
|
|
|
|
|
|
|
|
|
|
|
|
|
|
|
|
|
|
|
|
|
CH LIST |
17 |
|
|
|
|
|
|
|
|
|
|
|
|
|
|
|
|
|
|
|
|
|
|
|
|
|
Call the DVD Setup menu |
49 |
|
|
|
|
|
|
|
|
|
|
|
|
|
|
|
|
|
|
|
|
|
|
|
|
|
Activate the Analogue Main Menu |
11 |
|
|
|
|
|
|
|
|
|
|
|
|
|
|
|
|
|
|
|
|
|
|
|
|
|
||
|
|
|
|
|
|
|
|
|
|
|
|
|
|
|
|
|
|
|
|
|
|
|
|
|
Exit the Analogue or Digital Main Menu screen |
10 |
|
|
|
|
|
|
|
|
|
|
|
|
|
|
|
|
|
|
|
|
|
|
|
|
|
Cancel marking |
38 |
|
|
|
|
|
|
|
|
|
|
|
|
|
|
|
|
|
|
|
|
|
|
|
|
|
Exit the DVD Setup Menu screen |
49 |
|
|
|
|
|
|
|
|
|
|
|
|
|
|
|
|
|
|
|
|
|
|
|
|
|
|
|
|
|
|
|
|
|
|
|
|
|
|
|
|
|
|
|
|
|
|
|
|
|
|
|
|
Play |
34 |
|
|
|
|
|
|
|
|
|
|
|
|
|
|
|
|
|
|
|
|
|
|
|
|
|
||
|
|
|
|
|
|
|
|
|
|
|
|
|
|
|
|
|
|
|
|
|
|
|
|
|
|
|
|
|
|
|
|
|
|
|
|
|
|
|
|
|
|
|
|
|
|
|
|
|
|
|
|
Stop |
34 |
|
|
|
|
|
|
|
|
|
|
|
|
|
|
|
|
|
|
|
|
|
|
|
|
|
|
|
|
|
|
|
|
|
|
|
|
|
|
|
|
|
|
|
|
|
|
|
|
|
|
|
|
|
|
|
|
|
|
|
|
|
|
|
|
|
|
|
|
|
|
|
|
|
|
|
|
|
|
|
Hold the text page |
19 |
|
|
|
|
|
|
|
|
|
|
|
|
|
|
|
|
|
|
|
|
|
|
|
|
|
||
|
|
|
|
|
|
|
|
|
|
|
|
|
|
|
|
|
|
|
|
|
|
|
|
|
Skip chapter to reverse direction |
36 |
|
|
|
|
|
|
|
|
|
|
|
|
|
|
|
|
|
|
|
|
|
|
|
|
|
|
|
|
|
|
|
|
|
|
|
|
|
|
|
|
|
|
|
|
|
|
|
|
|
|
|
|
Reveal quiz page answers |
19 |
|
|
|
|
|
|
|
|
|
|
|
|
|
|
|
|
|
|
|
|
|
|
|
|
|
Review playback |
36 |
|
|
|
|
|
|
|
|
|
|
|
|
|
|
|
|
|
|
|
|
|
|
|
|
|
||
|
|
|
|
|
|
|
|
|
|
|
|
|
|
|
|
|
|
|
|
|
|
|
|
|
|
|
|
|
|
|
|
|
|
|
|
|
|
|
|
|
|
|
|
|
|
|
|
|
|
|
|
Subpage selection |
19 |
|
|
|
|
|
|
|
|
|
|
|
|
|
|
|
|
|
|
|
|
|
|
|
|
|
Forward playback |
36 |
|
|
|
|
|
|
|
|
|
|
|
|
|
|
|
|
|
|
|
|
|
|
|
|
|
||
|
|
|
|
|
|
|
|
|
|
|
|
|
|
|
|
|
|
|
|
|
|
|
|
|
|
|
|
|
|
|
|
|
|
|
|
|
|
|
|
|
|
|
|
|
|
|
|
|
|
|
|
Teletext enlargement |
19 |
|
|
|
|
|
|
|
|
|
|
|
|
|
|
|
|
|
|
|
|
|
|
|
|
|
Skip chapter to forward direction |
36 |
|
|
|
|
|
|
|
|
|
|
|
|
|
|
|
|
|
|
|
|
|
|
|
|
|
Fastext/TOPtext buttons |
19 |
|
|
|
|
|
|
|
|
|
|
|
|
|
|
|
|
|
|
|
|
|
|
|
|
|
DVD control buttons |
36, 39 |
|
|
|
|
|
|
|
|
|
|
|
|
|
|
|
|
|
|
|
|
|
|
|
|
|
Marking desired scenes |
38 |
|
|
|
|
|
|
|
|
|
|
|
|
|
|
|
|
|
|
|
|
|
|
|
|
|
||
|
|
|
|
|
|
|
|
|
|
|
|
|
|
|
|
|
|
|
|
|
|
|
|
|
|
|
|
|
|
|
|
|
|
|
|
|
|
|
|
|
|
|
|
|
|
|
|
|
|
|
|
Change playback angle of a DVD disc |
40 |
|
|
|
|
|
|
|
|
|
|
|
|
|
|
|
|
|
|
|
|
|
|
|
|
|
|
|
|
|
|
|
|
|
|
|
|
|
|
|
|
|
|
|
|
|
|
|
|
|
|
|
|
Repeat playback between A and B (DVD/CD) |
39 |
|
|
|
|
|
|
|
|
|
|
|
|
|
|
|
|
|
|
|
|
|
|
|
|
|
|
|
|
|
|
|
|
|
|
|
|
|
|
|
|
|
|
|
|
|
|
|
|
|
|
|
|
Teletext on/off |
19 |
|
|
|
|
|
|
|
|
|
|
|
|
|
|
|
|
|
|
|
|
|
|
|
|
|
|
|
|
|
|
|
|
|
|
|
|
|
|
|
|
|
|
|
|
|
|
|
|
|
|
|
|
Display the subtitle |
30, 41 |
|
|
|
|
|
|
|
|
|
|
|
|
|
|
|
|
|
|
|
|
|
|
|
|
|
|
|
|
|
|
|
|
|
|
|
|
|
|
|
|
|
|
|
|
|
|
|
|
|
|
|
|
Select between the available broadcast audio |
20 |
|
|
|
|
|
|
|
|
|
|
|
|
|
|
|
|
|
|
|
|
|
|
|
|
|
Display the multi audio menu |
29 |
|
|
|
|
|
|
|
|
|
|
|
|
|
|
|
|
|
|
|
|
|
|
|
|
|
Change sound track language of DVD |
41 |
|
|
|
|
|
|
|
|
|
|
|
|
|
|
|
|
|
|
|
|
|
|
|
|
|
Switches between the present channel and the last selected channel |
17 |
|
|
|
|
|
|
|
|
|
|
|
|
|
|
|
|
|
|
|
|
|
|
|
|
|
Zoom (for DVD playback) |
37 |
|
|
|
|
|
|
|
|
|
|
|
|
|
|
|
|
|
|
|
|
|
|
|
|
|
Locating desired scene |
37 |
|
|
|
|
|
|
|
|
|
|
|
|
|
|
|
|
|
|
|
|
|
|
|
|
|
|
|
|
|
|
|
|
|
|
|
|
|
|
|
|
|
|
|
|
|
|
|
|
|
|
|
|
Select picture format |
21 |
|
|
|
|
|
|
|
|
|
|
|
|
|
|
|
|
|
|
|
|
|
|
|
|
|
|
|
|
|
|
|
|
|
|
|
|
|
|
|
|
|
|
|
|
|
|
|
|
|
|
|
|
Sleep Timer |
18 |
|
|
|
|
|
|
|
|
|
|
|
|
|
|
|
|
|
|
|
|
|
|
|
|
|
|
|
7
Remote control (continued)
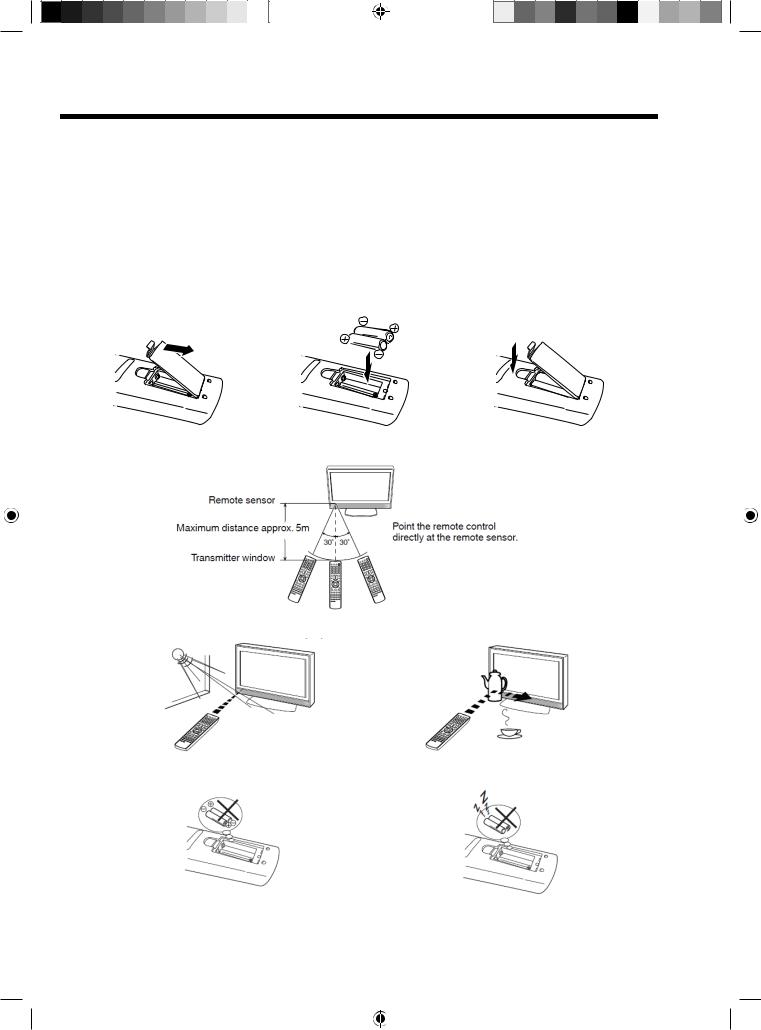
Install the batteries
Use batteries type UM4/R03 (AAA-Size).
Notes:
•Exhausted batteries can leak corrosive electrolyte, which may cause damage to the remote control - therefore remove exhausted batteries immediately.
•Do not use old or weak batteries. The remote control may not work properly with a weak voltage from such batteries. Replace exhausted batteries with new ones. Never try to recharge normal batteries - this could cause an explosion.
•Dispose of batteries in a designated disposal area.
Warnings:
•Never throw batteries into a fire.
•Never expose batteries to excessive heat such as sunshine, fire or the like.
1 Open the battery compartment cover in the direction of the arrow.
2 Install the batteries as shown |
3 Close the battery compartment. |
below, ensuring the correct polarity. |
|
Distance of remote control operation
The remote control handset will not work properly in the following cases:
If bright sunlight directly beams onto the unit front.
If an obstacle is placed between the unit and the handset.
If the batteries have not been installed according to their polarities.
If the batteries are weak.
8

Aerial connection
Note:
Before you connect other appliances:
•To avoid potentially damaging your set, make sure all items are switched off and disconnected from the mains power when you make the connections.
•Arrange the desired connection.
•When you have finished making the connections, reconnect the mains power to the unit and switch it back on.
Connect your aerial as shown below. Connections to other equipment is explained further on pages 56 ~ 59. If you have problems with reception, consult a TV antenna installer.
|
|
|
|
|
|
|
|
|
|
|
|
Illustration of 26DV665DB |
|
|
|
|
|
|
|
|
|
|
|
|
|
|
Illustration of 19DV665DB/19DV667DB/ |
|
|
||||||||||||||||||||||||||||||||||||||||||||||||||||||||||||||
|
|
|
|
|
|
|
|
|
|
|
|
|
|
|
|
|
|
|
|
|
|
|
|
|
|
|
|
|
|
|
|
|
22DV665DB/22DV667DB |
|
|
||||||||||||||||||||||||||||||||||||||||||||||||||||||||
|
|
|
|
|
|
|
|
|
|
|
|
|
|
|
|
|
|
|
|
|
|
|
|
|
|
|
|
|
|
|
|
|
|
|
|
|
|
|
|
|
|
|
|
|
|
|
|
|
|
|
|
|
|
|
|
|
|
|
|
|
|
|
|
|
|
|
|
|
|
|
|
|
|
|
|
|
|
|
|
|
|
|
|
|
|
|
|
|
|
|
|
|
|
|
|
|
|
|
|
|
|
|
|
|
|
|
|
|
|
|
|
|
|
|
|
|
|
|
|
|
|
|
|
|
|
|
|
|
|
|
|
|
|
|
|
|
|
|
|
|
|
|
|
|
|
|
|
|
|
|
|
|
|
|
|
|
|
|
|
|
|
|
|
|
|
|
|
|
|
|
|
|
|
|
|
|
|
|
|
|
|
|
|
|
|
|
|
|
|
|
|
|
|
|
|
|
|
|
|
|
|
|
|
|
|
|
|
|
|
|
|
|
|
|
|
|
|
|
|
|
|
|
|
|
|
|
|
|
|
|
|
|
|
|
|
|
|
|
|
|
|
|
|
|
|
|
|
|
|
|
|
|
|
|
|
|
|
|
|
|
|
|
|
|
|
|
|
|
|
|
|
|
|
|
|
|
|
|
|
|
|
|
|
|
|
|
|
|
|
|
|
|
|
|
|
|
|
|
|
|
|
|
|
|
|
|
|
|
|
|
|
|
|
|
|
|
|
|
|
|
|
|
|
|
|
|
|
|
|
|
|
|
|
|
|
|
|
|
|
|
|
|
|
|
|
|
|
|
|
|
|
|
|
|
|
|
|
|
|
|
|
|
|
|
|
|
|
|
|
|
|
|
|
|
|
|
|
|
|
|
|
|
|
|
|
|
|
|
|
|
|
|
|
|
|
|
|
|
|
|
|
|
|
|
|
|
|
|
|
|
|
|
|
|
|
|
|
|
|
|
|
|
|
|
|
|
|
|
|
|
|
|
|
|
|
|
|
|
|
|
|
|
|
|
|
|
|
|
|
|
|
|
|
|
|
|
|
|
|
|
|
|
|
|
|
|
|
|
|
|
|
|
|
|
|
|
|
|
|
|
|
|
|
|
|
|
|
|
|
|
|
|
|
|
|
|
|
|
|
|
|
|
|
|
|
|
|
|
|
|
|
|
|
|
|
|
|
|
|
|
|
|
|
|
|
|
|
|
|
|
|
|
|
|
|
|
|
|
|
|
|
|
|
|
|
|
|
|
|
|
|
|
|
|
|
|
|
|
|
|
|
|
|
|
|
|
|
|
|
|
|
|
|
|
|
|
|
|
|
|
|
|
|
|
|
|
|
|
|
|
|
|
|
|
|
|
|
|
|
|
|
|
|
|
|
|
|
|
|
|
|
|
|
|
|
|
|
|
|
|
|
|
|
|
|
|
|
|
|
|
|
|
|
|
|
|
|
|
|
|
|
|
|
|
|
|
|
|
|
|
|
|
|
|
|
|
|
|
|
|
|
|
|
|
|
|
|
|
|
|
|
|
|
|
|
|
|
|
|
|
|
|
|
|
|
|
|
|
|
|
|
|
|
|
|
|
|
|
|
|
|
|
|
|
|
|
|
|
|
|
|
|
|
|
|
|
|
|
|
|
|
|
|
|
|
|
|
|
|
|
|
|
|
|
|
|
|
|
|
|
|
|
|
|
|
|
|
|
|
|
|
|
|
|
|
|
|
|
|
|
|
|
|
|
|
|
|
|
|
|
|
|
|
|
|
|
|
|
|
|
|
|
|
|
|
|
|
|
|
|
|
|
|
|
|
|
|
|
|
|
|
|
|
|
|
|
|
|
|
|
|
|
|
|
|
|
|
|
|
|
|
|
|
|
|
|
|
|
|
|
|
|
|
|
|
|
|
|
|
|
|
|
|
|
|
|
|
|
|
|
|
|
|
|
|
|
|
|
|
|
|
|
|
|
|
|
|
|
|
|
|
|
|
|
|
|
|
|
|
|
|
|
|
|
|
|
|
|
|
|
|
|
|
|
|
|
|
|
|
|
|
|
|
|
|
|
|
|
|
|
|
|
|
|
|
|
|
|
|
|
|
|
|
|
|
|
|
|
|
|
|
|
|
|
|
|
|
|
|
|
|
|
|
|
|
|
|
|
|
|
|
|
|
|
|
|
|
|
|
|
|
|
|
|
|
|
|
|
|
|
|
|
|
|
|
|
|
|
|
|
|
|
|
|
|
|
|
|
|
|
|
|
|
|
|
|
|
|
|
|
|
|
|
|
|
|
|
|
|
|
|
|
|
|
|
|
|
|
|
|
|
|
|
|
|
|
|
|
|
|
|
|
|
|
|
|
|
|
|
|
|
|
|
|
|
|
|
|
|
|
|
|
|
|
|
|
|
|
|
|
|
|
|
|
|
|
|
|
|
|
|
|
|
|
|
|
|
|
|
|
|
|
|
|
|
|
|
|
|
|
|
|
|
|
|
|
|
|
|
|
|
|
|
|
|
|
|
|
|
|
|
|
|
|
|
|
|
|
|
|
|
|
|
|
|
|
|
|
|
|
|
|
|
|
|
|
|
|
|
|
|
|
|
|
|
|
|
|
|
|
|
|
|
|
|
|
|
|
|
|
|
|
|
|
|
|
|
|
|
|
|
|
|
|
|
|
|
|
|
|
|
|
|
|
|
|
|
|
|
|
|
|
|
|
|
|
|
|
|
|
|
|
|
|
|
|
|
|
|
|
|
|
|
|
|
|
|
|
|
|
|
|
|
|
|
|
|
|
|
|
|
|
|
|
|
|
|
|
|
|
|
|
|
|
|
|
|
|
|
|
|
|
|
|
|
|
|
|
|
|
|
|
|
|
|
|
|
|
|
|
|
|
|
|
|
|
|
|
|
|
|
|
|
|
|
|
|
|
|
|
|
|
|
|
|
|
|
|
|
|
|
|
|
|
|
|
|
|
|
|
|
|
|
|
|
|
|
|
|
|
|
|
|
|
|
|
|
|
|
|
|
|
|
|
|
|
|
|
|
|
|
|
|
|
|
|
|
|
|
|
|
|
|
|
|
|
|
|
|
|
|
|
|
|
|
|
|
|
|
|
|
|
|
|
|
|
|
|
|
|
|
|
|
|
|
|
|
|
|
|
|
|
|
|
|
|
|
|
|
|
|
|
|
|
|
|
|
|
|
|
|
|
|
|
|
|
|
|
|
|
|
|
|
|
|
|
|
|
|
|
|
|
|
|
|
|
|
|
|
|
|
|
|
|
|
|
|
|
|
|
|
|
|
|
|
|
|
|
|
|
|
|
|
|
|
|
|
|
|
|
|
|
|
|
|
|
|
|
|
|
|
|
|
|
|
|
|
|
|
|
|
|
|
|
|
|
|
|
|
|
|
|
|
|
|
|
|
|
|
|
|
|
|
|
|
|
|
|
|
|
|
|
|
|
|
|
|
|
|
|
|
|
|
|
|
|
|
|
|
|
|
|
|
|
|
|
|
|
|
|
|
|
|
|
|
|
|
|
|
|
|
|
|
|
|
|
|
|
|
|
|
|
|
|
|
|
|
|
|
|
|
|
|
|
|
|
|
|
|
|
|
|
|
|
|
|
|
|
|
|
|
|
|
|
|
|
|
|
|
|
|
|
|
|
|
|
|
|
|
|
|
|
|
|
|
|
|
|
|
|
|
|
|
|
|
|
|
|
|
|
|
|
|
|
|
|
|
|
|
|
|
|
|
|
|
|
|
|
|
|
|
|
|
|
|
|
|
|
|
|
|
|
|
|
|
|
|
|
|
|
|
|
|
|
|
|
|
|
|
|
|
|
|
|
|
|
|
|
|
|
|
|
|
|
|
|
|
|
|
|
|
|
|
|
|
|
|
|
|
|
|
|
|
|
|
|
|
|
|
|
|
|
|
|
|
|
|
|
|
|
|
|
|
|
|
|
|
|
|
|
|
|
|
|
|
|
|
|
|
|
|
|
|
|
|
|
|
|
|
|
|
|
|
|
|
|
|
|
|
|
|
|
|
|
|
|
|
|
|
|
|
|
|
|
|
|
|
|
|
|
|
|
|
|
|
|
|
|
|
|
|
|
|
|
|
|
|
|
|
|
|
|
|
|
|
|
|
|
|
|
|
|
|
|
|
|
|
|
|
|
|
|
|
|
|
|
|
|
|
|
|
|
|
|
|
|
|
|
|
|
|
|
|
|
|
|
|
|
|
|
|
|
|
|
|
|
|
|
|
|
|
|
|
|
|
|
|
|
|
|
|
|
|
|
|
|
|
|
|
|
|
|
|
|
|
|
|
|
|
|
|
|
|
|
|
|
|
|
|
|
|
|
|
|
|
|
|
|
|
|
|
|
|
|
|
|
|
|
|
|
|
|
|
|
|
|
|
|
|
|
|
|
|
|
|
|
|
|
|
|
|
|
|
|
|
|
|
|
|
|
|
|
|
|
|
|
|
|
|
|
|
|
|
|
|
|
|
|
|
|
|
|
|
|
|
|
|
|
|
|
|
|
|
|
|
|
|
|
|
|
|
|
|
|
|
|
|
|
|
|
|
|
|
|
|
|
|
|
|
|
|
|
|
|
|
|
|
|
|
|
|
|
|
|
|
|
|
|
|
|
|
|
|
|
|
|
|
|
|
|
|
|
|
|
|
|
|
|
|
|
|
|
|
|
|
|
|
|
|
|
|
|
|
|
|
|
|
|
|
|
|
|
|
|
|
|
|
|
|
|
|
|
|
|
|
|
|
|
|
|
|
|
|
|
|
|
|
|
|
|
|
|
|
|
|
|
|
|
|
|
|
|
|
|
|
|
|
|
|
|
|
|
|
|
|
|
|
|
|
|
|
|
|
|
|
|
|
|
|
|
|
|
|
|
|
|
|
|
|
|
|
|
|
|
|
|
|
|
|
|
|
|
|
|
|
|
|
|
|
|
|
|
|
|
|
|
|
|
|
|
|
|
|
|
|
|
|
|
|
|
|
|
|
|
|
|
|
|
|
|
|
|
|
|
|
|
|
|
|
|
|
|
|
|
|
|
|
|
|
|
|
|
|
|
|
|
|
|
|
|
|
|
|
|
|
|
|
|
|
|
|
|
|
|
|
|
|
|
|
|
|
|
|
|
|
|
|
|
|
|
|
|
|
|
|
|
|
|
|
|
|
|
|
|
|
|
|
|
|
|
|
|
|
|
|
|
|
|
|
|
|
|
|
|
|
|
|
|
|
|
|
|
|
|
|
|
|
|
|
|
|
|
|
|
|
|
|
|
|
|
|
|
|
|
|
|
|
|
|
|
|
|
|
|
|
|
|
|
|
|
|
|
|
|
|
|
|
|
|
|
|
|
|
|
|
|
|
|
|
|
|
|
|
|
|
|
|
|
|
|
|
|
|
|
|
|
|
|
|
|
|
|
|
|
|
|
|
|
|
|
|
|
|
|
|
|
|
|
|
|
|
|
|
|
|
|
|
|
|
|
|
|
|
|
|
|
|
|
|
|
|
|
|
|
|
|
|
|
|
|
|
|
|
|
|
|
|
|
|
|
|
|
|
|
|
|
|
|
|
|
|
|
|
|
|
|
|
|
|
|
|
|
|
|
|
|
|
|
|
|
|
|
|
|
|
|
|
|
|
|
|
|
|
|
|
|
|
|
|
|
|
|
|
|
|
|
|
|
|
|
|
|
|
|
|
|
|
|
|
|
|
|
|
|
|
|
|
|
|
|
|
|
|
|
|
|
|
|
|
|
|
|
|
|
|
|
|
|
|
|
|
|
|
|
|
|
|
|
|
|
|
|
|
|
|
|
|
|
|
|
|
|
|
|
|
|
|
|
|
|
|
|
|
|
|
|
|
|
|
|
|
|
|
|
|
|
|
|
|
|
|
|
|
|
|
|
|
|
|
|
|
|
|
|
|
|
|
|
|
|
|
|
|
|
|
|
|
|
|
|
|
|
|
|
|
|
|
|
|
|
|
|
|
|
|
|
|
|
|
|
|
|
|
|
|
|
|
|
|
|
|
|
|
|
|
|
|
|
|
|
|
|
|
|
|
|
|
|
|
|
|
|
|
|
|
|
|
|
|
|
|
|
|
|
|
|
|
|
|
|
|
|
|
|
|
|
|
|
|
|
|
|
|
|
|
|
|
|
|
|
|
|
|
|
|
|
|
|
|
|
|
|
|
|
|
|
|
|
|
|
|
|
|
|
|
|
|
|
|
|
|
|
|
|
|
|
|
|
|
|
|
|
|
|
|
|
|
|
|
|
|
|
|
|
|
|
|
|
|
|
|
|
|
|
|
|
|
|
|
|
|
|
|
|
|
|
|
|
|
|
|
|
|
|
|
|
|
|
|
|
|
|
|
|
|
|
|
|
|
|
|
|
|
|
|
|
|
|
|
|
|
|
|
|
|
|
|
|
|
|
|
|
|
|
|
|
|
|
|
|
|
|
|
|
|
|
|
|
|
|
|
|
|
|
|
|
|
|
|
|
|
|
|
|
|
|
|
|
|
|
|
|
|
|
|
|
|
|
|
|
|
|
|
|
|
|
|
|
|
|
|
|
|
|
|
|
|
|
|
|
|
|
|
|
|
|
|
|
|
|
|
|
|
|
|
|
|
|
|
|
|
|
|
|
|
|
|
|
|
|
|
|
|
|
|
|
|
|
|
|
|
|
|
|
|
|
|
|
|
|
|
|
|
|
|
|
|
|
|
|
|
|
|
|
|
|
|
|
|
|
|
|
|
|
|
|
|
|
|
|
|
|
|
|
|
|
|
|
|
|
|
|
|
|
|
|
|
|
|
|
|
|
|
|
|
|
|
|
|
|
|
|
|
|
|
|
|
|
|
|
|
|
|
|
|
|
|
|
|
|
|
|
|
|
|
|
|
|
|
|
|
|
|
|
|
|
|
|
|
|
|
|
|
|
|
|
|
|
|
|
|
|
|
|
|
|
|
|
|
|
|
|
|
|
|
|
|
|
|
|
|
|
|
|
|
|
|
|
|
|
|
|
|
|
|
|
|
|
|
|
|
|
|
|
|
|
|
|
|
|
|
|
|
|
|
|
|
|
|
|
|
|
|
|
|
|
|
|
|
|
|
|
|
|
|
|
|
|
|
|
|
|
|
|
|
|
|
|
|
|
|
|
|
|
|
|
|
|
|
|
|
|
|
|
|
|
|
|
|
|
|
|
|
|
|
|
|
|
|
|
|
|
|
|
|
|
|
|
|
|
|
|
|
|
|
|
|
|
|
|
|
|
|
|
|
|
|
|
|
|
|
|
|
|
|
|
|
|
|
|
|
|
|
|
|
|
|
|
|
|
|
|
|
|
|
|
|
|
|
|
|
|
|
|
|
|
|
|
|
|
|
|
|
|
|
|
|
|
|
|
|
|
|
|
|
|
|
|
|
|
|
|
|
|
|
|
|
|
|
|
|
|
|
|
|
|
|
|
|
|
|
|
|
|
|
|
|
|
|
|
|
|
|
|
|
|
|
|
|
|
|
|
|
|
|
|
|
|
|
|
|
|
|
|
|
|
|
|
|
|
|
|
|
|
|
|
|
|
|
|
|
|
|
|
|
|
|
|
|
|
|
|
|
|
|
|
|
|
|
|
|
|
|
|
|
|
|
|
|
|
|
|
|
|
|
|
|
|
|
|
|
|
|
|
|
|
|
|
|
|
|
|
|
|
|
|
|
|
|
|
|
|
|
|
|
|
|
|
|
|
|
|
|
|
|
|
|
|
|
|
|
|
|
|
|
|
|
|
|
|
|
|
|
|
|
|
|
|
|
|
|
|
|
|
|
|
|
|
|
|
|
|
|
|
|
|
|
|
|
|
|
|
|
|
|
|
|
|
|
|
|
|
|
|
|
(A)AC input: Connect the supplied power cable to an AC 110 ~ 240V/50Hz mains power supply only - do not attempt to connect it to any other type of supply. Never try to repair a damaged AC power cord with isolation-tape - this should be repaired by a specialist or replaced. Do not let your pet loose near the cable. Animals biting into the cable could receive a fatal electric shock, and could cause a hazard to others.
(B)COAXIAL DIGITAL AUDIO output: Digital output for CD/DVD & DVB-T (see page 58).
(C)HDMI input (19/22 inch): See page 56 ~ 57. HDMI1/HDMI2 input (26 inch): See page 56 ~ 57
(D)PC MONITOR input (PC): See page 56.
(E)PC/HDMI AUDIO input: See page 56 ~ 57.
(F)HEADPHONE jack: Plug headphones with a mini plug (3.5 mm) into this jack.
(G)AV2 (S-VIDEO, VIDEO, Audio L/R) input (19/22 inch): Input for analogue A/V-Signal (Composite/S-Video). See page 59.
AV3 (VIDEO, Audio L/R) input (26 inch): See page 58, 59.
(H)COMPONENT input: See page 59.
(I)AV1 (SCART) socket (19/22 inch): For the connection of SCART cable. See pages 58.
AV1/AV2 (SCART) socket (26 inch): See pages 58 ~ 59
(J)Aerial input socket: Connect the outdoor aerial to the aerial input socket (see page 58).
(K)C.I. slot: The Common Interface allows you to insert CAM (Conditional Access Module) and a suitable Smart Card to give you access to additional Pay-TV services. (See page 28) Before inserting the module, make sure to turn off the main power and then insert the module all the way into the slot until it is flushed with the side panel buttons.
(L)Bracket holes: Fix a wall mounting bracket (not supplied) here.
9

Auto setup
Your unit has an Automatic installation routine which makes installation in your unit easy. When you turn on the unit for the first time, the Automatic installation routine is activated. Using this routine, you can select the on-screen language, and automatically search for and store all the receivable analogue and digital (DVB) channels. The Automatic station presetting feature is for the set’s built-in tuner only. If you have a device such as a digital decoder (e.g.,
Satellite or Digital Terrestrial) connected (see page 58), you would need to tune it in separately according to its own instructions.
Note:
•To cancel the Auto Tuning, press EXIT/ CANCEL during the process.
The Automatic tuning process is only available the first time you turn on the TV/DVD. However you can restart this process using the Main Menu (see page 14).
Preparation:
1 |
Press |
|
on the unit. |
|
|
The Auto Installation menu will appear. |
|||
2 |
Press |
/ |
to select “Menu Language”, then |
|
|
press ENTER/CH LIST |
. |
||
|
Press |
/ |
to select desired language. |
|
3 Press |
/ |
to select “Country”, then press |
|
ENTER/CH LIST |
. |
||
Press |
/ |
to select your country. |
|
4 |
Press / to select “Auto Tuning”, then press ENTER/CH LIST |
. |
|
5 |
Press ENTER/CH LIST |
again. |
|
|
A message prompt appears with option to connect |
|
|
aerial to TV.
6 |
Press ENTER/CH LIST |
to start auto tuning. |
|
|
The system begins to search programmes. |
|
|
|
Your TV will now scan or auto-tune for all available |
|
|
|
channels. |
|
|
|
Your TV will tune analogue channels first, then tune |
|
|
|
the digital channels. |
|
|
|
Note: |
|
|
|
• Please be patient - the Auto Tuning process |
|
|
|
can take several minutes to complete. |
|
|
|
Once the auto channel search is completed the |
(Analogue) |
|
|
programme on the screen stops changing and the |
|
|
|
sound comes on, the search process is complete. |
|
|
(Digital)
10
Quick guide for menu operation
Make sure the aerial connection and power supply are connected as per the description on page 9.
Preparations:
•Turn on the unit with the
 button on the unit.
|
The |
|
|
power indicator |
||||||||||
|
will light up in green. |
|||||||||||||
|
To change the unit to |
|||||||||||||
|
standby mode, press |
|||||||||||||
|
on the remote control. |
|||||||||||||
|
Power indicator will |
|
|
|||||||||||
|
change from green to red. |
|||||||||||||
|
To turn on the unit from |
|||||||||||||
|
standby mode, press |
|||||||||||||
|
on the remote control |
|||||||||||||
|
again. |
|
|
|
|
|
|
|
|
|
||||
|
In standby mode, you can |
|||||||||||||
|
also turn the unit on with |
|||||||||||||
|
|
|
|
/ |
on the unit or |
|||||||||
|
CH |
/ |
on the remote |
|||||||||||
|
control. |
|
|
|
|
|
|
|
|
|
||||
|
To turn off the unit press |
|||||||||||||
|
|
|
|
button on the unit - |
||||||||||
|
to completely switch it off, |
|||||||||||||
|
disconnect the mains |
|||||||||||||
|
power supply. |
|
|
|||||||||||
• |
Press TV/DVD |
to |
||||||||||||
|
select the TV mode. |
|||||||||||||
• |
Press ATV/DTV |
|
to |
|||||||||||
|
toggle between analogue |
|||||||||||||
|
TV or digital TV mode. |
|||||||||||||
|
|
|
|
|
|
|
|
|
|
|
|
|
|
|
|
|
|
|
|
|
|
|
|
|
|
|
|
|
|
|
|
|
|
|
|
|
|
|
|
|
|
|
|
|
|
|
|
|
|
|
|
|
|
|
|
|
|
|
|
|
|
|
|
|
|
|
|
|
|
|
|
|
|
|
Notes:
•If no buttons are pressed after approximately 60 seconds, the Main Menu screen disappears.
•Press EXIT/CANCEL 

 to exit the Main Menu screen.
Quick guide for menu operation
Launch the Main Menu screen. For example: Select Auto Tuning.
1 |
Press INPUT . |
|
|
|
|
Select “ATV”, then press ENTER/CH LIST |
. |
|
|
2 |
Press MENU SETUP |
in ATV (analogue TV) mode or press DIGITAL MENU |
in DTV |
|
|
(digital TV) mode to display the Main Menu screen. |
|
||
When DIGITAL MENU 
 is pressed in ATV mode, it will automatically switch to DTV mode. And it is possible to use MENU SETUP
 in DTV mode.
3 |
Press / to select “Channel“, then press |
|
|
ENTER/CH LIST |
. |
4 |
Press |
/ |
to select “Auto Tuning”, then press |
|
ENTER/CH LIST |
to enter the Auto Tuning |
|||
menu.
5 |
Press / to select your country, then |
|
|
press ENTER/CH LIST |
. |
6 |
Press / to select “Start”, then press |
|
|
ENTER/CH LIST |
. |
A message prompt will appear with option to delete previously stored channels.
7 |
Press / to select “Yes” or “No”, then |
|
|
press ENTER/CH LIST |
. |
11
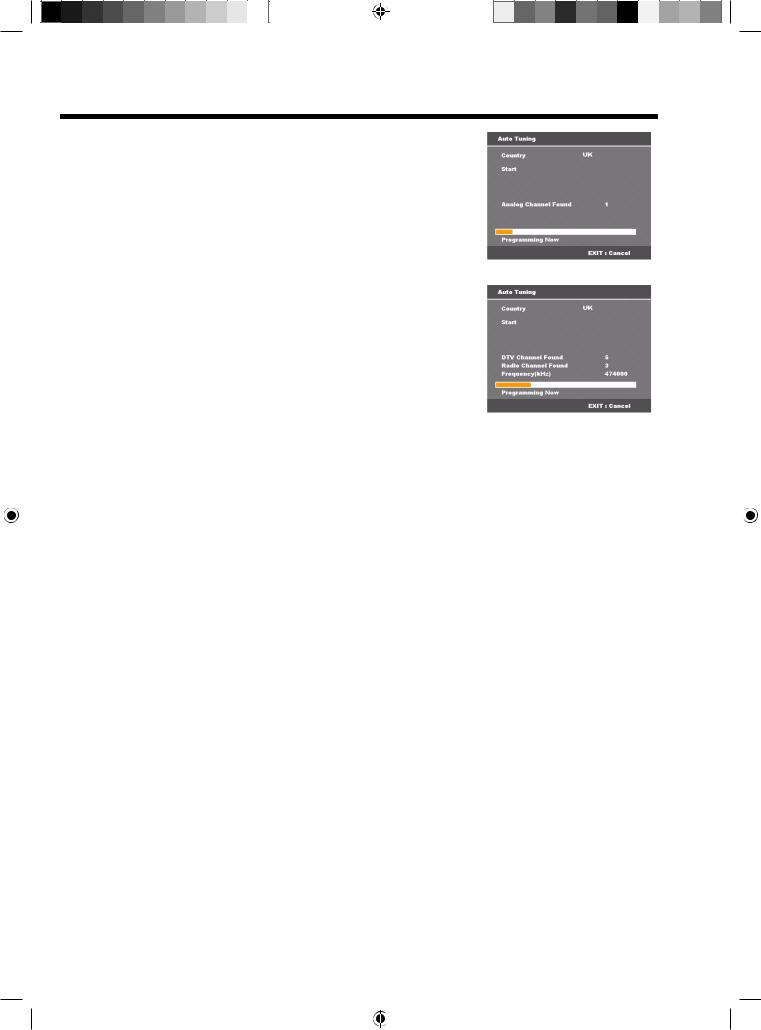
Quick guide for menu operation (continued)
The Auto Scan process will now begin.
A progress bar appears to indicate scanning progress.
Note:
•...on the following pages the Main Menu screen can be called in the same way as here.
(Analogue)
(Digital)
12
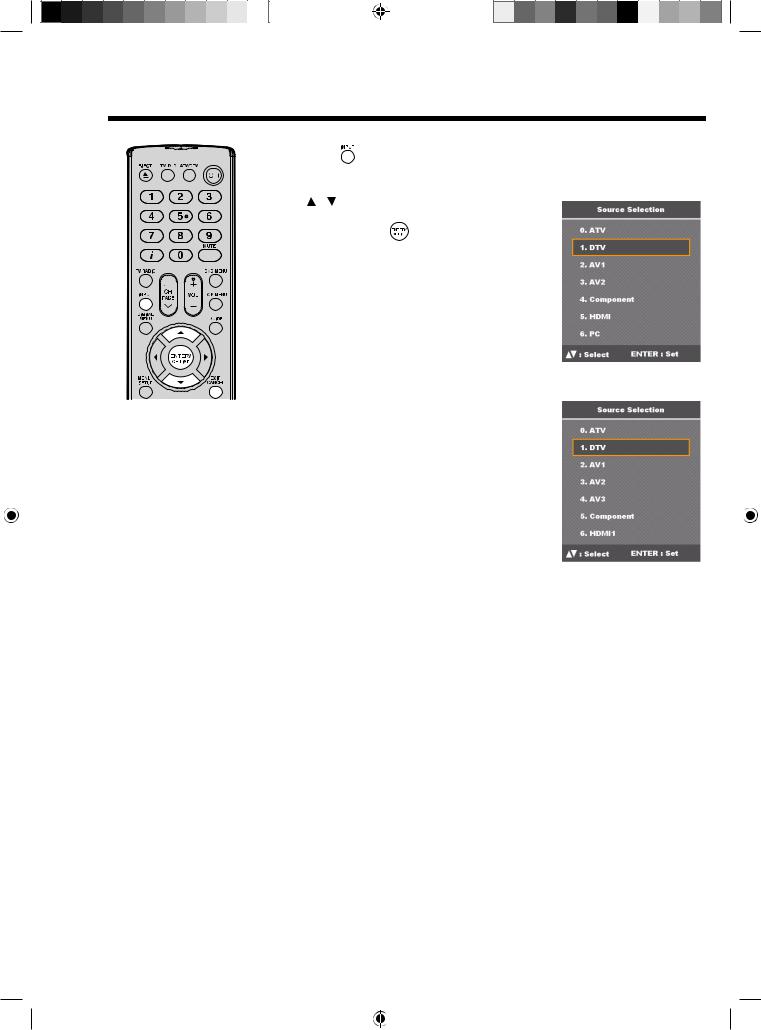
Selecting the video input source
Notes:
•If no buttons are pressed after approximately 5 seconds, the Main Menu screen disappears.
•All the channels will be deleted before the scanning process begins.
•You can cancel the scan process at any time by pressing EXIT/CANCEL. The carriers and the services stored before
EXIT/CANCEL is pressed will be stored.
Selecting the video input source
1 |
Press INPUT |
to view a signal from another device connected to your TV, such as a VCR |
||
|
or DVD player. |
|
||
|
You can select each input source depending on the input jack used to connect your devices. |
|||
2 |
Press |
/ |
or the corresponding number on the |
|
|
screen to select a video input source, then |
|||
|
press ENTER/CH LIST |
within 5 seconds. |
||
(19DV665DB/19DV667DB/
22DV665DB/22DV667DB)
(26DV665DB)
13
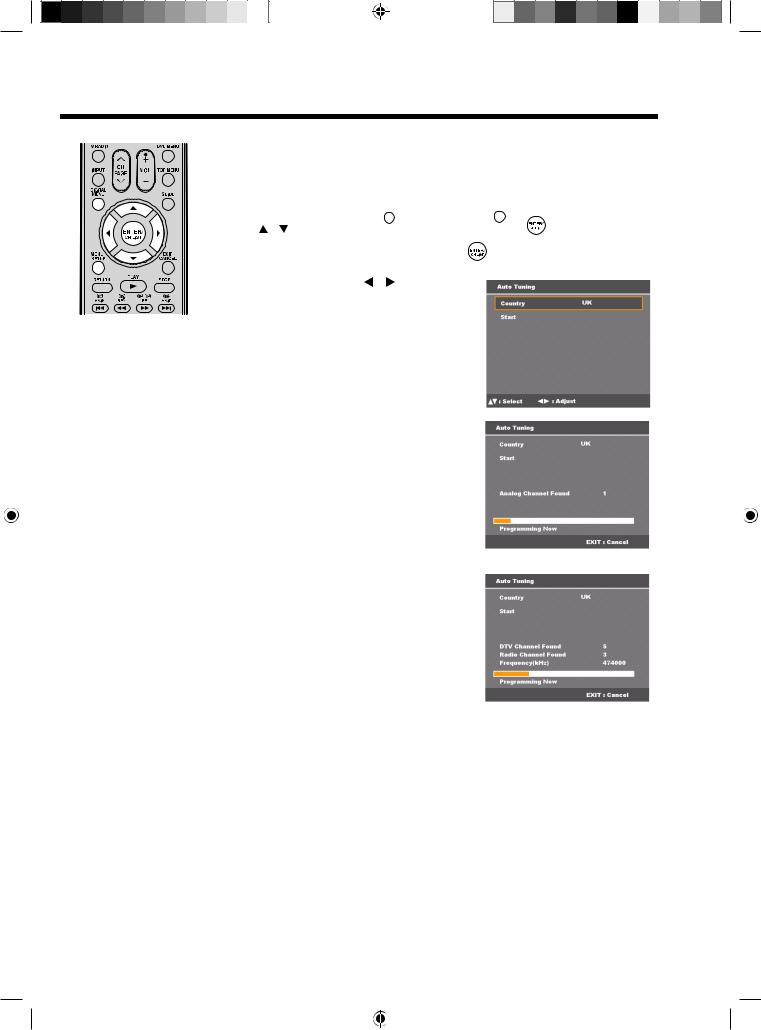
Automatic station presetting with the built-in Tuner
Automatic station presetting with the built-in Tuner
Perform this feature to search for and store new analogue and digital TV programmes after the Automatic installation (see page 10).
Preparation:
Make sure your antenna is connected to the aerial input (see page 9). Select ATV or DTV (see page 11), then press MENU SETUP 
 or DIGITAL MENU

 .
.
1 |
Press / to select “Channel“, then press ENTER/CH LIST |
. |
|||
2 |
Select “Auto Tuning”, then press ENTER/CH LIST |
. |
|
||
|
3 |
Select “Country”, then press |
/ to select your |
|
|
|
country. |
|
|
|
|
4 Select “Start”, then press ENTER/CH LIST  .
.
The automatic tuning will search for available broadcasts and should store the channels in the correct order. During the search the sound is muted. When all programmes have been stored, the normal TV screen will appear.
(Analogue)
(Digital)
14
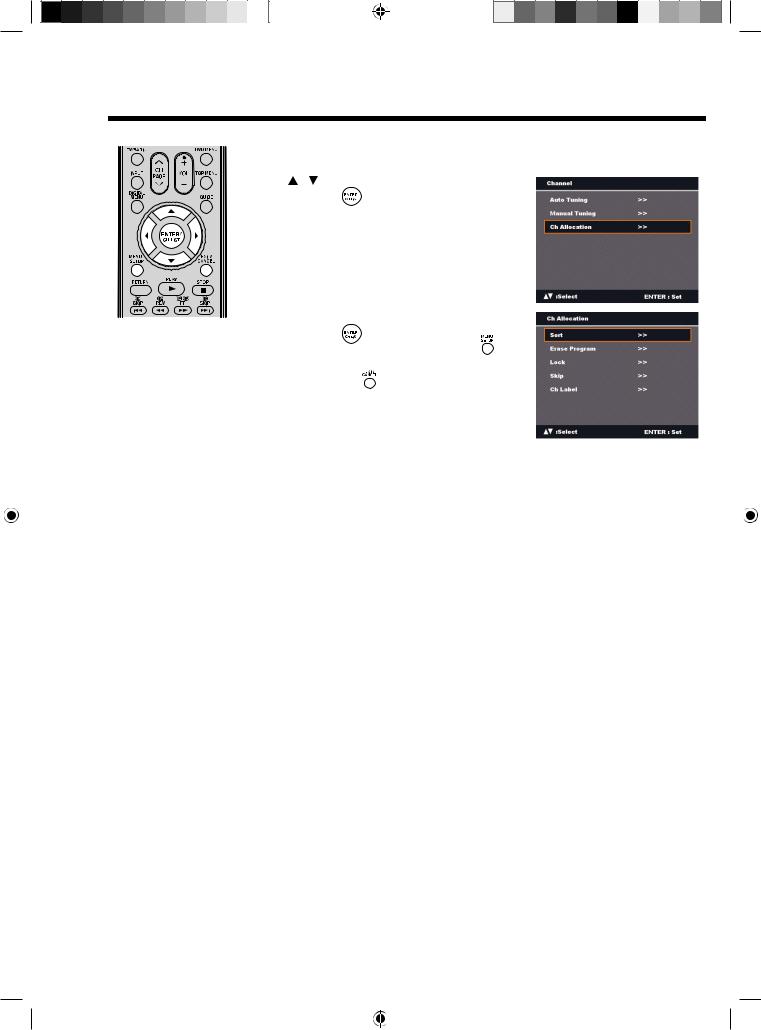
Changing the order of stored channels
Note:
•When changing the order of the channels, it is best to start with Ch1.
Changing the order of stored channels
The Automatic station presetting stores the stations in a specific order. However, this order can be changed if you wish.
1 |
Press / to select “Ch Allocation”, then press |
|
|
ENTER/CH LIST |
. |
2 |
Select the desired option, then press |
|
|
ENTER/CH LIST |
. |
3 |
After setting each option, press MENU SETUP |
|
|
to return to Ch Allocation menu. |
|
4 |
Press EXIT/CANCEL |
to return to the normal |
screen. |
|
|
Description about each setting option:
•Sort: Press  /
/  to select the channel that you want to move, then press ENTER/CH LIST
  .
.
Press  /
/  to select the position that you want to move the channel to, then press
ENTER/CH LIST  .
.
•Erase Program: Press  /
/  to select the channel that you want to erase, then press
ENTER/CH LIST  .
.
•Lock: This feature enables you to lock any channel you choose by pressing ENTER/CH LIST
 , then enter the parental lock password. If you have not set the parental lock password, you can use the initial password ‘0000’.
•Skip: Press  /
/  to select the channel that you want to skip, then press ENTER/CH LIST
  . A
. A  mark will appear.
•Ch Label: Press  /
/  to enter a suitable label for a selected channel, then press
  . Press
 /
/  to select character, then press ENTER/CH LIST
  . The cursor will move to the next position. Press ENTER/CH LIST
  to set the channel label.
15
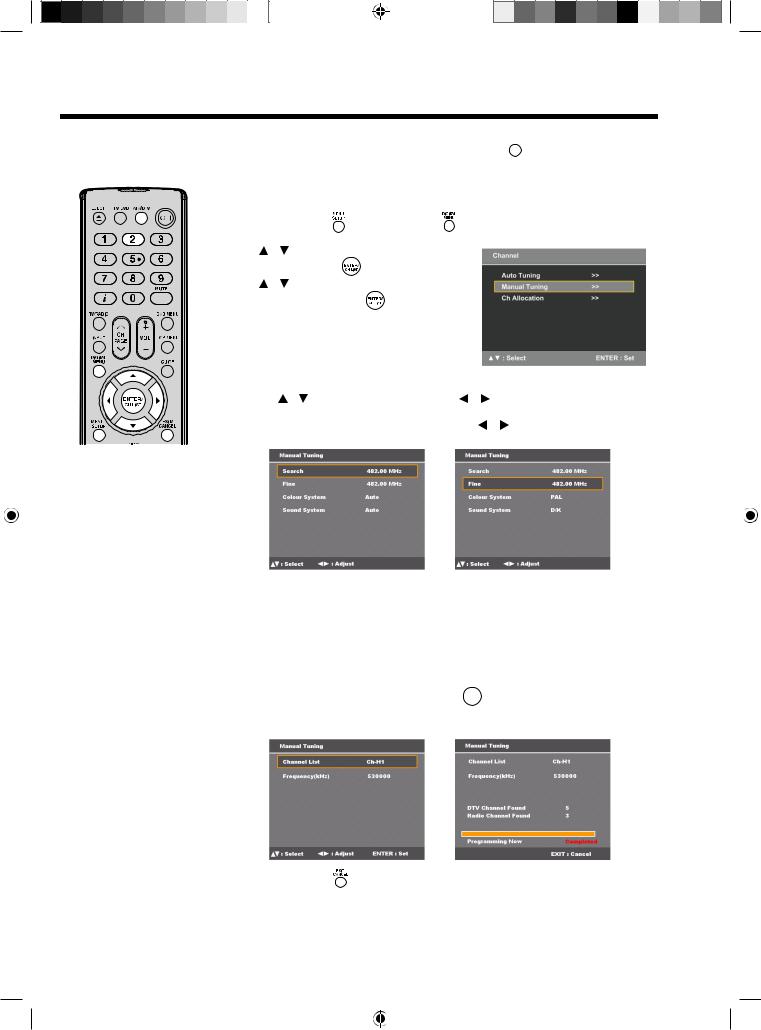
Manual TV station presetting
If you like, you may manually tune a certain station into a selected programme position, without deleting or modifying program position’s contents. The presetting applies to both analogue and digital TV. Press the ATV/DTV 

 button to enter ATV or DTV mode then follow the steps to set the TV stations manually.
Preparation:
Connect the aerial cable. Select programme position “2”. Press 2, OSD will indicate ‘2’ in left upper corner. Eventually recently stored TV-channel’s name might also appear.
1 |
Press MENU SETUP |
or DIGITAL MENU |
to display the Main Menu screen. |
|||
2 |
Press |
/ |
to select the “Channel” menu, then |
|
||
|
press ENTER/CH LIST |
|
. |
|
||
3 |
Press |
/ |
to select the “Manual Tuning” menu, |
|||
|
then press ENTER/CH LIST |
. |
|
|||
4 In ATV mode: |
|
|
|
||
(1) |
Press |
/ |
to select “Search”, then press |
/ |
to start tuning. Tuning will stop |
|
automatically at next received station. |
|
|
||
(2) |
If you like to use fine-tuning, select “Fine”. Press |
/ to fine tune. See the note on |
|||
|
this page. |
|
|
|
|
Note:
•Usually fine tuning is not necessary, due to tuning’s automatically stopping at the very best position. If you fine-tune anyway, proper working of teletextreception with built-in tuner is no longer guaranteed.
(3)To select a colour system for your TV, select “Colour System”. Press  /
/  to select “Auto”, “PAL” or “SECAM”. PAL should be selected for use in UK.
(4)To select a sound system, select “Sound System”. Press  /
/  to select “Auto”, “B/G”, “I”, “D/K” or “L/L’ ”.
In DTV mode:
You can select a channel number for the Channel List by pressing  /
/  . The corresponding tuning frequency for the channel will be set. Or, you can enter a frequency value to start tuning.
After setting the channel, press ENTER/CH LIST 

 to start scanning for channels.
A progress bar appears to indicate scanning progress and a list of the services collected from the channel will be listed.
5 Press EXIT/CANCEL |
to return to the normal screen. |
16
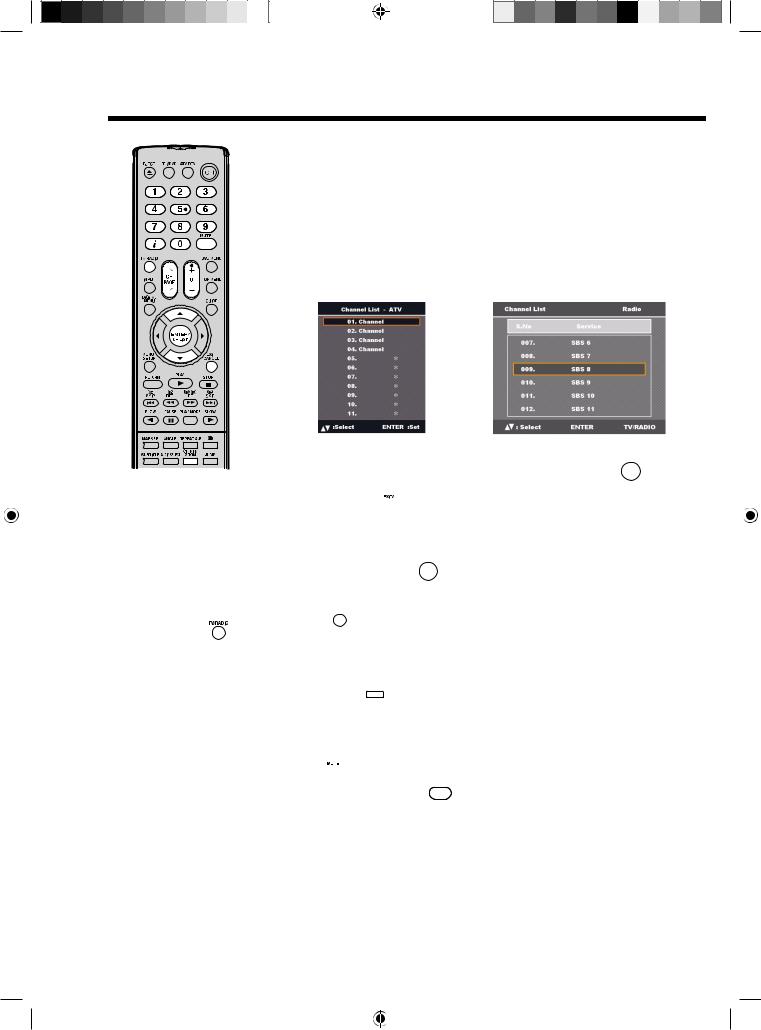
Basic operation
Notes: |
•If the built-in tuner does not receive anything (e.g., if no antenna is connected) during TV-operation, the TV-unit will change to standby after approx. 15 minutes.
•This unit only support NorDig Version 2.0 data service.
•Press TV/RADIO
to switch between three service categories — TV, Radio, and Data.
Channel selection
Use the 0 - 9 numbered buttons.
Example:
•No. 2: Press 0 and within 2 seconds, press 2.
•No. 29: Press 2 and within 2 seconds, press 9.
(1)Press CH  /
/ to select a channel. This takes approx. 2 seconds. If the auto search only stored 5 stations, only these 5 will appear. Skipped channels will not appear (see page 15).
The Channel List shows a list of all receivable programmes. They are located in channels 1 to 99 for ATV mode and 1 to 999 for DTV mode.
(2)Press CH LIST  to display the Channel List.
Analogue Channel List |
DTV Channel List |
(3)Press  /
/  to select the desired channel, then press ENTER/CH LIST

 to display the selected channel.
(4)Press EXIT/CANCEL 

 to exit.
Toggle between the list of TV, Radio, and Data services (DTV mode only)
(1)Press TV/RADIO 

 to switch between the TV, Radio, and Data mode.
(2)If you press ENTER/CH LIST 

 when you are in Radio mode the channel list menu will display the list of Radio services.
If you wish to view the list of Data services without exiting the current menu, press
TV/RADIO 

 once.
once.
If you wish to view the list of TV services without exiting the current menu, press
TV/RADIO 

 again.
QuickView
Press CH RTN ZOOM 

 to go back to the last selected channel.
Volume adjustment
Press VOL +/– to adjust the volume level. The volume level indicator shows the current volume level. The indicator will disappear after 4 seconds of inactivity.
Mute
Press MUTE  to switch off the sound. The TV/DVD’s sound will be turned off and “Mute” will appear on-screen. Press MUTE
 again or VOL +/– to turn the sound on.
17
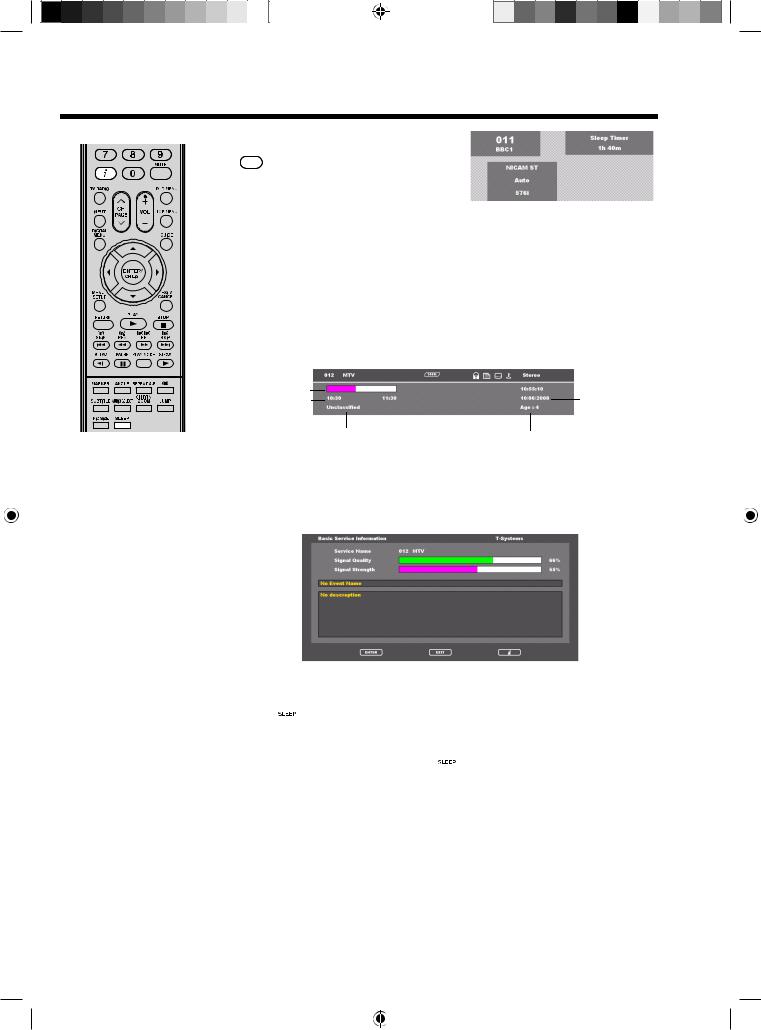
Basic operation (continued)
Notes: |
•In the Basic Service Information screen, the Channel/Service names, appear in full not abbreviated.
•Subtitles are displayed on the channel banner. Some broadcasts may not provide this service.
Information display
In ATV mode:
Press  to display the Channel number and sleep timer settings information on the screen. Current settings for the sound mode, picture size, and resolution (if in use) are also displayed. The information will appear for approx. 5 seconds.
In DTV mode:
When you switch channels, a channel banner is displayed for a few seconds. The channel banner shows information such as current date and time, DTV channel number, station, and messages from the DTV service providers, etc.
(1)While watching a programme, press  to display the Channel banner. The channel banner will disappear after a set time. You can change how long the channel banner is displayed, see page 24 for details.
|
|
|
DVB Teletext available |
|||||
Service name |
|
|
DVB Subtitle available |
|||||
Lock status |
|
Pay TV |
||||||
Service no. |
|
|
|
Audio mode |
||||
|
|
|
|
|
|
|
||
|
|
|
|
|
|
|
|
|
|
|
|
|
|
|
|
|
|
Duration bar
Starting/Ending time Time and Date of current programme
Genre |
Parental rating |
|
(2)Press  again to display the Basic Service Information screen.
You can verify the signal strength and quality of the selected service here. If necessary, adjust the direction of the antenna to obtain the maximum signal strength.
A short event description of an event can also be viewed here. For an extended description of an event, you can view it in the EPG menu (see page 31).
(3) Press  to remove the channel banner.
Sleep timer
Press SLEEP  to set the TV/DVD to turn off at a preset amount of time. The clock will count up 10 minutes for each press of the SLEEP button (Off, 0h 10m, 0h 20m, ..., 2h 0m).
After the sleep setting is programmed, the display will begin 30 seconds in advance to remind you that the sleep timer is enabled.
To confirm the sleep timer setting, press SLEEP  and the time remaining is displayed for a few seconds. To cancel the sleep timer, press the SLEEP button repeatedly until ‘Off’ appears.
18
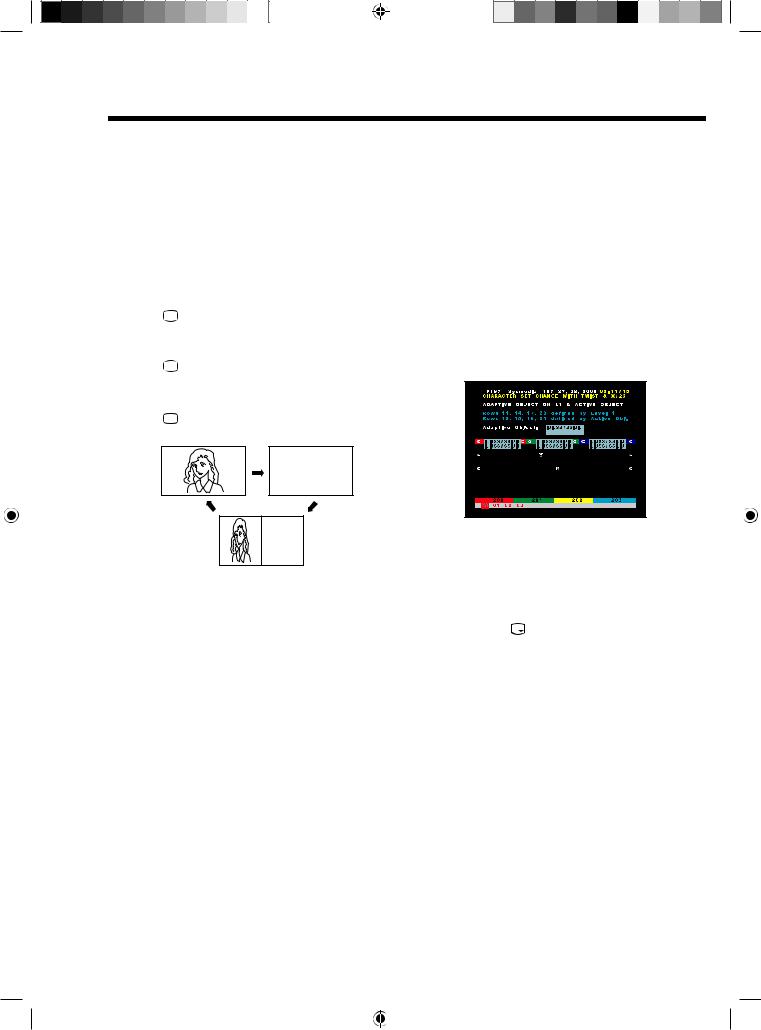
Teletext
Teletext is sent page by page. This unit is able to automatically store up to 256 pages, but they can only be accessed once they have been stored. This can take a few moments.
Fastext/TOPtext
The Fastext/TOPtext is teletext with a special directory.
On the lower part of the screen there are four different coloured fields (red, green, yellow, and blue). These fields lead directly to the pages shown within. The coloured buttons on the remote control correspond to the coloured fields. Press the appropriate coloured button in order to activate the desired colour field.
Switch Teletext on/off
Teletext is not transmitted by all channels.
(1)Select a channel that shows teletext.
(2)Press  . You will now see a teletext page.
(If ‘100’ is shown without any text information, it may mean that the channel you have selected does not support teletext.)
(3)Press  again to switch to split TV-teletext display mode. You will now see both the teletext page and the TV program.
(4)Press  once more to close the teletext screen.
(5)Press  again in order to switch teletext on. The last page which was stored is now shown.
TELETEXT
TELETEXT
Note:
•You cannot select any other channels as long as teletext is switched on. Switch teletext off when you want to switch over to another channel.
Select Page
Press CH  /
/ until the page you desire appears. Or ... use the 10 Number Buttons to enter the page number.
If you mistyped something, just enter the complete 3-digit wrong page number then enter the desired number again. Or ... press one of the coloured teletext buttons so the page from Fastext/TOPtext will be shown.
Hold Pages
Some pages are divided up into subpages by the channel.
Subpages are automatically shown in turn, as they are transmitted. In order to hold the page, press  .
.
Press  again in order to display the next subpage.
Directly Select Subpages
Subpage numbers are displayed below the coloured bar. Press  /
/  to select a subpage. Or, highlight the ‘
  ’ option to display subpages as they are transmitted. You can directly select the subpages if required.
Example:
On the screen below, page 197 offers the subpages service. At the bottom of the screen the subpages (01/02/03), available for page 197, are displayed.
To select a subpage:
(1)Press 
 in order to select 01 subpage.
(2)Press 
 again in order to switch to the 02 subpage.
(3)Press 
 once more to switch to the 03 subpage.
Enlargement
Press  to enlarge the display.
Either the upper or lower half of the screen is enlarged.
Each time you press 
 to toggle between half screen or full screen display.
Answering Quiz Questions
Some pages contain quiz questions with concealed answers. Press  in order to show the answers.
Page 100
Press ENTER/CH LIST  in order to show page 100.
19
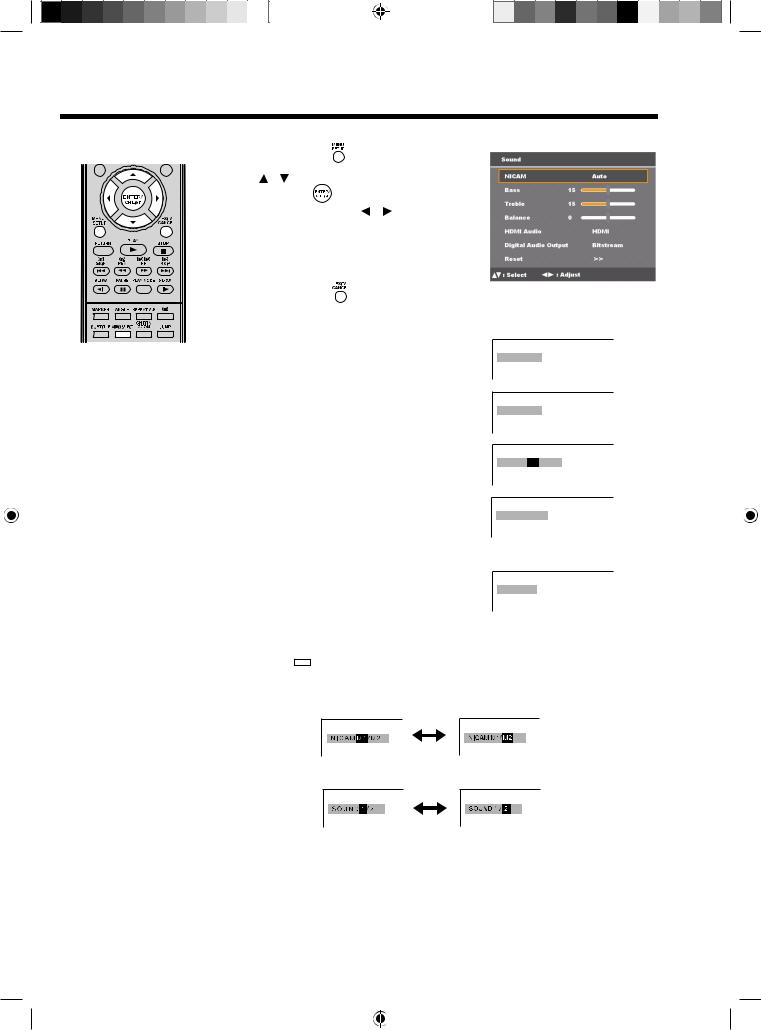
Stereo reception with the built-in analogue tuner
The built-in tuner can detect and receive NICAM stereo broadcasts automatically.
Note: |
•In case of bad reception, the stereo sound also can be disturbed.
NICAM stereo sound reception
1 |
Press MENU SETUP |
to display the Main Menu |
screen. |
|
|
|
Press / to select “Sound“, then press |
|
|
ENTER/CH LIST |
. |
2 |
Select “NICAM”, then press / to select “Auto” |
|
or “Off”. |
|
|
|
Select “Off” if you do not want to receive NICAM |
|
|
sound. |
|
3 |
Press EXIT/CANCEL |
to return to the normal screen. |
The following types of broadcast are possible with NICAM transmissions
•NICAM ST: Illuminates for approx. 4 seconds when a NICAM STEREO broadcast signal is received.
•NICAM M1: Illuminates for approx. 4 seconds when a NICAM MONO A broadcast signal is received.
•NICAM M1/M2: Illuminates for approx. 4 seconds when a NICAM MONO A and MONO B broadcast signal is received.
•NICAM OFF: This will be displayed for approx. 4 seconds if a NICAM signal is received when the ‘NICAM Off’ option is selected.
NICAM ST
N I C A M M 1
NICAM M1 / M2
NICAM OFF
Stereo reception in Germany
STEREO illuminates for approx. 4 seconds when a STEREO broadcast signal is received.
S T E R E O
When 2-channel sound reception is available, you can select your preferred audio with the
AUDIO SELECT 


 .
.
Each time you press AUDIO SELECT 


 , the sound channel will switch to the alternative channel available.
NICAM 2-channel sound reception (not available in Germany)
2-channel sound reception in Germany
20
Picture format
The broadcaster may transmit a Wide Screen Signaling (WSS) signal which can determine the correct picture width and set it automatically when the ‘Auto’ setting is used. If you want to change this setting, you can select from the formats listed below.
Notes:
•When the picture size is set to Auto mode, the aspect ratio will automatically change according to the WSS signal,
if it is available. This may either be transmitted by the broadcasting TV channel, or via a recording from a VCR etc. Any WSS signal received will only be effective in Auto mode - however, some DVD players/Digital Decoders etc. will automatically switch the aspect ratio via a SCART input (Pin 8 switching), even if Auto is not selected.
In any case, if you want to change to a different aspect ratio to the one selected automatically, you can change it by pressing PIC SIZE.
•In PC mode, the picture size settings is available only for 16:9 or 4:3 format.
•In HDMI or Component mode of scanning rate: 720p and 1080i, the picture size settings is available only for 16:9 or Real (HDMI mode only) format.
Auto picture size
Press PIC SIZE  repeatedly until ‘Auto’ appears on-screen.
Picture format setting
Press PIC SIZE  repeatedly to scroll through the following options.
4:3
This mode shows a picture in the standard 4:3 size with black side bars.
Real (HDMI mode only)
This picture is displayed with original size.
16:9
This mode is used with 16:9 signals from a Digital decoder, DVD player or other external source. The picture is uniformly stretched – a 4:3 image is horizontally stretched to fill the screen (For example, a 16:9 image is often stored ‘anamorphically’ on a DVD, where the 16:9 image is stored as a horizontally compressed 4:3 image – this mode restores the image to its correct 16:9 proportions).
Cinema
This mode is used to zoom-in on (expand) 4:3 ‘letterbox’ format pictures (with black side bars on the top and bottom of the picture) so that they fill more of the screen.
Note:
•In the Cinema mode, part of the picture may be slightly cut off due to the expansion. However, it is possible to scroll the picture up or down to view the top or bottom part of the picture.
14:9
This mode enlarges a standard 4:3 picture to the 14:9 format.
21
 Loading...