


 Loading...
MULTIFUNCTIONAL DIGITAL COLOR SYSTEMS
Quick Start Guide
Lineup of Our Manuals
Some of these manuals are printouts and others are PDF files recorded in the Client Utilities/User Documentation DVD. In the printouts, precautions and basic operations are described. Be sure to read “Safety Information” before using the
equipment. In the PDF files, detailed copying functions and other settings are described. Select and read those best suited to your needs.
Printouts
Safety Information
This Safety Information describes the necessary precautions for use. For your added security, be sure to read this booklet first.
PDF files recorded in the "Client Utilities/User Documentation DVD".
Quick Start Guide (This manual)
This Quick Start Guide describes the preparations, basic and advanced usage, maintenance and regular cleaning of the equipment.
PDF files recorded in the "Client Utilities/User Documentation DVD".
How to use the Client Utilities/User Documentation DVD
Windows:
1.Set the Client Utilities/User Documentation DVD in the DVD-ROM drive on your computer. Software Installer starts automatically.
If Software Installer does not launch, use the explorer to open the [e-STUDIO] folder in the Client Utilities/User Documentation DVD and double-click “Setup.exe”.
2.Select [I agree to the terms of the License Agreement.] and click [Next].
3.Click the Open User’s Manual link in Software Installer.
The browser starts automatically and the menu for choosing a language is displayed.
If the menu is not displayed, use the explorer to open the [Manuals] folder in the Client Utilities/User Documentation DVD and double-click “index.html”.
4.Click the desired language button. The menu for choosing the equipment is displayed.
5.Click the desired equipment button to display the menu for choosing an operator's manual.
6.Click the title of the operator’s manual to be viewed from the menu. Its PDF file is displayed.
Macintosh:
1.Set the Client Utilities/User Documentation DVD in the DVD-ROM drive on your computer.
2.Open the [Manuals] folder in the Client Utilities/User Documentation DVD and open the desired language folder.
3.Double-click the file of the operator’s manual to be viewed. Its PDF file is displayed.

PDF files
Copying Guide |
Troubleshooting Guide |
This Copying Guide describes the operations and settings enabled with the [COPY] button on the control panel.
This Troubleshooting Guide describes how to deal with problems, such as paper misfeeds, as well as how to react to messages displayed on the touch panel.
Scanning Guide
This Scanning Guide describes the operations and settings enabled with the [SCAN] button on the control panel and those of Internet Fax.
e-Filing Guide
This e-Filing Guide describes the operations and settings enabled with the [e-FILING] button on the control panel and the e-Filing web utility.
This e-Filing web utility enables you to operate e-Filing using the browser on your computer.
Network Fax Guide
This Network Fax Guide describes the operations of the N/W-Fax Driver.
The N/W-Fax driver enables you to send electronic documents as faxes or Internet faxes from your computer.
High Security Mode Management Guide
This High Security Mode Management Guide describes the conditions and settings to use the equipment in the high security mode.
MFP Management Guide
This MFP Management Guide describes the operations and settings enabled with the [USER FUNCTIONS] button and the [COUNTER] button on the control panel.
Software Installation Guide
This Software Installation Guide describes the installation procedures for printer drivers and utilities.
Printing Guide
This Printing Guide describes the settings of printer drivers required for printing and the various procedures.
TopAccess Guide
This TopAccess Guide describes procedures for remote setup and management from a web-based utility, “TopAccess”.
This “TopAccess” web utility enables you to manage the equipment using the browser on your computer.
Help menu for client software
To run the following client software, refer to the Help menu of each:
•AddressBook Viewer
•e-Filing Backup/Restore Utility
•TWAIN Driver / File Downloader
Operator’s manuals of options
In the following options sold separately, the corresponding operator’s manuals are co-packed.
•GD-1320/GD-1260 Operator’s Manual for FAX Unit
•GN-1060 Operator’s Manual for Wireless LAN Module
•GP-1070 Operator’s Manual for Data Overwrite Enabler
•KP-2004 Operator’s Manual for e-BRIDGE ID Gate
•KP-2005 Operator’s Manual for e-BRIDGE ID Gate
To read manuals in PDF (Portable Document Format) files
Viewing and printing manuals in PDF files require that you install Adobe Reader or Adobe Acrobat Reader on your PC. If Adobe Reader or Adobe Acrobat Reader is not installed on your PC, download and install it from the website of Adobe Systems Incorporated.
How to Read This Manual
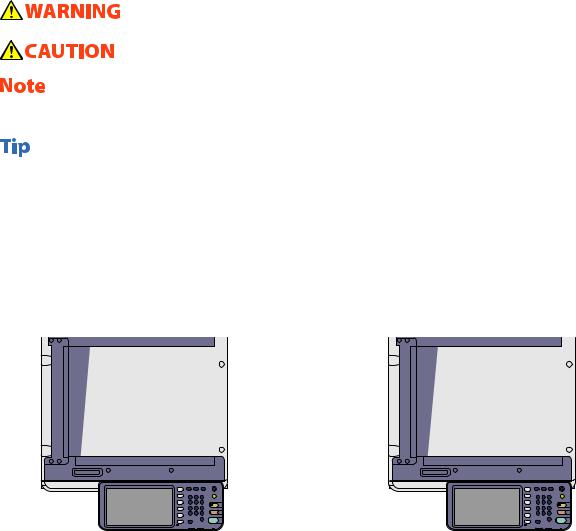
Symbols in this manual
In this manual, some important items are described with the symbols shown below. Be sure to read these items before using this equipment.
Indicates a potentially hazardous situation which, if not avoided, could result in death, serious injury, or serious damage, or fire in the equipment or surrounding objects.
Indicates a potentially hazardous situation which, if not avoided, may result in minor or moderate injury, partial damage to the equipment or surrounding objects, or loss of data.
Indicates information to which you should pay attention when operating the equipment.
Read the following description as required.
Describes handy information that is useful to know when operating the equipment.
& |
Indicates the pages describing items related to what you are currently doing. |
|
Description of original/paper direction
Paper or originals of A4 or B5 / LT size can be placed either in a portrait direction or in a landscape direction. In this manual, “-R” is added to this paper size when this size of paper or original is placed in a landscape direction.
Example: A4 / LT size original on the original glass
|
|
|
|
|
|
|
|
|
|
|
|
|
|
|
|
|
|
|
|
|
|
|
|
|
|
|
|
|
|
|
|
|
|
|
|
|
|
|
|
|
|
|
|
|
|
|
|
|
|
|
|
|
|
|
Placed in a portrait direction: A4 / LT |
Placed in a landscape direction: A4-R / LT-R |
|||||||||
Paper or originals of A3 or B4 / LD or LG size can only be placed in a landscape direction, therefore “-R” is not added to these sizes.
Screens and Operation Procedures
•In this manual, the screens and the operation procedures in Windows are described for Windows 7.
The details on the screens may differ depending on how the equipment is used, such as the status of the installed options, the OS version and the applications.
•The illustration screens used in this manual are for paper in the A/B format. If you use paper in the LT format, the display or the order of buttons in the illustrations may differ from that of your equipment.

CONTENTS
How to Read This Manual 2 Recommended toner cartridges 4
Chapter 1 PREPARATIONS
Description of Each Component 6 Turning Power ON/OFF 12 Placing Paper and Originals 15 Installing Client Software 17
Chapter 2 BASIC OPERATION |
|
Basic Copying Operation |
20 |
Basic Fax Operation |
24 |
Basic Scanning Operation |
28 |
Basic e-Filing Operation |
30 |
Basic Printing Operation |
32 |
Basic Menu Operation |
34 |
Chapter 3 MAINTENANCE |
|
Replacing Toner Cartridge |
36 |
Replacing Waste Toner Box |
37 |
Replacing Staple Cartridge |
38 |
Regular Cleaning |
42 |
Chapter 4 TROUBLESHOOTING |
|
Troubleshooting |
46 |
Chapter 5 ADVANCED FUNCTIONS |
|
Advanced Functions 50
Chapter 6 INFORMATION ABOUT EQUIPMENT
Items Included in This Product 60 Client Utilities/User Documentation DVD 61 Client Software 62 Options 64 Logging in 67 Specifications of Equipment 70 Specifications of Options 73
INDEX 79

Recommended toner cartridges
To assure optimal printing performance, we recommend that you use only genuine TOSHIBA toner cartridges. If you use a TOSHIBA-recommended toner cartridge, you can utilize the following three functions of this equipment:
•Cartridge detecting function:
This function checks if the toner cartridge is correctly installed and notifies you if it is not.
•Toner remaining check function:
This function notifies you when there is little toner remaining in the cartridge, as well as informing this to your authorized service representative automatically by the remote service.
•Image quality optimization function:
This function controls image quality according to the characteristics of the toner to be used and enables you to print images of an optimal quality.
If you are using a toner cartridge other than the one we recommend, the equipment may not be able to detect whether it is installed or not. Therefore, even if the toner cartridge is correctly installed, the error message “TONER NOT RECOGNIZED” appears on the touch panel and printing may not be performed. You may also not be able to utilize the image quality optimization function, the toner remaining check function and the remote service function notifying your authorized service representative automatically.
If you are using a toner cartridge other than the one we recommend, the toner will not be recognized. If this is a problem for you, please contact your service representative. Remember you will not be able to utilize the toner remaining check function and Image quality optimization function as we mentioned.
Trademarks
•The official name of Windows XP is Microsoft Windows XP Operating System.
•The official name of Windows Vista is Microsoft Windows Vista Operating System.
•The official name of Windows 7 is Microsoft Windows 7 Operating System.
•The official name of Windows Server 2003 is Microsoft Windows Server 2003 Operating System.
•The official name of Windows Server 2008 is Microsoft Windows Server 2008 Operating System.
•Microsoft, Windows, Windows NT, and the brand names and product names of other Microsoft products are trademarks of Microsoft Corporation in the US and other countries.
•Apple, AppleTalk, Macintosh, Mac, Mac OS, Safari, and TrueType are trademarks of Apple Inc. in the US and other countries.
•Adobe, Acrobat, Reader, and PostScript are either registered trademarks or trademarks of Adobe Systems Incorporated in the United States and/or other countries.
•Mozilla, Firefox and the Firefox logo are trademarks or registered trademarks of Mozilla Foundation in the U.S. and other countries.
•IBM, AT and AIX are trademarks of International Business Machines Corporation.
•NOVELL, NetWare and NDS are trademarks of Novell, Inc. in the US.
•TopAccess is a trademark of Toshiba Tec Corporation.
•Other company and product names given in this manual or displayed in this software may be the trademarks of their respective companies.

Chapter 1
PREPARATIONS
Description of Each Component 6 Turning Power ON/OFF 12 Placing Paper and Originals 15 Installing Client Software 17
Chapter 1 PREPARATIONS
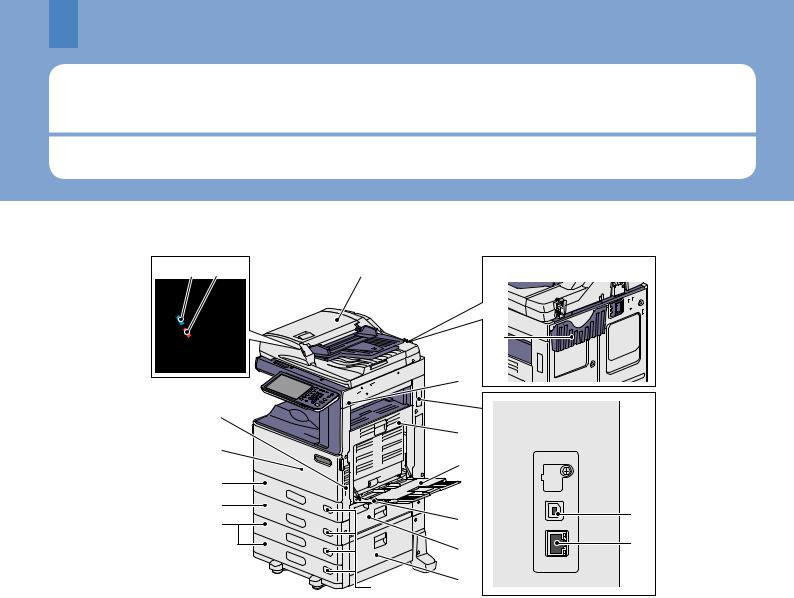
Description of Each Component
This section describes the names and operations of the equipment, control panel and touch panel.
Front / Right side
18 |
17 |
1 |
16 |
15 |
14 |
13 |
12 |
11 |
1.Reversing Automatic Document Feeder
The stack of originals is scanned one sheet at a time. Both sides of the originals can be scanned. A maximum of 100 sheets (80 g/m2 or 20 lb. Bond) can be placed in one go.
(The maximum number of sheets that can be set may vary depending on the media type of the originals.)
2.Operator’s Manual Pocket (back side)
Keep the manual in this pocket.
3.USB terminal (4-pin)
Use this terminal when connecting this equipment to a PC with a commercially available USB cable.
4.Network interface connector
Use this connector when connecting this equipment to a network.
5.USB port
Use this connector when printing files stored in a USB device or storing scanned data into the USB device. The Front USB Cable is required for using the USB port.
6.Automatic duplexing unit
This unit makes copies on both sides of the paper. Open it when paper misfeeds occur.
7.Bypass tray
Use this to perform printing on special media types such as OHP film, etc.
&P.23 “Bypass copying” in this manual
Back side
2 |
5 |
6 |
7 |
8 |
3 |
|
|
9 |
4 |
|
|
10 |
|
8.Paper holding lever
Use this to place paper on the bypass tray.
9.Paper feed cover (of the equipment)
Open this cover when releasing paper misfed in the drawer feeding area.
10.Paper feed cover
Open this cover when releasing paper misfed in the Paper Feed Pedestal or Large Capacity Feeder.
11.Paper size indicator
The size of the paper set in the drawer can be checked.
12.Paper Feed Pedestal and Additional Drawer Module or Large Capacity Feeder
Use the Paper Feed Pedestal to add one drawer. The Additional Drawer Module can be installed in this device. A maximum of 550 sheets (80 g/m2 or 20 lb. Bond) of plain paper can be placed in one go.
A maximum of 2000 sheets (80 g/m2 or 20 lb. Bond) of plain paper can be placed in the Large Capacity Feeder.
13.Paper Feed Unit
Use the Paper Feed Unit to add the second drawer. A maximum of 550 sheets (80 g/m2 or 20 lb. Bond) of plain paper can be placed in one go.
14.Drawer
A maximum of 250 sheets of plain paper can be placed in one go.
&P.15 “Placing paper” in this manual
Description of Each Component
15. Front cover |
17. Alarm lamp |
Open this cover when you replace the toner cartridge and clean the charger.
This orange lamp lights when a paper misfeed has occurred in the Reversing Automatic Document Feeder.
16. Main power switch |
18. Document lamp |
Use this switch to turn the power of the equipment ON or OFF.
&P.12 “Turning Power ON/OFF” in this manual
This blue lamp lights when the originals are placed on the original feeder tray. It also blinks while the originals are being scanned.
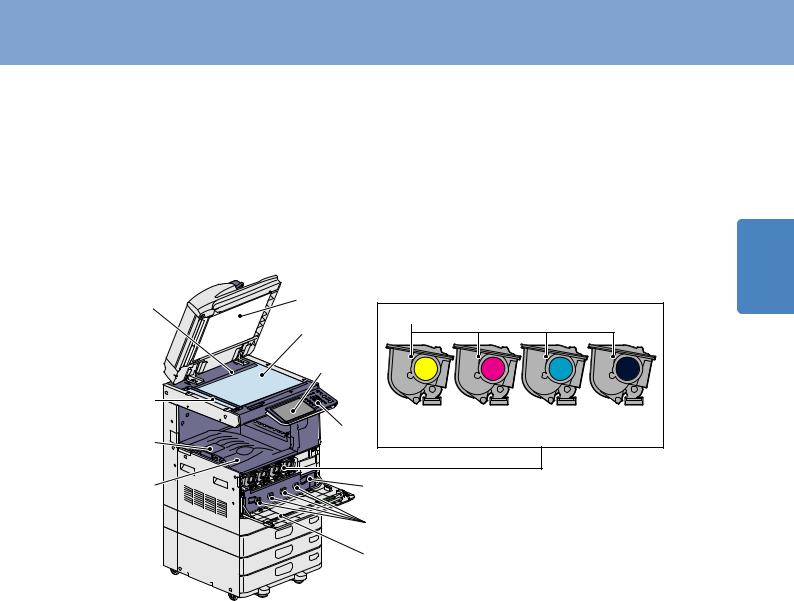
Left / Inner side |
1 |
|
12 |
1 |
|
|
|
|
|
5 |
|
|
|
|
|
2 |
|
|
|
|
|
|
|
|
|
|
|
3 |
|
|
|
|
11 |
|
|
|
|
|
10 |
4 |
Yellow |
Magenta |
Cyan |
Black |
|
|
|
|
|
|
9 |
|
6 |
|
|
|
|
|
7 |
|
|
|
|
|
8 |
|
|
|
1.Platen sheet
Use this to hold the original on the original glass to scan it.
&P.42 “Regular Cleaning” in this manual
2.Original glass
Use this to copy three-dimensional originals, book-type originals and special paper such as OHP film or tracing paper, as well as plain paper.
3.Touch panel
Use this to set and operate various types of functions such as copying, scanning and faxing. This also displays messages, such as when paper runs out or paper misfeeds occur.
&P.10 “Touch panel” in this manual
4.Control panel
Use this to set and operate various types of functions such as copying and faxing.
&P.8 “Control panel” in this manual
5.Toner cartridge
When toner runs out, the message appears on the touch panel. Replace the cartridge following the procedure below.
&P.36 “Replacing Toner Cartridge” in this manual
6.Waste toner box
When “Dispose of used toner” appears on the touch panel, replace the waste toner box according to the following procedures.
&P.37 "Replacing Waste Toner Box" in this manual
7.Main charger cleaners
If unevenness occurs on the copied or printed paper, clean the main chargers according to the following procedures.
&P.43 "Cleaning the main chargers and LED print heads" in this manual
8.LED print head cleaner
If unevenness occurs on the copied or printed paper, clean the LED print head according to the following procedures.
&P.43 "Cleaning the main chargers and LED print heads" in this manual
9.Exit tray
Printed paper exits into this tray.
10.Paper exit stopper
Use this to prevent the exiting paper from falling. Open this when you make many copies or prints on a larger size of paper such as A3, B4, LD and LG.
11.Scanning area
The data of originals transported from the Reversing Automatic Document Feeder are scanned here.
&P.42 “Regular Cleaning” in this manual
12.Original scale
Use this to check the size of an original placed on the original glass.
Chapter 1 PREPARATIONS
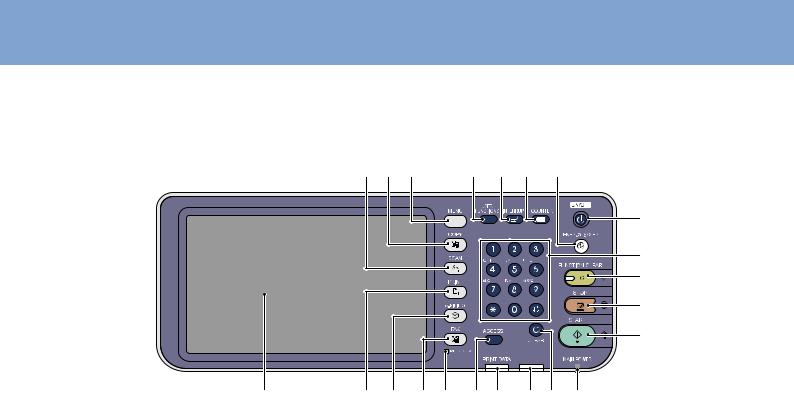
Control panel
Use the buttons on the control panel for various operations and settings in the equipment.
1 |
2 |
3 |
4 |
5 |
6 |
7 |
8 |
9 |
10 |
11 |
12 |
22 |
21 |
20 |
19 |
18 |
17 |
16 |
15 |
14 |
13 |
1.[SCAN] button
Use this button to access the scanning function.
2.[COPY] button
Use this button to access the copying function.
3.[MENU] button
Use this button to display frequently used templates.
4.[USER FUNCTIONS] button
Use this button for paper size or media type setting of drawers, and registration of the copy, scan and fax settings including a default setting change.
&MFP Management Guide (PDF): “Chapter 1: SETTING ITEMS (USER)”
&MFP Management Guide (PDF): “Chapter 2: SETTING ITEMS (ADMIN)”
5.[INTERRUPT] button
Use this button to interrupt print processing and perform a copy job. The interrupted job is resumed through your pressing this button again.
6.[COUNTER] button
Use this button to display the counter.
&MFP Management Guide (PDF): “Chapter 3: MANAGING COUNTERS (COUNTER MENU)”
7.[ENERGY SAVER] button
Use this button for the equipment to enter the energy saving mode.
8.[POWER] button
Use this button to turn the power of the equipment ON or OFF (shutdown).
9.Digital keys
Use these keys to enter any numbers such as the number of copies, telephone numbers or passwords.
10.[FUNCTION CLEAR] button
When this button is pressed, all selected functions are cleared and returned to the default settings. If the default setting is changed on the control panel, and then copying, scanning, faxing or similar is performed, the lamp of this button (orange) blinks.
11.[STOP] button
Use this button to stop any scanning and copying operations in progress.
12.[START] button
Use this button to start copying, scanning and faxing operations.
13.MAIN POWER lamp
This green lamp lights when the main power switch is ON.
14.[CLEAR] button
Use this button to correct the numbers keyed in, such as the number of copy sets.
15.Alarm lamp
This orange lamp lights when an error occurs and some action needs to be taken.
16.PRINT DATA lamp
This blue lamp lights during reception of data such as print data.
17.[ACCESS] button
Use this button when the department code or user information has been set. If this button is pressed after copying, etc., the next user needs to enter the department code or user information.
&P.67 “Logging in” in this manual
18.MEMORY RX / LINE lamp
This green lamp lights in the status of the fax data reception and fax communication. The equipment can be operated even while these lamps are lit.
19.[FAX] button
Use this button to access the Fax / Internet Fax function.
20.[e-FILING] button
Use this button to access stored image data.
This button is not provided for the e-STUDIO2051C/ 2551C.
Description of Each Component
21.[PRINT] button
Use this button to access the printing functions such as private printing, in this equipment.
22.Touch panel
Use this panel for the various settings of the copying, scanning and Fax functions. This also displays messages, such as when paper runs out or paper misfeeds occur.
Adjusting the angle of the control panel |
1 |
The angle of the control panel is adjustable at any angle between 7 and 90 degrees from the horizontal position.
When changing the angle of the control panel, be careful not to catch your hands in the gap between the equipment and the control panel.
This could injure you.
Chapter 1 PREPARATIONS
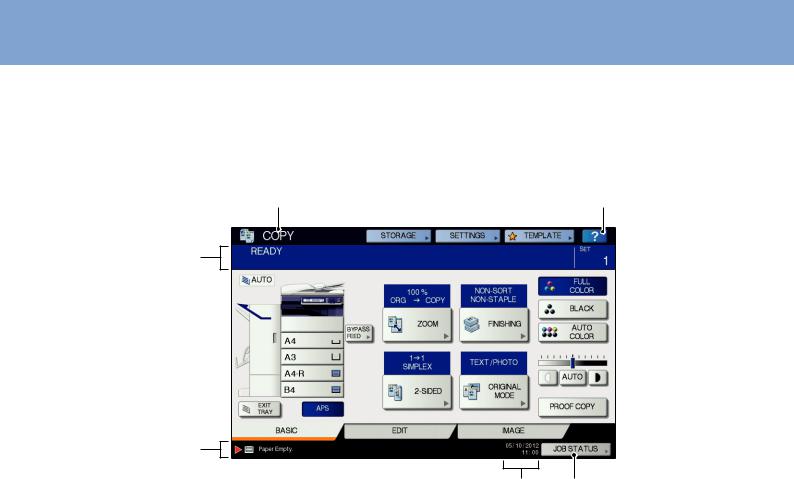
Touch panel
When the power is turned ON, the basic menu for copying functions is displayed on this touch panel. The status of the equipment is also displayed on the touch panel with messages and illustrations.
The menu shown at the time of turning the power ON can be changed to one for functions other than copying, for example, Fax function. Contact your service technician or representative for details.
1 |
2 |
6
5
4 3
1.Function display
The function being used, such as copying or faxing, is displayed.
2.[?] (HELP) button
Use this button to view the explanation of each function or the buttons on the touch panel.
&P.47 “Using the Help functions” in this manual
3.[JOB STATUS] button
This indicates the processing status of copy, fax, scan or print jobs, and also allows you to view their performance history.
4.Date and time
The present date and time are displayed.
5.Alert message indication area
This shows alert messages such as when the toner cartridges must be replaced.
6.Message indication area
The explanation of each operation or the current status is displayed in message form.
Message displayed
The following information appears on the touch panel:
•Equipment status
•Operational instructions
•Cautionary messages
•Reproduction ratios
•Number of copy sets
•Paper size and amount of paper remaining in a selected drawer
•Date and time
Touch buttons
Press these buttons on the touch panel lightly to set various functions.
Adjusting the contrast of the touch panel
You can set the contrast of the touch panel in the USER FUNCTIONS menu entered by pressing the [USER FUNCTIONS] button on the control panel.
&MFP Management Guide (PDF): “Chapter 1: SETTING ITEMS (USER)” - “Setting General Functions”
10
Description of Each Component
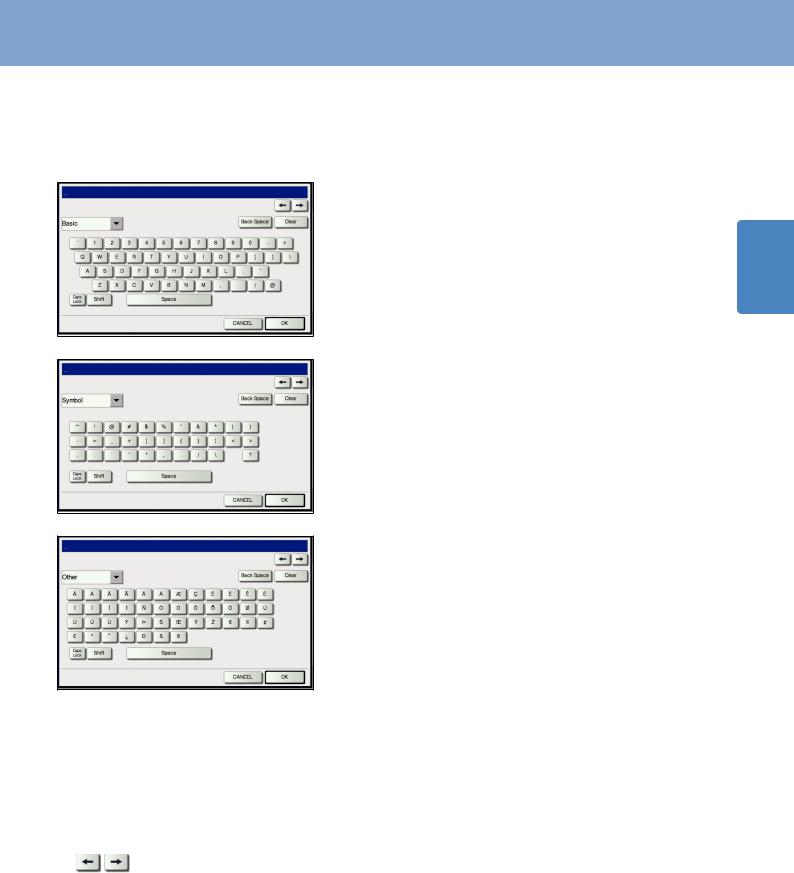
Setting letters
The following menu is displayed when the entry of any letter is required for scanning or e-Filing, etc. Use the buttons on the touch panel for letter entry.
After entering the letters, press [OK]. The menu will be changed.
1
The following buttons are used for letter entry.
[Basic]: |
Press this to access the basic keys. |
[Symbol]: |
Press this to access the symbol keys. |
[Other]: |
Press this to access the special keys. |
[Caps Lock]: |
Press this to switch capital letters and small letters. |
[Shift]: |
Press this to enter capital letters. |
[Space]: |
Press this to enter a space. |
: Press these to move the cursor.
[Back Space]: Press this to delete the letter before the cursor.
[Clear]: |
Press this to delete all letters entered. |
[CANCEL]: |
Press this to cancel the entry of letters. |
[OK]: |
Press this to fix all entered letters. |
11
Chapter 1 PREPARATIONS
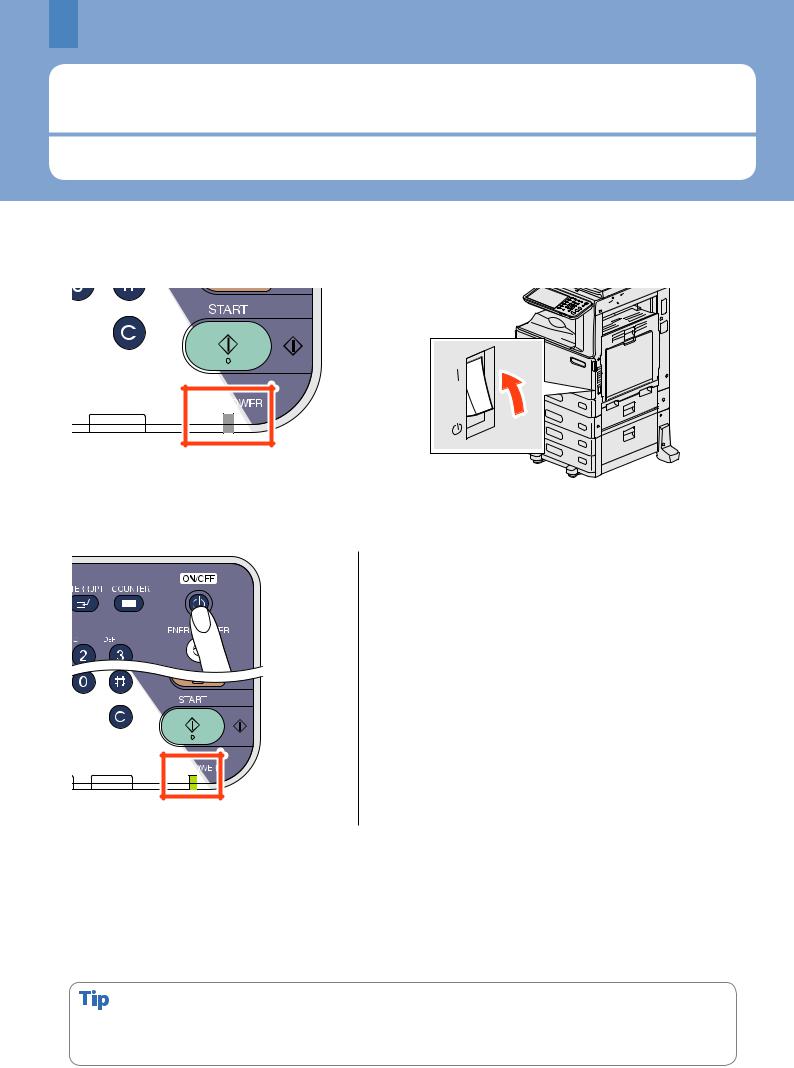
Turning Power ON/OFF
This section explains how to turn the power ON and OFF as well as the energy saving mode. How to turn the power ON differs between when the MAIN POWER lamp (green) on the control panel is lit and when it is not.
Turning the power ON
When the MAIN POWER lamp (green) on the control panel does not light:
Turn the power ON there.
When the MAIN POWER lamp (green) on the control panel lights:
•The equipment starts warming-up. “Wait Warming Up” appears during warming-up.
• While the equipment is warming up, you can use the auto job start function. For details, refer to the following guide:
&Copying Guide (PDF): “Chapter 2: HOW TO MAKE COPIES” - “Making Copies”
Press the [POWER] button.
When the equipment is ready for copying, “READY” will appear.
When you turn the power of the equipment OFF, be sure also to shut it down by pressing the [POWER] button on the control panel. Do not simply turn the main power switch OFF. For details, see the following page:
&P.13 “Turning the power OFF (Shutdown)” in this manual
When “ERASING DATA” appears
This message appears when the Data Overwrite Enabler has been installed. It appears immediately after the power is turned ON or after the equipment has been operated. You can operate the equipment even if it is displayed.
When the equipment is controlled under the department or user management function, enter the department code or user information first. For details, see the following page:
&P.67 “Logging in” in this manual
12

Turning Power ON/OFF
Turning the power OFF (Shutdown)
When turning the power of the equipment OFF, be sure to shut it down according to the procedure below. Check the following three points before shutdown.
•No jobs should be left in the print job list.
•None of the PRINT DATA lamp (blue) or the MEMORY RX / LINE lamp (green) should be blinking.
(If the equipment is shut down while any of the above lamps is blinking, jobs in progress such as FAX reception will be aborted.)
•No computer should access the equipment via the network, such as TopAccess.
1
If a job in process exists when the [POWER] button of the control panel is pressed, “Processing job will be deleted. Are you sure you want to shutdown?” appears.
“Shutdown is in progress.” appears for a while, and then the power is turned OFF.
Press the [POWER] button until a “pip” sound is heard.
When the equipment is not used for a long period of time:
When the power is turned OFF with the main power switch, the MAIN POWER lamp (green) will go out.
Press the [POWER] button on the control panel to shut down the equipment, check that the [ENERGY SAVER] button (green) stops blinking and is definitely not lit, and then turn the power OFF with the main power switch.
13

Chapter 1 PREPARATIONS
Saving energy when not in use – energy saving modes –
This equipment supports three energy saving modes; the Automatic Energy Save mode, Sleep mode and Super Sleep mode. The table below shows the procedures to switch modes manually and the conditions under which the equipment enters into or recovers from each mode.
Energy saving |
Procedure to switch |
Conditions to enter into |
Status of equipment |
Conditions to recover |
|
modes |
modes |
the mode |
from the mode |
||
|
|||||
|
|
|
|
|
|
Automatic |
When a specified period of |
|
“Saving energy - press |
When a button on the |
|
time *1 has passed since the |
|
START button.” appears on |
control panel *2 is pressed |
||
Energy Save |
— |
||||
last use of the equipment. |
the touch panel. |
or when print data or fax |
|||
mode |
|
||||
|
|
|
data are received. |
||
|
|
|
|
||
|
When the [ENERGY SAVER] |
When a particular option *5 |
The touch panel display |
Same as the Automatic |
|
|
button *3 is pressed or |
is installed or when a |
goes off and the [ENERGY |
Energy Save mode. |
|
Sleep mode |
when a specified period of |
particular protocol *6 is |
SAVER] button lights in |
|
|
|
time *4 has passed since the |
enabled. |
green. |
|
|
|
last use of the equipment. |
|
|
|
|
|
When the [ENERGY SAVER] |
When a particular option *5 |
Only the MAIN POWER |
When the [POWER] button |
|
|
button *3 is pressed or |
is not installed and also |
lamp (green) lights. |
is pressed, when print or |
|
Super Sleep |
when a specified period of |
when a particular protocol |
|
fax data are received |
|
mode |
time *4 has passed since the |
*6 is disabled. |
|
through a wired LAN or |
|
|
last use of the equipment. |
|
|
when the time set for |
|
|
|
|
|
Scheduled Print has come. |
*1 The default value set at the factory shipment is 1 minute.
*2 Any of the [START], [ENERGY SAVER], [COPY], [e-FILING], [SCAN], [PRINT] and [FAX] buttons. *3 [ENERGY SAVER] button on the control panel.
*4 The default value set at the factory shipment is 1 minute (The default value set at the factory shipment of the European version is 10 minutes). *5 The Wireless LAN Module and/or e-BRIDGE ID Gate.
*6 Any of IPX, AppleTalk and other protocols. When the IPsec function is enabled or the Ethernet speed is set to [AUTO (-1000MB)] or [1000BASE FULL], the equipment enters into the Sleep mode. For details, refer to the following guide:
&TopAccess Guide (PDF): “Chapter 8: [Administration] Tab Page” - “[Setup] Item list”
For changing the set period of time for entering into each mode, refer to the following guide:
For the European version
Contact your service representative to change the default settings noted above.
&MFP Management Guide (PDF): “Chapter 2: SETTING ITEMS (ADMIN)” - “Setting General Functions”
When the set period of time for switching to the Automatic Energy Save mode is the same as that for the Sleep mode or the Super Sleep mode, the equipment enters into the Sleep mode or the Super Sleep mode after the set period of time.
14
Placing Paper and Originals
Placing Paper and Originals
This section explains how to set paper and originals. Incorrect setting causes image skews or paper misfeeds. Follow the procedure below.
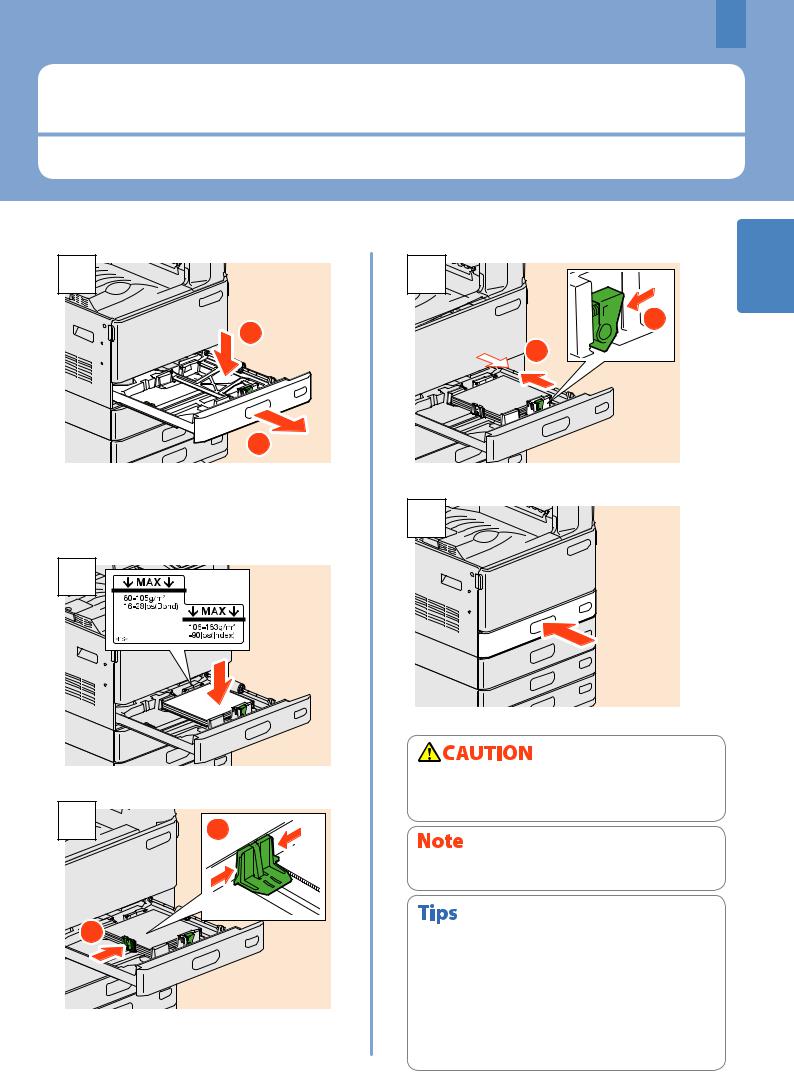
Placing paper
1 |
2
1
Pull out the drawer, and press down the paper plate. When placing paper in the Paper Feed Unit, Paper Feed Pedestal, or Additional Drawer Module, pull out the drawer, and then proceed to step 2.
2
Place paper face up.
3 

 1
1
2 |
Set the end guide so that it matches the paper size.
4 |
1 |


 1
1 
 2
2
Set the side guides so that they match the paper size.
5 |
Push in the drawer.
Be careful not to catch your fingers when pushing the drawer back.
This could injure you.
Be sure that the height of the stacked paper does not exceed the MAX line indicated on the side guides.
•For paper available for the equipment, see the following page:
&P.70 “Specifications of Equipment” in this manual
•Paper can be placed in the Paper Feed Unit, Paper Feed Pedestal and Additional Drawer Module following the above procedure. For placing paper in the Large Capacity Feeder, refer to the following guide:
&Copying Guide (PDF): “Chapter 1: BEFORE USING
EQUIPMENT” - “Placing Paper”
15

Chapter 1 PREPARATIONS
Placing originals
Original glass
1
Raise the Original Cover or the Reversing Automatic Document Feeder.
2
Place the original with its face down on the original glass and align it against the left rear corner.
Lower the Original Cover or the Reversing Automatic Document Feeder carefully. e-STUDIO2051C/2551C: Press [ZOOM] and set the size of the original.
&Copying Guide (PDF):“Chapter 3: BASIC COPY MODES”-“Enlargement and Reduction Copying”
Reversing Automatic Document
Feeder
1
Place the originals face up on the original feeder tray. Be sure that the document lamp (blue) lights up, which is provided on the Reversing Automatic Document Feeder.
2
Align the side guides to the original length.
When placing mixed-size originals on the Reversing Automatic Document Feeder, adjust its side guides to the widest original, and then align the originals against the guide on the front side.
A4-R B4
(LT-  LD)
LD)
Do not place any heavy objects (4 kg (9 lb.) or over) on the original glass and do not press on it with force.
Breaking the glass could injure you.
16
Installing Client Software
Installing Client Software
How to install the client software such as the printer driver from the Client Utilities/User Documentation DVD co-packed with the equipment is described as follows.
Recommended installation
The recommended client software such as the printer driver can be installed all in one go. |
1 |
|
|
||
|
|
|
1 |
Turn the power ON and confirm that “READY” appears on the touch panel. |
|
|
&P.12 “Turning Power ON/OFF” in this manual |
|
|
|
|
|
|
|
2 |
Insert the Client Utilities/User Documentation DVD in the DVD-ROM drive of a Windows |
|
|
computer. |
|
|
|
|
To install the client software, log onto Windows with a user account which enables the installation such as “Administrators”.
3
4
5
6
Select [I agree to the terms of the License Agreement.] and click [Next].
Click [Recommended].
Click [Install].
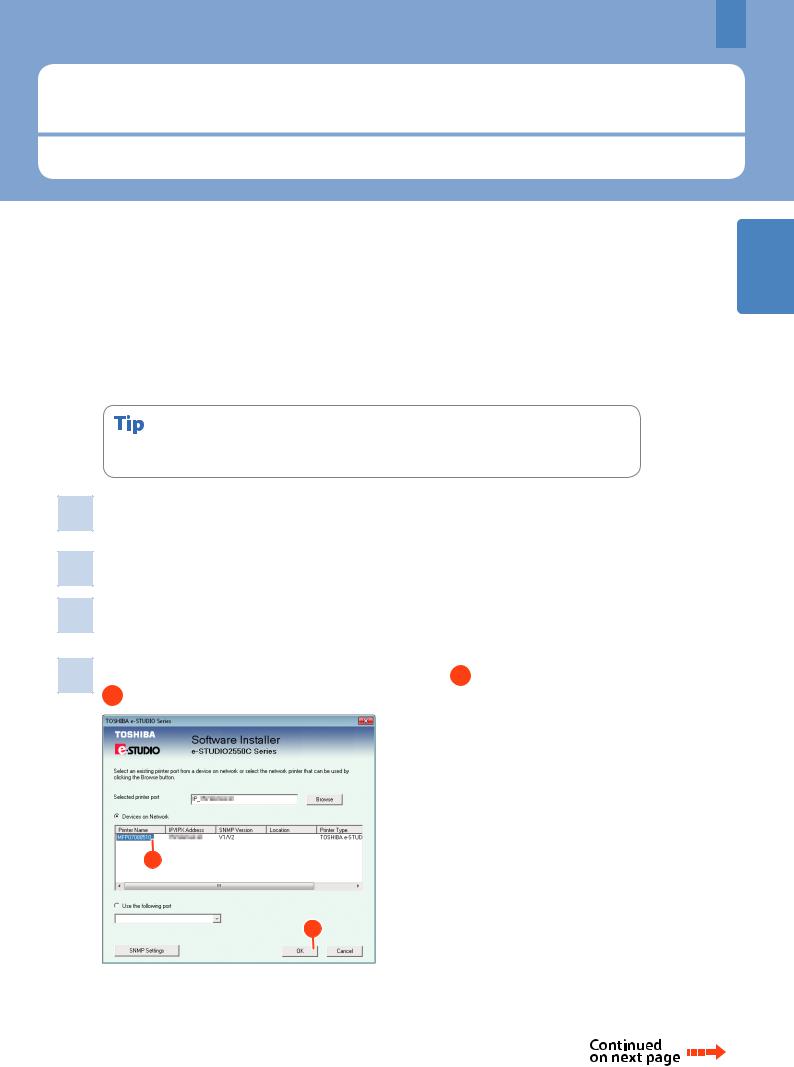
A list for the discovered printers is displayed. Then 1 select this equipment on the list and 2 click [OK].
1 |
2 |
17
Chapter 1 PREPARATIONS
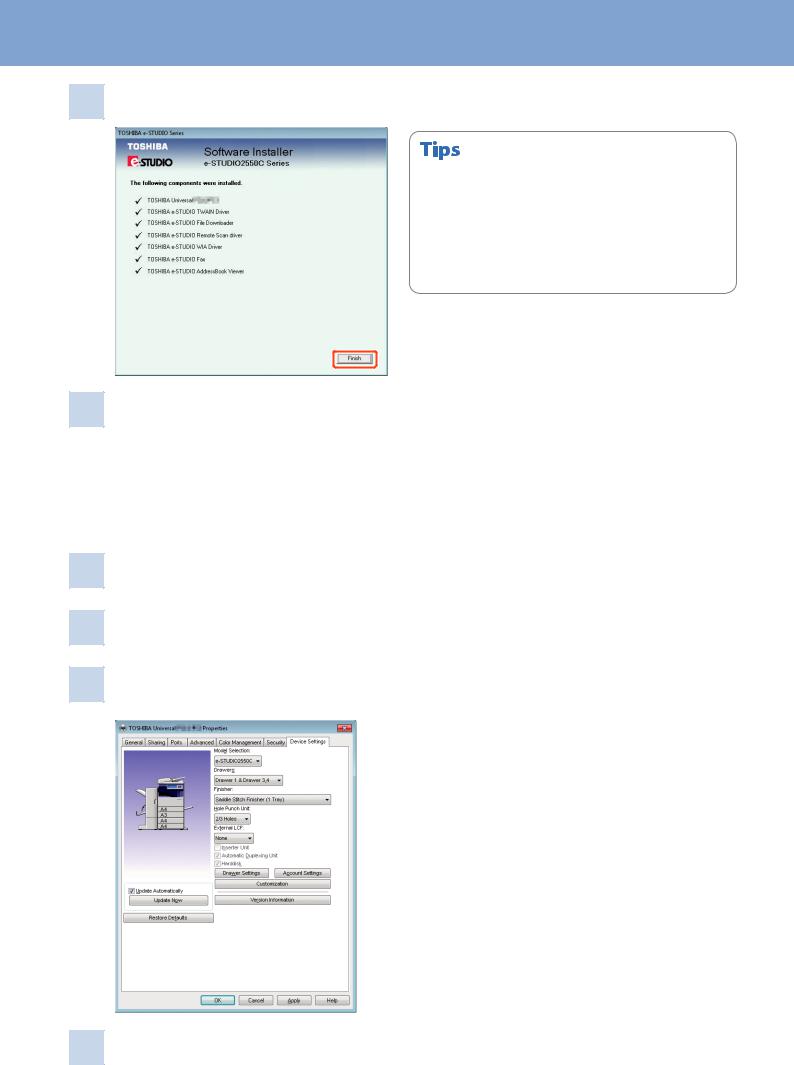
7 When the installation is completed, click [Finish].
• For details of the Client Utilities/User Documentation DVD, see the following page.
&P.61 “Client Utilities/User Documentation DVD“ in this manual
• For details of the recommended installation, refer to the following guide.
&Software Installation Guide (PDF): “Chapter 2: RECOMMENDED INSTALLATION”
8 Click [Exit] and then [Yes] to finish the installation.
Setting the printer driver
Before using the printer driver, you must configure the options installed in the equipment.
1
2
3
Select [Devices and Printers] in the [Start] menu.
Select TOSHIBA Universal Printer 2, right-click and then click [Printer Properties].
The configuration data of the options can be obtained automatically by opening the [Device Settings] tab menu.
4 Click [OK]. The setting is completed.
18
Chapter 2
BASIC OPERATION
Basic Copying Operation 20 Basic Fax Operation 24 Basic Scanning Operation 28 Basic e-Filing Operation 30 Basic Printing Operation 32 Basic Menu Operation 34

Chapter 2 BASIC OPERATION
Basic Copying Operation
The basic copying procedures, such as enlargement/reduction copying and duplex copying as well as bypass copying, are as follows.
Making copies
1Press the [COPY] button on the control panel.
2
3
Place the original(s).
&P.16 “Placing originals” in this manual
Select the copy modes as required.
You can switch the color mode. There are 3 color modes as shown below.
FULL COLOR: All originals are copied in full color. (Default) BLACK: All originals are copied in black and white. AUTO COLOR: The equipment automatically judges the
type of each color on originals. Colored originals are copied in full color and black- and-white originals are copied in black and white.
41 Key in the desired number of copies, and then 2 press the [START] button on the
control panel. Copying starts.
1 |
2 |
•To stop copying, press the [STOP] button on the control panel and then [MEMORY CLEAR] on the touch panel.
•Printed paper exits to the exit tray of the equipment or the Finisher. The tray to which the paper exits is indicated by the arrow on the touch panel.
20

Basic Copying Operation
Enlargement and reduction copying
1Press [ZOOM].
21 Select the desired paper size, 2
press [AMS], and then 3 [OK].
2 |
1 |
|
3 |
•Align the originals according to the desired paper size and direction. The size of the originals will be automatically determined.
•Automatic size detection for originals on the original glass is available only for e-STUDIO 2050C/2550C.
•When copying a set of originals whose sizes and directions are different, press [MIXED SIZE].
Selecting finishing mode (sorting)
1Press [FINISHING].
2
When you use the Reversing Automatic Document Feeder, the sorting mode is automatically set.
2 1 Press [SORT] and then 2 [OK].
1 |
2 |
•To set the staple and the hole punch mode, the optional finishing devices are needed. For the necessary options, see the following page.
&P.64 “Options” in this manual
•For example, when “Original 1”, “Original 2” and “Original 3” are copied in 2 sets, they can be made as follows.
Sort
|
|
|
|
|
|
|
|
|
|
|
|
|
|
|
|
|
|
|
|
|
|
|
|
|
|
|
|
|
|
|
|
|
|
|
|
|
|
|
|
|
|
|
|
|
|
|
|
|
|
|
|
|
|
|
|
|
|
|
|
|
|
|
|
|
|
|
|
|
|
|
|
|
|
|
|
|
|
|
|
|
|
|
|
|
|
|
|
|
|
|
|
|
|
|
|
|
|
|
|
|
|
|
|
|
|
|
|
|
|
|
|
|
|
|
|
|
|
|
|
|
|
|
|
|
|
|
|
|
|
|
|
|
1 |
2 |
|
|
|
|
|
1 |
2 |
|
|
|
|
|
1 |
2 |
|
||||||
|
|
|
|
|
|
3 |
|
|
|
|
|
|
3 |
|
|
|
|
|
|
3 |
|||||
|
|
|
|
|
|
|
|
|
|
|
|
|
|
|
|
|
|
|
|
|
|
|
|||
Group
|
|
|
|
|
|
|
|
|
|
|
|
|
|
|
|
|
|
|
|
|
|
|
|
|
|
|
|
|
|
|
|
|
|
|
|
|
|
|
|
|
|
|
|
|
|
|
|
|
|
|
|
|
|
|
|
|
|
|
|
|
|
|
|
|
|
|
|
|
|
|
|
|
|
|
|
|
|
|
|
|
|
|
|
|
|
1 |
2 |
|
|
|
1 |
1 |
2 |
||||||||
|
|
|
|
|
|
3 |
|
|
|
|
|
|
|
|||
|
|
|
|
|
|
|
|
|
|
|
|
|
||||
2 3 3
21
Chapter 2 BASIC OPERATION
Setting duplex copy
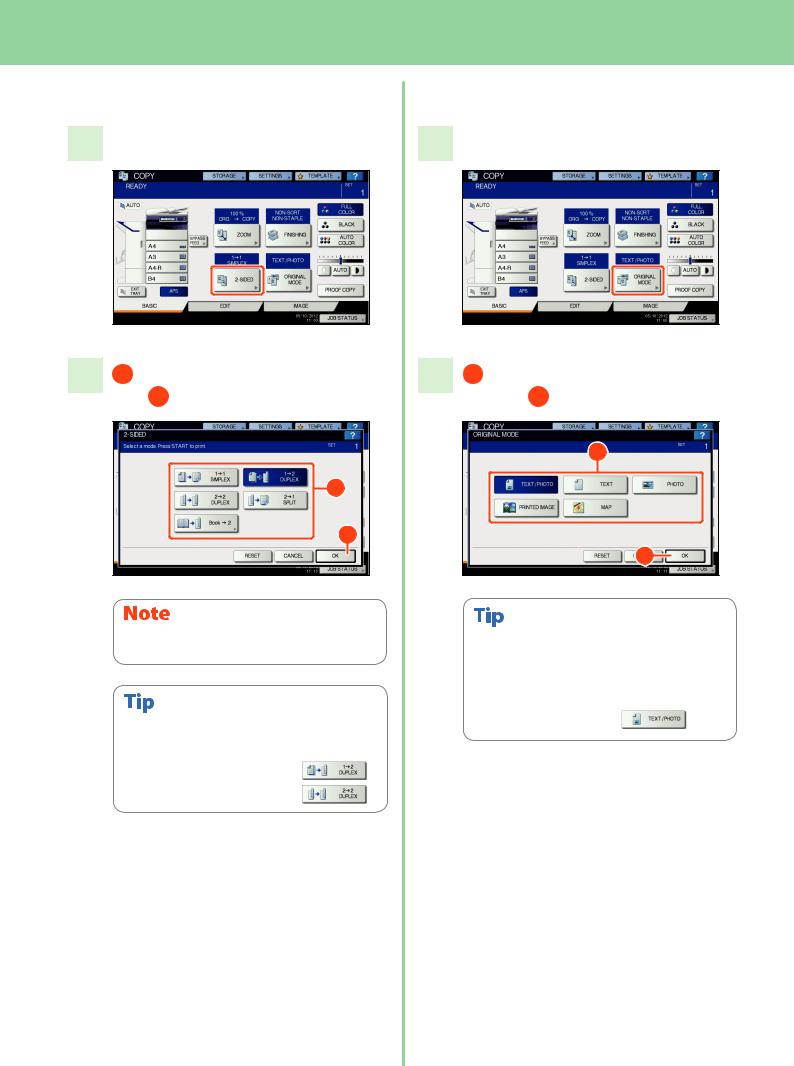
1Press [2-SIDED].
21 Select the desired duplex mode and
then 2 press [OK].
1 |
2 |
e-STUDIO2051C/2551C: This mode is available only when the Automatic Duplex Unit is installed.
You can choose from 5 types.
For example, the following settings can be made.
1-sided original to 2-sided copy:
2-sided original to 2-sided copy:
Setting original mode
1Press [ORIGINAL MODE].
21 Select the desired original mode
and then 2 press [OK].
1 |
2 |
The selectable original mode differs depending on the color mode. In the full color mode, you can choose from 5 types.
For example, the following settings can be made.
Originals with text and photographs mixed:
22
Basic Copying Operation
Density adjustment
You can manually adjust the density by pressing either  or
or  .
.
To lighten the density, press  , to darken it, press
 .
.
Press [AUTO] to adjust the density automatically.
The automatic density adjustment is set by default.
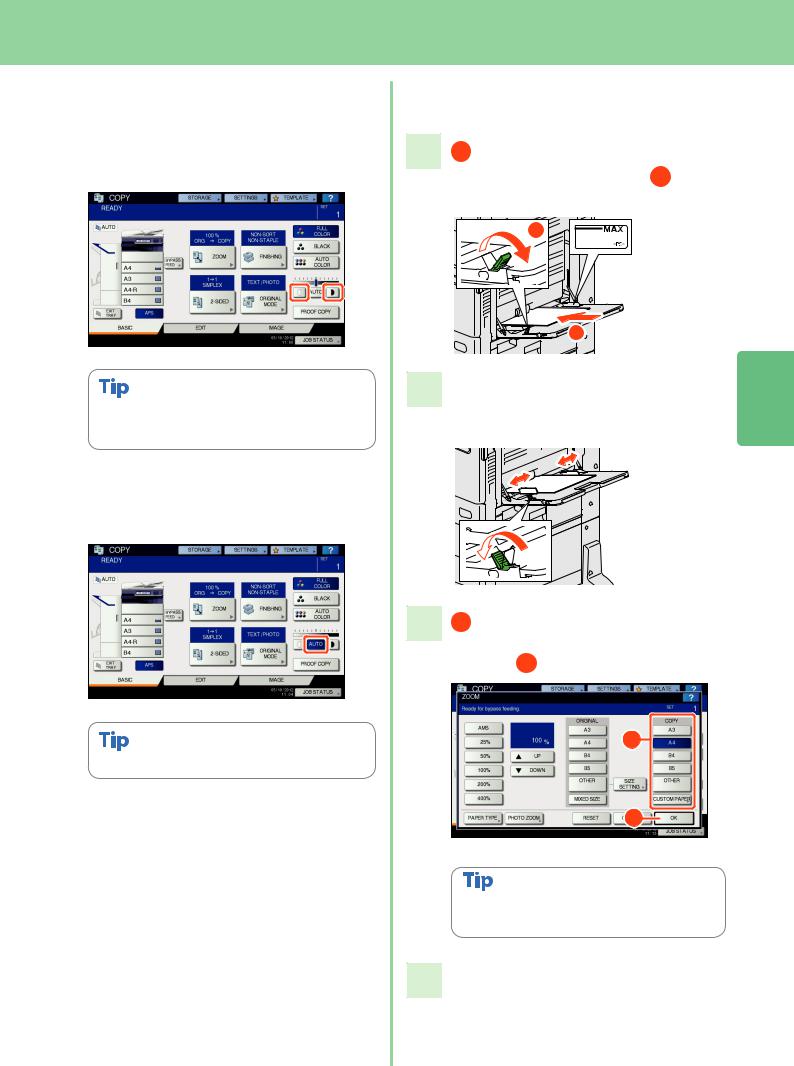
Bypass copying
11 Move the paper holding lever
toward the outside and then 2 place paper face down on the bypass tray.
1 |
2 |
2 |
Align the side guides to the paper |
2 |
length and then move the paper |
holding lever toward the equipment.
31 Press the button corresponding to
the size of paper set on the bypass tray and then 2 [OK].
1 |
2 |
Press [PAPER TYPE] if the type of the paper you placed on the bypass tray is other than plain paper.
4Press the [START] button. Bypass copying starts.
23

Chapter 2 BASIC OPERATION
Basic Fax Operation
The basic procedures for sending a fax, such as specifying fax numbers in the address book or setting the transmission conditions, are as follows.
Sending a fax
1Press the [FAX] button on the control panel.
2Place the original(s).
&P.16 “Placing originals” in this manual
3Key in the fax number of the recipient by pressing [INPUT FAX No.] on the touch panel or the digital keys on the control panel.
If you make a mistake when entering a fax number, press [BACK SPACE] on the touch panel to delete them one by one.
Or press the [CLEAR] button on the control panel or [CLEAR] on the touch panel to delete all the numbers you entered.
4Press [SEND] on the touch panel. The fax starts being sent.
Alternatively, you can press the [START] button on the control panel to send a fax.
24
Loading...