


 Loading...
|
♠♠♠♠♠♠♠♠♠♠♠♠♠♠♠♠♠♠♠♠♠♠♠♠♠♠♠♠♠♠♠♠♠♠♠♠♠♠♠♠♠♠♠♠♠♠♠♠♠ |
||
♠ |
|
♠ |
|
|
♠ |
||
♠ |
|
For users in the USA |
♠ |
♠♠♠♠♠♠♠♠♠♠♠♠♠♠♠♠♠♠♠♠♠♠♠♠♠♠♠♠♠♠♠♠♠♠♠♠♠♠♠♠♠♠♠♠ |
|
||
|
the following measures: |
♠♠♠♠♠♠♠♠♠♠♠♠♠♠♠♠♠♠♠♠♠♠♠♠♠♠♠♠♠♠♠♠♠♠♠♠♠♠♠♠♠♠♠♠ |
|
|
|
This device complies with Part 15 of the FCC rules. Operation is subject to the |
|
|
|
following two conditions: (1) This device may not cause harmful interference, |
|
|
|
and (2) this device must accept any interference received, including interference |
|
|
|
that may cause undesired operation. |
|
|
|
WARNING: |
|
|
|
FCC Regulations state that any unauthorized changes or modifications to this |
|
|
|
equipment not expressly approved by the manufacturer could void the user’s |
|
|
|
authority to operate this equipment. |
|
|
|
Note: |
|
|
|
This equipment has been tested and found to comply with the limits for a Class |
|
|
|
B digital device, pursuant to Part 15 of the FCC Rules. These limits are |
|
|
|
designed to provide reasonable protection against harmful interference in a |
|
|
|
residential installation. This equipment generates, uses and can radiate radio |
|
|
|
frequency energy and, if not installed and used in accordance with the |
|
|
|
instructions, may cause harmful interference to radio communications. |
|
|
|
However, there is no guarantee that interference will not occur in a particular |
|
|
|
installation. If this equipment does cause harmful interference to radio or |
|
|
|
television reception, which can be determined by turning the equipment off and |
|
|
|
on, the user is encouraged to try to correct the interference by one or more of |
|
|
|
● Reorient or relocate the receiving antenna. |
|
|
|
● Increase the separation between the equipment and receiver. |
|
|
|
● Connect the equipment into an outlet on a circuit different from that to which |
|
|
|
the receiver is connected. |
|
♠ |
|
● Consult the dealer or an experienced radio/TV technician for help. |
♠ |
♠ |
|
||
|
♠ |
||
|
♠ |
♠ |
|
|
♠♠♠♠♠♠♠♠♠♠♠♠♠♠♠♠♠♠♠♠♠♠♠♠♠♠♠♠♠♠♠♠♠♠♠♠♠♠♠♠♠♠♠♠♠♠♠♠ |
|
|
Caution
•Use only the line cable that was provided with the machine.
•To reduce the risk of fire, use only UL-Listed No.26 AWG or larger telecommunication line cord.
Note
•This manual (fax function) describes the e-STUDIO162/162D/151/151D model with optional facsimile expansion kit (GD-1190) installed. Depending on the model you have and on the options installed, some of the illustrations in this manual may be different, however, the basic operations are the same.
•This manual describes how to use the fax function of the machine.
Part names and functions shared with the copy function (for example, the misfeed indicator and add paper indicator), are described in the Operation Manual (for Basic Function). For more information, please read the Operation Manual (for Basic Function).
•This operation manual refers to the Automatic Document Feeder as the "ADF", and the Reversible Automatic Document Feeder as the "RADF".

INTRODUCTION
TYPE OF SERVICE
This equipment may not be used on coin service provided by the telephone company. Connection to party lines service is subject to state tariffs. Contact your state's public utility commission, public service commission, or corporation commission for more information.
ABOUT THE TELEPHONE CONSUMER PROTECTION ACT OF 1991
The Telephone Consumer Protection Act of 1991 makes it unlawful for any person to use a computer or other electronic device, including FAX machines, to send any message unless such message clearly contains in a margin at the top or bottom of each transmitted page or on the first page of the transmission, the date and time it is sent and an identification of the business or other entity, or other individual sending the message and the telephone number of the sending machine or such business, other entity, or individual.
(The telephone number provided may not be a 900 number or any other number for which charges exceed local or long-distance transmission charges.)
In order to program this information into your FAX machine, you should complete the following steps: See page 21 of this Operation Manual.
Important safety information
•If any of your telephone equipment is not operating properly, you should immediately remove it from your telephone line, as it may cause harm to the telephone network.
•The AC power outlet shall be installed near the equipment and shall be easily accessible.
•Never install telephone wiring during a lightning storm.
•Never install telephone jacks in wet locations unless the jack is specifically designed for wet locations.
•Never touch uninsulated telephone wires or terminals unless the telephone line has been disconnected at the network interface.
•Use caution when installing or modifying telephone lines.
•Avoid using a telephone (other than a cordless type) during an electrical storm. There may be a remote risk of electric shock from lightning.
•Do not use a telephone to report a gas leak in the vicinity of the leak.
•Do not install or use the machine near water, or when you are wet. Take care not to spill any liquids on the machine.
i

FCC Notice to users:
This equipment complies with Part 68 of the FCC rules and the requirements adopted by the ACTA.
On the rear cover of this equipment is a label that contains, among other information, a product identifier in the format US:AAAEQ##TXXXX.
If requested, this number must be provided to the telephone company.
The REN is used to determine the number of devices that may be connected to a telephone line. Excessive RENs on a telephone line may result in the devices not ringing in response to an incoming call. In most but not all areas, the sum of RENs should not exceed five (5.0).
To be certain of the number of devices that may be connected to a line, as determined by the total RENs, contact the local telephone company.
For products approved after July 23, 2001, the REN for this product is part of the product identifier that has the format US:AAAEQ##TXXXX.
The digits represented by ## are the REN without a decimal point (e.g., 03 is a REN of 0.3). For earlier products, the REN is separately shown on the label.
If this equipment causes harm to the telephone network, your telephone company may disconnect your service temporarily. If possible, They will notify you in advance. If advance notice is not practical, you will be notified as soon as possible. You will also be advised of your right to file a compliant with the FCC.
Your telephone company may make changes in its facilities, equipment, operations, or procedures that could affect the operation of your equipment. If this happens, the telephone company will provide advance notice in order for you to make necessary modifications to maintain uninterrupted service. If the equipment is causing harm to the telephone network, your telephone company may ask you to disconnect the equipment until the problem is resolved.
Connection to party line service is subject to state tariffs. Contact the state public utility commission, public service commission or corporation commission for information.
If you have any questions or problems which cannot be solved by reading this manual, please contact
TOSHIBA AMERICA BUSINESS SOLUTIONS, INC.
Electronic Imaging Division
2 Musick, Irvine, CA 92618-1631
A plug and jack used to connect this equipment to the premises wiring and telephone network must comply with the applicable FCC Part 68 rules and requirements adopted by the ACTA.
A compliant telephone cord and modular plug is provided with this product.
It is designed to be connected to a compatible modular jack that is also compliant. See installation instructions for details.
This equipment connects to the telephone network through a standard USOC RJ-11C network interface jack.
If your home has specially wired alarm equipment connected to the telephone line, ensure the installation of this equipment does not disable your alarm equipment.
If you have questions about what will disable alarm equipment, consult your telephone company or a qualified installer.
ii

TABLE OF CONTENTS |
|
INTRODUCTION ......................................................................................................................................... |
i |
QUICK REFERENCE GUIDE .................................................................................................................... |
3 |
LIST OF FAX FUNCTIONS........................................................................................................................ |
6 |
1 |
INSTALLATION |
|
CONNECTIONS .............................................. |
11 |
|
● CONNECTING THE TELEPHONE LINE CORD ... |
11 |
|
FINAL PREPARATIONS ................................ |
12 |
|
● CONNECTING OTHER DEVICES ................ |
12 |
|
2 |
INITIAL SETTINGS |
|
USING THE MACHINE WITH AN ANSWERING |
||
MACHINE......................................................... |
48 |
|
● QUIET DETECT TIME .................................. |
48 |
|
● ANSWERING MACHINE BACKUP............... |
49 |
|
3 |
CHOOSING SUITABLE MEDIA |
|
ORIGINALS SUITABLE FOR FAXING ........... |
50 |
|
● SIZE AND WEIGHT ...................................... |
50 |
|
● UNSUITABLE ORIGINALS ........................... |
51 |
|
PART NAMES................................................. |
13 |
A LOOK AT THE FAX OPERATION PANEL ..... |
14 |
ABOUT THE LIQUID CRYSTAL DISPLAY.... |
16 |
USING THE ARROW KEYS ........................... |
16 |
ADJUSTING THE BEEP VOLUME ................ |
16 |
ADJUSTING THE RINGING VOLUME........... |
17 |
SETTING THE LENGTH OF ALARM BEEPS .... |
18 |
ADJUSTING THE ALARM BEEP VOLUME .. |
19 |
FAX SETUP .................................................... |
20 |
● HOW TO ENTER CHARACTERS ................. |
20 |
● ENTERING YOUR NAME AND FAX NUMBER..... |
21 |
● SETTING THE DATE AND TIME .................. |
22 |
● SELECTING THE TRANSMISSION MODE .. |
26 |
● SELECTING THE RECEPTION MODE......... |
27 |
● SETTING THE NUMBER OF RINGS FOR |
|
AUTO RECEPTION ....................................... |
28 |
● SETTING THE NUMBER OF RINGS FOR |
|
MANUAL RECEPTION .................................. |
29 |
●SELECTING THE RECEPTION PAPER SIZE..29
●SETTING THE TRAY SELECTION (when the 250-sheet paper feed unit is installed)30
● SETTING THE DIAL MODE .......................... |
31 |
● SETTING THE NUMBER OF RECALL TIMES...... |
32 |
● SETTING THE RECALL INTERVAL.............. |
34 |
● SETTING THE INDEX FUNCTION................ |
36 |
● SETTING RESOLUTION PRIORITY ............. |
37 |
● SETTING UP THE MACHINE FOR USE WITH |
|
A PC MODEM................................................ |
38 |
● USING THE REMOTE RECEPTION |
|
FUNCTION .................................................... |
39 |
● DISTINCTIVE RINGING ................................ |
41 |
● STORING NUMBERS FOR AUTOMATIC |
|
DIALING......................................................... |
42 |
● STORING NUMBERS UNDER GROUP KEYS ..... |
45 |
1

4 |
HOW TO USE THE FAX FUNCTION |
|
SENDING ORIGINALS ................................... |
52 |
|
● SETTING THE ORIGINAL ............................. |
52 |
|
OPTIONAL TRANSMISSION SETTINGS ...... |
54 |
|
● ORIGINAL SIZE............................................. |
54 |
|
● RESOLUTION................................................ |
55 |
|
● CONTRAST ................................................... |
55 |
|
● COVER SHEET ............................................. |
56 |
|
● MESSAGE FUNCTION.................................. |
57 |
|
● TWO-SIDED ORIGINAL TRANSMISSION |
|
|
|
FUNCTION (when an RADF is installed)....... |
58 |
DIALING AND TRANSMITTING..................... |
59 |
|
● DIRECT KEYPAD DIALING........................... |
59 |
|
● RAPID KEY DIALING .................................... |
59 |
|
● SPEED DIALING ........................................... |
59 |
|
● CHAIN DIALING ............................................ |
60 |
|
● NORMAL DIALING USING THE [SPEAKER] |
||
|
KEY................................................................ |
60 |
● USING THE SEARCH KEY ........................... |
61 |
|
● REDIALING.................................................... |
61 |
|
IF THE MEMORY BECOMES FULL WHILE |
|
|
SCANNING AN ORIGINAL............................. |
62 |
|
CANCELING (DELETING) A STORED FAX JOB...62
RECEIVING FAXES........................................ |
63 |
● USING AUTO MODE..................................... |
63 |
● USING MAN. MODE...................................... |
63 |
● USING A.M. MODE ....................................... |
63 |
OPTIONAL RECEPTION SETTINGS ............. |
64 |
● TWO-SIDED RECEPTION |
|
(e-STUDIO162D/151D only) .......................... |
64 |
● RECEIVE REDUCE ....................................... |
65 |
WHEN USING MANUAL SENDING AND |
|
RECEIVING..................................................... |
66 |
5 |
SPECIAL FUNCTIONS |
|
MEMORY |
......................................................... |
67 |
DATA TRANSFER........................................... |
68 |
|
TRANSMISSION RESERVATION................... |
70 |
|
BROADCASTING ............................................ |
71 |
|
POLLING |
......................................................... |
73 |
● POLLING ...................................................... |
73 |
|
● SERIAL POLLING......................................... |
74 |
|
● POLLING TRANSMISSION (MEMORY |
|
|
POLLING) ..................................................... |
75 |
|
● RESTRICTING POLLING MACHINES |
|
|
(POLLING SECURITY) ................................. |
77 |
|
TIMER OPERATIONS ..................................... |
79 |
|
● CANCELING A TIMER TRANSMISSION JOB.. 80 |
||
ANTI JUNK FAX .............................................. |
81 |
|
OPERATION IN COPY, PRINTER, SCANNER, |
||
AND FAX MODES ........................................... |
84 |
|
6 |
TROUBLESHOOTING |
|
PRINTING OUT REPORTS ............................. |
85 |
|
● ACTIVITY REPORT AUTO LISTING ............ |
88 |
|
● PRINTING TRANSACTION REPORTS........ |
89 |
|
TROUBLESHOOTING..................................... |
90 |
|
MESSAGES AND SIGNALS ........................... |
91 |
|
● DISPLAY MESSAGES.................................. |
91 |
|
● AUDIBLE SIGNALS ...................................... |
91 |
|
7 |
APPENDIX |
|
SPECIFICATIONS ........................................... |
92 |
|
INDEX .............................................................. |
|
93 |
2
QUICK REFERENCE GUIDE
The following quick reference guide provides brief explanations the operation of the machine.
Selecting the transmission mode (p.26)
Memory transmission mode |
|
Direct transmission mode |
MEMORY |
|
MEMORY |
The indicator lights up when |
Press the |
The indicator is off when |
memory transmission mode |
[MEMORY] key |
direct transmission mode |
is selected. |
to change modes. |
is selected. |
Place the original
Using the ADF/RADF (p.52) |
Using the document glass (p.53) |
||||
|
|
|
|
|
|
|
|
|
|
|
|
Place the original face up |
Place the original face down |
(up to 30 pages at once) |
|
3
Sending a fax
Dialing methods
Direct Dialing (p.59)
Press the numeric keys to dial.
Speed Dialing (p.59)
SPEED/ |
Enter a two-digit |
SEARCH |
Speed Dial number. |
|
Rapid Key |
01 |
09 |
* It is not necessary to press the [START] key |
|
10 |
18 |
|||
Dialing (p.59) |
after pressing a Rapid Key. |
|||
|
|
Chain Dialing (p.60)
SPEED/
SEARCH
01 |
09 |
10 |
18 |
Speed Dial number or Rapid Key set for Chain Dialing when stored.
REDIAL/
PAUSE
Dial with the numeric keys and then press the [REDIAL/PAUSE] key.
Dial the next part of the number (a Group Key cannot be used).
Search Dialing (p.61)
SPEED/
SEARCH
Enter the first letter of the stored name.
Press when the first character of the
name is a special character or number.
Select the destination.
Search by fax numbers.
Redialing |
REDIAL/ |
|
(p.61) |
PAUSE |
Redial the last number dialed. |
Sending a fax
Using the ADF/RADF
|
|
|
RESOLU- |
|
|
|
|
|
|
|
|
|
TION |
CONTRAST |
|
Dial. |
|
|
|
|
|
|
|
|
|
|
|||
|
|
|
Adjust the resolution |
|
|
|
|
||
|
|
|
|
|
|
|
|
||
Place |
the original. (p.52) |
and contrast. (p.55) |
|
|
|
|
|
||
|
|
|
|
|
|
|
|
|
|
Using the document glass |
|
|
|
|
|
|
|||
|
|
Specify the |
RESOLU- |
|
|
|
|
|
|
|
|
|
|
|
|
|
|||
|
|
|
|
|
|
|
|||
|
|
TION |
CONTRAST |
Dial. |
If you are faxing a |
|
|||
|
|
original size. |
|
||||||
|
|
|
|
multi-page original, |
|
||||
|
|
(p.54) |
|
Adjust the resolution |
|
change pages and |
|
||
|
|
|
|
|
press the [START] |
|
|||
Place the original. (p.53) |
|
and contrast. (p.55) |
|
|
|||||
|
|
key ( ). |
|
||||||
|
|
|
|
|
|
|
|
|
|
4
Sending a fax to multiple destinations (Broadcasting) (p.71)
BROAD- |
RESOLU- |
|
Dial. |
CAST |
TION |
CONTRAST |
Adjust the resolution
Place the original.
and contrast. (p.55)
Storing a fax job while another job is in progress
|
|
|
|
|
|
|
|
|
Fax transmission |
|
|
|
RESOLU- |
|
|
|
|
|
|
|
|
|
|
|
||
or reception in |
|
|
|
|
|
|
|
|
|
|
|
TION |
CONTRAST |
Dial. |
The fax will be |
||
progress |
|
|
|
|
|
|||
|
|
|
|
|
transmitted after |
|||
|
|
|
|
|
|
|||
|
|
|
|
Adjust the resolution |
|
previous jobs are |
||
|
|
|
|
|
||||
Place the original. |
|
completed. |
||||||
and contrast. (p.55) |
|
|
|
|||||
|
|
|
|
|
|
|
||
Automatically sending a fax at a specified time (timer transmission)
To set up a timer transmission, see "TIMER OPERATIONS" (p.79).
Receiving a fax
Selecting the reception mode (p.63)
"AUTO"
RECEPTION MODE
|
"MAN." |
||
Press until the desired |
|
|
|
"A.M." |
|||
reception mode appears |
|||
|
|
||
in the display. |
|
|
|
|
|
||
"AUTO" :
"MAN." :
"A.M." :
Faxes are automatically received.
Select this mode when an extension phone is connected to the machine to receive phone calls. To receive a fax, answer the call on the phone and then press the [START] ( ) key.
Select this mode when an answering machine is connected to the machine. Faxes will be received automatically.
Calling a fax machine and requesting automatic transmission of an original placed in that machine (p.73)
Dial.
Select "POLLING MODE".
*Another fax machine can also call your fax machine and request automatic transmission of a original placed in your machine. For this to take place, the reception mode of your machine must be set to "AUTO".
5

LIST OF FAX FUNCTIONS
The FAX MAIN MENU is used to configure settings for the fax function and program information such as the fax number of the machine. The settings in the FAX MAIN MENU are shown below.
The procedure for configuring settings is explained in "SELECTING SETTINGS FOR THE FUNCTION" (p.10).
|
|
Menu item |
|
Settings (factory default setting appears in bold) |
Page |
|
|
|
|
|
|
0 : RX DATA TRANSFER |
|
|
|
||
|
|
|
|
||
|
1 |
: DATA TRANSFER |
Enable transfer of received faxes to another fax machine when |
69 |
|
|
|
|
printing is not possible. |
||
|
|
|
|
||
|
|
|
|
|
|
|
2 |
: FAX NUMBER |
Program the fax number of the machine to which received faxes |
68 |
|
|
|
|
will be transferred. |
||
|
|
|
|
||
|
|
|
|
|
|
1 : TIMER MODE |
|
|
|
||
|
|
|
|
||
|
1 |
: SET |
Set up a transmission or polling job to take place automatically |
79 |
|
|
|
|
at a specified time. |
||
|
|
|
|
||
|
|
|
|
|
|
|
2 |
: CLEAR |
Cancel a timer transmission job. |
79 |
|
|
|
|
|
|
|
2 : ENTRY MODE |
|
|
|
||
|
|
|
|
||
|
1 |
: FAX NUMBER |
Store (or delete) fax numbers in Rapid Keys, Speed Dial |
|
|
|
|
|
numbers, and Group Keys. |
42, 44, |
|
|
|
|
1 |
: RAPID KEY |
|
|
|
|
45, 47 |
||
|
|
|
2 |
: SPEED # |
|
|
|
|
|
||
|
|
|
3 |
: GROUP KEY |
|
|
|
|
|
|
|
|
2 |
: DATE&TIME SET |
Set the date and time in the machine. |
22 |
|
|
|
|
|
|
|
|
3 |
: OWN PASSCODE SET |
Program the name and phone number of the user of the |
21 |
|
|
|
|
machine. |
||
|
|
|
|
||
|
|
|
|
|
|
|
4 |
: PASSCODE # MODE |
Store fax numbers that are allowed to poll the machine when |
78 |
|
|
|
|
polling security is used. |
||
|
|
|
|
||
|
|
|
|
|
|
|
5 |
: DAY LIGHT SAVING |
Enable automatic adjustment of the clock at the beginning and |
25 |
|
|
|
|
end of daylight savings time. |
||
|
|
|
|
||
|
|
|
|
||
3 : MEMORY STATUS |
Check and delete stored fax jobs waiting for transmission and |
62 |
|||
|
|
|
automatic recall jobs. |
||
|
|
|
|
||
|
|
|
|
||
4 : USER PROGRAM |
|
|
|
||
|
|
|
|
||
|
1 |
: DOC. GLASS SIZE |
Set the size of an original faxed from the document glass. |
|
|
|
|
|
1 |
: 8.5x11 |
54 |
|
|
|
2 |
: 8.5x14 |
|
|
|
|
|
||
|
|
|
3 |
: A4 |
|
|
|
|
|
|
|
|
2 |
: FIXED DOC. SIZE |
Set the default size of originals faxed from the document glass. |
|
|
|
|
|
1 |
: 8.5x11 |
54 |
|
|
|
2 |
: 8.5x14 |
|
|
|
|
|
||
|
|
|
3 |
: A4 |
|
|
|
|
|
|
|
|
3 |
: RESO. PRIORITY |
Set the default resolution for fax transmission. |
|
|
|
|
|
1 |
: STANDARD |
37 |
|
|
|
2 |
: FINE |
|
|
|
|
|
||
|
|
|
3 |
: SUPER FINE |
|
|
|
|
|
|
|
|
4 |
: # OF RINGS (AUTO) |
Set the number of rings on which the machine answers calls in |
|
|
|
|
|
automatic reception mode. |
28 |
|
|
|
|
0 |
- 9 (2) |
|
|
|
|
|
|
|
|
5 |
: # OF RINGS (MANUAL) |
Set the number of rings on which the machine answers calls in |
|
|
|
|
|
manual reception mode. |
29 |
|
|
|
|
0 |
- 9 (0) |
|
|
|
|
|
|
|
6
|
|
|
|
|
|
|
|
|
|
|
|
|
Menu item |
|
|
Settings (factory default setting appears in bold) |
Page |
|
|
|
|
||
|
6 : AUTO LISTING |
Enable automatic printing of the Activity Report when |
|
||
|
|
information on a total of 50 fax transmissions/receptions |
|
||
|
|
accumulates. |
88 |
||
|
|
1 |
: ON |
|
|
|
|
2 |
: OFF |
|
|
|
|
|
|
||
|
7 : PRINT SELECTION |
1 : TRANSMISSION |
|
||
|
|
|
Select the condition for printing reports on fax transmissions. |
|
|
|
|
|
1 |
: ALWAYS PRINTS |
89 |
|
|
|
2 |
: ERROR ONLY |
|
|
|
|
3 |
: NEVER PRINTS |
|
|
|
|
|
|
|
|
|
2 |
: BROADCAST |
|
|
|
|
|
Select the condition for printing reports on broadcast |
|
|
|
|
|
transmissions. |
89 |
|
|
|
|
1 |
: ALWAYS PRINTS |
|
|
|
|
|
||
|
|
|
2 |
: ERROR ONLY |
|
|
|
|
3 |
: NEVER PRINTS |
|
|
|
|
|
|
|
|
|
3 |
: RECEPTION |
|
|
|
|
|
Select the condition for printing reports on received faxes. |
|
|
|
|
|
1 |
: ALWAYS PRINTS |
89 |
|
|
|
2 |
: ERROR ONLY |
|
|
|
|
3 |
: NEVER PRINTS |
|
|
|
|
|
|
|
|
|
4 |
: IMAGE MEM. PRINT |
|
|
|
|
|
Enable printing of the original image on transaction reports. |
|
|
|
|
|
1 |
: ALWAYS PRINTS |
89 |
|
|
|
2 |
: ERROR ONLY |
|
|
|
|
3 |
: NEVER PRINTS |
|
|
|
|
|
||
|
8 : RECALL TIMES BUSY |
Set the number of recall attempts that are made when the line is |
|
||
|
|
busy. |
32 |
||
|
|
00 - 14 (02) |
|
||
|
|
|
|
||
|
9 : RECALL TIMES ERR |
Set the number of recall attempts that are made when a |
|
||
|
|
communication error occurs. |
33 |
||
|
|
0 |
- 1 (1) |
|
|
|
|
|
|
||
|
10 : RECALL INT. BUSY |
Set the interval between recall attempts when the line is busy. 1 |
|
||
|
|
to 15 minutes can be selected. |
34 |
||
|
|
01 - 15 min. (03 min.) |
|
||
|
|
|
|
||
|
11 : RECALL INT. ERR |
Set the interval between recall attempts when a communication |
|
||
|
|
error occurs. 0 to 15 minutes can be selected. |
35 |
||
|
|
00 - 15 min. (01 min.) |
|
||
|
|
|
|
||
|
12 : SECURITY SELECT |
Enable the polling security function. |
|
||
|
|
1 |
: ON |
77 |
|
|
|
2 |
: OFF |
|
|
|
|
|
|
||
|
13 : FAX REMOTE |
Set the 1-digit number used to activate remote fax reception. |
40 |
||
|
NUMBER |
0 - 9 (5) |
|||
|
|
||||
|
|
|
|
||
|
14 : REMOTE RECEPTION |
Enable the remote reception function. |
|
||
|
|
1 |
: ON |
39 |
|
|
|
2 |
: OFF |
|
|
|
|
|
|
||
|
15 : FAX SIGNAL RCV |
Enable automatic fax reception when a fax tone is heard after |
|
||
|
|
answering a call on an extension phone. |
38 |
||
|
|
1 |
: ON |
||
|
|
|
|||
|
|
2 |
: OFF |
|
|
|
|
|
|
|
|
7
|
|
|
|
|
|
|
|
|
|
|
Menu item |
|
Settings (factory default setting appears in bold) |
Page |
|
|
|
|
|
|
16 : RCV REDUCE |
When a fax is received that is larger that the printing paper, |
|
|
|
|
enable reduction of the fax to the size of the paper to avoid the |
|
|
|
|
fax being cut off. |
65 |
|
|
|
1 |
: ON |
|
|
|
2 |
: OFF |
|
|
|
|
|
|
|
17 : BEEP LENGTH |
Set the length of the beep that sounds when fax transmission or |
|
|
|
|
reception ends. |
|
|
|
|
1 |
: 3 SEC |
18 |
|
|
2 |
: 1 SEC |
|
|
|
3 |
: NO BEEP |
|
|
|
|
|
|
|
18 : RINGER VOLUME |
Set the volume of the ringer. |
|
|
|
|
1 |
: OFF |
|
|
|
2 |
: LOW |
17 |
|
|
3 |
: MIDDLE |
|
|
|
4 |
: HIGH |
|
|
|
|
|
|
|
19 : BEEPER VOLUME |
Set the volume of the beep that sounds when a key is pressed. |
|
|
|
|
1 |
: OFF |
|
|
|
2 |
: LOW |
19 |
|
|
3 |
: MIDDLE |
|
|
|
4 |
: HIGH |
|
|
|
|
|
|
|
20 : DIAL MODE |
Set the dial mode for the type of line you are on. |
|
|
|
|
1 |
: TONE |
31 |
|
|
2 |
: PULSE |
|
|
|
|
|
|
|
21 : DISTINCTIVE RING |
Set the ring pattern for distinctive ring. |
|
|
|
|
1 |
: OFF |
|
|
|
2 |
: STANDARD |
|
|
|
3 |
: PATTERN 1 |
41 |
|
|
4 |
: PATTERN 2 |
|
|
|
|
||
|
|
5 |
: PATTERN 3 |
|
|
|
6 |
: PATTERN 4 |
|
|
|
7 |
: PATTERN 5 |
|
|
|
|
|
|
|
22 : INDEX PRINT |
Enable printing of a black mark (index) at the top of each |
|
|
|
|
received fax page. |
36 |
|
|
|
1 |
: ON |
|
|
|
|
||
|
|
2 |
: OFF |
|
|
|
|
|
|
|
23 : DATE&TIME FORMAT |
1 : TIME FORMAT |
|
|
|
|
|
Select 12-hour or 24-hour format for the time set in the |
|
|
|
|
machine. |
23 |
|
|
|
1 : 12 HOUR |
|
|
|
|
2 : 24 HOUR |
|
|
|
|
|
|
|
|
2 |
: DATE FORMAT |
|
|
|
|
Set the format of the date in the display and in printouts. |
|
|
|
|
1 : MMDDYYYY |
24 |
|
|
|
2 : DDMMYYYY |
|
|
|
|
3 : YYYYMMDD |
|
|
|
|
|
|
|
24 : 2-SIDED RX |
Print on both sides of the paper when a multi-page fax is received. |
|
|
|
(e-STUDIO162D/151D |
1 : ON |
64 |
|
|
only) |
2 : OFF |
|
|
|
|
|
|
|
|
25 : TRAY SELECTION |
Set the tray for printing received faxes. |
|
|
|
(When the 250-sheet paper |
1 : AUTO |
|
|
|
feed unit is installed.) |
2 : TRAY 1 |
30 |
|
|
("24: TRAY SELECTION" |
3 : TRAY 2 |
||
|
|
|||
|
when the |
|
|
|
|
e-STUDIO162/151 is used.) |
|
|
|
|
|
|
|
|
8
|
|
|
|
|
|
|
|
|
|
|
Menu item |
|
Settings (factory default setting appears in bold) |
Page |
|
|
|
|
|
5 :ANTI JUNK FAX |
|
|
|
|
|
|
|
|
|
|
1 : ANTI JUNK SELECT |
Enable the anti junk function to block fax reception from |
|
|
|
|
specified fax numbers. |
81 |
|
|
|
1 |
: ON |
|
|
|
|
||
|
|
2 |
: OFF |
|
|
|
|
|
|
|
2 : JUNK FAX # |
Program (or delete) fax numbers from which fax reception is to |
|
|
|
|
be blocked. |
82 |
|
|
|
1 |
: SET |
|
|
|
|
||
|
|
2 |
: CLEAR |
|
|
|
|
|
|
6 : A.M. MODE |
|
|
|
|
|
|
|
|
|
|
1: QUIET DETECT TIME |
Activate fax reception when a period of silence longer than the |
|
|
|
|
set time is detected. |
48 |
|
|
|
00 - 10 (05) |
|
|
|
|
|
|
|
|
2 : AUTO RECEIVE |
Enable fax reception when the answering machine is full and |
|
|
|
|
cannot receive messages or otherwise fails. |
49 |
|
|
|
1 |
: ON |
|
|
|
|
||
|
|
2 |
: OFF |
|
|
|
|
|
|
7 : MEMORY POLL MODE |
|
|
|
|
|
|
|
|
|
|
1 : 1 TIME |
Perform polling transmission once. |
75 |
|
|
|
|
|
|
|
2 : REPEAT |
Perform polling transmission repeatedly. |
75 |
|
|
|
|
|
|
8 : POLLING MODE |
Poll another fax machine. |
73 |
||
|
|
|
||
9 : SERIAL POLL MODE |
Sequentially poll multiple fax machines. |
74 |
||
|
|
|
|
|
9
SELECTING SETTINGS FOR THE FUNCTION
The general procedure for configuring settings for the fax function is explained below. Follow this procedure to configure the settings explained on pages 6 through 9.
An item can also be selected after pressing the [MENU] key by pressing the numeric key for the item (the key Note corresponding to the number that appears in front of the item). When the numeric key is pressed, the item is
selected or entered.
1 Press the [MODE SELECT] key to select fax mode.
|
The "FAX" indicator lights |
|
R |
up to indicate that fax |
|
mode is selected. |
||
|
2 Press the [MENU] key.
"FAX MAIN MENU" will appear in the display.
3 Press the [ ] key (
 ) or [
 ] key (
 ) to select a menu item and press the [ENTER] key.
The item is selected. Repeat this step until the item that you wish to configure appears.
4 Select a setting or enter information.
To select a setting:
Press the [ ] key (
  ) or [
 ] key (
  ) until the setting is selected.
To enter information:
Press the numeric keys to enter characters or numbers.
• If you mistakenly select the wrong item,  Note press the [CLEAR] key (
  ) and repeat
the procedure from step 2.
•To cancel a setting for a fax function, press the [MENU] key.
5 Press the [ENTER] key.
The setting or information is entered.
6 Press the [MENU] key.
Press the [MENU] key to exit.
10
1 |
Chapter 1 |
INSTALLATION |
CONNECTIONS
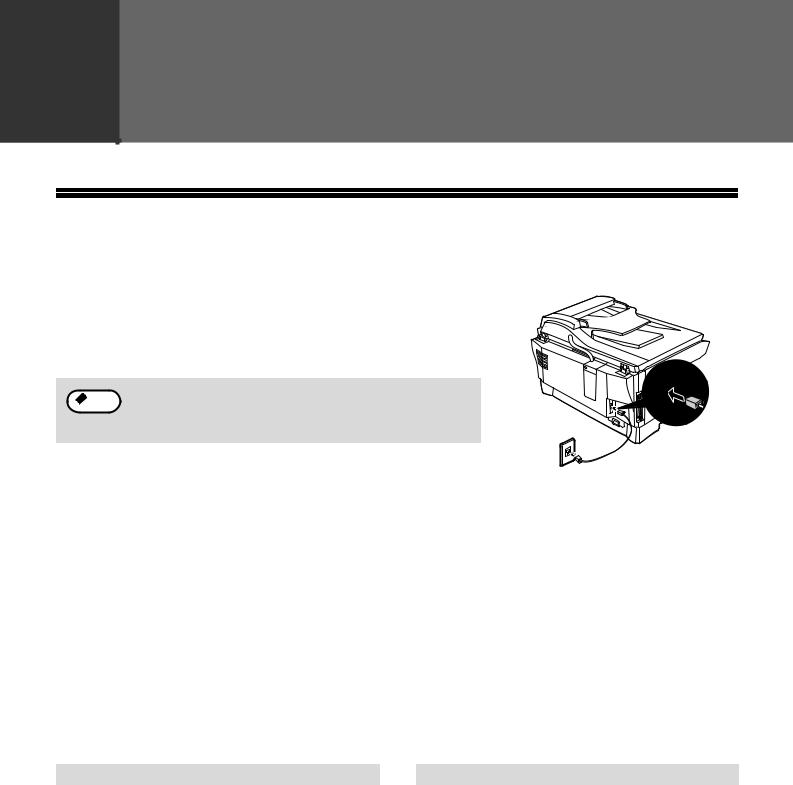
CONNECTING THE TELEPHONE LINE CORD
Plug one end of the telephone line cord into the jack on the machine marked "LINE." Plug the other side into a standard (RJ11C) single-line telephone wall jack. Be sure not to plug this telephone line cord into the "TEL" jack. The "TEL" jack is used to attach an extension telephone or answering machine to the machine. (See "CONNECTING OTHER DEVICES" (p.12))
If your area experiences a high incidence of lightning or power  Note surges, we recommend that you install surge protectors for the power and telephone lines. Surge protectors can be purchased
from your retailer or at most telephone specialty stores.
TEL
LINE
ABOUT THE OPERATION MANUALS
The operation manuals for the machine are as follows:
Facsimile Expansion Kit Operation Manual (this manual)
This manual explains the procedures for using the machine as a fax machine.
This manual only explains the fax functions of the machine. For Basic Function on using the machine, including safety information, installation, paper loading, removal of paper misfeeds, and peripheral equipment, see the operation manual for the machine.
Operation Manual (for Basic Function)
Explains the machine and how to use it as a copier. Also explains how to install the software that allows the machine to be used as a printer and scanner for your computer.
The following information is contained in the operation manual for the machine :
OPERATION MANUAL contents |
Page |
|
|
CAUTIONS |
3 |
|
|
PART NAMES |
9 |
|
|
POWER ON AND OFF |
12 |
|
|
LOADING THE PAPER TRAY |
15 |
|
|
BYPASS FEED (including special paper) |
17 |
|
|
OPERATION MANUAL contents |
Page |
|
|
|
|
CHANGING A TRAY'S PAPER SIZE |
19 |
|
SETTING |
||
|
||
|
|
|
MISFEED REMOVAL |
79 |
|
|
|
|
TONER CARTRIDGE REPLACEMENT |
83 |
|
|
|
|
CHECKING THE TOTAL COUNT |
87 |
|
|
|
|
CLEANING THE MACHINE |
88 |
|
|
|
Online Manual (on the CD-ROM)
This manual explains the procedures for using the machine as a printer and a scanner.
11

FINAL PREPARATIONS
CONNECTING OTHER DEVICES
If desired, an answering machine or external telephone can be connected to the machine through the telephone jack, labeled "TEL," on the rear of the machine.
●Connecting an answering machine to the machine allows you to receive both voice and fax messages when you are out. To use this feature, first change the outgoing message of your answering machine, and then set the reception mode of the machine to "A.M." (Answering Machine mode) when you go out.
If you are using distinctive ringing with an answering machine, you do not need to follow the procedure described Note below. (Please note that when distinctive ringing is used, the answering machine must be distinctive ring
compatible.)
Comments:
1.It is advisable to keep the length of the message under 10 seconds. If it is too long, you may have difficulty receiving faxes sent by automatic dialing.
2.Your callers can even leave a voice message and send a fax message on the same call. Modify your outgoing message to explain that this can be done by pressing their [START] key ( ) after leaving their voice message.
●You can connect an extension phone to the machine to make and receive calls like any other extension phone on your line. Even if you pick up the extension phone and hear a fax tone, the machine will automatically cut in and take over the line. Note, however, if you also have a PC modem on the same line, you must turn on the Remote Reception function, and deactivate the Fax Signal Receive function. See "SETTING UP THE MACHINE FOR USE WITH A PC MODEM" (p.38) and "USING THE REMOTE RECEPTION FUNCTION" (p.39).
Note |
The Remote Reception function is initially set to "ON". |
12

2 |
Chapter 2 |
INITIAL SETTINGS |
PART NAMES
The following illustration shows the part names with optional ADF/RADF.
|
ADF/RADF (Option) |
|
|
Reversing tray (RADF only) |
|
|
Original guides |
|
|
Document |
|
1 |
feeder cover |
|
|
||
2 |
Exit area |
|
Document feeder tray |
||
|
3
5
4
Bypass tray
TEL
 TEL jack
 LINE jack
LINE
1Document glass
2Operation panel
3Front cover
4Paper tray
5Bypass tray paper guides
|
6 |
|
7 |
|
8 |
|
9 |
9 |
10 |
|
6Paper output tray
7Paper output tray extension
8Power switch
9Handles
10 Power cord
13
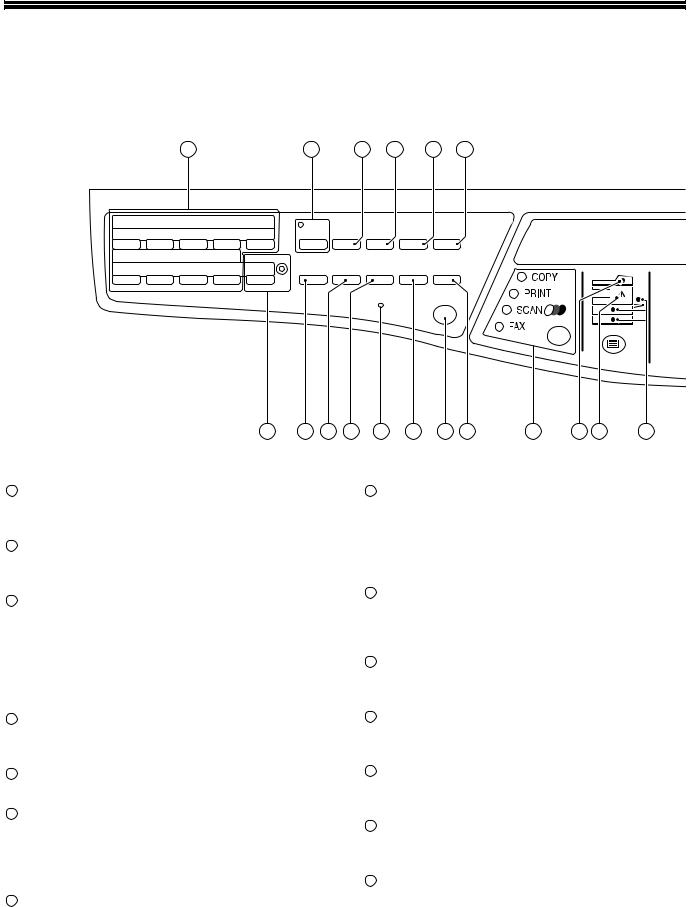
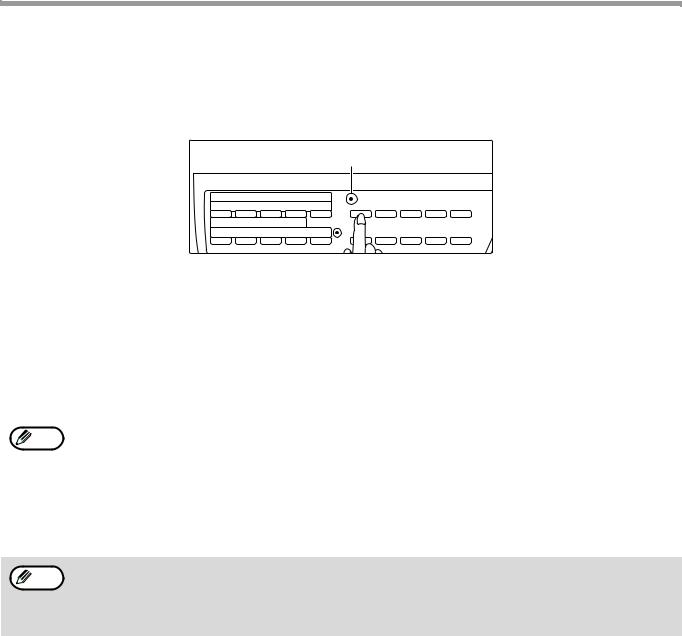
A LOOK AT THE FAX OPERATION PANEL
1 |
2 |
3 |
4 |
5 |
6 |
01 |
02 |
03 |
04 |
05 |
10 |
11 |
12 |
13 |
14 |
06 |
07 |
08 |
09 |
|
15 |
16 |
17 |
18 |
SHIFT |
|
SPEED/ |
BROAD- |
RECEPTION |
REDIAL/ |
MEMORY SEARCH |
CAST |
MODE |
PAUSE |
|
RESOLU- |
|
COVER |
|
|
TION |
CONTRAST SHEET |
REPORT |
2-SIDED TX |
|
LINE STATUS |
SPEAKER |
10 11 12 13
1Rapid keys
Press one of these keys to dial a fax or telephone number automatically.
2[MEMORY] key / indicator
Used for sending faxes in memory (indicator is lit) or direct sending (indicator is not lit).
3[SPEED/SEARCH] key
Press this key to dial a two digit Speed Dial number.
During character inputting, use this key to delete an incorrect entry.
Also, press this key twice to search for an automatic dialing number.
4[BROADCAST] key
Press this key to send originals to a group of receiving fax machines.
5[RECEPTION MODE] key
Press this key to select the mode of reception.
6[REDIAL/PAUSE] key
Press this key to automatically redial the last number you dialed.
Also, press this key to insert a pause when entering numbers.
7Display
Shows various messages during fax operation and programming.
14 |
15 |
16 |
17 |
18 |
19 |
20 |
21 |
8[CLEAR] key (  )
)
Press this key to stop an operation before it is completed, or to delete the number that was last input.
When a setting menu appears, use this key to move back to the previous menu level.
9[CLEAR ALL] key (  )
)
This returns all functions to the default settings. When pressed in a setting menu, this returns the settings and display to the initial state.
10[SHIFT] key / indicator
Press this key to switch between upper and lower case.
11[RESOLUTION] key
Press this key to adjust the resolution before sending faxes.
12[CONTRAST] key
Press this key to adjust the contrast before sending faxes.
13[COVERSHEET] key
Press this key to automatically add a cover sheet and message to a fax.
14LINE STATUS indicator
Lit when sending/receiving faxes, blinking when receiving data.
14
INITIAL SETTINGS
7 |
8 |
9 |
2
|
22 |
23 |
24 |
25 |
26 |
27 |
28 |
|
|
|
15 |
[REPORT] key |
|
|
|
23 |
[ |
] key ( |
), [ |
] key ( |
), [ENTER] key |
|
Press this key to print out a report of a fax |
|
|
Press the [ |
] key ( |
) or [ |
] key ( ) to |
|||
|
transaction and also when receiving a confidential |
|
select an item in a function setting menu. |
|||||||
|
fax. |
|
|
|
|
Press the [ENTER] key to enter a selection. |
||||
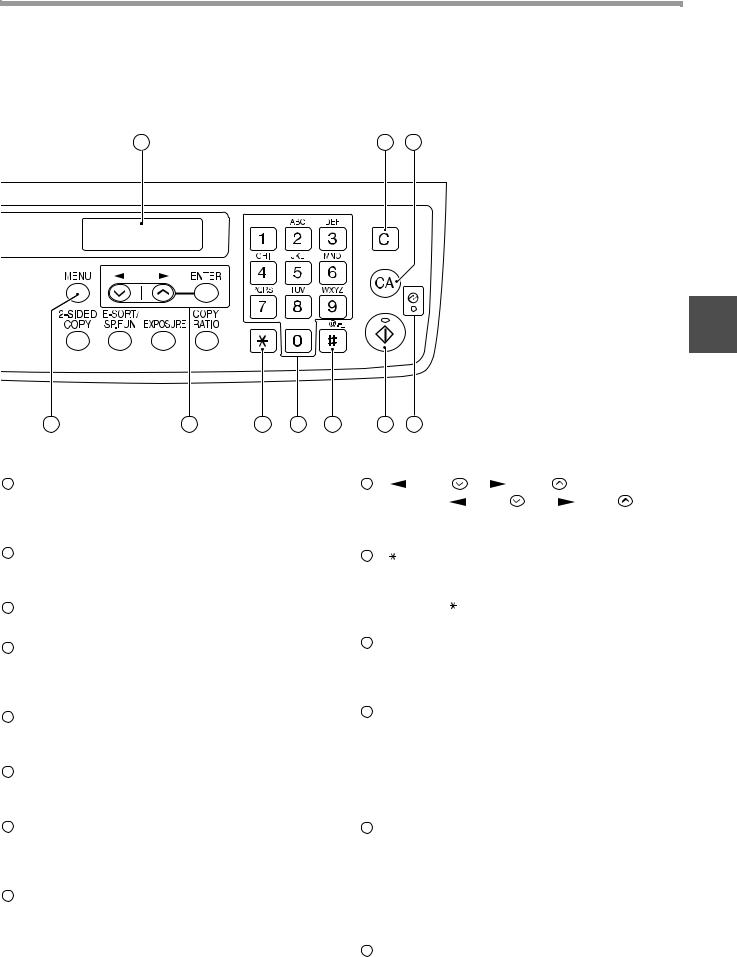
16 |
[SPEAKER] key |
|
|
|
24 |
[ |
] key |
|
|
|
|
Press this key to begin manual dialing. (To close |
|
Press this key to enter symbols during a name |
|||||||
|
the line, press the [SPEAKER] key again.) |
|
|
storing procedure. |
|
|
||||
17 |
[2-SIDED TX] key (e-STUDIO162D/151D only) |
|
Press the " " key to change from pulse dialing to |
|||||||
|
Press this key to fax a two-sided original. |
|
|
tone dialing mode. |
|
|
||||
|
|
|
|
|
|
|
|
|||
18 |
[MODE SELECT] key / Mode indicators |
|
25 |
Numeric keys |
|
|
||||
|
|
|
|
|
|
|
||||
Press this key to select the mode. The indicator of |
Press these keys to dial numbers, and enter |
|
numbers and letters during number/name storing |
||
the selected mode lights (copy, printer, scanner, |
||
procedures. |
||
fax mode indicators). |
||
|
19ADF/RADF indicator
This lights up when an original is placed in the ADF/RADF.
20Error indicator
This lights steadily or blinks when a paper misfeed or other error occurs.
21Tray location indicator
Indicates the selected paper tray. The indicator blinks when the tray is out of paper or is not closed.
22[MENU] key
Press this key to configure a user program.
26[#] key
Press this key to enter symbols during a name storing procedure. The [#] key scrolls through symbols in the opposite direction of the [ ] key. When dialing, press this key after you are finished scanning originals into memory from the document glass.
27[START] key (  )/ indicator
Used for the following:
•To begin sending a fax.
•Reading an original into memory from the document glass.
•Manually receiving a fax.
•Entering and setting information.
28Power save indicator
This lights up when the power save function is activated.
15
ABOUT THE LIQUID CRYSTAL DISPLAY
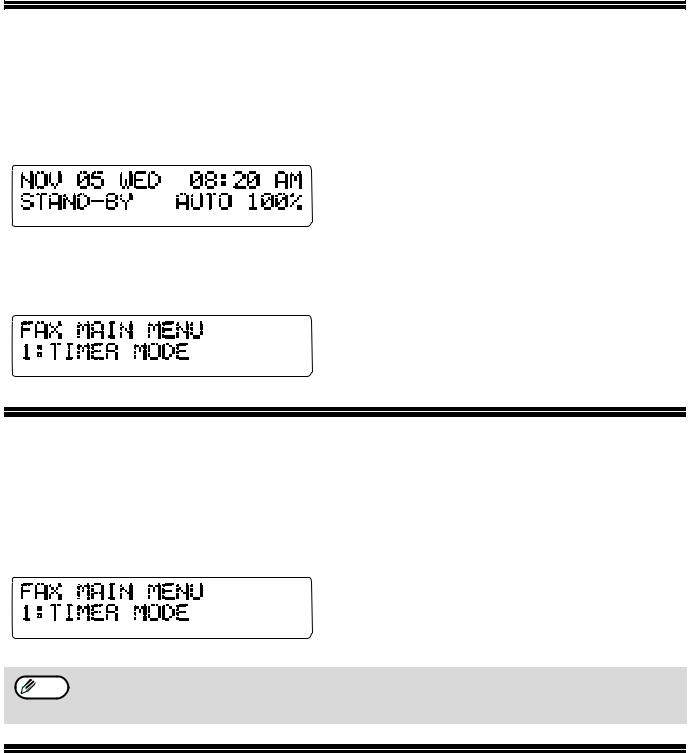
The machine is equipped with a two-line liquid crystal display (LCD) on the operation panel for displaying various messages and settings during operation. This LCD can display up to 20 characters on each line. When the machine is idle, the LCD shows the date, time, reception mode and the stand-by memory available.
Example:
When an original is placed in the ADF/RADF, the second line changes from "STAND-BY" to "SEND READY".
When the [MENU] key is pressed to configure a setting, the display appears as shown below.
Example:
The selected setting or entered information appears on the second line.
USING THE ARROW KEYS
To configure settings and program information, press the [MENU] key and then press the [ ] key (
  ) or [
  ] key (
  ) to select the item that you wish to configure.
The arrows keys can also be used while entering characters to move the cursor.
Example:
Press the [ ] key (
  ) or [
  ] key (
  ) to change the item selection that appears on the second line.
An item can also be selected after pressing the [MENU] key by pressing the numeric key for the item Note (the key corresponding to the number that appears in front of the item). When the numeric key is
pressed, the item is selected or entered.
ADJUSTING THE BEEP VOLUME
You can adjust the volume of the beep that sounds when a key is pressed.
The key beep volume is adjusted with "KEY TOUCH SOUND" (Program number 15) in the user programs of copy mode. See "User Programs" in the Operation Manual (for Basic Function).
16
ADJUSTING THE RINGING VOLUME
Adjust the ringing volume of the machine following the procedure below.
1 Press the [MENU] key. |
5 Press the [ENTER] key. |
2 Press the [ ] key ( ) or [ ] key ( ) |
6 Press the [MENU] key. |
2 |
until "4:USER PROGRAM" appears, |
|
|
and then press the [ENTER] key. |
Press the [MENU] key to |
|
|
exit. |
|
Selection |
|
|
"4:USER PROGRAM"
3 Press the [ ] key (
  ) or [
 ] key (
 ) until "18:RINGER VOLUME" appears, and then press the [ENTER] key.
Selection
"18:RINGER VOLUME"
4 Press the [ ] key (
  ) or [
 ] key (
 ) to set the ringer volume.
The selections are as
follows:
1:OFF
2:LOW
3:MIDDLE 4:HIGH
To turn off the ringer, select "1:OFF".
 Note An extension phone will still ring when the machine ringer is set to "1:OFF".
17
SETTING THE LENGTH OF ALARM BEEPS
You can select the length in seconds of the alarm beeps (emitted at the end of transmission and reception) following the procedure below.
1 Press the [MENU] key. |
6 Press the [MENU] key. |
Press the [MENU] key to exit.
2 Press the [ ] key (
  ) or [
 ] key (
 ) until "4:USER PROGRAM" appears, and then press the [ENTER] key.
Selection
"4:USER PROGRAM"
3 Press the [ ] key (
  ) or [
 ] key (
 ) until "17:BEEP LENGTH" appears, and then press the [ENTER] key.
Selection
"17:BEEP LENGTH"
4 Press the [ ] key (
  ) or [
 ] key (
 ) to set the alarm beeps to the desired length or to turn them off.
The selections are as
follows:
1:3SEC 2:1SEC 3:NO BEEP
5 Press the [ENTER] key.
18
ADJUSTING THE ALARM BEEP VOLUME
Adjust the volume of alarm beeps (emitted at the end of transmission and reception) following the procedure below.
1 Press the [MENU] key. |
6 Press the [MENU] key. |
2 Press the [ ] key (
  ) or [
 ] key (
 ) until "4:USER PROGRAM" appears, and then press the [ENTER] key.
Selection
"4:USER PROGRAM"
3 Press the [ ] key (
  ) or [
 ] key (
 ) until "19:BEEPER VOLUME" appears, and then press the [ENTER] key.
Selection
"19:BEEPER VOLUME"
4 Press the [ ] key (
  ) or [
 ] key (
 ) to set the alarm volume.
The selections are as
follows:
1:OFF
2:LOW
3:MIDDLE 4:HIGH
To turn off the alarm, select "1:OFF".
Press the [MENU] key to exit.
2
5 Press the [ENTER] key.
19
FAX SETUP
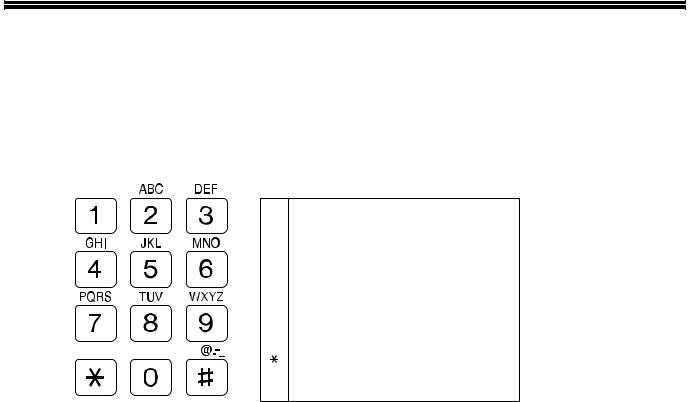
HOW TO ENTER CHARACTERS
You can enter letters with the numeric keys. Letters are marked above each of the numeric keys [2] through [9]. To enter a letter, press the appropriate key repeatedly until the desired letter appears (the number of the key appears first, followed by letters in the order marked above the key). The keys used for entering characters are shown below.
The following characters can be entered with the numeric keys:
key |
|
Characters that can be entered |
|||||||
1 |
1 |
Space |
|
|
|
|
|
|
|
2 |
A |
B |
C |
2 |
a |
b |
c |
|
|
3 |
D |
E |
F |
3 |
d |
e |
f |
|
|
4 |
G |
H |
I |
4 |
g |
h |
i |
|
|
5 |
J |
K |
L |
5 |
j |
k |
l |
|
|
6 |
M |
N |
O |
6 |
m |
n |
o |
|
|
7 |
P |
Q |
R |
S |
7 |
p |
q |
r |
s |
8 |
T |
U |
V |
8 |
t |
u |
v |
|
|
9 |
W |
X |
Y |
Z |
9 |
w |
x |
y |
z |
|
* } { ] [ ? > = ; : , + ) ('& % $"!/_-.@ # |
||||||||
0 |
0 |
|
|
|
|
|
|
|
|
## @.-_/ !"$ % &'( )+ ,: ; = > ? [ ] { } *
●To enter two characters in succession which require using the same key, press the [ ] key (
  ) once after entering the first character, and then enter the second character.
●If you enter an incorrect character or number, follow these steps to correct the mistake.
1.Press the [ ] key (
  ) or [
 ] key (
  ) to move the cursor to the character immediately following the incorrect character.
2.Press the [CLEAR] key (  ).
).
The character in front of the cursor is deleted.
3.Enter the correct character.
The character is inserted in front of the cursor.
20
INITIAL SETTINGS
ENTERING YOUR NAME AND FAX NUMBER
Note |
You can view all of the items in the menu display by pressing the [MENU] key, then using the [ ] key ( ) or |
|
[ ] key ( ) to scroll through the function list. Pressing the [ENTER] key chooses the displayed function. |
||
|
||
|
Procedures for inputting various items (name, telephone number, date, etc.) are given as follows. |
|
|
|
To have your name and fax number printed at the top of every page you transmit, program them by pressing the operation panel keys as shown below.
●If you enter an incorrect character or number, follow these steps to correct the mistake.
1.Press the [ ] key (
  ) or [
 ] key (
  ) to move the cursor to the character immediately following the incorrect character.
2.Press the [CLEAR] key (  ).The character in front of the cursor is deleted.
3.Enter the correct character.
IMPORTANT
FCC regulations require that your name, telephone/fax number, and the date and time appear on each fax message 2 you send. Enter your name and fax number here and set the date and time as explained in the following section to
have the fax machine include this information automatically at the top of your fax messages.
Use the following procedure to enter your name and fax number:
1 Press the [MENU] key.
2 Press the [ ] key (
  ) or [
 ] key (
 ) until "2:ENTRY MODE" appears, and then press the [ENTER] key.
Selection
"2:ENTRY MODE"
3 Press the [ ] key (
  ) or [
 ] key (
 ) until "3:OWN PASSCODE SET" appears, and then press the [ENTER] key.
Selection
"3:OWN PASSCODE SET"
4 Press the [ ] key (
  ) or [
 ] key (
 ) to select "1:SET" and then press the [ENTER] key.
Selection
"1:SET"
5 Enter your fax number with the numeric keys.
Enter your own fax
number (maximum 20
digits) by pressing the
Numeric keys.
To insert a "+", press the [  ] key.
6 Press the [ENTER] key.
"ENTER NAME" will appear in the display.
7 Enter your name with the numeric keys.
Enter your name by
pressing the appropriate
Numeric keys as shown
on the left. Press each
key repeatedly until the
desired letter appears in
the display (maximum of 40 characters).
To enter a space, press the [1] key twice.
21
INITIAL SETTINGS
8 Press the [ENTER] key. |
9 Press the [MENU] key. |
Press the [MENU] key to exit.
SETTING THE DATE AND TIME
The date and time that appear in the display are printed at the top of each page you transmit. Set the date and time by pressing the keys on the operation panel as shown below.
If you enter an incorrect number, press the [CLEAR] key (  ) and re-enter the number.
The time can be displayed in 12-hour or 24-hour format. "Month/Day/Year", "Day/Month/Year" or "Year/Month/Day" can be selected for the order of display of the date.
Use the following procedure to set the date and time:
1 Press the [MENU] key.
2 Press the [ ] key (
  ) or [
 ] key (
 ) until "2:ENTRY MODE" appears, and then press the [ENTER] key.
Selection
"2:ENTRY MODE"
3 Press the [ ] key (
  ) or [
 ] key (
 ) until "2:DATE&TIME SET" appears, and then press the [ENTER] key.
Selection
"2:DATE&TIME SET"
4 Enter the year, month, and day with the numeric keys and then press the [ENTER] key.
5 Enter the time with the numeric keys.
6 Press the [ ] key (
  ) or [
 ] key (
 ) to select "AM" or "PM".
When 24-hour format is selected, do not perform this step.
7 Press the [ENTER] key.
8 Press the [MENU] key.
Press the [MENU] key to exit.
22
INITIAL SETTINGS
To change the display format to 12-hour or 24-hour format, follow the steps below:
1 Press the [MENU] key. |
6 Press the [ENTER] key. |
2 Press the [ ] key ( ) or [ ] key ( ) |
7 Press the [MENU] key. |
until "4:USER PROGRAM" appears, |
|
and then press the [ENTER] key. |
Press the [MENU] key to |
Selection |
exit. |
2 |
|
||
|
|
"4:USER PROGRAM"
3 Press the [ ] key (
  ) or [
 ] key (
 ) until "23:DATE&TIME FORMAT" appears, and then press the [ENTER] key.
Selection
"23:DATE&TIME FORMAT"
4 Press the [ ] key (
  ) or [
 ] key (
 ) until "1:TIME FORMAT" appears, and then press the [ENTER] key.
Selection
"1:TIME FORMAT"
5 Press the [ ] key (
  ) or [
 ] key (
 ) to select "1:12HOUR" or "2:24HOUR".
23
INITIAL SETTINGS
To change the order of display of the date, follow the steps below:
1 Press the [MENU] key.
2 Press the [ ] key (
  ) or [
 ] key (
 ) until "4:USER PROGRAM" appears, and then press the [ENTER] key.
Selection
"4:USER PROGRAM"
3 Press the [ ] key (
  ) or [
 ] key (
 ) until "23:DATE&TIME FORMAT" appears, and then press the [ENTER] key.
Selection
"23:DATE&TIME FORMAT"
4 Press the [ ] key (
  ) or [
 ] key (
 ) until "2:DATE FORMAT" appears, and then press the [ENTER] key.
Selection
"2:DATE FORMAT"
5 Press the [ ] key (
  ) or [
 ] key (
 ) to select the display order.
The selections are as follows: 1:MMDDYYYY 2:DDMMYYYY 3:YYYYMMDD
6 Press the [ENTER] key.
7 Press the [MENU] key.
Press the [MENU] key to exit.
24
INITIAL SETTINGS
Daylight Saving Time Setting
Enable this setting to have the internal clock automatically move forward and backward at the beginning and end of Daylight Saving Time. The clock will move forward and backward as follows:
The first Sunday in April: 2:00 A.M.  3:00 A.M. The last Sunday in October: 2:00 A.M.
  1:00 A.M.
Note |
If a transmission is in progress when the clock adjustment time for daylight savings time arrives, the clock will not |
|
be adjusted until the transmission ends. |
||
|
||
|
|
Follow these steps to enable Daylight Saving Time.
1 Press the [MENU] key. |
5 Press the [ENTER] key. |
2 Press the [ ] key (
  ) or [
 ] key (
 ) until "2:ENTRY MODE" appears, and then press the [ENTER] key.
Selection
"2:ENTRY MODE"
3 Press the [ ] key (
  ) or [
 ] key (
 ) until "5:DAY LIGHT SAVING" appears, and then press the [ENTER] key.
Selection
"5:DAY LIGHT SAVING"
4 Press the [ ] key (
  ) or [
 ] key (
 ) to select "1:ON" or "2:OFF".
Select "1:ON" to enable
the function.
Select "2:OFF" to disable the function.
2
6 Press the [MENU] key.
Press the [MENU] key to exit.
25
INITIAL SETTINGS
SELECTING THE TRANSMISSION MODE
The machine has two modes for sending faxes: memory transmission and direct transmission. To change modes, press the [MEMORY] key. The MEMORY indicator lights up when memory transmission is selected, and goes off when direct transmission is selected.
MEMORY indicator
01 |
02 |
03 |
04 |
05 |
SPEED/ |
BROAD- |
RECEPTION REDIAL/ |
|
10 |
11 |
12 |
13 |
14 |
MEMORY SEARCH |
CAST |
MODE |
PAUSE |
06 |
07 |
08 |
09 |
|
|
COVER |
|
|
15 |
16 |
17 |
18 |
SHIFT |
|
SHEET |
REPORT |
2-SIDED TX |
|
|
|
|
|
LINE STATUS |
SPEAKER |
||
Transmission takes place as follows in each mode:
Memory transmission (the MEMORY indicator is lit)
When a fax is sent from the ADF/RADF and there are no previously stored fax jobs and no job in progress (the telephone line is not being used), dialing and scanning begin at the same time. Each page is transmitted after it is scanned. This transmission method is called Quick Online transmission.
If there are previously stored fax jobs or a job in progress, or the fax is being sent from the document glass, the fax is temporarily scanned into memory before transmission.
Note |
When a fax is sent by transmission reservation (p.70), broadcast transmission (p.71), broadcasting using a |
|
Group key (p.72), or timer transmission (p.79), the fax is scanned into memory before transmission. |
||
|
||
|
|
Direct transmission (the MEMORY indicator is off)
The fax is sent directly after the destination is dialed and the connection established.
The machine memory is not used for direct transmission, and thus direct transmission is possible even when the memory is full.
Note |
• |
A fax job cannot be stored while a direct transmission is in progress. |
• |
Only one page can be sent from the document glass by direct transmission. |
•A subsequent function cannot be used while a direct transmission is in progress.
Transmission reservation (p.70), broadcast transmission (p.71), broadcasting using a Group key (p.72), or timer transmission (p.79)
26
Loading...