


20050
Toro 20050, 20052, 20645, 20646, 20647 Service Manual
...
TORO/LAWNBOY BATTERY & ELECTRIC POWERED MOWER SERVICE MANUAL
Table Of Contents – Page 1 of 1
INTRODUCTION
SPECIFICATIONS
120 VOLT MODELS
BATTERY MODELS
MOTOR
EUROPEAN MODELS
METRIC TORQUE AND BLADE TIP SPEED
ASSEMBLY REQUIREMENTS
SPECIAL TOOLS
SAFETY INFORMATION
120 VOLT MODELS
BATTERY POWERED MODELS
OPERATIONAL TIPS (120 VOLT MODELS)
BEFORE STARTING
MAINTENANCE
OPERATIONAL TIPS (24/36 VOLT MODELS)
CHARGING
LED CHARGING LIGHTS CHART
STORAGE
BATTERY POWER STATUS
OPERATION
KEY
STARTING/STOPPING INSTRUCTIONS
MOWING TIPS
MAINTENANCE
TESTING ELECTRICAL COMPONENTS
120 VOLT MODELS
BATTERY POWERED MODELS
BLADE STOPPING SYSTEMS
DISASSEMBLY & REASSEMBLY
DISASSEMBLY — BATTERY MODELS
TRANSFORMER REPLACEMENT — BATTERY MODELS
BATTERY REPLACEMENT
BLADE REPLACEMENT — 120 VOLT MODELS
BLADE BRAKE — 120 VOLT MODELS
BRAKE DRUM
120 VOLT MOTOR REPLACEMENT
REPLACING BLADE SPINDLE OR SPINDLE BEARINGS
CABLE REPLACEMENT — ALL MODELS
CABLE ADJUSTMENT
BELT REPLACEMENT — 120 VOLT MODELS
HIPOT TESTING
INTRODUCTION
HIPOT TESTER SAFETY RULES
TESTING THE OUTLET FOR GROUND
TESTING PROCEDURE
TESTING THE MOTOR


Carefree Mower Service Manual i
TABLE OF CONTENTS
Introduction . . . . . . . . . . . . . . . . . . . . . . . . . . . . . . . . . . . . . . . . . . . . . . . . . . . . . . . . . . . . . 1 - 1
Models Covered In This Manual . . . . . . . . . . . . . . . . . . . . . . . . . . . . . . . . . . . . . . . . 1 - 1
North American Models . . . . . . . . . . . . . . . . . . . . . . . . . . . . . . . . . . . . . . . . . . . . 1 - 1
International Models . . . . . . . . . . . . . . . . . . . . . . . . . . . . . . . . . . . . . . . . . . . . . . 1 - 1
Model/Serial Number Location . . . . . . . . . . . . . . . . . . . . . . . . . . . . . . . . . . . . . . . . . 1 - 1
Specifications. . . . . . . . . . . . . . . . . . . . . . . . . . . . . . . . . . . . . . . . . . . . . . . . . . . . . . . . . . . . 1 - 2
120 Volt Models . . . . . . . . . . . . . . . . . . . . . . . . . . . . . . . . . . . . . . . . . . . . . . . . . . . . .1 - 2
Battery Models . . . . . . . . . . . . . . . . . . . . . . . . . . . . . . . . . . . . . . . . . . . . . . . . . . . . . .1 - 2
Motor. . . . . . . . . . . . . . . . . . . . . . . . . . . . . . . . . . . . . . . . . . . . . . . . . . . . . . . . . . . . . 1 - 3
European Models . . . . . . . . . . . . . . . . . . . . . . . . . . . . . . . . . . . . . . . . . . . . . . . . . . . 1 - 3
Metric Torque and Blade Tip Speed . . . . . . . . . . . . . . . . . . . . . . . . . . . . . . . . . . . . . .1 - 3
Assembly Requirements . . . . . . . . . . . . . . . . . . . . . . . . . . . . . . . . . . . . . . . . . . . . . 1 - 4
Special Tools . . . . . . . . . . . . . . . . . . . . . . . . . . . . . . . . . . . . . . . . . . . . . . . . . . . . . . 1 - 4
Safety Information . . . . . . . . . . . . . . . . . . . . . . . . . . . . . . . . . . . . . . . . . . . . . . . . . . . . . . . . 2 - 1
120 Volt Models . . . . . . . . . . . . . . . . . . . . . . . . . . . . . . . . . . . . . . . . . . . . . . . . . . . . 2 - 1
Important Safety Instructions . . . . . . . . . . . . . . . . . . . . . . . . . . . . . . . . . . . . . . . . 2 - 1
Safe Operating Practices . . . . . . . . . . . . . . . . . . . . . . . . . . . . . . . . . . . . . . . . . . . 2 - 1
General Operation . . . . . . . . . . . . . . . . . . . . . . . . . . . . . . . . . . . . . . . . . . . . . . . . 2 - 1
While Operating . . . . . . . . . . . . . . . . . . . . . . . . . . . . . . . . . . . . . . . . . . . . . . . . . . 2 - 2
Maintenance And Storage . . . . . . . . . . . . . . . . . . . . . . . . . . . . . . . . . . . . . . . . . . 2 - 3
Safety and Instruction Decals . . . . . . . . . . . . . . . . . . . . . . . . . . . . . . . . . . . . . . . 2 - 5
Battery Powered Models . . . . . . . . . . . . . . . . . . . . . . . . . . . . . . . . . . . . . . . . . . . . . 2 - 7
Introduction . . . . . . . . . . . . . . . . . . . . . . . . . . . . . . . . . . . . . . . . . . . . . . . . . . . . . 2 - 7
Important Safety Instructions . . . . . . . . . . . . . . . . . . . . . . . . . . . . . . . . . . . . . . . . 2 - 7
Safe Operating Practices . . . . . . . . . . . . . . . . . . . . . . . . . . . . . . . . . . . . . . . . . . . 2 - 7
General Operation . . . . . . . . . . . . . . . . . . . . . . . . . . . . . . . . . . . . . . . . . . . . . . . . 2 - 7
While Operating . . . . . . . . . . . . . . . . . . . . . . . . . . . . . . . . . . . . . . . . . . . . . . . . . . 2 - 8
Maintenance And Storage . . . . . . . . . . . . . . . . . . . . . . . . . . . . . . . . . . . . . . . . . . 2 - 9
Sound Emissions . . . . . . . . . . . . . . . . . . . . . . . . . . . . . . . . . . . . . . . . . . . . . . . . 2 - 11
Vibration Level . . . . . . . . . . . . . . . . . . . . . . . . . . . . . . . . . . . . . . . . . . . . . . . . . . 2 - 11
Symbol Glossary . . . . . . . . . . . . . . . . . . . . . . . . . . . . . . . . . . . . . . . . . . . . . . . . 2 - 11
Operational Tips (120 Volt Models) . . . . . . . . . . . . . . . . . . . . . . . . . . . . . . . . . . . . . . . . . . . 3 - 1
Before Starting . . . . . . . . . . . . . . . . . . . . . . . . . . . . . . . . . . . . . . . . . . . . . . . . . . . . . 3 - 1
Secure Extension Cord. . . . . . . . . . . . . . . . . . . . . . . . . . . . . . . . . . . . . . . . . . . . . 3 - 1
Plan Your Mowing Pattern . . . . . . . . . . . . . . . . . . . . . . . . . . . . . . . . . . . . . . . . . . 3 - 2
Maintenance . . . . . . . . . . . . . . . . . . . . . . . . . . . . . . . . . . . . . . . . . . . . . . . . . . . . . . . 3 - 2
Cleaning . . . . . . . . . . . . . . . . . . . . . . . . . . . . . . . . . . . . . . . . . . . . . . . . . . . . . . . . 3 - 2
After Every Use . . . . . . . . . . . . . . . . . . . . . . . . . . . . . . . . . . . . . . . . . . . . . . . . . . 3 - 3
Once A Year . . . . . . . . . . . . . . . . . . . . . . . . . . . . . . . . . . . . . . . . . . . . . . . . . . . . . 3 - 3
Blade . . . . . . . . . . . . . . . . . . . . . . . . . . . . . . . . . . . . . . . . . . . . . . . . . . . . . . . . . . 3 - 3
Servicing Double-Insulated Mower . . . . . . . . . . . . . . . . . . . . . . . . . . . . . . . . . . . 3 - 5
Storage . . . . . . . . . . . . . . . . . . . . . . . . . . . . . . . . . . . . . . . . . . . . . . . . . . . . . . . . 3 - 5

TABLE OF CONTENTS
ii Carefree Mower Service Manual
Operational Tips (24/36 Volt Models). . . . . . . . . . . . . . . . . . . . . . . . . . . . . . . . . . . . . . . . . . .3 - 7
Charging . . . . . . . . . . . . . . . . . . . . . . . . . . . . . . . . . . . . . . . . . . . . . . . . . . . . . . . . . . .3 - 7
LED Charging Lights Chart . . . . . . . . . . . . . . . . . . . . . . . . . . . . . . . . . . . . . . . . . . . . .3 - 8
Storage . . . . . . . . . . . . . . . . . . . . . . . . . . . . . . . . . . . . . . . . . . . . . . . . . . . . . . . . . . . 3 - 9
Battery Power Status . . . . . . . . . . . . . . . . . . . . . . . . . . . . . . . . . . . . . . . . . . . . . . . . .3 - 9
Operation. . . . . . . . . . . . . . . . . . . . . . . . . . . . . . . . . . . . . . . . . . . . . . . . . . . . . . . . . . 3 - 9
Key . . . . . . . . . . . . . . . . . . . . . . . . . . . . . . . . . . . . . . . . . . . . . . . . . . . . . . . . . . . . . 3 - 10
Starting/Stopping Instructions . . . . . . . . . . . . . . . . . . . . . . . . . . . . . . . . . . . . . . . . . .3 - 10
To Start Motor . . . . . . . . . . . . . . . . . . . . . . . . . . . . . . . . . . . . . . . . . . . . . . . . . . .3 - 10
To Stop Motor . . . . . . . . . . . . . . . . . . . . . . . . . . . . . . . . . . . . . . . . . . . . . . . . . . . 3 - 11
Circuit Breaker . . . . . . . . . . . . . . . . . . . . . . . . . . . . . . . . . . . . . . . . . . . . . . . . . . .3 - 11
Mowing Tips . . . . . . . . . . . . . . . . . . . . . . . . . . . . . . . . . . . . . . . . . . . . . . . . . . . . . . .3 - 11
Battery Run Time . . . . . . . . . . . . . . . . . . . . . . . . . . . . . . . . . . . . . . . . . . . . . . . . 3 - 11
General Mulching Tips . . . . . . . . . . . . . . . . . . . . . . . . . . . . . . . . . . . . . . . . . . . . .3 - 12
Cutting Leaves . . . . . . . . . . . . . . . . . . . . . . . . . . . . . . . . . . . . . . . . . . . . . . . . . . .3 - 12
Adjusting Height-of-Cut . . . . . . . . . . . . . . . . . . . . . . . . . . . . . . . . . . . . . . . . . . . . 3 - 13
Maintenance . . . . . . . . . . . . . . . . . . . . . . . . . . . . . . . . . . . . . . . . . . . . . . . . . . . . . . .3 - 13
Cleaning . . . . . . . . . . . . . . . . . . . . . . . . . . . . . . . . . . . . . . . . . . . . . . . . . . . . . . . .3 - 14
After Every Use . . . . . . . . . . . . . . . . . . . . . . . . . . . . . . . . . . . . . . . . . . . . . . . . . . 3 - 14
Once A Year . . . . . . . . . . . . . . . . . . . . . . . . . . . . . . . . . . . . . . . . . . . . . . . . . . . . 3 - 14
Blade . . . . . . . . . . . . . . . . . . . . . . . . . . . . . . . . . . . . . . . . . . . . . . . . . . . . . . . . . .3 - 14
Testing Electrical Components. . . . . . . . . . . . . . . . . . . . . . . . . . . . . . . . . . . . . . . . . . . . . . . .4 - 1
120 Volt Models. . . . . . . . . . . . . . . . . . . . . . . . . . . . . . . . . . . . . . . . . . . . . . . . . . . . . 4 - 1
Safety Information . . . . . . . . . . . . . . . . . . . . . . . . . . . . . . . . . . . . . . . . . . . . . . . . .4 - 1
Wiring Diagrams . . . . . . . . . . . . . . . . . . . . . . . . . . . . . . . . . . . . . . . . . . . . . . . . . . .4 - 1
120 Electrical System Testing. . . . . . . . . . . . . . . . . . . . . . . . . . . . . . . . . . . . . . . . 4 - 1
Battery Powered Models . . . . . . . . . . . . . . . . . . . . . . . . . . . . . . . . . . . . . . . . . . . . . . 4 - 2
Motor Testing . . . . . . . . . . . . . . . . . . . . . . . . . . . . . . . . . . . . . . . . . . . . . . . . . . . . .4 - 2
Solenoid Testing . . . . . . . . . . . . . . . . . . . . . . . . . . . . . . . . . . . . . . . . . . . . . . . . . .4 - 2
Testing Batteries . . . . . . . . . . . . . . . . . . . . . . . . . . . . . . . . . . . . . . . . . . . . . . . . . . 4 - 3
Charger Testing . . . . . . . . . . . . . . . . . . . . . . . . . . . . . . . . . . . . . . . . . . . . . . . . . . .4 - 4
Charging Indicator Lights . . . . . . . . . . . . . . . . . . . . . . . . . . . . . . . . . . . . . . . . . . . 4 - 4
Flashing Yellow Charging Indicator . . . . . . . . . . . . . . . . . . . . . . . . . . . . . . . . . . . .4 - 4
Flashing Red Charging Indicator . . . . . . . . . . . . . . . . . . . . . . . . . . . . . . . . . . . . . .4 - 5
Steady Red Charging Indicator . . . . . . . . . . . . . . . . . . . . . . . . . . . . . . . . . . . . . . .4 - 5
Steady Yellow Charging Indicator . . . . . . . . . . . . . . . . . . . . . . . . . . . . . . . . . . . . .4 - 5
Steady Green Charging Indicator . . . . . . . . . . . . . . . . . . . . . . . . . . . . . . . . . . . . . 4 - 6
Charge Remaining Indicator Lights. . . . . . . . . . . . . . . . . . . . . . . . . . . . . . . . . . . . 4 - 6
Transformer Testing . . . . . . . . . . . . . . . . . . . . . . . . . . . . . . . . . . . . . . . . . . . . . . . 4 - 7
US & Canadian Models. . . . . . . . . . . . . . . . . . . . . . . . . . . . . . . . . . . . . . . . . . . . 4 - 7
European, U.K., & Swiss Models . . . . . . . . . . . . . . . . . . . . . . . . . . . . . . . . . . . .4 - 7

Carefree Mower Service Manual iii
TABLE OF CONTENTS
Switch Testing . . . . . . . . . . . . . . . . . . . . . . . . . . . . . . . . . . . . . . . . . . . . . . . . . . . . . 4 - 8
Switch Testing (battery powered models). . . . . . . . . . . . . . . . . . . . . . . . . . . . . . . 4 - 8
Wire Harness . . . . . . . . . . . . . . . . . . . . . . . . . . . . . . . . . . . . . . . . . . . . . . . . . . . . 4 - 8
Testing Safety Key Terminals . . . . . . . . . . . . . . . . . . . . . . . . . . . . . . . . . . . . . . . 4 - 8
Circuit Breaker Testing . . . . . . . . . . . . . . . . . . . . . . . . . . . . . . . . . . . . . . . . . . . . 4 - 8
Blade Stopping Systems . . . . . . . . . . . . . . . . . . . . . . . . . . . . . . . . . . . . . . . . . . . . . . . . . . . 5 - 1
120 Volt Blade Stopping System . . . . . . . . . . . . . . . . . . . . . . . . . . . . . . . . . . . . . . . 5 - 1
Battery Mower Systems . . . . . . . . . . . . . . . . . . . . . . . . . . . . . . . . . . . . . . . . . . . . . . 5 - 1
Disassembly & Reassembly . . . . . . . . . . . . . . . . . . . . . . . . . . . . . . . . . . . . . . . . . . . . . . . . 6 - 1
Disassembly — Battery Models . . . . . . . . . . . . . . . . . . . . . . . . . . . . . . . . . . . . . . . . 6 - 1
Transformer Replacement — Battery Models . . . . . . . . . . . . . . . . . . . . . . . . . . . . . 6 - 1
Battery Replacement . . . . . . . . . . . . . . . . . . . . . . . . . . . . . . . . . . . . . . . . . . . . . . . . 6 - 1
Blade Replacement — 120 Volt Models . . . . . . . . . . . . . . . . . . . . . . . . . . . . . . . . . 6 - 1
Blade Brake — 120 Volt Models . . . . . . . . . . . . . . . . . . . . . . . . . . . . . . . . . . . . . . . 6 - 2
Brake Drum . . . . . . . . . . . . . . . . . . . . . . . . . . . . . . . . . . . . . . . . . . . . . . . . . . . . . . . 6 - 2
120 Volt Motor Replacement . . . . . . . . . . . . . . . . . . . . . . . . . . . . . . . . . . . . . . . . . . 6 - 2
Replacing Blade Spindle or Spindle Bearings . . . . . . . . . . . . . . . . . . . . . . . . . . . . . 6 - 3
Cable Replacement — All Models . . . . . . . . . . . . . . . . . . . . . . . . . . . . . . . . . . . . . . 6 - 3
Cable Adjustment . . . . . . . . . . . . . . . . . . . . . . . . . . . . . . . . . . . . . . . . . . . . . . . . . . . 6 - 3
Belt Replacement — 120 Volt Models . . . . . . . . . . . . . . . . . . . . . . . . . . . . . . . . . . . 6 - 3
Hipot Testing . . . . . . . . . . . . . . . . . . . . . . . . . . . . . . . . . . . . . . . . . . . . . . . . . . . . . . . . . . . . .7 - 1
Introduction . . . . . . . . . . . . . . . . . . . . . . . . . . . . . . . . . . . . . . . . . . . . . . . . . . . . . . . . .7 - 1
Hipot Tester Safety Rules . . . . . . . . . . . . . . . . . . . . . . . . . . . . . . . . . . . . . . . . . . . . . .7 - 1
Testing the Outlet for Ground . . . . . . . . . . . . . . . . . . . . . . . . . . . . . . . . . . . . . . . . . . .7 - 1
Testing Procedure. . . . . . . . . . . . . . . . . . . . . . . . . . . . . . . . . . . . . . . . . . . . . . . . . . . .7 - 1
Testing the Motor . . . . . . . . . . . . . . . . . . . . . . . . . . . . . . . . . . . . . . . . . . . . . . . . . . . .7 - 3

ABOUT THIS MANUAL
This manual was written expressly for the Toro and Lawn-Boy brand electric and battery
powered mowers. The Toro Company has made every effort to make the information in this
manual complete and correct.
This manual was written with the service technician in mind. The book contains material
covering mowers that operate on 120 volt alternating current (North America only), and battery
powered mowers that operate on 24 volt or 36 volt direct current.
We hope that you find this manual a valuable addition to your service shop. If you have
questions or comments regarding this manual, please contact us at the following address:
The Toro Company
Consumer Service Department
8111 Lyndale Avenue South
Bloomington, MN 55420-1196
The Toro Company reserves the right to change product specifications or this manual without
notice.
COPYRIGHT - ALL RIGHTS RESERVED
The Toro Company - 1999
Bloomington, MN 55420 - U.S.A.
PREFACE
Carefree Mower Service Manual 1- 1
INTRODUCTION
Models Covered In This Manual
North American Models
Models covered by this manual. All are built on the
same 18” chassis. The only differences are in the
electrical systems.
International Models
These models are offered in Europe, U.K., and
Switzerland. These models use 230 volt AC to char
g
e
the batteries. The electrical portion of these models
will be covered in a separate section.
NOTE: This manual may apply to model numbers
other than those in the tables above. Differences
between models, other than volta
g
e, may include
different ori
g
inal packa
g
in
g
or different standard
equipment. For example, a model may include a side
dischar
g
e chute, a ba
gg
er, both, or neither.
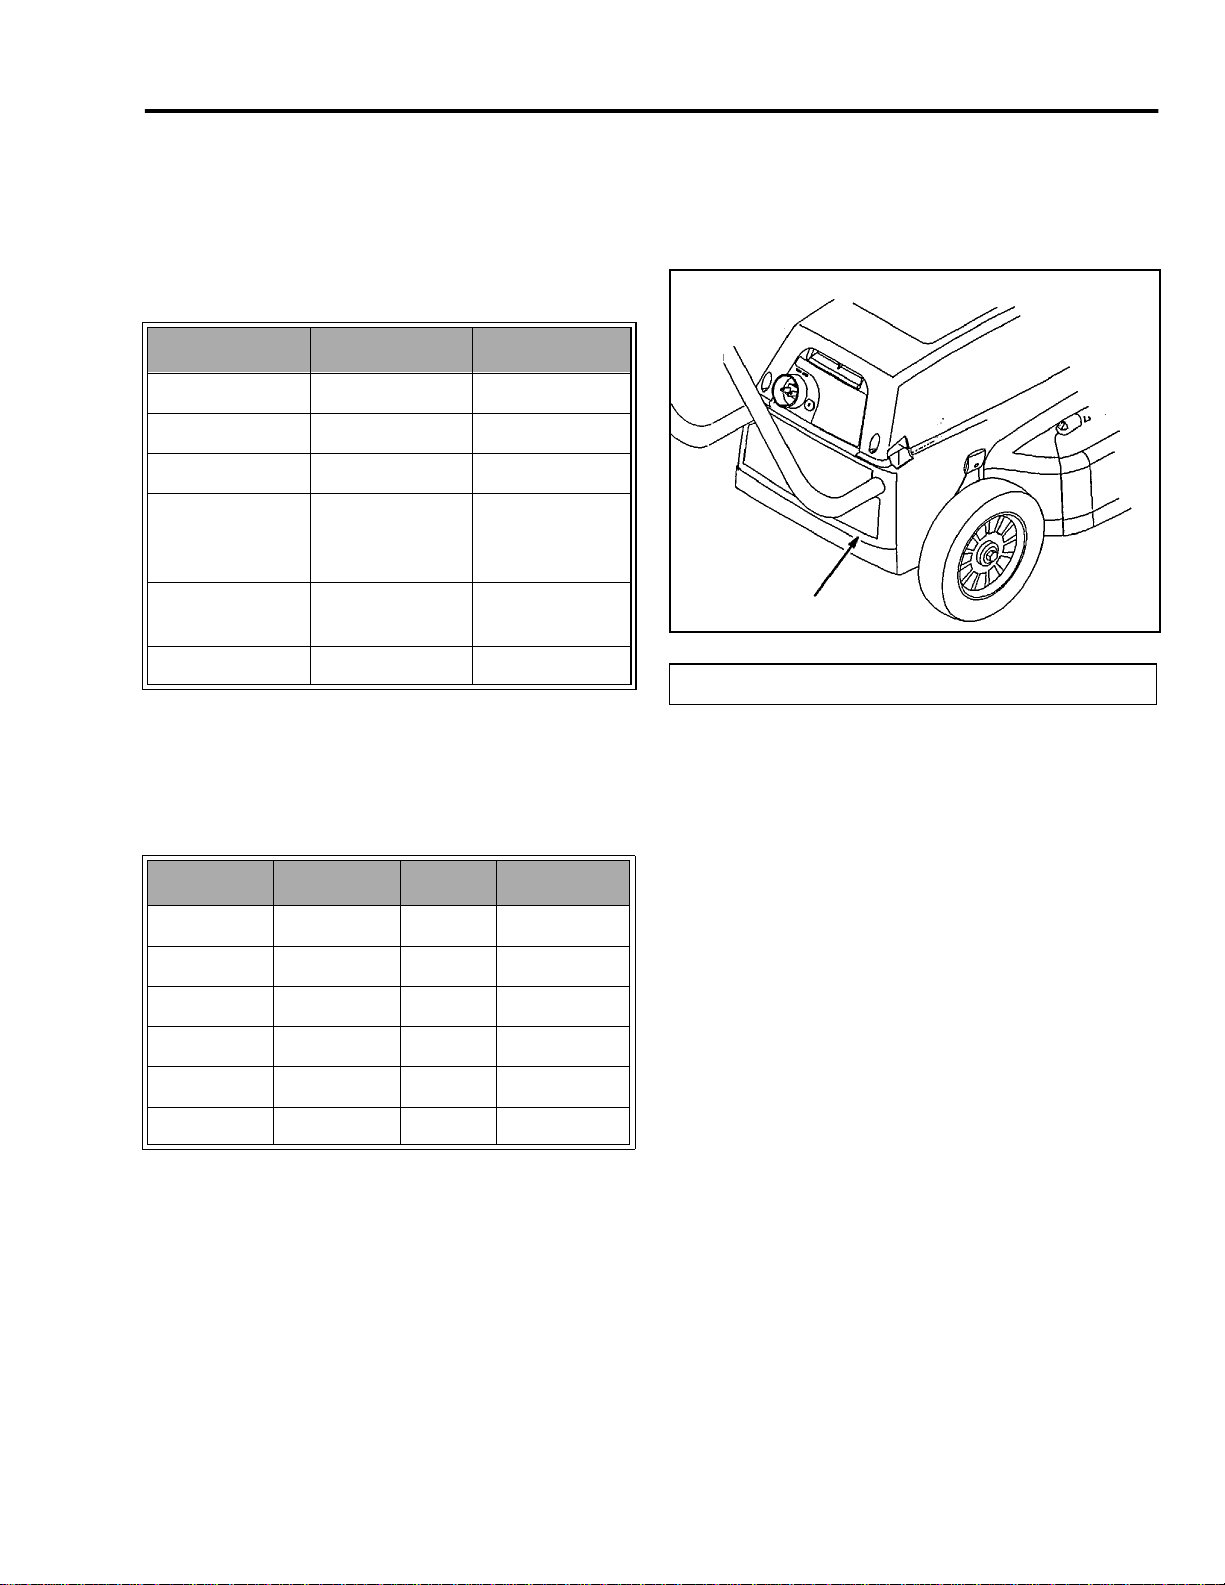
Model/Serial Number Location
On all battery or electric powered mowers, the model
and serial number is engraved in the lower rear of the
body or on a metal tag at this location (Figure 1).
Fi
g
ure 1
Fig-1
Model No. Brand Power
10101 Lawn-Boy 120 vac
10120 & 10122 Lawn-Boy 24 vdc
10123 Lawn-Boy 36 vdc
20645
20646
20050
Toro 120 vac
20647 & 20648
20652
Toro 24 vdc
20649 Toro 36 vdc
Model No. Brand Power Sold In
10701 Lawn-Boy 24 vdc Europe
21040 Toro 24 vdc Europe
10702 Lawn-Boy 24 vdc U.K.
21042 Toro 24 vdc U.K.
10703 Lawn-Boy 24 vdc Switzerland
21043 Toro 24 vdc Switzerland
(A) Model and Serial Number
A
1

SPECIFICATIONS
1 - 2 Carefree Mower Service Manual
Specifications (120 Volt Models)
Specifications (Battery Models)
These models are built on the same basic chassis as the 120 volt models. However, the major differences will be
due to the different style and quantity of batteries. This will affect the weight as well as the wiring, motor, and
solenoid. All batteries are of the sealed lead acid type.
Item Specification
Width of Cut
18” (46 cm)
Motor
Universal wound 120 volt motor. Motor rated at 12 amps continuous duty.
RPM
Motor 20,500 with step down belt drive ratio 5.8-1. Blade speed at 20,500 fps is 3,534 rpm.
Blade Tip Speed
@ 3600 rpm
16,493 fps
Weight
38 lbs. net dry.
Standard
Function
The mowers come with mulchin
g
capability and a side dischar
g
e deflector.
Options
Side ba
gg
in
g
kit.
Compliance
Conforms to UL #1447, CSA #C22.2 No. 147-M90, ANSI B71.1 and CPSC requirements.
Model Brand Battery Operating Volts Weight/Net Dry Run Time
10120 Lawn-Boy 4 - 6 volt (12.5 ah) 24 vdc 58 lbs. 45 - 60 min.
10122 Lawn-Boy 4 - 6 volt (12.5 ah) 24 vdc 60 lbs. 45 - 60 min.
10123 Lawn-Boy 6 - 6 volt (12.5 ah) 36 vdc 68 lbs. 65 - 90 min.
20052 Toro 4 - 6 volt (12.5 ah) 24 vdc 60 lbs. 45 - 60 min.
20647 Toro 2 - 12 volt (17 ah) 24 vdc 70 lbs. 60 - 90 min.
20648 Toro 4 - 6 volt (12.5 ah) 24 vdc 60 lbs. 45 - 60 min.
20649 Toro 3 - 12 volt (17 ah) 36 vdc 84 lbs. 90 - 120 min.

Carefree Mower Service Manual 1- 3
SPECIFICATIONS
Char
g
in
g
- On board char
g
in
g
converts 230 volt AC line volta
g
e to DC.
*Motor and blade speed specs same as North American models.
Metric Torque and Blade Tip Speeds
Motor
24 Volt Models 36 Volt Models
Type 24 volt permanent magnet 36 volt permanent magnet
Speed 3750 ± 375 rpm 3600 ± 360 rpm
Torque 165 oz.-in. @ 3100 rpm 180 oz.-in. @ 2950 rpm
Rated Continuous Duty 22 amps 15 amps
No Load Amps 8 amps 4.5 amps
Blade Tip Speed 17,180 fps @ 3750 rpm 16,473 fps @ 3600 rpm
Compliance Conforms to UL #1447, CSA #C22.2 No. 147-M90, ANSI B71.1 and CPSC
requirements
Standard Function Mulchin
g and side discharging
Options Side bagging kit
European Models
Model No. Brand Battery Operating Volts Weight Run Time Sold In
21040 Toro 4/6 volt 24 vdc 27kg 45 - 60 min. Europe
21042 Toro 4/6 volt 24 vdc 27kg 45 - 60 min. U.K.
21043 Toro 4/6 volt 24 vdc 27kg 45 - 60 min. Switzerland
24 Volt 36 Volt
Motor Torque 1.165 Newton-Meter
1165 Newton-Millimeter
1.271 Newton-Meter
1271 Newton-Millimeter
Blade Tip Speed 5236.5 Meters/Minute @ 3750 rpm 5021 Meters/Minute @ 3600 rpm

SPECIFICATIONS
1 - 4 Carefree Mower Service Manual
Assembly Requirements
Special Tools
Most repairs can be made using normal hand tools. However, the use of a powered screwdriver will prove
invaluable.
A volt/ohmmeter is necessary for troubleshooting the electrical system. A good digital meter will simplify taking the
necessary readings.
120 VAC models will require high potential testing after making repairs to the electrical components.
Item Assembly Information
Deck to liner screws 15 - 20 in. lbs. (17.3 - 23.0 kg cm)
Wheel bolts 180 - 240 in. lbs. (207 - 276 kg cm)
Motor to deck screws 80 - 85 in. lbs. (92 - 97 kg cm)
Spindle pulley nut (120 volt) 200 - 300 in. lbs. (230 - 345.5 kg cm)
Spindle to deck screws 80 - 85 in. lbs. (92 0 97 kg cm)
Blade bolt (battery models) 35 - 40 ft. lbs. (4.8 - 5.5 kg m)
Blade bolt (120 volt) 45 - 50 ft. lbs. (6.2 - 6.9 kg m)
Blade bolt/belleville washer cup side towards blade
Control cable bracket (battery models) Upper position
Control cable bracket (120 volt) Lower position

Carefree Mower Service Manual 2 - 1
SAFETY INFORMATION
120 Volt Models
IMPORTANT SAFETY INSTRUCTIONS
This machine meets or exceeds CPSC blade safety
requirements for walk-behind rotary mowers and
the B71.1 specifications of the American National
Standards Institute, in effect at time of production.
However, improper use or maintenance by the
operator or owner can result in injury. To reduce
the potential for injury, comply with these safety
instructions and always pay attention to the safety
alert symbol which means CAUTION,
WARNING or DANGER — "personal safety
instruction." Failure to comply with the instruction
may result in personal injury.
WARNING: To reduce the risk of fire, electric
shock, and personal injury when usin
g
electric
lawn mowers, always follow these basic safety
precautions.
READ ALL INSTRUCTIONS
BEFORE USING THIS MOWER
SAVE THESE INSTRUCTIONS
FOR FUTURE REFERENCE!
Safe Operating Practices
This product is capable of amputatin
g
hands and feet
and throwin
g
objects. Always follow all safety
instructions to avoid serious injury or death.
This mower is desi
g
ned for cuttin
g
and mulchin
g
g
rass
or, when equipped with a
g
rass ba
g
, for catchin
g
cut
g
rass. Any use for purposes other than these
could prove dan
g
erous to user or bystanders.
General Operation
1. Read this manual carefully before operating the
mower. Become familiar with the controls and
proper use of the mower. Never allow children
under 16 years of age to operate the mower.
Never allow adults to operate mower without
proper instructions.
2. The operator of the mower is responsible for
keeping everyone, especially children and pets,
away from area of operation. The operator is
responsible for accidents or hazards occurring to
other people or their property.
3. Thoroughly inspect area where mower will be
used and remove sticks, stones, wire, and debris
that could be picked up and thrown by mower.
Watch for foreign objects while mowing. Objects
struck by the lawn mower blade can cause severe
injuries to persons.
4. Wear long pants and substantial shoes. Do not
operate mower while wearing open-toed shoes,
jewelry, loose clothing or when barefoot. Use of
rubber gloves and footwear is recommended
when working outdoors.
5. Keep all guards, shields, safety devices, side
discharge chute or optional grass catcher in place.
Repair or replace damaged parts, including
decals. Never tamper with safety devices. Check
their proper operation regularly.
6. The motor and blade are designed to stop within 3
seconds after releasing the control bail. Ensure
that the control bail functions properly before each
use of mower. If the blade does not stop within 3
seconds, or if there is a grinding or scraping
metal-to-metal noise when the control bail is
released, contact your local Authorized Toro
Service Dealer for proper "On/Off" and blade
brake adjustment or replacement.
7. Before usin
g, always visually inspect to see that
the blades, blade fasteners and cutter assembly
are not worn or damaged. Replace worn or
damaged blades and fasteners in sets to preserve
balance.
8. Only use those accessories and attachments
designed to be used with this product. Use of any
accessory or attachment not designed for this
product may increase the risk of injury.
9. Ground Fault Circuit Interrupter (GFCI) protection
should be provided on the circuit(s) or outlet(s) to
be used for the lawn mower.
Receptacles are available having built-in GFCI
protection and may be used for this measure of
safety.
!
2

SAFETY INFORMATION
2 - 2 Carefree Mower Service Manual
10.
WARNING:
To prevent electric shock, use only
with an extension cord suitable for outdoor use,
such as SW-A, SOW-A, STW-A, STOW-A, SJW-
A, SJOW-A, SJTW-A, or SJTOW-A.
1 1. Extension Cord — Make sure your extension cord
set is in
good condition. When using an extension
cord, be sure to use one heavy enough to carry
the current your product will draw. Refer to
Extension Cord Chart, see page 3 - 1. An
undersized cord will cause a drop in line voltage
resulting in loss of power and overheating.
12. Properly connect extension cord to mower in order
to prevent disconnection of the cord (Figure 2).
Figure 2
0663-002
13. To reduce the risk of electric shock, this mower
has a polarized plug (one blade is wider than the
other) (Fi
g
ure 3) and will require the use of a
polarized extension cord. The polarized extension
cord receptacle will fit onto the mower plug only
one way. If the extension cord receptacle does
not fit fully onto the mower plug, reverse the cord
receptacle. If the cord receptacle still does not fit,
obtain a correct polarized extension cord. A
polarized extension cord will require the use of a
polarized wall outlet. The extension cord plug will
fit into the polarized wall outlet only one way. If
the cord plug does not fit fully into the wall outlet,
reverse the cord plug. If the cord plug still does
not fit, contact a qualified electrician to install the
proper wall outlet. Do not change the mower plug,
extension cord receptacle, or extension cord plug
in any way.
Figure 3
Scan7-a
While Operating
1. Do not connect extension cord to mower until you
are ready to mow.
2. Start the motor carefully according to instructions
and with feet well away from the blade.
3. Use Right Appliance — Do not use mower for any
job except that for which it is intended.
4. Stay Alert — Watch what you are doing. Do not
operate mower when tired or under the influence
of drugs, alcohol, or medication.
5. Be alert and turn mower off if children enter the
area.
6. Use extra care when approaching blind corners,
shrubs, trees, or other objects that may obscure
vision.
7. Do not mow near drop-offs, ditches, or
embankments. The operator could lose footin
g or
balance.
8. Avoid dangerous environments. Never operate
mower in wet grass or damp locations. Do not
use mower in the rain.
9. Do not run motor indoors.
10. Do not operate mower in gaseous, explosive
atmospheres. Normal sparking of motor could
ignite fumes.

Carefree Mower Service Manual 2 - 3
SAFETY INFORMATION
11. Always maintain secure footing. Keep a firm grip
on the handle and walk; never run. Mow only in
daylight or in good artificial light.
12. Mow across the face of slopes; never up and
down. Use extreme caution when changing
direction on slopes. Do not mow excessively
steep slopes. Wear skid resistant shoes on
slopes.
13. Don't Overreach — Keep proper footing and
balance at all times.
14. Do not force the mower. It operates best and
safest at the rate for which it was designed.
15. Always wear safety glasses or eye shields during
operation to protect eyes from foreign objects that
may be thrown from the machine. (Regular
eyeglasses are not safety glasses.)
16. Always wear an approved dust mask when using
unit in dusty conditions.
17. Keep face, hands, and feet away from the mower
housing and cutter blade when the motor is
running. Blade can cause injury to hands and
feet. Stay behind the handle until the motor stops.
18. Use extreme caution when reversing or pulling the
mower toward you. Before and while moving
backwards, look behind and down for small
children.
19. Since the blade rotates for a few seconds after the
control bar is released, stay behind the handle
until all movin
g parts stop.
20. After striking a foreign object or if mower vibrates
abnormally, stop motor and disconnect extension
cord. Check mower for damage and make all
repairs before using mower again. If major repairs
are ever needed or if assistance is desired,
contact your local Authorized Toro Service Dealer.
21. Do not operate mower if it has been dropped or
dama
ged in any way. Repair any damage before
operating mower.
22. Do not run the mower over the extension cord.
23. Inspect extension cord periodically and replace
cord if damaged.
24. Don't abuse extension cord. Never pull mower by
cord or yank cord to disconnect it from receptacle.
Keep cord away from heat, oil, and sharp edges.
25. Stop the motor, wait for all moving parts to stop,
and disconnect extension cord from mower before
adjusting the height-of-cut.
26. Stop the motor when pushing the mower outside
the lawn area.
27. Stop the motor and disconnect extension cord
from mower before removing side discharge chute
or optional grass catcher.
28. Stop motor before leaving the operator's position
— behind the handle. Disconnect extension cord
from mower if mower will be unattended.
29. If mower must be lifted to be transported, stop
motor, stay behind the handle until all moving
parts stop and disconnect extension cord from
mower.
Maintenance And Storage
1. Perform only those maintenance instructions
described in this manual. If major repairs are ever
needed or if assistance is desired, contact your
local Authorized Toro Service Dealer.
2. Before mower is cleaned, inspected, serviced, or
adjusted, stop motor and wait for all movin
g parts
to stop. Disconnect extension cord from mower.
3. To ensure the mower is in safe operating
condition, frequently check and keep all nuts,
bolts, and screws tight. Ensure blade bolt is
tightened to 45-50 ft.lbs. (61-68 N·m).
4. Always keep a sharp blade on your mower. When
servicing blade, refer to blade maintenance
section for correct installation and servicing
procedures. Use identical replacement blades
only.
5. To reduce fire hazard, keep motor free of
excessive grass, leaves, and accumulations of
dirt.
6. This unit is provided with double insulation. Use
only identical replacement parts. See “Servicing
Double-Insulated Mower” on page 3 - 5.

SAFETY INFORMATION
2 - 4 Carefree Mower Service Manual
7. When not in use, store mower indoors in a dry,
locked-up place out of the reach of children. Allow
motor to cool before storing in an enclosure.
8. Check optional grass catcher bag frequently for
wear or deterioration. Replace with a new bag
when worn or damaged for your protection.
9. At the time of manufacture, the mower conformed
to the safety standards in effect for rotary mowers.
To assure best performance and continued safety
certification of the mower, use
genuine Toro
replacement parts and accessories. Replacement
parts and accessories made by other
manufacturers may result in non-conformance
with the safety standards, and that could be
dangerous.
SAVE THESE INSTRUCTIONS
FOR FUTURE REFERENCE!
Carefree Mower Service Manual 2 - 5
SAFETY INFORMATION
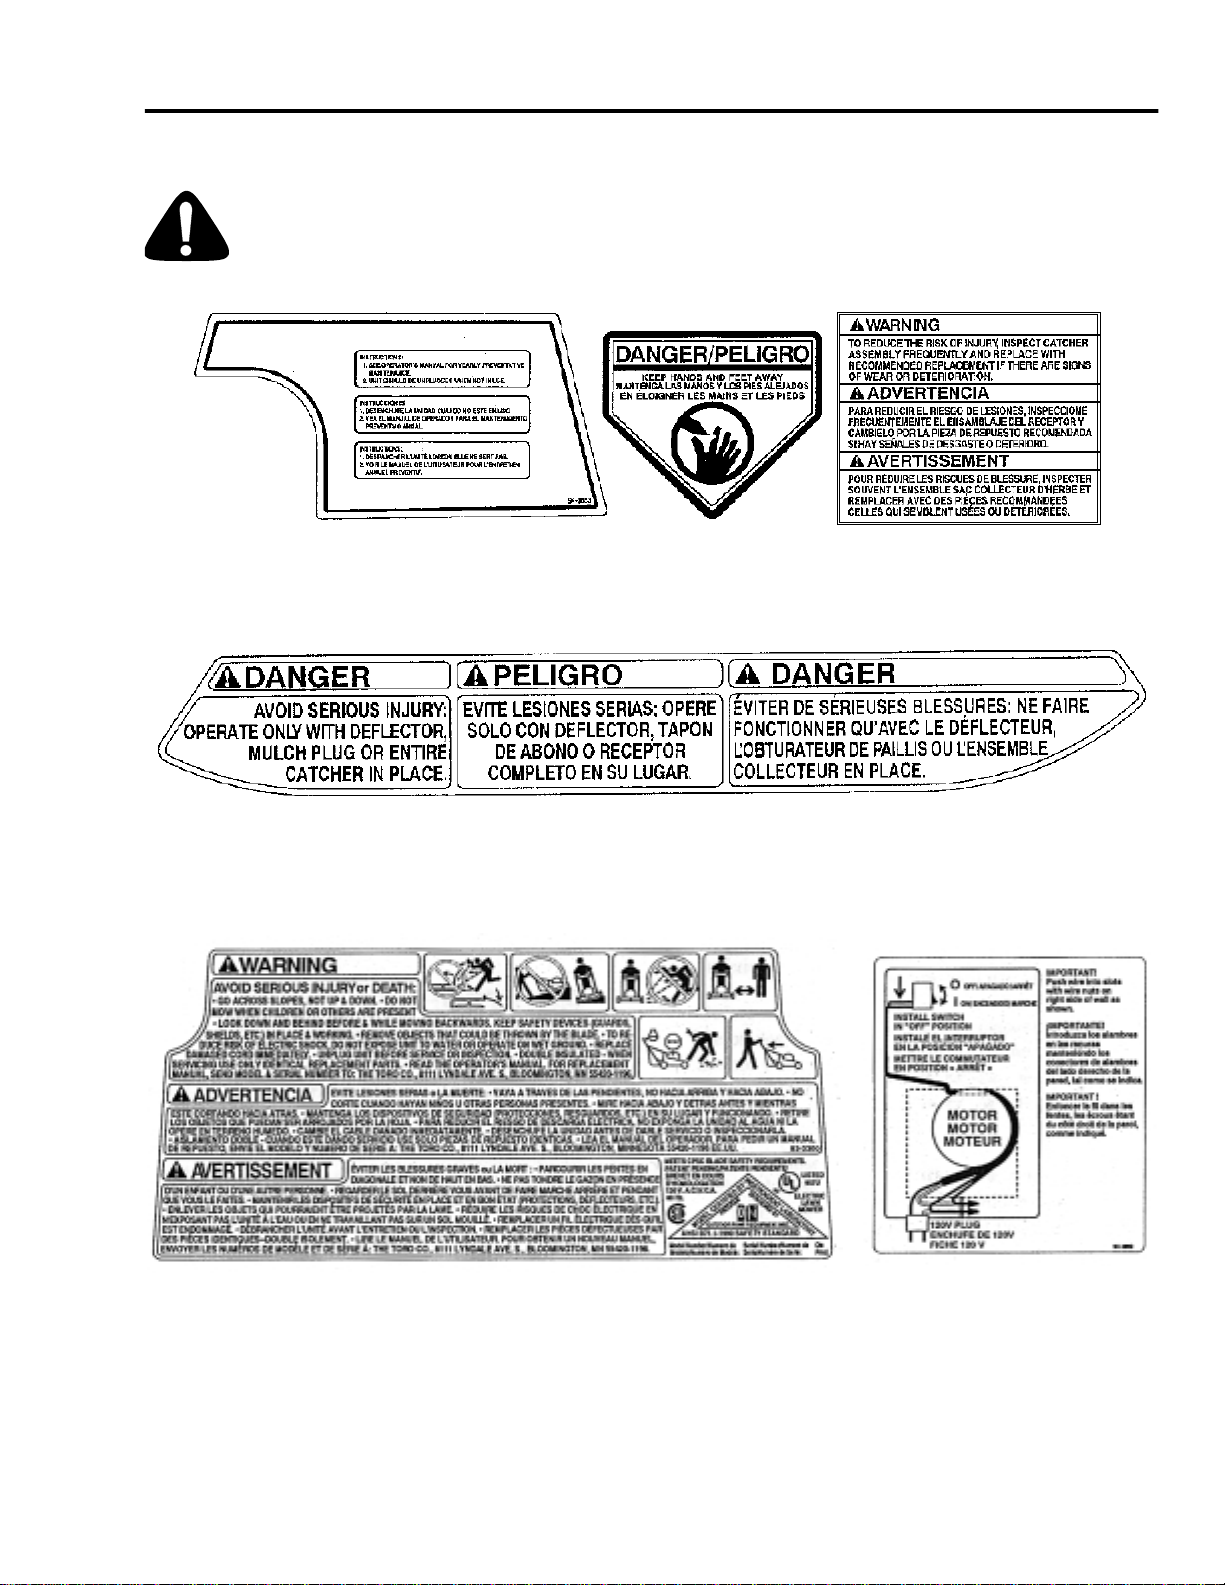
Safety and Instruction Decals
Safety decals and instructions are easily
visible to the operator and are located near
any area of potential danger. Replace any decal that
is damaged or lost.
ON CONTROL PANEL ON MULCH PLUG ON MULCH PLUG
ON MULCH PLUG
ON REAR OF MOWER UNDER COVER
(Part No. 94-3860)
ON REAR OF MOWER

Carefree Mower Service Manual 2 - 7
SAFETY INFORMATION
Battery Powered Models
Introduction
Thank you for purchasin
g
a Toro product.
All of us at Toro want you to be completely satisfied
with your new product, so feel free to contact your local
Authorized Service Dealer for help with service,
g
enuine Toro parts, or other information you may
require.
Read this manual carefully to learn how to operate and
maintain your product correctly. Readin
g
this manual
will help you and others avoid personal injury and
dama
g
e to the product. Althou
g
h Toro desi
g
ns,
produces and markets safe, state-of-the-art products,
you are responsible for usin
g
the product properly and
safely. You are also responsible for trainin
g
persons
who you allow to use the product about safe operation.
The Toro warnin
g
system in this manual identifies
potential hazards and has special safety messa
g
es
that help you and others avoid personal injury, even
death. DANGER, WARNING, and CAUTION are
si
g
nal words used to identify the level of hazard.
However, re
g
ardless of the hazard, be extremely
careful.
DANGER si
g
nals an extreme hazard that will cause
serious injury or death if the recommended precautions
are not followed.
WARNING si
gnals a hazard that may cause serious
injury or death if the recommended precautions are not
followed.
CAUTION signals a hazard that may cause minor or
moderate injury if the recommended precautions are
not followed.
Two other words are also used to hi
g
hli
g
ht information.
"Important" calls attention to special mechanical
information and "Note" emphasizes
g
eneral information
worthy of special attention.
The left and ri
g
ht side of the machine is determined by
standin
g
behind the handle in the normal operator's
position.
Safety
IMPORTANT SAFETY INSTRUCTIONS
Improper use or maintenance by the operator or
owner can result in injury. To reduce the potential
for injury, comply with these safety instructions
and always pay attention to the safety alert
symbol which means CAUTION, WARNING or
DANGER — “personal safety instruction.” Failure
to comply with the instruction may result in
personal injury.
READ ALL INSTRUCTIONS
BEFORE USING THIS MOWER
SAVE THESE INSTRUCTIONS
FOR FUTURE REFERENCE!
WARNING: To reduce the risk of personal injury
while using battery lawn mower, always follow
these basic safety instructions.
Safe Operating Practices
This product is capable of amputating hands and feet
and throwing objects. Always follow all safety
instructions to avoid serious injury or death.
This mower is designed for cutting and mulching grass
or, when equipped with a grass bag, for catching cut
grass. Any use for purposes other than these could
prove dangerous to user or bystanders.
General Operation
1. Read this manual carefully before operating the
mower. Become familiar with the controls and
proper use of the mower. Never allow children
under 16 years of age to operate the mower.
Never allow adults to operate mower without
proper instructions.
2. The operator of the mower is responsible for
keepin
g everyone, especially children and pets,
away from area of operation. The operator is
responsible for accidents or hazards occurring to
other people or their property.
!
2
 Loading...