


 Loading...
TomTom 4EN52, 4EH52, 4EJ41, 4ER5, 4EH44 User Manual
...TomTom GO
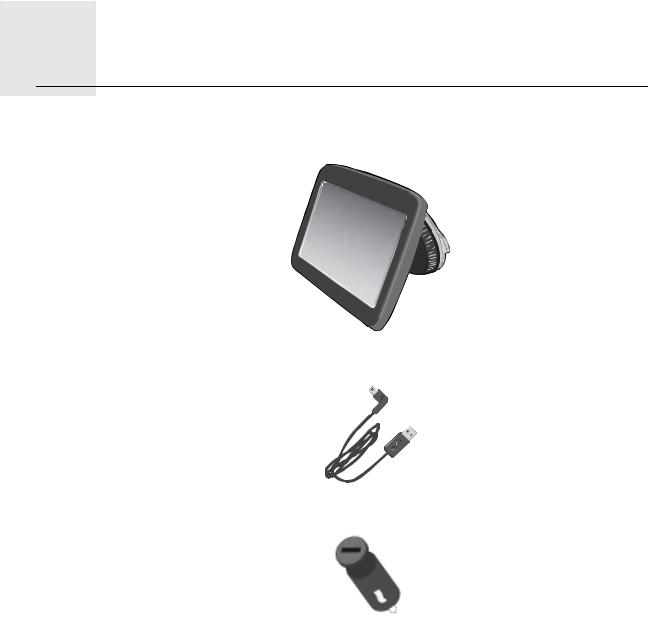
1.What’s in the box
•TomTom GO including the Easy Click mount
•USB cable
•USB car charger
•Installation poster
2

2. Read me first
Mounting your device in your car
Make sure that both the mount and your windscreen are clean and dry before you attach the mount. Place the device so that it does not interfere with your view of the road or of any of the controls in your car.
To attach the mount, press the suction cup firmly against the windscreen on an area where the glass is flat. Then twist the grip on the base of the mount in a clockwise direction until you hear a click.
Plug the cable into your car dashboard and connect the other end to the connector on the back of your device.
Switching on and off
To switch on your navigation device, press and hold the On/Off button until you see the start-up screen. The first time you switch on your device, it may take a short time to start.
Setting up
Important: Take care to select the correct language, since the language you choose will be used for all text on the screen.
When you first switch on your device, you have to answer a few questions to set up the device. Answer the questions by tapping the screen.
GPS reception
When you first start your TomTom GO navigation device, the device may need a few minutes to determine your GPS position and show your current position on the map. In future, your position will be found much faster, usually within a few seconds.
To ensure good GPS reception, you should use your device outdoors. Large objects such as tall buildings can sometimes interfere with reception.
Micro-SD card slot
Your TomTom GO navigation device includes a micro-SD card slot so you can add extra storage memory to your device. You can use a micro-SD card to store extra maps to use in your device.
The micro-sd card slot is located under a cover on the side of the device.
About MyTomTom
MyTomTom helps you manage the contents, maps and services of your TomTom GO navigation device, as well as giving you access to the TomTom community. It is a good idea
3
to frequently connect your navigation device to MyTomTom, to ensure you always have the latest updates. You can also log in to MyTomTom on the TomTom website.
Tip: We recommend using a broadband internet connection whenever you connect your navigation device to MyTomTom.
Setting up MyTomTom
1
2
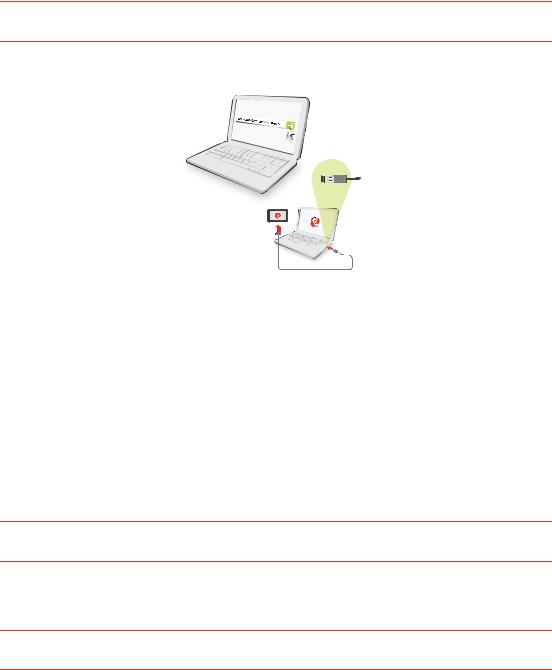
To set up MyTomTom, do the following:
1.Connect your computer to the internet.
2.Start a browser and go to tomtom.com/getstarted.
3.Click Download now.
Your browser downloads the MyTomTom support application, which you need to install on your computer in order to connect your device to MyTomTom. Follow the instructions on the screen if you are asked questions while downloading.
4.When prompted, connect your device to your computer using the USB cable. Then switch your device on.
Your device is then recognised, backed up and the latest updates are installed.
Important: You should plug the USB connector directly into a USB port on your computer and not into a USB hub or USB port on a keyboard or monitor.
Once the MyTomTom support application is installed, you can access MyTomTom from the notification area on your desktop.
Tip: When you connect your navigation device to your computer, MyTomTom tells you if there are any updates for your device.
Device not starting
In rare cases, your TomTom GO navigation device may not start correctly or may stop responding to your taps.
First, check that the battery is properly charged. To charge the battery, connect your device to the car charger. It can take up to 2 hours to fully charge the battery.
If this does not solve the problem, you can reset the device. To do this, press and hold the On/Off button for 15 seconds and release the button when your device begins to restart.
4

Charging your device
The battery in your TomTom GO navigation device charges when you connect it to the car charger or to your computer.
Important: You should plug the USB connector directly into a USB port on your computer and not into a USB hub or USB port on a keyboard or monitor.
Safety Notice
Some TomTom navigation devices contain a GSM/GPRS module which can interfere with electrical devices such as cardiac pacemakers, hearing aids and aviation equipment.
Interference with these devices may endanger the health or life of you or others.
If your device includes a GSM/GPRS module, do not use it near unprotected electrical units or in areas where the use of mobile telephones is prohibited, such as hospitals and airplanes.
Take care of your navigation device
Never leave your TomTom GO or accessories on view when you leave the car as they may become an easy target for thieves.
It is important to take care of your device:
•Your device is not designed for use in extreme temperatures and any such exposure may cause permanent damage. Extended exposure to sun light may lead to early deterioration in battery performance.
•Do not open the casing of your device under any circumstances. Doing so may be dangerous and will invalidate the warranty.
•Wipe or dry the screen of your device using a soft cloth. Do not use any liquid cleaners.
5
3. Safety
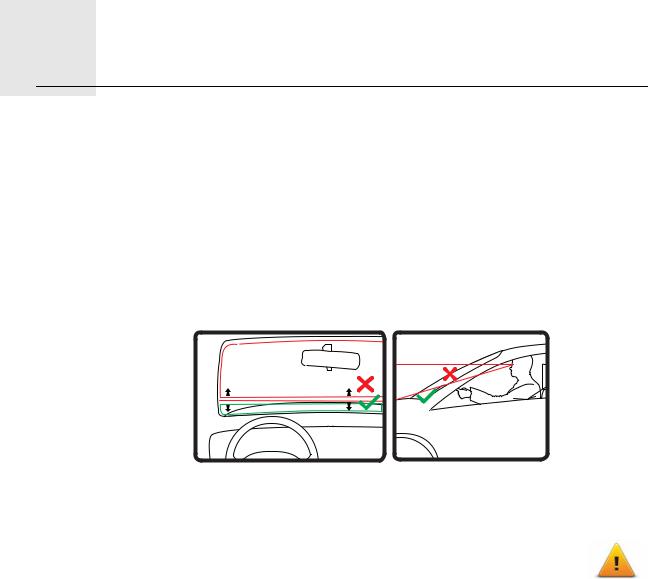
Installing the mount
Consider carefully where to attach the mount in your car. The mount should not block or interfere with any of the following:
•Your view of the road
•Any of the controls in your car
•Any of your mirrors
•The airbag
When your navigation device is in the mount, you should be able to reach the device easily without leaning or stretching. You can attach the mount to the windscreen, side window or use a Dashboard Mount Disk to attach the mount to your dashboard. The following diagrams show where you can safely attach the mount.
TomTom also offers alternative mounting solutions for your TomTom navigation device. For more information about Dashboard Mount Disks and alternative mounting solutions, go to tomtom.com/accessories.
Safety settings
We recommend using the safety settings to make your driving as safe as possible.
These are some of the options included in the safety settings:
•Show essential menu buttons while driving
•Show safety reminders
•Warn when driving faster than allowed
You can also drive more safely by using voice commands to control your TomTom GO.
6
4. Planning a route
Important: In the interest of safety and to reduce distractions while you are driving, you should always plan a route before you start driving.
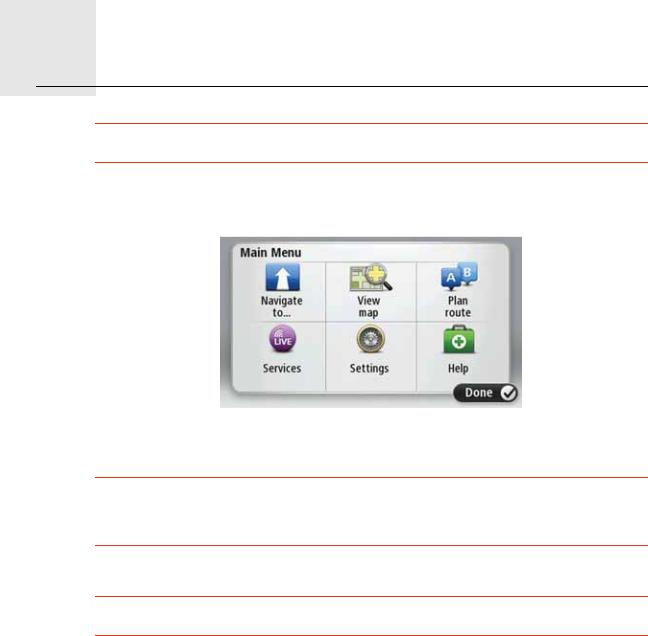
To plan a route on your TomTom GO, do the following: 1. Tap the screen to open the Main menu.
2.Tap Navigate to...
3.Tap Address.
Tip: The first time you plan a route, you are asked to select a country, state or region. Your selection is saved and used for all future routes until you change this setting.
You can change this setting by tapping the flag before you select a city.
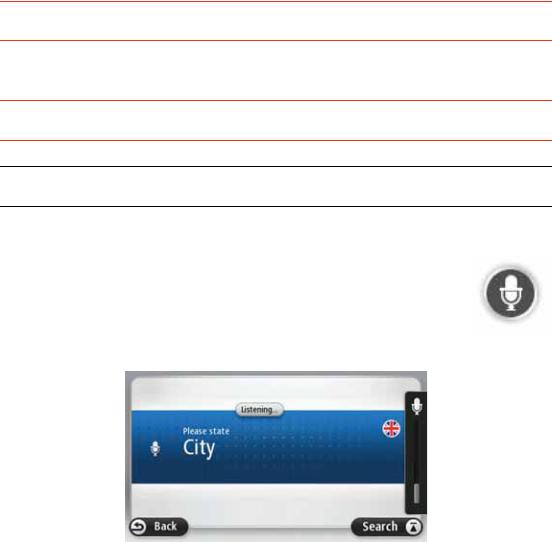
4. Enter the town or city name.
Tip: Instead of typing the address, tap the microphone button to enter the address by speaking to your GO.
•Towns with similar names are shown in the list while you type.
•When the correct city or town appears in the list, tap the name to select the destination.
7

5.Enter the streetname.
•Streets with similar names are shown in the list while you type.
•When the correct streetname appears in the list, tap the name to select the destination.
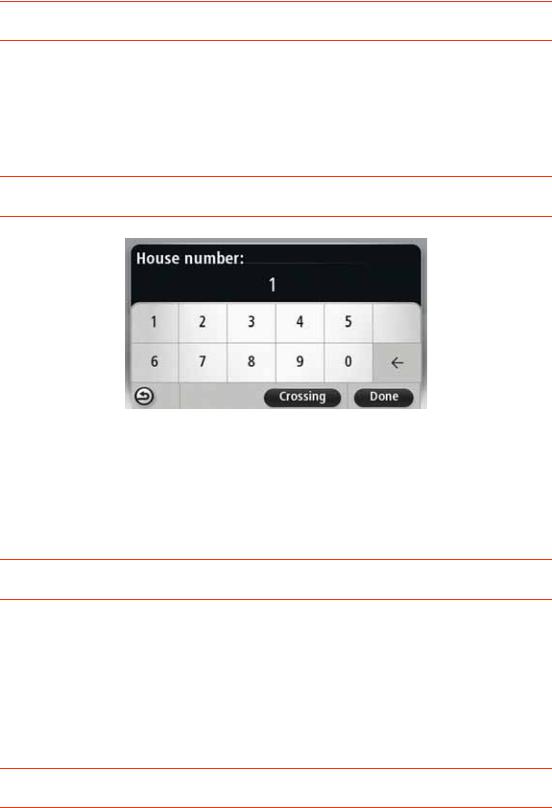
6. Enter the house number, then tap Done.
7.The location is shown on the map. Tap Select to continue or tap Back to enter another address.
Tip: If you want your final destination to be a car park, tap Park nearby and select a location from the list of car parks close to your general destination.
8
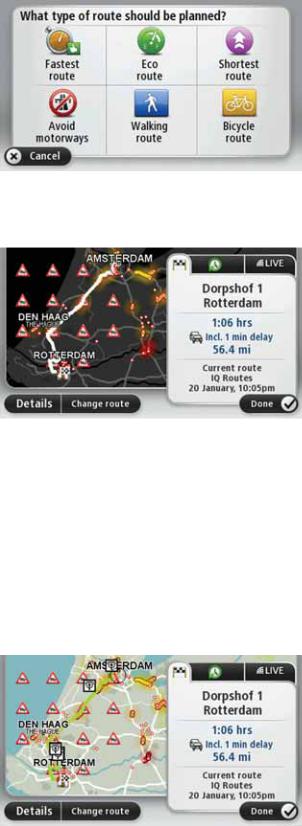
8. Select the type of route you want to plan.
9.When the new route is shown, tap Done.
•For more information about the route, tap Details.
•To plan a different route, tap Change route.
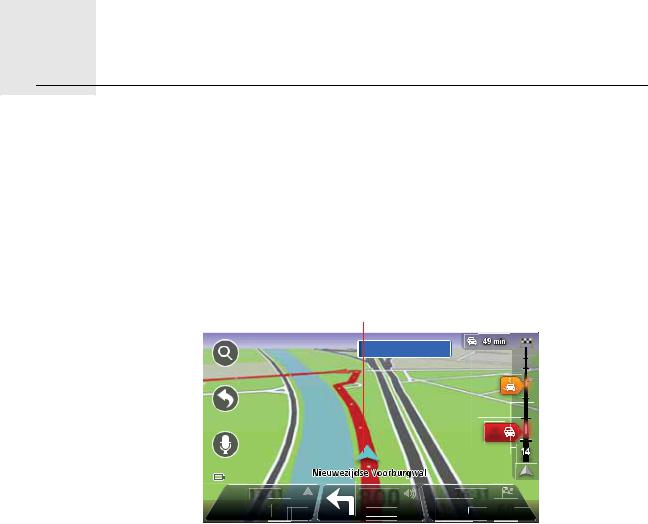
Your TomTom GO starts to guide you to your destination, using spoken instructions and onscreen directions.
Route summary
The route summary shows an overview of your route, the remaining distance to your destination and the remaining estimated journey time.
To view the route summary, tap the right-hand panel on the status bar in the Driving view or tap View route in the Main menu and then tap Show route summary.
When used with TomTom Traffic, the route summary shows an overview of your route, the remaining distance to your destination, the remaining estimated journey time and traffic information about delays on your route.
LIVE summary
LIVE summary shows LIVE services information on your route.
9
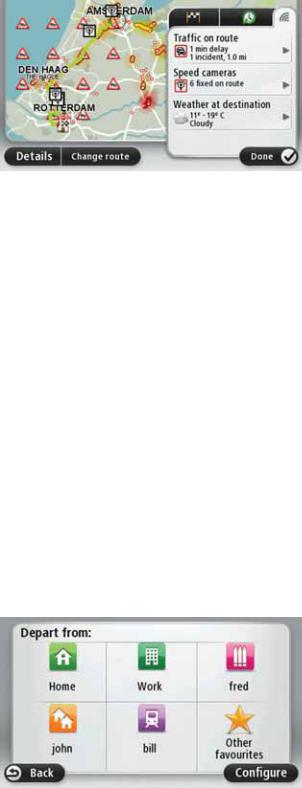
To view LIVE summary information, tap the LIVE tab on the route summary screen. Tap any of the panels for more detailed information.
The LIVE tab panels show the following information:
•Traffic on route - tap this panel to view detailed information about traffic delays and other incidents on your route.
•Speed cameras - tap this panel to open the Speed Camera menu. You can then report a speed camera or change your settings for speed camera warnings.
•Weather - tap this panel to view the latest weather reports.
Note: Not all LIVE services are available in all countries. You may be able to use LIVE services when travelling abroad. For more information on available services, go to tomtom.com/services.
Using your voice to plan a route
Instead of tapping the screen to plan a route, you can use your voice to plan a route. For information about planning a route using your voice, see Voice command and control.
Frequent destinations
If you often make trips to the same destinations, you can set your TomTom GO to ask if you want to plan a route to one of these locations, every time the device starts. This is faster than planning a route in the normal way.
To select a new destination, tap Start-up settings in the Settings menu and select Ask for a destination. Then select a button to use for this destination and answer the questions about the destination.
Show my frequent destinations
You can set your TomTom GO to ask if you want to plan a route to one of your frequently visited destinations every time the device starts.
To change this setting, do the following:
10
1.Tap Start-up settings in the Settings menu and then select Ask for a destination.
2.Tap Yes, then tap Yes again to begin entering information about the destination.
3.Select a symbol for the destination and tap Done to set the symbol, then tap Yes.
Tip: To add new destinations, select one of the numbered symbols and enter a name for the new destination button.
4.Tap Yes and if required enter a new name, then tap Done.
5.Enter the address details in the same way you enter an address when planning a route, then tap Done.
6.If you want to set more destinations, repeat the steps above. Otherwise, tap Done. You are asked if you want to change the start-up image.
7.If you want to change the image, tap Yes then follow the instructions shown on the screen. Otherwise, tap No.
Every time your TomTom GO starts, you are asked if you want to plan a route. If you tap Cancel, you are shown the Main Menu.
Using arrival times
When you plan a route, your TomTom GO asks you if you need to arrive at a particular time.
Tap YES to enter a preferred arrival time.
Your GO calculates your arrival time and shows you whether you will arrive on time.
You can also use this information to work out when you need to leave. If your GO shows that you will arrive 30 minutes early, you can wait and leave in 30 minutes time, rather than arrive early.
Your arrival time is constantly recalculated during your journey. The status bar shows whether you will arrive on time or if you are going to be late, as shown below:
|
You will arrive 55 minutes before the arrival time you entered. |
|
If the estimated arrival time is more than five minutes before the time |
|
you entered, it is shown in green. |
|
|
|
You will arrive 3 minutes before the arrival time you entered. |
|
If the estimated arrival time is less than 5 minutes before the time |
|
you entered, it is shown in yellow. |
|
|
|
You will arrive 19 minutes late. |
|
If the estimated arrival time is later than the time you entered, it is |
|
shown in red. |
|
|
|
Tap Status bar settings in the Settings menu, to enable or disable |
|
arrival time notifications. |
Status bar |
To enable arrival time notifications, select Leeway. |
preferences |
|
11
Navigation menu options
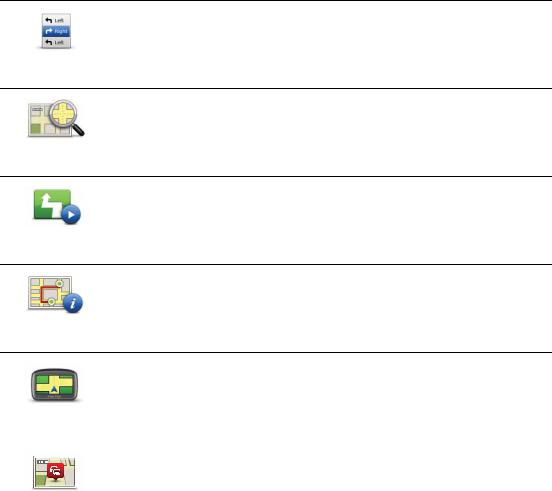
When you tap Navigate to..., you can set your destination in many ways, not just by entering the address. The other options are listed below:
|
Tap this button to use TomTom Local Search with Google to help you |
|
|
find shops and businesses in and around your current location. |
|
Local search |
You can choose to search for shops and businesses near you, near |
|
your destination, near any other destination or in a city. |
||
|
||
|
For example, if you are looking for a swimming pool near your cur- |
|
|
rent location, enter ’swimming pool’ and choose the best search |
|
|
result. |
|
|
|
|
|
Tap this button to navigate to your Home location. |
|
|
You will probably use this button more than any other. |
|
Home |
|
|
|
|
|
|
Tap this button to select a Favourite as your destination. |
|
Favourite |
|
|
|
|
|
|
Tap this button to enter an address as your destination. |
|
Address |
|
|
|
|
|
|
Tap this button to select your destination from a list of places you |
|
|
have recently used as destinations. |
|
Recent |
|
|
destination |
|
|
|
|
|
|
Tap this button to navigate to a Point of Interest (POI). |
|
Point of Interest |
|
|
|
|
|
|
Tap this button to select a point on the map as your destination using |
|
|
the map browser. |
|
Point on map |
|
|
|
|
|
|
Tap this button to enter a destination using latitude and longitude |
|
|
values. |
|
Latitude |
|
|
Longitude |
|
|
|
|
|
|
Tap this button to select your last recorded position, as your destina- |
|
|
tion. |
|
Position of last |
|
|
stop |
|
|
|
|
12

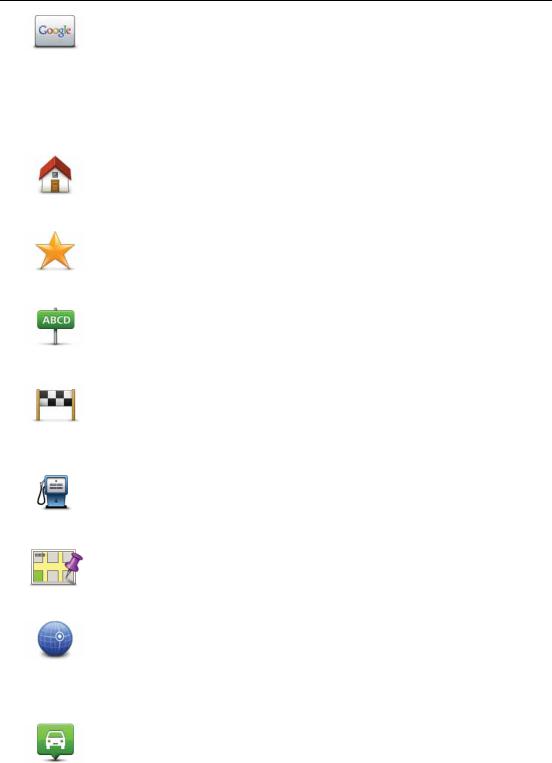
Planning a route in advance
You can use your TomTom GO to plan a route in advance, selecting your starting point and your destination.
Here are some more reasons to plan a route in advance:
•Find out how long a journey is going to take before you start.
You can also compare journey times for the same route at different times of the day or on different days of the week. Your GO uses IQ Routes when planning a route. IQ Routes calculates routes based on the real average speeds measured on roads.
•Study the route of a journey you are planning.
•Check a route for someone who is coming to visit you and then explain the route to them in detail.
To plan a route in advance, follow these steps:
1.Tap the screen to bring up the Main menu.
2.Tap the arrow button to move to the next menu screen and tap Plan route.
This button is shown while there is no planned route on your GO.
Prepare route
3.Select the starting point for your journey in the same way that you would select your destination.
4.Set the destination for your journey.
5.Choose the type of route that should be planned.
•Fastest route - the route which takes the least time.
•Eco route - the most fuel-efficient route for your journey.
•Shortest route - the shortest distance between the locations you set. This may not be the quickest route, especially if the shortest route is through a town or city.
•Avoid motorways - a route which avoids motorways.
•Walking route - a route designed for making the journey on foot.
•Bicycle route - a route designed for making the journey on a bicycle.
6.Choose the date and time that you will make the journey you are planning.
Your GO uses IQ Routes to work out the best possible route at that time. This is useful to see how long a journey takes at different times of the day or on different days of the week.
7.Your TomTom GO plans the route between the two locations you selected.
Viewing route information
You can access these options for the route you last planned by tapping View route in the Main Menu or the Details button on the route summary screen.
13
You can then select from the following options:
Tap this button for a list of all the turn instructions on the route.
This is very useful if you need to explain a route to someone else.
Show instructions
Tap this button to see an overview of the route using the map browser.
Show map of route
Tap this button to watch a demo of the journey. You can interrupt the demo at any time by tapping the screen.
Show route demo
Tap this button to open the route summary screen.
Show route summary
|
Tap this button to see a preview of your destination. |
|
|
You can navigate to a car park near your destination, call your desti- |
|
Show |
nation if a phone number is known, and view any available informa- |
|
tion about your destination. |
||
destination |
||
|
|
|
|
Tap this button to see all the traffic incidents on your route. |
|
|
Note: This button is only shown if your device has either an HD Traf- |
|
Show traffic on |
fic subscription or an RDS-TMC Receiver connected. Traffic infor- |
|
mation is not available in all countries or regions. For more |
||
route |
||
|
information about TomTom traffic information services, go to |
|
|
tomtom.com/services. |
|
|
|
14

5. Voice control
About voice control
Instead of tapping the screen to control your TomTom GO, you can use your voice to control your GO.
For example, to increase the volume on your GO, you can say, "Increase volume."
To view the list of available commands, tap Help in the Main menu or the Setting menu then tap Product manuals and then tap What can I say?
Important: Voice control requires a computer voice. When there are no computer voices installed on your TomTom GO, this feature is not available.
To select a computer voice, tap Voices in the Settings menu, then tap Change voice and select a computer voice.
Using voice control
To enable voice control and show the button in the Driving view, tap Make your own menu in the Settings menu and select the checkbox for Voice control.
To switch off voice control and remove the button from the Driving view, tap Make your own menu in the Settings menu and clear the checkbox for Voice control.
The following example shows how to use voice control to plan a journey to your Home address.
1.Tap the microphone button in the Driving view to turn on the microphone.
The microphone monitor is shown on the right-hand side of the screen.
2.When you hear the tone, say, "Navigate to Home".
While you are speaking the microphone monitor shows how well the device can hear your voice:
A green bar means the device can hear your voice.
A red bar means your voice is too loud for the device to recognise individual words and understand everything you say.
A grey bar means your voice is too quiet for the device to recognise individual words and understand everything you say.
For some phrases, your GO repeats what you say and asks for confirmation. 3. If the command is correct, say, "Yes."
15
If the command is incorrect, say, "No" and repeat the command after you hear the tone. Your GO plans a route from your current location to your Home address.
Tip: To stop your GO from listening out for further commands, say "Back" or "Cancel" or "Quit" or simply tap the screen.
Planning a journey using your voice
Important: In the interest of safety and to reduce distractions while you are driving, you should always plan a route before you start driving.
Note: It’s not possible to plan a route using your voice for all maps in all countries, or in all languages.
To plan a route to an address using speech, do the following:
1.Tap the voice control button in the Driving view.
2.When you hear the tone, say, "Navigate to address".
3.Say the name of the town.
Your GO shows a list of towns which sound similar to what you said and tells you which town is at the top of the list.
If the town you hear is the same as the town you requested then say, "Done" or "OK" or "Yes" or "One" or tap the town at the top of the list.
If the town you hear is incorrect, but the correct town is in the list, say the number next to the correct town or tap the name of the town.
For example, if the correct city is Paris and this town is shown at the third item in the list, you can say, "Three" or tap the name, Paris.
If the name is not in the list, then say "Back" or "No" or tap Back to return to the previous screen and say the town again when you hear the tone.
4.Say the streetname.
Your GO shows a list of streetnames which sound similar to what you said and tells you which streetname is at the top of the list.
If the streetname you hear is the same as the streetname you requested then say, "Done" or "OK" or "Yes" or "One" or tap the streetname at the top of the list.
16
Tip: Different locations may have the same name, such as a road that spans multiple postcodes. When this happens you need to look at the screen and tap the correct location.
If the street name you hear is incorrect, but the correct streetname is in the list, say the number next to the correct streetname or tap the streetname in the list.
If the streetname is not shown in the list, say "Back" or "No" or tap Back to return to the previous screen and then say the streetname again when you hear the tone.
5. Say the house number.
Important: Numbers need to been spoken in the same language as the button names and menus on your TomTom GO.
Numbers should be pronounced in the same way you normally say a number, in one continuous sentence. So 357 is pronounced, "Three hundred and fifty seven."
If the number is shown correctly then say, "Done" or "OK" or tap the keyboard to enter the number.
If the number is shown incorrectly then say, "Back" or "No" or tap the Backspace key and repeat the number.
Tip: If you say, "Back" when there are no numbers on the screen, your GO will return you to the previous screen.
When the number is shown correctly say, "Done" or "OK." Alternatively, enter the number by tapping the screen.
6.When the route has been calculated and the route summary is shown, tap Done.
Your TomTom GO starts to guide you to your destination, using spoken instructions and onscreen directions.
Entering addresses using your voice
Important: In the interest of safety and to reduce distractions while you are driving, you should always plan a route before you start driving.
Even if you don’t use voice control to start planning a journey, you can still use your voice to enter the address.
To start planning a journey tap Navigate to... in the Main menu, then tap Address.
17
To enter the destination using your voice, tap one of the following buttons:
|
Tap this button to enter an address entirely using speech. |
|
Spoken address helps you to enter information without tapping the |
Spoken address |
screen. |
|
|
|
This option recognises the following spoken terms: |
•Commands: Yes, No, Back, Done, OK, Crossing.
•Streetnames.
•Cities and towns and their centres.
•Favourites, postcodes and POIs.
•Plan alternative route, Recalculate original, Avoid roadblock, Minimise delays, Clear route, Travel via... and Recent destination.
•Numbers. These should be pronounced in the same way you normally say a number, in one continuous sentence. So 357 is pronounced, "Three hundred and fifty seven."
Tap this button at the base of the keyboard to use speech to enter an address. When the button is grey, you cannot use speech to enter an address.
This button is available for the for the following types of destination:
•City centre - to select a city or town centre.
•Street and house number - to select an address.
•Crossing or intersection - to select the point where two streets meet.
Tips:
•Your GO recognises places and streetnames when they are spoken in the local language using local pronunciation.
•Spoken address entry is not possible for postcodes which must be entered using the keyboard.
•Spoken address entry is not available for all maps in all countries.
18
6. Driving View
About the Driving View
When your TomTom GO device starts for the first time, you are shown the Driving View along with detailed information about your current position.
Tap the centre of the screen at any time to open the Main Menu.
You can choose the screen shown when you switch on your device by tapping Settings in the Main Menu, then tapping Start-up settings.
The Driving View
AB |
C D |
E |
||||||||||
|
|
|
|
Prins |
|
Hendrikkade |
|
|
|
|
|
|
|
|
|
|
|
|
|
|
|
|
|
||
|
|
|
|
|
|
|
|
|
|
|
||
|
|
|
|
|
|
|
|
|
|
|||
|
|
|
|
|
|
|
|
|
|
|
|
|
|
|
|
|
|
|
|
|
|
|
|
|
|
|
|
|
|
|
|
|
|
|
|
|
|
|
|
|
|
|
|
|
|
|
|
|
|
|
|
|
|
|
|
|
|
|
|
|
|
|
|
|
|
|
|
|
|
|
|
|
|
|
|
|
|
|
|
|
|
|
|
|
|
|
34 |
|
||
|
|
|
|
|
|
|
|
|
min |
|||
|
|
|
|
|
|
|
|
|
|
|
|
km |
|
|
|
|
|
|
|
|
|
|
|
|
|
|
13:31 |
|
800 |
16:31 |
|
|
|
|||||
|
|
|
|
|
|
|||||||
|
54 |
KM/H |
|
60MAX |
|
|
METRES |
2:30HRS |
|
60KM |
||
|
|
|
|
|
||||||||
|
|
|
|
|
|
|
|
|
|
|
||
F G H |
I J |
K |
||||||||||
1.Zoom button - tap the magnifying glass to show buttons for zooming in and out.
2.Quick menu - to enable the quick menu, tap Make your own menu in the Settings menu.
3.Your current position.
4.Road sign information or the next street name.
5.Traffic sidebar. Tap the sidebar to open the Traffic menu.
The traffic sidebar is only shown if your device has either an HD Traffic subscription or an RDS-TMC Receiver connected. Traffic information is not available in all countries or regions.
6.Battery level indicator.
7.Microphone button for voice command and control.
8.The time, your current speed and the speed limit, if known. To see the difference between your preferred arrival time and your estimated arrival time, check the Leeway checkbox in the Status bar settings.
Tap this part of the status bar to switch between a 3D map and a 2D map.
19
9. The name of the street you are on.
10.Navigation instruction for the road ahead and the distance to next instruction. If the second instruction is less that 150m after the first instruction, you see it shown immediately instead of the distance.
Tap this part of the status bar to repeat the last voice instruction and to change the volume. You can also tap here to mute the sound.
11.The remaining journey time, the remaining distance and your estimated arrival time. Tap this part of the status bar to open the Route Summary screen.
To change the information shown in the status bar, tap Status bar in the Settings menu.
Driving View symbols
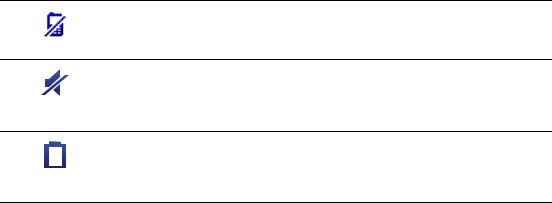
The following symbols are shown in the Driving View:
Mobile phone not connected - this symbol is shown when the selected mobile phone is not connected to your device. You must have already established a connection to this phone.
Sound muted - this symbol is shown when the sound has been muted.
To turn the sound back on, tap the middle panel in the status bar.
Battery - this symbol is shown when the battery level is low.
When your see this symbol, you should charge your navigation device as soon as possible.
20
7. Advanced Lane Guidance
About lane guidance
Note: Lane guidance is not available for all junctions or in all countries.
Your TomTom GO helps you prepare for motorway exits and junctions by showing the correct driving lane for your planned route.
As you approach an exit or junction, the lane you need is shown on the screen.
Using lane guidance
There are two types of lane guidance:
• Lane images
To turn lane images off, tap Settings in the Main Menu, then tap Advanced settings. Clear the checkbox for Show lane images.
Tip: Tap anywhere on the screen to return to the Driving View.
• Instructions in the status bar
21

Tip: If no lane guidance is shown in the status bar and all lanes are highlighted, you can use any lane.
22
8. Making changes to your route
About route changes
After you plan a route, you may want to change the route or even the destination. There are various ways to change your route without the need to completely replan the entire journey.
To change the current route, tap Change route in the Main menu:
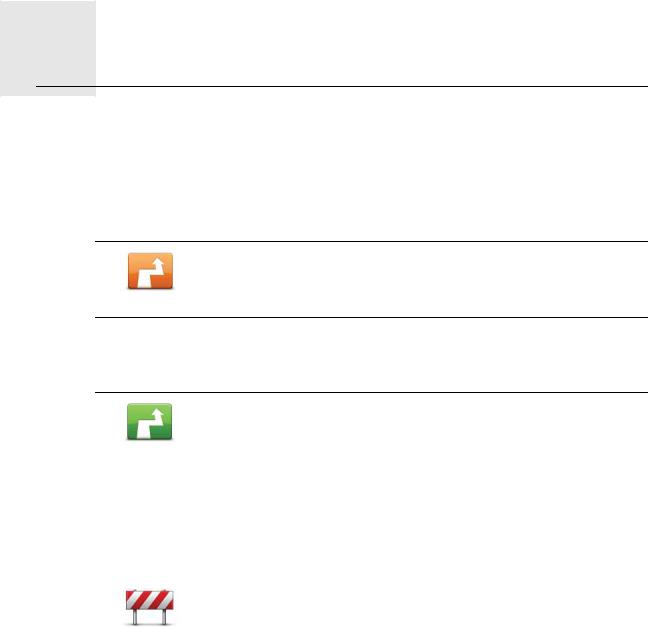
Tap this button to change the current route.
This button is only shown while there is a planned route on your GO.
Change route
Change route menu
To change the current route or your destination, tap one of the following buttons:
|
Tap this button to find an alternative to the current route. |
||
|
This button is only shown while there is a planned route on your GO. |
||
Calculate |
This is a simple way to search for a different route to your current |
||
alternative |
|||
|
destination. |
||
|
Your GO calculates a new route from your current location, to reach |
||
|
your destination using completely different roads. |
||
|
The new route is shown next to the original route so that you can |
||
|
select the route you want to use. |
||
|
|
||
|
Tap this button while driving on a planned route, to avoid a road- |
||
|
block or traffic congestion on the road ahead. |
||
Avoid roadblock |
Your GO will suggest a new route which avoids the roads on your |
||
current route for the selected distance. |
|||
|
|||
|
If the roadblock or traffic congestion suddenly clears, tap Recalcu- |
||
|
late route to replan your original route. |
||
|
|
||
|
Important: Be aware that when a new route is calculated, you might |
|
|
|
immediately be asked to turn off the current road. |
||
|
|
|
|
|
|
|
|
23

|
Tap this button to avoid traffic delays on a planned route. |
|
|
It is not always possible to avoid all traffic delays. Your GO will check |
|
Minimise delays |
for traffic delays on your route and calculate the best route to avoid |
|
all or most of the delays. |
|
|
|
|
|
|
|
|
|
Note: This button is only available when Traffic is enabled in the |
|
|
Services menu. For more information about TomTom traffic infor- |
|
|
mation services, go to tomtom.com/services. |
|
|
|
|
|
|
|
|
|
|
|
Tap this button to change the current destination. |
|
|
When you change the destination, you are shown the same options |
|
Change |
and asked to enter the new address in the same way as when you |
|
plan a new route. |
|
|
destination |
|
|
|
|
|
|
Tap this button to avoid part of the current route. |
|
|
You are shown a list of the streetnames on your route. When you tap |
|
Avoid part of |
one of the streetnames, your GO calculates a detour to avoid the |
|
selected street. The route summary shows both the new route and |
|
|
route |
|
|
|
your original route. Tap the panel on the right to select one of the |
|
|
routes and then tap Done. |
|
|
If you do not want to use either of the routes shown in the route |
|
|
summary, tap Change route to find another way to alter your route. |
|
|
|
|
|
Tap this button to change your route by selecting a location you |
|
|
want to travel past, maybe so you can meet someone on the way. |
|
Travel via... |
When you select a location to travel past, you are shown the same |
|
options and asked to enter the new address in the same way as |
|
|
|
|
|
|
when you plan a new route. |
|
|
Your GO calculates the route to your destination via the selected |
|
|
location. |
|
|
The selected location is shown on the map using a marker. You can |
|
|
only select one location to travel past on a route. |
|
|
Unlike the warning which is given when you reach your destination, |
|
|
no warning is given when you travel past a marked location. |
|
|
|
|
24
9. View map
About viewing the map
You can view the map in the same way as you might look at a traditional paper map. The map shows your current location and many other locations such as Favourites and POIs.
To view the map in this way, tap View map or View route in the Main menu.
You view different locations on the map by moving the map across the screen. To move the map, touch the screen and drag your finger across the screen.
To select a location on the map, tap the location on the map. The cursor highlights the location and displays useful information about the location in an information panel. Tap the information panel to create a Favourite or plan a route to that location.
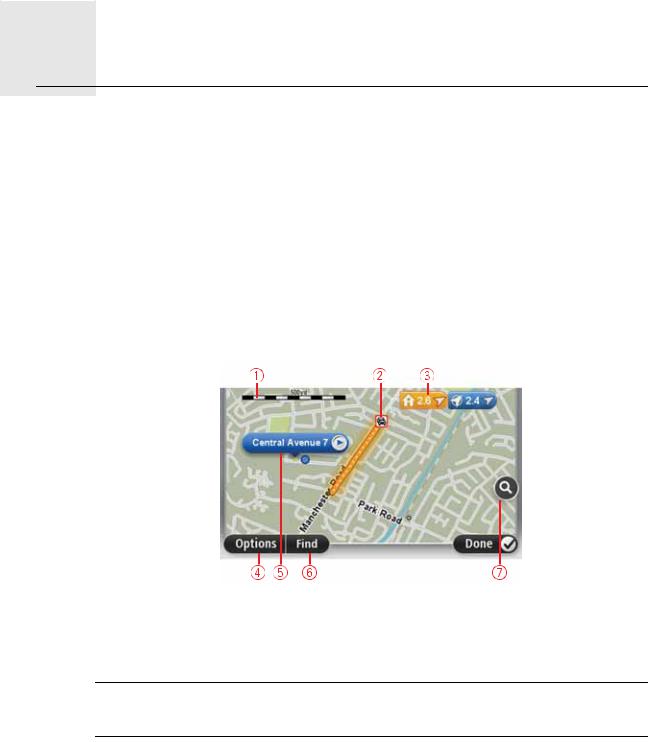
View map
1.The scale bar
2.Traffic - current traffic incidents. Use the Options button to select whether traffic information is shown on the map. When traffic information is shown on the map, POIs and Favourites are not shown.
Note: To use a TomTom traffic information service, you may need a subscription or a receiver. Traffic services are not supported in all countries. For more information and to subscribe, visit tomtom.com/services.
3.Marker
Markers point to your current location (blue), your home location (yellow) and your destination (red). The marker shows the distance to the location.
Tap a marker to centre the map on the location pointed to by the marker.
25

You can also set your own marker. Tap the cursor button, then tap Set marker position to place a green marker at the cursor position.
To turn markers off, tap Options, then Advanced and clear the Markers checkbox.
4.Options button
5.The cursor with streetname balloon.
Tap the button in the streetname balloon to open the cursor menu. You can navigate to the cursor position, make a Favourite of the cursor position, or find a Point of Interest near the cursor position.
6.The Find button
Tap this button to find specific addresses, favourites or Points of Interest.
7.The zoom bar
Zoom in and out by moving the slider.
Options
Tap the Options button to set the information shown on the map and show the following information:
•Traffic - select this option to show traffic information on the map. When traffic information is shown, POIs and Favourites are not shown.
Note: To use a TomTom traffic information service, you may need a subscription or a receiver. Traffic services are not supported in all countries. For more information and to subscribe, visit tomtom.com/services.
•Names - select this option to show street and city names on the map.
•Points of interest - select this option to show POIs on the map. Tap Choose POI to choose which POI categories are shown on the map.
•Images - select this option to show satellite images of the area being viewed. Satellite images are not available for every location on the map.
•Favourites - select this option to show your Favourites on the map.
Tap Advanced to show or hide the following information:
•Markers - select this option to enable markers. Markers point to your current location (blue), your home location (yellow) and your destination (red). The marker shows the distance to the location.
Tap a marker to centre the map on the location which the marker is pointing to.
To create your own marker, tap the cursor button. Then tap Set marker position to place a green marker at the cursor position.
To disable markers, tap Options, then tap Advanced and unselect Markers.
•Coordinates - select this option to show GPS coordinates in the lower left corner of the map.
Cursor menu
The cursor can be used to do more than highlight a location on the map.
26
Loading...