


CONSEILS DE RÉGLAGE
1.Placez les pinces du haut dans l’écartement du bord avant du coffre ou du hayon.
2.Placez les pinces du bas dans le bord inférieur du coffre ou du hayon.
3.Placez les pinces du bas dans les crochets de remorquage gauche et droit du véhicule.
5.Placez les pinces du bas dans le bord inférieur du pare-chocs interne en métal.
8.Placez les pinces du bas dans les trous du châssis à l’arrière du pare-chocs.
9.Placez les pinces du bas sur le bord inférieur du pare-chocs.
10.Placez la pince du bas sur le bord du pare-chocs structural situé derrière le recouvrement de plastique.
11.Les trous du châssis sont situés tout en haut, à l’arrière du pare-chocs.
12.Placez les pinces du bas dans les trous du châssis derrière le pare-chocs.
16.ATTENTION : Le recouvrement du pare-chocs peut se déformer avec l’emploi de ce support. Enlevez ce dernier lorsque vous ne l’utilisez pas.
17.Le bras supérieur du support, entre les tampons de caoutchouc, peut entrer en contact avec l’arête médiane du couvercle du coffre lorsque le support est entièrement monté
18.ATTENTION : Le bras inférieur du support s’adossera à la plaque d’immatriculation et aux feux arrière droit et gauche.
20.Ouvrez les portières arrière ou le hayon pour installer les pinces du haut.
21.ATTENTION : L’essuie-glace arrière ne peut pas être utilisé lorsque le RMS est monté.
23. Le support doit être monté sur la porte droite ou gauche, pas entre les deux.
25.AVIS IMPORTANT : Assurez-vous que les sangles du bas n’entrent pas en contact avec le silencieux ni avec le tuyau d’échappement.
26.ATTENTION : Le couvercle du coffre peut se déformer légèrement avec l’emploi du support. Enlevez ce dernier lorsque vous ne l’utilisez pas.
27.Faites passer la sangle du haut sous le déflecteur sur le dessus du hayon.
29.L’emploi du support fait en sorte que le joint d’étanchéité en caoutchouc au haut de la portière ou du hayon se déforme avec le temps. Enlevez le support lorsque vous ne l’utilisez pas.
30.Placez les pinces du bas dans les trous du châssis situés dans les entretoises gauche et droite du pare-chocs.
33L’utilisation du RMS est non recommandée, car les sangles ne peuvent être installées en toute sécurité.
34.L’utilisation du RMS est non recommandée, car les sangles ne peuvent être installées directement sur la vitre ou la moulure de plastique recouvrant la vitre.
35.L’utilisation du RMS est non recommandée, car le véhicule n’est pas en mesure de supporter la charge là où le RMS doit être monté.
36.L’utilisation du RMS est non recommandée, car le bras supérieur pourrait endommager le couvercle du coffre.
37.L’utliisation du RMS est non recommandée, car les sangles supérieures ne peuvent être installées en toute sécurité.
38.Le bras inférieur du Voyager reposera dans le renfoncement de la plaque d’immatriculation ou directement sur celle-ci.
39.Le bras inférieur du RMS reposera au-dessus de la plaque d’immatriculation.
40.Le bras inférieur du RMS reposera au bas du couvercle du coffre.
41.Ce véhicule n’était pas disponible lors des essais. Pour plus d’information, veuillez communiquer avec Thule.
®
SWEDEN
CAR RACK SYSTEMS
THULE U.S.A., 42 SILVERMINE RD., SEYMOUR CT 06483
FPO 000-0000
®
BIKE CARRIER
PORTE-BICYCLETTES
INSTRUCTIONS AND FIT GUIDE
INSTRUCTIONS DE MONTAGE
ET GUIDE D’ADAPTATION
975
2 BIKE CARRIER
976
3 BIKE CARRIER
®
SWEDEN
CAR RACK SYSTEMS
MADE IN U.S.A.
FABRIQUÉ AUX É.-U.
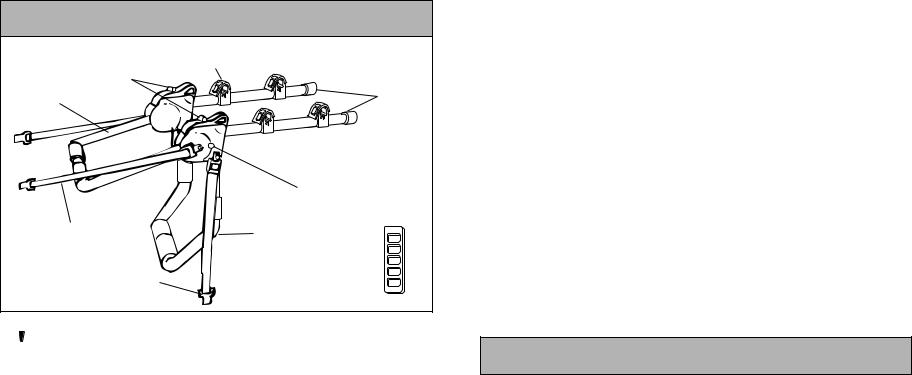
PARTS |
|
|
|
|
CRADLE |
975 X 4 |
|
|
853-1545 |
976 X 6 |
|
LOCK-N-LOAD |
|
|
|
UPPER ARM |
|
|
BIKE ARM |
|
|
|
|
|
|
FIT WINDOW |
|
UPPER STRAP |
|
|
|
W/WIDE CLIP X2 |
|
LOWER ARM |
|
753-0035-04 |
|
|
|
LOWER STRAP |
X2 |
CRADLE STRAP 975 X 4 |
|
853-1546 |
976 X 6 |
||
W/NARROW CLIP |
|
|
|
753-0035-06 |
|
|
|
 RMS WARNING & LIABILITY
Extensive research and design have gone into the RMS carrier and its recommended fits to ensure the highest level of quality, performance and safety. It is, however, your responsibility for the safe attachment and use of the carrier.
Because the attachment of the carrier is beyond the manufacturer's control, Thule is not responsible for carrier-to-vehicle nor bike to carrier attachment, nor any incidental or consequential damages that may occur from its installation or use.
The liability of the manufacturer, as stated in the Thule Warranty, is limited to the replacement of the merchandise that proves defective in materials and/or workmanship.
RMS SAFETY GUIDELINES
■Certain after-market accessories such as (but not limited to) rear deck racks, spoilers etc. may alter or prevent the use of the Voyager on that particular vehicle.
■No more than two bicycles should be mounted on the Voyager.
■The Voyager is not recommended for tandems or recumbents.
■The Voyager is not recommended for off road use.
■For safety to passengers, vehicle and carrier, obey all posted speed limits and traffic cautions. Adapt your speed to road conditions. Be fully aware of the width and height of your load. Use extreme caution when backing up and going on inclines.
RMS LIMITED WARRANTY
Thule will warranty any RMS carrier and RMS accessories produced by THULE to the original purchaser for three (3) years from the date of original retail purchase to be free from defects in materials or workmanship.
Subject to the limitations and exclusions stated below, THULE will remedy defects in materials or workmanship during the warranty period by repairing or replacing (at THULE's option) defective component(s) without charge for parts or labor to the original purchaser. The product or part thereof must be delivered to Thule, at the address shown below, immediately upon discovery of the claimed defect and there should be no attempt to repair the component(s) prior to its shipment to Thule. The purchaser will be responsible for the cost of mailing component(s) to the address listed below, attention Warranty Department.
Exceptions, Exclusions, & Limitations
No warranty is given for failures resulting from conditions beyond THULE's control including, but not limited to, misuse, overloading, or from failure to assemble and mount the RMS carrier in accordance with written THULE instructions.
No warranty is given for failures caused by accidents, unlawful vehicle operation, or defects/inconsistencies in the vehicle upon which the product is installed.
No warranty is given for failures caused by the user's failure to properly secure bike(s)/skis as recommended by THULE.
Repair or replacement of the defective THULE product is the original purchaser's exclusive remedy under this warranty. All consequential and incidental damages are excluded under this warranty.
Damage to your vehicle, your cargo, or to any other person or property is excluded. Mountings must be completed in accordance with the RMS instructions, Safety Guidelines and the RMS Fit Guide.
Claims under any implied warranties of merchantability or fitness for a particular purpose are limited to three years from the date of retail purchase. Proof of purchase may be required.
Some states do not allow the exclusion or limitation of incidental or consequential damages, or limitations on how long an implied warranty lasts, so the above limitations may not apply to you, This warranty gives you specific legal rights and you may also have other rights which vary from state to state.
For information about the THULE RMS Warranty in the U.S.A. Contact THULE 42 Silvermine Road, Seymour Connecticut 06483 Attn: Warranty Department
For information about the THULE RMS Warranty in CANADA.Contact
Sport Dinaco Inc, 4330 Joseph Dubreuil, Lachine, Quebec H8T 3C4 Attn: Warranty Department
FIT GUIDE |
GUIDE D’ADAPTATION |
|||
VEHICLE |
|
|
FIT # |
FIT TIP |
VÉHICULE |
|
|
RÉGLAGE N° |
CONSEIL DE RÉGLAGE |
TOYOTA cont. |
|
|
|
|
'93-96 |
Corolla sedan (berline) |
|
6 |
1,2,26,32 |
'88-96 |
Corolla wagon (familiale) |
|
8 |
1,3,21,38 |
'90-93 |
MR-2 |
No Fit/Aucune adaptation possible |
33 |
|
'92-95 |
Paseo |
|
6 |
1,2,32,38 |
'96 |
Paseo |
|
|
41 |
'91-96 |
Previa |
|
9 |
1,3,25,38 |
'95-96 |
RAV 4 |
|
|
41 |
'84-91 |
Supra |
No Fit/Aucune adaptation possible |
34 |
|
'85-88 |
Tercel wagon (familiale) |
|
9 |
1,2,39 |
'90 |
Tercel 2dr (2 portes) |
|
8 |
1,3,32 |
'91-96 |
Tercel 2dr/4dr (2 ou 4 portes) |
|
6 |
1,2 |
VOLKSWAGEN |
Cabriolet |
|
|
|
'84-91 |
No Fit/Aucune adaptation possible |
37 |
||
'90-94 |
Corrado |
|
6 |
1,12,21,25,32,38 |
'89 |
Fox 4dr/2dr (2 ou 4 portes) |
|
5 |
1,2,38 |
'89-92 |
Golf/GTI |
|
7 |
1,2,21,32,38 |
'93-95 |
Golf III |
|
8 |
1,2,32,38 |
'89-92 |
Jetta |
|
6 |
1,3,32,40 |
'93-95 |
Jetta III |
|
6 |
1,2,32,38 |
'90-91 |
Passat sedan (berline) |
|
5 |
1,3,38 |
'92-96 |
Passat sedan (berline) |
No Fit/Aucune adaptation possible |
33 |
|
'90-91 |
Passat wagon (familiale) |
|
9 |
1,2,21,38 |
'87-89 |
Scirocco |
|
6 |
1,3,21,38 |
VOLVO |
240/260 sedan (berline) |
|
|
|
'80-91 |
|
6 |
1,2,38 |
|
'85--91 |
240/260 wagon (familiale) |
|
10 |
1,2,21,32,38 |
'84-89 |
740/760 sedan (berline) |
|
6 |
1,9 |
'90 |
740/760 sedan (berline) |
|
6 |
1,2 |
'84-96 |
740/760/940/960 wagon (familiale) |
10 |
1,2,21,32,38 |
|
'91-96 |
740/960 sedan (berline) |
|
6 |
1,2,32,38 |
'92-96 |
850 sedan (berline) |
|
6 |
1,2,32,38 |
'94-96 |
850 wagon (familiale) |
No Fit/Aucune adaptation possible |
34 |
|
FIT TIPS
1.Place top clips in the gap at the front edge of the top of the trunk, hatch or door.
2.Place lower clips in the bottom edge of trunk or hatch.
3.Set lower clips into vehicle's left and right tow loops under the rear of the vehicle.
5.Set lower clips into bottom edge of internal metal bumper.
8.Set lower clips into frame holes in back of bumper.
9.Set lower clips onto bottom edge of bumper.
10.Set lower clip onto edge of structural bumper located behind plastic bumper.
11.Frame holes are located up high on the backside of bumper.
12.Set lower clips into frame holes in chassis behind bumper.
16.CAUTION: Bumper cover may deform with the use of this carrier. Remove carrier when not in use.
17.The upper arm of the carrier, between the rubber pads, may come in contact with the center ridge in the trunk lid when carrier is fully mounted.
18.CAUTION: Lower arm of the carrier will mount against the license plate and the lights to the left and right of it.
20.Rear doors or hatch must be opened to mount top clips.
21.CAUTION: Rear wiper can not be used when RMS is mounted.
23. Carrier must be mounted on right or left door, not in between.
25.IMPORTANT: Always check to make sure there is no contact between the lower straps and the muffler and/or exhaust pipe.
26.CAUTION: The trunk lid may deform slightly with the use of this carrier. Remove carrier when not in use.
27.Route top strap under the spoiler on top of the hatch.
29.Rubber weather stripping at the top of door/hatch will deform over time with the use of this carrier. Remove carrier when not in use.
30.Set lower clips into frame holes in bumper located by the right and left bumper strut.
33.RMS is not recommended because, lower straps can not be mounted in a safe place.
34.RMS is not recommended because, top straps should not be mounted directly to glass or plastic trim covering glass.
35.RMS is not recommended because, the vehicle is unable to support the weight at the point where the RMS must be placed.
36.RMS is not recommended because, upper arm of RMS could damage trunk lid.
37.RMS is not recommended because, top straps can not be mounted in a safe place.
38.Lower arm of RMS will rest in the license plate well or directly on license plate.
39.Lower arm of RMS will rest above license plate well.
40.Lower arm of RMS will rest at bottom of trunk lip.
41.Vehicle not available at time of testing. Please call for update.
 Loading...