


Thomson 14CB25CT, 14CB25FT, 14CB15FT, C3610C, 14CB15CT Manual
... 2 Combo(GB-D-IT-ES) 17/05/1999 19:58 Page 1
GUARANTEE
The type and production number of your appliance are printed on the guarantee certificate delivered with your video recorder. Keep this certificate as well as the invoice.These documents are indispensable for claiming your guarantee rights.
• All repairs during the guarantee period must be carried out by an authorised technician representing our brand.
• If this condition is not met, your rights will no longer be valid.
• Never open the appliance yourself, since this may be dangerous for you or damage the equipment.
PRECAUTIONS
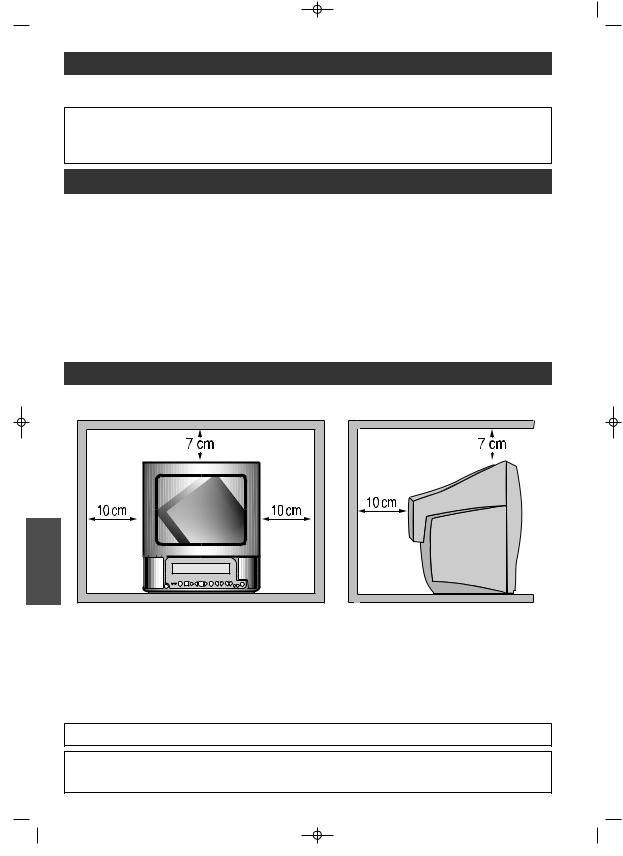
SETTING UP - Ensure that the mains supply in your house complies with that indicated on the identification sticker located on the back of your appliance. Install the video recorder horizontally, away from any source of heat (fireplace) or appliances creating strong magnetic or electric fields.
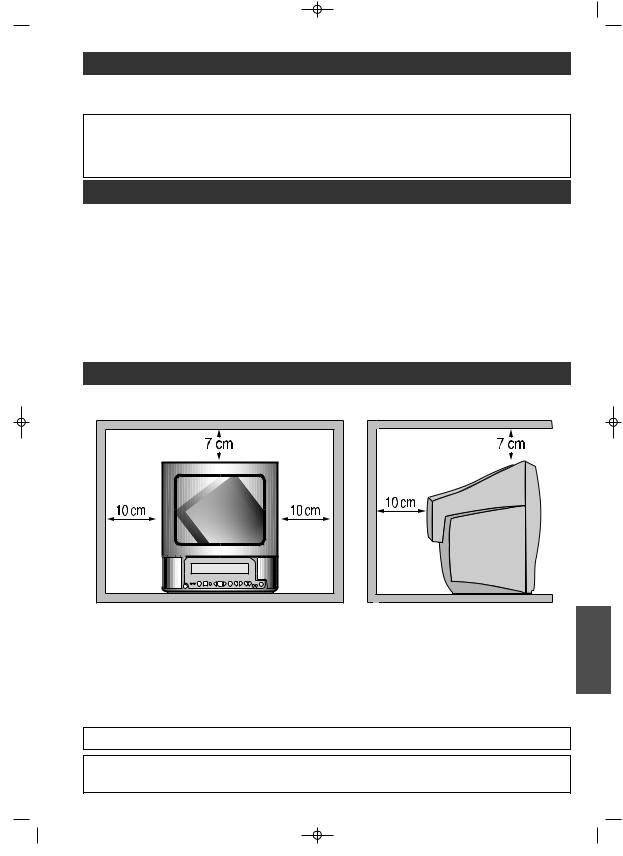
If you install your video recorder in a purpose-built unit, check that the air vents are not obstructed.Allow a clearance of 10 cm on either side and at the rear of the appliance and at least 7 cm above.
Even when the on/off switch is off, the Combi TV-video recorder is not completely cut off from the mains. To disconnect it completely, it is necessary to remove the mains plug from the mains socket
For MAINS powered apparatus and for apparatus producing internal voltages greater than 35V (peak) a.c. or d.c., having no protection against splashing water, the instructions for use shall state that the apparatus shall not be exposed to dripping or splashing and that no objects filled with liquids, such as vases, shall be placed on the apparatus.
The ventilation should no be impedes by covening the ventilation openings with item, such as newspapers, table-cloths, curtains, etc…
No naked flame sources, such as lighted candies, should be placed on the apparatus.
USE
Maximum ambient temperature: 35°
Maximum humidity ratio: 85%
ENGLISH
USE - If your appliance, or a cassette, has been stored in a very cold atmosphere for a certain amount of time (transported during winter for example), wait approximately 2 hours before using your video recorder. The openings located on the top and the bottom are for ventilation purposes.They should not be obstructed. In the event of lightning, the appliance should be disconnected from the external aerial.
Under no circumstances should this appliance be put to industrial use. It is designed solely for domestic operation.
MAINTENANCE - Use a dry, clean, soft cloth. Do not use any scouring agents, solvents or abrasive products, etc. If an object or liquid enters inside the appliance, unplug it immediately and have it checked by an authorised technician.
It is illegal to make total or partial copies of recordings protected by copyright laws without explicit permission of the copyright holder.
Thomson Multimédia is not liable if the television is used other than in accordance with this manual.
1
 2 Combo(GB-D-IT-ES) 17/05/1999 19:58 Page 2
ENGLISH
CONTENTS
BASIC CONNECTIONS . . . . . . . . . . . . . . . . . . . . . . . . . . . . . . . . . . . . . . . . . 3
NAVIGATION PRINCIPLES . . . . . . . . . . . . . . . . . . . . . . . . . . . . . . . . . . . . . . 3
INSTALLING TV CHANNELS ON THE COMBI TV-VIDEO RECORDER FOR
THE FIRST TIME . . . . . . . . . . . . . . . . . . . . . . . . . . . . . . . . . . . . . . . . . . . .13
Sorting your channels . . . . . . . . . . . . . . . . . . . . . . . . . . . . . . . . . . .14
SETTING THE CLOCK . . . . . . . . . . . . . . . . . . . . . . . . . . . . . . . . . . . . .14
NEW CHANNELS . . . . . . . . . . . . . . . . . . . . . . . . . . . . . . . . . . . . . . . .15
OPERATING BASIC COMBI TV-VIDEO RECORDER FUNCTIONS . . . . . . . .17
AUDIO VIDEO 1/2 . . . . . . . . . . . . . . . . . . . . . . . . . . . . . . . . . . . . . . . . . .20
RECORDING . . . . . . . . . . . . . . . . . . . . . . . . . . . . . . . . . . . . . . . . . . . . . . .21
Instant recording of a TV programme . . . . . . . . . . . . . . . . . . . . . .21
Recording with automatic stop . . . . . . . . . . . . . . . . . . . . . . . . . . . .21
PROGRAMMING A RECORDING WITH SHOW VIEW CODES . . . . . . . . . . .22
SETTING TIMER RECORDING . . . . . . . . . . . . . . . . . . . . . . . . . . . . . . . . . .23
ERASING A TIMER RECORDING . . . . . . . . . . . . . . . . . . . . . . . . . . . . . . . .25
PREFERENCES . . . . . . . . . . . . . . . . . . . . . . . . . . . . . . . . . . . . . . . . . . . . .26
HOW TO USE VIDEOTEXT ? . . . . . . . . . . . . . . . . . . . . . . . . . . . . . . . . . . .27
ADDITIONAL INFORMATION . . . . . . . . . . . . . . . . . . . . . . . . . . . . . . . . . .28
IDENTIFYING AND SOLVING PROBLEMS . . . . . . . . . . . . . . . . . . . . . . . . . .32
In our efforts to improve the quality of our products, we reserve the right to change their features.The information contained in these instructions are therefore liable to change and are not contractual.
BEFORE YOU START
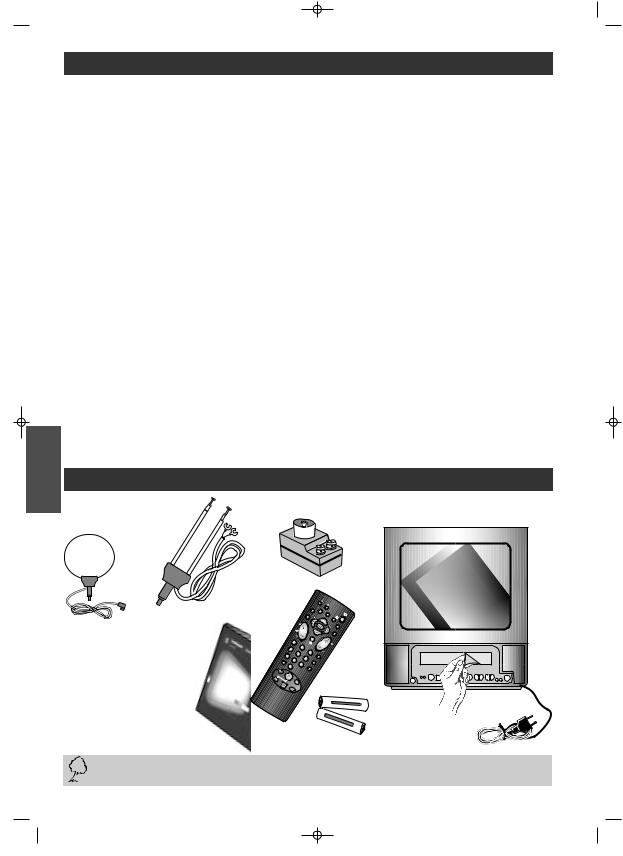
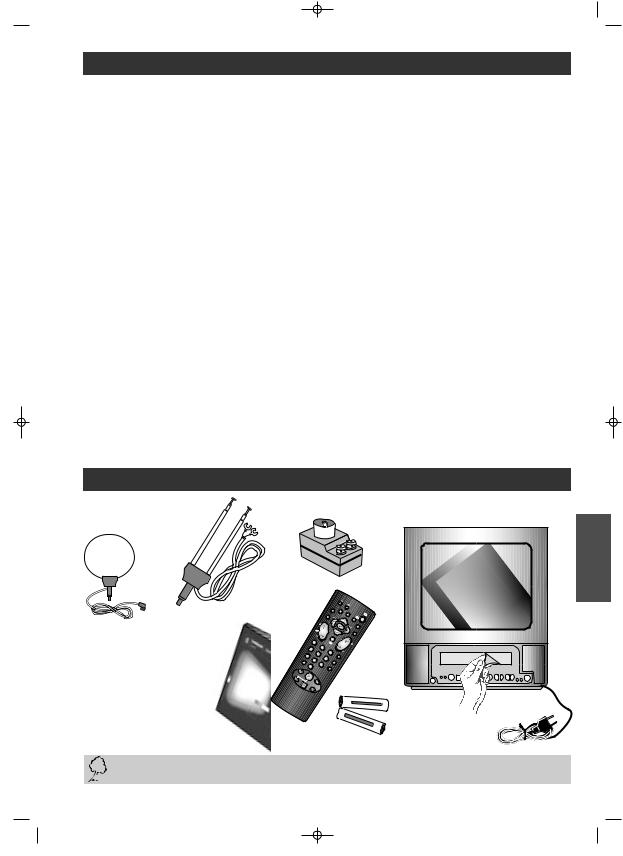
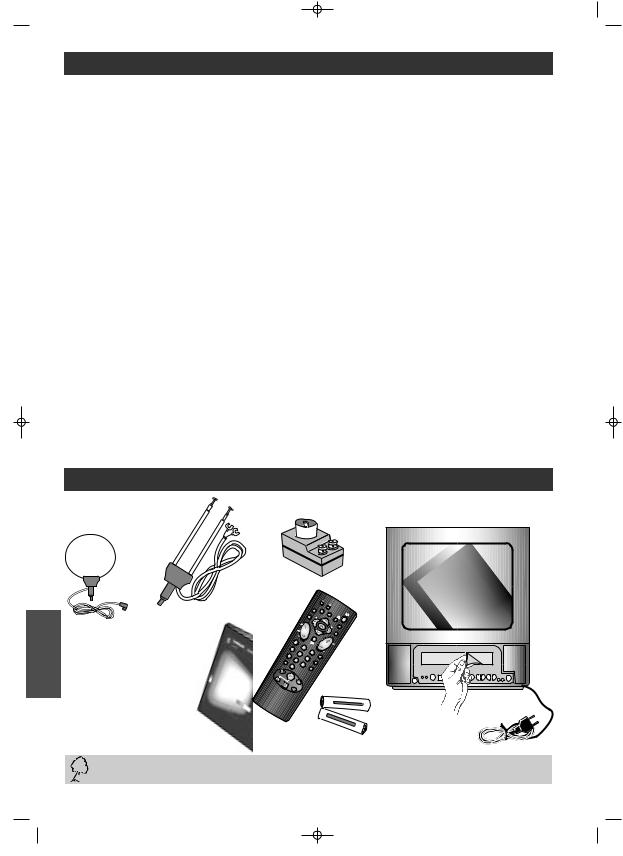
Dipole antenna or
Loop antenna *
Getting started guide and operating instructions
Antenna adaptator *
|
|
|
|
TRK |
|
|
|
|
|
|
|
|
PREF. |
SHOWVIEW |
INFO |
|
|
|
|
|
|
|
EXIT |
|
|
|
|
|
|
|
|
|
|
|
|
VPS |
|
TV |
|
|
|
|
|
|
|
|
|
|
|
|
|
|
||
|
|
|
|
|
|
TEXT |
|
|
|
|
|
|
GOTO |
|
|
|
MENU |
|
|
|
|
|
|
0000 |
|
|
|
|
|
|
||
1 |
|
|
|
|
|
|
|
|
||
|
|
|
|
|
|
|
|
|
|
|
4 |
2 |
|
|
|
|
|
|
|
|
|
|
|
|
|
|
|
|
|
|
|
|
5 |
3 |
|
|
PR |
|
|
|
|
|
|
7 |
6 |
|
MONITOR |
|
|
|
|
|
|
|
8 |
|
|
|
|
|
|
|
|||
AV |
9 |
0000 |
|
|
|
|
|
|
|
|
0/-- |
|
|
|
|
|
|
|
|||
SP/LP |
|
|
|
|
|
|
|
|
||
REW. |
|
|
|
|
|
|
|
|
||
PLAY |
|
|
|
|
|
|
|
|
|
|
REC. |
F. |
|
|
|
|
|
|
|
|
|
FWD |
|
|
|
|
|
|
|
|
|
|
STOP |
|
|
|
|
|
|
|
|
|
|
PAUSE |
|
|
|
|
|
|
|
|
|
|
|
|
|
|
|
0%MERCURY |
|
V 1,5 AAA SIZE |
|
|
|
|
|
|
|
+ |
DUTY |
HEAVY EXTRA |
- |
|||
|
|
|
|
- |
|
GREENELL |
|
|||
|
|
|
|
|
|
|
||||
|
|
|
|
SIZEGREENELL |
|
|
||||
|
|
|
|
|
EXTRA |
|
|
|
|
|
|
|
|
|
|
|
AAA 1,5HEAVY |
DUTY |
+ |
|
|
|
|
|
|
|
|
V |
|
|
||
|
|
|
|
|
|
|
|
0%MERCURY |
|
|
Remote control unit and batteries
These documents have been printing on environnementally-friendly recycled, non-bleached paper.
* If included
2
 2 Combo(GB-D-IT-ES) 17/05/1999 19:58 Page 3
ABOUT THIS INSTRUCTION BOOKLET : this document applies to several Combi TV-Video recorder models. Certain functions or settings may, therefore, not be included in the model which you have bought.
ABOUT THE SWITCH: the position of the On / Off switch varies from model to model. It may be located on the front panel or on the right side.
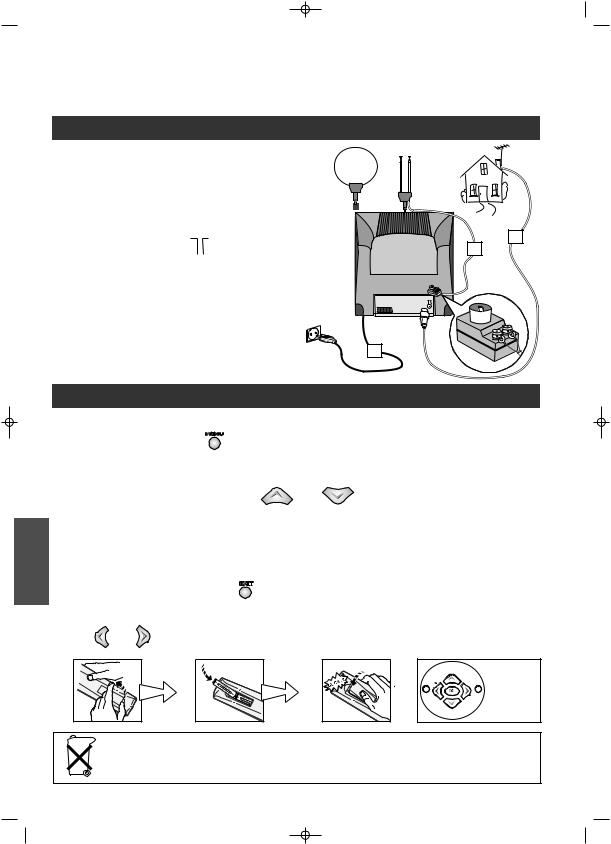
BASIC CONNECTIONS
*
1 Plug existing aerial cable or use the dipole antenna |
1 |
|
into the Combi TV-Video ( |
IN ). |
1 |
|
||
2 Connect the Combi TV-Video to the mains using the power cord.
|
220 - 240 V |
2 |
NAVIGATION PRINCIPLES |
|
|
Always point the remote control at the Combi TV-Video recorder. |
|
|
1 CALLING UP A MENU - The key |
MENU |
|
on the remote control calls up the menu which enables you to use the features of |
||
your Combi TV-Video recorder and to adjust it.
2 NAVIGATION WITHIN THE MENUS :
1 - To choose a function, select a line with  or
or  .
.
2 - To validate your choice, press  .
.
3 - To make an adjustment (i.e. to select an option, increase or decrease a given value), you must use key  or
or  .
.
4 - To exit a menu, press key |
EXIT |
. |
EXAMPLE : The symbols C/B displayed on the screen indicate that an option is available. To select an option, press key  or
or  .
.
! |
1 |
2 |
3 |
VPS |
|
|
|
|
EXIT |
MENU |
▲ |
|
|
|
|
COK B |
|
|
|
|
|
GO TO 0000 |
▼ |
|
|
|
|
EXIT |
MENU |
Please respect the environment! Before throwing any batteries away, consult your distributor who may be able to take them back for specific recycling.
ENGLISH
* If included
3
 2 Combo(GB-D-IT-ES) 17/05/1999 19:58 Page 4
GARANTIE
Auf dem Garantieschein sind der Typ und die Seriennummer Ihres Gerätes angegeben. Bitte den Garantieschein zusammen mit der Rechnung sorgfältig aufbewahren, da diese bei einem eventuellen Garantiefall unbedingt erforderlich sind.
•Jede Reparatur während der Garantiezeit muß von einem Techniker vorgenommen werden, der als Vertreter unserer Marke zugelassen ist.
•Bei jedem Verstoß gegen diese Regel verfällt Ihr Garantieanspruch.
•Öffnen Sie Ihr Gerät nie selbst. Sie könnten sich selbst gefährden oder das Gerät beschädigen.
VORSICHTSMAßNAHMEN
INSTALLATION - Stellen Sie sicher, daß die Netzspannung in Ihrer Wohnung mit der übereinstimmt, die auf dem Typenschild auf der Gerätrückseite angegeben ist. Stellen Sie den Kombi TV-Videorecorder waagerecht und in großer Entfernung von bedeutenden Wärmequellen (Kamin usw.) oder Geräten auf, die starke Magnetbzw. Kraftfelder erzeugen.
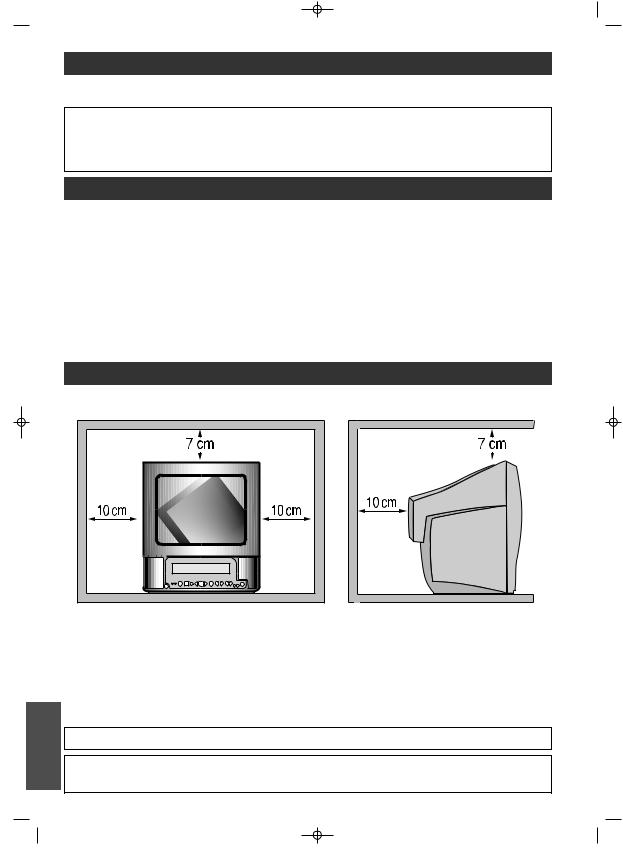
Falls Sie den Kombi TV-videorecorder in einem eigens dafür vorgesehenen Möbelstück installieren, sollten Sie auf eine einwandfreie Belüftung achten. Lassen Sie an den Seiten sowie auf der Rückseite des Geräts mindestens 10 cm und oberhalb mindestens 7 cm Zwischenraum.
Selbst wenn der Schalter Ein/Aus auf Aus steht, ist der Kombi TV-Videorecorder nicht vollständig vom Netzt getrennt. Um ihn vollständig vom Netzt zu trennen, ist es notwendig, den Netztstecker aus der Steckdose zu ziehen.
Für Geräte, die an das Stromnetz angeschlossen werden und interne Spannungen über 35 V (Peak) über Mittelfeldoder Wechselstrom erzeugen und die keinen Schutz gegen Wasserspritzer aufweisen, wird in den Bedienungsanleitungen angegeben, daß das Gerät nicht einer Berieselung oder Wasserspritzern ausgesetzt werden und daß kein mit Flüssigkeit gefülltes Gefäß, wie z.B. eine Vase, auf dem Gerät abgestellt werden darf.
DieVentilation darf nicht durchVerschließen derVentilationsöffnungen mit Gegenständen wie z.B. Zeitschriften,Tischservietten, Vorhängen etc. behindert werden.
Auf dem Gerät darf keine offene Flamme, etwa eine brennende Kerze abgestellt werden.
INBETRIEBNAHME
Maximale Raumtemperatur: 35°
Maximaler Feuchtigkeitsgehalt: 85%
DEUTSCH |
INBETRIEBNAHME - Wenn Ihr Gerät oder eine Cassette längere Zeit in einer kalten Umgebung war, etwa während eines Transports im Winter, sollten Sie vor dem Gebrauch des Videorecorders ungefähr 2 Stunden warten. Die Öffnungen über und unter dem Gerät dienen der Entlüftung und sind stets freizuhalten. Bei Gewittern empfiehlt es sich, den Stecker des Geräts aus der Buchse zu ziehen, die an die Außenantenne angeschlossen ist.
Dieses Gerät darf auf keinen Fall zu gewerblichen Zwecken verwendet werden, sondern dient ausschließlich dem Heimgebrauch.
WARTUNG - Verwenden Sie einen weichen, trockenen, sauberen Lappen ohne Beizund Lösungsmittel, scheuernde Substanzen usw. Ziehen Sie den Stecker des Geräts sofort aus der Buchse, falls ein Gegenstand oder eine Flüssigkeit in das Geräteinnere eindringen, und lassen Sie den Videorecorder von einem zugelassenen Techniker überprüfen.
Das vollständige oder teilweise Kopieren von Aufnahmen, die den gesetzlichen Bestimmungen bezüglich der Urheberrechte unterliegen, verstößt ohne die ausdrückliche Genehmigung des Rechtsinhabers gegen die geltenden Vorschriften.
Sollte das Fersehgerät nicht in Übereinstimmung mit den Anweisungen der vorliegenden Anleitung benutzt werden, sind alle Rechtsansprüche gegen Thomson Multimédia ausgeschlossen.
4
 2 Combo(GB-D-IT-ES) 17/05/1999 19:59 Page 5
INHALTSVERZEICHNIS
GRUNDANSCHLÜSSE . . . . . . . . . . . . . . . . . . . . . . . . . . . . . . . . . . . . . . . . . . 6
NAVIGATIONSPRINZIPIEN . . . . . . . . . . . . . . . . . . . . . . . . . . . . . . . . . . . . . . . 6
ERSTMALIGE EINSTELLUNG DER FERNSEHSENDER IN IHREM
KOMBI TV-VIDEORECORDER . . . . . . . . . . . . . . . . . . . . . . . . . . . . . . . . . .13
Sortieren der Sender . . . . . . . . . . . . . . . . . . . . . . . . . . . . . . . . . . . .14
EINSTELLEN VON DATUM UND UHRZEIT . . . . . . . . . . . . . . . . . . . . . . . .14
NEUE SENDER . . . . . . . . . . . . . . . . . . . . . . . . . . . . . . . . . . . . . . . . . .15
BENUTZEN DER GRUNDLEGENDEN FUNKTIONEN DES
KOMBI TV-VIDEORECORDERS . . . . . . . . . . . . . . . . . . . . . . . . . . . . . . . . .17
AUDIO VIDEO 1/2 . . . . . . . . . . . . . . . . . . . . . . . . . . . . . . . . . . . . . . . . . .20
AUFNEHMEN . . . . . . . . . . . . . . . . . . . . . . . . . . . . . . . . . . . . . . . . . . . . . .21
Sofortaufnahme einer Fernsehsendung . . . . . . . . . . . . . . . . . . . . . .21
Aufnahme mit automatischem Ausschalten . . . . . . . . . . . . . . . . . . .21
PROGRAMMIEREN EINER AUFNAHME MIT HILFE DER SHOWVIEW CODES .22
TIMER-PROGRAMMIERUNG . . . . . . . . . . . . . . . . . . . . . . . . . . . . . . . . . . . .23
LÖSCHEN EINER PROGRAMMIERTEN AUFNAHME . . . . . . . . . . . . . . . . . .25
VORZUGSEINSTELLUNGEN . . . . . . . . . . . . . . . . . . . . . . . . . . . . . . . . . . . .26
WIE KANN MAN VIDEOTEXT BENUTZEN? . . . . . . . . . . . . . . . . . . . . . . . .27
ZUSÄTZLICHE INFORMATIONEN . . . . . . . . . . . . . . . . . . . . . . . . . . . . . . .28
FEHLERERKENNUNG UND ABHILFEMAßNAHMEN . . . . . . . . . . . . . . . . . . .32
Im Bermühen um eine ständige Verbesserung unserer Produkte behalten wit uns vor, die technischen Daten ohne
Vorankündigung zu verändern. Die in der vorliegenden Anleitung enthaltenen Angaben sind daher Änderungen
unterworfen und keinesfalls rechtsverbindlich.
VOR DER INBETRIEBNAHME
Dipolantenne |
Antennenadapter * |
oder Spulenantenne *
DEUTSCH
Installationsanleitung und benutzerhandbuck
|
|
|
|
TRK |
|
|
|
|
|
|
|
|
PREF. |
SHOWVIEW |
INFO |
|
|
|
|
|
|
|
EXIT |
|
|
|
|
|
|
|
|
|
|
|
|
VPS |
|
TV |
|
|
|
|
|
|
|
|
|
|
|
|
|
|
||
|
|
|
|
|
|
TEXT |
|
|
|
|
|
|
GOTO |
|
|
|
MENU |
|
|
|
|
|
|
0000 |
|
|
|
|
|
|
||
1 |
|
|
|
|
|
|
|
|
||
|
|
|
|
|
|
|
|
|
|
|
4 |
2 |
|
|
|
|
|
|
|
|
|
|
|
|
|
|
|
|
|
|
|
|
5 |
3 |
|
|
PR |
|
|
|
|
|
|
7 |
6 |
|
MONITOR |
|
|
|
|
|
|
|
8 |
|
|
|
|
|
|
|
|||
AV |
9 |
0000 |
|
|
|
|
|
|
|
|
0/-- |
|
|
|
|
|
|
|
|||
SP/LP |
|
|
|
|
|
|
|
|
||
REW. |
|
|
|
|
|
|
|
|
||
PLAY |
|
|
|
|
|
|
|
|
|
|
REC. |
F. |
|
|
|
|
|
|
|
|
|
FWD |
|
|
|
|
|
|
|
|
|
|
STOP |
|
|
|
|
|
|
|
|
|
|
PAUSE |
|
|
|
|
|
|
|
|
|
|
|
|
|
|
|
0%MERCURY |
|
V 1,5 AAA SIZE |
|
|
|
|
|
|
|
+ |
DUTY |
HEAVY EXTRA |
- |
|||
|
|
|
|
- |
|
GREENELL |
|
|||
|
|
|
|
|
|
|
||||
|
|
|
|
SIZEGREENELL |
|
|
||||
|
|
|
|
|
EXTRA |
|
|
|
|
|
|
|
|
|
|
|
AAA 1,5HEAVY |
DUTY |
+ |
|
|
|
|
|
|
|
|
V |
|
|
||
|
|
|
|
|
|
|
|
0%MERCURY |
|
|
Fernbedienung und batterien
Um weiteren Belastungen der Umwelt vorzubeugen, sind diese Handbücher auf ungebleichtem Recyclingpapier gedruckt worden.
* bei entsprechend ausgestatteten Modellen
5
 2 Combo(GB-D-IT-ES) 17/05/1999 19:59 Page 6
ZU DIESER ANLEITUNG: die vorliegende Bedienungsanleitung bezieht sich auf mehrere Kombi TV-Videorecordermodelle, so daß gewisse Funktionen oder Einstellungen von Ihrem Modell abweichen bzw. fehlen können.
ZUR TASTE EIN/AUS : Je nach Modell kann sich die Taste Ein/Aus |
vorne oder an der Seite des Videorecorders befinden. |
GRUNDANSCHLÜSSE
*
DEUTSCH
1 Schließen Sie das Kabel der Außenantenne oder der |
1 |
|
Dipolantenne an die Buchse ( |
IN ). Ihres Kombi |
1 |
TV-Videorecorders an. |
|
|
2 Schließen Sie den Kombi TV-Videorecorder über das |
|
|
Netzkabel an eine Steckdose an. |
|
|
|
220 - 240 V |
2 |
NAVIGATIONSPRINZIPIEN |
|
|
Richten Sie die Fernbedienung stets auf den Kombi TV-Videorecorder. |
|
|
1 AUFRUF EINES MENÜS - Die Taste |
MENU |
|
der Fernbedienung ruft das Menü auf, daß Ihnen das Benutzen der Funktionen |
||
Ihres Kombi TV-Videorecorders bzw. dessen Einstellung ermöglicht.
2 NAVIGATION IN DEN MENÜS
1 - Um eine Funktion zu wählen, eine Zeile mit |
oder |
wählen. |
2 - Zum Bestätigen Ihrer Wahl auf  drücken.
3 - Zum Vornehmen einer Einstellung (eine Option wählen, einen Wert erhöhen oder verrungen) sind die Tasten  oder
oder  zu benutzen.
|
EXIT |
4 - Zum Verlassen eines Menüs die Taste |
drücken. |
BEISPIEL :Die auf dem Bildschirm angezeigten Symbole C/Bgeben an, daß eine Option vorhanden ist. Zur Wahl einer Option
die Taste |
oder |
drücken. |
! |
1 |
2 |
3 |
VPS |
|
|
|
|
EXIT |
MENU |
▲ |
|
|
|
|
COK B |
|
|
|
|
|
GO TO 0000 |
▼ |
|
|
|
|
EXIT |
MENU |
 Batterie-Entsorgung : batterien gehören nicht in den Hausmüll. Als Verbraucher sind Sie gesetzlich verpflichtet, gebauchte Batterien zurückzugeben. Sie können Ihren alten Batterien bei den öffentlichen Sammelstellen in Ihrer Gemeinde oder überall dort abgeben, wo Batterien der betreffenden Art verkauft werden.
* bei entsprechend ausgestatteten Modellen
6
 2 Combo(GB-D-IT-ES) 17/05/1999 19:59 Page 7
GARANZIA
Nel certificato di garanzia rilasciato con il videovision è indicato il tipo ed il numero di fabbricazione dell'apparecchio. Conservatelo con la ricevuta fiscale. Questo certificato e la ricevuta fiscale sono infatti i documenti indispensabili per fare valere i vostri diritti di garanzia.
• Qualunque riparazione durante il periodo di garanzia deve essere effettuata da un tecnico di un nostro Centro Assistenza autorizzato.
•Qualunque violazione o questa regola comporta l'annullamento dei diritti di garanzia.
•Non aprite mai il vostro apparecchio da soli. Ciò potrebbe essere pericoloso per voi, o potrebbe danneggiare l'apparecchio stesso.
PRECAUZIONI
INSTALLAZIONE - Accertatevi che la tensione in rete della vostra abitazione sia conforme a quella indicata sull'etichetta di identificazione situata sulla parte posteriore dell'apparecchio. Installate il videovision orizzontalmente, lontano da fonti di calore (camini...) o da apparecchi produttori di campi magnetici o elettrici elevati.
Se installate il videovision in un mobile apposito, controllate che l'aerazione non sia ostruita. Lasciate 10 cm minimo da ogni lato e nella parte posteriore dell'apparecchio, e 7 cm minimo nella parte superiore.
Anche se l’interruttore di accendimento/spegnimento è in posizione spegnimento, il videovision non è completamente scollegato dalla rete di alimentazione. Per scollegarlo completamente, estrarre la presa del videovision dalla presa di alimentazione. Per gli apparecchi funzionanti su rete e gli apparecchi che producono tensioni interne superiori s 35V (picco), a corrente continua o alternata, che non sono provvisti di protezioni contro spruzzi d’acqua, le istruzioni di funzionamento precisano che l’apparecchio non deve essere esposto ad acqua corrente o a spruzzi e che non dovranno essere posti sull’apparecchio oggetti pieni di liquido, come vasi ecc.
L’aerazione non deve essere impedita otturando le bocche di aerazione con oggetti come giornali, tovaglioli da tavola, tende ecc.
Non dovranno essere poste sull’apparecchio fiamme libere come candele accese.
UTILIZZO
Temperatura ambientale massima : 35°
Tasso d’umiditá massimo : 85%
USO - Se l’apparecchio o una cassetta sono rimasti per un certo tempo in un ambiente freddo, per esempio in occasione di un trasporto, in inverno, aspettare circa 2 ore prima di utilizare l’apparecchio. Le aperture situate sopra e sotto sono previste per la ventilazione e non devono essere coperte. In caso di temporale, si consiglia di scollegare il videovision dalla presa collegata all ‘ antenna esterna. Questo apparechio è stato concepito per l’uso domestico. Non deve venir utilizzato a fini industriali.
MANUTENZIONE - Utilizzare uno strofinaccio morbido, asciutto e pulito, non utilizzare mai prodotti abrasivi, solventi, ecc. Se un oggetto o un liquido penetra nell'apparecchio, scollegatelo immediatamente e fatelo controllare da un tecnico autorizzato.
ITALIANO
La copia totale o parziale di registrazioni protette dalla legislazione sui diritti d'autore, senza autorizzazione esplicita del titolare dei diritti, è vietata dalla legislazione in vigore.
Thomson Multimédia declina ogni responsabilità in caso di utilizzo non conforme a quanto indicato nel presente libretto d'istruzioni.
7
 2 Combo(GB-D-IT-ES) 17/05/1999 19:59 Page 8
ITALIANO
SOMMARIO
COLLEGAMENTI DI BASE . . . . . . . . . . . . . . . . . . . . . . . . . . . . . . . . . . . . . . . 9 CRITERI DI NAVIGAZIONE . . . . . . . . . . . . . . . . . . . . . . . . . . . . . . . . . . . . . . . 9
COME INSTALLARE PER LA PRIMA VOLTA I CANALI TV
SUL VIDEOVISION . . . . . . . . . . . . . . . . . . . . . . . . . . . . . . . . . . . . . . . |
. . . .13 |
Riordinare i vostri canali . . . . . . . . . . . . . . . . . . . . . . . . . . . . . |
. . . .14 |
REGOLAZIONE DELL’OROLOGIO . . . . . . . . . . . . . . . . . . . . . . . . . . |
. . . .14 |
NUOVO CANALE . . . . . . . . . . . . . . . . . . . . . . . . . . . . . . . . . . . . |
. . . .15 |
UTILIZZARE LE FUNZIONI DI BASE DEL VIDEOVISION . . . . . . . . . . . |
. . . .17 |
AUDIO VIDEO 1/2 . . . . . . . . . . . . . . . . . . . . . . . . . . . . . . . . . . . . . . |
. . . .20 |
REGISTRARE . . . . . . . . . . . . . . . . . . . . . . . . . . . . . . . . . . . . . . . . . . |
. . . .21 |
Registrare immediatamente una trasmissione TV . . . . . . . . . . |
. . . .21 |
Registrazione con interruzione automatica . . . . . . . . . . . . . . . |
. . . .21 |
PROGRAMMARE UNA REGISTRAZIONE CON I CODICI SHOW VIEW |
. . . .22 |
PROGRAMMARE UNA REGISTRAZIONE . . . . . . . . . . . . . . . . . . . . . . . |
. . . .23 |
CANCELLARE UNA PROGRAMMAZIONE . . . . . . . . . . . . . . . . . . . . . |
. . . .25 |
PREFERENZE . . . . . . . . . . . . . . . . . . . . . . . . . . . . . . . . . . . . . . . . . . |
. . . .26 |
COME UTILIZZARE IL TELEVIDEO ? . . . . . . . . . . . . . . . . . . . . . . . . . |
. . . .27 |
INFORMAZIONI COMPLEMENTARI . . . . . . . . . . . . . . . . . . . . . . . . . . |
. . . .28 |
IDENTIFICARE E RISOLVERE I PROBLEMI . . . . . . . . . . . . . . . . . . . . . . |
. . . .32 |
Al fine di migliorare la qualitá dei nostri prodotti, ci riserviamo il diritto di modificarne le caratteristiche. Le informazioni contenute in questo manualetto d’istruzioni possono quindi venir modificate e non rivestono carattere contrattuale.
PRIMA DI COMINCIARE
Antenna bipolare |
Adattatore antenna * |
o |
|
Antenna ad anello * |
|
Manuali di installazione
e di utilizzazione
|
|
|
|
TRK |
|
|
|
|
|
|
|
|
PREF. |
SHOWVIEW |
INFO |
|
|
|
|
|
|
|
EXIT |
|
|
|
|
|
|
|
|
|
|
|
|
VPS |
|
TV |
|
|
|
|
|
|
|
|
|
|
|
|
|
|
||
|
|
|
|
|
|
TEXT |
|
|
|
|
|
|
GOTO |
|
|
|
MENU |
|
|
|
|
|
|
0000 |
|
|
|
|
|
|
||
1 |
|
|
|
|
|
|
|
|
||
|
|
|
|
|
|
|
|
|
|
|
4 |
2 |
|
|
|
|
|
|
|
|
|
|
|
|
|
|
|
|
|
|
|
|
5 |
3 |
|
|
PR |
|
|
|
|
|
|
7 |
6 |
|
MONITOR |
|
|
|
|
|
|
|
8 |
|
|
|
|
|
|
|
|||
AV |
9 |
0000 |
|
|
|
|
|
|
|
|
0/-- |
|
|
|
|
|
|
|
|||
SP/LP |
|
|
|
|
|
|
|
|
||
REW. |
|
|
|
|
|
|
|
|
||
PLAY |
|
|
|
|
|
|
|
|
|
|
REC. |
F. |
|
|
|
|
|
|
|
|
|
FWD |
|
|
|
|
|
|
|
|
|
|
STOP |
|
|
|
|
|
|
|
|
|
|
PAUSE |
|
|
|
|
|
|
|
|
|
|
|
|
|
|
|
0%MERCURY |
|
V 1,5 AAA SIZE |
|
|
|
|
|
|
|
+ |
DUTY |
HEAVY EXTRA |
- |
|||
|
|
|
|
- |
|
GREENELL |
|
|||
|
|
|
|
|
|
|
||||
|
|
|
|
SIZEGREENELL |
|
|
||||
|
|
|
|
|
EXTRA |
|
|
|
|
|
|
|
|
|
|
|
AAA 1,5HEAVY |
DUTY |
+ |
|
|
|
|
|
|
|
|
V |
|
|
||
|
|
|
|
|
|
|
|
0%MERCURY |
|
|
Telecomando e batterie
Rispettosi dell’ambiente, abbiamo stampato questi documenti su carta riciclata non sbiancata.
* solo su certi modelli
8

 2 Combo(GB-D-IT-ES) 17/05/1999 19:59 Page 9
A PROPOSITO DI QUESTO MANUALETTO: il presente documento è comune a più modelli di Videovision, pertanto alcune funzioni o determinate regolazioni possono mancare sul modello da voi acquistato.
A PROPOSITO DELL’INTERRUTTORE: la posizione dell’interruttore On/Off è diversa a seconda dei modelli. Può trovarsi sul lato anteriore o sul lato destro.
COLLEGAMENTI DI BASE
1
2
Collegare al Videovision ( |
IN ) il cavo d'antenna |
esistente o utilizzare l’antenna bipolare.
Collegare il Videovision alla presa di corrente con il cavo elettrico.
*
1
1
|
|
|
|
|
220 - 240 V |
2 |
|
|
CRITERI DI NAVIGAZIONE |
|
|
|
|
|
|
||
Per l'uso rivolgere sempre il telecomando verso il Videovision |
|
|
|
|||||
|
|
MENU |
|
|
|
|
|
|
1 PER SELEZIONARE UN MENU - Il tasto |
sul telecomando permette di visualizzare il menu che vi consentirà di utiliz- |
|||||||
zare le funzioni del vostro Videovision |
o di regolarlo. |
|
|
|
|
|||
2 NAVIGAZIONE NEI MENU : |
|
|
|
|
|
|
|
|
1 |
- Per selezionare una funzione, scegliete una linea con |
o |
. |
|
|
|||
2 |
- Premete su |
per confermare la vostra scelta. |
|
|
|
|
||
3 |
- Per effettuare una regolazione, (selezionare un'opzione, aumentare o diminuire un valore) utilizzate i tasti |
o |
. |
|||||
|
|
|
EXIT |
|
|
|
|
|
4 |
- Per uscire da un menu, premete su |
. |
|
|
|
|
|
|
ESEMPIO : I simboli C/Bsullo schermo indicano che un'opzione è accessibile. |
|
|
|
|||||
Per selezionare un'opzione, premete i tasti |
o |
. |
|
|
|
|
||
! |
1 |
2 |
3 |
VPS |
|
|
|
|
EXIT |
MENU |
▲ |
|
|
|
|
COK B |
|
|
|
|
|
GO TO 0000 |
▼ |
|
|
|
|
EXIT |
MENU |

 Rispettate l'ambiente! Non buttate via le pile, rivolgetevi ai punti di raccolta, che sono incaricarti di recuperarle se possono subire un riciclaggio speciale.
ITALIANO
* solo su certi modelli
9
 2 Combo(GB-D-IT-ES) 17/05/1999 19:59 Page 10
GARANTÍA
El certificado de garantía entregado con el Combi TV-vídeo indica el tipo y el número de fabricación de su aparato. Guárdelo con la factura. Se trata de los documentos imprescindibles para utilizar el derecho a la garantía.
•Toda reparación efectuada durante el periodo de garantía deberá ser realizada por un técnico de un Centro de Asistencia autorizado.
•Toda infracción de esta regla implicará la anulación del derecho de garantía.
•No abra nunca el aparato usted mismo. Puede ser peligroso para usted y causar daños al equipo.
ESPAÑOL
PRECAUCIÓN
INSTALACIÓN - Asegúrese de que la tensión de la red eléctrica de su domicilio es la misma que la que indica la etiqueta de identificación, situada en la parte trasera de su aparato. Instale horizontalmente el Combi TV-vídeo, lejos de cualquier fuente de calor importante (chimenea...) y de aparatos que produzcan campos magnéticos o eléctricos importantes.
Si usted instala el Combi TV-vídeo en un mueble previsto para ello, controle que la ventilación no esté obstaculizada. Deje 10 cm como mínimo por cada lado y por detrás del aparato y al menos 7 cm por la parte de arriba.
Incluso cuando el interruptor marcha/parada está en posición parada, el Combi TV-vídeo no está completamente separado del sector. Para desconectarlo completamente, es necesario retirar el enchufe de la toma de alimentación.
Para los aparatos que funcionan con la red eléctrica y aquellos que producen voltajes internos superiores a 35V (pico), en corriente directa o alterna, que no presenten ninguna protección contra las salpicaduras de agua, las instrucciones de funcionamiento precisarán que el aparato no debe ser expuesto al chorreo o las salpicaduras, y que no se le debe colocar encima ningún objeto lleno de líquido, como un florero.
No deben haber obstáculos a la ventilación por obturación de las mangas de ventilación con objetos tales como periódicos, servilletas, cortinas, etc.
No se debe colocar sobre el aparato una llama descubierta, tal como una vela encendida.
UTILIZACIÓN
Temperatura ambiente máxima: 35°C
Grado medio de humedad: 85%
UTILIZACIÓN - Si su aparato, o si una cinta, ha permanecido durante algún tiempo en un ambiente frío, por ejemplo debido a un transporte en invierno, espere aproximadamente 2 horas antes de utilizar su aparato de video. Las aberturas situadas por encima y por debajo han sido previstas para la ventilación. No deben ser recubiertas. Durante las tormentas, se aconseja desenchufar el video de la toma conectada a la antena exterior. Este aparato ha sido previsto para un uso doméstico. No debe ser nunca utilizado para fines industriales.
MANTENIMIENTO - Utilice un paño suave, límpio y seco, no utilice productos decapantes, disolventes, abrasivos, etc... Si un objeto o un líquido se introduce en el aparato, desenchúfelo inmediatamente y póngase en contacto con un técnico autorizado.
Es ilegal hacer copias completas o parciales de las grabaciones protegidas por la ley de copyright, sin tener autorización explícita del titular de los derechos.
Thomson Multimedia no se responsabiliza por la utilización no conforme a las indicaciones de estas instrucciones.
10
 Loading...