


Thermador PSC366, PSC364GD, PSC486GL, PSC484WK, PSC484GG User Manual
...CARE AND USE MANUAL
F o r P r o f e s s i o n a l C o o k t o p s
Models
P24WK
PSC364GD
PSC364GL
PSC366
PSC484GG
PSC486GD
PSC486GL
PSC484WK
A SPECIAL MESSAGE TO OUR CUSTOMERS
Thank you for selecting the Thermador PROFESSIONAL® Cooktop. We recommend that you take time to read this entire booklet before using your new appliance for the first time.
The booklet contains suggestions we believe will be helpful as well as directions for using all the features of this cooktop. Keep it in a handy place, as it has the answers to questions that may occur when you start to cook.
Let us know if we can help you. When you write, please include the model and serial numbers of your cooktop.
Sincerely,
Thermador Test Kitchen Consumer Scientists
▲! WARNING:
If the information in this manual is not followed exactly, a fire or explosion may result causing property damage, personal injury or death.
FOR YOUR SAFETY
Do not store or use gasoline or other flammable vapors and liquids in the vicinity of this or any other appliance.
AVERTISSEMENT
Ne pas entreposer ni utiliser de l‘essence ni d’autres vapeurs ou liquides inflammables dans le voisinage de l’appareil, ni de tout autre appareil.
WHAT TO DO IF YOU
SMELL GAS
•Do not try to light any appliance.
•Do not touch any electrical switch; do not use any phone in your building.
•Immediately call your gas supplier from a neighbor’s phone.
•Follow the gas supplier’s instruction.
•If you cannot reach your gas supplier, call the fire department.
▲Installation and service must be performed by a qualified installer, service agency or the gas supplier.
CE QUI FAIRE SI VOUS SENTEZ LE GAZ
•Ne pas essayer d'allumer aucum appareil.
•Ne pas toucher aucum interrupteur électrique;nepasutiliseraucuntéléphone dans votre bàtiment.
•Appelerimmediatementvotrefournisseur de gaz du téléphone d'un voisin. Sulvre l'instruction du fournisseur de gaz.
•Si vous ne pouvez pas contacter votre fournisseur, téléphone le service des incendies.
▲L'installation et le service doivent étre exécutés par un installateur qualifié, une agence de service ou le fournisseur de gaz.
INTRODUCTION
The Thermador PROFESSIONAL® Cooktops are built-in units available in a number of configurations. Models PSC486GD, PSC486GL, PSC484GG and PSC484WK feature a gas cooking surface with six sealed burners and a griddle, six sealed burners and a grill, four sealed burners with a griddle and a grill, or four sealed burners with a wok, respectively. Models PSC364GD, PSC364GL, and PSC366 feature a gas cooking surface with four sealed burners and a griddle, four sealed burners and a grill, or six sealed burners. Models P24WK and PSC484WK have a high output WOK burner rated at 30,000 BTU/HR.
IMPORTANT
All Cooktops having less than 12" (305 mm) horizontal clearance between combustible materials and the back edge of the Cooktop must be installed with a Thermador Low Back Backguard. If more than 12" (305 mm) horizontal clearance exists, a Thermador Island Trim may be used instead of the backguard. Before using the Cooktop, insure that it is equipped with the appropriate Low Back Backguard or Island Trim. Refer to the Installation Instructions accompanying this appliance for more information.
Cooktops are shipped by the factory to operate on natural gas. Verify the type of gas being used at the installation site matches the type of gas used by the appliance.
If the location/job site requires a conversion from one type of gas to another, contact the dealer where the unit was purchased or contact Thermador (800/735-4328). The field conversion kit for all Professional cooktops (PSC series) is Thermador Model CTLPKIT. Field conversion must be done by qualified service personal only.
!CAUTION
When connecting the unit to propane gas, make certain the propane gas tank is equipped with its own high-pressure regulator in addition to the pressure regulator supplied with the range. The pressure of the gas supplied to the appliance regulator must not exceed 14" (34.57 mB) water column.
TABLE OF CONTENTS |
|
Introduction........................................................ |
1 |
Gas Type Verification ......................................... |
1 |
SECTION ONE: General Safety Instructions |
|
Safety ................................................................. |
2 |
Precautions......................................................... |
3 |
SECTION TWO: Before You Begin |
|
Before Using Your Cooktop for the First Time... 5 |
|
SECTION THREE: Description |
|
Model & Parts Identification – PSC48 ................ |
6 |
Model & Parts Identification – PSC36 ................ |
7 |
Model & Parts Identification – P24WK............... |
8 |
SECTION FOUR: Using the Cooktop |
|
Sealed Burners ................................................... |
9 |
ExtraLow® Burners ........................................... |
10 |
Electronic Igniter .............................................. |
10 |
Flame Setting Guidelines................................. |
11 |
Cookware Recommendations .......................... |
12 |
Specialty Cookware ......................................... |
13 |
Surface Burner Cooking Chart ................. |
14 – 15 |
Using the Grill .......................................... |
16 – 18 |
Grill Cooking Chart .................................. |
19 – 20 |
Using the Griddle ............................................. |
21 |
Griddle Cooking Chart .................................... |
21 |
SECTION FIVE: Wok Operation |
|
Before Using Prepare Wok ................................. |
5 |
Using the Wok.................................................. |
22 |
Wok Operation ................................................ |
23 |
SECTION SIX: Care and Maintenance |
|
Cooktop and Wok Cleaning Chart .......... |
24 – 28 |
SECTION SEVEN: Before Calling For Service |
|
Do-It-Yourself Maintenance ............................. |
29 |
Before Calling For Service ............................... |
30 |
Data Rating Plate ............................................. |
30 |
Warranty ........................................................... |
33 |
TESTED IN ACCORDANCE WITH ANSI Z21.1 CURRENT ISSUE, STANDARD FOR HOUSEHOLD COOKING GAS APPLIANCES. IN CANADA TESTED IN ACCORDANCE WITH CAN/CGA 1.1 DOMESTIC GAS RANGES, CURRENT ISSUE.
Check your local building codes for the proper method of installation. In the absence of local codes, this unit should be installed in accordance with the Natrional Fuel Gas Code No. Z223.1 Current Issue and the National Electrical Code ANSI/NFPA No. 70 Current Issue or the Can B149 Installation Codes for Gas Burning Appliances and C22.1 Canadian Electrical Code Part 1.
Page1
Section One: General Safety Instructions
SAFETY
ELECTRICAL REQUIREMENTS AND GROUNDING INSTRUCTIONS
!CAUTION
PLEASE READ CAREFULLY
All Cooktop models and the Wok require an electrical circuit rated at 120 volts, 60 Hz., 15 Amps.
For personal safety, this appliance must be connected to a properly grounded and polarized electrical power supply.
Always disconnect the electrical plug from the wall receptacle before servicing this unit.
See Installation Instructions for electrical requirements and grounding instructions.
DO NOT UNDER ANY CIRCUMSTANCES CUT OR REMOVE THE SEPARATE GROUND WIRE OR THE THIRD (GROUND) PRONG FROM THE POWER CORD PLUG.
It is the personal responsibility and obligation of you, the user, to have this appliance connected to the electrical power supply in accordance with the National Electrical Code and/or applicable local codes and ordinances by a qualified electrician.
It is recommended that a dedicated circuit servicing this appliance be provided.
!CAUTION - ALL MODELS
In Case of an Electrical Failure
If for any reason a gas control knob is turned ON and there is no electric power to operate the electronic igniters on the cooktop burners, turn OFF the gas control knob and wait 5 minutes for the gas to dissipate before lighting the cooktop burner manually.
To light the cooktop burners and grill manually, carefully hold a lighted match to the burner ports and turn the gas control knob to HI. During a power failure, you can manually light the standard cooktop burners and grill only, but each must be lit with a match.
If the grill is left on and power is restored, the grill will relight.
DO NOT attempt to light the two left burners manually. These burners are equipped with the ExtraLow® feature and cannot be lit manually.
See Pages 11 and 29 for additional information on manually lighting the burners.
Page 2

Section One: General Safety Instructions
! CAUTION
SAFETY PRACTICES TO AVOID PERSONAL INJURY
Your new Thermador PROFESSIONAL® Cooktop has been designed to be a safe, reliable appliance when properly used and cared for. If not properly used, it could be dangerous. Read all instructions in this Care and Use Manual carefully before using this cooktop.
! WARNING: These
precautions will reduce the risk of burns, electric shock, fire, and injury to persons. Use extreme care when using this restaurant caliber cooktop as this appliance provides intense heat and can increase the accident potential.
When using kitchen appliances, these basic safety precautions must be followed:
•Insure proper installation and servicing. Follow the installation instructions provided with this product. Have the cooktop installed and grounded by a qualified technician.
•Have the installer show you where the gas supply shut-off valve is located so that you know how and where to turn off the gas to the cooktop.
•If you smell gas, follow the instructions shown inside the front cover.. If the connections are not perfectly tight, you can have a small leak and therefore a faint gas smell. Finding a gas leak is not a “do-it-yourself” procedure. Some leaks can only be found with the burner control in the ON position and this must be done by a qualified service technician.
See inside the front cover regarding gas leaks.
•In the event a burner goes out and gas escapes, turn off the burner and open a window or a door. Do not attempt to use the cooktop until the gas has had time to dissipate. Wait at least
5 minutes before using the Cooktop.
•Do not repair or replace any part of the appliance unless specifically recommended in this manual. All other servicing should be referred to a qualified technician.
•Children should not be left alone or unattended in an area where appliances are in use.
They should never be allowed to sit or stand on any part of the appliance.
Do not store items of interest to children above the cooktop or at the back of it. If children should climb onto the appliance to reach these items, they could be seriously injured.
•Never use any part of the cooktop for storage. Flammable materials can catch fire and plastic items may melt or ignite.
•If the cooktop is near a window, be certain the curtains do not blow over or near the cooktop burners; they could catch on fire.
•DO NOT USE WATER ON GREASE FIRES. Turn appliance off and smother fire with baking soda or use a dry chemical or foam-type extinguisher.
•Never let clothing, pot holders, or other flammable materials come in contact with or too close to any element, burner or burner grate until it has cooled. Fabric may ignite and result in personal injury.
•Use only dry pot holders.
Moist or damp pot holders on hot surfaces may cause burns from steam. Do not use a towel or other bulky cloth in place of pot holders. Do not let pot holders touch hot elements, hot burners, or burner grates.
•For personal safety, wear proper apparel. Loose fitting garments or hanging sleeves should never be worn while using this appliance. Some synthetic fabrics are highly flammable and should not be worn while cooking.
•Do not use aluminum foil as a shield against food spills or drippings around the burners or control panel area. This could obstruct the flow of combustion and ventilation air. This can damage the finish of the cooktop.
The appliance is for cooking.
Based on safety considerations, never use the cooktop to warm or heat a room. Such use can damage the cooktop.
• When using the cooktop: DO
NOT TOUCH THE BURNER GRATES OR THE IMMEDIATE
SURROUNDING AREAS adjacent to the burners may become hot enough to cause burns.
Page 3

Section One: General Safety Instructions
! CAUTION
•Never leave the cooktop unattended when using high flame settings. Boil-overs cause smoking and greasy spills that may ignite. More importantly, if the burner flames are smothered, unburned gas will escape into the room. See inside the front cover regarding gas leaks.
•Only certain types of glass, heatproof glass-ceramic, ceramic, earthenware or other glazed utensils are suitable for cooktop use. This type of utensil may break with sudden temperature changes. Use only on low or medium heat settings according to the utensil manufacturer’s directions.
•Do not heat unopened food containers; a buildup of pressure may cause the container to burst.
•During cooking, set the burner control so that the flame heats only the bottom of the pan and does not extend beyond the bottom of the pan.
•Use caution to insure that drafts like those from forced air vents or fans do not blow flammable material toward the flames or push the flames so that they extend beyond the edges of the pot.
•Always use utensils that have flat bottoms, large enough to cover the burner. The use of undersized utensils can expose a portion of the flame and may result in ignition of clothing.
•To minimize burns, ignition of flammable materials and unintentional spills, position handles
of utensils inward so they do not extend over adjacent work areas, cooking areas or the edge of the cooktop.
•Hold the handle of the pan to prevent movement of the utensil when stirring or turning food.
•Do not use the grill for cooking excessively fatty meats or products which promote flareups.
•The optional cutting board accessory must be removed before operating the griddle.
•GREASE IS FLAMMABLE. Let hot grease cool before attempting to handle it. Avoid letting grease deposits collect. Clean after each use.
•For proper lighting and performance of the burners, keep the ports clean. It is necessary to clean these when there is a boil over or when the burner does not light even though the electronic igniters click. See Page 27.
! WARNING
After a spill or boil over, turn off the burner and clean around the burner and burner port. After cleaning, check for proper operation.
• Clean the cooktop with caution. Avoid steam burns; do not use a wet sponge or cloth to clean the cooktop while it is hot. Some cleaners produce noxious fumes if applied to a hot surface. Follow directions provided by the cleaner manufacturer.
•Be sure all cooktop and grill controls are turned off and the cooktop and grill are cool before using any type of aerosol cleaner on or around the cooktop. The chemicals that produce the spraying action can, in the presence of heat, ignite or cause metal parts to corrode. Service should only be done by authorized technicians. Technicians must disconnect the power supply before servicing this unit.
•CAUTION: To avoid fire hazzard, clean the ventilator hood and filters above the cooktop frequently so grease from cooking vapors does not accumulate on them.
•In case of fire or when intentionally “flaming” liquor or other spirits on the cooktop, follow hood manufacturer’s instructions.
•Install a smoke detector in or near the kitchen.
•California Proposition 65 Warning: The burning of gas cooking fuel generates some byproducts which are on the list of substances which are known by the State of California to cause cancer or reproductive harm. California law requires businesses to warn customers of potential exposure to such substances. To minimize exposure to these substances, always operate this unit according to the instructions contained in this booklet and provide good ventilation to the room when cooking with gas.
SAVE THESE INSTRUCTIONS
Page 4
Section Two: Before You Begin
BEFORE USING YOUR COOKTOP FOR THE FIRST TIME
1. Check that you have all the items listed for your model, as shown in the chart below.
2 . Record the Model and Serial number of your appliance as described on Page 30. This may be used for any future contacts with your servicer or the factory. Enter this information on the Product Registration Card included with this product; then mail it to the indicated address.
3.Optional Accessories: Grill Cover, Griddle Cover, Cast Iron Wok Ring, Chopping Board for built-in griddle area. A portable griddle and other accessories are available from your Thermador dealer.
Description |
PSC364GD |
PSC364GL |
PSC366 |
PSC484GG |
PSC484WK |
PSC486GD |
PSC486GL |
P24WK |
|
|
|
|
|
|
|
|
|
|
|
Star™ Burner caps |
4 |
4 |
6 |
4 |
4 |
6 |
6 |
|
|
|
|
|
|
|
|
|
|
|
|
Burner Grates |
2 |
2 |
3 |
2 |
2 |
3 |
3 |
|
|
|
|
|
|
|
|
|
|
|
|
Control Knobs |
5 |
5 |
6 |
6 |
5 |
7 |
7 |
1 |
|
Cast Iron Grill Grate |
|
1 |
|
1 |
|
|
1 |
|
|
Stainless Steel |
|
|
|
|
|
|
|
|
|
Radiant |
|
1 |
|
1 |
|
|
1 |
|
|
Removable Griddle |
1 |
|
|
1 |
|
1 |
|
|
|
Wok Pan and Lid |
|
|
|
|
1 |
|
|
1 |
|
|
|
|
|
|
|
|
|
|
|
Product |
|
|
|
|
|
|
|
|
|
Registration Card |
1 |
1 |
1 |
1 |
1 |
1 |
1 |
1 |
|
Backguard |
* |
* |
* |
* |
* |
* |
* |
* |
|
|
|
|
|
|
|
|
|
|
|
Installation |
|
|
|
|
|
|
|
|
|
Instructions |
1 |
1 |
1 |
1 |
1 |
1 |
1 |
1 |
|
|
|
|
|
|
|
|
|
|
|
* Backguard or Island Trim must be ordered separately. These are not included with the cooktop shipment.
BEFORE USING YOUR WOK THE FIRST TIME
Remove all packaging materials and temporary labels from the Wok Pan.
1.For Models P24WK and PSC484WK, check that you have these items:
• One Wok Pan with Lid and Trivet.
2.The first time the Wok Pan is used, clean the surface thoroughly with hot soapy water. The initial cleaning is needed to remove the protective oil coating. Dry thoroughly.
3.Apply a light coat of vegetable oil (do not use corn oil) to the entire inside and outside surface with a paper towel.
4.Heat the Wok Pan on a medium setting until cooking surface turns golden brown. Cool wok.
5.Repeat this procedure several times. This seasoning seals the pores of the metal, keeps food from sticking, and prevents the Wok from rusting.
6.Wipe off excess oil before using or storing the Wok Pan. Do not scour because scouring will remove seasoning.
BEFORE USING YOUR GRIDDLE THE FIRST TIME
Clean the surface with hot soapy water. Rinse thoroughly with clear water. The griddle is now ready to use.
Page 5

Section Three: Description
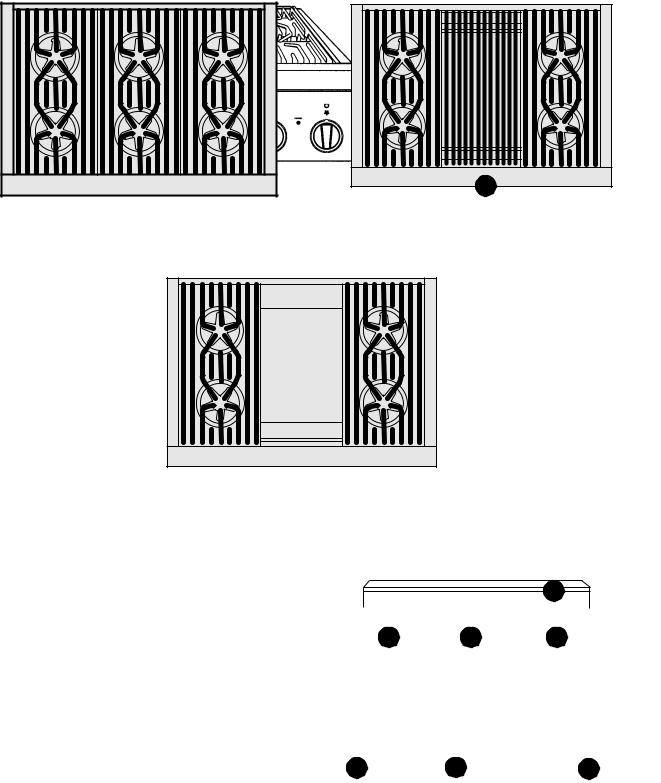
MODEL and PARTS IDENTIFICATION for 48" MODELS
MODEL PSC484WK
(4 Burners and Wok)
MODEL PSC484GG
(4 Burners and Griddle and Grill)
Key for PSC48 Models
1 – 12” Low Back or Island Trim (ordered separately)
2 – Burner Grates & Burners
3 – Grill (PSC484GG and PSC486GL)
4 – Griddle (PSC484GG and PSC486GD)
5 – Control Knobs, ExtraLow® Burners
6 – Control Knobs, Standard Burners
7 – Control Knob, Grill
8 – Control Knob, Griddle Thermostat
MODEL PSC486GD
(6 Burners and Griddle)
MODEL PSC486GL
(6 Burners and Grill)
1
2 |
2 |
3 |
4 |
5 |
6 |
7 |
8 |
Model PSC484GG
Page 6
Section Three: Description
MODEL and PARTS IDENTIFICATION for 36" MODELS
MODEL PSC366
(6 Burners)
4
MODEL PSC364GL
(4 Burners and Grill)
MODEL PSC364GD
(4 Burners and Griddle)
Key for PSC36 Models |
|
|
1 |
|
|
|
|
|
|
1 |
– 12” Low Back or Island Trim |
|
|
|
|
(ordered separately) |
2 |
3 |
2 |
2 |
– Burner Grates & Burners |
|
|
|
3 – Griddle ( PSC364GD)
4 – Grill (PSC364GL) – shown in top view
5 – Control Knobs, ExtraLow® Burners
6 |
– Control Knob, Griddle Thermostat |
5 |
6 |
7 |
|
(PSC364GD) |
|
Model PSC364GD |
|
7 |
– Control Knobs, Standard Burners |
|
|
|
|
|
|
Page 7
Section Three: Description
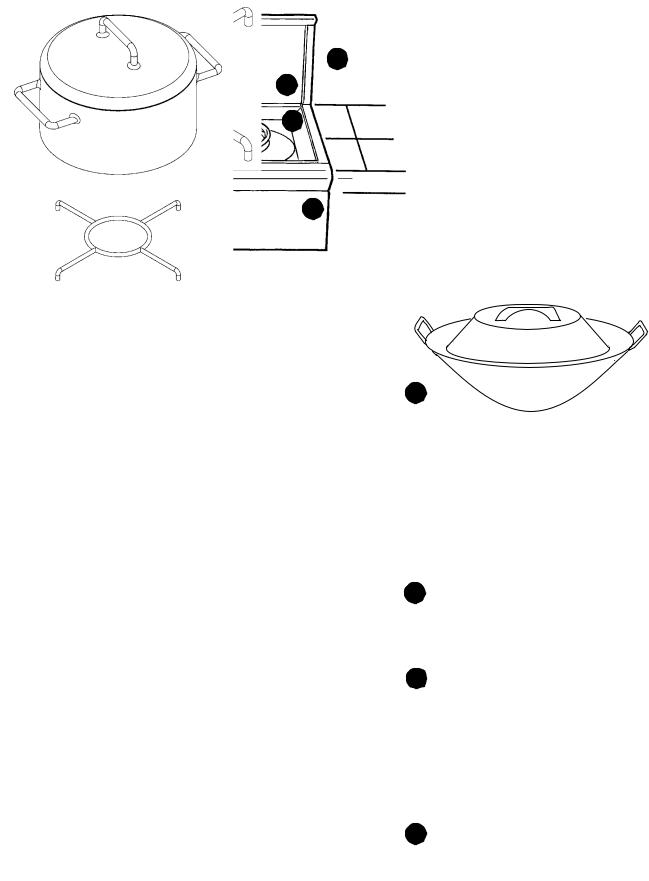
MODEL and PARTS IDENTIFICATION for 24" MODELS
1
2
3
4
MODEL P24WK Key for Model GP24WK and PSC484WK
1 – Low Back Guard (shown). Optional Island Trim available. (Low Back or Island Trim must be
ordered separately.)
5
2 – 24" Wok cooktop
3 – Wok pan support ring
4 – Control knob
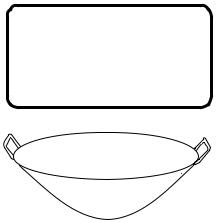
5 – Wok pan and lid
6 – Large Kettle/Pot (not provided)
7 – Wok Trivet
6
7
WOK TRIVET
Fits over wok pan sup-
port ring for large pots 3 used over wok burner.
(see right)
Wok Pan with Lid
Wok Trivet Assembly
Page 8
Section Four: Using the Cooktop
USING THE COOKTOP
Sealed Burners |
CONTROL KNOBS |
Sealed Star™ Burner Base
The cooktop features four or six gas surface burners; each rated at 15,000 BTU/HR. The burners are sealed to the stainless steel top frame to prevent liquid spills from accumulating below the top surface, making it easier to clean.
On all models, the two left burners have the exclusive ExtraLow‚ feature; the remaining burners are standard. Each burner has its own control knob.
The control knobs for two sealed gas burners, one in front and one in the rear, are located directly in front of and below the pair of burners on the control panel.
Rear
Burner Setting
Location Indicator
Knob
Bezel
Standard Burner
Control Knob
The icon above each control shows whether the burner position is in the front or in the rear. A solid star indicates the location of the burner controlled by that particular knob. The drawing above shows the knob controlling the rear burner.
OPERATION OF THE BURNERS
•Press in on the knob and turn it counter-clockwise to the HI setting.
•The igniter for the selected sealed burner clicks and sparks.
•After flame ignition, the igniters stop clicking.
•Rotate the knob to any flame setting between HI and LO.
•The Blue Burner Signal Light, between the burners, will light when adjacent burners are lit. They will remain on until the burner is turned off.
BTU Output for Standard Burners
•HI is equivalent to 15,000 BTU / HR.
•LO is equivalent to 2,200 BTU / HR.
BTU Output for ExtraLow® Burners
•HI is equivalent to 15,000 BTU / HR.
•LO is equivalent to 3,000 BTU / HR.
•XLO is equivalent to 370 BTU / HR.
ExtraLow® Burners
The controls for the two left burners, front and rear, have flame settings even lower than the standard LO settings.
Front
Burner
Location
ExtraLow
Range
ExtraLow® Burner
Control Knob
The drawing shows that the control knob has an additional range between the LO and XLO settings. When the knob is set within this range, the flame pulses off and on. By varying the length of time the flame is off and on, the heat is reduced even further to cook delicate foods. For example, these very low settings are suitable for simmering and poaching, melting chocolate and butter, holding cooked foods at temperatures without scorching or burning, etc.
Page 9
 Loading...