


Care & Use Manual
for
Thermador Built-In Ovens
Models
C302, C272
C301, C271
© 2001 BSH Home Appliances Corp.

A Special Message
to Our Customers
Thank you for buying a Thermador oven.We recommend that you take the time to read this entire booklet before using your new appliance.
We hope that the information in this manual will help you easily operate and care for your oven for years of satisfaction.
Please contact us if you have any questions or comments. Phone us at 1-800-735-4328 or write to us at:
Customer Support Call Center
Thermador
5551 McFadden Avenue
Huntington Beach, CA 92649
Sincerely,
Thermador Test Kitchen Consumer Scientists

C Oven Care and Use Manual
Table of Contents
Important Safety Instructions. 2-3
General Appliance and |
|
Oven Safety Features ............................... |
2 |
Oven Features ...................................... |
4-9 |
Features of Your Oven............................. |
4 |
Oven Control Features ........................... |
5 |
UsingThe Control Panel .......................... |
6 |
Child Lockout/Panel Lock ...................... |
6 |
Sights & Sounds ......................................... |
7 |
Voltage Connection .................................. |
7 |
Oven Modes ............................................... |
8 |
General Oven Tips .................................... |
9 |
Oven Operations ........................ |
10 - 27 |
Setting the Clock .................................... |
10 |
Setting the Lights..................................... |
10 |
Setting the Timer..................................... |
11 |
Bake ............................................................ |
12 |
Baking Chart ............................................ |
13 |
Convection Mode Operation............... |
14 |
Convection Chart ................................... |
15 |
Convection Bake Mode Operation..... 16 |
|
Convection Bake Chart ......................... |
17 |
Roast Mode Operation ......................... |
18 |
Roasting Chart......................................... |
19 |
Convection Roast Mode |
|
and Probe Operation ....................... |
20 |
Convection Roast Chart ....................... |
21 |
Broil and Convection Broil |
|
Mode Operation ............................... |
22 |
Broil Chart ............................................... |
23 |
Convection Broil Chart ......................... |
23 |
Proof Mode Operation .......................... |
24 |
Dehydrate Mode Operation ................ |
25 |
Timed Oven Feature Operation ......... |
26 |
Setting the Sabbath Mode ..................... |
27 |
Care and Cleaning................. |
28-31 |
Self Cleaning The Oven.......................... |
28 |
Self Clean Mode ...................................... |
29 |
Oven Cleaning Chart ............................. |
30 |
Oven Finishes/Cleaning Method .......... |
31 |
Do-It-Yourself Maintenance .. |
32-34 |
Removing the Oven Door .................... |
32 |
Replacing the Oven Light ...................... |
33 |
Changing to 24-Hour Clock ................. |
33 |
Changing to Centigrade ........................ |
34 |
Calibrating Oven Temperature ............. |
34 |
Problem Solving .................... |
35-36 |
Solving Baking Problems ........................ |
35 |
Solving Operational Problems ............. |
36 |
Consumer Service .................... |
36 |
How to Obtain Service ......................... |
36 |
Thermador® Warranty ........................... |
37 |
Service Data Record .............................. |
37 |
Page 1

Safety Precautions |
C Oven Care and Use Manual |
General Appliance and Oven
SAFETY PRECAUTIONS
Please read all instructions before using this appliance.
▲! WARNING
When properly cared for, your new Thermador oven has been designed to be a safe, reliable appliance.
Read all instructions carefully before using this oven. These precautions will reduce the risk of burns, electric shock, fire, and injury to persons. When using kitchen appliances, basic safety precautions must be followed, including the following:
•This appliance must be properly installed and grounded by a qualified technician. Connect only to properly grounded outlet. See “Grounding Instructions” found in the Installation Instructions.
•This appliance should be serviced only by qualified service technician. Contact the nearest authorized service center for examination, repair or adjustment.
•Do not repair or replace any part of the oven unless specifically recommended. Refer service to an authorized servicer.
•Do not operate this appliance if it is not working properly or if it has been damaged, until an authorized servicer has examined it.
•Install or locate this appliance only in accordance with the Installation Instructions.
•Use this oven only as intended by the manufacturer. If you have any questions, contact the manufacturer.
•Do not cover or block any openings on this appliance.
•Use this appliance only for its intended use as described in this manual. Do not use corrosive chemicals, vapors, or nonfood products in this appliance. This type of oven is specifically designed to heat or cook. It is not designed for industrial or laboratory use. The use of corrosive chemicals in heating or cleaning will damage the appliance.
•In the event that personal clothing or hair catches fire, DROP AND ROLL IMMEDIATELY to extinguish flames.
•Do not allow children to use this appliance, unless closely supervised by an adult. Children and pets should not be left alone or unattended in the area where the appliance is in use. Never allow children to sit or stand on any part of the oven.
•Do not store items of interest to children above the oven. If children should climb onto the appliance to reach these items, they could be seriously injured.
To reduce the risk of fire in the oven cavity:
1.Do not store flammable materials in or near the oven.
2.Do not use water on a grease fire. Smother fire or use a dry chemical or foam-type extinguisher.
3.It is highly recommended that a fire extinguisher be readily available and highly visible next to any cooking appliance.
4.Do not overcook food. Carefully attend oven if paper, plastic or other combustible materials are placed inside the oven.
5.Do not use the cavity for storage purposes. Do not leave paper products, cooking utensils or food in the cavity when not being used.
6.If materials inside the oven should ignite, keep oven door closed. Turn oven off and disconnect the circuit at the circuit breaker box.
7.Do not block any vent openings.
8.Be sure the blower fan runs whenever the oven is in operation. If the fan does not operate, do not use the oven. Call an authorized service center.
9.Never use the oven to warm or heat a room. This can damage the oven parts.
10.For personal safety, wear proper clothing. Loose fitting or garments with hanging sleeves should never be worn while using this appliance.
Continued on next page
Page 2

Safety Precautions |
C Oven Care and Use Manual |
IMPORTANT SAFETY INSTRUCTIONS
Please read all instructions before using this appliance.
SAFETY FOR THE OVEN
•Tie long hair so that it doesn't hang loose.
•Do not touch heating elements or interior surfaces of oven.
•The heating elements may be hot even though they are dark in color. Interior surfaces of an oven become hot enough to cause burns.
•During and after use, do not touch or let clothing or other flammable materials contact the heating elements or the interior surfaces of the oven until they have had sufficient time to cool.
•The trim on the top and sides of the oven door may become hot enough to cause burns.
•Use care when opening the door. Open the door slightly to let hot air or steam escape before removing or replacing food.
•Do not heat unopened food containers. Build-up of pressure may cause the container to burst and result in injury.
•Always place oven racks in desired location while oven is cool. If a rack must be moved while oven is hot, do not let potholder contact the hot heating elements.
•Use only dry pot holders. Moist or damp pot holders on hot surfaces may result in burns from steam. Do not let pot holder touch hot eating elements. Do not use a towel or other bulky cloth.
SAFETY FOR THE SELF-CLEANING OVEN
•Confirm that the door locks and will not open once START is touched and the door lock icon appears. If door does not lock, touch OVEN OFF and do not run Self Clean. Phone 800/735-4328 for service (see Page 36 for obtaining service).
•Do not clean the door gasket. It is essential for a good seal. Care should be taken not to rub, damage, move or remove the door gasket.
•Do not use commercial oven cleaners or oven liner protective coatings of any kind in or around any part of the oven.
•Clean only oven parts listed in this manual.
•Before self-cleaning the oven, remove the broiler pan, oven racks, other utensils and excess soft spillage.
•Listen for fan. A fan noise should be heard sometimes during the cleaning cycle. If no fan is heard, call for service.
▲! WARNING
The California Safe Drinking Water and Toxic Enforcement Act requires businessestowarncustomersofpotential exposure to substances which are known by the State of California to cause cancer or reproductive harm.
The elimination of soil during selfcleaning generates some by-products which are on this list of substances.
To minimize exposure to these substances, always operate this oven according to the instructions in this manual and provide good ventilation to the room during and immediately after self-cleaning the oven.
Page 3
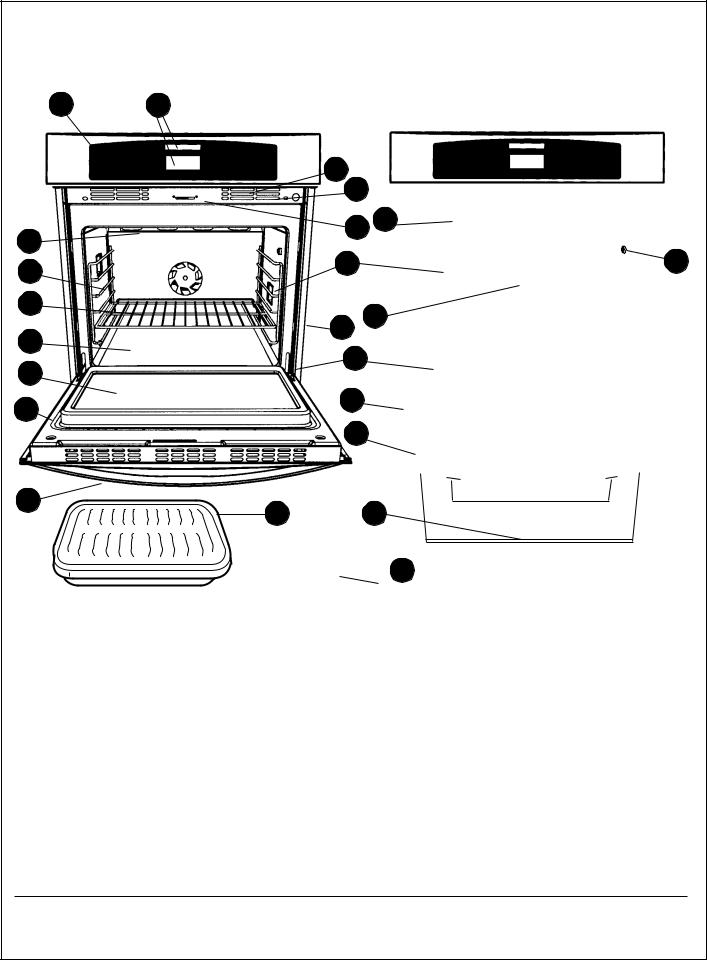
Oven Features |
C Oven Care and Use Manual |
Features of Your Oven
7
6
5
4
3
2
1
MODELS C301, C271 |
MODELS C302, C272 |
SINGLE OVENS |
DOUBLE OVENS |
8 9
10
11 |
|
13 |
12 |
14 |
20 |
15
16
17
18
19
23 21
22
|
# |
Item |
# |
Item |
|
|
1 |
Door Handle |
12 |
Front Frame |
|
|
2 |
Oven Door Gasket |
13 |
Automatic Door Lock Latch |
|
|
|
|
|
|
|
|
3 |
Window |
14 |
Halogen Oven Lamps (2) |
|
|
|
|
|
|
|
|
4 |
Bake Element, under oven floor |
15 |
Convection Fan and Cover |
|
|
5 |
Removable Oven Racks |
16 |
Side Trim |
|
|
6 |
Rack Supports* |
17 |
Door Hinge |
|
|
7 |
Broil Element |
18 |
Removable Door |
|
|
8 |
Glass Touch Control Panel |
19 |
Door Cooling Vents |
|
|
9 |
Clock/Time Display & Control Display |
20 |
Probe Receptacle |
|
|
10 |
Model & Serial No. Location, (look through slot) |
21 |
Vent Trim |
|
|
11 |
Oven Cooling Vents |
22 |
Probe |
|
|
*Rack support positions are numbered from the bottom rack |
23 |
Broiler Pan and Grid |
||
|
support(#1) to the top (#6). Cooking charts in this manual refer to |
|
|
|
|
|
the recommended rack positions. |
|
|
|
|
|
|
|
|
||
Page 4
Oven Features |
C Oven Care and Use Manual |
Oven Control Features
4
3
|
PROBE |
CONVECTION |
BAKE |
UPPER |
5 |
|
6 |
|
8 |
9 |
10 |
||
|
|
|
|
1 |
|
LOWER |
1 |
2 |
3 |
LIGHT |
PANEL LOCK |
CLOCK |
|
|
SELF CLEAN |
BROIL |
ROAST |
UPPER |
|
4 |
5 |
6 |
|
|
|
||
|
|
|
TIMER 1 |
TIMER OFF |
TIMER 2 |
||||||||
|
|
|
|
|
|
OFF |
|
|
|
|
|||
|
|
|
|
|
|
|
7 |
8 |
9 |
|
11 |
|
|
|
PROOF |
STOP |
|
COOK |
LOWER |
|
|
|
|||||
|
2 |
|
|
START |
0 |
|
|
|
|||||
|
DEHYDRATE |
|
TIME |
TIME |
OFF |
|
|
|
|
|
|||
7
CONTROL MENU
1.Oven Mode Pads
•Probe – selects doneness temperatures.
•Convection – selects the Convection mode and may be used in combination with Bake, Roast or Broil.
•Bake – selects the Bake mode.
•Roast – selects the Roast mode.
•Broil – selects the Broil mode.
•Proof/Dehydrate – touch once to select proof; touch twice to select dehydrate.
•Self Clean – selects a Self-Clean mode.
2.Timed Cooking Pads
•Cook Time – selects the hours to cook.
•Stop Time – selects the time of day the oven is to automatically turn off.
3.Oven Selector Pads
•Upper/Lower – (double oven models only). touch once to select the upper oven;touch twice to select the lower oven.
•Upper Off – turns the upper oven off.
•Lower Off – turns the lower oven off.
NUMBER PADS
6.Number pads – 1 to 0 – selects a time of day, temperatures, cook and stop time, or timer(s).
7.Start pad – touch this pad last to start cooking modes or timing functions.
LIGHT, PANEL LOCK, CLOCK, and
TIMER(S) MENU
8.Light – turns oven lights on/off.
9.Panel Lock – locks the cooking modes in the off position.
10.Clock – selects the time of day on the 12-hour clock.
11.Timers
•Timer 1 – sets a kitchen timer.
•Timer 2 – sets a second kitchen timer.
•Timer Off – turns timer(s) off.
SPECIAL FEATURES
DISPLAY WINDOWS
4.Clock
•Displays the time of day.
•Displays timer(s) countdown.
•Displays “Panel Lock” affirmation.
5.Oven
•Displays selected words, numbers and symbols.
•Sabbath Mode Setting – complies with some religious requirements.
•12 or 24 hour clock choice – clock setting options.
•Fahrenheit or Centigrade – temperature setting options.
•Panel Lock / Child Lockout – Panel lock prevents any cooking mode from being set when oven is not being used.
Page 5
Oven Features |
C Oven Care and Use Manual |
UsingThe Control Panel
The control panel contains a series of electronic touch pads that enable you to set the oven. As you touch these pads, words and numbers appear in the display windows. These word and number displays are called “prompts” and show what has been selected and what must be done next.Touch only one mode or number pad at a time.
|
|
|
|
|
|
|
|
|
|
|
|
|
|
|
|
|
|
|
|
|
|
|
|
|
|
2 |
|
12:00 |
|
|
|
|
|
|
|
|
|||||
|
|
|
1 |
|
|
|
|
|
|
|
|
|
|
|
|
4 |
|
|
|
|
|
|
|
|
|
|
|
|
|
|
|
|
|
|
|
|
|
|
|
||
|
|
|
|
|
|
|
|
|
|
|
|
|
|
|
|
|
|
|
||
|
PROBE |
CONVECTION |
BAKE |
UPPER |
|
|
|
|
|
|
|
|
|
|
|
|
|
|
||
|
COOK TIME |
1: 00 |
|
|
|
|
|
325 |
o |
1 |
2 |
3 |
LIGHT |
PANEL LOCK 6 |
CLOCK |
|||||
|
|
|
|
|
LOWER |
|
|
|
|
|
|
|
4 |
5 |
6 |
|||||
|
SELF CLEAN |
BROIL |
ROAST |
UPPER |
|
|
|
|
|
|
|
3 |
TIMER 1 |
TIMER OFF |
TIMER 2 |
|||||
|
|
|
|
|
|
|
||||||||||||||
|
|
|
|
|
|
|
||||||||||||||
|
|
|
|
|
OFF |
|
|
|
|
|
|
|
7 |
8 |
9 |
|||||
|
|
|
|
|
|
|
|
|
|
|
|
|
|
|
||||||
|
|
|
|
|
|
CONVECTION |
|
|
|
|
|
|
|
|
|
|
||||
|
PROOF |
STOP |
COOK |
LOWER |
|
|
|
|
|
|
|
|
|
5 |
|
|||||
|
|
|
|
|
|
|
|
|
|
|||||||||||
|
DEHYDRATE |
|
TIME |
TIME |
OFF |
ROAST |
|
|
|
START |
0 |
|
|
|||||||
|
|
|
|
|
|
|
|
|
|
|
|
|
|
|
|
|
|
|
|
|
1.1 CONTROL MENU
These pads set the oven modes and select the oven to be used - in double oven models.
2.2 CLOCK / TIMER DISPLAY WINDOW
Clock andTimer settings are displayed in this window.TheTimer settings countdown in minutes and seconds or in hours and minutes.
3.3 MODE DISPLAY WINDOW
The settings are shown in this window to verify what has been selected. The display shows the oven selected (in double oven models),cooking or timed mode,elements on in the oven,oven temperature, and the preheat function.
7
C301U model control panel shown in 20º open position.
4.4 NUMBER PADS and START
The number pads select temperatures and time settings in seconds, minutes and hours. It is necessary to select the START pad to complete any mode or timed entry.
5.5 CLOCK andTIMER MENU
These pads select the Clock and minute Timers that operate independently of any oven mode. These pads control the interior oven lights and Panel Lock.
6PANEL LOCK/Child Lockout
The Panel Lock is selected to prevent the control pads from being activated when the oven is not being used.Touch and hold for 5 seconds to activate; repeat to cancel.
7TOUCH 'n' TILT PANEL
This panel is on single oven C301U model only. It can be used in the tilt or flush-to-oven position. Push in along the center, bottom of the panel to release latch and raise panel upward.Push again to release latch and lower the panel.
Single oven models, C301U and C271U, will have only one oven displayed on the control panel and menu. Instructions and illustrations for double oven models are used throughout this manual.
Page 6

Oven Features |
C Oven Care and Use Manual |
Interpreting the Control Panel: Sights & Sounds
The directions in the Care and Use Manual for setting the oven and its various modes are based on the assumption that the panel displays and sounds will “lead” or help you set the controls easily. To aid in this path the following descriptions provide a basis for interpreting what is seen and heard.
Flashing Symbols or Numbers
Signals an incomplete setting; calls for another step or START to be touched.
I Beep
Signals the receipt of an entry.
2 Beeps
Signal an error in entry.
4 Chimes
Signal the end of a setting.
Probe Symbol
Displays the internal temperature of the meat rather than the oven roasting temperature. Oven temperature can be seen briefly by touching the cook mode after touching START.
Lock Symbol
Displays during the Microwave, CookSmart, and Self Clean modes whenever the door is locked. Door can be opened when symbol no longer appears.
PAU
Displays when a Microwave or Cooksmart program is paused or interrupted and door unlocks.
Err
Displays if an invalid temperature or time is entered.
Power Failure
After the power returns to the oven, the clock displays the time when the power was lost or turned off.
120/208 Volt Connection
•Preheat the oven for all cooking modes. Preheat time will be slightly longer.
•Preheat the broil element with the door open for 3 to 4 minutes or until the top element is red. Do not preheat with the broil pan in the oven.
•The Self-Clean mode may need a longer clean time than normal, depending on the amount of soil.
UPPER
LOWER
(Double oven models only) Selects the active oven to be set by highlighting the oven in the mode display window.
Default Settings
The cooking modes automatically select a suitable temperature. These can be changed when a different one is needed.
START
Touch to complete an entry and before entering an additional one.
UPPER OFF and LOWER OFF
Touch to cancel a mode that has already been started or completed.
COOK TIME
Sets the number of hours and minutes the oven will be “on”. Unlike Timer 1 or 2, the oven turns “off” automatically when the time elapses. This pad is used with the automatic timed oven control.
F Number Codes
These codes are displayed when there is a problem with the signal sent to the electronic control board.See Solving Operational Problems, Page 36.
Convection Fan
Operates during any convection mode. The fan turns off if the door is opened.
Component Cooling Fan
Activates during any cooking or self-cleaning mode to cool inner components and outer door surfaces. This air is exhausted through the vent located below the lower oven in double oven models. It continues to run until components have cooled sufficiently.
Page 7

Oven Features |
C Oven Care and Use Manual |
Heating Modes Available in Each Oven
The following illustrations give an overview of what happens in the oven with each mode setting. The arrows represent the location of the heat source during specific modes.The lower element is concealed under the oven floor.
BAKE or PROOF
Baking is cooking with heated air. Both upper and lower elements are used to heat the air and cycle to maintain the temperature.Proofing, while similar to bake, holds an optimum low temperature for yeast to rise.
ROAST
Roast has more top heat than bake. This additional top heat is for conventional open roasting when drippings are desired or for covered-dish roasting.
BROIL
Broiling uses intense heat radiated from the upper element to give excellent top browning or searing.
CONVECTION or DEHYDRATE
Convection is cooking with heat from a third element concealed behind the back wall of the oven. It is used with a fan to speed up the circulation of heated air throughout the oven. Dehydrating is similar to convection cooking and holds an optimum low temperature while circulating the heated air to remove moisture slowly for food preservation.
CONVECTION BAKE
Convection Bake has heat from the upper and lower element with circulation assisted by the convection fan. This mode is designed for breads and pastries.
CONVECTION ROAST
Convection roasting combines the heat from the lower concealed element with additional heat from the convection element and fan and the top element. The result is a crispier exterior that seals in the interior juices. It is perfect for roasting tender meats in an uncovered,low-sided pan.
CONVECTION BROIL
Convection broiling combines the intense heat from the upper element with the circulation assisted by convection fan. This air circulation crisps the exterior surface and retains inner moisture in meats more than 1-1/2" thick.
Page 8
Oven Features |
C Oven Care and Use Manual |
GeneralTips
PREHEATING THE OVEN*
•Preheat the oven when using the BAKE, CONVECTION and ROAST modes.
•Preheat is not necessary for BROIL and CONVECTION BROIL modes.
•Preheat is optional for CONVECTION ROAST. Preheating is not recommended for CONVECTION ROAST when using the PROBE. A hot oven impairs connecting the meat probe into the receptacle.
•Oven is not preheated for CONVECTION BAKE, to take advantage of the lower heat yielding a better crust on baked items.
•Place racks in the oven before preheating.
•During preheat,the selected cooking temperature is displayed and alternates with a display of the actual oven temperature.
•The oven chimes once when it is preheated and the selected cooking temperature is displayed.
OPERATIONAL SUGGESTIONS
•Use the cooking charts as a guide.
•Do not set pans on the opened oven door.
•Use the interior oven light to view the food through the oven door window rather than opening the door frequently.
•UseTIMER 1 ORTIMER 2 to keep track of cooking times.
UTENSILS
•Reduce oven temperature 25º when baking in glass.
•Use pans that give the desired browning.For tender, golden brown crusts, use light nonstick/anodized or shiny metal utensils.
•For brown,crisp crusts,use dark nonstick/anodized or dark, dull metal utensils or glass bakeware. Insulated baking pans may increase the length of cooking time.
•Do not cook with the empty broiler pan in the oven, as this could change cooking performance. Store the broil pan outside of the oven.
•Tips for “Solving Baking Problems” are found on Page 35.
HIGH ALTITUDE BAKING
•When cooking at high altitude,recipes and cooking times will vary from the standard. For accurate information,write the Extension Service,Colorado State University, Fort Collins, Colorado 80521. There may be a cost for the bulletins.
CONDENSATION/TEMPERATURE SENSOR
•It is normal for a certain amount of moisture to evaporate from the food during any cooking process. The amount depends on the moisture content of the food. The moisture may condense on any surface cooler than the inside of the oven, such as the control panel.
•Your new Thermador® oven has an electronic temperature sensor that accurately maintains the temperature selected. Your previous oven may have had a mechanical thermostat that drifted gradually over time to a higher temperature. It is common to experience an adjustment period when cooking your favorite recipes in the new oven.
OVEN RACKS
•Rack positions are numbered from the bottom rail guide (#1) to the top (#6). Check the cooking charts for the recommended position.
•To insert racks into the oven, hold the rack with the back rail up and toward the back. Place the safety hooks under the front of the rail guides. Push the rack into the oven, lifting the rack stops over the front of the rail guides. Slide the rack into position.
•To remove racks or reposition racks in the oven, pull the rack towards the front of the oven. Lift up the front of rack over the safety stops and pull from the oven.
•Rack rail supports should not be removed from the oven.
•CAUTION! Never use aluminum foil to cover the oven racks or to line the oven. It can cause damage to the oven can liner if heat is trapped under the foil.
•When placing food on a rack, pull the rack out to the stop position. The racks are designed to lock when pulled forward.
Page 9
Oven Operations |
C Oven Care and Use Manual |
Setting the Clock
•Always set the clock immediately after installation or after a power failure. Once power returns to the oven, the clock displays the time of day when power was turned off or lost.
•If 15 seconds elapse between touching the clock pad or number pads, the mode is automatically cancelled. Set again.
•The time of day clock can be set when an automatic timed cooking mode is in operation.
To Set the CLOCK:
You Will See
1. Select the CLOCK pad. |
Touch |
CLOCK
2. |
Set the current time of day. |
Touch |
|
(Example shows 8 o’clock set for |
8 |
|
the time of day.) |
0 |
|
|
0 |
3. |
Select START or CLOCK. |
Touch |
|
|
START |
––:–– |
SET CLOCK |
|
|
8:00 |
SET CLOCK |
|
8:00
Setting the Lights
•Oven lights turn on automatically when the door is opened and off when closed.
•To set manually, always start by highlighting the oven, whether it is “active” or not.
(Touch the UPPER / LOWER pad to display the “active” oven; flashing outline is the active oven.)
•A single LIGHT pad activates the lights in either oven.
• The lights do not operate in the Self-Clean mode.
To manually control the interior oven lights if either oven is in use:
1.Select the “active” oven by touching once or twice to highlight oven display.
2.Touch LIGHT once to turn light on or off.
Touch
UPPER LOWER
Touch
LIGHT
Page 10
 Loading...