


First Steps with TI-Nspire™
First Steps
with
Technology for teaching and learning mathematics
Seven Introductory Tutorials for the  Handheld
©2012TexasInstrumentsEducationTechnology |
Page 1 |

First Steps with TI-Nspire™
About this document
This document includes seven introductory tutorials to take new users through many key features of TI-Nspire™ maths and science learning technology. This technology includes both handhelds and computer software, providing teachers the flexibility to meet different classroom needs. However, the primary focus of these tutorials is the handheld device. All activities are equally applicable to the computer software but screen shots and key presses relate to the handheld.
About the tutorials
The tutorials are designed to be worked through in order, with later ones building on skills covered earlier. The first time you meet a new technique, there are very detailed instructions about which keys to press – but, as you would expect, the amount of detail is reduced when the technique is used subsequently.
In an Appendix you will find an example that links together several of the applications introduced separately in the tutorials. As well as enabling you to revisit many of the techniques you met earlier, it provides an example of the use of “multiple representations” of mathematical concepts.
References
In the tutorials you will find occasional references to documents that are supplied in electronic form with your
TI-Nspire handheld.
They are also available from http://education.ti.com/guides, choose TI-Nspire technology.
They are:
•Getting Started with the TI-Nspire™ CX / TI-Nspire™ CX CAS Handheld
•TI-Nspire™ Reference Guide
•TI-Nspire™ Technology Version 3.0 Release Notes
Key features of TI-Nspire™
•Multiple representations, dynamically linked, encouraging different approaches to solving problems and expressing solutions.
•A complete set of mathematical tools for algebra, geometry, number, calculus, statistics, matrices and vectors, finance and real-world data logging.
•Working documents which can be saved, recalled, edited, transferred between handheld and computer and distributed electronically.
•A tool for key concept and key skill development across all the secondary school years.
First edition, November 2007.
Second edition, February 2008.
Third edition, August 2008.
Fourth edition, June 2010.
Fifth edition, September 2011.
Sixth edition, January 2012.
Page 2 |
© 2012 Texas Instruments Education Technology |

First Steps with TI-Nspire™
Contents
TI-Nspire Keypad Layout.................................................................................................. |
Page 5 |
Tutorial 1........................................................................................................................... |
Page 6 |
TI-Nspire Documents: basic ideas |
|
•Memory
•Battery Life
•Documents, problems, pages, applications and home screen
•Use of /key and keyboard shortcuts
•Home Screen
•Scratchpad
•Document Browser to navigate around documents and folders
•Page Sorter to navigate inside documents
•Different menus in different contexts
•The Document menu
Tutorial 2......................................................................................................................... |
Page 15 |
The Calculator application: arithmetic and algebra
•Basic calculations
•Standard layout of expressions
•Recalling previous expressions and results
•Approximate (decimals) and exact (fractions) evaluations
•Templates and menus
•Document settings
•Defining and using variables
•Working with Statistical Distributions
Tutorial 3......................................................................................................................... |
Page 22 |
The Notes application
•Purposes of the application
•Page layouts with split screens
•Templates for the Notes menu
•Using Interactive Notes
•Creating Questions using the Teacher Software
Tutorial 4......................................................................................................................... |
Page 27 |
Graphing
•The work area, entry line, function history
•Entering, editing, deleting and hiding functions
•Grabbing and dragging labels
•Setting the axes
•Tracing along graphs
•Marking and labelling points and coordinates
•Using the Analyse Graph Tools
•Transforming graphs and their functions manually
•Using Sliders
•Sequence Plotting
© 2012 Texas Instruments Education Technology |
Page 3 |

First Steps with TI-Nspire™
Tutorial 5......................................................................................................................... |
Page 35 |
Geometry
•The Plane Geometry and Graphing views
•Lines, segments and rays
•Construction of parallel lines
•Drawing and labelling points on objects
•Construction of shapes
•Selecting and grabbing screen objects
•Making measurements and storing as variables
•Attributes which change the appearance and lock screen objects
Tutorial 6......................................................................................................................... |
Page 41 |
Lists and Spreadsheet
•Entering and editing data and formulas
•Lists and functions
•Resizing cells
•Ambiguous variable/cell names
•Capturing data from the Graphs & Geometry application
•Function tables
•Frequency Chart
Tutorial 7......................................................................................................................... |
Page 46 |
Oneand two-variable statistics
•Creating oneand two-variable statistical plots in the Data & Statistics application
•Using boxplots to compare data sets
•Using categorical data for pie charts
•Manually fitting straight lines to data
•Automatically fitting linear-regression lines to data
Appendix......................................................................................................................... |
Page 53 |
• Multiple Representations – an example
Page 4 |
© 2012 Texas Instruments Education Technology |

First Steps with TI-Nspire™
TI-Nspire CX Keypad Layout
Start by spending a few seconds looking at the layout of the keypad.
© 2012 Texas Instruments Education Technology |
Page 5 |

First Steps with TI-Nspire™
Tutorial 1: TI-Nspire documents
Tutorial 1
TI-Nspire Documents
This first tutorial introduces some of the key features of TI-Nspire™ learning technology, in particular the structure of TI-Nspire documents, with different applications operating on different pages. The various menus are introduced, as well as creating and navigating around documents. The tutorial assumes that you are using the TI-Nspire handheld device and the tutorial begins by drawing a comparison between this and other types of technology.
Is it a calculator? Is it a computer? ….It’s a handheld device!
Pick up the TI-Nspire handheld device and, if you are used to using a calculator, particularly
a Texas Instruments TI-83 or TI-84 graphics calculator, you are likely to feel a certain reassuring familiarity: there’s a screen and a keyboard laid out in a fairly familiar way. As with many calculators the on/off switch is in the top right corner. So press cto switch on.
Nothing on the screen?
See Getting Started with the TI-Nspire Handheld, Recharging the Handheld
Please don’t worry about what’s on the screen for the moment, but think about how to switch it off. The c key has “off” written in light blue above it so that’s the one to use after pressing the blue key marked /.
But just a minute, it was a key marked 2nd that you used on the calculators, and the change to the use of a ctrl key is quite significant. The designers at TI have moved to making this device much more like a computer and it has a ctrl key, /, and also a shift key g. Many of the main keys on the handheld have second functions written in blue above the key and these are activated using the ctrl key. Notice for example q, pand h. The ctrl key can be used in conjunction with the alphabetic keys to create keyboard shortcuts just as you are used to doing on a computer. For example, you can copy and paste using /Cand /V. There’s also that most useful keyboard shortcut for undoing a previous action, /Z, which can also be activated by pressing /d(ª). (See Getting Started guide, Using Keyboard Shortcuts for a full list).
Memory
Just like a computer, documents can be stored on the TI-Nspire CX handheld – The TI-Nspire™ CX handheld comes equipped with 192 MB of memory Of the total memory, 128 MB is dedicated to document storage. As documents are created and stored they take up space on the handheld’s memory so you may find that every now and again you need to free space on memory after long-term use. If there isn’t enough memory on the handheld, you can do one of the following:
•Back up documents and folders to a computer or another TI-Nspire CX
•Delete documents and folders you no longer use
•Reset the memory, which deletes all files and folders on the handheld
Page 6 |
© 2012 Texas Instruments Education Technology |

First Steps with TI-Nspire™
Tutorial 1: TI-Nspire documents
Battery Life
The TI-Nspire™ CX handheld comes with a rechargeable battery, which should be charged for at least six hours before first use. The built-in rechargeable battery does not need to be removed from the handheld in order to recharge it. The handheld will still work and can be used while it is charging.
With use of 2 hours per day at the default brightness level the battery should last for up to 10 days.
The handheld comes with the following cables:
•Standard mini-A to mini-B USB cable for transferring files between handhelds
•Standard A to mini-B USB cable for transferring files to and from a computer and for charging the battery via the USB port
Charging the handheld
To charge the battery in the TI-Nspire™CX handheld:
•Connect the handheld to a computer using a standard A to mini-B USB cable. If the driver is not found when the handheld is connected to the computer download the software that includes a driver from http://education.ti.com/software.
OR
•Connect to a wall outlet using a TI wall adapter (sold separately).
OR
•Place the handheld or multiple handhelds in a TI-Nspire™ CX Docking Station.
© 2012 Texas Instruments Education Technology |
Page 7 |
First Steps with TI-Nspire™
Tutorial 1: TI-Nspire documents
The Home Screen
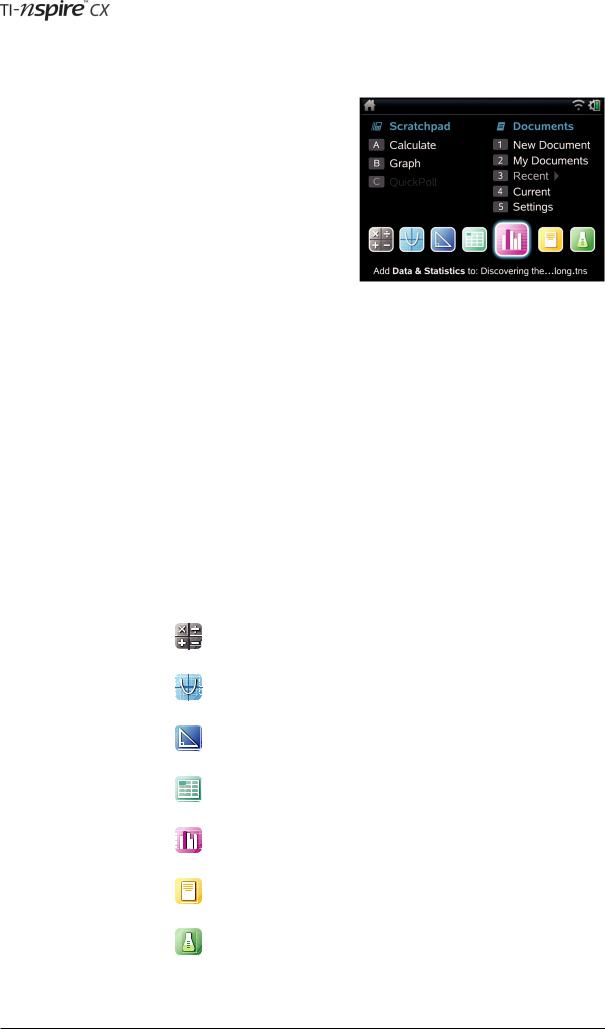
When you switched on a calculator you expected to see what was called the Home Screen and you’d be able to start carrying out calculations right away. But the TI-Nspire handheld is different in this respect too. Press c, the home button, a black key at the top right of the keypad. You should see a screen similar to this. Navigate to the various icons on the Home Screen using the large square Touchpad on the keypad. This behaves as both a touchpad (like using a laptop), and as a navigational device as you can press on the up, down, left and right arrows to move the selector around.
To click or select something you press the xsquare symbol in the middle of the touchpad, or press the enter key. However don’t select anything else yet!
Consider whether the TI-Nspire’s home screen is more reminiscent of a calculator or of a computer. When a computer wakes up you first see the desktop and in many ways this TI-Nspire Home Screen is similar. With a computer you have to choose an application to use -- a word-processor, spreadsheet or whatever. You then must open a document within which you will be able to write text, do calculations, manipulate images etc.
Computer: Desktop Choose Application Open Document
In many ways working with TI-Nspire is similar. You always have to work within a document and you can use different applications to calculate, draw graphs, , work with geometry, manipulate lists and spreadsheets, work with data and statistics, add notes and perform data logging.
The TI-Nspire applications are:
• Calculator
• Graphs
• Geometry
• Lists & Spreadsheet
• Data & Statistics
• Notes
• Vernier DataQuest™
Page 8 |
© 2012 Texas Instruments Education Technology |

First Steps with TI-Nspire™
Tutorial 1: TI-Nspire documents
What is quite different from the computer is that within one document you can have multiple pages or problems that can make use of the different applications. The spreadsheet on one page of a document can interact seamlessly with calculations done on a calculator page and graphs drawn on another. You can also have more than one different representation on one page.
This use of multiple representations is one of the many things that make the TI-Nspire such a powerful tool.
So with TI-Nspire you first open a document, or start a new one, and then choose an application.
TI-Nspire: Home screen New document Choose application
Tip: If you would like to return to the document you are working on without inserting
a new page, from the Home screen select option 4: Current.
You can do this by pressing 4on the keypad.
© 2012 Texas Instruments Education Technology |
Page 9 |
First Steps with TI-Nspire™
Tutorial 1: TI-Nspire documents
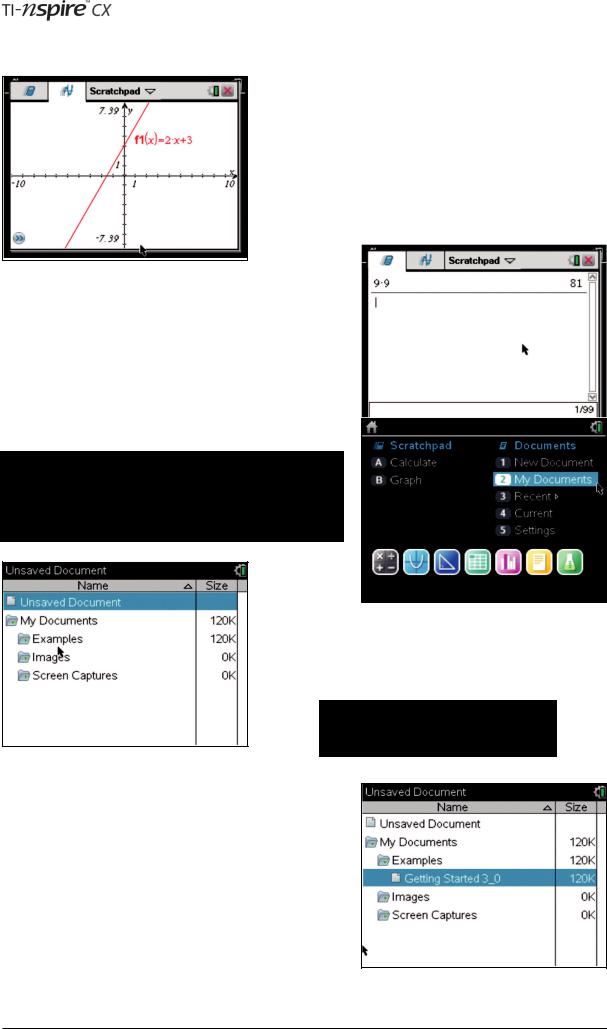
Scratchpad
Because there are some occasions when you really just want to carry out a quick calculation or draw a quick graph the TI-Nspire includes a feature called the Scratchpad. The scratchpad is designed for those casual throw-away calculations that need to be done from time to time, but are not worth keeping in a full document. To access the Scratchpad press ».
This opens a calculator page for performing quick calculations. Pressing »again swaps between the calculator and a graph scratchpad page. To close the Scratchpad simply press d.
Documents, Problems and Pages
In order to see what documents are pre-loaded on your handheld you need to use option 2 on the Home screen:
My Documents…
Either use the touchpad to move the selector down to the 2: My Docs… option then press xto select it.
Or use the touchpad to move the cursor over option 2 and xOr just press 2key to select option the 2nd option.
You should see a screen called the Document Browser and it will be something like the one shown here. Documents are organized into folders as they would be on a computer. A new TI-Nspire handheld should have a folder called Examples:
Tip: You can use either xor ·as
alternative key presses
Move the cursor to the folder entitled Examples.
Then press xor ·or ¢on the touchpad to open the folder.
Inside the Examples Folder on your handheld you will probably find a document entitled ’Getting Started 3_0’. Use ¤to locate and ·to open the document.
Page 10 |
© 2012 Texas Instruments Education Technology |
If the handheld has been used previously you will see a dialog box asking you if you want to save the document that is currently open. Unless you want to save your previous work press eor ¢to move the highlight to No. To confirm this choice press ·.
First Steps with TI-Nspire™
Tutorial 1: TI-Nspire documents
eis often used to move to and highlight different parts of the screen
Navigating Documents
When the document opens you may see a screen similar to the one shown on the left. For the moment, please do not follow the instructions on the screen just yet! Continue working through this tutorial, which will introduce you to many of the key features of the TI-Nspire document model.
Among these key features are useful and easy ways to navigate through documents. For example, pressing /¢will take you to the next page in a document. Similarly, pressing /¡returns you to the previous page. Pressing /£will take you to the Page Sorter which enables you to move quickly and easily through the pages of a document.
Notice the information typically provided on the Page Sorter:
 Name of Document
problem
Number or Name of the Problem
A TI-Nspire document can consist of multiple problems and each problem can consist of multiple pages.
For example, the document shown here consists of at least two problems, with 5 and 9 pages respectively.
© 2012 Texas Instruments Education Technology |
Page 11 |
First Steps with TI-Nspire™
Tutorial 1: TI-Nspire documents
Scroll downwards with the Touchpad and you will see all the problems in the document. If you move the highlight onto Problem 2, say, and press ¡the pages of that problem will close up. Pressing ·or /¤takes you back to single page view on the page currently selected.
Each page of a document contains one (or more) of the TI-Nspire applications.
As a reminder, these are the same applications that can be accessed from the Home screen, i.e.:
• Calculator
• Graphs
• Geometry
• Lists & Spreadsheet
• Data & Statistics
• Notes
• Vernier DataQuest™
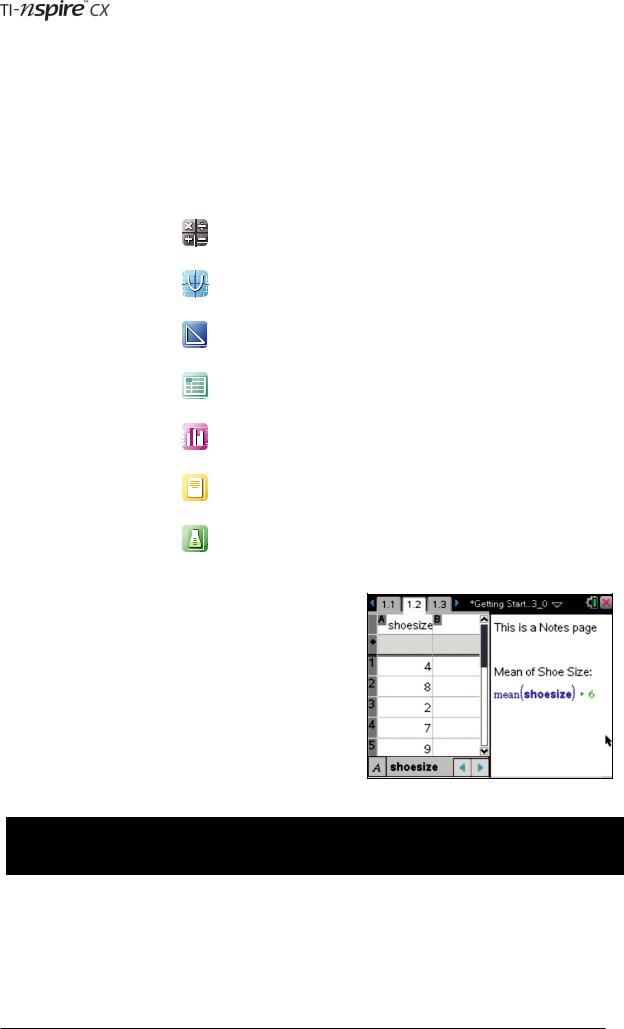
The use of each of the applications which you might want to use for data logging is covered in the tutorials that follow. Any page can be divided into as many as four work areas, allowing up to four different applications to be used per page. To do this, See ‘Splitting the Screen’ in Tutorial 3, page 23.
Shown here is a page that has been split into two with the Lists & Spreadsheet application on the left, and the Notes application beside it.
If the ‘Getting Started 3_0’ document is present on your handheld, work through it now as far
as page 2.5. This will allow you to revise what has been covered so far in this tutorial
Page 12 |
© 2012 Texas Instruments Education Technology |
First Steps with TI-Nspire™
Tutorial 1: TI-Nspire documents
Contextual Menus
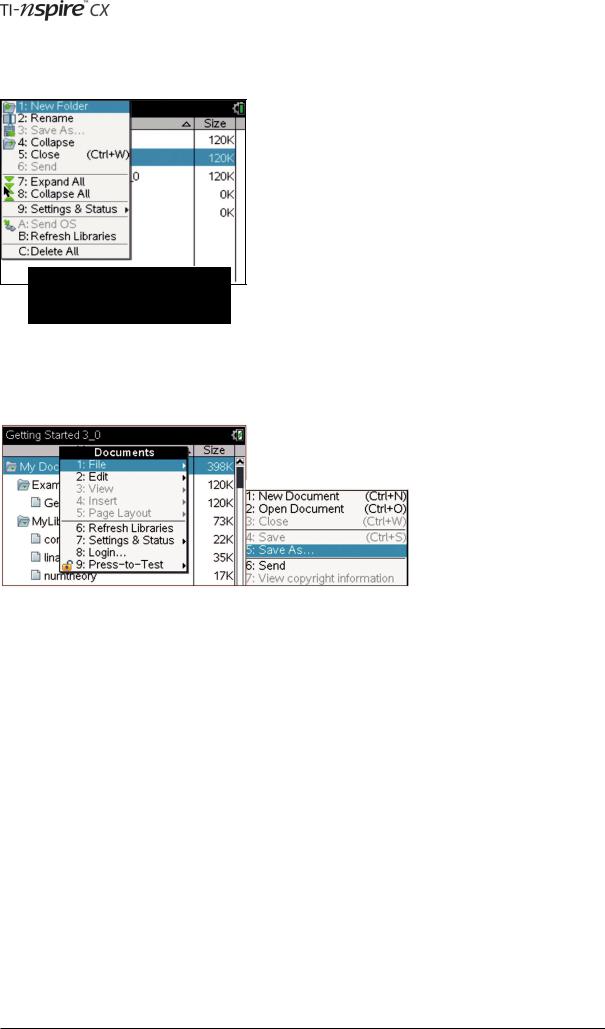
Return to the Home screen, and select 2: My Docs… to access
the document browser. Notice that within the document browser new folders may be created or folders renamed. Items that are grey, rather than black in a menu cannot be chosen in the current environment. For example, on the screen on the left, option 3: Save As… is unavailable.
Pressing dwill always close
down a menu or dialog box.
To save a document under a new name press ~.
This opens a menu providing access to document management features. By pressing 1and then 5the document can be saved under another filename.
© 2012 Texas Instruments Education Technology |
Page 13 |
First Steps with TI-Nspire™
Tutorial 1: TI-Nspire documents
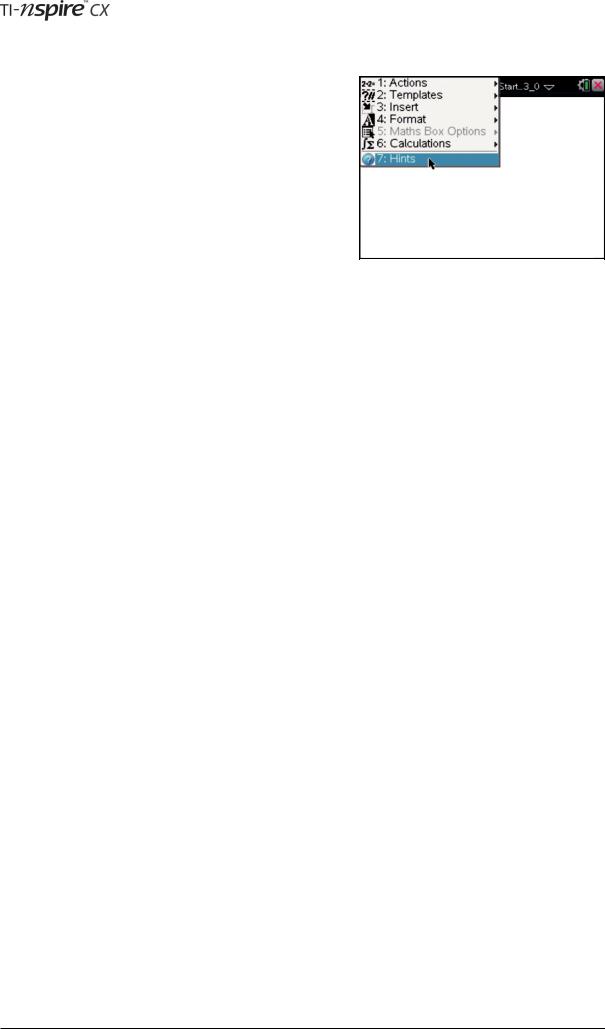
Then open a document in the browser and pressbagain. It is important to realise that bwill always provide access to the features of the current environment. For example, within the Notes application, this menu offers only the available options for that application (as shown to the right).
There are a number of tools that are available for managing documents when you choose the use the Document menu by pressing the ~button. Several options are marked by the symbol ¢and pressing ¢on the Touchpad opens their submenus.
Within any application, this Document menu retains the same features but any options that are currently unavailable are greyed out.
The next tutorial describes creating a new document and using a first TI-Nspire application.
Check list of some key points in Tutorial 1:
•Understanding, the terms document, problem, page, application, and home screen
•Use of the /key and keyboard shortcuts
•The Home Screen
•Scratchpad
•Memory
•Battery Life
•The Document Browser to navigate around documents and folders
•The Page Sorter to navigate inside documents
•The use of eand d
•Why bproduces different menus in different contexts
•The Document menu
Page 14 |
© 2012 Texas Instruments Education Technology |
First Steps with TI-Nspire™
Tutorial 2: The Calculator Application
Tutorial 2
The Calculator Application
At the heart of TI-Nspire is the Calculator application, the workspace for numeric and algebra operations.
This tutorial introduces some of the key features of the application, starting with a new blank document.
This document will be saved, used again and added to in subsequent tutorials
Basic operations
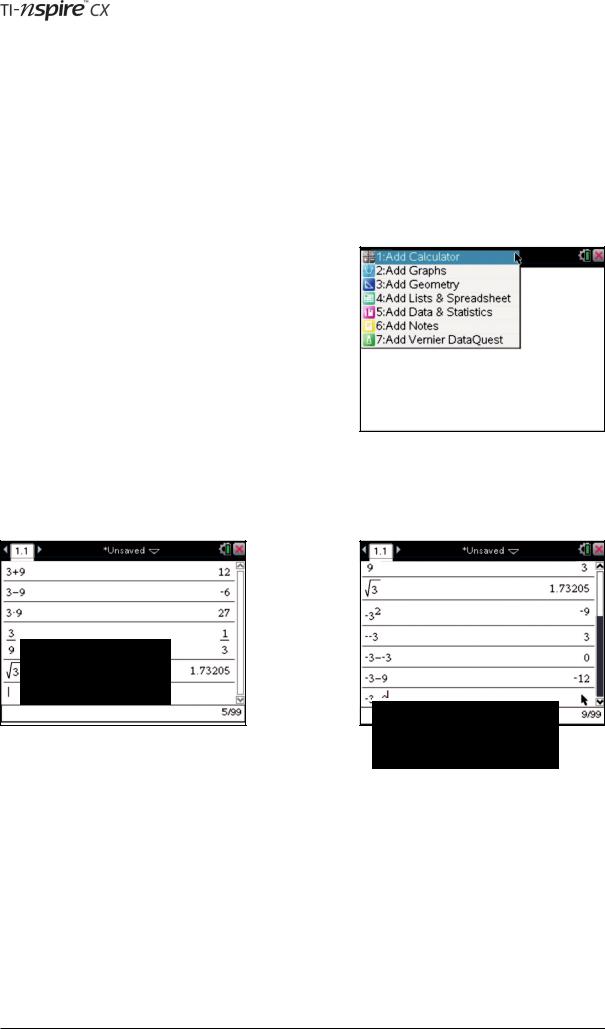
First create a new blank document by pressing cand choosing option 1: New Doc from the Home Screen. To open a page which uses the calculator application:
press 1or ·or x.
Try keying in and entering expressions using the four basic arithmetic operations, square roots, negatives etc. Look carefully at how the expressions as well as the results appear on the screen, in order to understand the conventions the handheld uses with its default settings.
NB multiplication
and division.
What do you expect the result
of this calculation to be?
Notice that in many cases the layout of the expression changes when ·is pressed—in particular watch how the multiplication and division operations are handled.
Try typing a lengthy expression and, before pressing ·, see the effect of using .and then /..
© 2012 Texas Instruments Education Technology |
Page 15 |
First Steps with TI-Nspire™
Tutorial 2: The Calculator Application
A History Lesson
You will have noticed that, as new expressions are entered, previous ones scroll off the top of the screen. The TI-Nspire handheld will remember a history of up to 99 expressions and these can be recalled using the up key on the Touchpad. Press and hold £and see the way the highlight flicks back through previous expressions and results. Stop at some point in the history and press ·. You should see either the previous expression or the result copied to the entry line ready to be used as all or part of a new expression.
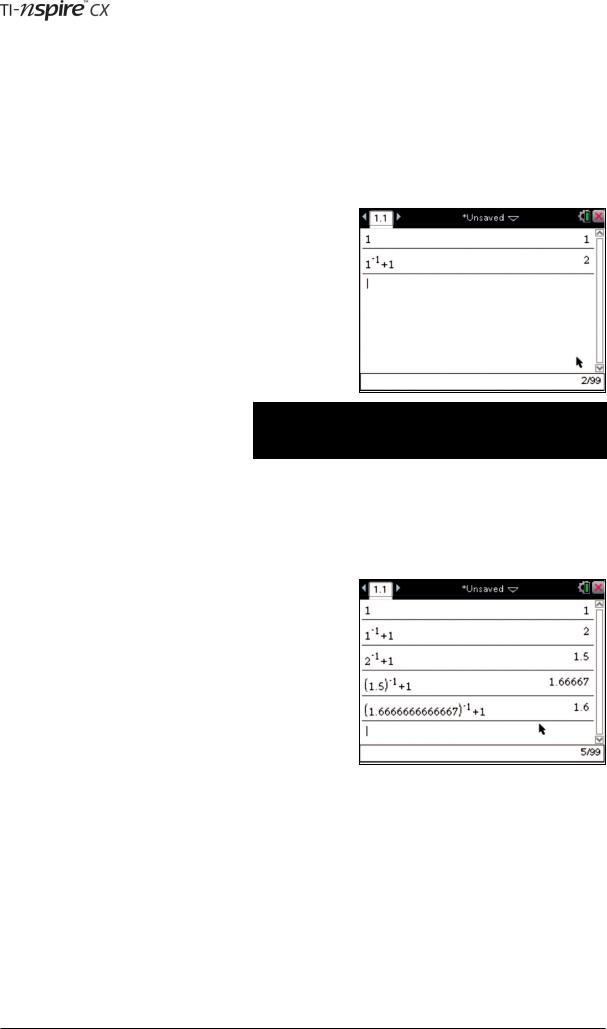
Notice that, after an expression has been evaluated, simply pressing ·again repeats the previous entry. What would you expect to see if you repeatedly pressed ·on this screen? Try it by pressing
1·
lv1¢+1
···…
Notice how entering an operation at the beginning of an expression (the power operation in this example) causes the automatic entry of Ans, standing for the previous answer.
If you ever need to clear the history there is an option in the Actions submenu: press b15. This is also a way of producing an uncluttered screen for making screenshots such as the one above.
Approximate Calculations
If you repeat the key sequence above but replace the first · with /·you get the rather different results shown here. Try it and continue pressing ·until you get an (apparently) unchanging approximation for the Golden Ratio.
The default mode for calculations is to give exact results (using fractions) rather than approximate results (using decimals). It is possible to alter this using the system settings as you will see later in this tutorial.
Another way of choosing a decimal result is to enter a decimal
in the expression that you type, e.g. try entering 1 / 7 and then 1.0 / 7.
Page 16 |
© 2012 Texas Instruments Education Technology |
First Steps with TI-Nspire™
Tutorial 2: The Calculator Application
Templates
Many of the handheld’s keys provide templates to enable you to enter a range of mathematical expressions. For example, in this tutorial you have used the keys /qfor square roots and lfor powers. In both cases a small box appears in the expression inviting you to enter values. Some care is necessary when entering more complex expressions using such templates.
For example, try entering √3+√5. In order to move out of the box after entering 3 you need to press either e or ¢. This explains the use of ¢in the key sequence in part b above.
More complex templates are available from the Maths |
|
|
|
|
Templates Menu that can be opened by pressing t. |
|
|
|
|
To make a selection from this menu you need to move the |
|
|
|
|
highlight with the Touchpad and press ·. |
A menu of maths templates |
|||
|
||||
Those options which have a bold T superimposed are |
|
|
|
|
|
|
|
|
|
not available on the numeric version of TI-Nspire as they |
|
|
|
|
require a Computer Algebra System (which cannot be |
|
|
|
|
used in most exams). |
|
|
|
|
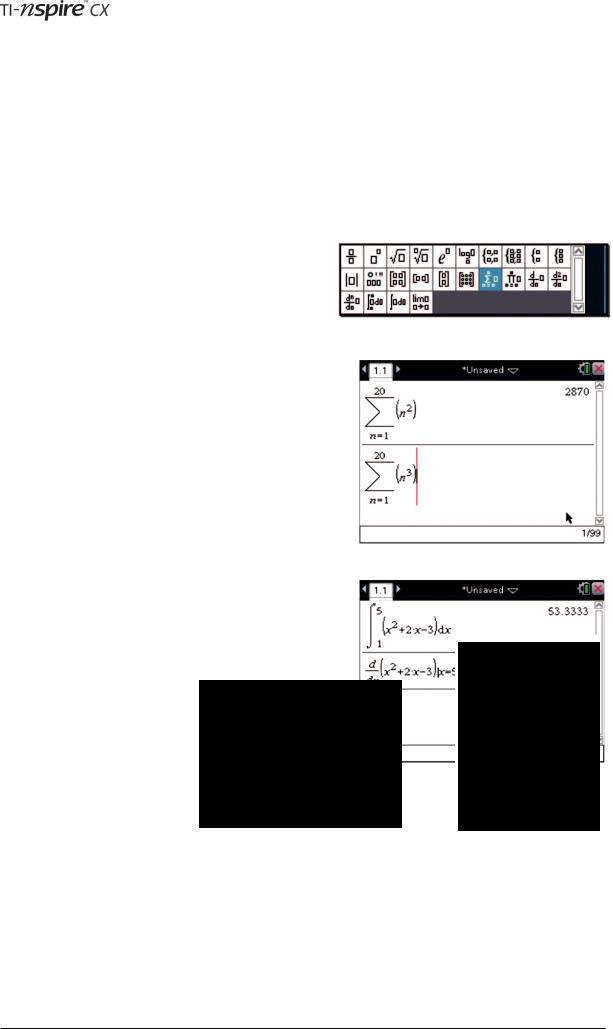
Try using a template to produce the sums of the first 20 |
|
|
|
|
square numbers. You will need to use an alphabetic key |
|
|
|
|
such as Nto enter the variable name. Press eor use |
|
|
|
|
the Touchpad to move from one small box to the next. |
|
|
|
|
Now produce the sums of the first 20 cubic numbers. The |
|
|
|
|
easiest key sequence to use is (probably!): |
|
|
|
|
|
|
|
|
|
££·¡¡.3· |
|
|
|
|
Other useful templates are the definite integral template, |
|
|
|
|
and the differential at a point template. |
|
|
|
|
These can also be accessed from the Calculus Menu b4. |
|
|
|
|
|
|
|
|
|
|
|
|
|
|
Derivative of |
Integral of x2+2x-3 |
x2+2x-3 at x=5 |
between 1 and 5 |
© 2012 Texas Instruments Education Technology |
Page 17 |
 Loading...