


585
Table of contents
 Loading...
SpeedTouch™585(v6)
Wireless Residential ADSL Gateway
User’s Guide
Power
Ethernet
WLAN
DSL
Internet


SpeedTouch™
585
User’s Guide
(v6)

Copyright
Copyright ©1999-2006 THOMSON. All rights reserved.
Distribution and copying of this document, use and communication of its contents is not permitted without written authorization
from THOMSON. The content of this document is furnished for informational use only, may be subject to change without notice,
and should not be construed as a commitment by THOMSON. THOMSON assumes no responsibility or liability for any errors or
inaccuracies that may appear in this document.
Thomson Telecom Belgium
Prins Boudewijnlaan, 47
B-2650 Edegem
Belgium
http://www.thomson-broadband.com
Trademarks
The following trademarks are used in this document:
SpeedTouch™ is a trademark of THOMSON.
DECT is a trademark of ETSI.
Bluetooth® word mark and logos are owned by the Bluetooth SIG, Inc.
Ethernet™ is a trademark of Xerox Corporation.
Wi-Fi® and the Wi-Fi logo are registered trademarks of the Wi-Fi Alliance. "Wi-Fi CERTIFIED", "Wi-Fi ZONE", "Wi-Fi Alli-
ance", their respective logos and "Wi-Fi Protected Access" are trademarks of the Wi-Fi Alliance.
UPnP™ is a certification mark of the UPnP™ Implementers Corporation.
Microsoft®, MS-DOS®, Windows® and Windows NT® are either registered trademarks or trademarks of Microsoft Corpo-
ration in the United States and/or other countries.
Apple® and Mac OS® are registered trademarks of Apple Computer, Incorporated, registered in the United States and
other countries.
UNIX® is a registered trademark of UNIX System Laboratories, Incorporated.
Adobe®, the Adobe logo, Acrobat and Acrobat Reader are trademarks or registered trademarks of Adobe Systems, Incor-
porated, registered in the United States and/or other countries.
Other brands and product names may be trademarks or registered trademarks of their respective holders.
Document Information
Status: v2.0 (August 2006)
Reference: E-DOC-CTC-20051017-0147
Short Title: User’s Guide ST585
(v6) R6.1

Contents
Contents
About this User’s Guide .............................................. 1
1 Getting to know your SpeedTouch™ ......................... 3
1.1 SpeedTouch™ LED Behaviour ........................................................ 4
1.2 Accessing your SpeedTouch™ ....................................................... 6
1.2.1 Access via the Web Interface.......................................................................................... 7
1.2.2 Access via CLI................................................................................................................... 8
1.2.3 Access via FTP................................................................................................................ 10
1.2.4 Remote Assistance ........................................................................................................ 13
2 Local Network Setup .................................................. 15
2.1 Wired Ethernet ............................................................................. 16
2.2 Wireless Ethernet ......................................................................... 17
2.2.1 Wireless Basics .............................................................................................................. 18
2.2.2 Connecting Wireless Clients for the First Time ...........................................................20
2.2.3 Wireless Security ........................................................................................................... 22
2.2.4 Connecting Additional Wireless Clients.......................................................................24
2.2.5 Extending the Range of Your Wirelstess Network......................................................26
3 Internet Connectivity Dial-In Clients ......................... 29
3.1 SpeedTouch™ Web Pages ............................................................ 31
3.2 Internet Gateway Device Control Agent ...................................... 33
E-DOC-CTC-20051017-0147 v2.0
i

Contents
4 SpeedTouch™ Web Interface ....................................35
4.1 Navigation .................................................................................... 36
4.1.1 Menu............................................................................................................................... 37
4.1.2 Language Bar ................................................................................................................. 38
4.1.3 Navigation Bar ............................................................................................................... 39
4.1.4 Notification Area............................................................................................................40
4.1.5 Tasks ...............................................................................................................................41
4.2 Home ............................................................................................ 42
4.3 SpeedTouch ................................................................................. 43
4.3.1 Information.....................................................................................................................44
4.3.2 SpeedTouch™ Easy Setup............................................................................................ 45
4.3.3 Restart.............................................................................................................................46
4.3.4 Configuration ................................................................................................................. 47
4.3.5 Back up & Restore..........................................................................................................48
4.3.6 Reset to Factory Defaults .............................................................................................. 49
4.3.7 Event Logs...................................................................................................................... 50
4.4 Broadband Connection................................................................. 51
4.4.1 Connectivity Check ........................................................................................................52
4.4.2 DSL Connection .............................................................................................................53
4.4.3 Internet Services ............................................................................................................ 54
4.4.4 Internet Service Settings............................................................................................... 55
4.5 Toolbox ........................................................................................ 56
4.5.1 Remote Assistance ........................................................................................................ 57
4.5.2 Game & Application Sharing ........................................................................................58
4.5.3 Defined Games & Applications..................................................................................... 60
4.5.4 Game or Application Definition....................................................................................61
4.5.5 New Game or Application.............................................................................................62
4.5.6 Parental Control ............................................................................................................. 63
4.5.7 Content Level ................................................................................................................. 66
4.5.8 Firewall ...........................................................................................................................67
4.5.9 Intrusion Detection ........................................................................................................70
4.5.10 Dynamic DNS ................................................................................................................. 71
4.5.11 User Management ......................................................................................................... 72
4.5.12 Edit User .........................................................................................................................74
4.5.13 Change Default User......................................................................................................75
4.5.14 Add User......................................................................................................................... 76
ii
E-DOC-CTC-20051017-0147 v2.0

Contents
4.6 Home Network ............................................................................. 77
4.6.1 Devices............................................................................................................................ 79
4.6.2 Device Settings ..............................................................................................................80
4.6.3 Assign Public IP.............................................................................................................. 82
4.6.4 Wireless Device Settings...............................................................................................83
4.6.5 Access Point Settings .................................................................................................... 84
4.6.6 Configuring WDS........................................................................................................... 88
4.6.7 Interfaces ........................................................................................................................89
4.6.8 Interface Settings...........................................................................................................90
4.6.9 DHCP Pool ...................................................................................................................... 91
5 Troubleshooting.......................................................... 93
5.1 General SpeedTouch™ Troubleshooting ...................................... 94
5.1.1 Wired Ethernet Troubleshooting ..................................................................................95
5.1.2 Wireless Ethernet Troubleshooting..............................................................................96
5.2 UPnP™ on Windows XP Systems................................................. 97
5.3 Reset to Factory Defaults ............................................................ 99
E-DOC-CTC-20051017-0147 v2.0
iii

Contents
iv
E-DOC-CTC-20051017-0147 v2.0
About this User’s Guide
About this User’s Guide
Used symbols The following symbols are used in this User’s Guide:
A note provides additional information about a topic.
A tip provides an alternative method or shortcut to perform an action.
A caution warns you about potential problems or specific precautions that
!
need to be taken.
Terminology Generally, the SpeedTouch™585(v6)(i) will be referred to as SpeedTouch™ in this
User’s Guide.
Documentation and
software updates
THOMSON continuously develops new solutions, but is also committed to improve
its existing products.
For suggestions regarding this document, please contact
documentation.speedtouch@thomson.net
For more information on THOMSON's latest technological innovations, documents
and software releases, visit us at: w
.
ww.speedtouch.com.
E-DOC-CTC-20051017-0147 v2.0
1

About this User’s Guide
2
E-DOC-CTC-20051017-0147 v2.0

Getting to know your SpeedTouch™
1 Getting to know your SpeedTouch™
Introduction With the SpeedTouch™585(v6)(i) Wireless Residential ADSL Gateway you can build a
secure home or small office network, seamlessly connecting wired and wireless
devices and surf the Internet at high speed, all combined in one device.
Installation For more information on how to set up, install and wire your SpeedTouch™ and set
up Internet connection, refer to the Installation and Setup Guide.
Configuration This User’s Guide will help you configuring your SpeedTouch™.
Before you begin Before connecting the SpeedTouch™, please read the SpeedTouch™ Quick
Installation Guide and the Safety Instructions and Regulatory Notices.
Chapter 1
E-DOC-CTC-20051017-0147 v2.0
3

Chapter 1
Getting to know your SpeedTouch™
1.1 SpeedTouch™ LED Behaviour
Front panel LEDs The SpeedTouch™ is equipped with a number of LEDs on its front panel, indicating
the state of the device during normal operation.
The following table shows the meaning of the different LEDs.
Indicator Description
Name Colour State
Power Green Solid on Power on, normal operation
Red Solid on Power on, self-test failed, indicating
device malfunction
Orange Solid on Bootloader active
Off Power off
Ethernet Green Blinking Ethernet activity
Solid on Ethernet connection, no activity
Off No Ethernet connection
WLAN Green Blinking Wireless activity, WPA encryption
Solid on No wireless activity, WPA encryption
Amber Blinking Wireless activity, WEP encryption
Solid on No wireless activity, WEP encryption
Red Blinking Wireless activity, no security
Solid on No wireless activity, no security
Red/
green
Off WLAN disabled
4
Toggling Wireless client registration phase
E-DOC-CTC-20051017-0147 v2.0
Getting to know your SpeedTouch™
Indicator Description
Name Colour State
DSL Green Blinking Pending DSL line synchronisation
Solid on DSL line synchronised
Off No DSL line
Internet Green Blinking Internet activity
Solid on Internet connectivity, no activity
Red Solid on Internet connection setup failed
Off No Internet connection
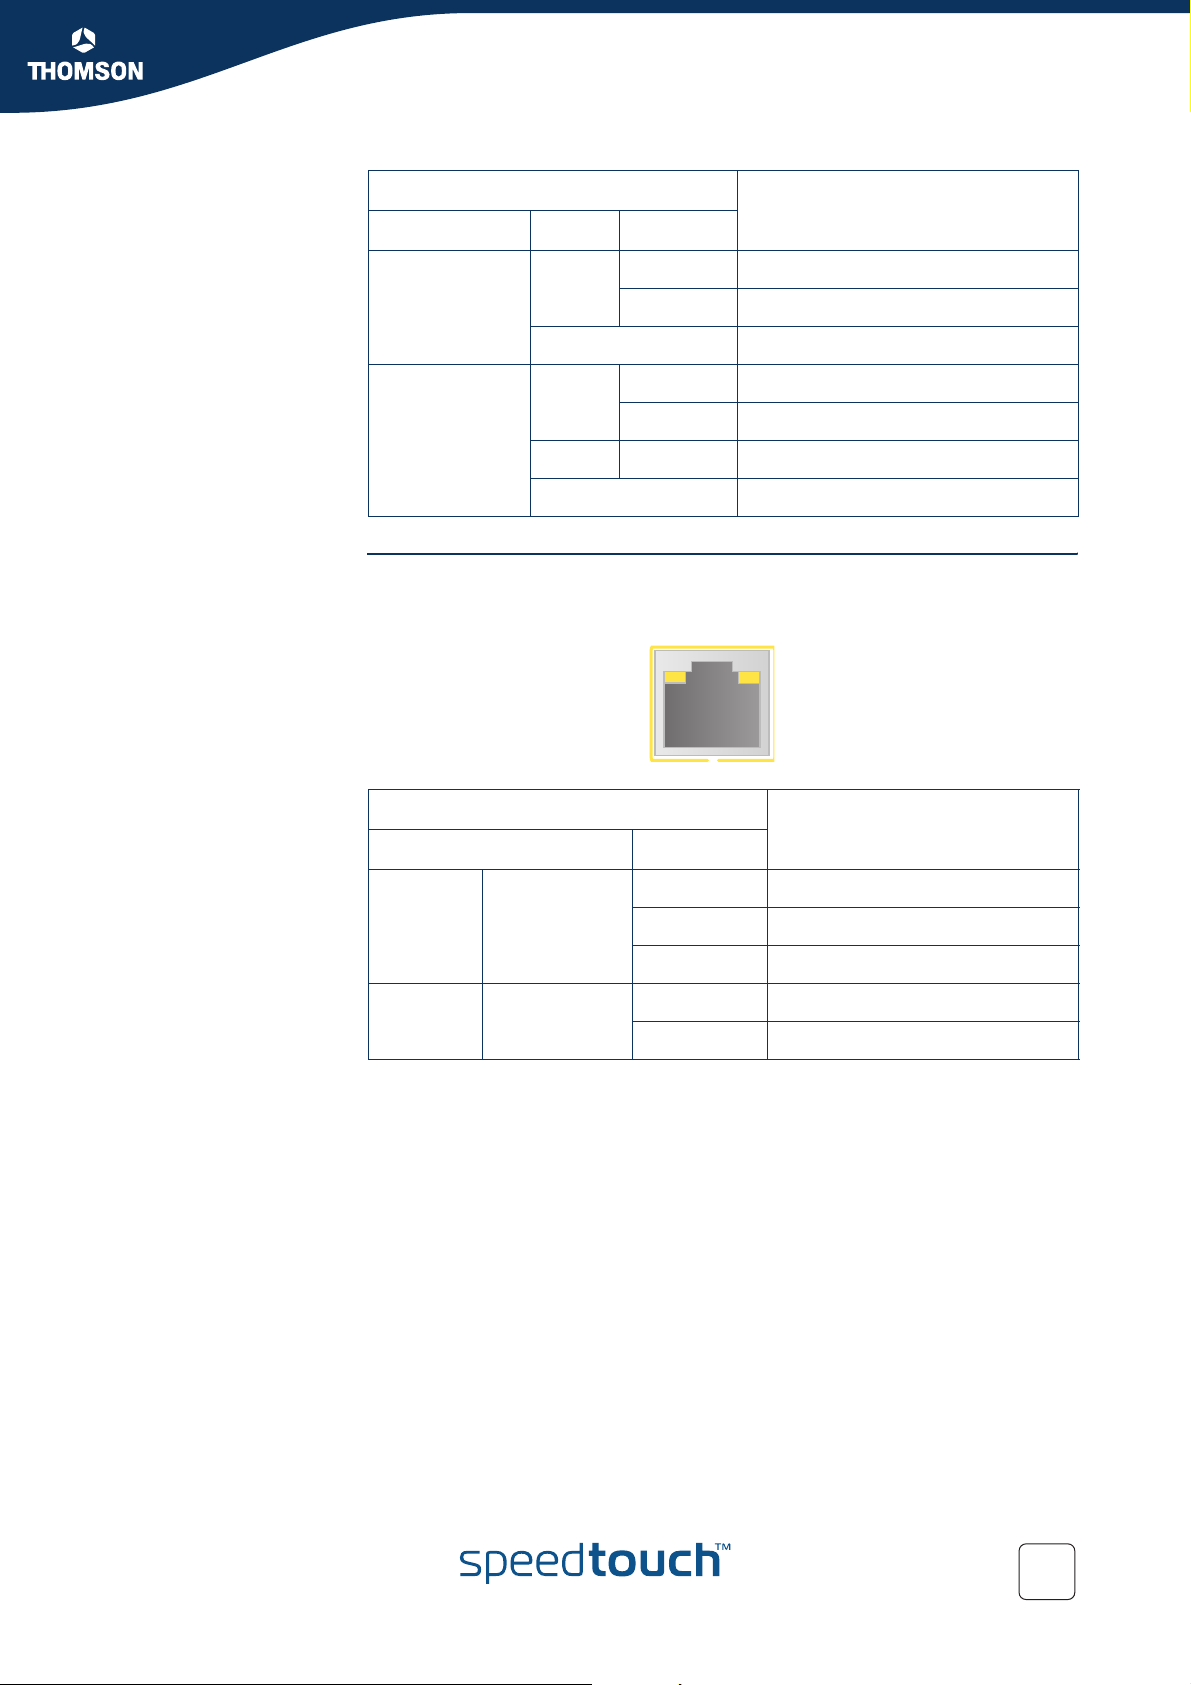
Ethernet LEDs A LED may be provided per Ethernet port to indicate link integrity (or activity).
Depending on the SpeedTouch™ product you are using, a second LED (A) may be
provided to indicate the 10/100Base-T selection:
Chapter 1
AB
Indicator Description
Name LED Status
A
(Optional)
B 10/100Base-T Off 10Base-T Ethernet connection
Integrity
(Activity)
Off No connection on this port
Solid on Ethernet link up
Blinking Data is flowing from/to this port
Solid on 100Base-T Ethernet connection
E-DOC-CTC-20051017-0147 v2.0
5

Chapter 1
Getting to know your SpeedTouch™
1.2 Accessing your SpeedTouch™
Access methods Your SpeedTouch™ is accessible in one of the following ways:
Access Method Can be used to
Web browser Configure your SpeedTouch™ via HTTP or
HTTPS.
For more information, see “1.2.1 Access via
the Web Interface” on page 7.
Command Line Interface (CLI) Fine-tune your SpeedTouch™ configuration.
For more information, see “1.2.2 Access via
CLI” on page 8.
File Transfer Protocol (FTP) Back up and restore data on your
SpeedTouch™.
For more information, see “1.2.3 Access via
FTP” on page 10.
Remote Assistance Allow a remote user to help you configuring
your SpeedTouch™.
For more information, see “1.2.4 Remote
Assistance” on page 13.
6
E-DOC-CTC-20051017-0147 v2.0

1.2.1 Access via the Web Interface
Chapter 1
Getting to know your SpeedTouch™
To access the
SpeedTouch™ via the
Web interface
Proceed as follows:
1 Open a Web browser.
2 In the address bar, type your SpeedTouch™’s IP address or DNS host name
(http://speedtouch.lan or 192.168.1.254 by default)
You can access the pages via HTTP or HTTPS.
For remote assistance the secure version HTTPS is used in
combination with certificates. Simply provide your ISP with the link as
shown, user name and password before he can log on to the pages.
For more information, see “1.2.4 Remote Assistance” on page 13.
The SpeedTouch™ Home page appears, from where you can navigate to all
the configurable aspects of the SpeedTouch™.
For more information on the Web pages, see “4 SpeedTouch™ Web Interface” on
page 35.
E-DOC-CTC-20051017-0147 v2.0
7

Chapter 1
Getting to know your SpeedTouch™
1.2.2 Access via CLI
To access the
SpeedTouch™ via the
Command Line
Interface (CLI)
You can access the Command Line Interface (CLI) via:
A Telnet session
This requires a TCP/IP connection between the host from which the Telnet
session is opened and the SpeedTouch™. Your SpeedTouch™ and the
connected computer must have an IP address in the same subnet.
Quote site commands (over FTP)
For more information, see “ Quote site command” on page 12.
For more information on CLI commands, see the SpeedTouch™ CLI Reference
Guide.
8
E-DOC-CTC-20051017-0147 v2.0
Chapter 1
Getting to know your SpeedTouch™
To start a Telnet
session
Proceed as follows:
1 Open a telnet application.
You can use the Command Prompt window.
In Microsoft Windows XP for instance:
1 On the Windows taskbar, click Start.
2 Select (All) Programs > Accessories > Command Prompt
.
2 Connect to your SpeedTouch™.
In the Command Prompt window:
At the prompt, type
telnet followed by the IP address of your
SpeedTouch™ (192.168.1.254 by default).
3 Enter your SpeedTouch™ security user name and password.
The default user is ‘Administrator’ and the default password is blank.
As soon as you have opened a session to the CLI, the SpeedTouch™ banner is
displayed, followed by the CLI prompt, as shown in the example below.
Username : Administrator
-----------------------------------------------------------------------
* ______ SpeedTouch
* ___/_____/\
* / /\\ Version X.X
* _____/__ / \\
* _/ /\_____/___ \ Copyright (c) 1999-2005,
* // / \ /\ \ THOMSON
* _______//_______/ \ / _\/______
* / /\ \ / // /\
* __/ / \ \ / / / / _\__
* / / / \_______\/ / / / / /\
* /_/______/___________________/ /________/ /___/ \
* \ \ \ ___________ \ \ \ \ \ /
* \_\ \ / /\ \ \ \ \___\/
* \ \/ /\ \\ \/
* \_____/ / \ \ \________\/
* /__________/ \ \ /
* \ _____ \ /_____\/
* \ / /\ \ /___\/
* /____/\\/
* \ \ /___\/
* \____\/
----------------------------------------------------------------------{Administrator}=>
E-DOC-CTC-20051017-0147 v2.0
9
Chapter 1
Getting to know your SpeedTouch™
1.2.3 Access via FTP
To access the
SpeedTouch™ via the
File Transfer Protocol
(FTP)
You can access the file system of the SpeedTouch™ via the File Transfer Protocol
(FTP), in order to:
Restore or back up configuration files, templates or language packs.
Upgrade your configuration or firmware.
File system The SpeedTouch™ file system is stored on non-volatile memory and contains the
SpeedTouch™ software, service template files and (optionally) default setting files.
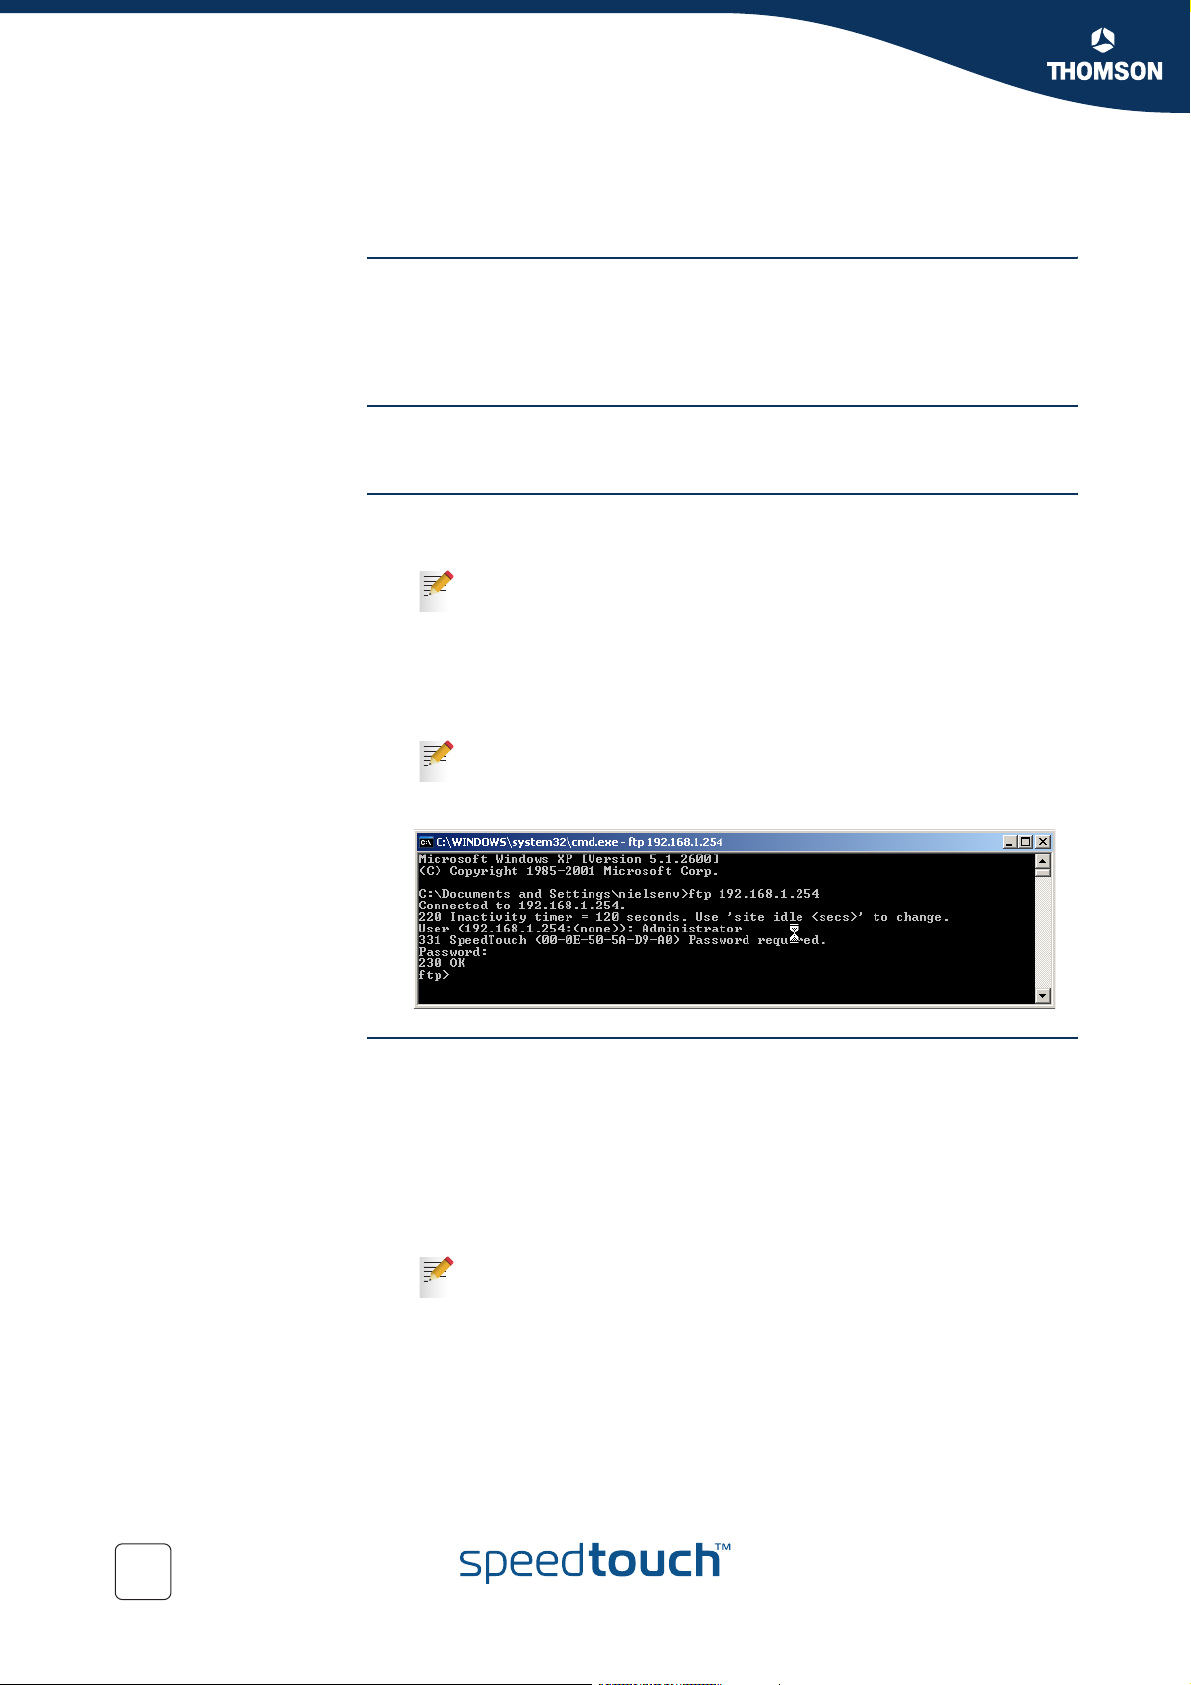
To open an FTP session Proceed as follows:
1 Open a Command Prompt window.
In Microsoft Windows XP for instance:
1 On the Windows taskbar, click Start.
2 Select
2 At the prompt, type ftp followed by the IP address of your SpeedTouch™
(192.168.1.254 by default).
3 Enter your SpeedTouch™ security user name and password.
The default user is ‘Administrator’ and the default password is blank.
The example below shows an FTP session to the SpeedTouch™ file system.
(
All) Programs > Accessories > Command Prompt
.
File system structure The structure of the file system is very simple: it consists of a single root directory
called root and two subdirectories called active and dl (download).
The root directory contains:
all the necessary files for the SpeedTouch™ to start correctly
the active and the dl directories
The active directory contains the active software image.
The dl directory contains the passive software image.
If you made changes to the SpeedTouch™ configuration and saved
them, a user.ini configuration settings file is created in the dl
subdirectory.
10
E-DOC-CTC-20051017-0147 v2.0

Chapter 1
Getting to know your SpeedTouch™
File system access
rights
Common FTP
commands
In the different directories you have the following rights:
Directory Access rights
root NO read/write
active read-only
dl read/write
Depending on the access rights you have in a directory, you can use one of the
following commands:
Use the
to ...
command ...
cd access another directory than the one currently open.
Example: ftp>cd dl.
dir list the directory files.
Example: ftp>dir.
bin set the transfer mode to ‘binary’.
hash turn on the hashing option.
put upload files.
Example: ftp>put C:/MyBackupFiles/user.ini.
A configuration file must be uploaded to the dl directory.
get download files.
Example: ftp>get user.ini.
Downloading the configuration file must be done from the dl
directory.
delete delete files.
bye quit FTP.
E-DOC-CTC-20051017-0147 v2.0
11
Chapter 1
Getting to know your SpeedTouch™
FTP file transfer To allow correct file transfers, set the transfer mode to “binary”: at the ftp prompt,
bin and press ENTER.
type
Turn on the hashing option to see the progression of the file transfer: At the
ftp prompt, type
hash and press ENTER.
Example.
/home/doejohn{1}$ftp 192.168.1.254
Connected to 192.168.1.254
220 Inactivity timer = 120 seconds. Use 'site idle <secs>' to change.
Name (192.168.1.254:doejohn):
331 SpeedTouch™ (00-90-D0-01-02-03) User 'doejohn' OK. Password requir
ed.
Password : ######
330 OK
ftp>
ftp>bin
200 TYPE is now 8-bit binary
ftp>
ftp>hash
200Hash mark printing on (8192 bytes/hash mark).
ftp>cd dl
250 Changed to /dl
ftp>put C:\user.ini
200 Connected to 192.168.1.10 port 1271
150 Opening data connection for user.ini
226 File written successfully
ftp: 256 bytes sent in 0,000Seconds 256000,000Kbytes/sec.
ftp>
Quote site command All the CLI commands can be executed from within an FTP session. Only complete
CLI commands (in other words, the complete command syntax with all the
parameters already specified) can be executed.
Example: To execute the CLI command
currently assigned to SpeedTouch™ interfaces, at the FTP prompt, type ‘quote site
ip iplist’ and press ENTER.
ftp> quote site ip iplist
200- Interface Type IP-address Point-to-point/Mask
200- 2 LocalNetwork Ethernet 10.0.0.138 255.255.255.0
200- 2 LocalNetwork Ethernet *192.168.1.254 255.255.255.0
200- 1 Internet Serial 81.240.198.191 81.240.198.1
200- 0 loop Internal 127.0.0.1 255.255.255.255
200200 CLI command "ip iplist" executed
ftp>
For more information on CLI commands, see the SpeedTouch™ CLI Reference
Guide.
:ip iplist to list all IP addresses
12
E-DOC-CTC-20051017-0147 v2.0
1.2.4 Remote Assistance
Chapter 1
Getting to know your SpeedTouch™
To access the
SpeedTouch™ remotely
To enable remote
access
To disable remote
access
You can make your SpeedTouch accessible from the Internet with regard to remote
support. In this way, you can allow your help desk to access your SpeedTouch™
remotely.
Proceed as follows:
1 Go to the SpeedTouch™ pages, as described in “1.2.1 Access via the Web
Interface” on page 7.
2 In the menu, select Toolbox > Remote Assistance.
3 Click Enable Remote Assistance.
4 Provide the following parameters to your help desk:
URL (the HTTPS link)
User name
Password
Your ISP is now able to access your SpeedTouch™ via the HTTPS link in
combination with the provided certificate (a secure authentication
mechanism).
For security reasons, remote assistance will be automatically disabled after
20 minutes of inactivity, or after restarting your SpeedTouch™.
Proceed as follows:
1 Go to the SpeedTouch™ pages, as described in “1.2.1 Access via the Web
Interface” on page 7.
2 In the menu, select Toolbox > Remote Assistance.
3 Click Disable Remote Assistance.
E-DOC-CTC-20051017-0147 v2.0
13

Chapter 1
Getting to know your SpeedTouch™
14
E-DOC-CTC-20051017-0147 v2.0

Local Network Setup
2 Local Network Setup
Introduction The SpeedTouch™ offers you the following local networking solutions:
Wired Ethernet
Wireless Ethernet
Device settings Once you have connected a device, you can personalise its settings. For more
information, see “ Configure” on page 81.
Chapter 2
E-DOC-CTC-20051017-0147 v2.0
15

Chapter 2
Local Network Setup
2.1 Wired Ethernet
Local network The Ethernet ports on the back panel allow you to connect the SpeedTouch™ to an
existing 10 or 100Base-T Ethernet network or one (or more) computer(s) with an
installed Ethernet card.
Using the SpeedTouch™ Ethernet switch, you can create a local Ethernet network of
up to four devices, without needing extra networking devices.
In the SpeedTouch™ package, a yellow full-wired straight-through RJ-45/
RJ-45 Ethernet cable is included.
Standard wiring
procedure
Use the yellow Ethernet cable provided to wire your computer's Ethernet port to
one of the SpeedTouch™'s Ethernet ports.
The Ethernet cable can also be used to wire an Ethernet port of your
SpeedTouch™ to any external Ethernet hub or switch.
Please follow the installation instructions supplied with the external hub or
switch for connections and Ethernet cabling.
Ethernet link check LED indicators allow you to check your Ethernet. See “1.1 SpeedTouch™ LED
Behaviour” on page 4 for more information.
Device settings Once you have connected a device, you can personalise its settings.
For more information, see “ Device settings” on page 15.
Managed Ethernet
switch
Your SpeedTouch™ intelligently switches data between the devices on your LAN,
using priority queuing to ensure that higher priority messages are delivered first
and in real time. This feature maximizes your network performance.
The managed Ethernet switch allows you to configure a Virtual Local Area Network
(VLAN), group ports or isolate a port, configure secure channel connections, define
Quality of Service (QoS), and configure port mirroring, allowing monitoring from
one port to another.
You can configure the managed Ethernet switch manually using CLI (For more
information, see the SpeedTouch™ CLI Reference Guide).
16
E-DOC-CTC-20051017-0147 v2.0

Local Network Setup
2.2 Wireless Ethernet
Introduction The SpeedTouch™ Wi-Fi® certified IEEE 802.11g compliant wireless access point
allows multiple computers to connect wirelessly to your local network over the
SpeedTouch™ Wireless LAN environment. The SpeedTouch™ is backward
compatible with IEEE 802.11b, which means 802.11b and 802.11g devices can
coexist in the same wireless network.
The Wireless Distribution System (WDS) on your SpeedTouch™ allows you to
extend the range of your wireless network. To be able to use WDS, you will need to
introduce an additional WDS-enabled access point into your wireless network.
To be able to connect the computers, make sure that a wireless client adapter
(WLAN client) is installed on each computer you want to connect via the WLAN.
Chapter 2
Wireless client
requirements
All wireless client adapters compliant to 802.11g and/or 802.11b can communicate
with the SpeedTouch™ and other members of the SpeedTouch™ (W)LAN
environment. However, be aware that only 802.11g compliant wireless clients are
able to gain full profit of the 54 Mb/s (Max) bandwidth delivered by the
SpeedTouch™.
It is highly recommended to use only wireless client adapters that are Wi-Fi™
certified to ensure smooth interoperability with the SpeedTouch™’s WLAN.
E-DOC-CTC-20051017-0147 v2.0
17
Chapter 2
Local Network Setup
Wireless Fidelity The Wi-Fi certification ensures that your SpeedTouch™ will interoperate with any
Network Name or SSID The WLAN's 'radio' link is a shared medium. As no physical connection exists
2.2.1 Wireless Basics
802.11b/g 802.11b is an IEEE standard, operating at 2,4 GHz at a speed of up to 11 Mb/s.
802.11g, a newer IEEE standard also operating at 2,4 GHz, gives you up to 54
Mb/s speed, more security and better performance.
Wi-Fi certified 802.11g and 802.11b compliant wireless device.
Access Point The SpeedTouch™ Wireless LAN Access Point (AP) behaves as a networking hub
allowing to wirelessly interconnect several devices to the local (W)LAN and to
provide access to the Internet.
between the SpeedTouch™ and wireless clients, a name must be given to allow
unique identification of your WLAN radio link. This is done by the Service Set ID
(SSID), also referred to as Network Name. Wireless clients must be part of this SSID
environment in order to be able to communicate with other clients on the (W)LAN including the SpeedTouch™.
Radio channels The 802.11g standard allows several WLAN networks using different radio channels
to be co-located. The SpeedTouch™ supports multiple radio channels and is able to
select the best radio channel at each startup.
You can choose to set the channels automatically or manually.
The different channels overlap. To avoid interference with another access
point, make sure that the separation (in terms of frequency) is as high as
possible. It is recommended to keep at least 3 channels between 2 different
access points.
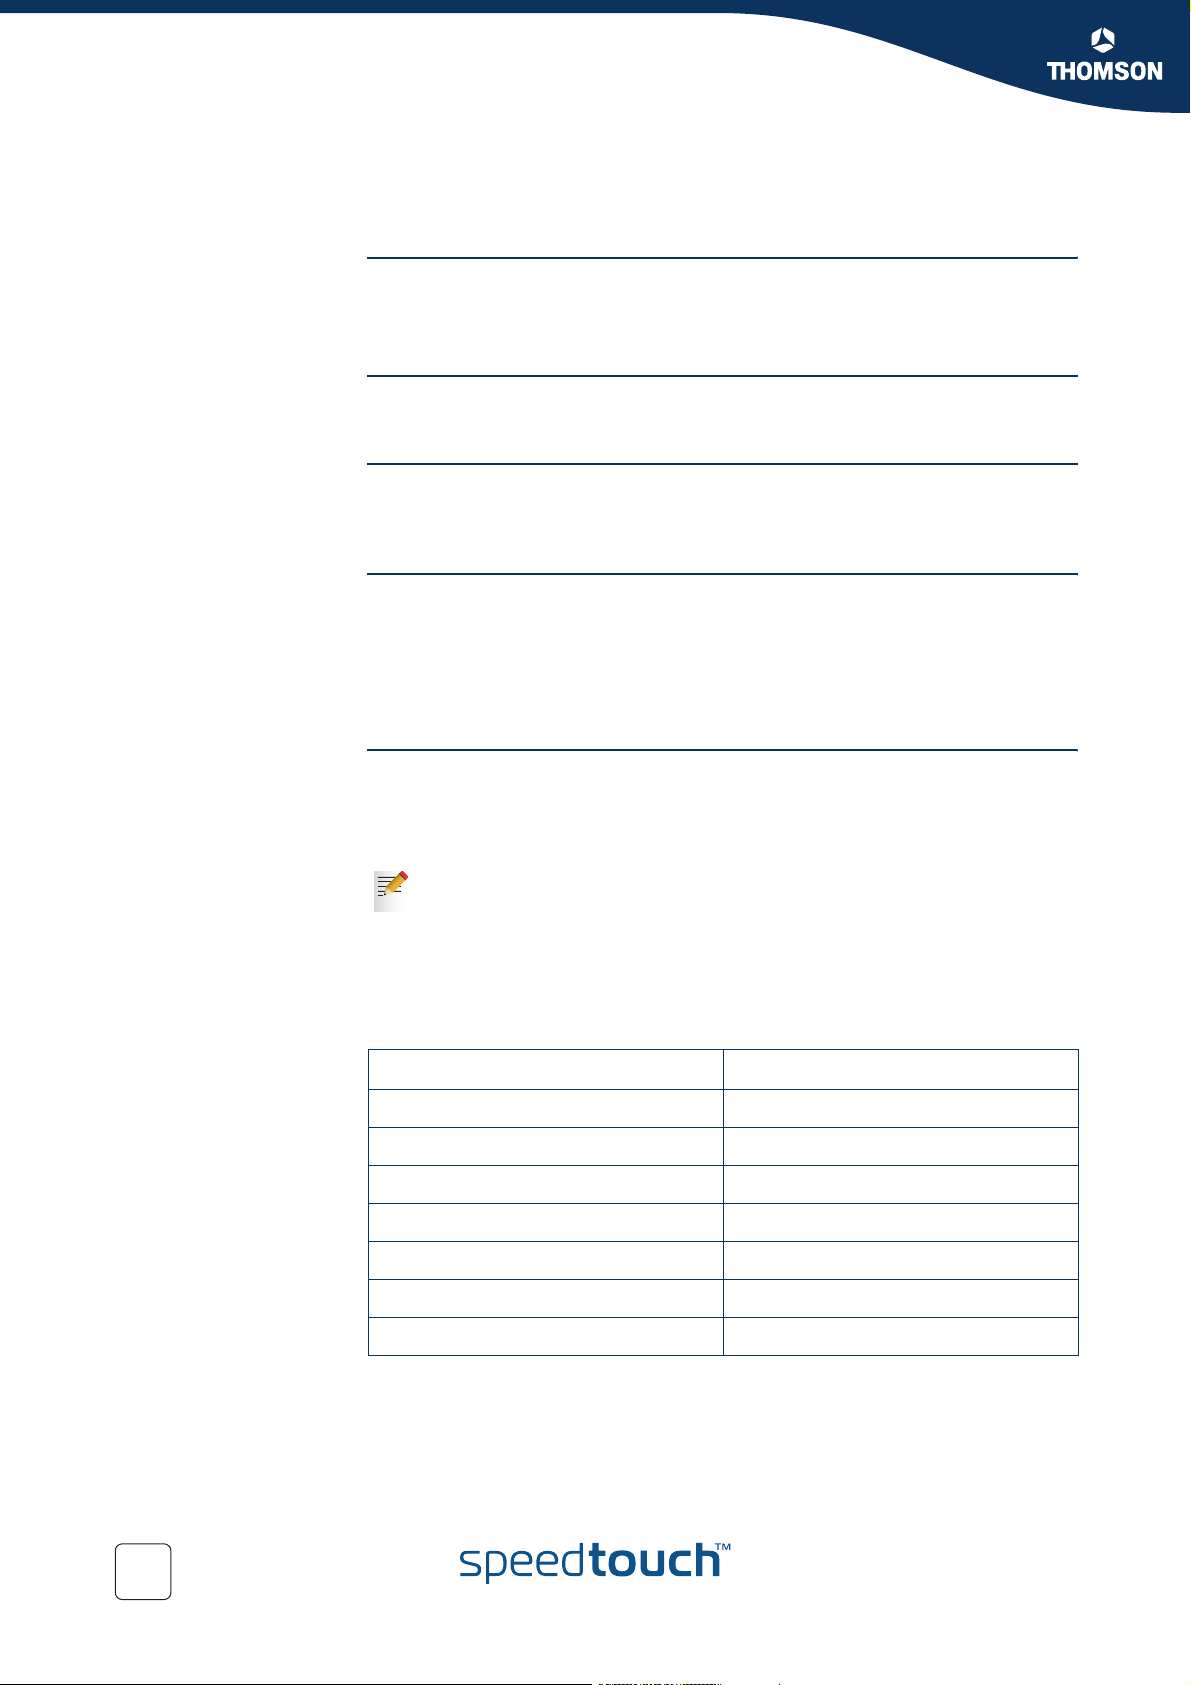
The SpeedTouch™ supports all channels allowed for wireless networking. However,
depending on local regulations, the number of channels actually allowed to be used
may be additionally restricted, as shown in the table below.
Regulatory Domain Allowed Radio Channels
China 1 to 13
Europe 1 to 13
Israel 5 to 8
Japan 1 to 14
Jordan 10 to 13
Thailand 1 to 14
USA / Canada 1 to 11
18
E-DOC-CTC-20051017-0147 v2.0

Chapter 2
Local Network Setup
Antennas Direct the external antenna to allow optimization of the wireless link. If for example
the antenna is erect, wireless links in the horizontal plane are favoured. Please note
that the antenna characteristics are influenced by the environment, that is by
reflections of the radio signal against walls or ceilings. It is advisable to use the
received signal strength as indicated by the wireless client manager to optimize the
antenna position for the link to a given client.
Concrete walls weaken the radio signal and thus affect the connection.
E-DOC-CTC-20051017-0147 v2.0
19

Chapter 2
Local Network Setup
2.2.2 Connecting Wireless Clients for the First Time
Wireless default
settings
To prepare wireless
clients for the first time
After every Reset-to-Defaults, the SpeedTouch™ wireless access point
configuration is returned to its initial default settings.
These default settings are:
Security level is low (security disabled) for an easy first use, meaning the data
will not be encrypted. Wireless security settings are described in
“2.2.3 Wireless Security” on page 22.
This default network name (SSID) is printed on the identification label located
on the bottom of your SpeedTouch™ and is unique for each device. It consists
of the concatenation of the word “SpeedTouch” and 6 hexadecimal
characters, without any spaces, for example SpeedTouch123456.
The SpeedTouch™ is broadcasting its network name (SSID).
The radio channel number is set to ‘automatically scan for the best radio
channel’.
Registration is not activated. New stations are allowed automatically. The
Access Control List is open and empty. No wireless client will be denied access
to the SpeedTouch™ based on its physical hardware address.
The default wireless settings may differ from the settings listed above
!
depending on your Service Provider’s requirements. If this is the case, refer
to the installation/configuration instructions provided by your Service
Provider.
Make sure that:
The SpeedTouch™ is turned on and ready for service.
The SpeedTouch™ is in its default configuration.
If necessary, reset the SpeedTouch™ to its default configuration (See
“5.3 Reset to Factory Defaults” on page 99 for more information).
A wireless client adapter is installed on your computer.
The wireless client adapter’s IP configuration is set to dynamically obtain its IP
configuration (DHCP) - this is usually the default. For more information, see
the documentation of your wireless client adapter.
To configure wireless
clients for the first time
20
The wireless client must be correctly configured for the default network name. As
the SpeedTouch™ broadcasts its network name to the wireless clients, you can
select the SpeedTouch™ wireless network from a list of available networks.
Depending on your wireless client a wireless icon may become green or a message
similar to the following may appear: “Successfully joined Wireless network
SpeedTouch123456”.
Some wireless clients do not automatically join a wireless network. If so,
follow the instructions for the wireless client software to initiate association.
E-DOC-CTC-20051017-0147 v2.0
Chapter 2
Local Network Setup
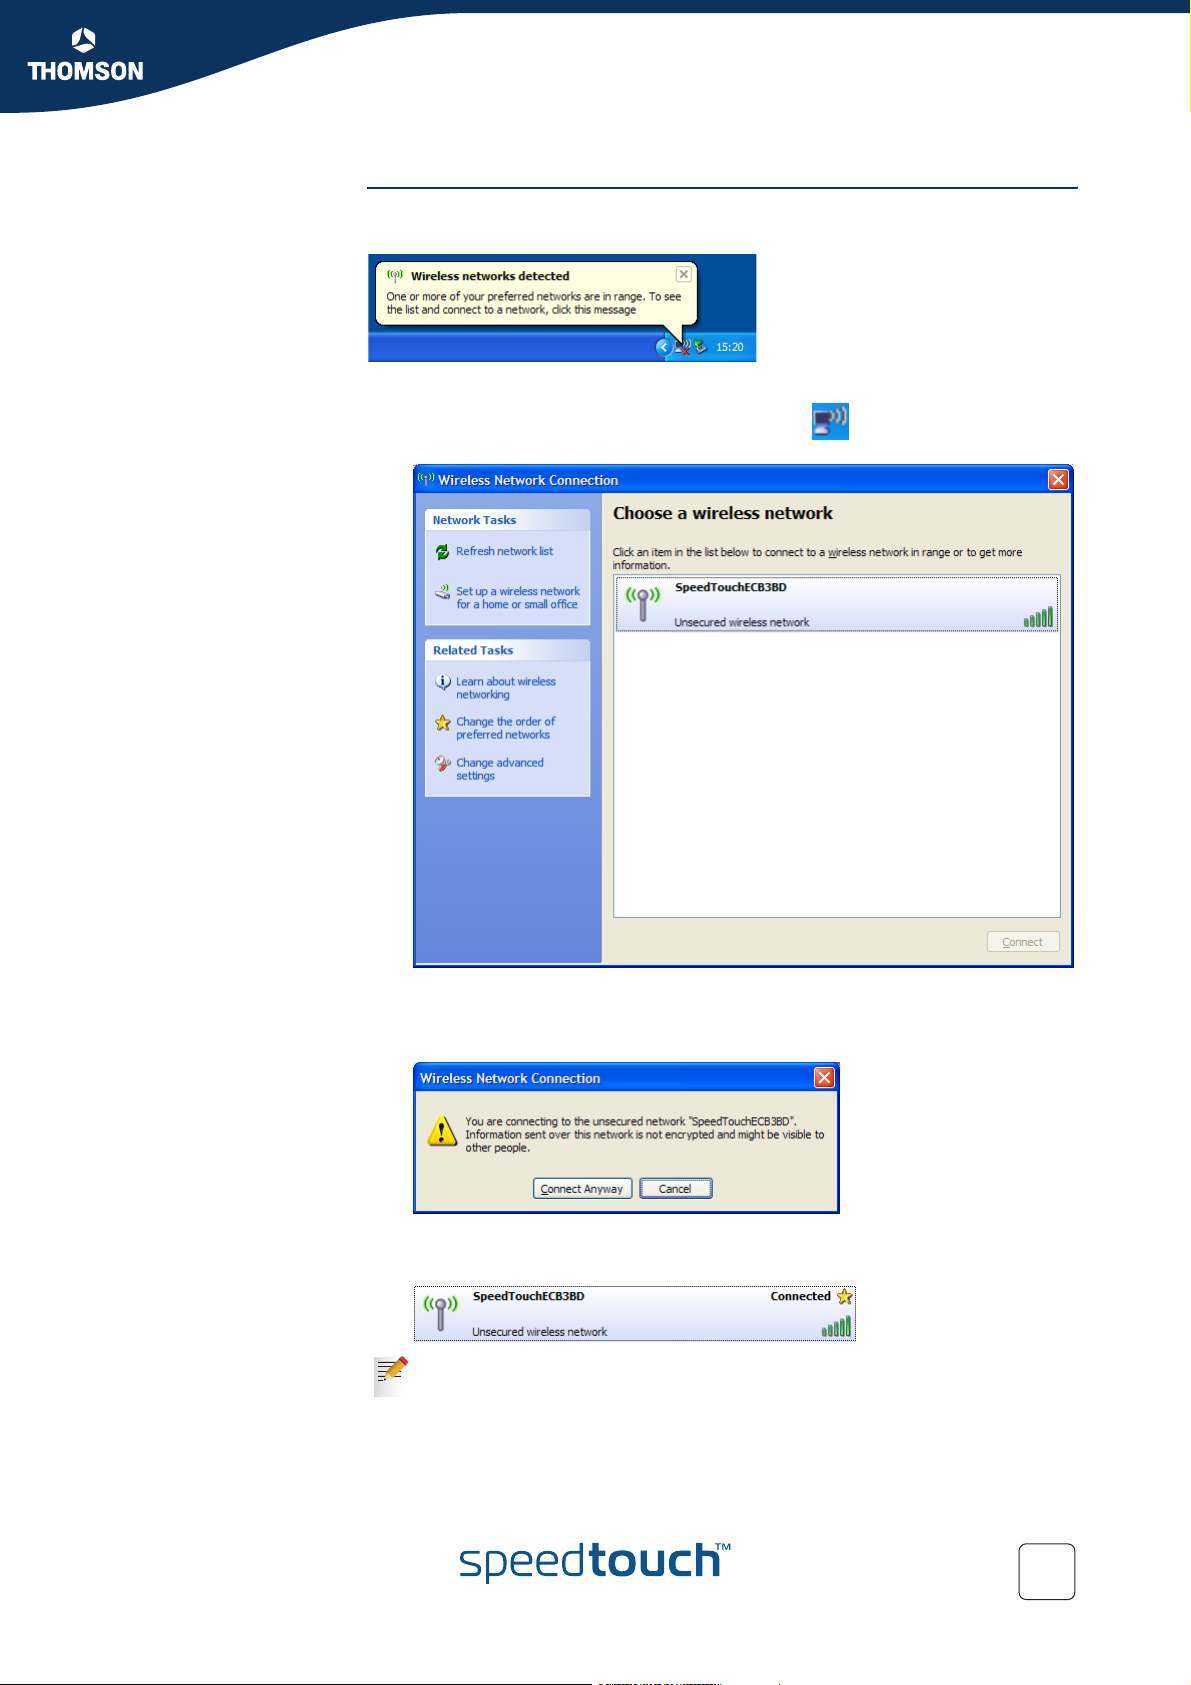
First-time association
example
The example below shows how the SpeedTouch™ wireless network is presented
towards a Windows XP Service Pack 2 system.
Proceed as follows to associate your wireless client to the SpeedTouch™:
1 Click the network icon in the notification area:
The Wireless Network Connection window appears:
E-DOC-CTC-20051017-0147 v2.0
2 In the Choose a wireless network list, select the SpeedTouch™ wireless
network and click Connect.
The following window appears:
3 Click Connect Anyway.
Your computer is now connected to the SpeedTouch™ wireless network.
For other Operating Systems the wireless client will in most cases be
configured via dedicated client managers.
21
Chapter 2
Local Network Setup
Security settings To personalise the wireless security settings on your SpeedTouch™:
2.2.3 Wireless Security
Introduction Since the SpeedTouch™ wireless environment is a radio environment, precautions
must be taken to ensure that your wireless network is safe from malicious intruders.
To secure your wireless network, the following wireless access point settings can be
personalised:
Your Network Name (SSID)
ACL setting
Data encryption
1 Go to the SpeedTouch™ Web pages.
2 In the menu, select Home Network.
3 Click your WLAN.
4 In the upper right corner, click Configure.
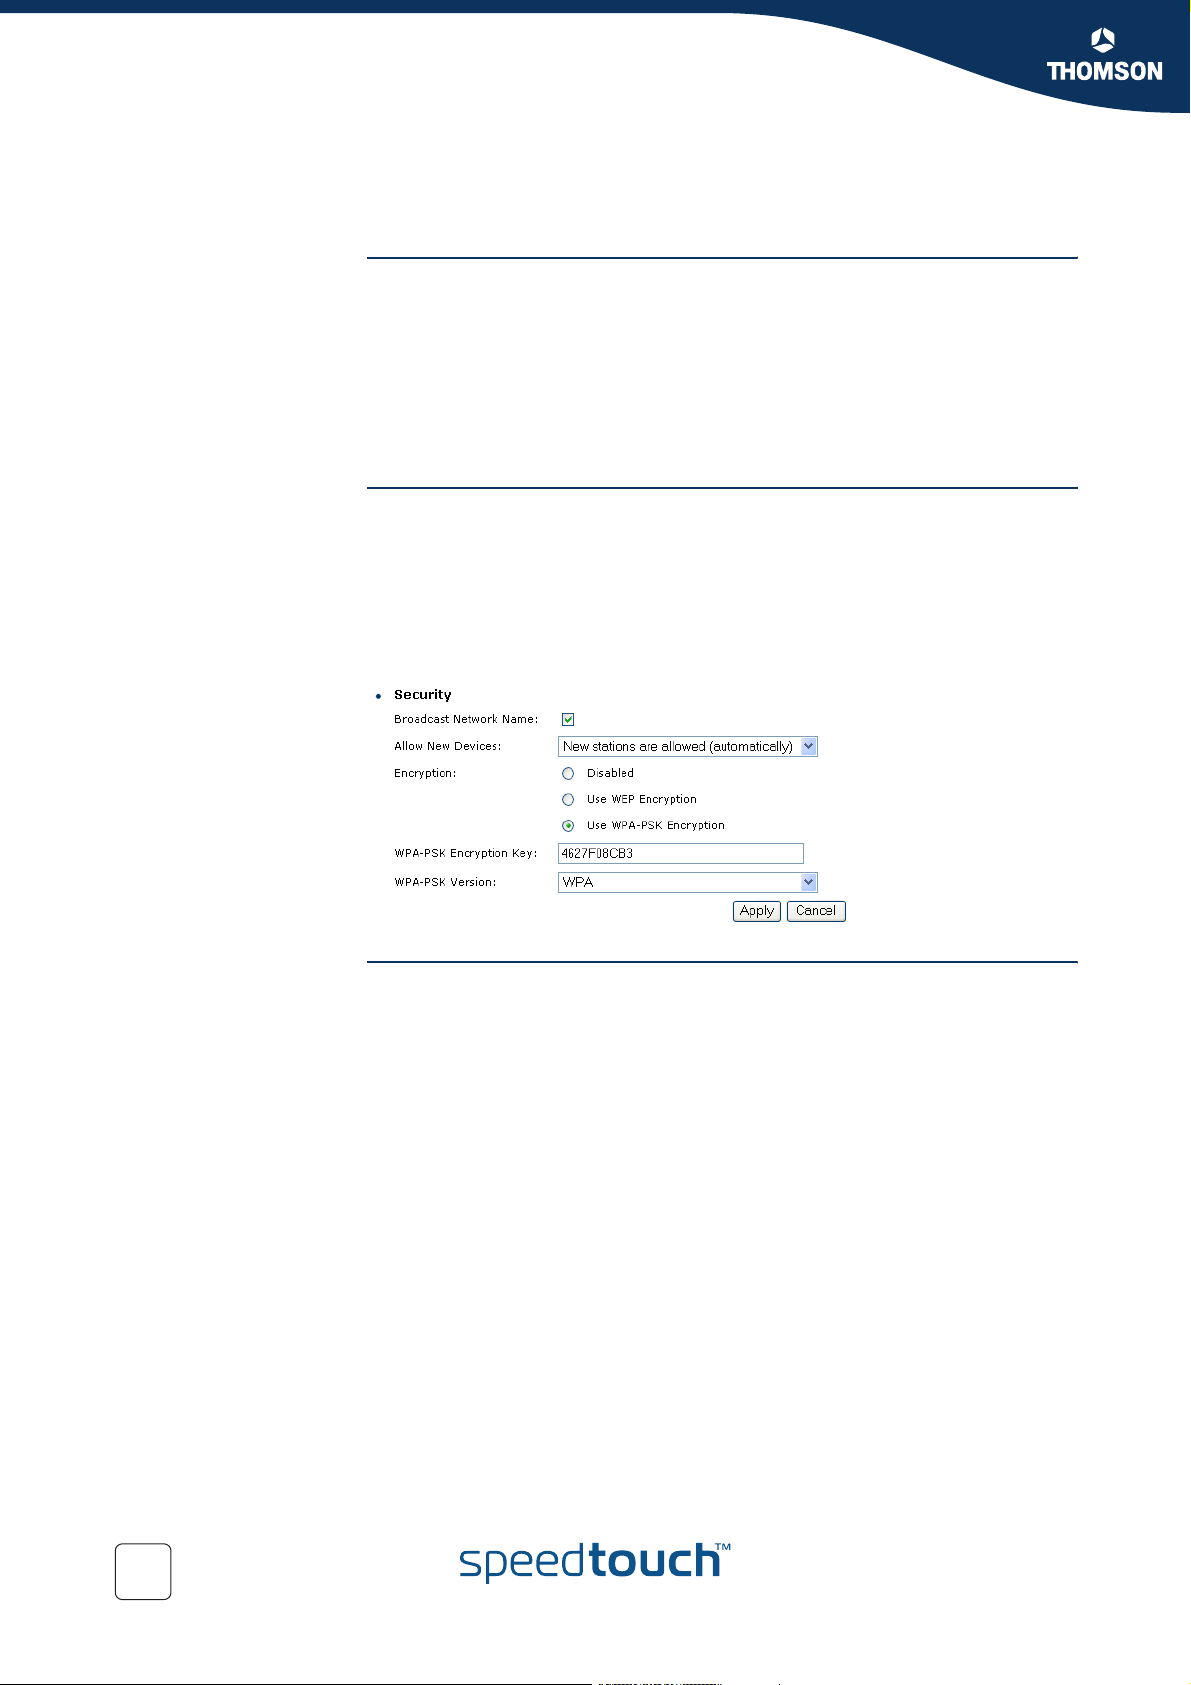
5 On the Wireless Access Point page, you can modify the Security settings.
Network Name (SSID) On the Wireless Access Point page, you can give a new name to your Network
Name (SSID).
Under Security, you can clear Broadcast Network Name (SSID), to prohibit the
Network Name from being broadcast.
22
E-DOC-CTC-20051017-0147 v2.0
Loading...