


D01054920B
DP-004
Portable
4-Track Digital
Pocketstudio
This device has a serial number located on the bottom panel. Please record it and retain it for your records.
Serial number:
__________________
OWNER'S MANUAL

IMPORTANT SAFETY PRECAUTIONS
1Read these instructions.
2Keep these instructions.
3Heed all warnings.
4Follow all instructions.
5Do not use this apparatus near water.
6Clean only with dry cloth.
7Do not block any ventilation openings. Install in accordance with the manufacturer's instructions.
8Do not install near any heat sources such as radiators, heat registers, stoves, or other apparatus (including amplifiers) that produce heat.
9Do not defeat the safety purpose of the polarized or grounding-type plug. A polarized plug has two blades with one wider than the other. A grounding type
plug has two blades and a third grounding prong. The wide blade or the third prong are provided for your safety. If the provided plug does not fit into your outlet, consult an electrician for replacement of the obsolete outlet.
10Protect the power cord from being walked on or pinched particularly at plugs, convenience receptacles, and the point where they exit from the apparatus.
11Only use attachments/accessories specified by the manufacturer.
12Use only with the cart, stand, tripod, bracket, or table specified by the manufacturer, or sold with the apparatus. When a cart is used, use caution when moving the cart/apparatus combination to avoid injury from tip-over.
13Unplug this apparatus during lightning storms or when unused for long periods of time.
14Refer all servicing to qualified service personnel. Servicing is required when the apparatus has been damaged in any way, such as power-supply cord or plug is damaged, liquid has been spilled or objects have fallen into the apparatus, the apparatus has been exposed to rain or moisture, does not operate normally, or has been dropped. Do not expose this apparatus to drips or splashes.
••Do not place any objects filled with liquids, such as vases, on the apparatus.
••Do not install this apparatus in a confined space such as a book case or similar unit.
••The apparatus should be located close enough to the AC outlet so that you can easily grasp the power cord plug at any time.
••The main plug is used as the disconnect device; the disconnect device should remain readily operable.
••An apparatus with Class I construction shall be connected to an AC outlet with a protective grounding connection.
••Batteries (battery pack or batteries installed) should not be exposed to excessive heat such as sunshine, fire or the like.
••Excessive sound pressure from earphones and headphones can cause hearing loss.
••This product uses batteries. Misuse of batteries could cause a leak, rupture or other trouble. Always abide by the following precautions when using batteries.
••Never recharge non-rechargeable batteries. The batteries could rupture or leak, causing fire or injury.
••When installing batteries, pay attention to the polarity indications (plus/minus (+/–) orientation), and install them correctly in the battery case as indicated. Putting them in backward could make the batteries rupture or leak, causing fire, injury or stains around them.
••When throwing used batteries away, follow the disposal instructions indicated on the batteries and the local disposal laws.
••Do not use batteries other than those specified. Do not mix and use new and old batteries or different types of batteries together. The batteries could rupture or leak, causing fire, injury or stains around them.
••Do not carry or store batteries together with small metal objects. The batteries could short, causing leak, rupture or other trouble.
••Do not heat or disassemble batteries. Do not put them in fire or water. Batteries could rupture or leak, causing fire, injury or stains around them.
••If the battery fluid leaks, wipe away any fluid on the battery case before inserting new batteries. If the battery fluid gets in an eye, it could cause loss of eyesight. If fluid does enter an eye, wash it out thoroughly with clean water without rubbing the eye and then consult a doctor immediately. If the fluid gets on a person’s body or clothing, it could cause skin injuries or burns. If this should happen, wash it off with clean water and then consult a doctor immediately.
2 TASCAM DP-004

IMPORTANT SAFETY INSTRUCTIONS
••The unit power should be off when you install and replace batteries.
••Remove the batteries if you do not plan to use the unit for a long time. Batteries could rupture or leak, causing fire, injury or stains around them. If the battery fluid leaks, wipe away any fluid on the battery case before inserting new batteries.
FOR U.S.A.
TO THE USER
This equipment has been tested and found to comply with the limits for a Class B digital device, pursuant to Part 15 of the FCC Rules. These limits are designed to provide reasonable protection against harmful interference in a residential installation. This equipment generates, uses, and can radiate radio frequency energy and, if not installed and used in accordance with the instruction manual, may cause harmful interference to radio communications. However, there is no guarantee that interference will not occur in a particular installation. If this equipment does cause harmful interference to radio or television reception, which can be determined by turning the equipment off and on, the user is encouraged to try to correct the interference by one or more of the following measures.
a)Reorient or relocate the receiving antenna.
b)Increase the separation between the equipment and receiver.
c)Connect the equipment into an outlet on a circuit different from that to which the receiver is connected.
d)Consult the dealer or an experienced radio/TV technician for help.
CAUTION
Changes or modifications to this equipment not expressly approved by TEAC CORPORATION for compliance could void the user's authority to operate this equipment.
|
|
Declaration of Conformity |
Model Number |
: DP-004 |
|
Trade Name : TASCAM |
||
Responsible party |
: TEAC AMERICA, INC. |
|
Address |
: 7733 Telegraph Road, Montebello, |
|
|
California, U.S. A. |
|
Telephone number |
: 1-323-726-0303 |
|
This device complies with Part 15 of the FCC Rules. Operation is subject to the following two conditions: (1) this device may not cause harmful interference, and (2) this device must accept any interference recieved, including interference that may cause undesired operation.
TASCAM DP-004 3
IMPORTANT SAFETY PRECAUTIONS
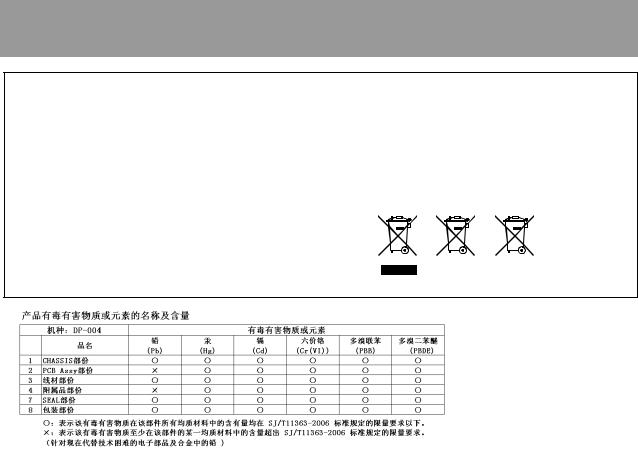
Information for Users on Collection and Disposal of Old Equipment and used Batteries
These symbols on the products, packaging, and/or accompanying documents mean that used electrical and electronic products and batteries should not be mixed with general household waste. For proper treatment, recovery and recycling of old products and used batteries, please take them to applicable collection points, in accordance with your national legislation and the Directives 2002/96/EC and 2006/66/EC.
By disposing of these products and batteries correctly, you will help to save valuable resources and prevent any potential negative effects on human health and the environment which could otherwise arise from inappropriate waste handling.
For more information about collection and recycling of old products and batteries, please contact your local municipality, your waste disposal service or the point of sale where you purchased the items.
Information on Disposal in other Countries outside the European Union
These symbols are only valid in the European Union. If you wish to discard these items, please contact your local authorities or dealer and ask for the correct method of disposal.
Note for the battery symbol (bottom right two symbol examples)
This symbol might be used in combination with a chemical symbol. In this case it complies with the requirement set by the Directive for the chemical involved.
Pb
4 TASCAM DP-004

1–Introduction...................................................................... |
8 |
Overview of this unit............................................................ |
8 |
About this manual................................................................ |
8 |
Manual conventions............................................................... |
8 |
Product parts......................................................................... |
9 |
Trademarks............................................................................ |
9 |
About SD cards................................................................... |
10 |
Precautions for use............................................................... |
10 |
Beware of condensation.................................................... |
10 |
Cleaning the unit................................................................ |
10 |
2–Quick Start Guides...................................................... |
11 |
QSG 1–Playback and mixing ............................................. |
11 |
Preparing to listen to the demo song..................................... |
11 |
Playing and mixing the demo song....................................... |
13 |
Shutting down the unit.......................................................... |
15 |
QSG 2–Recording and mastering ..................................... |
15 |
Connecting and setting the input sources.............................. |
15 |
Loading a song file................................................................ |
17 |
Setting the guitar as track 1 recording source....................... |
18 |
Adjusting the input level and monitoring.............................. |
18 |
Recording guitar to track 1................................................... |
19 |
Listening to your recording................................................... |
20 |
Adding another recording (1)—record guitar to track 2........ |
21 |
Adding another recording (2)—record vocals on track 3...... |
22 |
Mixing the tracks................................................................. |
24 |
Mastering the mix................................................................ |
25 |
Shutting down the unit......................................................... |
27 |
Table of Contents |
|
3–Names and Functions of Parts.......................... |
28 |
Top panel............................................................................. |
28 |
Front panel........................................................................... |
31 |
Rear panel............................................................................ |
31 |
Right side panel.................................................................. |
32 |
Left side panel..................................................................... |
32 |
Bottom................................................................................. |
33 |
4–Preparations................................................................... |
34 |
Preparing the power and SD card.................................... |
34 |
Installing an SD card............................................................. |
34 |
Preparing the power............................................................. |
35 |
Installing batteries................................................................ |
35 |
Connecting an AC adapter (sold separately)......................... |
36 |
Start-up & shutdown.......................................................... |
36 |
Starting up the unit.............................................................. |
36 |
Shutting down..................................................................... |
37 |
Formatting SD cards........................................................... |
38 |
Display screens.................................................................... |
39 |
Home Screen........................................................................ |
39 |
Screen Organization............................................................. |
40 |
Using the screens................................................................. |
41 |
Editing names...................................................................... |
43 |
Recorder modes ................................................................. |
44 |
Connecting with other equipment................................... |
45 |
Rear panel connections........................................................ |
45 |
Right side panel connections................................................ |
45 |
Left side panel connections.................................................. |
46 |
Setting the contrast............................................................ |
46 |
TASCAM DP-004 5

Table of Contents |
|
5–Song Management.................................................... |
47 |
Partitions and songs........................................................... |
47 |
Selecting the active partition............................................ |
47 |
Loading a saved song........................................................ |
48 |
Creating a new song.......................................................... |
49 |
Saving a song...................................................................... |
49 |
Viewing song information ................................................ |
50 |
Copying songs...................................................................... |
51 |
Erasing songs...................................................................... |
52 |
Protecting songs................................................................. |
53 |
6–Basic Recording............................................................ |
54 |
Selecting the input source................................................. |
54 |
Monitoring the input signal.............................................. |
55 |
Setting the monitoring mode................................................ |
55 |
About the OL indicators and meters................................ |
56 |
Assigning input channels................................................... |
57 |
Making the first recording................................................. |
58 |
Overdubbing........................................................................ |
60 |
Setting up to overdub........................................................... |
61 |
Rehearsal ............................................................................ |
61 |
Recording an overdub.......................................................... |
62 |
Mixdown.............................................................................. |
62 |
Level and balance................................................................. |
62 |
Stereo position (panning)..................................................... |
62 |
Mastering............................................................................. |
62 |
Setting the end point............................................................ |
63 |
Recording the master track................................................... |
64 |
Undoing operations (undo)............................................... |
66 |
Undoing the last operation (single undo).............................. |
66 |
Undoing a previous operation (multi-undo).......................... |
66 |
Erasing the operation history................................................ |
68 |
7–Recorder Functions.................................................... |
69 |
Punching in and out........................................................... |
69 |
Bouncing tracks.................................................................. |
69 |
Using the bounce function.................................................... |
70 |
Confirming the result............................................................ |
71 |
Locate and search functions............................................. |
71 |
Direct locate function........................................................... |
71 |
RTZ and LRP......................................................................... |
72 |
Fast forward/rewind search.................................................. |
73 |
Repeat playback.................................................................. |
73 |
Setting IN and OUT points.................................................... |
73 |
Editing IN/OUT points.......................................................... |
74 |
Using repeat playback.......................................................... |
75 |
Setting the interval between repetitions............................... |
75 |
8–Miscellaneous Functions....................................... |
76 |
Metronome ......................................................................... |
76 |
Tuner..................................................................................... |
77 |
Turning the power off automatically............................... |
78 |
Restoring the initial preference settings......................... |
78 |
Viewing information........................................................... |
79 |
9–SD Card Management............................................. |
81 |
Overview of partitions....................................................... |
81 |
Write-protected cards........................................................ |
81 |
Formatting cards and setting partition sizes.................. |
82 |
Reformatting MTR partitions............................................ |
83 |
Reformatting the FAT partition......................................... |
84 |
Initializing SD cards............................................................ |
85 |
6 TASCAM DP-004

10–Editing Tracks............................................................. |
86 |
Overview of track editing.................................................. |
86 |
Edit points............................................................................ |
86 |
Basic editing procedures....................................................... |
86 |
CLONE TRACK (track duplication).................................... |
87 |
CLEAN OUT (track erase).................................................. |
88 |
SILENCE (part erase).......................................................... |
88 |
CUT (remove part).............................................................. |
89 |
OPEN (insert silence).......................................................... |
90 |
11–Exchanging Data with a Computer............. |
91 |
Supported operating systems........................................... |
92 |
Connecting with a computer............................................ |
92 |
Disconnecting...................................................................... |
93 |
Song backup and restoration............................................ |
94 |
Backing-up songs................................................................. |
94 |
Restoring songs.................................................................... |
96 |
Track import and export.................................................... |
97 |
Importing tracks................................................................... |
97 |
Exporting tracks................................................................... |
99 |
Exporting a stereo master............................................... |
100 |
12–Troubleshooting...................................................... |
102 |
13–Specifications & Messages.............................. |
103 |
Audio input/output ratings............................................. |
103 |
Audio performance........................................................... |
103 |
General............................................................................... |
103 |
Optional accessories......................................................... |
104 |
Computer requirements................................................... |
104 |
Dimensions........................................................................ |
104 |
Table of Contents |
|
Block diagram................................................................... |
105 |
Messages........................................................................... |
106 |
14–Commonly-used Functions............................. |
109 |
TASCAM DP-004 7

1–Introduction
Thank you for your purchase of TASCAM’s 4-track digital Pocketstudio, the DP-004.
The DP-004 is designed to provide you with great sound in an easy-to-use compact package, allowing you to concentrate on the music, and not on the recording process.
Overview of this unit
Using an SD card this unit can record two tracks simultaneously and work with up to four tracks in a multitrack project. Moreover, using its mixer
functions, you can mix down a multitrack to create a stereo master.
This stereo master can then be transferred to a computer connected by USB. In addition to copying stereo masters from this unit to the
computer, various other data, including track and song data can be transferred to a computer as back-ups.
About this manual
Please read chapter 2, “Quick Start Guides,” first and follow the instructions in it to learn about and practice using this unit’s functions.
Chapter 3 explains the functions of the keys, knobs, connectors and other features. Chapters 4 and 5 explain other things you should know before you use this unit. Chapters 6 to 11 explains the uses and functions of this unit in detail. Chapters 12 and 14 provide troubleshooting information and a list of functions that you might want to use and where you can find them in the manual. Chapter 13 includes the unit’s specifications and a list of error messages.
Manual conventions
This manual often refers to the DP-004 as “the unit” and the SD card as the “card.”
When we refer to DP-004 features such as keys and connections, we display them like this: MENU.
When we show messages, for example, that appear on the screen, we show them like this: SONG LOAD.
8 TASCAM DP-004

The four keys beneath the LCD display are called function keys, and are referred to as F1, F2, F3 and F4 from left to right. The functions displayed at the bottom of the screen above the keys are sometimes shown after the key name in parentheses (e.g. F4 (¥) key, F2 (EXEC) key).
TIP We give hints and tips on using the DP-004 when you see this icon.
NOTE A note provides additional explanations for special situations.
CAUTION A caution shows that you may lose data (recordings) if you do not follow the instructions.
WARNING Warnings should be taken seriously. They describe situations which can cause injury or damage to the equipment if you do not follow the instructions.
This manual cannot begin to be a full guide to multitrack recording techniques. However, if you search the Internet or visit a library you should find various documents on recording.
1–Introduction
Product parts |
|
You should find these items in the box: |
|
••Main unit.................................................................... |
1 |
••SD Card (in the unit).................................................. |
1 |
••USB Cable.................................................................. |
1 |
••AA alkaline batteries................................................. |
4 |
••Owner's Manual (this document)............................... |
1 |
••Warranty card............................................................ |
1 |
If any of these items is missing, contact your TASCAM supplier.
Trademarks
The SD Logo is a trademark.
Microsoft, Windows, Windows 2000, Windows XP, and Windows Vista are either registered trademarks or trademarks of Microsoft Corporation in the United States and/or other countries.
TASCAM DP-004 9

1–Introduction
Macintosh, Mac OS and Mac OS X are trademarks of Apple Inc.
Other company names and product names in this document are the trademarks or registered trademarks of their respective owners.
About SD cards
This unit uses SD cards for recording and playback.
SD and SDHC cards that are at least 512 MB in size can be used. A list of SD cards that have been tested with this unit can be found on the TASCAM web site (www.tascam.com).
Precautions for use
SD cards are delicate media. In order to avoid damaging a card or the card slot, please take the following precautions when handling them.
•• Do not leave them in extremely hot or cold places.
•• Do not leave them in extremely humid places.
•• Do not let them get wet.
•• Do not put things on top of them or twist them.
•• Do not hit them.
Beware of condensation
If the unit is moved from a cold to a warm place, or used after a sudden temperature change, there is a danger of condensation; vapor in the air could
condense on the internal mechanism, making correct operation impossible. To prevent this, or if this occurs, let the Pocketstudio sit for one or two hours at the new room temperature before using.
Cleaning the unit
To clean the unit, wipe gently with a soft dry cloth. Do not use any benzene, paint thinner, ethyl alcohol or other chemical agents to clean the unit as they could damage the surface.
10 TASCAM DP-004
QSG 1–Playback and mixing
First, we will play the demo song on the included SD card. The SD card with the demo song is shipped already installed in the battery compartment on the bottom of the unit, but we will start by explaining how to insert an SD card here.
Preparing to listen to the demo song
1Open the battery compartment and insert the SD Card into the slot.
2–Quick Start Guides
CAUTION
•Do not insert the card backwards or apply unnecessary force. This could damage the slot or card.
•Do not remove the SD card when the unit’s power is ON. Make sure the unit power is OFF before you remove the card. If you remove the SD card while the power is ON, all recordings and settings since the last time the unit was shutdown or a song was saved will be lost. Lost data cannot be recovered.
NOTE
To use a new SD card or card that has been used with another device with this unit, it is necessary to format it first. A screen prompting you to format it appears if you insert such an SD card.
2Insert four AA batteries into the compartment, paying attention to the plus/minus (+/–) orientation. This unit can use alkaline or NiMH batteries.
TASCAM DP-004 11
2–Quick Start Guides
TIP
This unit can also be powered by a PS-P520 power adapter (sold separately) (see “Connecting an AC adapter” on page 36).
CAUTION
•Do not remove the batteries or disconnect the power cable while the unit power is ON. If you do so, the unit cannot shut down properly and all unsaved settings and recorded data will be lost. Lost data cannot be restored.
•The included alkaline batteries are for confirming operation of the unit and might not last very long.
3Close the battery compartment cover after installing the SD card and batteries.
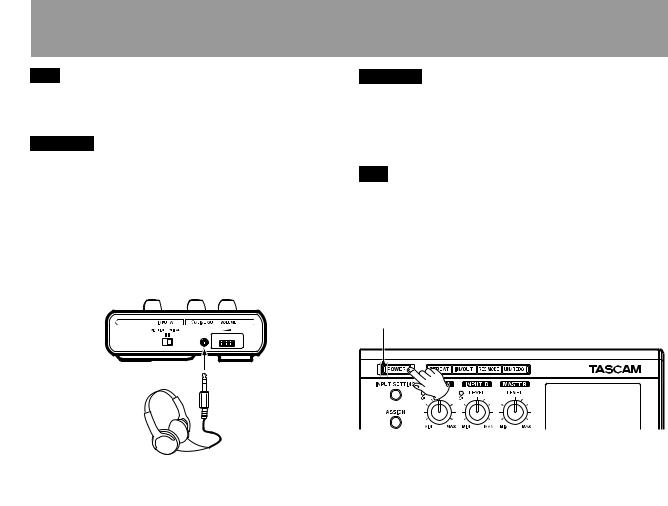
4Connect headphones to the  /LINE OUT connector.
Headphones
CAUTION
The volume adjustment dial is small and does not have any indications. Before turning the power ON, always turn it in the direction of the arrow until it stops to minimize the volume. Sudden bursts of loud sounds can cause hearing damage and speaker damage, for example.
TIP
You can also attach an amplifier or speakers with built-in amplification to monitor through speakers.
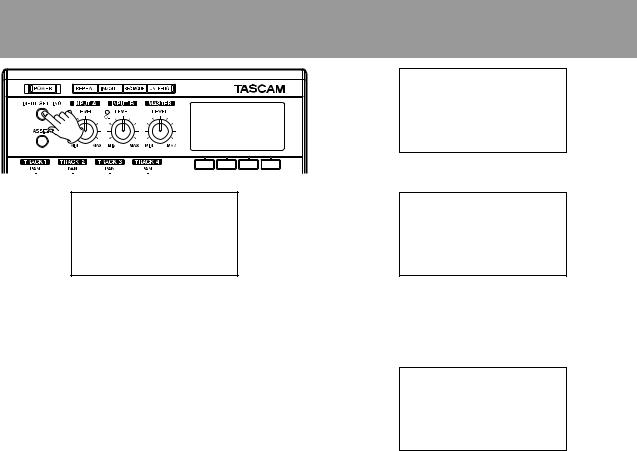
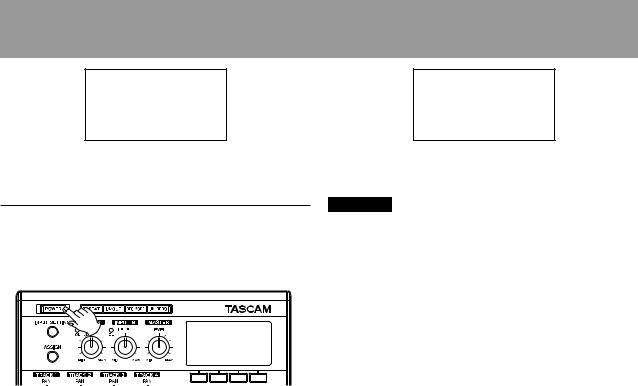
5Press and hold the POWER key on the top panel until TASCAMappears on screen (or the POWER key indicator lights green).
After starting up the Home Screen appears on the display.
POWER indicator
12 TASCAM DP-004
2–Quick Start Guides
Playing and mixing the demo song
Before the unit is shipped, a demo song is stored on its SD card. We are now going to use basic playback and mixing features with this demo song.
1Press the MENU key when the Home Screen is open. The MENUscreen is displayed.
2Rotate the DATA wheel to select SONG, and press the F4 (¥) key to open the SONGscreen.
3Rotate the DATA wheel to select LOAD, and press the F4 (¥) key to open the SONGLOAD screen that shows a list of songs.
4Rotate the DATA wheel to select DEMOSONG, and press the F2 (EXEC) key.
The demo song loads and the SONGscreen reopens.
5Press the HOME key to reopen the Home Screen.
TASCAM DP-004 13
2–Quick Start Guides
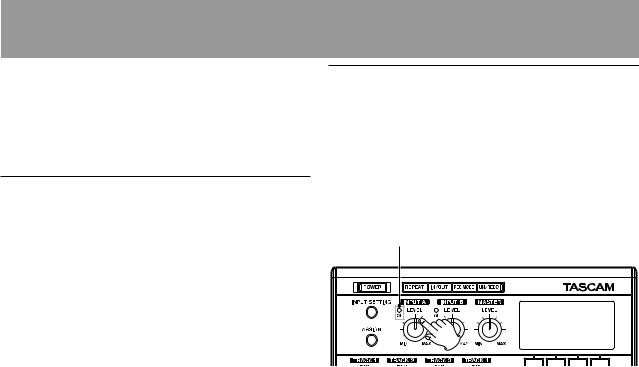
6To hear the demo song, press the ¥ key and use the LEVEL knobs for tracks 1–4, the MASTER LEVEL knob and the VOLUME dial.
The MASTER LEVEL knob adjusts the volume of all four tracks at the same time. The standard position is around 2–3 o'clock.
Use the LEVEL knobs to adjust the balance between tracks 1–4.
Use the VOLUME dial to adjust the final monitoring level.
7Use the PAN knobs to adjust the stereo position of tracks 1–4.
14 TASCAM DP-004

Shutting down the unit
If you are finished, shut the unit down unless you want to try the features in QSG 2 on the following page now.
Press and hold the POWER key until “POCKETSTUDIO” appears on the screen. The unit shuts down automatically after completing a shutdown procedure that saves various information.
CAUTION
Do not remove the batteries or disconnect the power cable accidently while the unit is operating. If you do so, the unit cannot shut down properly and
all unsaved data will be lost. Lost data cannot be restored. We recommend that you also save the data manually often.
QSG 2–Recording and mastering
Here, we will try multitrack recording. In the following example, we will use an electric guitar to record a rhythm guitar part on track 1 and a lead guitar part on track 2. Then, we will use the built-in mic to record a voice on track 3. Finally, we will
2–Quick Start Guides
mix the tracks down.
In this section, we assume that you have already followed the instructions in “QSG 1–Playback and mixing” to connect monitoring equipment and install the SD card.
TIP
This example uses the built-in mic for recording vocals, but you could also connect an external mic to the INPUT A or INPUT B connector on the rear panel and record it.
Connecting and setting the input sources
1Connect an electric guitar to the INPUT A connector on the rear panel.
2Set the MIC/LINE-GUITAR switch on the left side panel to GUITAR.
TIP
When connecting an electric-acoustic guitar with a built-in preamp or an active electric guitar, as well as when connecting an electric guitar with effect boxes between it and this unit, set the MIC/LINE–GUITAR switch to MIC/LINE.
3 Press the INPUT SETTING key to open the INPUT
SETTINGscreen.
TASCAM DP-004 15
2–Quick Start Guides
The IN Aand IN Bitems are used to set the input sources for the and channels.
At first, the input source for IN A(INPUT A channel) is already selected.
4Use the DATA wheel to change the IN Ainput source
to GUITAR/LINE.
5 Press the F4 (¶) key to select the current input for IN B(INPUT B channel).
6. Use the DATA wheel to set the IN Binput source to
INT.MIC B-Low, INT.MIC B-Midor INT.MIC B-High.
This sets MIC B, which is the built-in mic on the right side of the front panel as the input source for INPUT B.
16 TASCAM DP-004

NOTE
INT.MIC B-Low, INT.MIC B-Mid, INT.MIC B-High change the sensitivity of the built-in mics. Set it according to the loudness of the subject being recorded.
If you are not sure which setting to use, choose INT. MIC B-Low. If the input level is too low after adjusting it later, return to this screen and change the setting to INT. MIC B-Mid. If the input level is still too low, change this
setting to INT.MIC B-High.
7After changing the setting, press the HOME key to return to the Home Screen.
NOTE
The MODE item on the INPUT SETTING screen is used to set the input monitoring mode. Set to STEREO, input signals from INPUT A and INPUT B channels are output separately on the L and R channels, respectively. Set to MONOx2, input signals from both INPUT A and INPUT B channels are output as a combined mono signal from both the left and right channels.
Loading a song file
After listening to the demo song, follow these procedures to load SONG001 to record your song.
1 With the transport stopped and the Home Screen
2–Quick Start Guides
open, press the MENU key to open the MENUscreen.
2Use the DATA wheel to select SONGand press F4 (¥) to open the SONGmenu screen.
3Use the DATA wheel to select LOADand press F4 (¥) to open the SONG LOADscreen. A list of the songs appears.
TASCAM DP-004 17
2–Quick Start Guides
4Use the DATA wheel keys to select SONG001and press F2 (EXEC) to load this song that does not have any recordings in it yet.
The SONGmenu screen reopens.
5Press the HOME key to return to the Home Screen.
Setting the guitar as track 1 recording source
The default settings are for the INPUT A channel to be the recording source for tracks 1 and 3 and for the INPUT B channel to be the recording source for tracks 2 and 4.
In “Connecting and setting the input sources” above, we made a guitar the input source for the INPUT A channel and a built-in mic (MIC B) the input source for the INPUT B channel. Therefore, the guitar is already set to record to tracks 1 and 3 and is ready to record to tracks 2 and 4.
As a result, there is no need to change the input channel assignments to record the guitar to track 1 in this example. See “Adding another recording (1)” on page 21 and “Adding another recording (2)” on page 22 for how to change track recording sources.
Adjusting the input level and monitoring
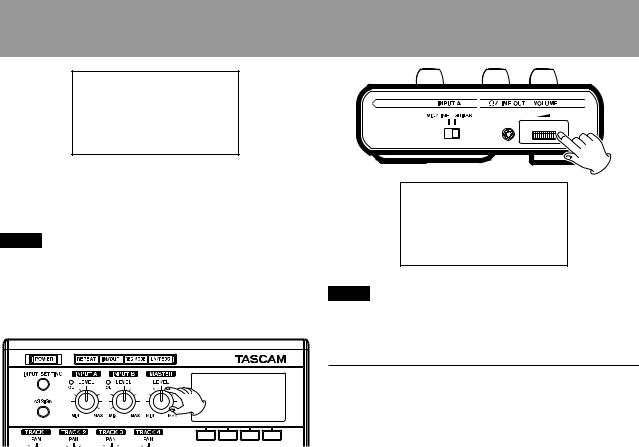
Use the INPUT A channel LEVEL knob to adjust the guitar input level.
Set the LEVEL knob so that the INPUT A channel OL indicator does not light even when the loudest sound to be recorded is input. If the indicator continues to light even when the LEVEL knob is turned down, the guitar signal itself is too loud. In this case, lower the output level on the guitar.
OL indicator
When you play the guitar, its input level is shown by the A meter on the screen.
18 TASCAM DP-004
2–Quick Start Guides
If you turn up the MASTER LEVEL knob and the VOLUME dial, you can hear the guitar on the left channel of your headphones, and the L meter on the screen moves.
NOTE
If you change the MODEitem on the INPUT SETTING screen to mono mode (MONOx2), you will be able to hear the guitar sound on both left and right channels and both the Land Rmeters on the screen will move (see “Monitoring the input signal” on page 55).
NOTE
When the input source is a built-in mic, the signal from the built-in mic cannot be monitored if the REC indicator of the track that it is assigned to is not lit.
Recording guitar to track 1
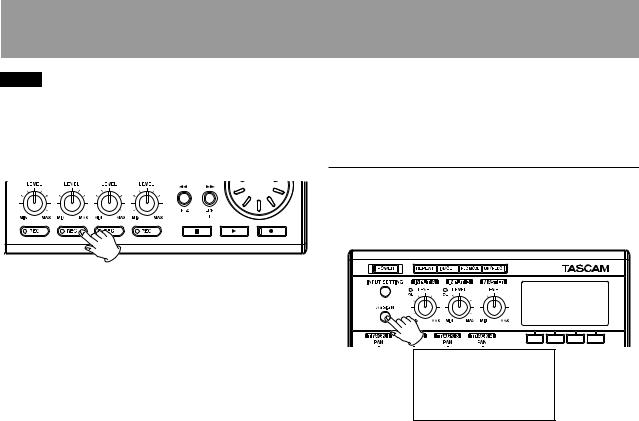
1Press the TRACK 1 REC key. The key blinks showing that the track is in record standby.
TASCAM DP-004 19

2–Quick Start Guides
2Press the playback (Á) key while pressing and holding the record (–) key to start recording. The track 1 REC key stops blinking and stays lit constantly.
You are recording. Play your guitar!
3When you are finished, press the stop (ª) key to stop recording.
4 Press the TRACK 1 REC key again. Its light turns off.
Listening to your recording
1To go to the beginning of the song, press the Ô key while pressing and holding the stop (ª) key. (This is the Return To Zero (RTZ) function)
2Press the playback (Á) key to play the recorded track.
3Use the track 1 LEVEL knob and the MASTER LEVEL knob to adjust the playback level. Use the VOLUME dial to adjust the final monitoring volume.
20 TASCAM DP-004
TIP
•Use the track 1 PAN knob to set the stereo position of the track signal.
•If you are not satisfied with the recorded sound, follow the procedures above again from the beginning. If you are satisfied with this recording continue to the next section.
Adding another recording (1)—record guitar to track 2
Now, you will record lead guitar on track 2 while listening to the rhythm guitar on track 1. This time, you will need to change the track 2 record source.
1Press the ASSIGN key to open the INPUT ASSIGN screen.
2–Quick Start Guides
The input channels (INPUT A or INPUT B) that are the recording sources for each track are shown. In the initial setting, INPUT A is assigned as the recording source for tracks 1 and 3, and INPUT B is assigned as the recording source for tracks 2 and 4.
2Press the F4 (¶) key to select TRACK 2to change its current input channel from the default of IN B.
3Turn the DATA wheel to set the input to IN A.
TASCAM DP-004 21
2–Quick Start Guides
NOTE
You do not need to change the input if you want to record the lead guitar on track 3.
4Press the HOME key to return to the Home Screen.
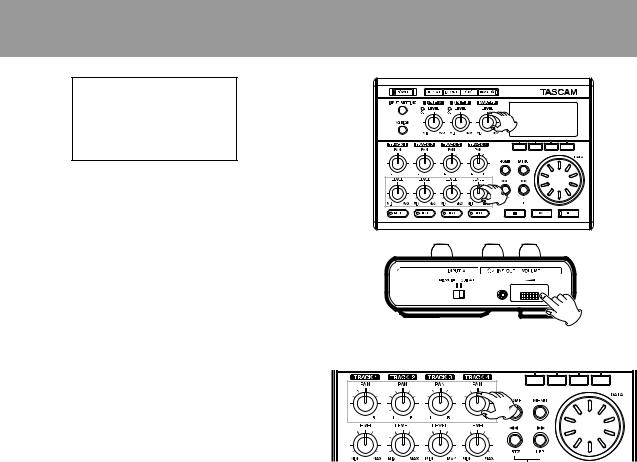
5Press the TRACK 2 REC key. The key blinks showing that the track is in record standby.
6Press the Ô key while pressing and holding the stop (ª) key to return to the beginning of the song. Press the playback (Á) key to listen to the rhythm guitar track while you practice the lead part. Both guitar parts can be heard through the headphones.
7Use the track LEVEL knobs, MASTER LEVEL knob and VOLUME dial to adjust the output volume and the balance between the tracks.
8Return to the start of the track again and press the playback (Á) key while pressing and holding the record (–) key to start recording. The TRACK 2 REC key stops blinking and stays lit constantly.
You are recording again. Play your guitar!
9When you are finished, press the stop (ª) key to stop recording.
10Press the TRACK 2 REC key again. Its light turns off.
Adding another recording (2)—record vocals on track 3
1 Press ASSIGN to open the INPUT ASSIGNscreen.
2Press the F4 (¶) key to select TRACK 3to change its current input channel from the default of IN A.
22 TASCAM DP-004
2–Quick Start Guides
3 Turn the DATA wheel to set the input to IN B.
NOTE
If the OL indicator continues to light even when the LEVEL knob is turned down, the mic signal itself is too loud. In this case, if the input setting is INT.MIC
B-High, change it to INT.MIC B-Mid or INT.MIC B-Low. If
the input setting is INT.MIC B-Mid, change it to INT. MIC B-Low. If the OL indicator continues to light even when set to INT.MIC B-Low, move the sound source away from the mic or lower the volume at the sound source.
NOTE
By default, INPUT B is set as the recording source for tracks 2 and 4, so you do not need to change the input if you want to record the vocal on track 4.
4Press the HOME key to return to the Home Screen.
5Press the TRACK 3 REC key. The key blinks showing that the track is in record standby.
6Use the INPUT B channel LEVEL knob to adjust the mic input level. Set the LEVEL knob so that the INPUT B channel OL indicator does not light even
when the loudest sound to be recorded is input.
The input level of built-in MIC B is shown by the B meter on the screen.
TASCAM DP-004 23
2–Quick Start Guides
Raise the MASTER LEVEL knob and VOLUME dial as necessary to hear the mic input through the vocals.
CAUTION
Always monitor through headphones when using a mic. If you monitor through speakers, feedback could occur and the recorded sound might not be right.
NOTE
When the input source is one of the built-in mics, the input cannot be heard when the REC indicator is not lit.
7Press the Ô key while pressing and holding the stop (ª) key to return to the beginning of the song. Press the playback (Á) key to play the recorded guitar tracks while you practice the vocal part.
Both guitar parts and your singing can be heard through the headphones.
8Use the track LEVEL knobs, MASTER LEVEL knob and VOLUME dial to adjust the output volume and the balance between the tracks.
9Return to the start of the track again and press the playback (Á) key while pressing and holding the record (–) key to start recording. The TRACK 3 REC key stops blinking and stays lit constantly.
You are recording again. Sing!
10When you are finished, press the stop (ª) key to stop recording.
11Press the TRACK 3 REC key again. Its light turns off.
Mixing the tracks
After you finish recording, the next step is to make a stereo mix. This unit allows you to make a stereo mix for every song.
1Use the LEVEL knobs for tracks 1, 2 and 3, to adjust the levels of the tracks and the balance between them. Use the MASTER LEVEL knob to adjust the overall level.
24 TASCAM DP-004
2Use the track PAN knobs to adjust the stereo positioning of the tracks.
Watch the Land Rmeters at the right side of the display as you adjust levels and panning.
Mastering the mix
Now we will record your stereo mix. We call this process mastering.
The time between the song’s beginning (00:00:00:00) and the OUT point will be recorded as the stereo master. So, first we must set the OUT
(end) point.
2–Quick Start Guides
1 Press the IN/OUT key to open the I/O SETTINGscreen.
2Play the song back, and press the F4 (OUT) key at the position where you want the stereo master end point. “SET OUT !” appears and this position is set
as the OUT point, which will be the end point of the master.
TASCAM DP-004 25
2–Quick Start Guides
TIP
You can also set the OUT point when playback is stopped by pressing the F4 (OUT) key.
3Press the IN/OUT key (or HOME key) to return to the
Home Screen.
4Press the REC MODE key to open the RECORDER MODE screen.
7Press the playback (Á) key while pressing and holding the record (–) key to start master
recording. Recording automatically ends when the recorder position reaches the OUT point.
NOTE
You can use the LEVEL knobs to adjust the track and overall levels as you record.
8Press the REC MODE key to open the RECORDER MODE screen.
5Turn the DATA wheel to select MASTER REC.
6Press the F4 (EXEC) key to put the unit into master recording mode and return to the Home Screen.
9Turn the DATA wheel to select MASTER PLAY.
10Press the F4 (EXEC) key to put this unit into master playback mode and return to the Home Screen.
26 TASCAM DP-004
2–Quick Start Guides
11 Press the playback (Á) key to play the stereo master that you created.
Shutting down the unit
Shutdown the unit when you are finished.
1Press and hold the POWER key until POCKETSTUDIO appears on the screen.
2The power turns off after the unit completes its shutdown process, including saving various information from your session.
CAUTION
Always follow the above procedures to shut the unit down. Do not remove the card or batteries when the unit is turned on. Failure to power off properly first will cause any recordings and settings made since the last power off and song save to be lost. This data cannot be recovered.
TASCAM DP-004 27
3–Names and Functions of Parts
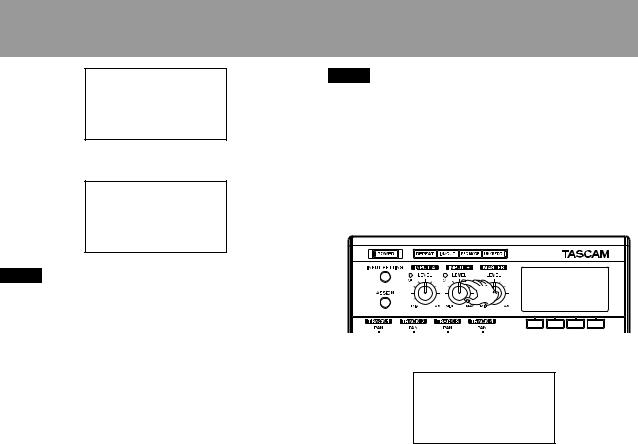
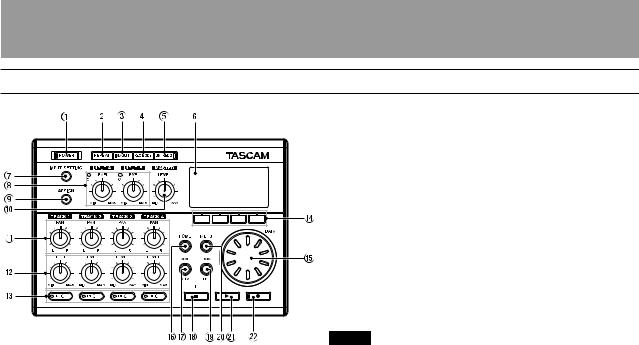
Top panel
2 |
3 |
4 |
REPEAT key
Turns the repeat playback mode on and off. (See “Repeat playback” on page 73.)
IN/OUT key
Press this key to open the I/O SETTINGscreen to set INand OUTpoints for repeat playback and track
editing functions. (See “Setting IN and OUT points” on page 73.) The OUTpoint also determines the end point when mastering.
REC MODE key
Use this key to open the RECORD MODEscreen to set the record mode. Select between MULTI TRACK, BOUNCE, MASTER RECand MASTER PLAY. (See “Recorder modes” on page 44.)
1 POWER key and indicator
Press and hold this key to turn the unit ON and OFF. (See “Start-up & shutdown” on page 36.)
The indicator lights when the power is on.
NOTE
Multitrack is the standard mode and the unit defaults to this mode every time it is turned on. Various functions do not work in other modes.
28 TASCAM DP-004

3–Names and Functions of Parts
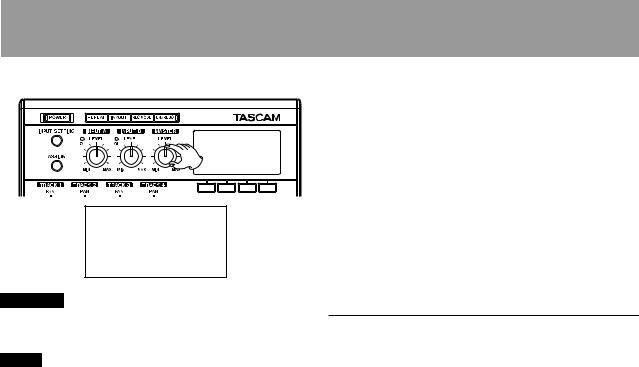
5 UN/REDO key and indicator |
9 ASSIGN key |
Press this to undo the last action. Press again to redo it. (See “Undoing operations (undo)” on page 66.)
Press this key while pressing and holding the STOP ( ·) key to open the HISTORYscreen where you can undo multiple steps.
This indicator lights when one or more operations that have been undone can still be redone.
6 LCD Display
This shows the Home Screen and various other screens. (See “Display screens” on page 39.)
The display contrast can be changed using the PREFERENCEscreen. (See “Setting the contrast” on page 46.)
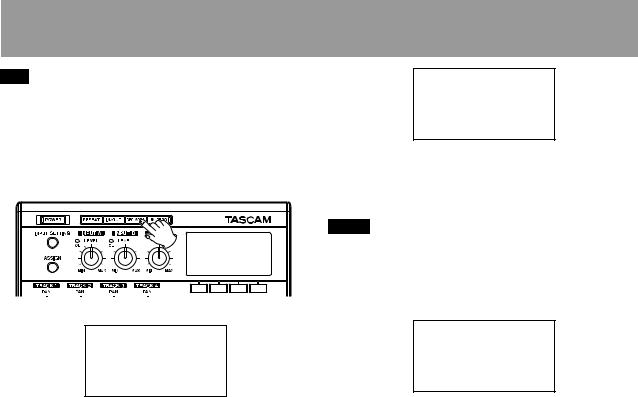
7 INPUT SETTING key
Press this key to open the INPUT SETTINGscreen where you can select the input source. (See “Selecting the input source” on page 54.)
8 INPUT A and INPUT B LEVEL knobs and OL indicators
Use these knobs to adjust the input levels for INPUT A and INPUT B. (See “Making the first recording” on page 58.)
If the input source level is too high its OL (overload) indicator lights. Moreover, even if the input level is suitable, the OL indicator might light if the LEVEL knob is turned past 2 or 3 o’clock.
Press this key to open the INPUT ASSIGNscreen where you can assign the A and B input channels to tracks. An assigned channel becomes the recording signal source for its track. (See “Assigning input channels” on page 57.)
0 MASTER LEVEL knob
Adjusts the monitoring level of the stereo output signal.
This knob also adjusts the recording level when performing a bounce or mix down.
qTrack PAN knobs
Use these knobs to adjust the panning of each track in the stereo mix. (See “Stereo position (panning)” on page 62.)
wTrack LEVEL knobs
Use these knobs to adjust the playback levels of each track. (See “Level and balance” on page 62.)
eTrack REC keys and indicators
Press a REC key to put a track in recording standby mode (the key flashes). Pressing the key again cancels recording standby mode. If you press the
PLAY (¥) key while holding down the RECORD (–) key, recording will begin on every track in recording standby mode (the REC indicator lights).
TASCAM DP-004 29

3–Names and Functions of Parts
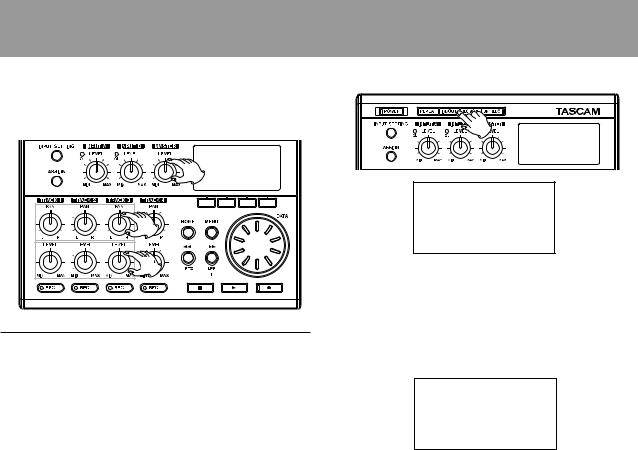
r Function keys
The functions of these keys are shown at the bottom of the screen and depend on the current screen.
NOTE
In this manual, the four function keys are referred to as F1, F2, F3 and F4 in order from left and right. Sometimes, the name of the function is also shown in parentheses (e.g. F4 (¥) key, F2 (EXEC) key).
t DATA wheel
Use this to change parameter values when using menus. When the unit is stopped and the Home Screen is open, turn to change the record/playback position. (See “Direct locate function” on page 71.)
y HOME key
Press this key to open the Home Screen.
uÔ/RTZ key
Press this key when the transport is stopped or playing to fast rewind. Press it again to change the speed from 10x to 50x, again for 100x and 1000x.
If you press this key while holding down the STOP ( ·) key, the transport will locate to the head of the song (RTZ). (See “RTZ and LRP” on page 72.)
i STOP ( ·) key
Press this key alone to stop recording, playback, fast forward and fast rewind. If you press the Ô
or key at the same time, the transport will also locate to the head of the song (RTZ) or the last
recording start position (LRP). (See “RTZ and LRP” on page 72.)
o /LRP key
Press this key when the transport is stopped or playing to fast forward. Press it again to change the speed from 10x to 50x, again for 100x and 1000x.
If you press this key while holding down the STOP ( ·) key, the transport will locate to the last
recording start position (LRP). (See “RTZ and LRP” on page 72.)
p MENU key
Press this key to open the MENUscreen.
a PLAY (¥) key
Press this key to start playback. While pressing the RECORD (–) key, press this key to start recording. Press this key again when recording to stop recording and start playback (punch out).
s RECORD (–) key and indicator
Press the PLAY (¥) key while pressing this key to start recording. The indicator lights when recording. If you press this key when any of the track REC indicators is lit, or during playback, recording will begin (punch in). (See “Punching in and out” on page 69.)
30 TASCAM DP-004
 Loading...