


P.N. 112200
MODELS / MODELOS
2345, 2346, 2347, 2348, 2349
Instruction Manual
MIXMASTER® HERITAGE SERIES™ STAND MIXER
RE A D AL L IN S T R U C T I O N S BE F O R E US I N G TH I S AP P L I A N C E
Manual de Instrucciones
BATIDORA MIXMASTER® HERITAGE SERIES™
LE A TO D A S L A S IN S T R U C C I O N E N T E S D E US A R ES T E APA R AT O

SAFE T Y
THIS UNIT IS FOR HOUSEHOLD USE ONLY
The motor of your MixMaster® Heritage Series™ Mixer is protected by a heat cured insulation. This is a standard process. Due to the heat curing of the insulation, you may experience an odor and possibly a slight wisp of smoke from your mixer’s motor. This effect will disappear after the first few uses.
SPECIAL INSTRUC TIONS
FOR PRODUCTS PURCHASED IN THE U.S. AND CANADA ONLY
To reduce the risk of electrical shock, this appliance is equipped with a 3-prong plug.
If you are unable to insert the plug into the outlet, contact a qualified electrician to replace the obsolete outlet. Do not attempt to defeat the safety purpose of the 3-prong plug
by modifying it in any way. Also, do not pull, twist or otherwise abuse the power cord; instead, grasp the plug and pull to remove from the outlet.
If the use of an extension cord is necessary, please follow these guidelines:
•Use only 3-wire extension cords which have 3-prong grounding-type plugs and 3-pole cord connectors that accept the plug from the mixer.
•Use only extension cords having an electrical rating not less than the rating of the mixer.
•Examine the extension cord before using and do not use if the extension cord is damaged.
•Do not abuse the extension cord and do not yank on any cord to disconnect.
•Keep extension cord away from heat and sharp edges.
SAVE THESE INSTRUC TIONS 
3

TABLE O F CONTENTS
Important Safeguards . . . . . . . . . . . . . . . . . . . . . . . . . . . . . . . . . . . . . . . . . . . . 2 Special Instructions . . . . . . . . . . . . . . . . . . . . . . . . . . . . . . . . . . . . . . . . . . . . . 3 Table of Contents . . . . . . . . . . . . . . . . . . . . . . . . . . . . . . . . . . . . . . . . . . . . . . . 4 Welcome . . . . . . . . . . . . . . . . . . . . . . . . . . . . . . . . . . . . . . . . . . . . . . . . . . . . . 5 Features . . . . . . . . . . . . . . . . . . . . . . . . . . . . . . . . . . . . . . . . . . . . . . . . . . . . . . 5 Learning About Your Stand Mixer . . . . . . . . . . . . . . . . . . . . . . . . . . . . . . . . . . . 6 The Role of the Dual-Motor 3-Way Beating Action . . . . . . . . . . . . . . . . . . . . . . . 8 Preparing the Stand Mixer for Use . . . . . . . . . . . . . . . . . . . . . . . . . . . . . . . . . . . 9 Raising and Lowering the Mixing Head . . . . . . . . . . . . . . . . . . . . . . . . . . . . . . . 9 Installing the Attachments . . . . . . . . . . . . . . . . . . . . . . . . . . . . . . . . . . . . . . . . . 9 Adjusting the Turntable . . . . . . . . . . . . . . . . . . . . . . . . . . . . . . . . . . . . . . . . . . . 10 Preparation: Adding the Mixing Bowl . . . . . . . . . . . . . . . . . . . . . . . . . . . . . . . . . 11 Operating Instructions: About the Speed Control Dial . . . . . . . . . . . . . . . . . . . . . 11 Mixing Guide . . . . . . . . . . . . . . . . . . . . . . . . . . . . . . . . . . . . . . . . . . . . . . . . . . 12 Caring For Your Mixer . . . . . . . . . . . . . . . . . . . . . . . . . . . . . . . . . . . . . . . . . . . 13 Cleaning Your Mixer . . . . . . . . . . . . . . . . . . . . . . . . . . . . . . . . . . . . . . . . . . . . . 13 Storing Your Mixer . . . . . . . . . . . . . . . . . . . . . . . . . . . . . . . . . . . . . . . . . . . . . . 13 Maintenance . . . . . . . . . . . . . . . . . . . . . . . . . . . . . . . . . . . . . . . . . . . . . . . . . . . 13 Helpful Hints . . . . . . . . . . . . . . . . . . . . . . . . . . . . . . . . . . . . . . . . . . . . . . . . . . 13 MixMaster® Heritage™ Series Recipes . . . . . . . . . . . . . . . . . . . . . . . . . . . . . . . . 14 Warranty Information . . . . . . . . . . . . . . . . . . . . . . . . . . . . . . . . . . . . . . . . . . . . . 18 How to Obtain Warranty Service . . . . . . . . . . . . . . . . . . . . . . . . . . . . . . . . . . . . 18
4

WELCOME
Congratulations! You are the owner of a SUNBEAM® MixMaster® Heritage Series™ Stand Mixer. Before you use this product for the first time, please take a few moments to read these instructions and keep it for reference. Pay particular attention to the Safety Instructions provided. Please review the product service and warranty statements. For your future reference, please note:
Date product received: ______________________________________________
Model/Service number: _____________________________________________
(Located on the bottom of the stand mixer)
FE AT U R E S
Thank you for choosing the SUNBEAM® MixMaster® Heritage Series™ stand mixer. For generations we have been helping families prepare mashed potatoes, moist cakes, light and fluffy meringue and chewy cookies. You can even make bread dough with your SUNBEAM® MixMaster® mixer.
The SUNBEAM® MixMaster® Heritage Series™ stand mixer offers you a range of
12 variable mixing speeds. The dual motor 3-way beating action has been designed to mix ingredients thoroughly and evenly.
You’ll love being able to make so many things with your SUNBEAM® MixMaster®.
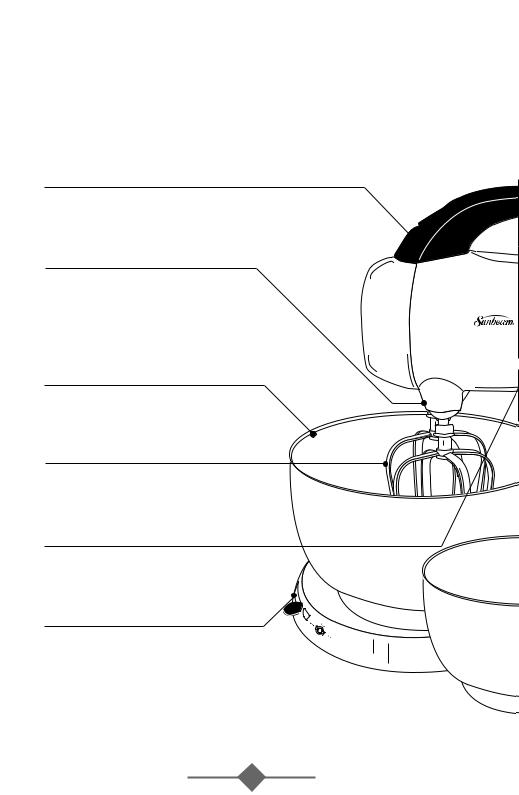
LE A R N I N G AB O U T YO U R STA N D MI X E R
Attachment Eject Button
The eject button, located on the top of the handle releases the beaters, dough hooks or whisks for easy cleaning.
Dual-Motor 3-Way Beating Action
Patent pending dual-motor design enables one motor to drive the beaters, each turning in opposite directions, and a second motor drives the bowl. This new technology results in more powerful and thorough mixing.
Variable Bowl Speed
The bowl speed increases and decreases automatically as the beater speed is increased and decreased.
Off-Center Head and Beaters
The head of the MixMaster® and beaters are positioned off-center to the bowl to make it easier to add ingredients during mixing.
Tilt Back Locking Head
The head of the MixMaster® tilts back and locks securely into position to allow easy removal of mixing bowls and attachments.
Bowl Selector
Simply slide the bowl selector lever to the left when using the small bowl and to the right when using the large bowl.
6

TILT
RELEA
Stainless Steel Wire Whisks
For whisking cream, egg whites, light batters and cake mixes.
Stainless Steel “V-Groove” Beaters
Heavy-duty “V-groove” beaters for creaming butter and sugar, plus mixing heavy cake mixes.
Stainless Steel Dough Hooks
Heavy-duty dough hooks take the hard work out of kneading dough and other heavy mixtures.
SE
12 Variable Speeds
The combination of 12 variable speeds and a powerful torque control motor ensures superior mixing control and maintains speed regardless of the mixing load.
Stainless Steel Mixing Bowls
4.6 and 2.2 quart mixing bowls are ideal for mixing large or small quantities of ingredients.
Die-Cast Metal Body
The heavy-duty, die-cast metal body combined with non-slip rubber feet keep the MixMaster® stable during operation.
3
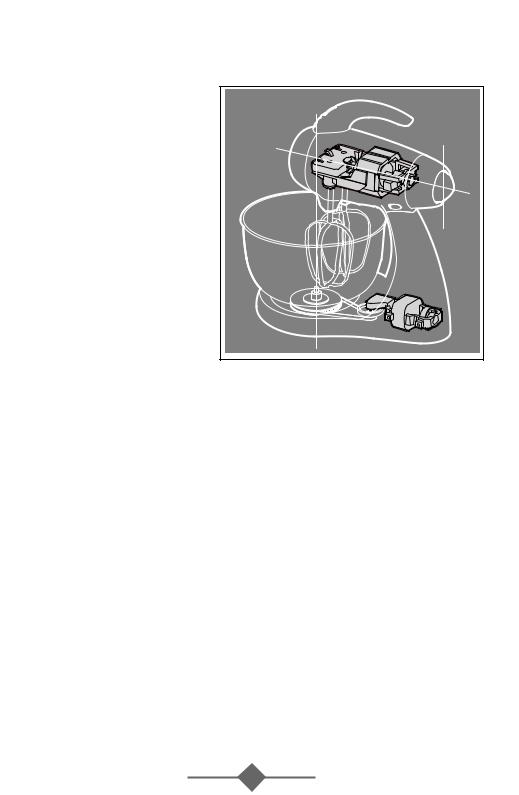
THE ROLE OF THE DUAL-MOTOR 3-WAY BEATING ACTION
Sunbeam launched its 3-way beating action in the 1930s which revolutionized mixing at the turn of a dial. The 3-way beating action
is determined by each of the two beaters turning against each other, plus the bowl also rotating.
Our latest innovation of this historic 3-way beating action is the introduction of an additional motor. One motor is located in the head of the MixMaster®. This drives the individual beaters, each turning in opposite directions. The second motor is located in the base of the neck of the MixMaster® and drives the turntable, rotating the bowl against the direction of the outside beater. The speed of the bowl rotation is automatically calibrated to the mixing speed selected. Therefore as the mixing speed increases so does the speed of the bowl, and as the mixing speed is decreased, the bowl speed also slows. These actions combine to ensure more powerful and thorough mixing. This dual motor design is patent pending.
8

PREPARING THE STAND MIXER FOR USE
Before preparing the mixer for use, be sure the speed control dial is in the OFF position and the electric cord is unplugged. Be sure to wash bowls and attachments before initial use.
RAISING AND LOWERING THE MIXING HEAD
Press the tilt release button, located at the top |
(1) |
of the neck of the MixMaster®. While the |
|
button is depressed, hold the handle (1) |
|
and ease the head of the MixMaster® back. |
|
The MixMaster® head will lock into this tilt |
|
position (2). To lower the mixing head press |
|
the tilt release button. While the button is |
(2) |
depressed hold the handle (2) and ease the |
|
head of the MixMaster® down (1). A “click” |
|
sound will indicate when the mixer head |
|
has locked into position. |
|
TILT  BUTTON
INSTALLING THE ATTACHMENTS (BEATERS, WIRE WHISKS, OR DOUGH HOOKS)
Select the pair of attachments best suited for your mixing job. (See Mixing Guide on Page 12 for recommendations). Take the attachment that has a red colored band around the top – illustrated as attachment (A). Insert attachment (A) into the socket on the side of the mixer nearest the side of the bowl. The socket is identified by a red dot beside it. Take the other attachment that has a white colored band around the top – illustrated as attachment (B).
Insert attachment (B) into the socket nearest the center of the bowl.
NOTE: Be sure both attachments click firmly in place, you may need to twist the beater attachment slightly
to engage it in position prior to pushing it in place.
A |
B |
CONE SQUARE
BEATER BEATER
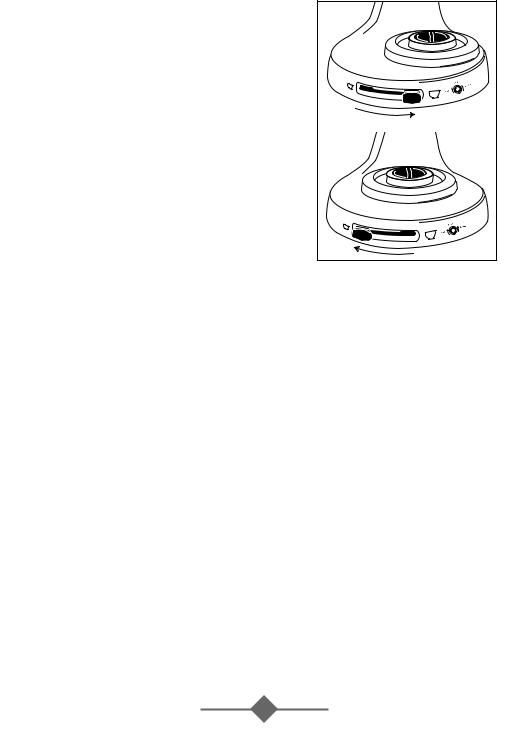
ADJUSTING THE TURNTABLE
The turntable must be adjusted depending upon which bowl size is being used (see “Adding the Mixing Bowl”). To adjust, press down on the Turntable Bowl Selector Switch and slide switch to the proper icon.
10
PR E PA R AT I O N
ADDING THE MIXING BOWL |
|
|
|
Once you have selected the bowl you wish to use, move |
|
|
|
the turntable bowl selector switch to the proper setting – |
|
|
|
the large bowl icon if you are using the large bowl; |
|
|
|
the small bowl icon if you are using a small bowl. |
|
B |
|
Gently rotate the bowl counterclockwise until it drops |
A |
||
|
|||
into position or is sitting flat (A). Then rotate the bowl |
|
|
|
clockwise to lock into position (B). The bowl should |
|
|
|
feel firm with no movement. |
|
|
NOTE: Mixing bowls should NEVER be used in a conventional oven, microwave oven, on top of the range or on any other heated surface. If mixing bowls are scratched
or chipped, do not use mixer.
OP E R AT I N G INSTRUC TIONS
ABOUT THE SPEED CONTROL DIAL
The speed control dial is used for turning the mixer ON and OFF and for selecting its 12 mixing speeds. Rotate the speed control dial in a clockwise direction to increase mixing speed; and in a counterclockwise direction to decrease mixing speed.
As you rotate the speed control dial, notice that a numbered speed is aligned with the indicator on top of the mixer head. This numbered speed indicates the speed at which the mixer is operating.
Rotate the speed control dial until the indicator is opposite the numbered speed you wish to use.
SPEED |
SPEED CONTROL |
|
INDICATOR |
DIAL |
|
|
|
|
|
|
|
MIXING GUIDE

MIXING GUIDE
Please keep in mind that the various mixing tasks and related speeds, listed in the following table, may vary slightly from recipe to recipe.
For most recipes, it is better to begin your mixing on a slower speed until the ingredients begin combining, then move to the appropriate speed range for the particular task.
When mixing larger quantities you may need to increase the MixMaster® speed due to the amount of mixing required and the larger load on the machine.
When building up a recipe that requires the addition of dry ingredients, such as flour, slow the speed down while these ingredients are being added to avoid a snow storm effect. Once the extra ingredients begin combining then slowly increase to the appropriate speed for the particular mixing task.
SPEED |
|
RECOMMENDED |
SETTING RANGE |
MIXING TASK |
ACCESSORY |
LOW |
FOLDING & KNEADING |
Standard Beaters |
1-3 |
Folding |
Dough Hooks |
|
KneadingDoughs |
|
|
(pastry, bread, scones, etc.) |
|
MEDIUM |
LIGHT MIXING |
Standard Beaters |
4-6 |
KneadingHeavy Doughs |
Dough Hooks |
|
(large quantities) |
|
|
BeatingPackaged Mixes |
|
|
Beatingcreaming sugar and butter |
|
HIGH |
CREAMING & BEATING |
Wire Whisks |
7-9 |
WhiskingLight Batters |
Standard Beaters |
|
BeatingCake Mixes, Heavy Batters, Icings, etc. |
|
VERY HIGH |
WHIPPING & AERATING |
Wire Whisks |
10-12 |
WhiskingEgg Whites, Cream, etc. |
|
|
|
|
12
 Loading...