


IMPORTANT SAFEGUARDS
When using |
electrical |
appliances, basic |
safety precautions |
|
should always be followed including |
the |
following: |
||
• Read all |
instructions |
before using |
the |
Mixer. |
•To protect against risk of electrical shock do not put Mixer in water or other liquid.
•Close supervision is necessary when Mixer is used by or near
children. |
|
|
• Unplug |
from outlet |
while not in use, before putting on or taking off |
parts |
and before |
cleaning. |
• Avoid contacting moving parts. Keep hands, hair, clothing as well as spatulas and other utensils away from beaters during operation to
reduce the risk of injury |
to |
persons |
and/or damage |
to |
the |
Mixer. |
• Do not operate Mixer with a damaged cord or plug or after the |
||||||
appliance malfunctions, or |
is |
dropped |
or damaged |
in |
any |
manner, |
Return appliance to the factory service center for examination, repair or electrical or mechanical adjustment.
•The use of attachments not recommended or sold by Sunbeam-Oster
|
Household Products |
may |
cause |
fire, |
electrical shock or injury. |
||
• |
Do |
not |
use outdoors. |
|
|
|
|
• Do |
not |
let cord hang over edge of table or counter or touch hot |
|||||
|
surfaces, |
including |
the |
stove. |
|
|
|
• |
Remove |
beaters from Mixer before washing. |
|||||
• |
Do not place Mixer on or near a hot burner, or in a heated oven, |
||||||
• |
Do |
not |
use Mixer for other than intended use. |
||||
• |
Do |
not |
leave Mixer unattended |
while |
in operation. |
||
SAVE THESE INSTRUCTIONS
NOTE: This Mixer is intended for household use only.

Use and Care Information
Before assembling your Sunbeam Mixmaster Mixer BE SURE THE POWER CORD IS UNPLUGGED and Speed Control dial is in the OFF position.
1, Fit the revolving turntable into the base of the stand using the socket corresponding to the size of bowl selected (large or small).
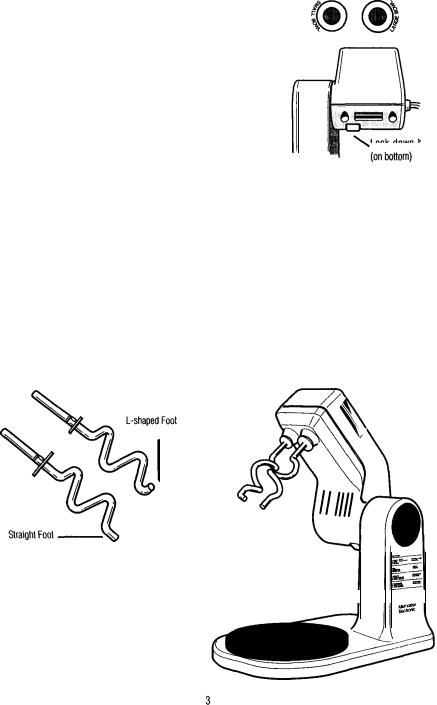
2.Tilt the mixer head by pressing in on the button on the bottom of the mixer head. Lift it up and back toiilt it out of the way of the bowl.
Lifl up until the mixer head snaps into a locked position.
3.Attaching the beaters. It is most important that the beaters are fully inserted into the proper sockets or your Sunbeam Mixmaster Mixer will not operate correctly. The beater with the nylon button should
be inserted by its shaft into the socket closest to the side of the bowl. The square shaped beater without the nylon button is inserted
in the socket closest to the center of the bowl. insert the beaters one at a time with a slight
twisting action until they snap into place. Release the button and lower the mixer into the bowl ready for use.
Note: If a beater should not properly snap into place pull it out of the socket and rotate it one quarter turn. Reinsert the beater into the socket until it snaps into position.
4. Attaching the dough hooks. The dough hook with the small washer and L-shaped foot goes into the socket on the side of the mixer nearest the side of the bowl. The other dough hook with the large washer and straight foot goes into the socket nearest the center of the bowl. See the dough hook symbols located on the front of the mixer head.
Note: The dough hooks must |
go |
into the correct sockets. |
The mixer will not |
operate with the dough hooks in the wrong |
position as the dough hook |
will |
hit the bowl. Read the |
following instructions |
carefully. |
Operating Instructions
1. The SPEED CONTROL is used to start, stop, and control the speeds of your Sunbeam Mixmaster Mixer. Clearly marked instructions for correct mixing speeds for each type of mixture are shown in the mixing guide, page 5. The Speed Control should be in the OFF position before tilting the mixer head.
2. The LOCK DOWN BUTTON is located on the underside of the mixer head. When mixing batters and kneading bread dough make sure the mixer head is locked down. To tilt mixer head back, simply press in on the button.
3. The TURNTABLE. The rotating turntable fits into the socket on the base of the stand. Make sure turntable is properly in place before
using mixer. The turntable is |
fitted with ball bearings which provide |
|
an |
easy turning action of the |
bowl while mixing. THE TURNTABLE ASSEMBLY SHOULD NOT BE IMMERSED |
IN |
WATER. |
|
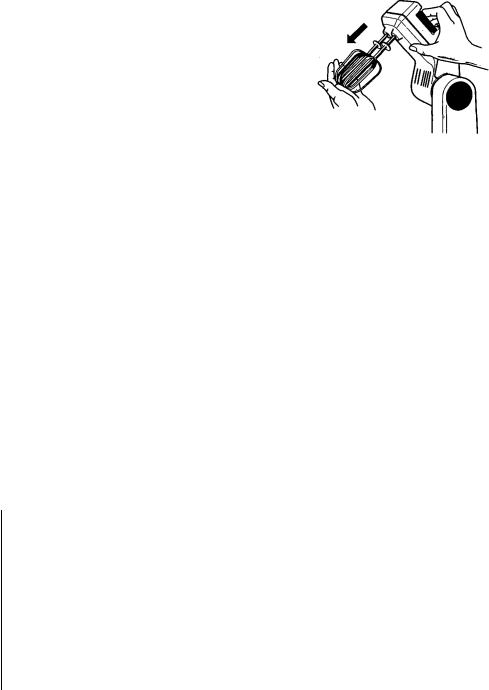
4. EJECTING BEATERS & DOUGH HOOKS. TURN THE SPEED CONTROL TO OFF. UNPLUG THE MIXER CORD. Raise the mixer head. The beaters or dough hooks may then be removed. NOTE: DO NOT KNOCK BEATERS AGAINST THE BOWL ON COMPLETION OF MIXING.
Use and Care Cautions For Glass Bowls
Failure to follow these instructions can cause breakage.
1.Do not use on top of stove.
2.Do not use in toaster oven.
3.Do not use with hot foods and liquids.
4.Do not handle bowl with a wet cloth or place on a wet or cold surface.
5.Do not use chipped or cracked bowls.
6.Do not use scouring pads or any object that will scratch the bowls.
7.Do not use in oven, under broiler or in a microwave oven.
Mixing Guide
About the Speed Control
The Speed Control dial is used for turning the mixer ON and OFF and for selecting its 12 mixing speeds. Rotate the Speed Control dial in a clockwise direction to increase mixing speed, and in a counterclockwise direction to decrease mixing speed. As you rotate the Speed Control dial, notice that a numbered speed is aligned with the indicator on top of the mixer head. This numbered speed indicates the speed at which the mixer is operating. Rotate the Speed Control dial until the indicator is opposite the numbered speed you wish to use.
About the mixing guide
The mixing guide has been designed to help you take the guess work out of preparing foods. Use the descriptions as a mixing guide when preparing your favorite recipes. Following is a description of each
4
 Loading...