


Gas Grill
Built-In LP Gas Grill Installation Guide
Assembly - Pg. 7 • Tank Enclosure Installation - Pg. 26
ESNA Guía de instalación de barbacoas de gas propano licuado empotradas - Pg. 33
 Guide pour l’installation du grill à gaz PL intégré - Pg. 47
460 - LP
660 - LP
#56583
You must read this Owner’s Guide before operating your gas grill.
m DANGER
If you smell gas:
1.Shut off gas to the appliance.
2.Extinguish any open flames.
3.Open lid.
4.If odor continues, keep away from the appliance and immediately call your gas supplier or your fire department.
Leaking gas may cause a fire or explosion which can cause serious bodily injury, death, or damage to property.
mWARNING:
1.Do not store or use gasoline or other flammable liquids or vapors in the vicinity of this or any other appliance.
2.An LP cylinder not connected for use shall not be stored in the vicinity of this or any other appliance.
mWARNING: Follow all leak-check procedures carefully in this manual prior to barbecue operation. Do this even if the barbecue was dealer-assembled.
NOTICE TO INSTALLER: These instructions must be left with the owner and the owner should keep them for future use.
THIS GAS APPLIANCE IS DESIGNED FOR OUTDOOR USE ONLY.
mWARNING: Do not ignite this appliance without first reading the BURNER IGNITION sections of this manual.
56583 02/28/11 LP US - ENGLISH

WARNINGS
m DANGER
Failure to follow the Dangers, Warnings and Cautions contained in this Owner’s Manual may result in serious bodily injury or death, or in a fire or an explosion causing damage to property.
m WARNINGS
mDo not store a spare or disconnected liquid propane cylinder under or near this barbecue.
mImproper assembly may be dangerous. Please follow the assembly instructions carefully.
mAfter a period of storage, and/or nonuse, the Weber® gas barbecue should be checked for gas leaks and burner obstructions before use. See instructions in this manual for correct procedures.
mDo not operate the Weber® gas barbecue if there is a gas leak present.
mDo not use a flame to check for gas leaks.
mCombustible materials should never be within 24 inches (61 cm) of the back or sides of your Weber® gas barbecue.
mDo not put a barbecue cover or anything flammable on, or in the storage area under the barbecue.
mYour Weber® gas barbecue should never be used by children. Accessible parts of the barbecue may be very hot. Keep young children away while it is in use.
mYou should exercise reasonable care when operating your Weber® gas barbecue. It will be hot during cooking or cleaning and should never be left unattended, or moved while in operation.
mShould the burners go out while in operation, turn all gas valves off. Open the lid and wait five minutes before attempting to relight, using the igniting instructions.
mDo not use charcoal or lava rock in your Weber® gas barbecue.
mNever lean over open grill or place hands or fingers on the front edge of the cookbox.
mShould a grease fire occur, turn off all burners and leave lid closed until fire is out.
mDo not enlarge valve orifices or burner ports when cleaning the valves or burners.
mThe Weber® gas barbecue should be thoroughly cleaned on a regular basis.
mLiquid propane gas is not natural gas. The conversion or attempted use of natural gas in a liquid propane unit or liquid propane gas in a natural gas unit is dangerous and will void your warranty.
mDo not attempt to disconnect any gas fitting while your barbecue is in operation.
mUse heat-resistant barbecue mitts or gloves when operating barbecue.
mKeep any electrical supply cord and the fuel supply hose away from any heated surfaces.
mCombustion byproducts produced when using this product contain chemicals known to the state of California to cause cancer, birth defects, or other reproductive harm.
mDo not use this barbecue unless all parts are in place. The unit must be properly assembled according to the assembly instructions.
mProposition 65 Warning: Handling the brass material on this product exposes you to lead, a chemical known to the state of California to cause cancer, birth defects or other reproductive harm.
(Wash hands after handling this product.)
LIQUID PROPANE GAS UNITS ONLY
mUse the pressure regulator and hose assembly that is supplied with your Weber® gas barbecue.
mDo not attempt to disconnect the gas regulator and hose assembly or any gas fitting while your barbecue is in operation.
mA dented or rusty liquid propane cylinder may be hazardous and should be checked by your liquid propane supplier. Do not use a liquid propane cylinder with a damaged valve.
mAlthough your liquid propane cylinder may appear to be empty, gas may still be present, and the cylinder should be transported and stored accordingly.
mIf you see, smell or hear the hiss of escaping gas from the liquid propane cylinder
1.Move away from liquid propane cylinder.
2.Do not attempt to correct the problem yourself.
3.Call your fire department.
2
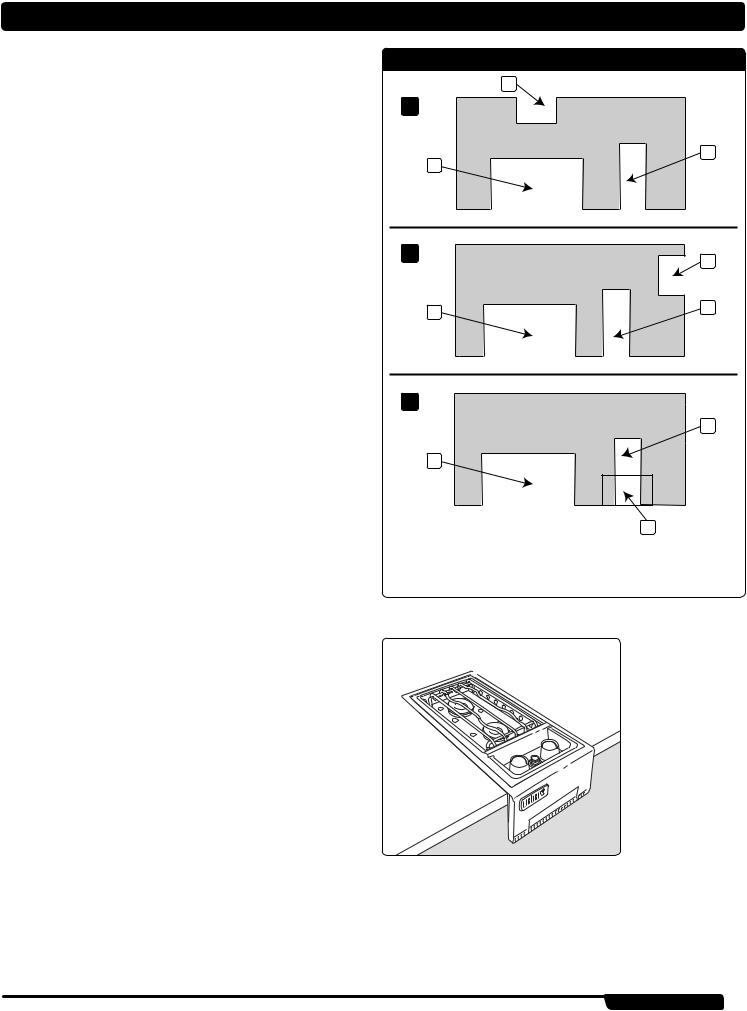
BUILT-IN CUTOUT DIMENSIONS
“ISLAND” STRUCTURE CONFIGURATION OPTIONS
There are many available options for locating the major components of your Island structure. Your major components are:
A)The Built in Grill
B)Gas supply enclosure
C)Optional Side burner accessory
The 3 common options (A, B, C) are illustrated in the “ ‘Island’ Structure Configuration Options” table.
Note: Gas Line Limitation
The gas supply hose from grill manifold to gas supply bulkhead must not exceed 58" (147 cm).The 3/8" (9.52 mm) Side Burner accessory hose (not included) must not exceed 58" (147 cm).
NOTE: IF YOU HAVE PURCHASED A SIDEBURNER
If you have purchased a Side Burner accessory with your Summit® gas grill, Weber® recommends that you read the SUMMIT® BUILT-IN SIDEBURNER INSTALLATION/ OWNER’S GUIDE before designing your “island” structure.
“ISLAND” STRUCTURE CONFIGURATION OPTIONS
2
A
3
1
B |
|
2 |
|
|
|
|
1 |
3 |
|
|
C
3
1
|
|
|
|
|
|
2 |
|
||
|
|
|
|
|
1 |
Summit® 4-burner/6-burner grill |
|||
2 |
Gas supply |
|||
|
|
|
|
|
3 |
Optional sideburner accessory |
|||
|
|
|
|
|
|
|
|
|
|
www.weber.com® 3
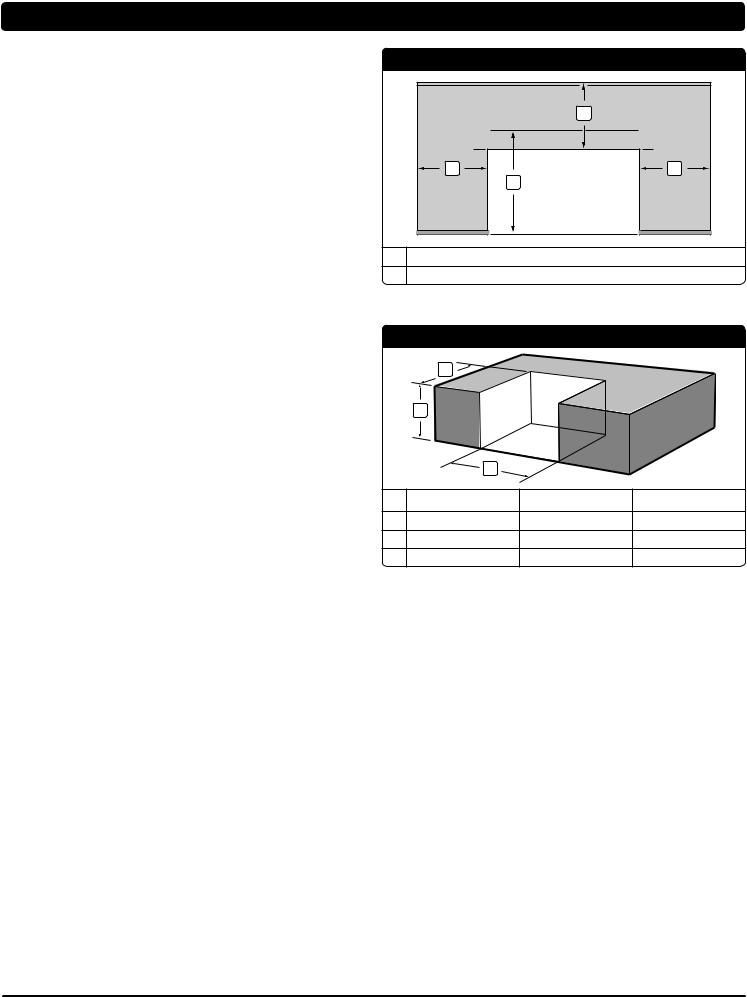
BUILT-IN CUTOUT DIMENSIONS
LOCATING YOUR GRILL
When determining a suitable location for your Summit® gas grill installation, give attention to concerns such as exposure to wind, proximity to traffic paths, and keeping any gas supply lines as short as possible. Never locate the Summit® gas grill in a garage, breezeway, shed, under an unprotected overhang, or other enclosed area. Locate the grill and structure so there is enough room to safely evacuate the area in case of a fire.
CLEARANCE FROM SURFACES OR STRUCTURES
mWARNING: Clearance from any surface or structure is
24" (610 mm) from the back and sides of the grill. Refer to “Typical Gas Supply Installation” before starting installation.
mWARNING: The structure, “island”, countertops, and adjacent work areas for the built-in grill installation must be built from noncombustible materials only.
NOTE: If you have questions on what materials are considered noncombustible, contact your local building materials supplier or fire department.
BUILT-IN STRUCTURE CUTOUT DIMENSIONS
All dimensions are to finished surfaces.
mWARNING: All countertop finished surfaces must be constructed of a noncombustible material.
|
|
CLEARANCES |
|
|
|
1 |
|
|
1 |
2 |
1 |
|
|
|
|
1 |
|
24" (610 mm) any surface |
|
2 |
27" (686 mm) minimum for lid clearance |
||
|
BUILT-IN CUTOUT GENERAL DIMENSIONS |
||
|
3 |
|
|
|
2 |
|
|
|
1 |
|
|
|
460 |
660 |
TOLERANCES |
1 |
34" (864 mm) |
42" (1067 mm) |
±1/4" (6 mm) |
2 |
36" (914 mm) |
36" (914 mm) |
max |
3 |
24 5/16" (618 mm) |
24 5/16" (618 mm) |
±1/4" (6 mm) |
4
BUILT-IN CUTOUT DIMENSIONS
GENERAL CONSTRUCTION DETAILS
Summit® Built-In unit and all other accessory units should be on site before construction begins.
For ease of installation, the grill will be pushed on its casters into the built-in structure.
The installation of this grill requires a level floor pad surface (1) and countertop surface. The floor pad surface must be constructed from solid materials and must be level
and smooth. Proper subgrade materials must be used under the floor pad to prevent materials from settling and heaving.
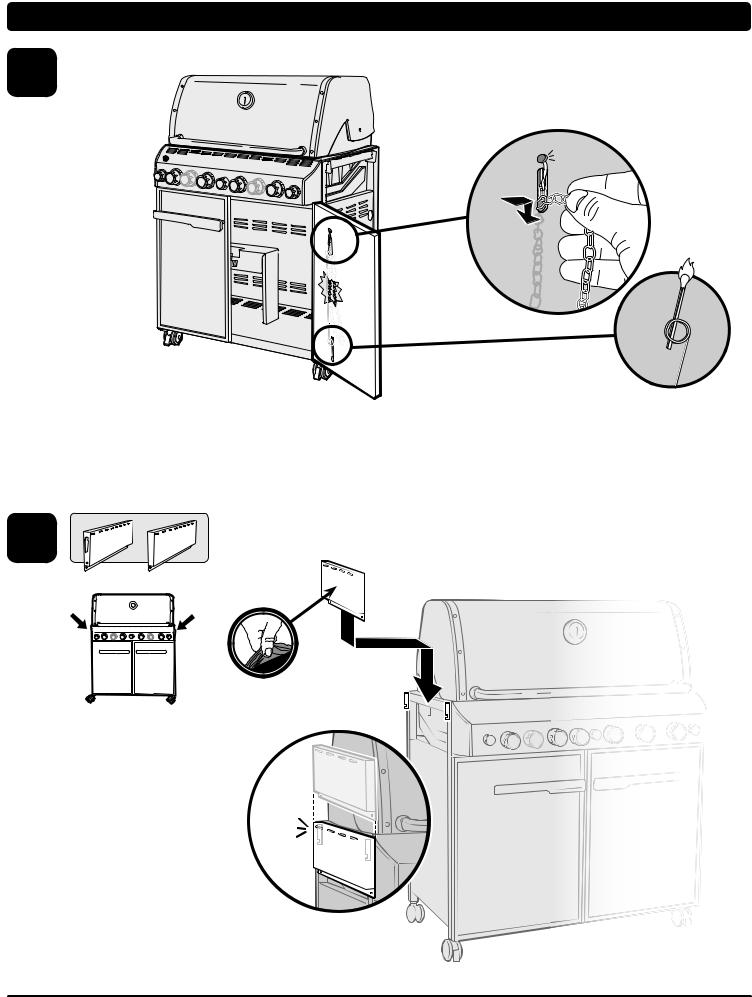
Rotisserie Outlet
If the supporting structure is going to have an electrical outlet for a rotisserie, it should be on the left side of the structure.
1
Grill and enclosure illustrations are for reference only.
BUILT-IN CUTOUT DETAILED DIMENSIONS
|
1 |
|
d |
|
|
|
|
|
|
|
|
|
1 |
|
1 |
|
2 |
|
|
|
|
||
|
|
|
4 |
1 |
3 |
|
|
2 |
|
||
|
5 |
|
|
||
|
|
|
b |
||
6 |
|
|
|
||
|
|
|
|
||
|
|
|
|
|
|
|
3 |
|
c |
|
|
|
7 |
b |
|
|
|
a |
|
|
|
|
|
|
|
|
|
|
DIMENSIONS
1
2
3
4
5
6
7
a
b
c
d
460 |
660 |
24" minimum* (610 mm) |
24" minimum* (610 mm) |
|
|
16 1/2" (419 mm) |
16 1/2" (419 mm) |
|
|
11 1/8" (283 mm) |
11 1/8" (283 mm) |
|
|
10 1/2" (267 mm) minimum |
10 1/2" (267 mm) minimum |
|
|
24 5/16" (618 mm) |
24 5/16" (618 mm) |
|
|
36" (914 mm) maximum |
36" (914 mm) maximum |
|
|
34" (864 mm) Built-In frame |
42" (1067 mm) Built-In frame |
|
|
For a countertop treatment: recommended 3/4" (19 mm) overhang.
Gas inlet
Side burner opening
Access for electric on left hand side
*Clearance from any surface or structure is at least 24" (610 mm) from the back and sides of the grill or side burner.
www.weber.com® 5
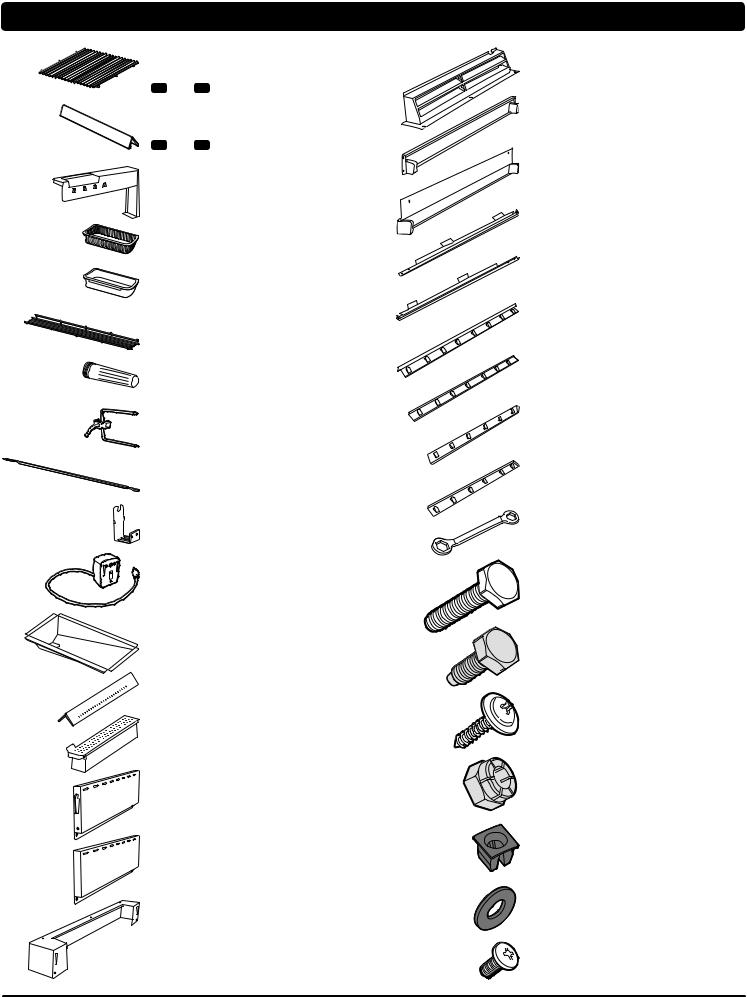
PARTS LIST • LISTA DE PIEZAS • LISTE DES PIECES
Stainless Steel Cooking Grates
Parrillas de cocción de acero inoxidable Grilles de cuisson en acier inoxydable
460 - 2 660 - 3
Flavorizer® Bars
Barras Flavorizer®
Barres Flavorizer®
460 - 8 660 - 12
Catch Pan Holder - 1
Soporte del plato recolector - 1
Support pour égouttoir - 1
Disposable Drip Pan - 1
Bandeja de goteo desechable - 1
Egouttoir jetable - 1
Catch Pan - 1
Plato recolector - 1
Egouttoir - 1
Warming Rack - 1
Rejilla para calentar - 1
Grille de maintien au chaud - 1
Battery Housing - 1
Compartimiento de la batería - 1
Logement des piles - 1
Rotisserie Forks - 4
Horquillas del asador rotativo - 4
Fourches de la rôtissoire - 4
Rotisserie Spit - 1
Asador rotativo - 1
Broche de la rôtissoire - 1
Rotisserie Bracket - 1
Soporte del asador rotativo - 1
Support de la rôtissoire - 1
Rotisserie Motor - 1
Motor del asador rotativo - 1
Moteur de la rôtissoire - 1
Slide Out Grease Tray - 1
Bandeja deslizante de grasa - 1
Plateau de récupération des graisses amovible - 1
Smoker Bar - 1
Barra del ahumador - 1
Barre du fumoir - 1
Smoker Box - 1
Caja del ahumador - 1
Boîtier du fumoir - 1
Left Side Vent - 1
Respiradero del lado izquierdo - 1
Aération latérale gauche - 1
Right Side Vent - 1
Respiradero del lado derecho - 1
Aération latérale droite - 1
Rear Vent Bracket - 1
Soporte del respiradero posterior - 1
Support de l’aération arrière - 1
Rear Vent - 1
Respiradero posterior - 1
Aération arrière - 1
Front Wheel Alignment Panel - 1
Panel de alineación de las ruedas delanteras - 1
Panneau d’alignement de la roue avant - 1
Rear Wheel Alignment Panel - 1
Panel de alineación de las ruedas traseras - 1
Panneau d’alignement de la roue arrière - 1
Left Trim Piece - 1
Pieza de guarnición izquierda - 1
Pièce à rogner de gauche - 1
Right Trim Piece - 1
Pieza de guarnición derecha - 1
Pièce à rogner de droite - 1
Rear Filler Strip - 1
Tira de relleno posterior - 1
Bande de remplissage arrière - 1
Front Filler Strips- 2
Tiras de relleno delanteras - 2
Bandes de remplissage avant- 2
Left Top Filler Strip - 1
Tira de relleno izquierda superior - 1
Bande de remplissage supérieure gauche - 1
Right Top Filler Strip - 1
Tira de relleno derecha superior - 1
Bande de remplissage supérieure droite - 1
Wrench - 1
Llave - 1
Clé - 1
1 Inch Bolts (1/4 - 20 x 1") - 2
Pernos de 1 pulgada (1/4 - 20 x 1") - 2 Boulons de 1 pouce (1/4 - 20 x 1") - 2
Silver Hex Bolts (1/4 - 20 x 5/8") - 4
Pernos hexagonales plateados (1/4 - 20 x 5/8") - 4 Boulons hexagonaux en argent (1/4 - 20 x 5/8") - 4
Screws - 3
Tornillos - 3
Vis - 3
Nut (1/4 - 20) - 2
Tuerca (1/4 - 20) - 2
Ecrou (1/4 - 20) - 2
Plastic Plugs - 3
Tapones de plástico - 3
Bouchons de plastique - 3
Washers - 4
Arandelas - 4
Rondelles - 4
Silver Screws (10 - 32 x 3/8") - 11
Tornillos plateados (10 - 32 x 3/8") - 11
Vis en argent (10 - 32 x 3/8") - 11
6
ASSEMBLY • ENSAMBLAJE • ASSEMBLAGE
TOOLS NEEDED:
HERRAMIENTAS REQUERIDAS:
OUTILS NECESSAIRES :
The grill illustrated may have slight differences than the model purchased.
La barbacoa ilustrada puede tener ligeras diferencias con respecto al modelo comprado.
Il est possible que le grill de l’illustration présente de légères différences par rapport au modèle acheté.
mIMPORTANT: TO PROPERLY ALIGN FRAME AND DOORS, ASSEMBLE GRILL ON A FLAT AND LEVEL SURFACE.
mIMPORTANTE: PARA ALINEAR CORRECTAMENTE EL BASTIDOR Y LAS PUERTAS, ARME LA BARBACOA SOBRE UNA SUPERFICIE PLANA Y HORIZONTAL.
mIMPORTANT : POUR ALIGNER CORRECTEMENT LE CADRE ET LES PORTES, ASSEMBLEZ LE GRILL SUR UNE SURFACE PLANE ET REGULIERE.
Remove protective film from stainless surface before using grill.
Retire la película protectora de la superficie de acero inoxidable antes de utilizar la barbacoa.
Retirez la pellicule de protection de la surface inoxydable avant d’utiliser le grill.
•Adjust doors, if necessary
•Si fuese necesario, ajuste la puerta
•Ajustez les portes, si nécessaire.
www.weber.com® 7

|
|
ASSEMBLY • ENSAMBLAJE • ASSEMBLAGE |
||
1 |
460 |
660 |
||
|
|
|
|
|
|
|
|
|
|
2 |
8

ASSEMBLY • ENSAMBLAJE • ASSEMBLAGE
3batteries only. Do not mix old and new batteries or different types of batteries (standard, alkaline or rechargeable).
Requiere 3 baterías alcalinas “D” (incluidas). Use solamente baterías alcalinas. No mezcle baterías nuevas con viejas o
diferentes tipos de baterías entre sí (normales, alcalinas o recargables).Requires 3 “D” alkaline batteries (included). Use alkaline
Nécessite 3 piles alcalines “D” (fournies). Utilisez des piles alcalines uniquement. Ne mélangez pas des piles usagées avec des piles neuves ou différents types de piles (standard, alcalines ou rechargeables).
4
www.weber.com® 9
ASSEMBLY • ENSAMBLAJE • ASSEMBLAGE
5
6
10
ASSEMBLY • ENSAMBLAJE • ASSEMBLAGE
7
8
www.weber.com® 11

ASSEMBLY • ENSAMBLAJE • ASSEMBLAGE
9
10 
12
ASSEMBLY • ENSAMBLAJE • ASSEMBLAGE
11
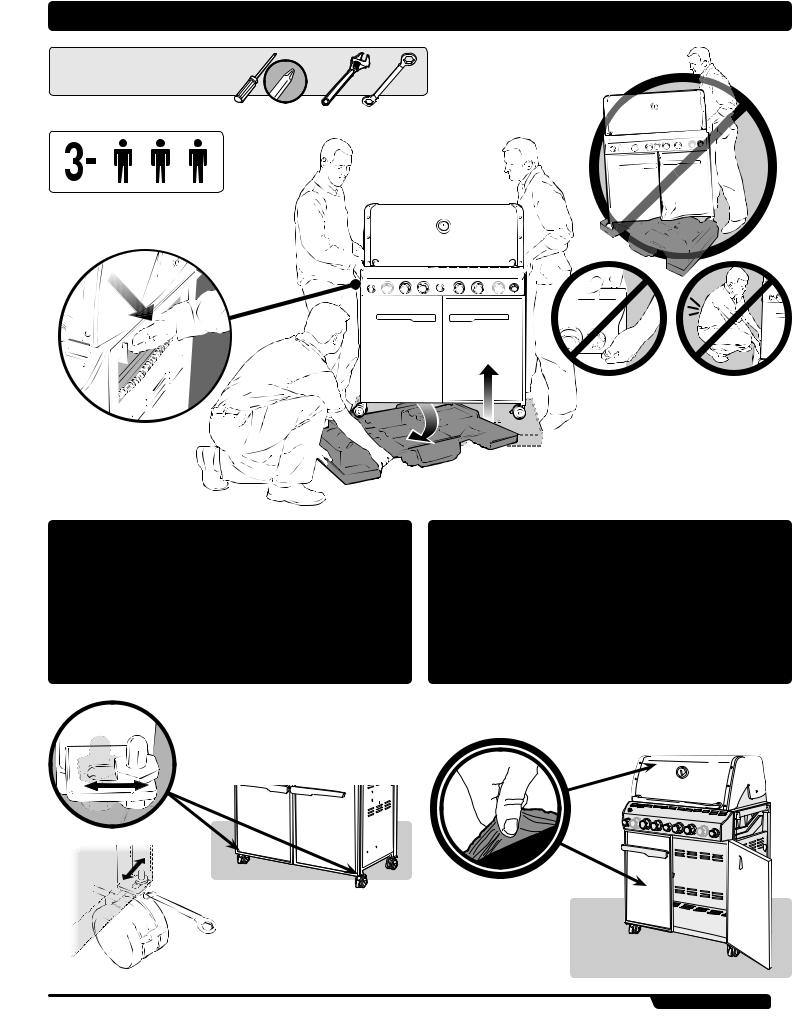
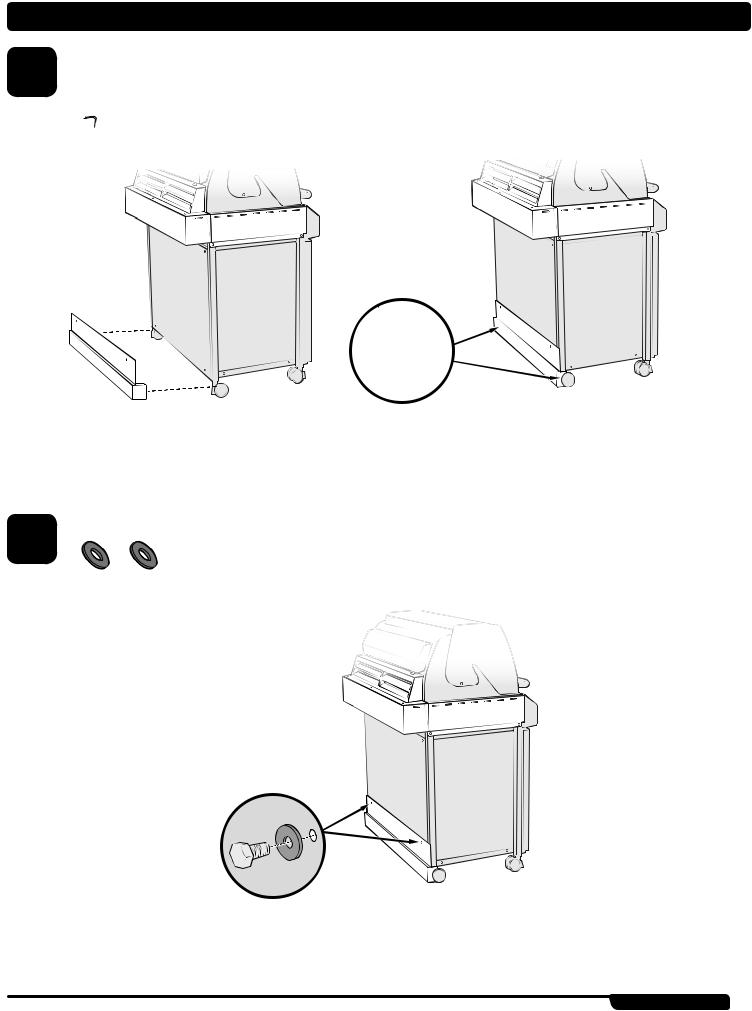
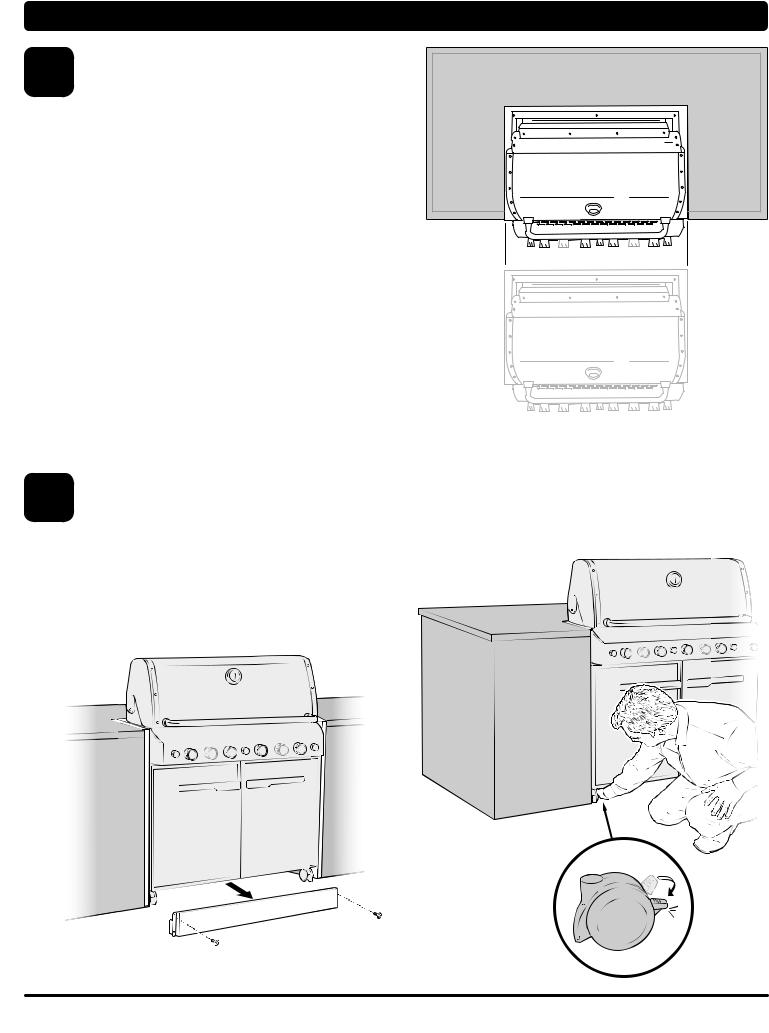
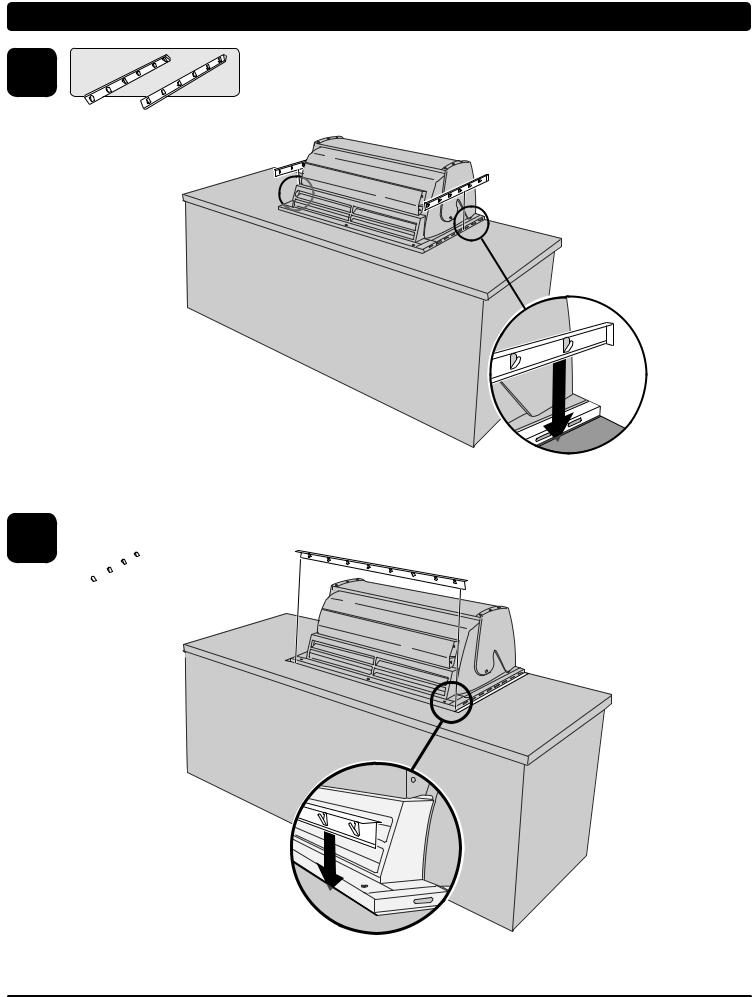
Now that the side vents are installed, the grill should be placed
12 directly in front of the cut-out opening (a) of the built-in structure. The grill will be pushed straight into the structure once the wheel alignment panels are installed in the following steps.
Align grill with enclosure, but do not roll grill into enclosure at this time.
Ahora que los respiraderos laterales están instalados, la barbacoa deberá colocarse directamente en frente de la abertura del corte (a) en la estructura de empotramiento.
Una vez que los paneles de alineación de las ruedas estén instalados en los siguientes pasos, la barbacoa se empujará directamente dentro de la estructura. Alinee la barbacoa con el compartimiento, pero no la ruede aún dentro del mismo.
Maintenant que les aérations latérales sont installées, le grill devrait être placé directement en face de l’ouverture découpée
(a) de la structure encastrée. Le grill sera enfoncé directement
à l’intérieur de la structure une fois que les panneaux d’alignement des roues seront installés selon les étapes suivantes. Alignez le grill avec le meuble, mais ne faites pas rouler le grill à l’intérieur du meuble pour l’instant.
a
www.weber.com® 13
13
14
ASSEMBLY • ENSAMBLAJE • ASSEMBLAGE
Remove two screws and two washers from back panel and set aside. Do not discard hardware.
Retire dos tornillos y dos arandelas del panel posterior y póngalos a un lado. No deseche los herrajes.
Retirez les deux vis et les deux rondelles du panneau arrière et mettez-les de côté. Ne jetez pas la quincaillerie.
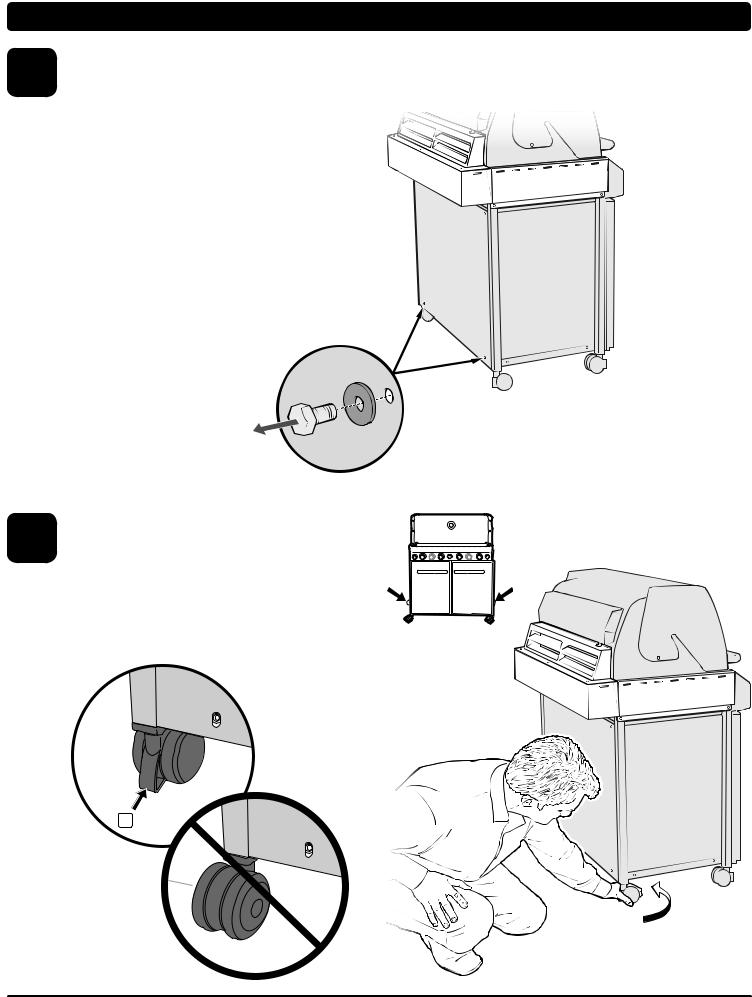
Rotate rear casters so that the points of the casters (a) are facing outward toward the grill enclosure.
Gire las ruedas traseras de manera que las puntas de las ruedas (a) den cara afuera hacia el compartimiento de la barbacoa.
Faites pivoter les roulettes arrière de sorte que les points des roulettes (a) se trouvent orientés vers l’extérieur vers le meuble d’accueil du grill.
a
14
ASSEMBLY • ENSAMBLAJE • ASSEMBLAGE
15 
16 
www.weber.com® 15
ASSEMBLY • ENSAMBLAJE • ASSEMBLAGE
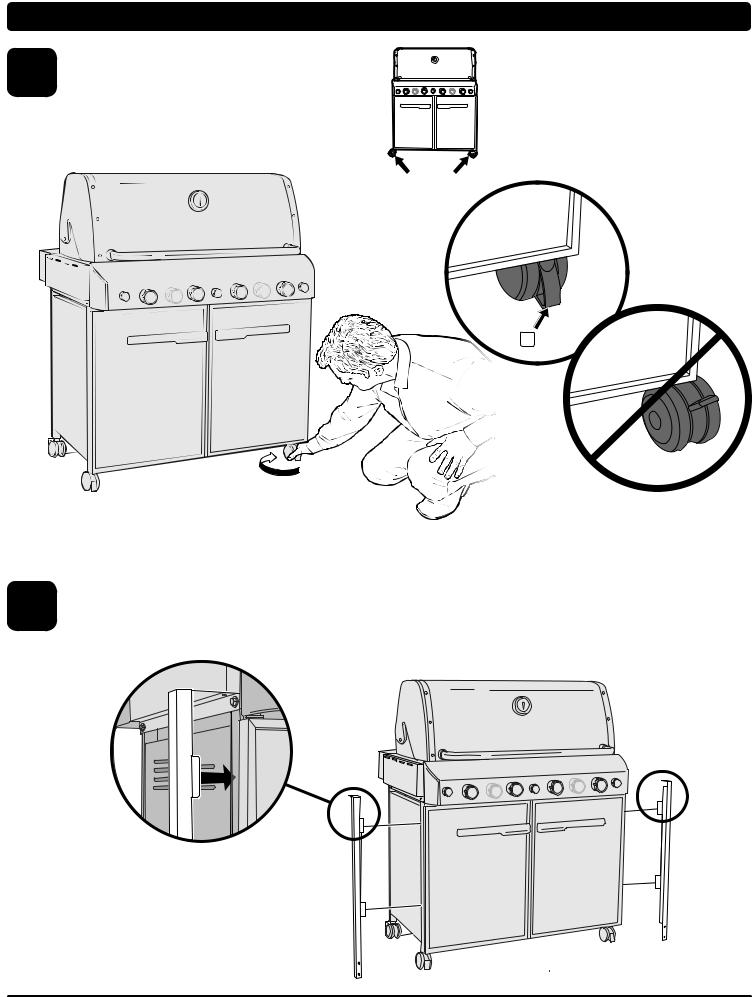
17 |
Rotate front casters so that caster points (a) are facing the front |
of the grill. |
|
Gire las ruedas delanteras de manera que las puntas de las |
ruedas (a) den cara al frente de la barbacoa.
Faites pivoter les roulettes avant de sorte que les points des roulettes (a) se trouvent face à l’avant du grill.
a
18 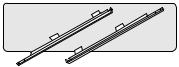
16

ASSEMBLY • ENSAMBLAJE • ASSEMBLAGE
19 
20 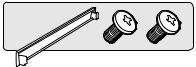
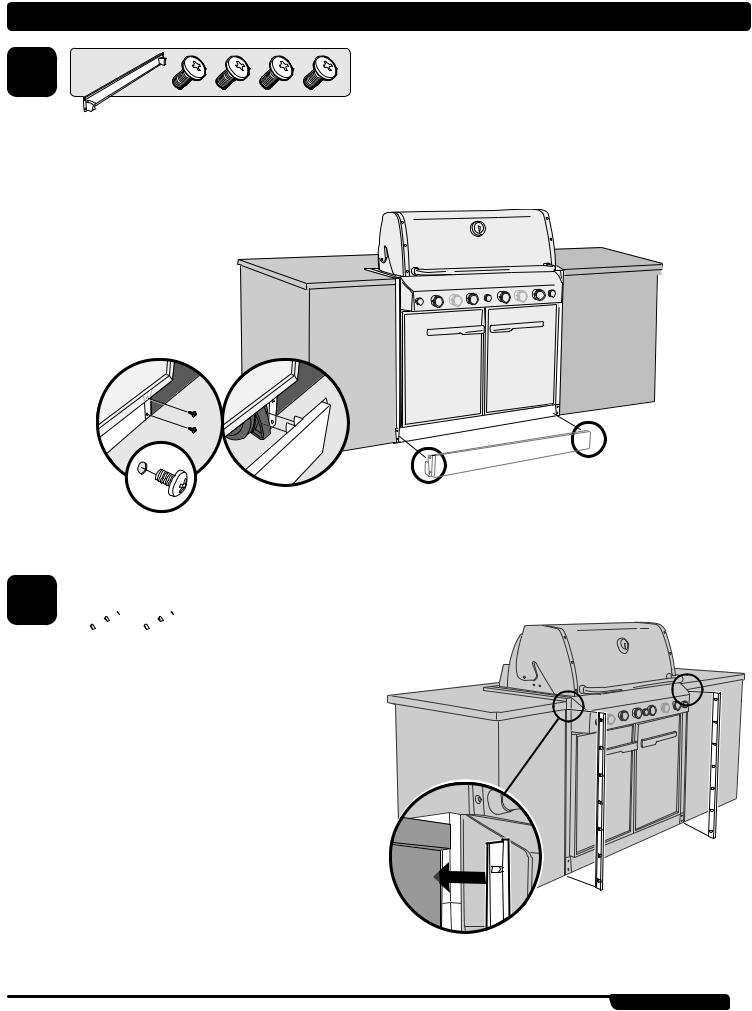
Temporarily install the front wheel alignment panel using just one screw on each side.
Instale temporalmente el panel delantero de alineación de las ruedas utilizando sólo un tornillo en cada lado.
Installez temporairement le panneau d’alignement des roues avant en utilisant juste une vis de chaque côté.
www.weber.com® 17
ASSEMBLY • ENSAMBLAJE • ASSEMBLAGE
21 |
Roll grill straight back into enclosure. |
Important Note: Surface must be level. |
|
Ruede la parrilla directamente atrás hacia el compartimiento. |
Nota importante: La superficie debe estar nivelada.
Faites rouler le grill directement à l’intérieur du meuble.
Remarque importante : La surface doit être plane.
After the grill is properly located in the enclosure, remove the 22 Front Wheel Alignment Panel. Reach underneath grill and lock
the two front casters.
Una vez que la barbacoa esté correctamente ubicada dentro del compartimiento retire el Panel Delantero de Alineación de las Ruedas. Metiendo la mano debajo de la barbacoa, tranque los seguros de las ruedas delanteras.
Une fois que le grill a été positionné correctement à l’intérieur du meuble, retirez la Panneau d’alignement des roues avant. Passez sous le grill et verrouillez les deux roulettes avant.
18
ASSEMBLY • ENSAMBLAJE • ASSEMBLAGE
23
Reinstall the Front Wheel Alignment Panel securing both sides with all four screws.
Reinstale el Panel Delantero de Alineación de las Ruedas atornillándola a ambos lados con todos los cuatro tornillos.
Remettez en place le Panneau d’alignement des roues avant en fixant les deux côtés à l’aide de la totalité des quatre vis.
24 
The included filler strips may be used to fill any gaps at the countertop or front of the grill. Install as needed.
Las tiras de relleno incluidas pueden utilizarse para rellenar cualquier separación en la encimera o en la parte delantera de la barbacoa. Instálelas según se requiera.
Les bandes de remplissage fournies peuvent être utilisées pour combler tout écart au niveau du plan de travail ou de l’avant du grill. Installez-les selon les besoins.
www.weber.com® 19
ASSEMBLY • ENSAMBLAJE • ASSEMBLAGE
25
26 
20
 Loading...