


 Loading...

The information in this documentation is subject to change without notice and does not represent a commitment on the part of Steinberg Media Technologies GmbH. The software described by this document is subject to a License Agreement and may not be copied to other media. No part of this publication may be copied, reproduced, or otherwise transmitted or recorded, for any purpose, without prior written permission by Steinberg Media Technologies GmbH.
All product and company names are ™ or ® trademarks of their respective owners. Windows XP is a trademark of Microsoft Corporation. The Mac logo is a trademark used under license. Macintosh is a registered trademark.
Mac OS X is a registered trademark. Cakewalk SONAR is a registered trademark of Twelve Tone Systems. ReWire is a trademark of Propellerhead Software AB. Logic is a trademark of Apple Computer, Inc. registered in the U.S. and other countries.
© Steinberg Media Technologies GmbH & Wizoo Sound Design GmbH, 2005. All rights reserved.
HYPERSONIC
2English

Table of contents
6Register your software!
6The Steinberg Key
7 Minimum system requirements (PC version)
8Installing Hypersonic 2 (PC version)
8Removing Hypersonic 2 (PC version)
9Minimum system requirements (Mac version)
9Installing Hypersonic 2 (Mac version)
10Activating the Steinberg Key
11Preparations
ENGLISH
11Setting up Hypersonic 2 as a VST Instrument in Cubase
12Setting up Hypersonic 2 as a DXi2 Synth
13Using Hypersonic in an AU compatible application
13 Hypersonic stand-alone and ReWire
15Latency
16Overview
21Quickstart
22Linking parts
23Tweaking a sound
23Checking polyphony
24Create a key split/crossfade
25Adding a drumloop
26User interface
26Changing values
27Assigning MIDI Controllers
28Editing text
28 Using the MIDI keyboard
30Play PC Keyboard
30All Notes Off
31Hyperknobs
31The concept of Hyperknobs
32Using Hyperknobs
33Reference of most common knob labels
35Sound generation structure
35 |
Combi |
35 |
Patch |
35 |
Element |
37 |
Browsing, searching, loading and saving |
HYPERSONIC
English 3

37 |
Browsing patch banks |
38 |
Loading a patch into a part slot |
38 |
Selecting patches from within the host application |
39 |
Loading patches from disk |
39 |
Browsing the patch library |
40 |
Finding patches |
42Managing banks and patches
42Managing user banks
43Managing user patches
44Selecting banks and patches via MIDI program change
45Combis
46The Part area
46Arranging parts
47Layering parts (Link)
47Muting parts
48Setting levels and metering
48Setting part levels
48Activating meters
49The Combi Chain
52The MIDI page
52Key Range
53Velocity range
54Transposing and tuning
54Voices
55Parameter lock
56The Mix page
58The Edit page
59Managing elements
62The Patch Settings [P]
64The Arpeggiator
66The Arpeggiator’s programmable step sequencer
68Editing synth elements
69The Easy Page
71The Osc Page
72Sample Element [S]
72Sample Selector Display
72Startpoint
73Formant/Zone Shift
73Velocity to Layer
74Mono Legato Offsets
HYPERSONIC
4English

75 Analog Element [A]
75 Analog Osc 1 & 2
77Oscillator 3
78HPF – High Pass Filter
78 PWM Limit – Pulse Width Modulation Limit
78 WT Alias – Wavetable Aliasing
78 Wavetable Element [W]
80 FM Element [F]
80Carrier
81Modulator 1 & 2
83The FX page
83Global or patch FX
84Programming FX
86Using patch FX
87FX Management
87Effects structure
89FX elements in a patch
90The Setup Page
90Configuring outputs
92MIDI Settings
94Loading and saving patches and combis
94Memory Usage
96Help menu
ENGLISH
HYPERSONIC
English 5

Register your software!
Please take a moment to complete and return the registration card enclosed with Hypersonic 2. This will entitle you to technical support, and we’ll also keep you up to date with the latest news and updates.
The Steinberg Key
Please read this section before installing the Hypersonic software.
Included with the Hypersonic 2 package, you will find an activation code for the Steinberg Key (sometimes referred to as a “dongle”), a hardware copy protection device that is part of the Hypersonic copy protection scheme. Hypersonic 2 will not run if there is no Steinberg Key and if this key hasn’t been properly activated. You can either separately purchase a new Steinberg Key for use with Hypersonic 2, or use a key previously bought for use with a different Steinberg application.
The Steinberg Key
The Steinberg Key is, in fact, a little computer on which your Steinberg software licenses are stored. All hardware-protected Steinberg products use the same type of key, and you can store more than one license on one key. Also, licenses can (within certain limits) be transferred between keys – which is helpful, e.g. if you want to sell a piece of software.
•If you have a Windows PC, the installation routine will initiate a restart of Windows after installation of the key drivers and the program software. After the restart, you can plug the key into the USB port to proceed with the key activation.
•If you have an Apple Macintosh computer, there will be no automatic restart. Be sure to read the information regarding the Steinberg Key that is displayed during the installation process.
HYPERSONIC
6English

• If you already own copy-protected Steinberg software, you should re- |
ENGLISH |
||
|
|||
|
move any existing Steinberg Keys from the computer’s USB port dur- |
|
|
|
ing the Hypersonic 2 installation routine. |
|
|
|
|||
|
|
|
|
|
The Steinberg Key must not be plugged in before or during the installa- |
|
|
|
tion of Hypersonic if this is the first time you use such a key. Otherwise |
|
|
|
the operating system of your computer will register it as new USB hard- |
|
|
|
ware and try to find drivers that won’t be present before Hypersonic 2 in- |
|
|
|
stallation. |
|
|
|
|
|
|
|
|
|
|
|
If you already own a Steinberg Key (e.g. for Cubase or Nuendo), you can |
|
|
|
load your Hypersonic licenses onto that one, using the activation codes |
|
|
|
supplied with Hypersonic. This way you need only one USB key for both |
|
|
|
your host application and Hypersonic 2 (see below). |
|
|
|
|
|
|
Minimum system requirements (PC version)
•A PC with a 1.4 GHz Pentium or equivalent AMD processor (faster recommended)
•512 MB of RAM (1 GB recommended)
•1.7 GB of free hard disk space for the content
•Windows® XP Home or XP Professional
•Windows MME compatible audio hardware (an ASIO compatible audio card is recommended).
•If you want to use Hypersonic 2 as a plug-in or ReWire slave device, you’ll need Cubase or Nuendo or another VST 2.0, ReWire or DXi 2 compatible host application.
•A Steinberg Key and an available USB port
•A DVD-ROM drive for installation
•Monitor and graphics card supporting at least 1024 x 768 resolution.
•A working internet connection for the activation of the Steinberg Key.
•Please also observe the system requirements of your host application.
Please note that some features may not be supported in some host applications.
HYPERSONIC
English 7

Installing Hypersonic 2 (PC version)
Proceed as follows to install Hypersonic:
1.Make sure that NO Steinberg Key is connected to the USB port.
2.Insert the Hypersonic 2 DVD into your DVD drive, launch the Explorer or open the “My Computer” window and double click on the symbol for the DVD drive that holds the Hypersonic 2 DVD.
If autostart is activated, the DVD contents will automatically open in a new window.
3.Double click on the Hypersonic 2 Installer symbol to launch the installation program and follow the instructions on screen.
4.After installation of the software, the installation routine will initiate a restart of your computer.
5.After the automatic restart, you will be prompted to plug the Steinberg Key into the USB port to proceed with the key activation.
Once the key is activated, you can start using Hypersonic 2, see page 10.
Removing Hypersonic 2 (PC version)
1.Open the “Add or Remove Programs” control panel of Windows XP.
2.Select Hypersonic 2 and click “Add/Remove.”
3.Follow the on-screen instructions.
HYPERSONIC
8English

Minimum system requirements (Mac version)
•A Power Mac G4 867 MHz computer (faster recommended)
•512 MB of RAM (1 GB recommended)
•1.7 GB of free hard disk space for the content
•Mac OS X version 10.4
•CoreAudio compatible audio hardware
•If you want to use Hypersonic 2 as a plug-in or ReWire slave device, you’ll need Cubase or Nuendo or another VST 2.0, ReWire or AU compatible host application.
•A Steinberg Key and an available USB port
•A DVD-ROM drive for installation
•Monitor and graphics card supporting at least 1024 x 768 resolution.
•A working internet connection for the activation of the Steinberg Key.
•Please also observe the system requirements of your host application.
Please note that some features may not be supported in some host applications.
ENGLISH
Installing Hypersonic 2 (Mac version)
Proceed as follows to install Hypersonic:
1.Make sure that NO Steinberg Key is connected to the USB port.
2.Quit all other applications so that you return to the Finder. Disable any system activity monitoring software or extension, in particular anti-virus software. Now, insert the Hypersonic DVD into the computer’s DVD drive.
3.If the DVD window doesn’t open automatically, double-click on the Hypersonic 2 DVD icon on your desktop.
4.Double-click the Syncrosoft LCC.mpkg file to run the copy protection installation program and follow the on-screen instructions.
5.Depending on the format you want to install, open the folder “Hypersonic 2 VST”, “Hypersonic 2 AU” or “Hypersonic 2 ReWire”. Double-click the corresponding PKG file to run the Hypersonic 2 installation program and follow the on-screen instructions.
HYPERSONIC
English 9

6.After installing the plug-in, copy the folder “Hypersonic 2 Content” to your system hard drive in the folder “Library/Application Support/ Steinberg/”.
If you copy the content to another directory on your hard drive you will have to run the “Set VB Content Location” application in the “Hypersonic 2 Content” folder on your hard drive, otherwise Hypersonic 2 will not find its data!
Do not move the Hypersonic 2 plug-in itself – it must stay in the VST plug-ins folder so the host application(s) can find it.
7.When the program software has been installed, proceed with the key activation (see below).
Activating the Steinberg Key
Whether you bought a new key when you bought Hypersonic 2, or if you want to use one you previously bought with a different Steinberg product: your Steinberg Key does not yet contain the license required for Hypersonic 2. You must download this license before you can launch Hypersonic 2!
Use the activation code supplied with the program in order to download the valid Hypersonic 2 license to your Steinberg Key. This process is the same both for existing and new keys. Proceed as follows:
1.After installation of the dongle drivers and the program software (and, on a Windows PC, after restarting your computer), plug the Steinberg Key into the USB port.
If you are unsure of which port this is, consult the documentation of your computer.
2.If this is the first time a copy protection device is plugged in, it will be registered as a new hardware device. On a Mac, drivers are found automatically without further user interaction. Windows will display a dialog asking you whether you would like to find drivers for the device manually or automatically.
Under Windows, choose to find drivers automatically. The dialog closes, and you may have to reboot your computer.
HYPERSONIC
10 English
3. Make sure that your computer has a working internet connection. |
ENGLISH |
|
|
License download is made “online”. If the computer on which you installed Hypersonic 2 |
|
is not connected to the internet, it is possible to use another computer for the online con- |
|
|
|
nection – proceed with the steps below and see the help for the License Control Center |
|
application. |
|
4. Launch the “License Control Center” application (found in the Windows |
|
Start menu under “Syncrosoft” or in the Macintosh Applications folder). |
|
This application allows you to view your Steinberg Keys and load or transfer licenses. |
|
5. Use the License Control Center “Wizard” function and the activation |
|
code supplied with Hypersonic 2 to download the license for |
|
Hypersonic 2 to your Key. Simply follow the on-screen instructions. |
|
If you are uncertain about how to proceed, consult the help for LCC. |
|
When the activation process is completed, you are ready to launch |
|
Hypersonic 2! |
|
Preparations
The following sections describe how to set up Hypersonic 2 for use with different interface formats.
Setting up Hypersonic 2 as a VST Instrument in Cubase
The following information refers to the use of Hypersonic within Cubase SX. We assume that you have correctly set up both Cubase SX and your MIDI and audio hardware.
Should you wish to use Hypersonic within another VST host application such as Nuendo, please refer to its documentation.
Proceed as follows to activate Hypersonic:
1.Make sure that Cubase SX receives MIDI data that you generate with your external MIDI master keyboard.
2.In Cubase SX, open the “VST Instruments” window from the Devices menu, and select “Hypersonic” from the pop-up menu of a free VST Instrument slot.
HYPERSONIC
English 11

3.Clicking the “Power” button in the rack will activate/deactivate Hypersonic 2.
By default this is automatically activated when a VST Instrument is loaded.
4.Click on the “Edit” button (“e”) to open the Hypersonic 2 window.
•Make sure that the currently selected Cubase SX track is set to MIDI channel 1 or ANY.
When set, you are ready to start using Hypersonic 2!
Setting up Hypersonic 2 as a DXi2 Synth
The following information refers to the use of Hypersonic 2 within Cakewalk SONAR 1. We assume that you have correctly set up both SONAR and your MIDI and audio hardware. Should you wish to use Hypersonic 2 within another DXi2 compatible host application, please refer to its documentation.
Proceed as follows to activate Hypersonic 2:
1.Make sure that SONAR receives MIDI data that you generate with your external MIDI master keyboard. You can check this visually with the “MIDI In/Out Activity” tray icon.
2.In SONAR, open the “Synth Rack” window from the View menu.
3.Click the Insert button (or select the Insert option on the main menu).
4.Open the DXi Synth submenu and select “Hypersonic 2” from the pop-up menu.
5.By default, the “Insert DXi Synth Options” dialog appears. To create one MIDI track and connect an audio track to the outputs 1 and 2 of Hypersonic, activate the options “MIDI Source Track” and “First Synth Output (Audio)”. To create all available Hypersonic outputs, activate “All Synth Outputs (Audio)”.
Refer to your host application’s documentation for further details.
6.Clicking the “Connection State” button in the Synth Rack will activate/ deactivate Hypersonic 2. By default this is automatically activated when DXi SoftSynths are loaded.
HYPERSONIC
12 English

7. |
Double-click on the “Hypersonic 2” entry or click the “Synth Proper- |
ENGLISH |
|
||
|
ties” button in the toolbar of the Synth Rack to open the Hypersonic 2 |
|
8. |
window. |
|
|
||
In SONAR, select the previously created MIDI track “Hypersonic 2”. |
|
|
|
Hypersonic 2 will now receive MIDI data from the selected track. Make |
|
|
sure that the MIDI channel of the currently selected SONAR track is set |
|
|
to the channel on which Hypersonic 2 is to receive MIDI data. |
|
When set, you are ready to start using Hypersonic!
Using Hypersonic in an AU compatible application
You can use Hypersonic in an AU host application (e.g. Logic).
The Hypersonic 2 AU version is installed in the folder “Library/Audio/ Plug-ins/Components”.
For Logic Pro 7 proceed as follows:
1.Open the Track Mixer and choose the desired Instrument channel.
2.Click the I/O field and, in the pop-up menu that appears, choose Stereo, AU Instruments, Steinberg and finally, Hypersonic 2.
Now Hypersonic 2 is loaded and ready to play.
Hypersonic stand-alone and ReWire
Hypersonic can be used as a stand-alone application, independently of any host application. This makes it possible to use Hypersonic in sequencer applications that do not support one of the provided plugin formats of Hypersonic (i.e. VST, DXi and AU), but allow for data exchange using ReWire.
ReWire 2 is a special protocol for streaming audio and MIDI data between two computer applications. When using ReWire, the order in which you launch and quit the two programs is very important, as the first audio application launched will capture the audio card resources.
HYPERSONIC
English 13

Proceed as follows:
1.First, launch the sequencer application you wish to use (e.g. Ableton Live, ProTools).
If your sequencer supports ReWire, it will provide a way to assign audio and MIDI channels for the exchange of data. See the documentation of your sequencer application for details.
2.Now, launch Hypersonic as a stand-alone application.
You can launch the program just like any other application on your computer through the Start menu or desktop icon (Win) or by double-clicking the application symbol in the Applications folder (Mac). You can also double-click the Hypersonic program file in the installation folder.
When you now play with Hypersonic, the sound is streamed via ReWire to the assigned mixer channels in your host.
Note that you are now running two completely separate applications. When you save your sequencer project, this will include the overall channel and bus configuration, but none of the settings in Hypersonic! To retain your Hypersonic settings, choose the Save Bank command (in Hypersonic either from the File menu or from the context menu). You may want to choose a file name that indicates that the file contains settings created for a particular sequencer project.
Similarly, when you re-open a project in your sequencer application and have launched Hypersonic, use the Load Bank command in Hypersonic to reload the Hypersonic settings pertaining to this particular project.
The Preferences dialog
When running Hypersonic as a stand-alone application, you will find a Preferences item in the File menu in the top left corner of the application window (Win) or in the Hypersonic menu in the top left of the display (Mac). When selected, a dialog with a number of options opens.
•Select an audio card driver from the ASIO Device pop-up.
•In the table below the ASIO device pop-up, click one of the entries in the ASIO Output column to change the assignment of virtual outputs of your VST Instrument to the physical outputs on your audio hardware.
Click the ASIO Control Panel button to open a dialog with advanced settings for your ASIO device.
HYPERSONIC
14 English

• Use the MIDI Input pop-up to specify a MIDI input. Click the Reset |
ENGLISH |
|
|
MIDI button to reset all MIDI controllers. |
|
Clicking Reset MIDI is similar to pressing the Panic button on a MIDI keyboard. |
|
|
|
• The Tempo and Time Signature fields provide Hypersonic with tempo |
|
and time signature information. |
|
In stand-alone mode, such information is not available from a host application. |
|
The other items on the File menu (Save/Load Bank and Save/Load |
|
Program) are the same as on the VSTi’s rack menu. |
|
Latency
Although Hypersonic is practically latency-free, high latency times (the delay between pressing keys on your MIDI keyboard and hearing a sound) can occur when you play Hypersonic via your MIDI keyboard in real time.
This is often caused by the audio card or the MIDI interface, although it won’t be an issue when playing back a song with a Hypersonic 2 MIDI track. To get rid of annoying real time latency, we recommend you to replace your current audio card with a professional audio card for which an ASIO driver is available. Most soundcards built into off- the-shelf computers don’t use an ASIO driver and usually produce large latencies of up to several hundred milliseconds.
HYPERSONIC
English 15
Overview
In this section we’ll show you around Hypersonic 2 and its various areas. If you’re impatient and want to start exploring on your own, skip this section and go to page 21.
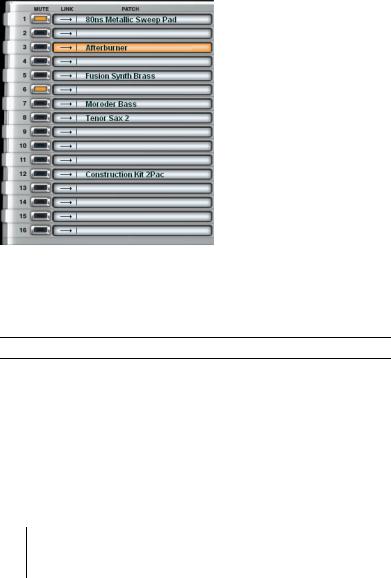
The Part area
A “Part” in Hypersonic 2 is a slot that is assigned to a MIDI channel and holds a patch with its mixer and MIDI parameters. The 16 parts are displayed and editable in the Part area. Here you can select a patch for a MIDI channel, mute patches, or link them.
The Mute buttons flash to show MIDI activity.
HYPERSONIC
16 English
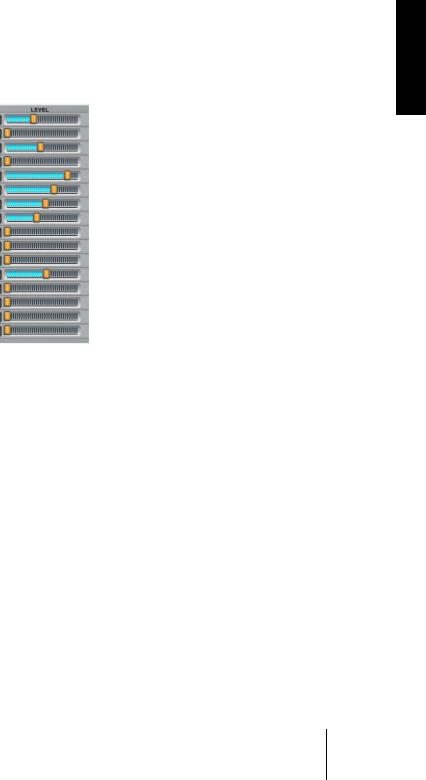
The Level Strip
ENGLISH
The Level strip is a volume mixer for the 16 parts. Under the hood, it features meters for audio level, polyphony and velocity (explained below).
HYPERSONIC
English 17
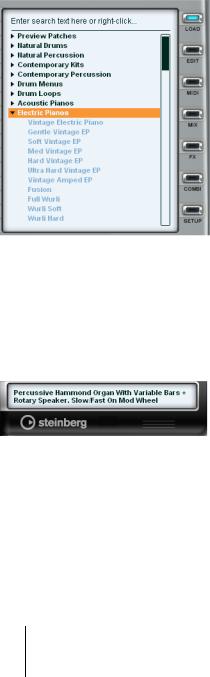
The Display
The Display area is like an editor window that can switch to one of the seven editor pages, using the page selector buttons to the right.
Here you can load patches, edit them, set MIDI and Mixer settings for parts, tweak the FX, create Combi Chains and adjust your global settings in the Setup page.
The Hyper Display
The Hyper display is a context-sensitive text display. When you browse or select a patch, it shows the patch description. It also displays controller assignments and parameter values. You can edit patch descriptions when creating or editing user patches.
HYPERSONIC
18 English
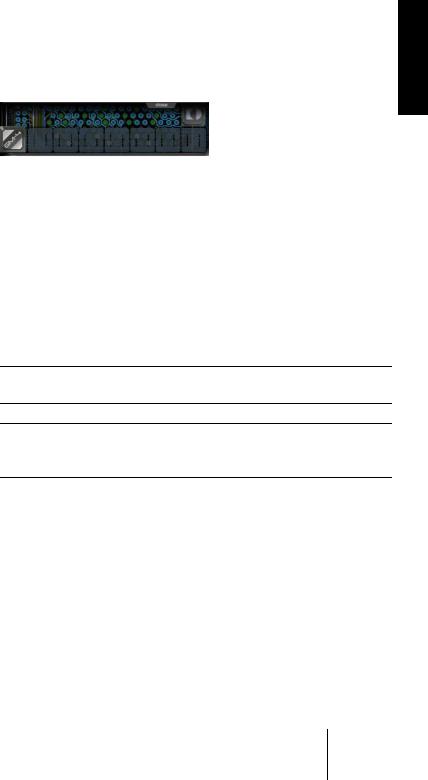
The Expansion Bay
ENGLISH
Clicking on the three lines at the bottom of the Hyper display opens a lid, revealing the expansion bay. This holds the Hyper modules, which expand the standard instrument with more synthesizers or sound libraries. Slot 1 holds the built-in Wizoo Wave ROM, Slot 2 holds the GM4 General MIDI module.
The 3 demo expansions
In addition to the Wizoo Wave ROM and the GM4 General MIDI module, Hypersonic 2 comes with three Wizoo demo expansions. To use these demo versions, you must activate them using the corresponding 30 day trial licenses.
Attention! If you already own Expansions please don’t install the expansion demo licenses on your dongle!
Clicking on the empty slots takes you to a web page (assuming your computer is connected to the internet) with current info about available Hyper modules.
The three demo modules are:
•US-1 Ultra Synth
High-end analog synth with fat and powerful sound, flexible modulation options, 3 oscillators with analog waveforms, wavetable synthesis, sync, and unison mode, Multimode filter with osc audio modulation and overdrive envelopes, 3 LFOs, Modulation matrix for easy modulation control and expressive playing, expert page for detailed adjustment of various sound parameters. Includes 256 patches from professional sound designers.
•GP-2 Grand Pianos
Two outstanding piano models with character adjustment knob (soft/ natural/ bright/ hard). Three versions of each piano are optimized for different amounts of available host RAM, adjustable velocity curve with three preset buttons.
HYPERSONIC
English 19
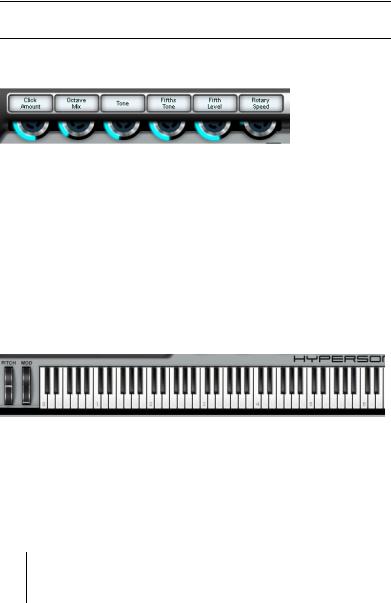
•NB-3 Virtual Tonewheel Organ
9 drawbars, unique tonewheel emulation (variable from the original sine wave sound to a dirtier, more complex timbre), buttons for percussion on/off, loud/soft, short/long, 3rd/2nd harmonic, virtual rotary speaker cabinet with valve preamp, controls for speed, color and overdrive, authentic rotor horn display. Rotary cabinet can be an FX element in any patch. Includes 64 patches by Peter Gorges.
For more information about the Expansions refer to the Hyper Modules manual PDF file on the Hypersonic 2 DVD.
The Hyperknobs
The six Hyperknobs are probably the most effective editing options ever offered by a synthesizer. For each patch, each Hyperknob can be assigned to a specific function. The Hyperknobs have names indicating the parameters they control.
Hyperknobs provide an optimized combination of quick but in-depth access to the most important elements of each patch. Finally, you can create customized “signature sounds” without having to spend hours tweaking the many and often confusing parameters. Learn more in the section “The Edit page” on page 58.
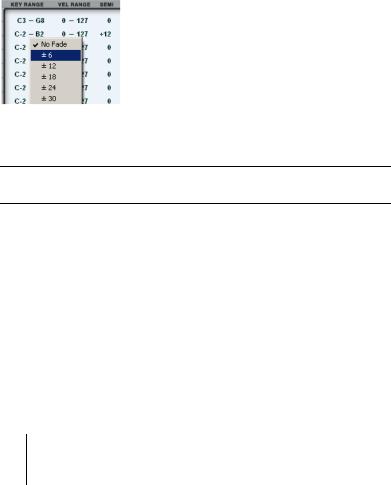
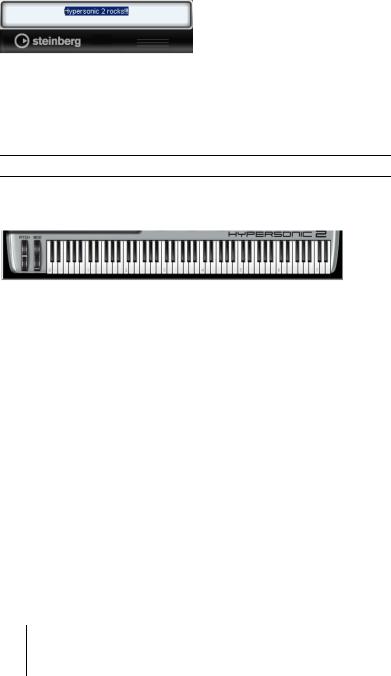
The MIDI keyboard
Hypersonic 2 features a built-in MIDI keyboard with pitch bend and modulation wheels. You can use it as a substitute for a hardware MIDI keyboard when editing sounds, or to monitor incoming MIDI notes.
HYPERSONIC
20 English
Quickstart
Getting started with Hypersonic 2 is simple – this isn’t an instrument that takes years of study before you can start playing. If you’re impatient, click around and you’ll likely figure out most of it. If you need some support taking the first steps with Hypersonic 2 read the following tutorial.
Hypersonic 2 must be loaded, receiving MIDI, and outputting audio prior to starting the tutorial.
Loading your first patch
Suppose you get a brilliant idea for a song based on an electric piano figure – and you need a perfect electric piano sound, right now. No problem:
1.Click on part 1 (corresponding to MIDI channel 1) so it becomes highlighted.
2.Click the Load button right next to the display area.
Alternatively, you can simply double-click an empty part slot. The Display area will automatically switch to display the Load page.
3.Click into the text entry field (top row), type “electric piano,” and hit [Return]. Hypersonic 2 will find all electric piano patches.
4.Select “Vintage Electric Piano” by double-clicking it. This loads it into the part you selected in Step 1.
If you have Hypersonic 2 running in a host with MIDI record function, why don’t you record a couple of bars right now.
You may alternatively check the bank/patch selector of your host’s MIDI track. If it complies fully to the VST 2.0 standard, you can browse and select your Hypersonic 2 patches directly from within the track.
ENGLISH
HYPERSONIC
English 21

Linking parts
In the next step you probably want to underlay the electric piano with a wide, soft pad. Easy:
1. Click the arrow to the left of the patch name in part 2.
Now part 2 corresponds to the MIDI channel of part 1.
2.Select part 2 – otherwise the electric piano would get replaced by your new selection.
Every part corresponds to the particular MIDI channel – part 2 to MIDI channel 2 – unless you link it to the previous part.
3.This time, we’ll select a patch directly from the browser: Scroll the list in the display area so you can see the “Soft Pads” bank.
4.To open it, double-click on the arrow.
5.Double-click a couple of pads until you find one you like.
Now when you play the electric piano part, the pad doubles it.
HYPERSONIC
22 English

Tweaking a sound
Let’s say you want less key-off noise, yet more phasing, in the electric piano, and you want the pad to fade in and out more slowly. Welcome to Hyperknobs!
1.Highlight part 1 (electric piano). The Hyperknob labels match the controls you’d expect on an electric piano.
2.For less electric piano key-off noise, drag-click knob 1 (Note Off Level) a bit to the left.
3.For more phasing, turn up knob 5 (Phaser) a bit.
4.To change the pad’s fade time, highlight part 2. Now the Hyperknobs turn into pad controls.
5.Turn up knobs 5 and 6 (Attack, Release) as desired.
Click the Edit button to open the Edit page and take a look. There are more parameters, but we’ll come to these later.
ENGLISH
Checking polyphony
You can use the Level strip for metering. Turn the light blue bars into displays for audio level, polyphony, or velocity:
1.Click the meter strip’s “Level” label.
2.It changes to “Polyphony”.
3.The meters turn into meters for polyphony. Play some chords and check the polyphony of both piano and pad.
Note that the polyphony meter in part 2 (pad) increases after playing a couple of chords. This is due to the pad’s long release time, where notes continue to decay after new notes are sounded.
HYPERSONIC
English 23
Create a key split/crossfade
Now let’s assign the pad chords to the lower key range, and solo with the electric piano on the upper range.
1.Select the MIDI page.
2.Set the left key range limit for part 1 to C3 by hold-dragging the mouse over the value.
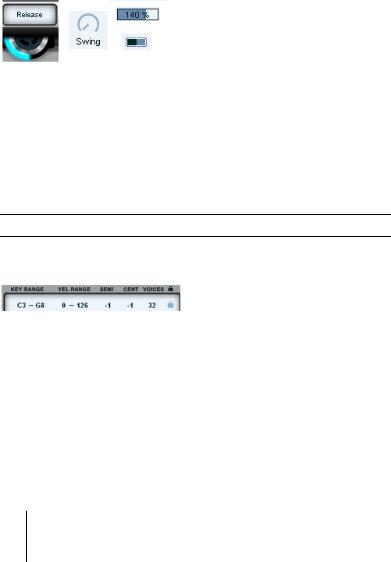
3.Set the right key range limit for part 2 to B2.
4.Click on the hyphen between the two note limits of a part and choose crossfade range +6 for both parts from the pop-up menu. This crossfades notes around the split point rather than creating a hard split.
5.Transpose part 2 up by one octave by setting the Semi parameter to +12.
For a velocity switch, reset the key ranges to their original values and use the Vel Range parameters accordingly.
HYPERSONIC
24 English

Adding a drumloop
Hypersonic 2’s drumloops can also serve as drum kits because they’re “sliced” at the various hits, and the slices are mapped across the keyboard.
1.Select part 3, use the search function to find the patch “Tite Room Funk”, and load it.
2.Play the note C4. The loop plays in sync with your song. If you like, record a bar or two as a backing groove.
Note that if you play a key between F2 and G#8, the loop changes its pitch but the tempo remains constant.
3.Now play chromatically from C1 up to D2 and beyond. Get the idea?
When Hypersonic 2 auto-plays the loop, it internally plays this range at the tempo of the host software.
4.Choose any other loop and play C4. Change your host’s tempo; the drumloops always sync to the host tempo.
5.Get creative with the Hyperknobs and tweak the loops.
You should now be able to try your own first steps with Hypersonic 2. If this isn’t enough for you and you want to become a “power user”, take a closer look at the following, detailed sections in this manual.
ENGLISH
HYPERSONIC
English 25
User interface
Read the following and click around the user interface to get used to the most common controls in Hypersonic 2.
Changing values
Knobs and sliders
There are three types of controllers in Hypersonic 2: six virtual hardware knobs (Hyperknobs) on the main interface, LCD knobs and sliders in the display area. To set them:
•Clicking on a knob position sets the value to that position. To turn a knob, click and drag the mouse vertically or horizontally. This also applies for sliders.
•Sliders can be bidirectional, the default setting is the middle position. From there you can drag bipolar sliders to positive (right) or negative (left) values.
Knob behavior may vary according to preference settings in your host.
Alphanumeric values
Alphanumeric values (such as values, note numbers) appear in the display area only. To edit them:
•To decrease a value by one discrete step, click the value. To increase by one discrete step right-click(Win)/[Ctrl]-click (Mac) the value. Hold [Shift] when clicking or right-clicking for larger intervals (e.g. octaves, increments of 10).
•Click and drag up and down for bigger changes. Hold [Shift] for finetuning.
•[Ctrl]-click (Win)/[Command]-click (Mac) to set knobs to default values.
HYPERSONIC
26 English
Selectable values
ENGLISH
Sometimes a parameter has a selection of options rather than alphanumerical values. In this case:
•Click on the value field to open a pop-up menu, and select a value.
Use of modifier keys when changing values
•[Shift]-click generally enables fine-tuning mode (slows down value changes).
•A click with the [Ctrl] (Win)/[Command] (Mac) key pressed resets the knob to its default value.
•[Alt]-click changes knob’s behavior from circular to linear.
Assigning MIDI Controllers
You can assign many of the features of Hypersonic 2 to MIDI controllers for automation or real-time control via, for example, the knobs of your MIDI keyboard. There are two ways to do this:
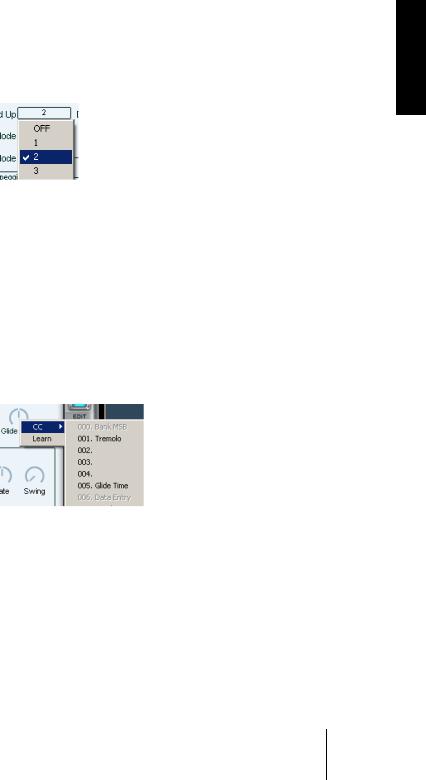
1.Right-click the parameter, then click “CC” and choose a controller number from the drop-down list.
2.Right-click the parameter, select Learn and move the desired knob or controller on your MIDI keyboard or sequencer host. Hypersonic 2 will “learn” (set this MIDI controller to) the parameter you have chosen.
•To unload the MIDI assignment right-click the parameter and choose “Forget”.
HYPERSONIC
English 27
Editing text
There are three areas where you will want to change text: patch names in the Part area, Hyperknob names and patch comments in the Hyper display.
•To edit text, just double-click it and edit, or enter new text.
You can copy and paste text from any text field to another.
Using the MIDI keyboard
The keyboard in Hypersonic 2 has all the obvious functions of an onscreen keyboard, along with a couple of “under the hood” goodies.
MIDI note display
The keyboard displays notes received on the currently highlighted part channel.
Playing notes
The MIDI keyboard “sends” data to the currently highlighted patch. Use this feature to quickly check out parts without having to re-assign your hardware MIDI keyboard.
•Click on a key to play the corresponding note.
The keyboard sends higher velocity values as you click closer to the key’s lower edge.
•Right-click a key to play only the highlighted part (kind of a “solo” function for linked parts).
HYPERSONIC
28 English
When the Edit page is open, right-clicking a key has an additional feature: the next element in the patch that responds to that key is displayed on the Edit page. Just above the keys of the keyboard, a red bar indicates the key range of this element. This way, you can step through the individual elements of the patch quickly, making the editing of certain elements within a patch easier.
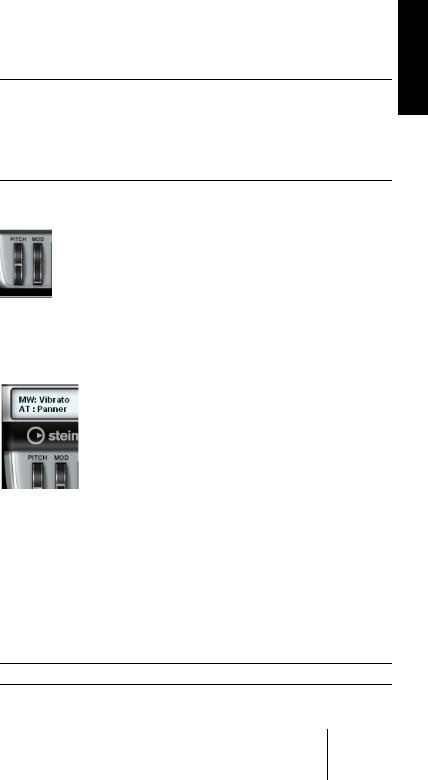
Using the wheels
•To turn a wheel, click-drag it. The pitch wheel (left) jumps back to zero when you release it. The mod wheel (right) doesn’t.
Viewing controller assignments
When you turn the modulation wheel, the Hyper display shows how modulation and aftertouch affect that particular patch.
Shifting the key range
The current key range is displayed by gray numbers on the C keys, representing the MIDI octave.
•Shift the key range of the MIDI keyboard by holding [Shift] and dragging the keyboard left or right.
The middle C on the Hypersonic 2 keyboard is C3 (MIDI note number 60).
ENGLISH
HYPERSONIC
English 29

Hard disk activity display
The “2” in the Hypersonic 2 logo lights up to show hard disk activity when you load sample-based patches. (If your computer is reasonably fast, you’ll seldom see it flashing.)
Play PC Keyboard
You will find this feature by right-clicking (Win)/[Ctrl]-clicking (Mac) anywhere around the edge of Hypersonic. This feature allows you to play Hypersonic patches from your computer keyboard. The currently highlighted Hypersonic part (and any linked parts) will be played. The notes you play are also output via MIDI, allowing you to record them or to use Hypersonic as a MIDI source to play other instruments in your host application.
The Hypersonic on-screen keyboard now also outputs MIDI information. Your host application must support MIDI output from plug-ins.
•The 'C' key plays a C3 note. Keys on the same row play the adjacent white notes.
•The 'F' key plays a C#3 note. Keys on the same row play the available black notes.
•The 'R' key plays a C4 note. Keys on the same row play the adjacent white notes.
•The '5' key plays a C#4 note. Keys on the same row play the available black notes.
•The left and right arrow keys transpose the keyboard in octaves.
If you are using a computer keyboard layout for a language other than English or German, this may result in some interesting scales!
Select “Play PC Keyboard” mode a second time to disable it.
All Notes Off
You will find this feature by right-clicking (Win)/[Ctrl]-clicking (Mac) anywhere around the edge of Hypersonic. It releases all currently playing Hypersonic voices, useful if you have hanging MIDI notes. This is often called a 'Panic' mode.
HYPERSONIC
30 English
Loading...