


StarTech.com RKCONS1916GB, RKCONS1916EU, RKCONS1908GB, RKCONS1716GB, RKCONS1708GB User Manual
...1U 17” & 19” Rackmount LCD Console with 8 & 16 Port KVM Switch
RACKCONS1708
RACKCONS1716
RACKCONS1908
RACKCONS1916
RKCONS1708GB
RKCONS1716GB
RKCONS1908GB
RKCONS1916GB
RKCONS1708EU
RKCONS1916EU
*actual product may vary from photos
DE: Bedienungsanleitung - de.startech.com
FR: Guide de l'utilisateur - fr.startech.com
ES: Guía del usuario - es.startech.com
IT: Guida per l'uso - it.startech.com
NL: Gebruiksaanwijzing - nl.startech.com
PT: Guia do usuário - pt.startech.com
For the most up-to-date information, please visit: www.startech.com
Manual Revision: 03/28/2012

FCC Compliance Statement
This equipment has been tested and found to comply with the limits for a Class B digital device, pursuant to part 15 of the FCC Rules. These limits are designed to provide reasonable protection against harmful interference in a residential installation. This equipment generates, uses and can radiate radio frequency energy and, if not installed and used in accordance with the instructions, may cause harmful interference to radio communications. However, there is no guarantee that interference will not occur in a particular installation. If this equipment does cause harmful interference to radio or television reception, which can be determined by turning the equipment off and on, the user is encouraged to try to correct the interference by one or more of the following measures:
•Reorient or relocate the receiving antenna.
•Increase the separation between the equipment and receiver.
•Connect the equipment into an outlet on a circuit different from that to which the receiver is connected.
•Consult the dealer or an experienced radio/TV technician for help.
Use of Trademarks, Registered Trademarks, and other Protected Names and Symbols
This manual may make reference to trademarks, registered trademarks, and other protected names and/or symbols of third-party companies not related in any way to StarTech.com. Where they occur these references are for illustrative purposes only and do not represent an endorsement of a product or service by StarTech.com, or an endorsement of the product(s) to which this manual applies by the third-party company in question. Regardless of any direct acknowledgement elsewhere in the body of this document, StarTech.com hereby acknowledges that all trademarks, registered trademarks, service marks, and other protected names and/or symbols contained in this manual and related documents are the property of their respective holders.
Instruction Manual

Table of Contents |
|
Introduction............................................................................................. |
1 |
Packaging Contents.................................................................................................................................. |
1 |
Installation and Usage........................................................................... |
2 |
Hardware Guide......................................................................................................................................... |
2 |
Connecting the Console/Module......................................................... |
6 |
Connecting computers to the module................................................ |
8 |
Module Operation.................................................................................. |
13 |
Specifications.......................................................................................... |
21 |
Technical Support................................................................................... |
22 |
Warranty Information............................................................................ |
22 |
Instruction Manual
i

Introduction
Thank you for purchasing a StarTech.com LCD Rack Console with KVM. This product combines an LCD Console with 17” monitor, with a 16-port KVM switch, allowing you to manage multiple computers using an integrated keyboard, mouse, and TFT screen that slides into a compact 1U of rack space when not in use.
Packaging Contents
•1x 1U LCD Rack Console Drawer
•1x 1U Multi-Platform KVM Switch
•1x Mounting Rails - Set
•1x Mounting Brackets
•1x Power Adapter
Instruction Manual
1

Installation and Usage
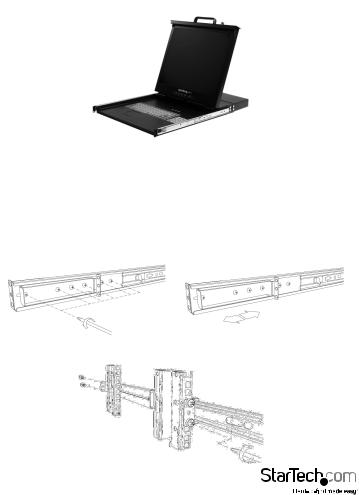
Hardware Guide
Side Rails with Front and Rear Brackets (2)
Mounting Brackets (2) |
Keys (2) |
Screw Kit |
Please note: RACKCONS1716 is comprised of two distinct components - a Rackmountable Console and a Rackmountable KVM Module, as illustrated below. The two devices are attached via a Centronics connector on the Rear panel of the Console and similarly the front panel of the Module.
Module - Rear Panel
Module - Front Panel
Instruction Manual
2
Console - Front View (open)
Mounting the Console
1.Loosen the rear screws (pre-installed in side rails) and adjust the length of the rear bracket to fit the depth of your cabinet:
2.Install the rail into the cabinet:
Instruction Manual
3
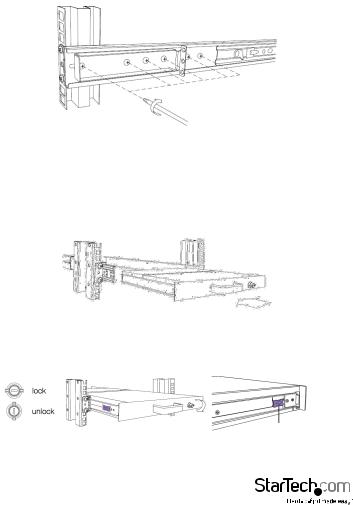
3. Tighten the screws that were loosened in Step 1:
4.Install the remaining rail, repeating Steps 1-3.
5.Slide the Module onto the Console side rails, connecting the Module and Console using the male Centronics connector provided by the Console, and the female Centronics connector provided by the Module. Ensure the connection is secure, and that the module is firmly seated within the Console side rails.
6.Gently, but firmly insert the Console (with Module attached) into the left and right rails:
7.Unlock the console, and pull the left and right rail-lock switches towards you simultaneously, and hold them in this position while pushing the console into the cabinet:
Rail Lock Switch
Instruction Manual
4
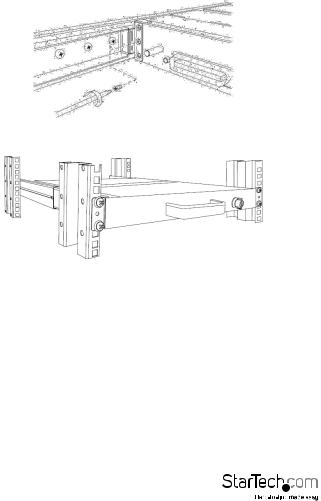
1. Install three screws on each side of the console:
2. Installation is now complete:
Instruction Manual
5
Connecting the Console/Module
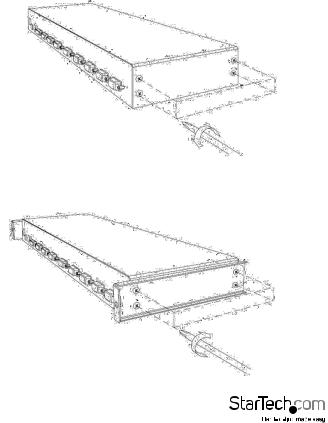
To connect the KVM Console/Module to a computer, perform the following steps:
1.Remove the four screws from both sides of the KVM console. Be sure to retain these screws for the next installation step.
2.Attach the mounting brackets to both sides of the KVM console, using the screws removed in step 1.
Instruction Manual
6
 Loading...