


3-865-814-42 (1)
FM/MW/SW
Cassette
Car Stereo
Operating Instructions
Manual de instrucciones
GB
ES
CT
For installation and connections, see the supplied installation/connections manual.
Para obtener información sobre la instalación y las conexiones, consulte el manual de instalación/conexiones suministrado.
w u s A w™u s C
XR-C5200
XR-4900
1999 by Sony Corporation

for the customers in the USA
Warning (XR-C5200 only)
This equipment has been tested and found to comply with the limits for a Class B digital device, pursuant to Part 15 of the FCC Rules. These limits are designed to provide reasonable protection against harmful interference in a residential installation. This equipment generates, uses, and can radiate radio frequency energy and, if not installed and used in accordance with the instructions, may cause harmful interference to radio communications. However, there is no guarantee that interference will not occur in a particular installation. If this equipment does cause harmful interference to radio or television reception, which can be determined by turning the equipment off and on, the user is encouraged to try to correct the interference by one or more of the following measures:
—Reorient or relocate the receiving antenna.
—Increase the separation between the equipment and receiver.
—Connect the equipment into an outlet on a circuit different from that to which the receiver is connected.
—Consult the dealer or an experienced radio/ TV technician for help.
You are cautioned that any changes or modifications not expressly approved in this manual could void your authority to operate this equipment.
Table of Contents |
|
This Unit Only |
|
Location of controls ............................................ |
3 |
Getting Started |
|
Resetting the unit ................................................ |
4 |
Detaching the front panel .................................. |
4 |
Setting the clock .................................................. |
5 |
Cassette Player |
|
Listening to a tape ............................................... |
6 |
Playing a tape in various modes ....................... |
7 |
Radio |
|
Memorizing stations automatically |
|
— Best Tuning Memory (BTM) .................... |
7 |
Memorizing only the desired stations ............. |
8 |
Receiving the memorized stations .................... |
8 |
Other Functions |
|
Labelling the rotary commander ...................... |
9 |
Using the rotary commander .......................... |
10 |
Adjusting the sound characteristics ................ |
11 |
Attenuating the sound ...................................... |
11 |
Changing the sound and display settings ..... |
12 |
Boosting the bass sound |
|
— D-bass ....................................................... |
12 |
Welcome !
Thank you for purchasing this Sony Cassette Player. This unit lets you enjoy a variety of features as well as an optional rotary commander.
In addition to the cassette playback and radio operations, you can expand your system by connecting an optional CD/MD unit* (XR-C5200 only).
*You can connect a CD changer, an MD changer, a CD player, or an MD player.
With Optional Equipment |
|
CD/MD Unit (XR-C5200 only) |
|
Playing a CD or MD ......................................... |
13 |
Playing tracks repeatedly |
|
— Repeat Play .............................................. |
14 |
Playing tracks in random order |
|
— Shuffle Play .............................................. |
14 |
Additional Information |
|
Precautions ......................................................... |
15 |
Maintenance ....................................................... |
16 |
Dismounting the unit ....................................... |
16 |
Specifications ..................................................... |
17 |
Troubleshooting guide ..................................... |
18 |
2

Location of controls
|
|
– |
PRESET + |
MODE |
SOUND |
6 |
DISC |
|
|
|
D-BASS |
SEEK / AMS |
|
DSPL |
|
|
|
|
|
|
|
|
OFF 1 2 |
3
SOURCE
|
SHIFT |
|
SET UP |
PLAY MODE |
|
|
|
RELEASE |
OFF |
1 |
2 |
3 |
4 |
5 |
6 |
|
|
|
|
|
|
|
XR-C5200
Refer to the pages listed for details.
1SEEK/AMS (seek/Automatic Music Sensor/manual search) control
6, 8, 14
2MODE (*) button
During tape playback: Playback direction change 6
During radio reception: BAND select 7, 8
During CD or MD playback*:
CD/MD Unit select 13
3SOURCE (TAPE/TUNER/CD*/MD*) button
6, 7, 8, 13
4Dial (volume/bass/treble/left-right/ rear-front control) 5, 11
5 SOUND button 11
6 Display window
7DSPL (display mode change) button 6, 9, 13
8 6 (eject) button 6
9XR-C5200: PRESET/DISC button XR-4900:
PRST button
During radio reception: Preset stations select 8
During CD/MD playback*:
Disc change 14
0RELEASE (front panel release) button 4, 16
!Á Reset button (located on the front side of the unit behind the front panel) 4
!ª OFF button 4, 6
!£ SHIFT button
PLAY MODE 7, 8, 9, 14
SET UP 5, 12, 13
!¢ POWER SELECT switch
(located on the bottom of the unit)
See “POWER SELECT switch” in the Installation/Connections manual.
!° Frequency select switch
(located on the bottom of the unit)
See “Frequency select switch” in the Installation/Connections manual.
!¤ Number buttons 8
!¦ D-BASS control 12
* XR-C5200 only
3
Getting Started
Resetting the unit
Before operating the unit for the first time or after replacing the car battery, you must reset the unit.
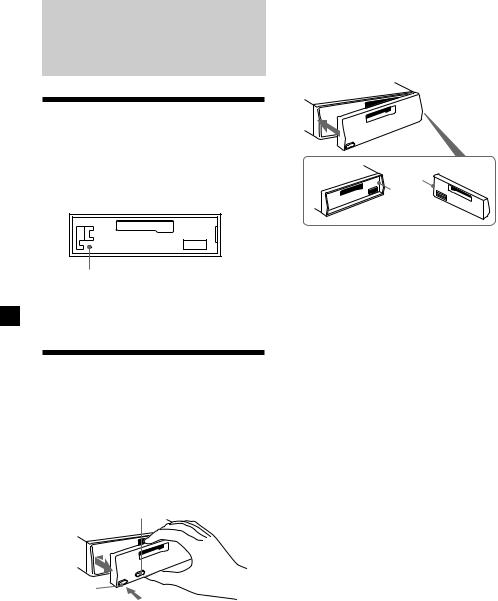
Remove the front panel and press the reset button with a pointed object, such as a ballpoint pen.
Reset button
Note
Pressing the reset button will erase the clock setting and some memorized functions.
Detaching the front panel
You can detach the front panel of this unit to protect the unit from being stolen.
1 Press (OFF).
2 Press (RELEASE), then slide the front panel a little to the left, and pull it off towards you.
(OFF)
(RELEASE)
Notes
•Be sure not to drop the panel when detaching it from the unit.
•If you detach the panel while the unit is still turned on, the power will turn off automatically to prevent the speakers from being damaged.
•When carrying the front panel with you, use the supplied front panel case.
Attaching the front panel
Attach part a of the front panel to part b of the unit as illustrated and push the left side into position until it clicks.
a
b
Notes
•Be sure not to attach the front panel upside down.
•Do not press the front panel too hard against the unit when attaching it.
•Do not press too hard or put excessive pressure on the display window of the front panel.
•Do not expose the front panel to direct sunlight or heat sources such as hot air ducts, and do not leave it in a humid place. Never leave it on the dashboard of a car parked in direct sunlight where there may be a considerable rise in temperature.
Caution alarm
If you turn the ignition key switch to the OFF position without removing the front panel, the caution alarm will beep for a few seconds (only when the POWER SELECT switch on the bottom of the unit is set to the A position).
If you connect an optional power amplifier and do not use the built-in amplifier, the beep sound will be deactivated.
4
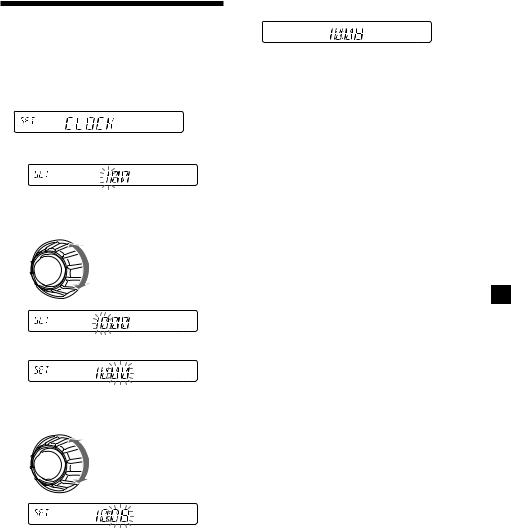
Setting the clock
The clock uses a 12-hour digital indication.
Example: To set the clock to 10:08
1 Press (SHIFT), then press (2) (SET UP) repeatedly until “CLOCK” appears.
1 Press (4) (n).
The hour indication flashes.
2 Set the hour.
to go backward
to go forward
3 Press (4) (n).
The minute indication flashes.
4 Set the minute.
to go backward
to go forward
2 Press (SHIFT).
The clock starts.
3 Press (SHIFT).
After the clock setting is complete, the display returns to normal playback mode.
Note
If the POWER SELECT switch on the bottom of the unit is set to the B position, turn the power on first, then set the clock.
5
Cassette Player
Listening to a tape
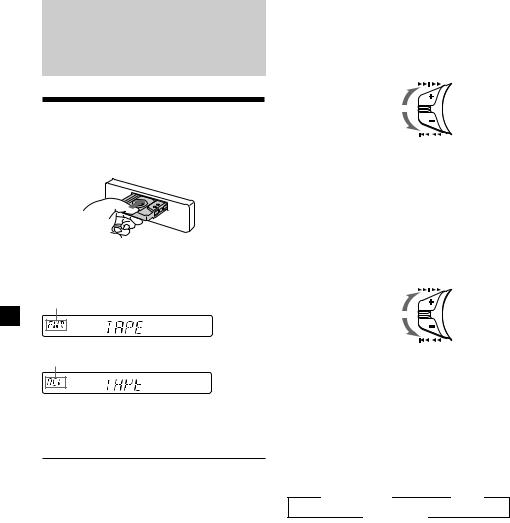
Insert a cassette.
Playback starts automatically.
If a cassette is already inserted, to start playback, press (SOURCE) repeatedly until “FWD” or “REV” appears.
The side facing up is played.
The side facing down is played.
Tip
To change the tape‘s playback direction, press
(MODE) (*).
To |
Press |
Stop playback |
(OFF) |
Eject the cassette |
6 |
|
|
Fast-winding the tape
During playback, push the SEEK/AMS control up or down and hold.
SEEK / AMS
Fast-forward
Rewind
To start playback during fast-forwarding or rewinding, press (MODE) (*).
Locating a specific track
—Automatic Music Sensor (AMS)
During playback, push the SEEK/AMS control up or down and release, for each track you want to skip.
You can skip up to nine tracks at one time.
SEEK / AMS
To locate succeeding tracks
To locate preceding tracks
Note
The AMS function may not work when:
—the blanks between tracks are shorter than four seconds
—there is noise between tracks
—there are long sections of low volume or quiet interludes.
Changing the display item
Each time you press (DSPL), the item changes as follows:
z Tape playback |
z Clock |
Frequency* Z
* While the ATA function is activated.
After you select the desired item, the display will automatically change to the Motion Display mode after a few seconds.
In the Motion Display mode, all the above items are scrolled in the display one by one in order.
Tip
The Motion Display mode can be turned off. (See “Changing the sound and display settings” on page 12.)
6
Playing a tape in various modes
You can play the tape in various modes: •REP (Repeat Play) repeats the current track. •BL SKP (Blank Skip) skips blanks longer than
eight seconds.
•ATA (Automatic Tuner Activation) turns on the tuner automatically when fast-winding the tape.
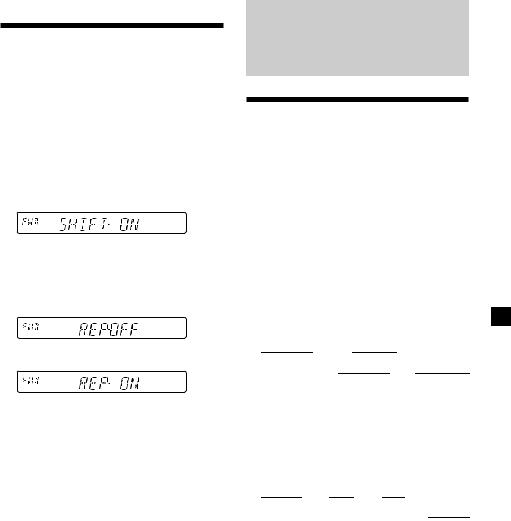
1 During playback, press (SHIFT).
“SHIFT-ON” appears in the display.
2 Press (3) (PLAY MODE) repeatedly until the desired play mode appears.
Each time you press (3) (PLAY MODE), the item changes as follows:
REP nBL SKP nATA
3 Press (4) (n) to select “ON.”
The selected play mode starts.
4 Press (SHIFT).
To return to normal playback mode, select “OFF” in step 3 above.
Note
If the “SFT” indication appears, press (SHIFT) to complete the mode setting.
Radio
Memorizing stations automatically
— Best Tuning Memory (BTM)
The unit selects the stations with the strongest signals and memorizes them in the order of their frequencies. You can store up to 6 stations on each band (FM1, FM2, FM3, MW, SW1, and SW2).
Caution
When tuning in stations while driving, use Best Tuning Memory to prevent accidents.
1 Press (SOURCE) repeatedly to select the tuner.
Each time you press (SOURCE), the source changes as follows:
|
z TUNER |
|
z CD* |
|
|
|
|
TAPE Z |
|
Z |
|
||
|
MD* |
|||||
|
|
|||||
*If the corresponding optional equipment is not connected, this item will not appear (XR-C5200 only).
2 Press (MODE) repeatedly to select the band.
Each time you press (MODE), the band changes as follows:
|
z FM1 |
|
z FM2 |
|
z FM3 |
|
|
||
|
|
|
|
|
|
|
|
|
|
|
SW2 Z |
|
|
|
|
|
MW Z |
|
|
|
|
|
SW1 Z |
|
|
||||
|
|
|
|
|
|
||||
|
|
|
|
|
|
||||
|
|
|
|
|
|
|
|
|
|
3 Press (SHIFT), then press (3) (PLAY
MODE) repeatedly until “B.T.M” appears.
4 Press (4) (n).
The unit stores stations in the order of their frequencies on the number buttons.
A beep sounds when the setting is stored.
continue to next page n
7

5 Press (SHIFT).
Notes
•The unit does not store stations with weak signals. If only a few stations can be received, some number buttons will retain their former setting.
•When a number is already indicated in the display, the unit stores stations in order from the one currently displayed.
Memorizing only the desired stations
You can preset up to 18 FM stations (6 each for FM1, 2, and 3), up to 6 MW stations, and up to 12 SW stations (6 each for SW1 and 2) in the order of your choice.
1 Press (SOURCE) repeatedly to select the tuner.
2 Press (MODE) repeatedly to select the band.
3 Push the SEEK/AMS control up or down to tune in the station that you want to store on the number button.
4 Press and hold the desired number button ((1) to (6)) until “MEM” appears.
The number button indication appears in the display.
Note
If you store a new station on a number button which already has a station registered, the previously stored station will be replaced by the new station.
Receiving the memorized stations
1 Press (SOURCE) repeatedly to select the tuner.
2 Press (MODE) repeatedly to select the band.
3 Press the number button ((1) to (6)) on which the desired station is stored.
Tip
Press either side of (PRESET/DISC) or (PRST) to receive the stations in the order they are stored in the memory (Preset Search function).
If you cannot tune in a preset station
Push and release the SEEK/AMS control up or down to search for the station (automatic tuning).
Scanning stops when the unit receives a station. Push the SEEK/AMS control up or down repeatedly until the desired station is received.
Note
If the automatic tuning stops too frequently, press (SHIFT), then press (3) (PLAY MODE) repeatedly until “LOCAL” (local seek mode) is displayed. Then press (4) (n) to select “LOCAL-ON.” Press (SHIFT). Only the stations with relatively strong signals will be tuned in.
Tip
If you know the frequency of the station you want to listen to, push the SEEK/AMS control up or down and hold until the desired frequency appears (manual tuning).
8
If FM stereo reception is poor
— Monaural Mode
1 During radio reception, press (SHIFT), then press (3) (PLAY MODE) repeatedly until “MONO” appears.
2 Press (4) (n) repeatedly until “MONO-
ON“ appears.
The sound improves, but becomes monaural (“ST” disappears).
3 Press (SHIFT).
To return to stereo mode, select “MONO-OFF” in step 2 above.
Changing the display item
Each time you press (DSPL), the item changes as follows:
Frequency ÷Clock
After you select the desired item, the display will automatically change to the Motion Display mode after a few seconds.
In the Motion Display mode, all the above items are scrolled in the display one by one in order.
Tip
The Motion Display mode can be turned off. (See “Changing the sound and display settings” on page 12.)
Other Functions
You can also control this unit with an optional rotary commander.
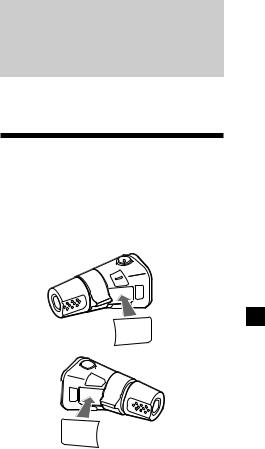
Labelling the rotary commander
Depending on how you mount the rotary commander, attach the appropriate label as shown in the illustration below.
SOUND
MODE
DSPL
DSPL
MODE
SOUND
9
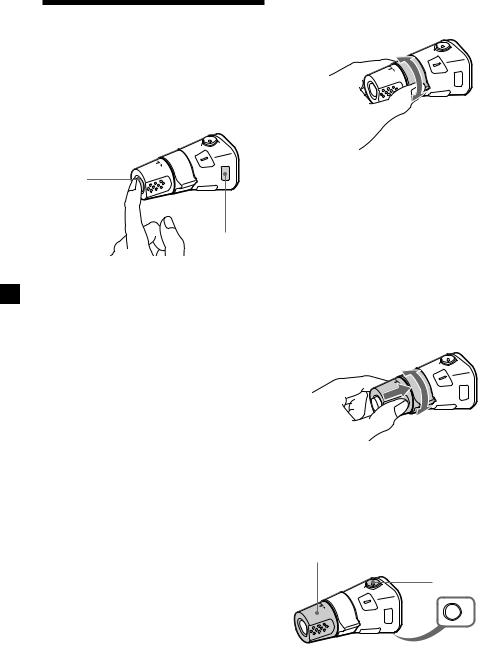
Using the rotary commander
By rotating the control (the SEEK/AMS control)
The rotary commander works by pressing buttons and/or rotating controls.
By pressing buttons
(the SOURCE and MODE buttons)
(SOURCE)
(MODE)
Each time you press (SOURCE), the source changes as follows:
TUNER nCD* nMD* nTAPE
Pressing (MODE) changes the operation in the following ways;
•Tape : playback direction
•Tuner : FM1 nFM2 nFM3 nMW n
SW1 nSW2
•CD unit* : CD1 nCD2 n…
•MD unit* : MD1 nMD2 n…
*If the corresponding optional equipment is not connected, this item will not appear (XR-C5200 only).
Tip
When the POWER SELECT switch is set to position B, you can turn on this unit by pressing (SOURCE) on the rotary commander.
Rotate the control and release it to:
•Locate the beginnings of tracks on the tape. Rotate and hold the control momentarily, then release it to fast-wind the tape. To start playback while fastwinding the tape, press (MODE).
•Locate a specific track on a disc. Rotate and hold the control until you locate the specific point in a track, then release it to start playback (XR-C5200 only).
•Tune in stations automatically. Rotate and hold the control to find a specific station.
By pushing in and rotating the control (the PRESET/DISC control)
Push in and rotate the control to:
•Receive the stations memorized on the number buttons.
•Change the disc (XR-C5200 only).
Other operations
Rotate the VOL control to adjust the volume.
Press (ATT) to attenuate the sound.
OFF
Press (OFF) to turn off the unit.
10
Press (SOUND) to

 adjust the volume and sound menu.
Press (DSPL) to change the displayed items.
Changing the operative direction
The operative direction of controls is factoryset as shown below.
To increase
To decrease
If you need to mount the rotary commander on the right hand side of the steering column, you can reverse the operative direction.
Press (SOUND) for two seconds while pushing the VOL control.
Tip
You can also change the operative direction of these controls with the unit (page 12).
Adjusting the sound characteristics
You can adjust the bass, treble, balance, and fader.
You can store the bass and treble levels independently for each source.
1 Select the item you want to adjust by pressing (SOUND) repeatedly.
VOL (volume) nBAS (bass) n
TRE (treble) nBAL (left-right) n
FAD (front-rear)
2 Adjust the selected item by rotating the dial.
Adjust within three seconds after selecting the item. (After three seconds, the dial function reverts to volume control.)
Attenuating the sound
Press (ATT) on the optional rotary commander.
“ATT-ON” flashes momentarily.
To restore the previous volume level, press (ATT) again.
Tip
The unit decreases the volume automatically when a telephone call comes in (Telephone ATT function).
11

Changing the sound and display settings
The following items can be set: •CLOCK (page 5).
•BEEP – to turn the beep sound on or off. •RM (Rotary Commander) – to change the
operative direction of the rotary commander.
—Select “NORM” to use the rotary commander in the factory-set position.
—Select “REV” when you mount the rotary commander on the right hand side of the steering column.
•M.DSPL (Motion Display) – to turn the motion display on or off.
•A.SCRL (Auto Scroll)* (page 13).
1 Press (SHIFT).
2 Press (2) (SET UP) repeatedly until the desired item appears.
Each time you press (2) (SET UP), the item changes as follows:
CLOCK nBEEP nRM nM.DSPL nA.SCRL*
*When no MD is playing, this item will not appear (XR-C5200 only).
3 Press (4) (n) to select the desired setting (Example: ON or OFF).
4 Press (SHIFT).
After the mode setting is complete, the display returns to normal playback mode.
Note
If the “SFT” indication appears, press (SHIFT) to complete the mode setting.
Boosting the bass sound
— D-bass
You can enjoy a clear and powerful bass sound. The D-bass function boosts the low frequency signal with a sharper curve than conventional bass boost.
You can hear the bass line more clearly even while the vocal volume remains the same. You can emphasize and adjust the bass sound easily with the D-BASS control.
Level |
D-BASS 3 |
|
D-BASS 2 |
|
D-BASS 1 |
0dB
Frequency (Hz)
Adjusting the bass curve
Turn the D-BASS control to adjust the bass level (1, 2, or 3).
“D-BASS” appears in the display.
To cancel, turn the control to OFF.
Note
If the bass sound becomes distorted, adjust the D-BASS control or volume.
12
 Loading...