


3-810-312-31(1)
Stereo
Cassette Deck
Operating Instructions |
|
|
EN |
||
|
|
GB |
|||
|
|
|
|
|
|
Mode d’emploi |
|
|
F |
||
|
|
|
|||
Manual de instrucciones |
|
ES |
|||
|
|
||||
|
|
|
|
|
|
Manual de Instruções |
|
|
|
P |
|
TC-WE405
TC-WR661
ã 1996 by Sony Corporation
3-810-312-31(1)

WARNING
To prevent fire or shock hazard, do not expose the unit to rain or moisture.
2EN
3-810-312-31(1)

Welcome!
Thank you for purchasing the Sony Stereo Cassette Deck. Before operating the unit, please read this manual thoroughly and retain it for future reference.
TABLE OF CONTENTS
Getting Started
Unpacking 4
Hooking Up the System 4
About This Manual
The instructions in this manual are for models TC-WE405 and TC-WR661. Check your model number by looking at the rear panel of your tape deck. In this manual, the TC-WE405 is the model used for illustration purposes. Any difference in operation is clearly indicated in the text, for example, “TCWE405 only.”
Type of differences
Model |
WE405 WR661 |
Feature |
|
Dolby HX PRO |
• |
|
|
PHONES jack |
• |
|
|
Convention
The following icon is used in this manual:
zIndicates hints and tips for making the task easier.
Playing a Tape 5
Recording on a Tape 6
Advanced Recording Operations
Adjusting the Recording Level Automatically (Auto Rec Level) 8 Fading In and Out (Fader) 9
Dubbing a Tape 9
Inserting a Blank Space During Recording (Record Muting) 10
Additional Information
Precautions 11
Notes on Cassette Tapes 11
Cleaning 12
Troubleshooting 13
Specifications 14
Index 15
EN
3EN
3-810-312-31(1)
Getting Started
Unpacking
Check that you received the following items:
• Audio connecting cords (2)
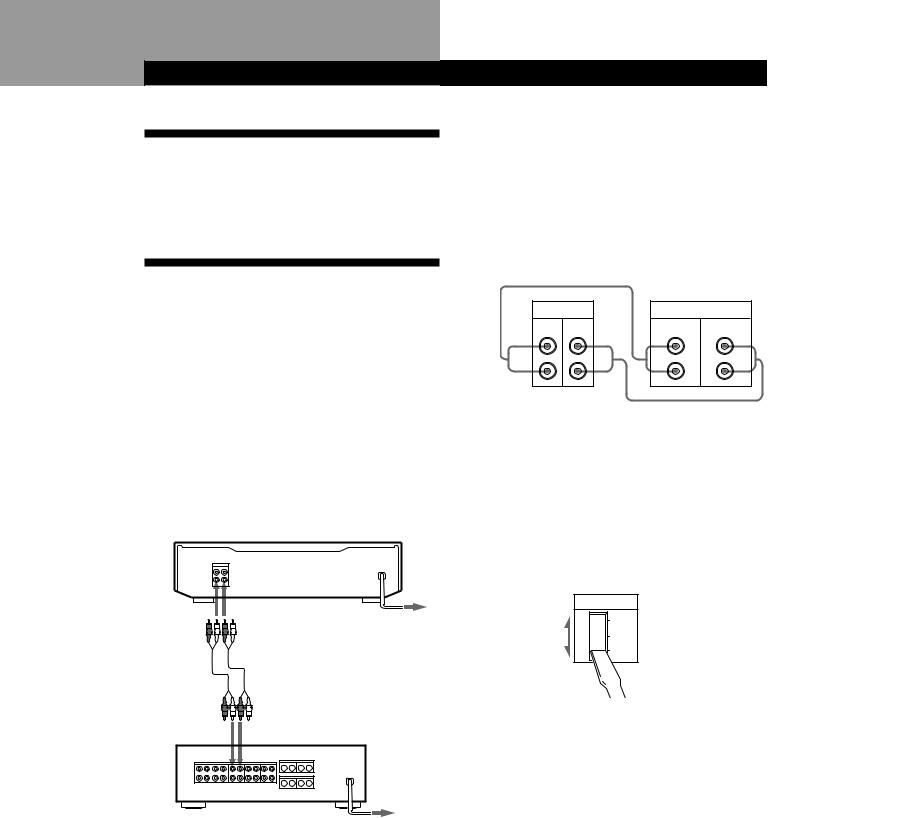
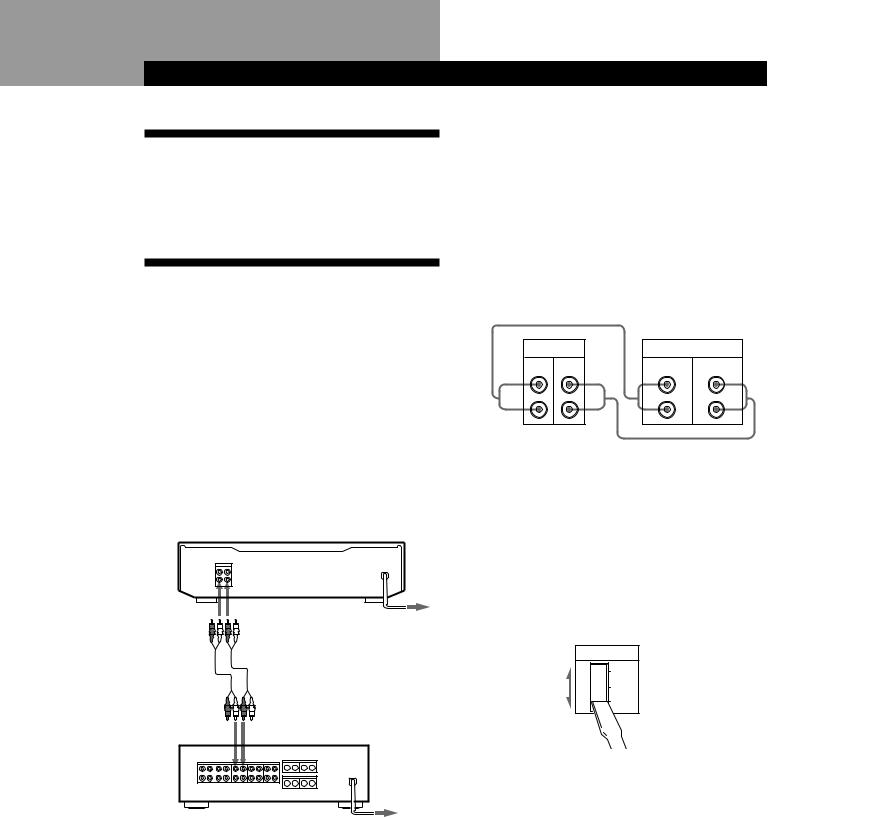
Hooking Up the System
This section describes how to hook up the tape deck to an amplifier. Be sure to turn off the power of each component before making the connections.
To purchasers of the TC-WR661
For information on connecting your tape deck to the TAAV561 Amplifier, refer to the Operating Instructions included with the TA-AV561.
To purchasers of the TC-WE405
Follow the instructions below to connect your tape deck to an amplifier.
TC-WE405
to LINE IN |
to LINE OUT |
to an AC outlet
to REC OUT |
to TAPE IN |
Amplifier
to a
wall outlet
Hookups
When connecting an audio connecting cord, be sure to match the color-coded cord to the appropriate jacks on the components: Red (right) to Red and White (left) to White. Be sure to make connections firmly to avoid hum and noise.
Connect the tape deck to the amplifier as shown below.
Tape‚deck |
Amplifier |
|
LINE |
TAPE |
|
IN OUT |
REC OUT |
IN |
L |
L |
L |
R |
R |
R |
•
•: Signal flow
Setting the voltage selector (only on models supplied with a voltage selector)
Check that the voltage selector on the rear panel of the tape deck is set to the local power line voltage. If not, set the selector to the correct position using a screwdriver before connecting the AC power cord to an AC outlet.
VOLTAGE
220V
240V
120V
Connecting the AC power cord
Connect the AC power cord to an AC outlet.
Where do I go next?
Now you’re ready to use your tape deck.
For basic operations, go to pages 5 to 7; for advanced operations, go to the sections starting from page 8.
4EN
3-810-312-31(1)
|
|
|
|
|
|
Basic Operations |
|
|
Basic Operations |
|
Playing a Tape |
|
||
2 |
4 |
|
3 |
|
|
|
|
|
|
|
|
|
AUTO |
|
|
|
|
|
DIRECTION |
DOLBY NR |
|
REC LEVEL |
||
|
|
|
|
D a RELAY OFF |
B |
C |
4 |
5 |
|
|
|
|
|
|
|
|
|
6 |
|
|
|
|
|
|
|
|
|
3 |
7 |
|
|
|
|
SYNCHRO DUBBING A→B |
|
|
2 |
8 |
|
|
|
|
|
HIGH/NORMAL |
FADER |
ARL |
|
|
|
|
|
|
|
START(DECK B P) |
|
|
1 |
9 |
|
|
DECK A |
|
DECK B |
PAUSE |
REC MUTE |
REC |
|
0 |
10 |
|
COUNTER RESET |
P |
R |
r |
|
|
|
||
|
0 |
|
) |
0 |
) |
|
|
|
PHONES |
POWER |
p |
» |
á |
p |
» |
á |
|
|
|
|
|
|
¤ |
¤ |
|
|
|
|
|
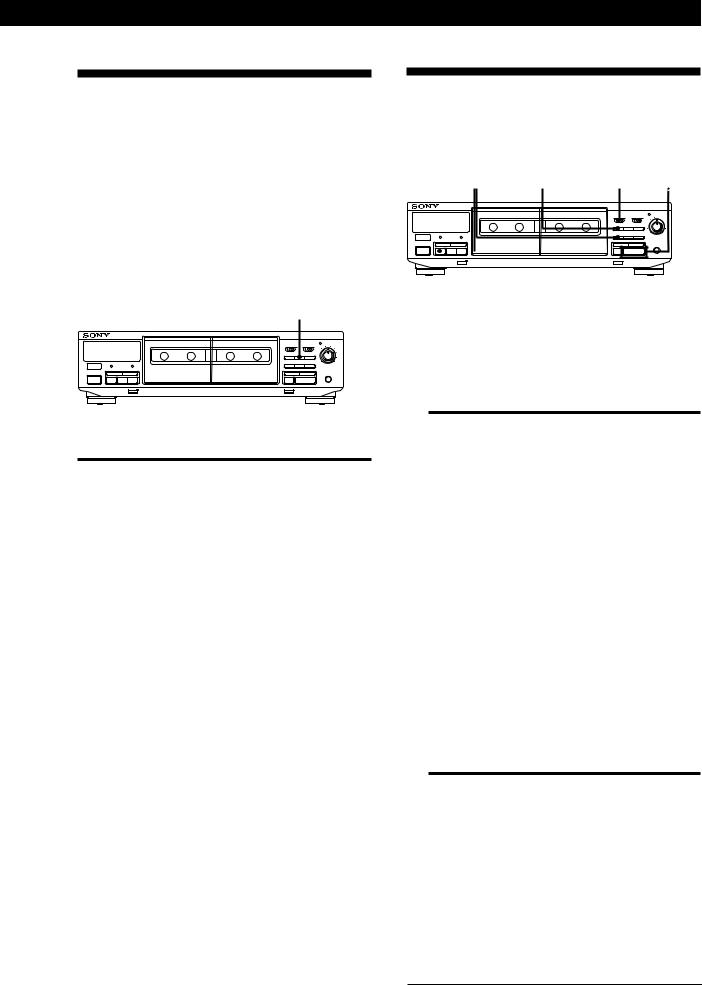
•See page 4 for hookup information.
•You can use either deck for playback.
zTo locate the beginning of a tape and start playback automatically (Auto Play)
Press 0 while holding down á. For the reverse side, press )while holding down ».
zTo play a tape recorded with the Dolby NR* system
Set DOLBY NR to the same position that the tape was recorded in—B or C.
zWhat is the Dolby NR system?
The Dolby NR (noise reduction) system eliminates tape hiss noise by boosting low-level signals in the highfrequency range during recording, then lowering them during playback. Type C provides greater noise reduction than type B.
zYou can connect the headphones to PHONES (TC-WE405 only)
*Dolby noise reduction manufactured under license from Dolby Laboratories Licensing Corporation.
“DOLBY“ and the double-D symbol aare trademarks of Dolby Laboratories Licensing Corporation.
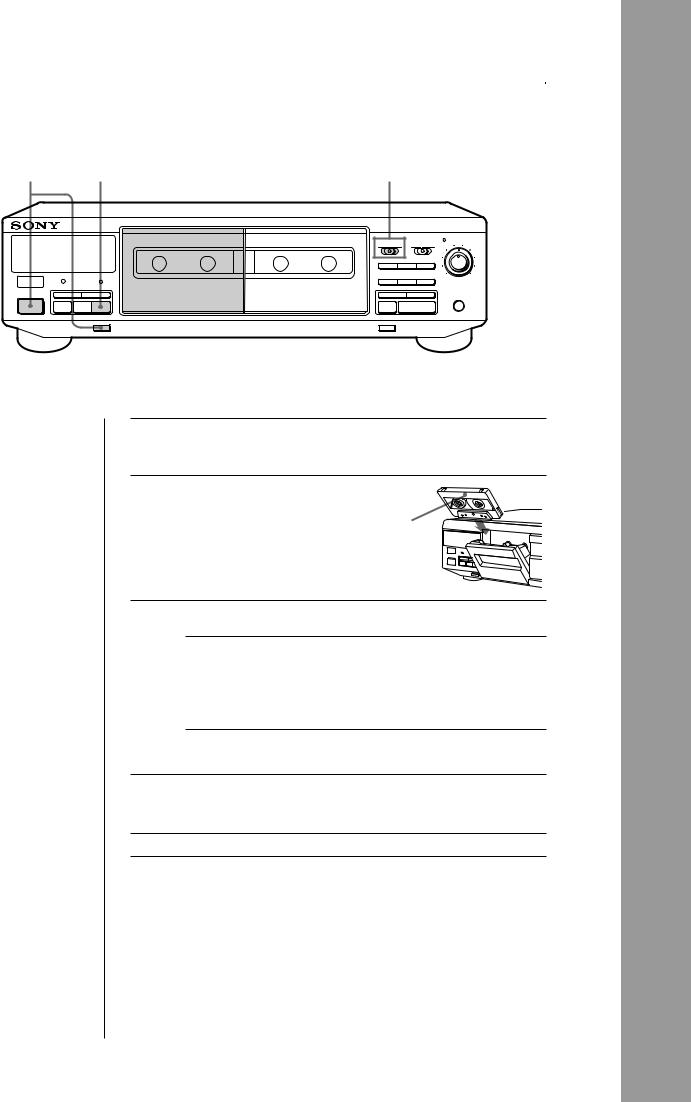
1 |
Turn on the amplifier and select the tape deck position. |
2 |
Press POWER, and then press ¤ |
and insert a cassette. |
With the side you want to play facing you
3 Set DIRECTION.
To play back |
Set to |
|
|
One side only |
A |
|
|
Both sides continuously* |
a |
|
|
Both decks in succession* |
RELAY |
* The deck automatically stops after playing back five times.
4 Press á.
The deck starts playing. Adjust the volume on the amplifier.
To |
Press |
|
|
Stop playing |
p |
|
|
Start playback from the reverse side |
» |
|
|
Pause (deck B only) |
PAUSE P. Press the button again to |
|
resume play. |
|
|
Fast-forward or rewind |
)or 0when the deck is stopped |
|
|
Take out the cassette |
¤after stopping playing |
|
|
5EN
Operations Basic
3-810-312-31(1)
Basic Operations
Recording on a Tape
2 |
3 4 |
|
|
|
|
|
|
|
|
AUTO |
|
|
|
|
|
DIRECTION |
DOLBY NR |
|
REC LEVEL |
||
|
|
|
|
|
|
|
|||
|
|
|
|
D a RELAY OFF |
B |
C |
4 |
5 |
|
|
|
|
|
|
|
|
|
6 |
|
|
|
|
|
|
|
|
|
3 |
7 |
|
|
|
|
SYNCHRO DUBBING A→B |
|
|
2 |
8 |
|
|
|
|
|
HIGH/NORMAL |
FADER |
ARL |
|
|
|
|
|
|
|
START(DECK B P) |
|
|
1 |
9 |
|
|
|
|
|
|
|
|
|
||
|
DECK A |
|
DECK B |
PAUSE |
REC MUTE |
REC |
|
0 |
10 |
|
COUNTER RESET |
P |
R |
r |
|
|
|
||
|
0 |
|
) |
0 |
) |
|
|
|
PHONES |
POWER |
p |
» |
á |
p |
» |
á |
|
|
|
|
|
|
¤ |
¤ |
|
|
|
|
|
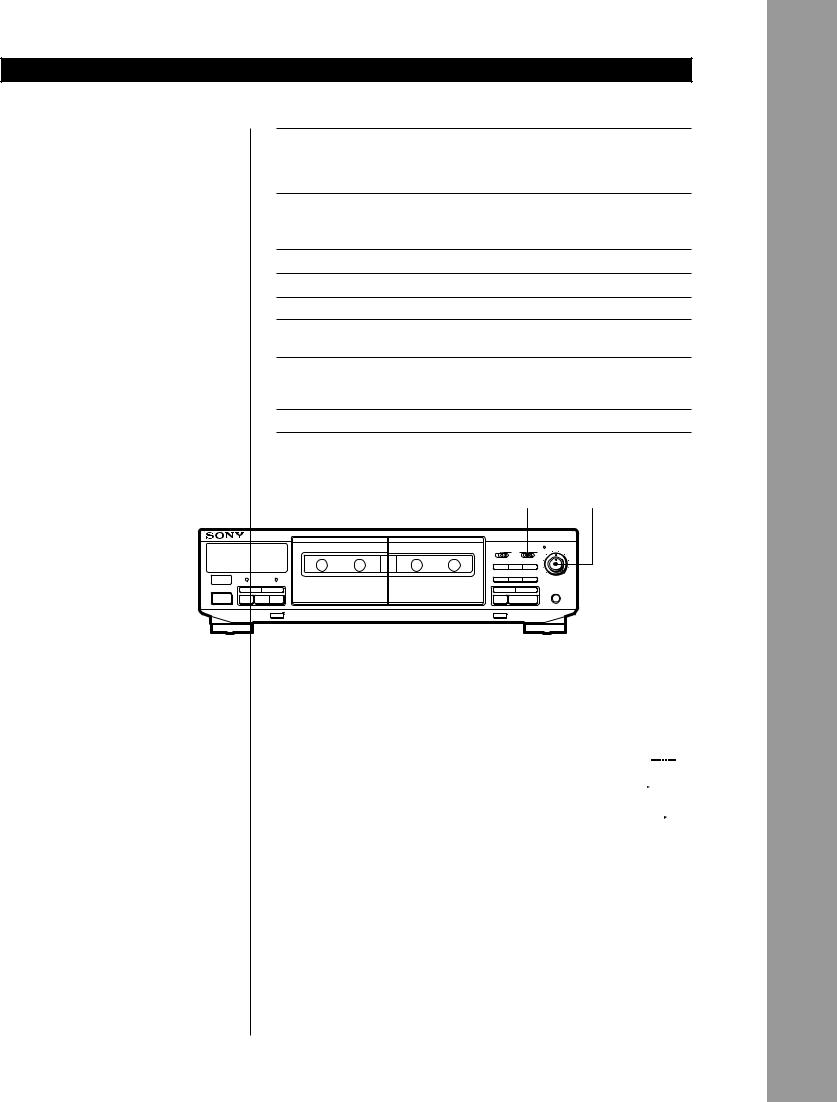
•See page 4 for hookup information.
•Use deck B (on your right hand side) for recording.
•See "Dubbing a Tape" (page 9) to make a copy of the tape.
Note
When deck B is recording or in recording pause, all buttons on deck A do not work.
|
|
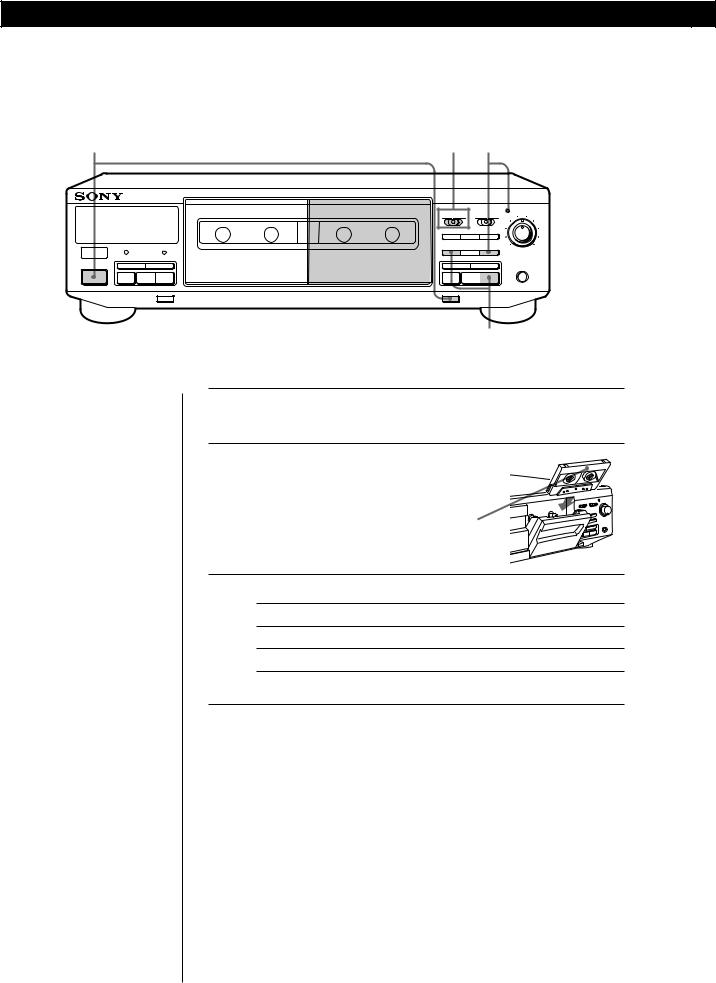
5 |
1 |
Turn on the amplifier and play the program source you want |
|
to record. |
|
|
2 |
Press POWER, and then press ¤and |
|
insert a cassette into deck B. |
|
|
|
With the side you want to record |
|
|
facing you |
|
3 |
Set DIRECTION. |
|
To record on |
Set to |
|
|
Only one side |
A |
|
Both sides* |
a |
* Recording stops when the tape reaches the end of reverse side.
4 |
Press REC r. |
álights up for recording on the side facing you. If it doesn’t, |
press áonce.
The tape deck automatically adjusts the recording level
(see page 8). After the AUTO indicator lights up continuously, stop playing the program source. If you wish to adjust the recording level manually, see “To adjust the recording level manually” on page 7.
6EN
3-810-312-31(1)
Basic Operations
zTo protect recordings against accidental erasure
Break out the record-protect tab(s) (see page 11).
zThe Dolby HX PRO* system automatically works during recording (TC-WE405 only)
Distortion and noise in the high-frequency response are reduced to produce highquality sound that can be enjoyed even during
playback on other tape decks.
*HX Pro headroom extension originated by Bang & Olufsen and manufactured under license from Dolby Laboratories Licensing Corporation.
“DOLBY“, the double-D symbol aand “HX PRO” are trademarks of Dolby Laboratories Licensing Corporation.
DECK B
¤
5 Press PAUSE Por á. Recording starts.
6 Start playing the program source.
To |
Press |
|
|
Stop recording |
p |
|
|
Start recording from the reverse side |
»twice in Step 5 |
|
|
Pause |
PAUSE P. Press the button again to |
|
resume recording. |
|
|
Take out the cassette |
¤after stopping recording |
|
|
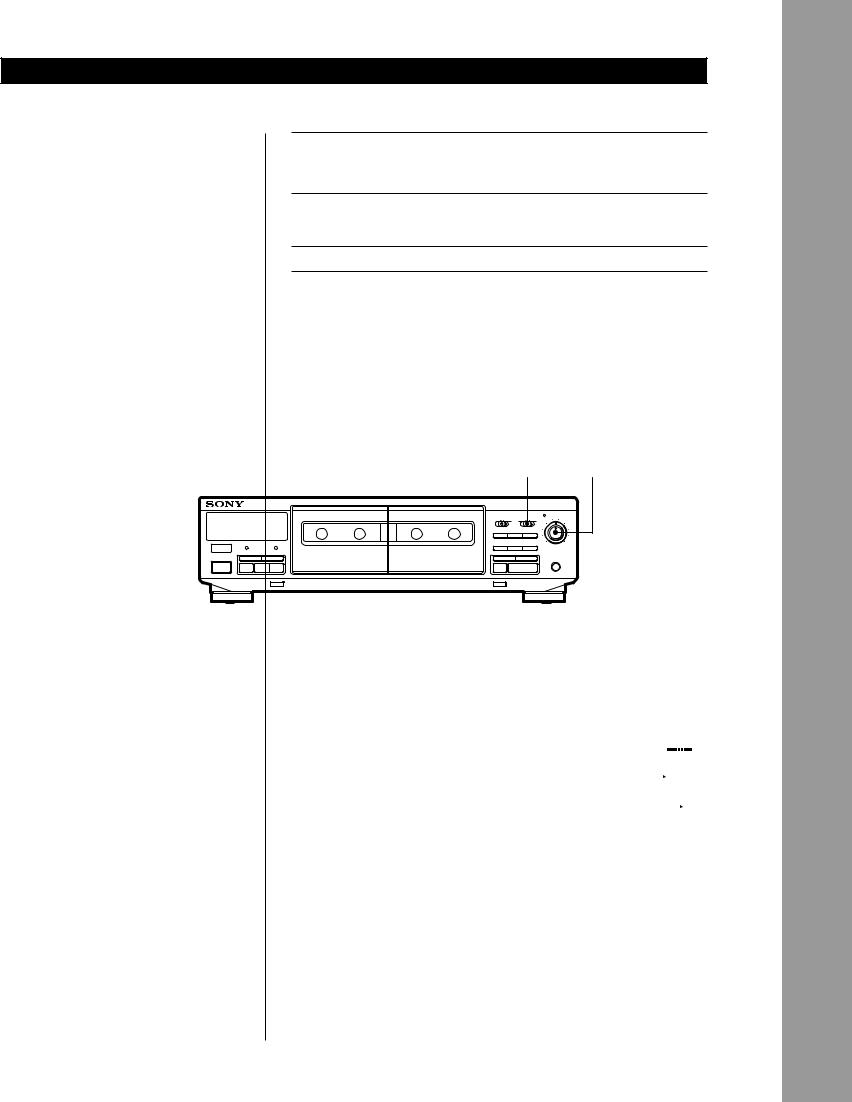
Use these switches (controls) to perform additional operations
DOLBY NR |
REC LEVEL |
||
|
|
AUTO |
|
DIRECTION |
DOLBY NR |
REC LEVEL |
|
D a RELAY |
OFF B C |
4 |
5 |
|
|
6 |
|
|
|
3 |
|
SYNCHRO DUBBING A→B |
|
2 |
|
START(DECK B P) |
|
1 |
|
PAUSE REC MUTE REC |
|
|
|
PHONES
¤
To record with the Dolby NR system
Set DOLBY NR to B or C before you start recording.
To adjust the recording level manually
After pressing REC rin Step 4 on page 6, turn |
dB – |
∞ |
–30 –20 –10 –4 0 +4 +8 |
|||||||||||||||||||||||||||||||||
REC LEVEL so that the peak level meters reach |
L |
|
|
|
|
|
|
|
|
|
|
|
|
|
|
|
|
|
|
|
|
|
|
|
|
|
|
|
|
|
|
|
|
|
|
|
R |
|
|
|
|
|
|
|
|
|
|
|
|
|
|
|
|
|
|
|
|
|
|
|
|
|
|
|
|
|
|
|
|
|
|
|
|
the recommended level for the corresponding |
|
|
|
|
|
|
|
|
|
|
|
|
|
|
|
|
|
|
|
|
|
|
|
|
|
|
|
|
|
|
|
|
|
|
|
|
|
|
|
|
|
|
|
|
|
|
|
|
|
|
|
|
|
|
|
|
|
|
|
|
|
|
|
|
|
|
|
|
|
|
|
|
|
For type I or |
|
|
|
|
|
|
|
|
|
|
|
|
|
|
|
|
|
|
|
|
|
|||||||||||||||
tape type. After completing the adjustment, stop |
|
|
|
|
|
|
||||||||||||||||||||||||||||||
|
|
|
|
|
|
|
|
|
|
|
||||||||||||||||||||||||||
playing the program source, then continue the |
type II tape |
|
|
|
||||||||||||||||||||||||||||||||
For type IV tape |
|
|
|
|
|
|
|
|
|
|
|
|
|
|
|
|
||||||||||||||||||||
procedure from Step 5. |
|
|
|
|||||||||||||||||||||||||||||||||
|
|
|
|
|||||||||||||||||||||||||||||||||
|
|
|
|
|
|
|
|
|
|
|
|
|
|
|
|
|
|
|
|
|
|
|
|
|
|
|
|
|
|
|
|
|
|
|
|
|
Operations Basic
7EN
3-810-312-31(1)
Advanced Recording Operations
Adjusting the Recording Level
Automatically (Auto Rec Level)
The Auto Rec Level function automatically measures the peak signal level and adjusts the recording level accordingly.
PAUSE P REC r á
|
|
|
|
|
|
|
|
AUTO |
|
|
|
|
|
|
DIRECTION |
|
DOLBY NR |
|
REC LEVEL |
||
|
|
|
|
D a RELAY |
OFF |
B |
C |
4 |
5 6 |
|
|
|
|
|
|
|
|
|
3 |
|
7 |
|
|
|
|
SYNCHRO DUBBING A |
B |
|
|
|
|
|
|
|
|
|
HIGH/NORMAL |
FADER→ |
ARL |
2 |
|
8 |
|
|
|
|
|
START(DECK B P) |
|
|
1 |
|
9 |
|
|
DECK A |
|
DECK B |
PAUSE |
REC MUTE |
REC |
|
0 |
10 |
|
|
COUNTER RESET |
P |
|
R |
r |
|
|
|
||
|
0 |
|
) |
0 |
|
) |
|
|
|
PHONES |
POWER |
p |
» |
á |
p |
|
» |
á |
|
|
|
¤¤
1Follow Steps 1 to 3 of “Recording on a Tape” on page 6.
Make sure that record-protect tabs on the cassette have not been removed.
2Press REC r.
The AUTO indicator flashes and the deck automatically adjusts the recording level. The AUTO indicator lights up continuously after the recording level has been adjusted.
zYou should adjust the recording level manually with REC LEVEL in the following cases:
—The recording level cannot be adjusted properly due to excessive noise in the program source.
—The program source level is too low and the recording level does not increase.
During a quiet passage in a program source such as classical music, the recording level may not increase for some time. If a high sound level is expected later on in the track, play that portion first so that the right adjustment can be obtained.
—The recording level does not decrease for a long time. The Auto Rec Level function may not work properly when you try to record sound produced by a graphic equalizer that has extremely high-level signals.
zTo record with the optimum recording level
•To prevent changes in the recording level after recording starts, press REC rwhile playing the highest sound level portion of the program source to be recorded. The result is a more natural-sounding recording.
•If you play the entire program source after the AUTO indicator has stopped flashing and is lit continuously, the deck will set the recording level for the portion of the program source with the highest signal level.
zRecording level setting remains even after the recording has ended
3Press PAUSE Por á. Recording starts.
To cancel the Auto Rec Level function
Press ARL or turn REC LEVEL so that the AUTO indicator goes off. If you do either of these during recording, recording will continue but with the Auto Rec Level function turned off.
To stop recording
Press p.
zWhat is the Auto Rec Level function?
The Auto Rec Level function automatically sets the recording level according to the peak signal level of the program source. While the AUTO indicator is flashing, the deck sets the recording level as high as possible without causing distortion. If the signal level rises excessively after the start of recording, the deck gradually decreases the recording level.
After you have finished recording with the Auto Rec Level function, the AUTO indicator remains on and the recording level setting remains the same. To cancel the setting, do one of the following:
•Press ARL to turn off the AUTO indicator
•Turn REC LEVEL
•Turn the deck off.
8EN
3-810-312-31(1)
Fading In and Out (Fader)
You can gradually increase the recording level at the beginning of a recording (fade in) or gradually decrease the recording level at the end of a recording (fade out).
It is convenient to use this function, for example, when the tape reaches to its end and you don’t want the track to be cut off abruptly.
You can do fade in or out recording only when you have adjusted the recording level manually
(see page 7).
FADER
|
|
|
|
|
|
|
|
AUTO |
|
|
|
|
|
|
DIRECTION |
|
DOLBY NR |
|
REC LEVEL |
||
|
|
|
|
D a RELAY |
OFF |
B |
C |
4 |
5 6 |
|
|
|
|
|
|
|
|
|
3 |
|
7 |
|
|
|
|
SYNCHRO DUBBING A |
B |
|
|
|
|
|
|
|
|
|
HIGH/NORMAL |
FADER→ |
ARL |
2 |
|
8 |
|
|
|
|
|
START(DECK B P) |
|
|
1 |
|
9 |
|
|
DECK A |
|
DECK B |
PAUSE |
REC MUTE |
REC |
|
0 |
10 |
|
|
COUNTER RESET |
P |
|
R |
r |
|
|
|
||
|
0 |
|
) |
0 |
|
) |
|
|
|
PHONES |
POWER |
p |
» |
á |
p |
|
» |
á |
|
|
|
|
|
|
¤ |
¤ |
|
|
|
|
|
|
To |
Do the following: |
Fade in |
1 Follow Steps 1 to 4 of “Recording on a |
|
Tape” on page 6. |
|
2 Press FADER. During fade-in, the |
|
AUTO indicator flashes, then goes off |
|
when the fade-in has completed. |
|
|
Fade out |
Press FADER when you want to start |
|
fading out while recording. When the |
|
fade-out has completed, “REC” flashes |
|
in the display and the deck pauses. |
|
|
Note
Fade-in or fade-out is not possible when REC LEVEL is set to 0 (minimum).
Advanced Recording Operations
Dubbing a Tape
You can copy a tape in deck A to a tape in deck B at normal or high speed.
p PAUSE P HIGH / NORMAL |
DIRECTION »/ á |
|||||||
|
|
|
|
|
|
AUTO |
|
|
|
|
DIRECTION |
|
DOLBY NR |
|
REC LEVEL |
||
|
|
D a RELAY |
OFF |
B |
C |
4 |
5 6 |
|
|
|
|
|
|
|
3 |
|
7 |
|
|
SYNCHRO DUBBING A |
B |
|
|
|
|
|
|
|
HIGH/NORMAL |
FADER→ |
ARL |
2 |
|
8 |
|
|
|
START(DECK B P) |
|
|
1 |
|
9 |
|
DECK A |
DECK B |
PAUSE |
REC MUTE |
REC |
|
0 |
10 |
|
COUNTER RESET |
P |
R |
r |
|
|
|
||
0 |
) |
0 |
|
) |
|
|
|
PHONES |
POWER p |
» á |
p |
» |
á |
|
|
|
|
¤¤
1Insert the recorded cassette into deck A and a blank cassette into deck B.
Make sure the record-protect tabs on the cassette in deck B have not been removed.
2Select the side(s) to be recorded on.
|
To record on |
Set DIRECTION to |
|
|
|
|
|
|
One side |
A |
|
|
|
|
|
|
Both sides |
a. |
|
|
|
Recording on the reverse side on |
|
|
|
deck B starts independently of |
|
|
|
playback on deck A. |
|
|
|
|
|
|
|
RELAY. |
|
|
|
Recording on the reverse side on |
|
|
|
deck B starts simultaneously with |
|
|
|
playback of the reverse side on |
|
|
|
deck A. |
|
|
|
|
|
3 Select the dubbing speed. |
|||
|
To select |
Press HIGH/NORMAL |
|
|
|
|
|
|
Normal speed |
Once |
|
|
|
|
|
|
High speed |
Twice |
|
|
|
|
|
“HIGH” or “NORM” appears in the display. The tape deck changes to dubbing standby.
4 Select the side from which to start dubbing.
|
|
To record from |
Press |
|
|
|
|
|
|
|
|
The front side |
á |
|
|
|
|
|
|
|
|
The reverse side |
» |
|
|
|
|
|
|
5 Press PAUSE Pto start dubbing. |
|
|||
To stop dubbing |
|
|
||
|
|
|
|
|
|
During |
Press |
|
|
|
|
|
|
|
|
Normal-speed dubbing |
pon deck B |
|
|
|
|
|
|
|
|
High-speed dubbing |
pon either deck |
|
|
9EN
3-810-312-31(1)

Advanced Recording Operations
zDuring high-speed dubbing
Only pis operative.
zYou don‘t have to adjust the recording level or select the Dolby NR system during dubbing
Dubbing is automatically performed with the same recording level and Dolby NR system as the original in deck A. If, however, you want to monitor the sound during normal-speed dubbing, set DOLBY NR to match the tape in deck A (see page 5).
Note
If a TV set is placed near the tape deck, noise may occur during high-speed dubbing. In that case, turn the television set off or move it away from the tape deck.
Dubbing only specific portions
You can do this only during the normal-speed dubbing.
1Press pon deck A at the portion you want to skip.
Deck B changes to recording pause.
2Locate the point you want to resume recording on deck A, then stop the tape.
3Press PAUSE Pto resume dubbing.
10EN
Inserting a Blank Space During
Recording (Record Muting)
You can insert a blank space of 4 seconds between each track or erase unwanted portions on a tape.
|
REC MUTE R á |
|||
PAUSE P |
||||
|
|
|
AUTO |
|
|
DIRECTION |
DOLBY NR |
REC LEVEL |
|
|
D a RELAY |
OFF B C |
4 |
5 6 |
|
SYNCHRO DUBBING A→B |
|
3 |
|
|
|
2 |
8 |
|
|
START(DECK B P) |
|
1 |
|
DECK A DECK B |
PAUSE REC MUTE REC |
|
|
|
COUNTER RESET |
|
|
|
|
|
|
|
|
PHONES |
POWER p |
p |
|
|
|
¤¤
1Start recording.
2Press REC MUTE Rwhere you want to insert a blank space.
“REC” flashes in the display and a blank is recorded on the tape.
After 4 seconds, Plights up and the tape deck changes to recording pause.
3Press PAUSE Por áto resume recording.
zIf you want to insert a blank space longer than 4 seconds
Hold down REC MUTE Ras long as you want. After 4 seconds, “REC” flashes faster.
When you release REC MUTE R, Plights up and the tape deck changes to recording pause.
Press PAUSE Por áto resume recording.
3-810-312-31(1)
Additional Information
Specifications
System
Recording system
4-track 2-channel stereo
Fast-winding time (approx.)
180 sec. (with Sony C-60 cassette)
Bias
AC bias
Signal-to-noise ratio (at peak level and weighted with Dolby NR off)
Type I tape, Sony Type I (NORMAL): 55 dB Type II tape, Sony Type II (HIGH): 57 dB Type IV tape, Sony Type IV (METAL): 58 dB
S/N ratio improvement (approximate values)
With Dolby B NR on: 5 dB at 1 kHz, 10 dB at 5 kHz With Dolby C NR on: 15 dB at 500 Hz, 20 dB at 1 kHz
Harmonic distortion
0.4% (with Type I tape, Sony Type I (NORMAL):
160 nWb/m 315 Hz, 3rd H.D.)
1.8% (with Type IV tape, Sony Type IV (METAL):
250 nWb/m 315 Hz, 3rd H.D.)
Frequency response (Dolby NR off)
Type I tape, Sony Type I (NORMAL): 30 - 16,000 Hz (±3 dB, IEC)
Type II tape, Sony Type II (HIGH): 30 - 17,000 Hz (±3 dB, IEC)
Type IV tape, Sony Type IV (METAL): 30 - 19,000 Hz (±3 dB, IEC)
30 - 13,000 Hz (±3 dB, –4 dB recording)
Type I tape, Sony Type I (NORMAL): 20 - 17,000 Hz (±6 dB)
Type II tape, Sony Type II (HIGH): 20 - 18,000 Hz (±6 dB)
Type IV tape, Sony Type IV (METAL): 20 - 20,000 Hz (±6 dB)
Wow and flutter
±0.15% W. Peak (IEC)
0.1% W. RMS (NAB)
±0.2% W. Peak (DIN)
Inputs
Line inputs (phono jacks)
Sensitivity : 0.16 V
Input impedance : 47 kilohms
Outputs
Line outputs (phono jacks)
Rated output level : 0.5 V at a load impedance of 47 kilohms
Load impedance : Over 10 kilohms
Headphones (stereo phone jack) (TC-WE405 only)
Output level : 0.25 mW at a load impedance of 32 ohms
14EN
General
Power requirements
Where purchased |
Power requirements |
|
|
U.S.A. and Canada |
120 V AC, 60 Hz |
|
|
U.K. and Continental Europe |
220 - 230 V AC, 50/60 Hz |
|
|
Australia |
240 V AC, 50/60 Hz |
|
|
Other countries |
120/220/240 V AC, |
|
50/60 Hz |
|
|
Power consumption |
|
18 W |
|
Dimensions (approx) (w/h/d)
430× 120× 305mm(w/h/d) (17× 43/4× 121/8inches)
including projecting parts and controls
Mass (approx.)
3.8 kg (8 lbs 7 oz)
Supplied accessories
Audio connecting cords (2 phono plugs - 2 phono plugs) (2)
Optional accessory
Remote commander RM-J910
For more information on the availability of the remote commander, contact your nearest Sony dealer.
Design and specifications are subject to change without notice.
3-810-312-31(1)

|
|
|
|
|
|
|
|
|
|
|
|
|
Index |
Index |
|
|
|
|
|
|
|
|
|
Index
A, B
Adjusting
recording level automatically. See Auto rec level
recording level manually 7 volume 5
Audio connecting cord 4, 14 Auto play 5
Auto rec level 8
C
Cassette. See Tape Cleaning
cabinet 11
heads and tape path 12 Connecting. See Hooking up
D, E, F, G
Dolby HX PRO system 7 Dolby NR system 5, 7 Dubbing
high-speed dubbing 9 normal-speed dubbing 9, 10 only specific portions 10
Fader 9
Fading
in. See Fader out. See Fader
H, I, J, K, L, M, N, O
Heads cleaning 12
demagnetizing 12 Hooking up
hookups 4 overview 4
Insert
blank space 10 cassette 5, 6
P, Q, R, S
Playing
auto play 5 basic play 5
Recording 6 Record muting 10 Specifications 14
T, U, V, W, X, Y, Z
Tape
ejecting 5, 7 notes 11
path cleaning 12 protect the recording 11 type 11
Troubleshooting 13 Unpacking 4
Names of Controls
Buttons
ARL (automatic recording level adjustment) 8 FADER 9
HIGH/NORMAL 9
PAUSE P 5, 7 - 10, 13
REC (recording) r 6 - 8
REC MUTE (record muting) R 10 ¤(eject) 5 - 7, 12, 13
p(stop) 5, 7 - 10, 13
á(forward play) 5 - 10, 13 »(reverse play) 5, 7, 9, 13
), 0(fast-forwarding and rewinding) 5, 13
Switches
DIRECTION 5, 6, 9
DOLBY NR 5, 7, 10, 13
POWER 5, 6
Controls
REC (recording) LEVEL 7 - 9
Jacks
LINE IN 4
LINE OUT 4
PHONES 5
Others
AUTO indicator 6, 8, 9
Cassette holder 5, 6, 12
Peak level meters 7
15EN
3-810-312-31(1)

AVERTISSEMENT
Afin d’éviter tout risque d’incendie ou d’électrocution, ne pas exposer cet appareil à la pluie ou à l’humidité.
2F
3-810-312-31(1)

Bienvenue!
Merci pour l’achat de cette platine à cassette stéréo Sony. Avant de la mettre en service, veuillez lire attentivement ce mode d’emploi et le conserver pour toute référence future.
Table des matières
Préparatifs
Déballage 4
Raccordement de la platine 4
A propos de ce manuel
Les instructions de ce mode d’emploi concernent les modèles TC-WE405 et TC-WR661. Vérifiez le numéro de votre modèle sur le panneau arrière de la platine. Les illustrations de ce mode d’emploi représentent le TC-WE405. Toute différence de fonctionnement est clairement indiquée dans le texte, par exemple “TC-WE405 uniquement”.
Type de différences
Modèle |
WE405 WR661 |
Fonction |
|
Dolby HX PRO |
• |
|
|
Prise PHONES |
• |
|
|
Convention
Le symbole suivant est utilisé dans ce mode d’emploi:
Indique des conseils et des
zsuggestions qui facilitent une manipulation.
Lecture d’une cassette 5
Enregistrement sur une cassette 6
Fonctions élaborées pour l’enregistrement
Réglage automatique du niveau d’enregistrement (fonction d’autoréglage du son) 8
Fondu à l’ouverture et fondu à la fermeture (Fader) 9 Copie d’une cassette 9
Insertion d’un espace vierge pendant l’enregistrement (Silencieux d’enregistrement) 10
Informations complémentaires
Précautions 11
Remarques sur les cassettes 11
Nettoyage 12
En cas de panne 13
Spécifications 14
Index 15
F
3F
3-810-312-31(1)
Préparatifs
Déballage
Vérifiez si les éléments suivants se trouvent bien dans l’emballage:
• Cordons de liaison audio (2)
Raccordement de la platine
Cette partie explique comment raccorder la platine à l’amplificateur. N’oubliez pas d’éteindre les deux appareils avant de les raccorder.
Pour les acheteurs du TC-WR661
Consultez le mode d’emploi de l’amplificateur TA-AV561 pour le raccordement de votre platine à cassette à cet appareil.
Pour les acheteurs du TC-WE405
Suivez les instructions ci-dessous pour raccorder votre platine à cassette à un amplificateur.
TC-WE405
vers LINE IN |
vers LINE OUT |
|
vers une prise |
|
secteur |
vers REC OUT |
vers TAPE IN |
|
Amplificateur |
vers une prise murale
4F
Raccordements
Quand vous branchez un cordon de liaison audio, vérifiez la couleur de la prise et celle de la fiche du cordon: Fiche rouge (droite) dans la prise rouge et fiche blanche (gauche) dans la prise blanche. Veillez à bien enfoncer les fiches pour éviter tout ronflement ou bruit.
Raccordez la platine à l’amplificateur comme indiqué ci-dessous.
Platine à cassette |
Amplificateur |
|
‚ |
|
|
LINE |
TAPE |
|
IN OUT |
REC OUT |
IN |
L |
L |
L |
R |
R |
R |
•
•: Flux du signal
Réglage du sélecteur de tension (uniquement pour les modèles avec sélecteur de tension)
Vérifiez que le sélecteur de tension sur le panneau arrière de la platine à cassette est réglé sur la tension du secteur local. Si ce n’est pas le cas, réglez-le sur la position correcte avec un tournevis avant de brancher le cordon d’alimentation secteur sur une prise secteur.
VOLTAGE
220V
240V
120V
Branchement du cordon d’alimentation secteur
Branchez le cordon sur une prise secteur.
Que faire ensuite?
Maintenant la platine à cassette est prête.
Pour les fonctions de base, voir pages 5 à 7; pour les fonctions élaborées, voir les paragraphes à partir de la page 8.
3-810-312-31(1)

Fonctionnement de base
Lecture d’une cassette
2 4 3
|
|
|
|
|
|
|
|
AUTO |
|
|
|
|
|
DIRECTION |
DOLBY NR |
|
REC LEVEL |
||
|
|
|
|
|
|
|
|||
|
|
|
|
D a RELAY OFF |
B |
C |
4 |
5 |
|
|
|
|
|
|
|
|
|
6 |
|
|
|
|
|
|
|
|
|
3 |
7 |
|
|
|
|
SYNCHRO DUBBING A→B |
|
|
2 |
8 |
|
|
|
|
|
HIGH/NORMAL |
FADER |
ARL |
|
|
|
|
|
|
|
START(DECK B P) |
|
|
1 |
9 |
|
|
DECK A |
|
DECK B |
PAUSE |
REC MUTE |
REC |
|
0 |
10 |
|
COUNTER RESET |
P |
R |
r |
|
|
|
||
|
0 |
|
) |
0 |
) |
|
|
|
PHONES |
POWER |
p |
» |
á |
p |
» |
á |
|
|
|
|
|
|
¤ |
¤ |
|
|
|
|
|
•Voir page 4 pour le raccordement.
•Vous pouvez utiliser les deux platines pour la lecture.
zPour localiser le début d’une bande et commencer la lecture automatiquement (Auto Play)
Appuyez sur 0tout en maintenant áenfoncé. Pour la face arrière, appuyez sur )en maintenant » enfoncé.
zPour écouter une cassette avec le système de réduction de bruit Dolby*
Sélectionnez pour DOLBY NR le même réglage - B ou C - que lors de l’enregistrement de la cassette.
zQu’est-ce que le système de réduction de bruit Dolby?
Le système de réduction Dolby élimine le ronflement en accentuant les signaux de basses fréquences sur la plage de hautes fréquences pendant l’enregistrement, puis en les réduisant pendant la lecture. Le type C assure une réduction du bruit supérieure à celle du type B.
zVous pouvez brancher le casque sur PHONES (TCWE405 uniquement)
*Réduction de bruit Dolby fabriquée sous licence de Dolby Laboratories Licensing Corporation.
DOLBY et le symbole double-D asont des marques de Dolby Laboratories Licensing Corporation.
1 |
Allumez l’amplificateur et sélectionnez la fonction platine. |
2 |
Appuyez sur POWER puis sur ¤et introduisez une cassette. |
Tournez la face à lire vers vous.
3 Réglez DIRECTION.
Pour reproduire |
Réglez sur |
|
|
Une face seulement |
A |
|
|
Les deux faces continuellement* |
a |
|
|
Les deux platines successivement* |
RELAY |
*La platine s’arrête automatiquement au bout de cinq lectures consécutives.
4 Appuyez sur á.
La lecture commence. Réglez le volume sur l’amplificateur.
Pour |
Appuyez sur |
Arrêter la lecture |
p |
|
|
Démarrer la lecture sur la face arrière |
» |
|
|
Faire une pause (platine B uniquement) |
PAUSE P. Appuyez une nouvelle fois |
|
sur cette touche pour poursuivre la |
|
lecture. |
|
|
Avancer rapidement ou rebobiner la |
)ou 0quand la platine est arrêtée |
bande |
|
|
|
Sortir la cassette |
¤après avoir arrêté la lecture |
|
|
5F
base de Fonctionnement
3-810-312-31(1)

 Fonctionnement de base
Enregistrement sur une cassette
2 |
3 4 |
|
|
|
|
|
|
|
|
AUTO |
|
|
|
|
|
DIRECTION |
DOLBY NR |
|
REC LEVEL |
||
|
|
|
|
D a RELAY OFF |
B |
C |
4 |
5 |
|
|
|
|
|
|
|
|
|
6 |
|
|
|
|
|
|
|
|
|
3 |
7 |
|
|
|
|
SYNCHRO DUBBING A→B |
|
|
2 |
8 |
|
|
|
|
|
HIGH/NORMAL |
FADER |
ARL |
|
|
|
|
|
|
|
START(DECK B P) |
|
|
1 |
9 |
|
|
DECK A |
|
DECK B |
PAUSE |
REC MUTE |
REC |
|
0 |
10 |
|
COUNTER RESET |
P |
R |
r |
|
|
|
||
|
0 |
|
) |
0 |
) |
|
|
|
PHONES |
POWER |
p |
» |
á |
p |
» |
á |
|
|
|
|
|
|
¤ |
¤ |
|
|
|
|
|
5
•Voir page 4 pour le raccordement.
•Utilisez la platine B (côté droit) pour l’enregistrement.
•Voir “Copie d’une cassette” (page 9) pour copier une cassette.
Remarque
Quand la platine B enregistre ou est en pause d’enregistrement, toutes les touches de la platine A sont inopérantes.
1 |
Allumez l’amplificateur et reproduisez la source de |
|
programme que vous voulez enregistrer. |
||
2 |
Appuyez sur POWER puis sur ¤, et introduisez |
|
une cassette dans la platine B. |
|
|
|
Tournez la face à enregistrer |
|
|
vers vous. |
|
3 |
Réglez DIRECTION. |
|
Pour enregistrer sur |
Réglez sur |
|
|
Une face seulement |
A |
|
Les deux faces* |
a |
|
* L’enregistrement s’arrête quand la face arrière est finie. |
|
4 |
Appuyez sur REC r. |
|
ás’allume pour indiquer que l’enregistrement commence sur |
||
la face tournée vers vous. Si ce n’est pas le cas, appuyez une fois sur á.
La platine à cassette ajuste automatiquement le niveau d’enregistrement (voir page 8). Après l’allumage de l’indicateur AUTO, arrêtez la source de programme. Si vous souhaitez ajuster le niveau d’enregistrement manuellement, voir “Pour ajuster manuellement le niveau d’enregistrement” (page 7).
6F
3-810-312-31(1)
Fonctionnement de base
z Pour protéger vos |
|
5 |
Appuyez sur PAUSE Pou á. |
|
|
|
|
|
enregistrements contre un |
|
L’enregistrement commence. |
|
|
|
|
||
effacement accidentel |
|
|
|
|
|
|
|
|
Brisez la ou les languettes de |
|
|
|
|
|
|
|
|
protection (voir page 11). |
|
6 Démarrez la source de programme. |
|
|
|
|||
|
|
|
|
|
||||
|
|
Pour |
|
Appuyez sur |
|
|||
|
|
Arrêter l’enregistrement |
p |
|
|
|
|
|
|
|
Démarrer l’enregistrement sur la face |
»deux fois à l’étape 5 |
|||||
|
|
arrière |
|
|
|
|
|
|
|
|
Faire une pause |
PAUSE P. Appuyez une nouvelle fois |
|||||
|
|
|
|
sur cette touche pour poursuivre |
||||
|
|
|
|
l’enregistrement. |
||||
|
|
Sortir la cassette |
¤après avoir arrêté l’enregistrement |
|||||
z Le système Dolby HX |
|
Utilisez aussi les sélecteurs et interrupteurs (commandes) |
||||||
PRO* s’active |
|
suivants |
|
|
|
|
|
|
automatiquement |
|
|
|
DOLBY NR |
REC LEVEL |
|||
pendant l’enregistrement |
|
|
|
|
|
|
|
|
(TC-WE405 uniquement) |
|
|
|
|
|
|
|
|
La distorsion et le bruit sont |
|
|
|
DIRECTION |
DOLBY NR |
REC LEVEL |
||
|
|
|
|
|
|
|
AUTO |
|
réduits dans la réponse de |
|
|
|
D a RELAY |
OFF |
B C |
5 |
6 |
|
|
|
|
|
|
4 |
||
|
|
|
|
|
|
3 |
|
|
hautes fréquences pour |
|
|
|
SYNCHRO DUBBING A→B |
|
|
2 |
|
DECK A |
DECK B |
|
PAUSE REC MUTE |
REC |
1 |
|
||
|
|
|
|
START(DECK B P) |
|
|
|
|
produire un son de haute |
|
COUNTER RESET |
|
|
|
|
|
|
|
|
|
|
|
|
PHONES |
|
|
qualité dont on pourra |
|
¤ |
|
¤ |
|
|
|
|
profiter même pendant la |
|
|
|
|
|
|
||
|
|
|
|
|
|
|
|
|
lecture sur d’autres platines à |
|
|
|
|
|
|
|
|
cassette. |
|
|
|
|
|
|
|
|
Pour enregistrer avec le système de réduction de bruit Dolby
Réglez DOLBY NR sur B ou C avant de commencer l’enregistrement.
Pour ajuster manuellement le niveau d’enregistrement
Après la pression de REC rà l’étape 4 de la |
|
|
|
|
|
|
|
|
|
|
|
|
|
|
|
|
|
|
|
|
|
|
|
|
|
|
|
|
|
|
|
|
|
|
|
dB –∞ –30 –20 –10 |
–4 0 +4 +8 |
||||||||||||||||||||||||||||||||||
page 6, tournez REC LEVEL de sorte que les |
|||||||||||||||||||||||||||||||||||
L |
|
|
|
|
|
|
|
|
|
|
|
|
|
|
|
|
|
|
|
|
|
|
|
|
|
|
|
|
|
|
|
|
|
||
R |
|
|
|
|
|
|
|
|
|
|
|
|
|
|
|
|
|
|
|
|
|
|
|
|
|
|
|
|
|
|
|
|
|
||
|
|
|
|
|
|
|
|
|
|
|
|
|
|
|
|
|
|
|
|
|
|
|
|
|
|
||||||||||
décibelmètres atteignent le niveau |
|
|
|
|
|
|
|
|
|
|
|
|
|
|
|
|
|
|
|
|
|
|
|
|
|
|
|
|
|
|
|
|
|
|
|
pour une |
|
|
|
|
|
|
|
|
|
|
|
|
|
|
|
|
|
|
|||||||||||||||||
recommandé pour le type de cassette utilisée. |
|
|
|
|
|
|
|
|
|
|
|
|
|
|
|
|
|
|
|||||||||||||||||
cassette de |
|
|
|
|
|
|
|
|
|
|
|
|
|
|
|
|
|
|
|
||||||||||||||||
|
|
|
|
|
|
|
|
|
|
|
|
|
|
|
|
|
|
|
|||||||||||||||||
Une fois ces réglages effectués, arrêtez la source de |
type I ou II |
|
|
|
|
|
|
|
|
|
|
|
|
|
|
|
|
|
|
||||||||||||||||
programme et continuez la procédure à partir de |
pour une |
|
|
|
|
|
|
|
|
|
|
|
|
|
|
|
|
|
|
||||||||||||||||
l’étape 5. |
cassette de type |
|
|
||||||||||||||||||||||||||||||||
|
|||||||||||||||||||||||||||||||||||
|
IV |
|
|
|
|
|
|
|
|
|
|
|
|
|
|
|
|
|
|
||||||||||||||||
*HX Pro headroom extension d’origine Bang & Olufsen et fabriqué sous licence de Dolby Laboratories Licensing Corporation.
DOLBY, le symbole double-D aet HX PRO sont des marques de Dolby Laboratories Licensing Corporation.
base de Fonctionnement
7F
3-810-312-31(1)
 Loading...