


4-204-789-65
R
420478965
Trinitron Colour
Television
Instruction Manual |
GB |
KV-28FX20U
KV-32FX20U
© 1999 by Sony Corporation Printed in UK
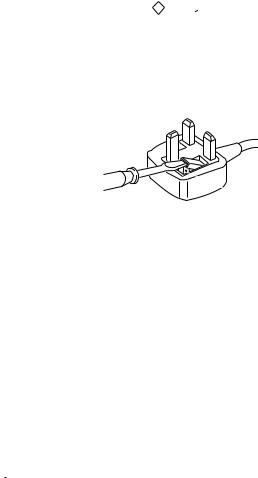
NOTICE FOR CUSTOMERS IN THE UNITED KINGDOM
A molded plug complying with BS1363 is fitted to this equipment for your safety and convenience.
Should the fuse in the plug supplied need to be replaced, a 5 AMP fuse approved by ASTA or BSI to BS 1362 (i.e. marked with ASAT or  ) must be used.
When an alternative type of plug is used it should be fitted with a 5 AMP FUSE, otherwise the circuit should be protected by a 5 AMP FUSE at the distribution board.
If the plug supplied with this equipment has a detachable fuse cover, be sure to attach the fuse cover after you change the fuse. Never use the plug without the fuse cover. If you should lose the fuse cover, please contact your nearest Sony service station.
How to replace the Fuse
Open the fuse compartment with a blade screwdriver, and replace the fuse.
•IMPORTANT
If the plug supplied is not suitable for the socket outlet in your home, it should be cut off and an appropriate plug fitted in accordance with the following instructions:
The wires in this mains lead are coloured in accordance with the following code: Blue Neutral
Brown Live
As the colours of the wires in the mains lead of this apparatus may not correspond with the coloured markings identifying the terminals in your plug, proceed as follows:
The wire which is coloured blue must be connected to the terminal which is marked with the letter N or coloured black. The wire which is coloured brown must be connected to the terminal which is marked with the letter L or coloured red. Do not connect either wire to the earth terminal in the plug which is marked by the letter E or by the safety earth
symbol |
|
|
or coloured green or green and yellow. |
WARNING
•To prevent shock hazard, do not insert the plug cut off from the mains lead into a socket outlet. This plug cannot be used and should be destroyed.
•To prevent fire or shock hazard, do not expose the unit to rain or moisture.
•Dangerously high voltages are present inside the set. Do not open the cabinet. Refer servicing to qualified personnel only.

Instruction Manual GB
1

Safety Information
For your safety
All TVs operate on extremely high voltages. To prevent fire or electric shock, please follow the safety procedures indicated below.
For General Safety
•Do not expose the TV set to rain or moisture.
•Do not remove the rear cover.
•For your protection, refer all servicing to qualified personnel only.
For Safe Installation
•Do not install the TV in hot, humid or excessively dusty places.
•Do not block or cover the ventilation openings. For ventilation, leave a space of at least 10 cm all around the set.
•Do not install the TV where it may be exposed to mechanical vibrations.
•Place the TV set only on a stable stand designed for the weight and dimensions of the TV.
For Safe Operation
•Do not operate the TV set on anything other than a 220-240V AC, 50Hz supply.
•Do not operate the TV if any liquid or solid objects fall in through the ventilation slots. Have it checked immediately.
•For environmental and safety reasons, it is recommended that the TV set is not left in standby mode when not in use. Switch off at the mains.
•Do not disconnect the TV by pulling on the power cable. Disconnect by removing the mains plug.
•In case of a thunderstorm, disconnect the TV set from the main supply and the aerial. Otherwise the set may be damaged by a stroke of lightning.
For Maintenance
•Clean the TV screen with a soft dampened cloth. Do not use any abrasive cleaners.
•Dust and nicotine deposits may cause heat accumulation inside the TV set. In the long term this could be a safety risk and may shorten the lifetime of your TV set. Therefore have your set serviced about every five years.
2

Table of Contents
Table of Contents
Quick Start Guide |
|
||
Checking the accessories supplied |
4 |
||
Inserting batteries into the remote control |
4 |
||
Connecting the aerial |
5 |
||
Switching on the TV |
5 |
||
Automatically tuning the TV |
6 |
||
|
|
|
|
Overview |
|
||
Overview of the TV set buttons |
7 |
||
Overview of the remote control buttons |
8 |
||
|
|
|
|
Additional TV Features |
|
||
Choosing a language for the TV menu screens |
9 |
||
Automatically tuning the TV |
10 |
||
Re-arranging the TV channels |
11 |
||
Adjusting the picture |
12 |
||
Changing picture and sound modes quickly |
12 |
||
Adjusting the sound |
13 |
||
Changing the screen mode |
14 |
||
Using the ‘Further Programme Preset’ feature |
15 |
||
Adjusting the picture rotation |
16 |
||
Using the parental lock |
17 |
||
Using the sleep timer |
18 |
||
Manually tuning the TV |
19 |
||
Skipping programme positions |
20 |
||
Naming a channel |
21 |
||
|
|
|
|
Teletext |
|
||
Switching Teletext on and off |
22 |
||
Using other Teletext functions |
22 |
||
|
|
|
|
Optional Equipment |
|
||
Connecting equipment to the TV |
23 |
||
Additional information when connecting equipment |
23 |
||
Selecting the output source for the scart socket |
|
|
24 |
|
|||
Smartlink |
24 |
||
Using the ‘AV Label Preset’ feature |
25 |
||
|
|
|
|
Additional Information |
|
||
Specifications |
26 |
||
Troubleshooting |
28 |
||
|
|
|
|
3
Quick Start Guide |
|
Follow steps 1-5 to: |
Check the accessories supplied |
|
Insert batteries into your remote control |
|
Connect the aerial to your TV |
|
Plug in and switch on the TV |
|
View programmes on your TV |
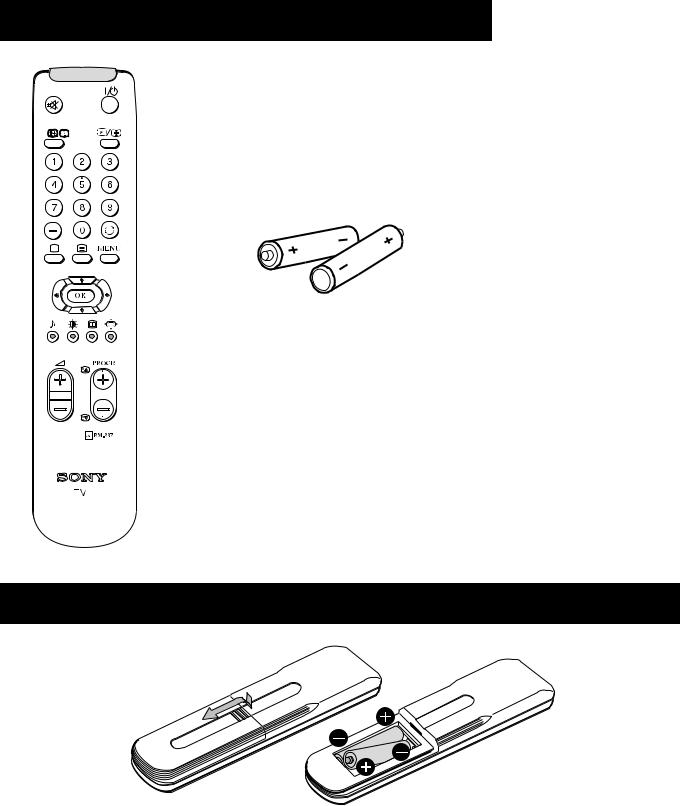
1. Checking the accessories supplied
Batteries
Remote control
2. Inserting batteries into the remote control
Always remember to dispose of used batteries in an environmental friendly way.
4
Quick Start Guide
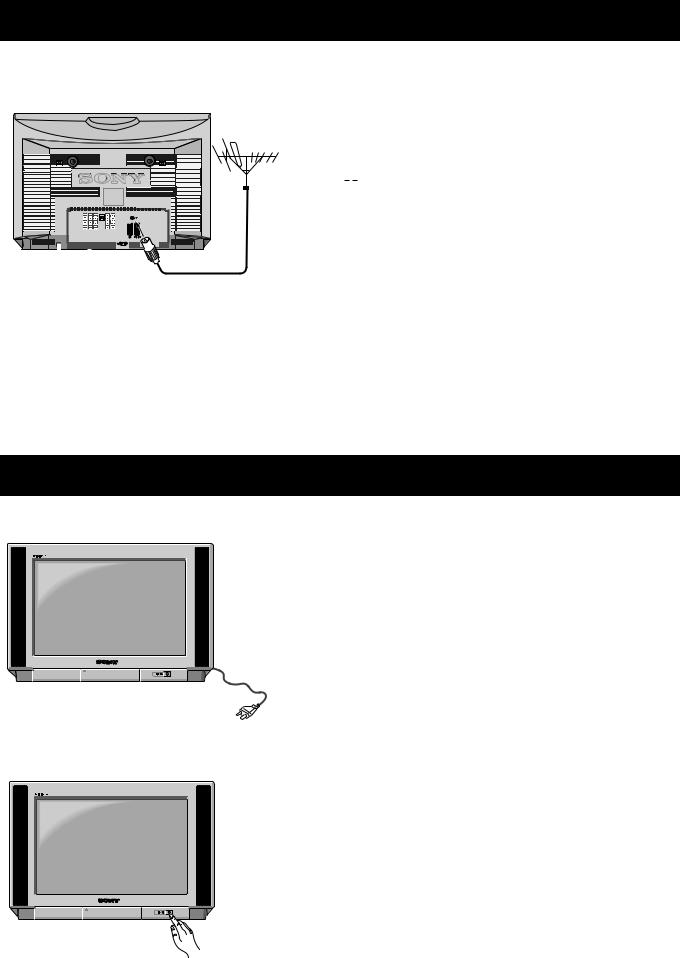
3. Connecting the aerial
Connect a conventional aerial to the socket marked 
 on the rear of the TV.
4. Switching on the TV
Connect the TV plug to the mains socket (220-240V AC, 50Hz) and switch on.
Push in the on/off switch on the front of the TV.
5

Quick Start Guide
Automatically tuning the TV
When you first switch on the TV, the following sequence of menu screens appear on the TV enabling you to 1) choose a language for the TV menu screens, 2) add channels to the TV, 3) arrange the channels.
1.When switching on the TV for the first time, the ‘LANGUAGE’ menu appears automatically on the TV screen enabling you to select in which language you wish to read the TV menu screens. Press the UP or DOWN arrow keys on the remote control to select your chosen language then press the OK button to confirm your selection.
2.The ‘AUTO TUNE’ menu appears on the TV screen in your selected language. Press the UP or DOWN arrow keys to select ‘YES’ then press the OK button to confirm.
3.A new menu screen appears asking you to check that the antenna is connected. Ensure the antenna is connected then press the OK button to confirm. The TV now starts to automatically search and store all available channels for you. Please be patient and do not press any buttons.
4.When the TV has finished tuning in all available channels, the ‘PROGRAMME SORTING’ menu appears on the TV screen which enables you to change the order of the channels on your TV. If you wish to change the channel order, press the UP or DOWN arrow keys on your remote control until the channel you wish to rearrange appears on the screen then press the OK button. Press the UP or DOWN arrow keys to select the new programme number position for your selected channel then press the OK button to confirm. The selected channel now moves to its new programme position and the other channels move accordingly. Repeat this procedure if you wish to sort the order of other channels on your TV.
5.Press the MENU button to remove the menu from the TV screen.
6.Press the PROGR+/- or the numbered buttons on the remote control to view the TV channels.
Do you want to start automatic tuning?
Yes
No
Confirm: OK
Please confirm that antenna is connected
Confirm: OK
AUTO PROGRAMME
PROG |
SYS |
CHAN |
LABEL |
6 |
B/G |
C26 |
- - - - - |
AUTO PROGRAMME
6
Overview
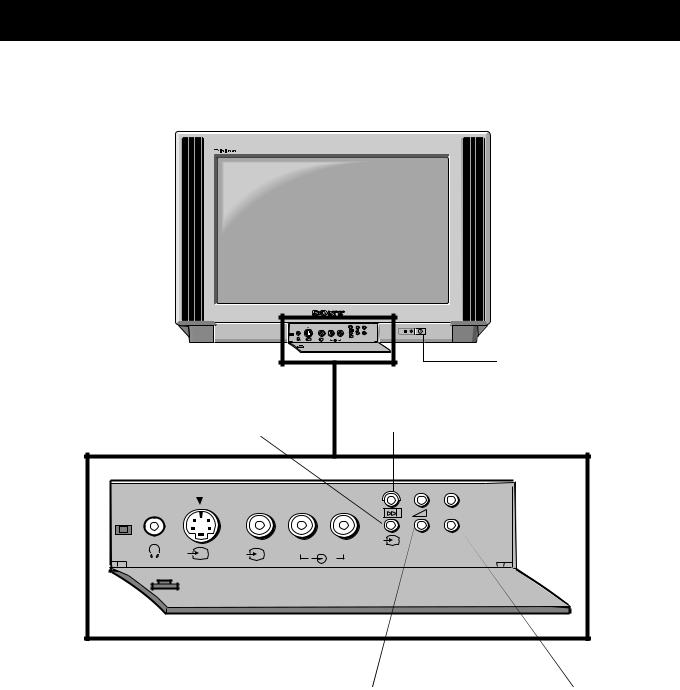
Overview of the TV set buttons
|
|
+ |
+ |
|
|
MONO |
P |
|
|
|
|
|
|
_ |
_ |
s |
3 |
L/G/S/I R/D/D/D |
On/Off switch. |
3 |
|||
|
|
|
|
|
|
|
Press to switch TV on and off. |
Video input button. |
Auto tune button. |
|
Press to select the input |
||
Press to select the |
||
signals from VCR etc. |
||
automatic tuning function. |
||
|
|
|
+ |
+ |
|
|
MONO |
P |
|
|
|
|
|
|
_ |
_ |
s |
3 |
L/G/S/I R/D/D/D |
|
3 |
|
Volume control buttons.
Press to increase(+)/decrease(-) volume.
Programme Up(+) or Down(-) buttons.
Press to select TV channels.
7
 Loading...