


DHR-1000
3-800-999-13(1)
1997 by Sony Corporation
DHR-1000
Digital Video
Cassette Recorder
Operating Instructions
2
Introduction
WARNING
To prevent fire or shock hazard, do not
expose the unit to rain or moisture.
This symbol is intended to alert the user to
the presence of uninsulated “dangerous
voltage” within the product’s enclosure that
may be of sufficient magnitude to constitute a
risk of electric shock to persons.
This symbol is intended to alert the user to
the presence of important operating and
maintenance (servicing) instructions in the
literature accompanying the appliance.
• Do not install the unit near heat sources such as radiators or air
ducts, or in a place subject to direct sunlight, excessive dust,
mechanical vibration or shock.
• Do not install the unit in an inclined position. It is designed to
be operated in a horizontal position only.
• Keep the unit and cassettes away from equipment with strong
magnets, such as microwave ovens or large loudspeakers.
• Do not place heavy objects on the unit.
• Do not place any objects containing liquid (e.g. vases) on the
unit.
• If the unit is brought directly from a cold to a warm location,
moisture may condense inside the VCR and cause damage to
the video head and tape. When you first install the unit, or
when you move it from a cold to a warm location, wait for
about one hour before operating the unit.
Information
For customers in the USA
This equipment has been tested and found to comply with the
limits for a Class B digital device, pursuant to Part 15 of the
FCC Rules. These limits are designed to provide reasonable
protection against harmful interference in a residential
installation. This equipment generates, uses, and can radiate
radio frequency energy and, if not installed and used in
accordance with the instructions, may cause harmful
interference to radio communications. However, there is no
guarantee that interference will not occur in a particular
installation. If this equipment does cause harmful interference
to radio or television reception, which can be determined by
turning the equipment off and on, the user is encouraged to try
to correct the interference by one or more of the following
measures:
• Reorient or relocate the receiving antenna.
• Increase the separation between the equipment and receiver.
• Connect the equipment into an outlet on a circuit different
from that to which the receiver is connected.
• Consult the dealer or an experienced radio/TV technician for
help.
You are cautioned that any changes or modifications not
expressly approved in this manual could void your authority to
operate this equipment.
Caution
Television programs, films, video tapes and other materials may
be copyrighted. Unauthorized recording of such material may
be contrary to the provisions of the copyright laws. Also, use of
this recorder with cable television transmission may require
authorization from the cable television transmission and/or
program owner.
Owner’s record
The model number is located at the rear and front of the unit
and the serial number on the top. Record these numbers in the
spaces provided below. Refer to them whenever you call upon
your Sony dealer regarding this product.
Model No. _______________
Serial No. ______________________
CAUTION
To prevent electric shock, do not use this polarized AC plug
with an extension cord, receptacle or other outlet unless the
blades can be fully inserted to prevent blade exposure.
Precautions
Safety
• Operate the unit only on 120 V AC, 60 Hz .
• If anything falls into the cabinet, unplug the unit and have it
checked by qualified personnel before operating it any further.
• One blade of the plug is wider than the other for the purpose
of safety and will fit into the power outlet only one way. If you
are unable to insert the plug fully into the outlet, contact your
Sony dealer.
• Unplug the unit from the wall outlet if you do not intend to
use it for an extended period of time. To disconnect the cord,
pull it out by the plug, never by the cord.
• Do not use the unit in areas where there is danger of it
becoming wet.
Installing
• This unit is equipped with a fan at the rear. Do not insert
objects nor touch the fan during operation.
• To prevent internal heat buildup, install the unit at least 5 cm
away from the wall, and dust the unit periodically.
• Do not place the unit on surfaces (rugs, blankets, etc.) or near
materials (curtains, draperies) that may block the ventilation
slots.

3
Introduction
Table of contents
4 Features
Getting Started
8 Step 1: Unpacking
9 Step 2: Setting up the remote commander
11 Step 3: Hookups
27 Setting the clock
30 Presetting channels
33 Setting up cable box control
36 Setting up VCR Plus+
Basic Operations
38 Playing a tape
39 Recording TV programs
40 Recording TV programs using VCR Plus+
42 Setting the timer manually
Additional Operations
44 Playing/searching at various speeds
45 Displaying tape information
46 Selecting the sound
47 Recording stereo and bilingual programs
48 Recording TV programs using the quick timer
49 Searching using the index function
51 Checking/changing/cancelling timer settings
53 Adjusting the picture (Y/C delay)
54 Changing menu options
57 Erasing the cassette memory
Editing
58 Before editing
Editing with LANC cable
64 Connections
67 Copying a tape
68 Cutting out unwanted scenes
70 Assemble editing
73 Video insert editing
75 Audio insert editing
Editing without LANC cable
77 Connections
79 Copying a tape
80 Cutting out unwanted scenes
82 Video insert editing
84 Audio insert editing
Other editing features
86 Audio dubbing
88 Listening to the inserted/dubbed sound
89 Connecting a titler or editing controller
91 Connecting a capture board or video printer
Additional Information
92 General setup information
93 Precautions
96 Troubleshooting
99 Specifications
101 Index to parts and controls
108 Index to MENU screens
Back cover Index

Features
4
Features
Thank you for purchasing the Sony Digital Video Cassette Recorder
(VCR). This Digital VCR has the following features:
High-quality digital picture and sound
Over 500 lines of horizontal resolution
This VCR achieves the highest resolution picture in home video
equipment.
PCM-recorded digital sound
This VCR records sound as digital signals. There are two audio
recording modes:
– 16-bit mode: for high sound quality. Sound is recorded and played
back at 16-bit quantization and 48kHz sampling frequency, the same
quality as DAT (Digital Audio Tape).
– 12-bit mode: for audio dubbing. Sound is recorded and played back
at 12-bit quantization and 32kHz sampling frequency. This mode
provides two stereo sound tracks.
Clear Frame Technology that enables clear still pictures
Conventional VCRs normally display still pictures by skipping every
other scanning line. This VCR substitutes data for the missing lines and
displays the still picture in more detail.
Advanced editing features
DV
With digital-to-digital connection, video and audio signals are
transmitted in digital form for high-quality editing.
Detachable operation panel
Controls used for editing are arranged together on a operation panel.
You can also detach the operation panel for convenient operation.
Edit Window
The Edit Window displays up to 10 edit points during assemble editing.
This feature lets you check each editing start/end point visually.

Features
5
Convenient features made possible with the DV
format
Quick access with sub-code data
Index signals are written separately from video/audio signals on a sub-
code data track. This enables the VCR to quickly locate a specific
recording.
Recording data display
With the DV format, data such as the recording date and time are
recorded onto the tape. Information such as the shutter speed, program
AE mode, white balance, iris and gain are also recorded with a Sony
digital camcorder. You can call up this information on the TV screen.
Cassette memory search
When you record programs on a tape with cassette memory, the
programs are displayed as a list. Choose a program from the list and
the VCR will locate the recording. You can also search for scenes
recorded in the Photo mode with a digital camcorder.
Features
6
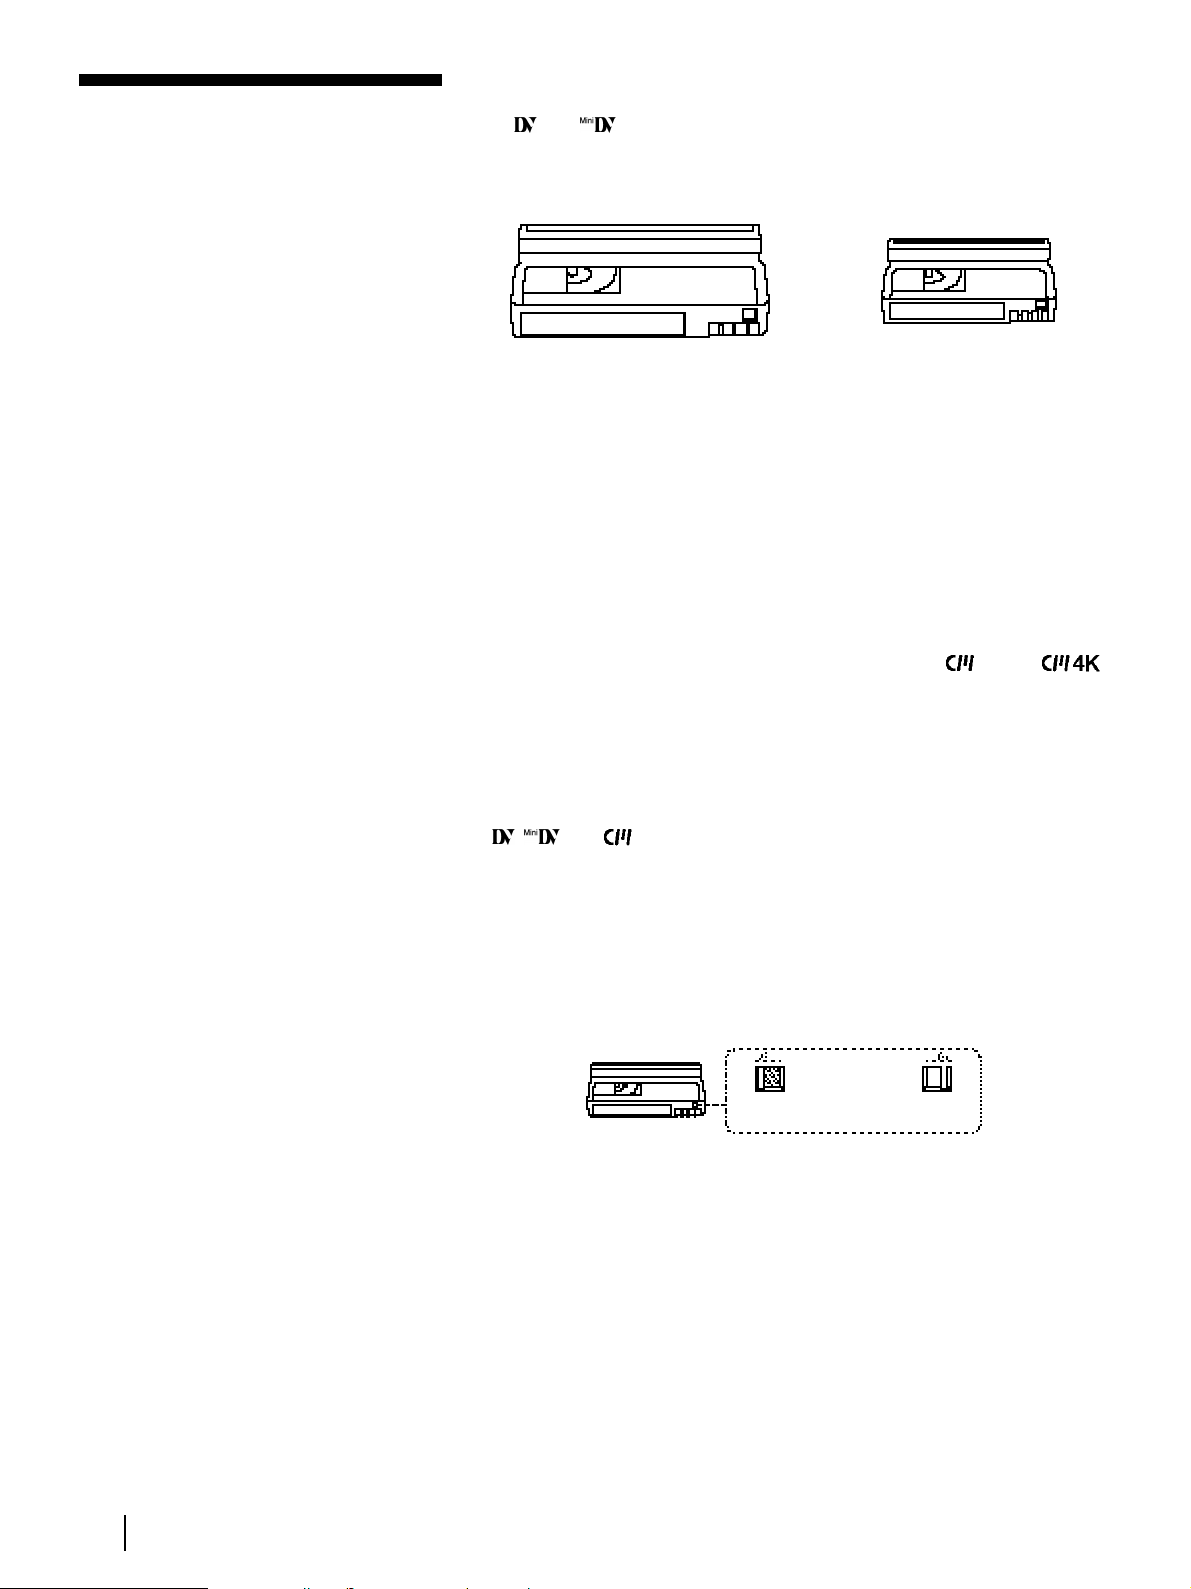
Using DV cassettes
Use and cassettes with this VCR.
DV180 can record programs for 180 minutes and MiniDV60 can record
for 60 minutes. You can use Mini DV cassettes with digital camcorders.
You cannot use h, H, j, , k, K, l, nor ¬ tapes
on this VCR.
Cassette memory
Cassette memory is an optional feature that is mounted on some DV
cassettes and Mini DV cassettes. When you record a program, the
recording date and time, and the programs’ position on the tape are
stored in the cassette memory so that you can quickly search for the
program later on.
DV tapes with cassette memory are marked with the mark.
indicates that 4 kbits of data can be stored on that cassette. This VCR
can retrieve up to 16 kbits of data.
Notes
• You cannot play back a DV tape recorded in other color systems on
this VCR.
• , and are trademarks.
To save a recording
To prevent accidental erasure of a recording, slide in the tab on the
cassette so that the red portion becomes visible. To record on a tape,
slide out the tab so that the red portion is hidden.
Features (continued)
DV cassette
Mini DV cassette
Write Protected Write Enabled
Features
7
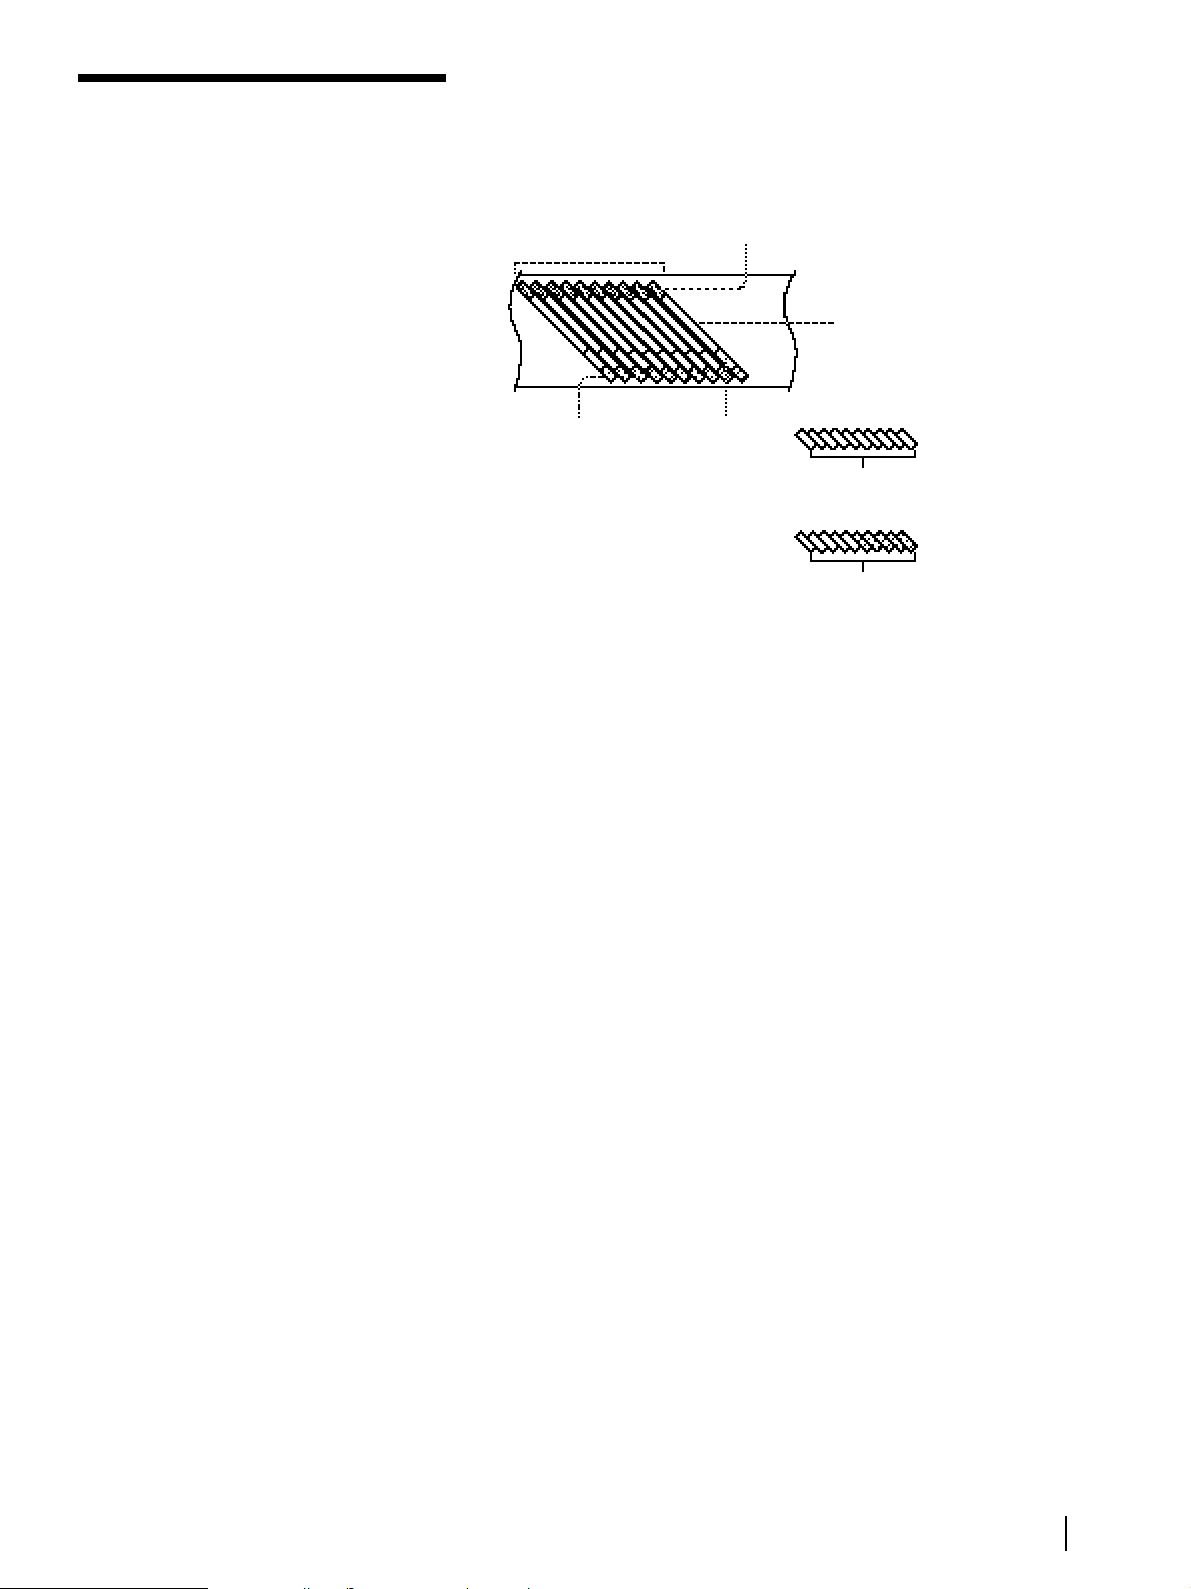
DV recording format
The following figure shows how signals are recorded on a DV tape.
Copyright precautions
On recording
You cannot record any software having copyright protection signals on
this VCR. If you start recording protected video and audio signals, a
warning message appears on the TV screen and the VCR stops
recording.
If you timer record a program that is encoded with copyright protection
signals, the VCR will continue recording but the video and audio
signals will not be recorded on tape.
On playback
When you play back software having copyright protection signals on
this VCR, you may not be able to copy it onto other equipment.
Video sector
Video signals,
recording data,etc.
Sub code sector
Index signals,
time codes,etc.
10 tracks = 1 frame
ITI sector
Reference signals
for insert editing,
etc.
Audio sector
Audio signals
16-bit audio mode
1 stereo track
12-bit audio mode
2 stereo tracks
8
Getting Started
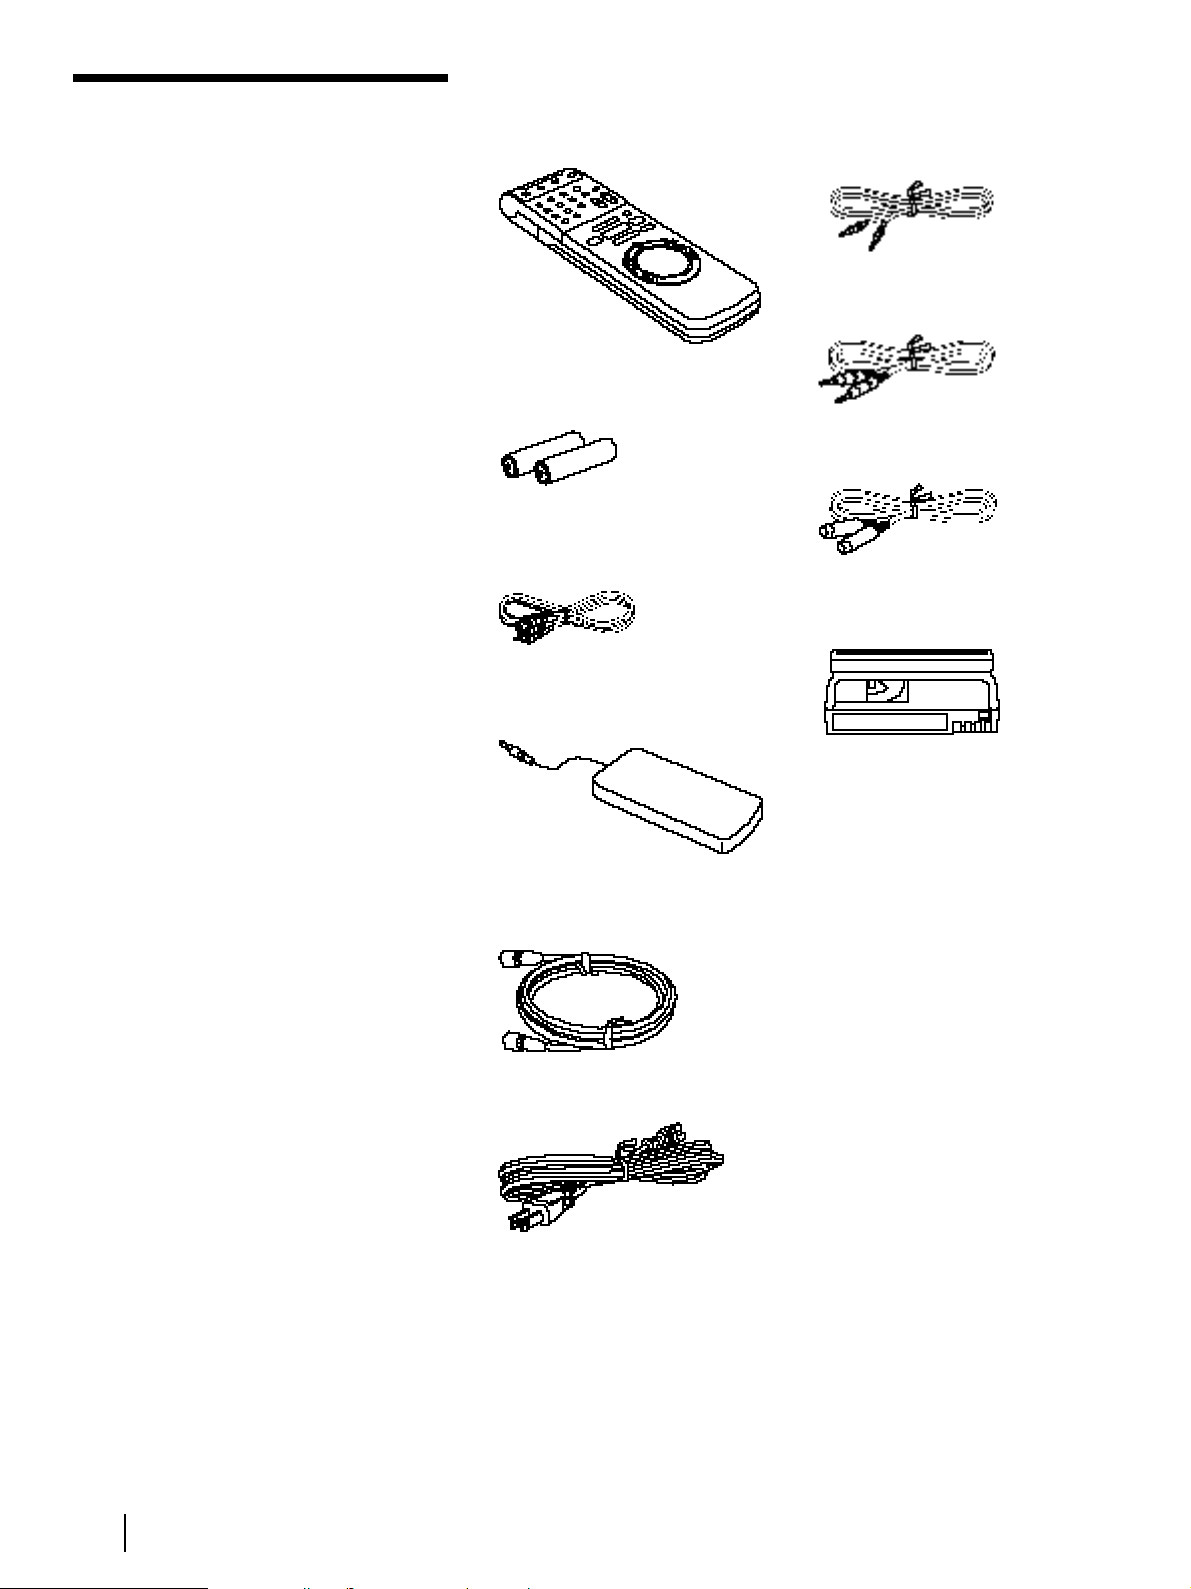
Check that you have the following items:
• Remote commander
• Size AA (R6) batteries
• Audio/video cable
(3-phono to 3-phono)
• Cable Mouse (cable box
controller)
• 75-ohm coaxial cable with
F-type connectors
• AC power cord
• Control S cable
• LANC cable
• S-Video cable
• Cleaning Cassette
Getting Started
Step 1: Unpacking

9
Getting Started
Step 2: Setting up
the remote
commander
Notes
• With normal use, the
batteries should last for
approximately three to six
months.
• If you will not use the
remote commander for an
extended period, remove
the batteries to avoid
possible damage from
battery leakage.
• Do not use a new battery
with an old one.
• Do not use different types of
batteries together.
Inserting the batteries
Insert two size AA (R6) batteries by matching the + and – on the
batteries with the diagram inside the battery compartment.
Setting the COMMAND MODE switch
To remotely control the VCR with the commander, set COMMAND
MODE on the remote commander to the same position as that on the
VCR. Usually set to VCR 4. If the other VCR does not have a
COMMAND MODE switch, use the following setting:
VTR 1: For Sony Betamax format VCRs
VTR 2: For Sony 8mm format VCRs
VTR 3: For Sony VHS format VCRs
VTR 4: For Sony DV format VCRs
VTR 5 and 6: (reserve)
Using the remote commander
You can use this remote commander to operate this VCR and a Sony
TV. The POWER, VOL +/–, CH +/–, [TV]/[VTR], channel number,
ENTER, DISPLAY and AUDIO MONITOR buttons on the remote
commander can be used to operate your TV.
To operate Set [TV] / [VTR] to
the VCR [VTR] and point at the remote sensor on the VCR
a Sony TV [TV] and point at the remote sensor on the TV
[TV]/[VTR]
COMMAND
MODE
(continued)
10
Getting Started
Controlling other TVs with the remote commander
The remote commander is preprogrammed to control non-Sony TVs. If
your TV is listed in the table below, set the appropriate manufacturer’s
code number.
1 Set [TV] / [VTR] at the top of the remote commander to [TV].
2 Hold down POWER, and enter your TV’s code number(s) using the
number buttons. Press the ENTER button. Then release POWER.
Now you can use the POWER, VOL +/–, CH +/– and TV / VTR
buttons to control your TV. To control the VCR, reset [TV] / [VTR] to
[VTR].
Code numbers of controllable TVs
If more than one code number is listed, try entering them one at a time
until you find the one that works with your TV.
Manufacturer Code number
Sony 01
Akai 04
AOC 04
Centurion 12
Coronado 03
Curis-Mathes 12
Daytron 12
Emerson 03, 04, 14
Fisher 11
General Electric 06, 10
Goldstar 03, 04, 17
Hitachi 02, 03
J.C.Penney 04, 12
JVC 09
KMC 03
KTY 03, 04
Magnavox 03, 08, 12
Marantz 04, 13
MGA/Mitsubishi 04, 12, 13
NEC 04, 12
Manufacturer Code number
Panasonic 06, 19
Philco 03, 04
Philips 08
Pioneer 16
Portland 03
Quasar 06
Radio Shack 05, 14
RCA 04, 10
Sampo 12
Samsung 03, 12
Sanyo 11
Scott 12
Sears 07, 11
Sharp 03, 05, 18
Sylvania 08, 12
Teknika 03, 08, 14
Toshiba 07
Wards 03, 04, 12
Yorx 12
Zenith 15
Notes
• If the TV uses a different
remote control system from
the one programmed to
work with the VCR, you
cannot control your TV with
the remote commander.
• If you enter a new code
number, the code number
previously entered will be
erased.
• When you replace the
batteries of the remote
commander, the code
number automatically resets
to 1 (Sony). Reset to the
appropriate code number.
Step 2: Setting up the remote
commander (continued)
11
Getting Started
Refer to
Page 12
Page 14
Page 16
Page 18
Page 20
Page 22
Page 24
Use
Audio/video (A/V) hookup,
then follow one of the
hookups below.
Hookup 1
Hookup 2
Hookup 3
Hookup 4
Hookup 5
Hookup 6
Step 3: Hookups
Caution
• Connections between the
VCR’s VHF/UHF connector
and the antenna terminals
of the TV receiver should be
made only as shown in the
following instructions.
Failure to do so may result
in operation that violates
the regulations of the
Federal Communications
Commission regarding the
use and operation of RF
devices. Never connect the
output of the VCR to an
antenna or make
simultaneous (parallel)
antenna and VCR
connections at the antenna
terminals of your receiver.
Note to CATV system
installer
• This reminder is provided
to call the CATV system
installer’s attention to
Article 820-40 of the NEC
that provides guidelines for
proper grounding and, in
particular, specifies that the
cable ground shall be
connected to the grounding
system of the building, as
close to the point of cable
entry as practical.
* DSS
®
is a registered
trademarks of DIRECTV,
Inc., a unit of Hughes
Electronics Corporation.
Selecting the best hookup option
There are many ways in which your VCR can be hooked up.
To hook up your VCR so that it works best for you, first scan through
the table below. Then use the accompanying diagrams and procedures
on the following pages to set up your VCR.
If you have
TV that has audio/video inputs
Cable box that is compatible
with the VCR’s cable box control
feature
No cable box or incompatible
cable box with only a few
scrambled channels
Antenna only, no cable TV
Incompatible cable box with
many scrambled channels
DSS
®
(Digital Satellite System)*
receiver
Incompatible cable box with
only a few scrambled channels,
using an A/B switch
After you’ve completed the connections, follow the instructions for
setup. During setup, if you need more details on the procedure
described, page numbers are provided where you can find complete,
step-by-step instructions.
After you’ve completed the setup, you’re ready to use your VCR.
Procedures differ depending on the hookup you used.
Before you get started
• Turn off the power to all equipment.
• Do not connect the AC power cords until all of the connections are
completed.
• Be sure you make connections firmly. Loose connections may cause
picture distortion.
• If your TV doesn’t match any of the examples provided, see your
nearest Sony dealer or qualified technician.
12
Getting Started
If your TV has audio/video (A/V) input jacks, you will get a better
picture and sound if you hook up your VCR using these connections.
In addition, for a true “home theater” experience, you should connect
the audio outputs of your VCR or TV to your stereo system. If your TV
has an S-video input jack, you will enjoy an even better picture if you
connect to the TV with the supplied S-video cable.
If your TV doesn’t have A/V inputs, see the following pages for
antenna or cable hookups.
If you’re planning to use your VCR only to play back pictures and
movies, you’re finished setting up the VCR after you’ve made these
connections. If you want to record off-air or off your cable TV system,
complete these connections first, and then go to the following pages for
antenna or cable hookups.
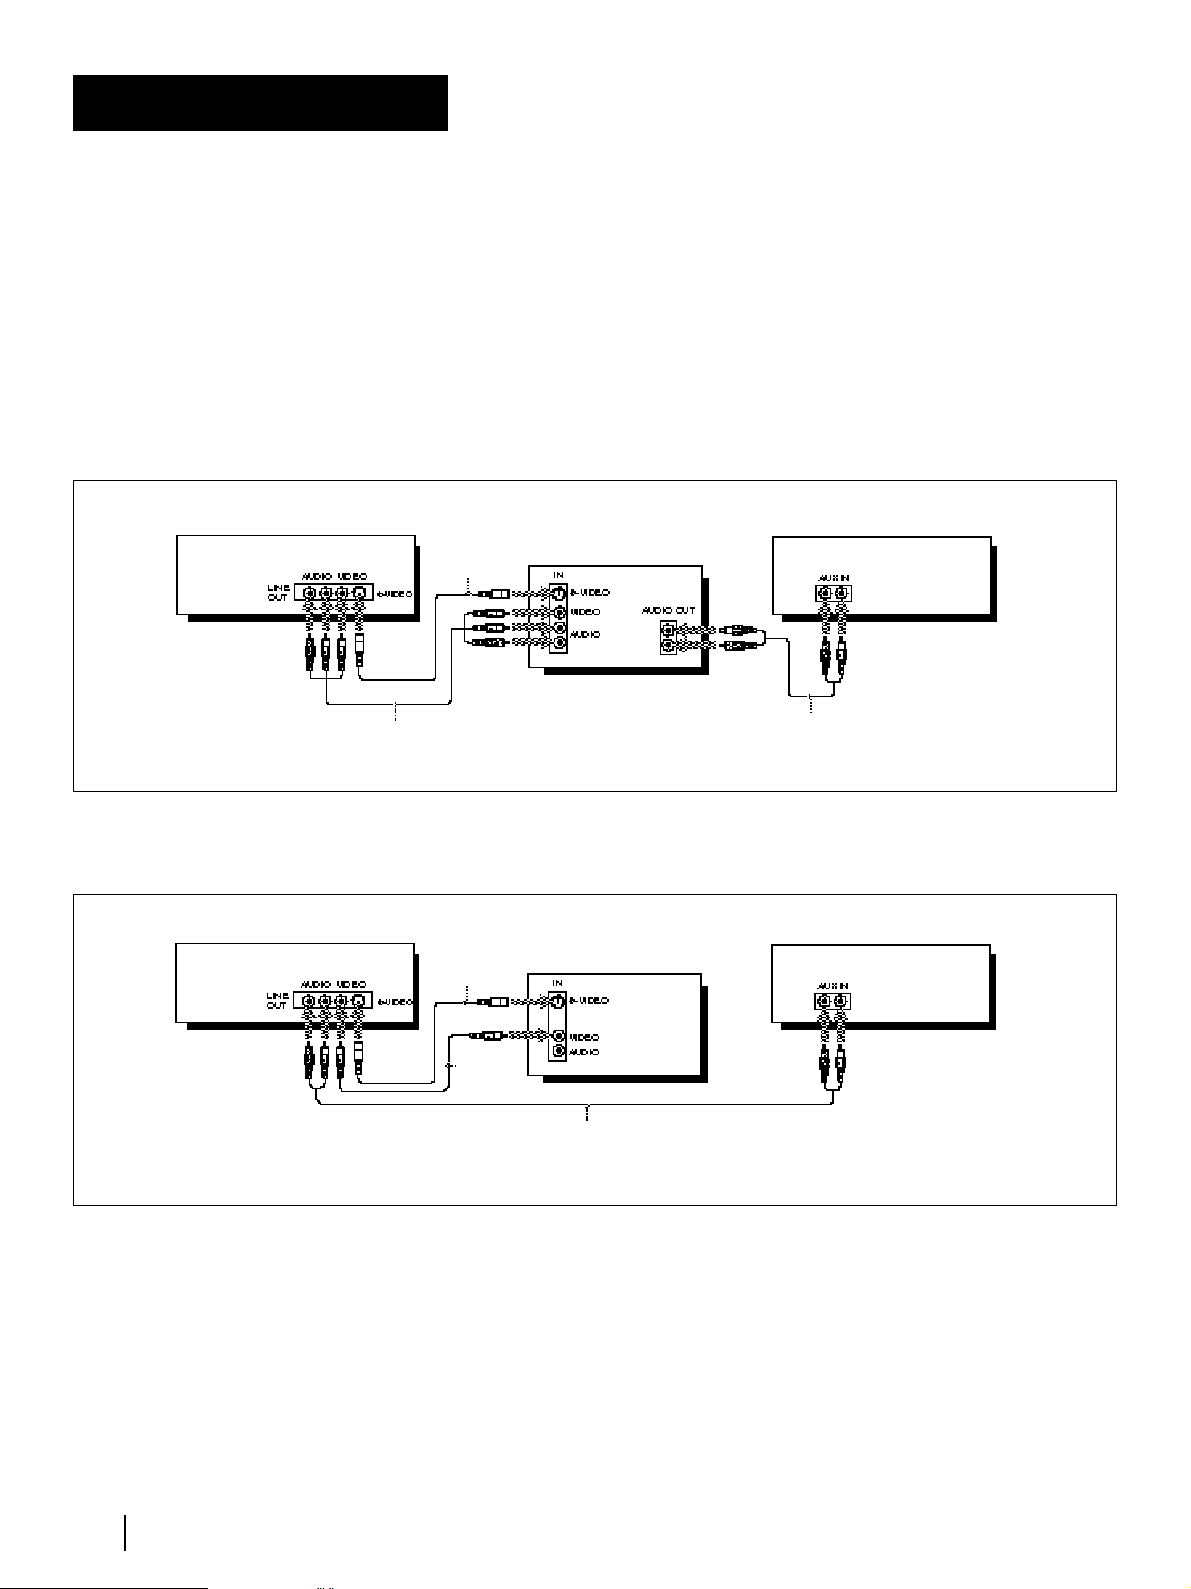
A Use this hookup if your TV has stereo jacks
B Use this hookup if your TV doesn’t have stereo jacks
Audio/video (A/V) hookup
Note
• To play a tape in stereo, you
must use the A/V
connection.
Audio/video cable (supplied)
Stereo receiver
Stereo receiver
TV
VCR
VCR
TV
Audio cable (not supplied)
S-video
cable
(supplied)
Audio cable (not supplied)
S-video
cable
(supplied)
Video
cable (not
supplied)
13
Getting Started
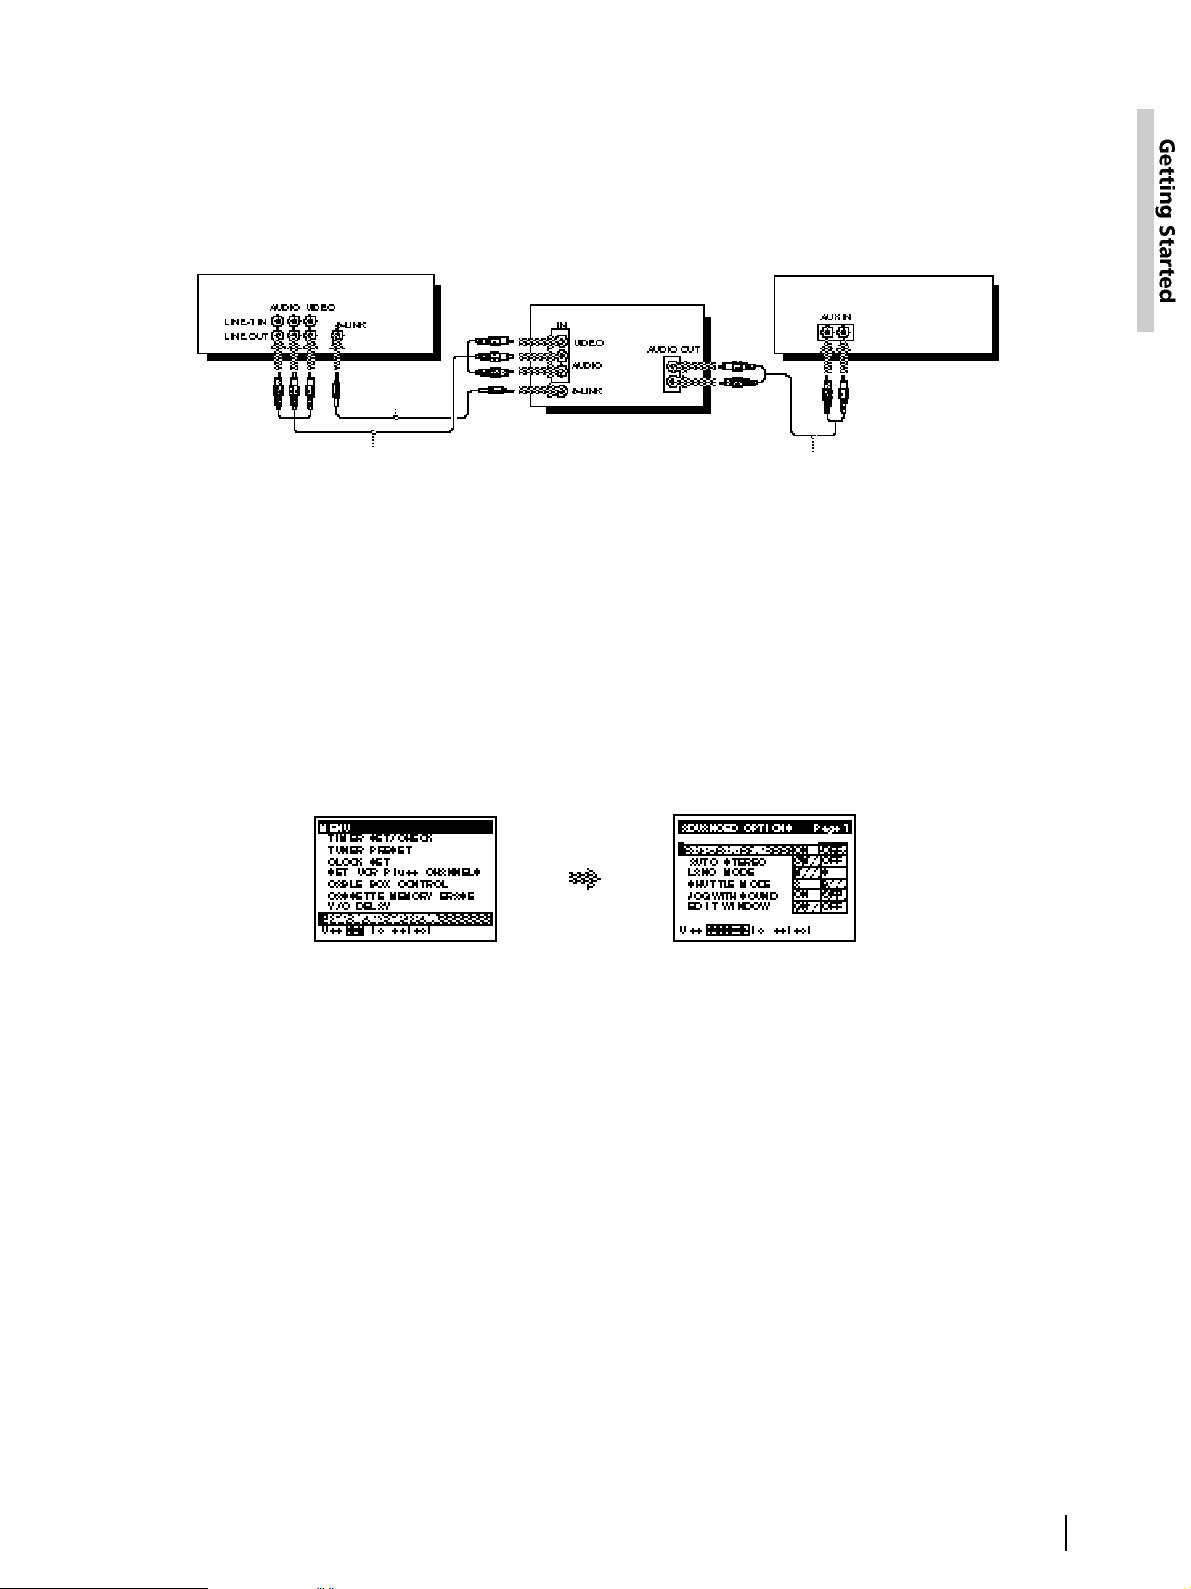
C Use this hookup if your TV has S-Link™ function
If your TV has the S-Link™ (A/V bus control) function, hook up your
VCR using the connection shown as below. Your TV will automatically
switch to the A/V inputs for your VCR when you play back or operate
menu on the VCR
A/V hookup: VCR setup
After you’ve connected your TV and completed antenna or cable
hookup, use the following procedure to set up the VCR.
Press MENU and select
ADVANCED OPTIONS.
Set AUTO ANT SEL to
OFF and press
EXECUTE.
For details, see page 54.
Audio/video cable (supplied)
VCR
TV
Stereo receiver
Control S cable
(supplied)
Audio cable (not supplied)
14
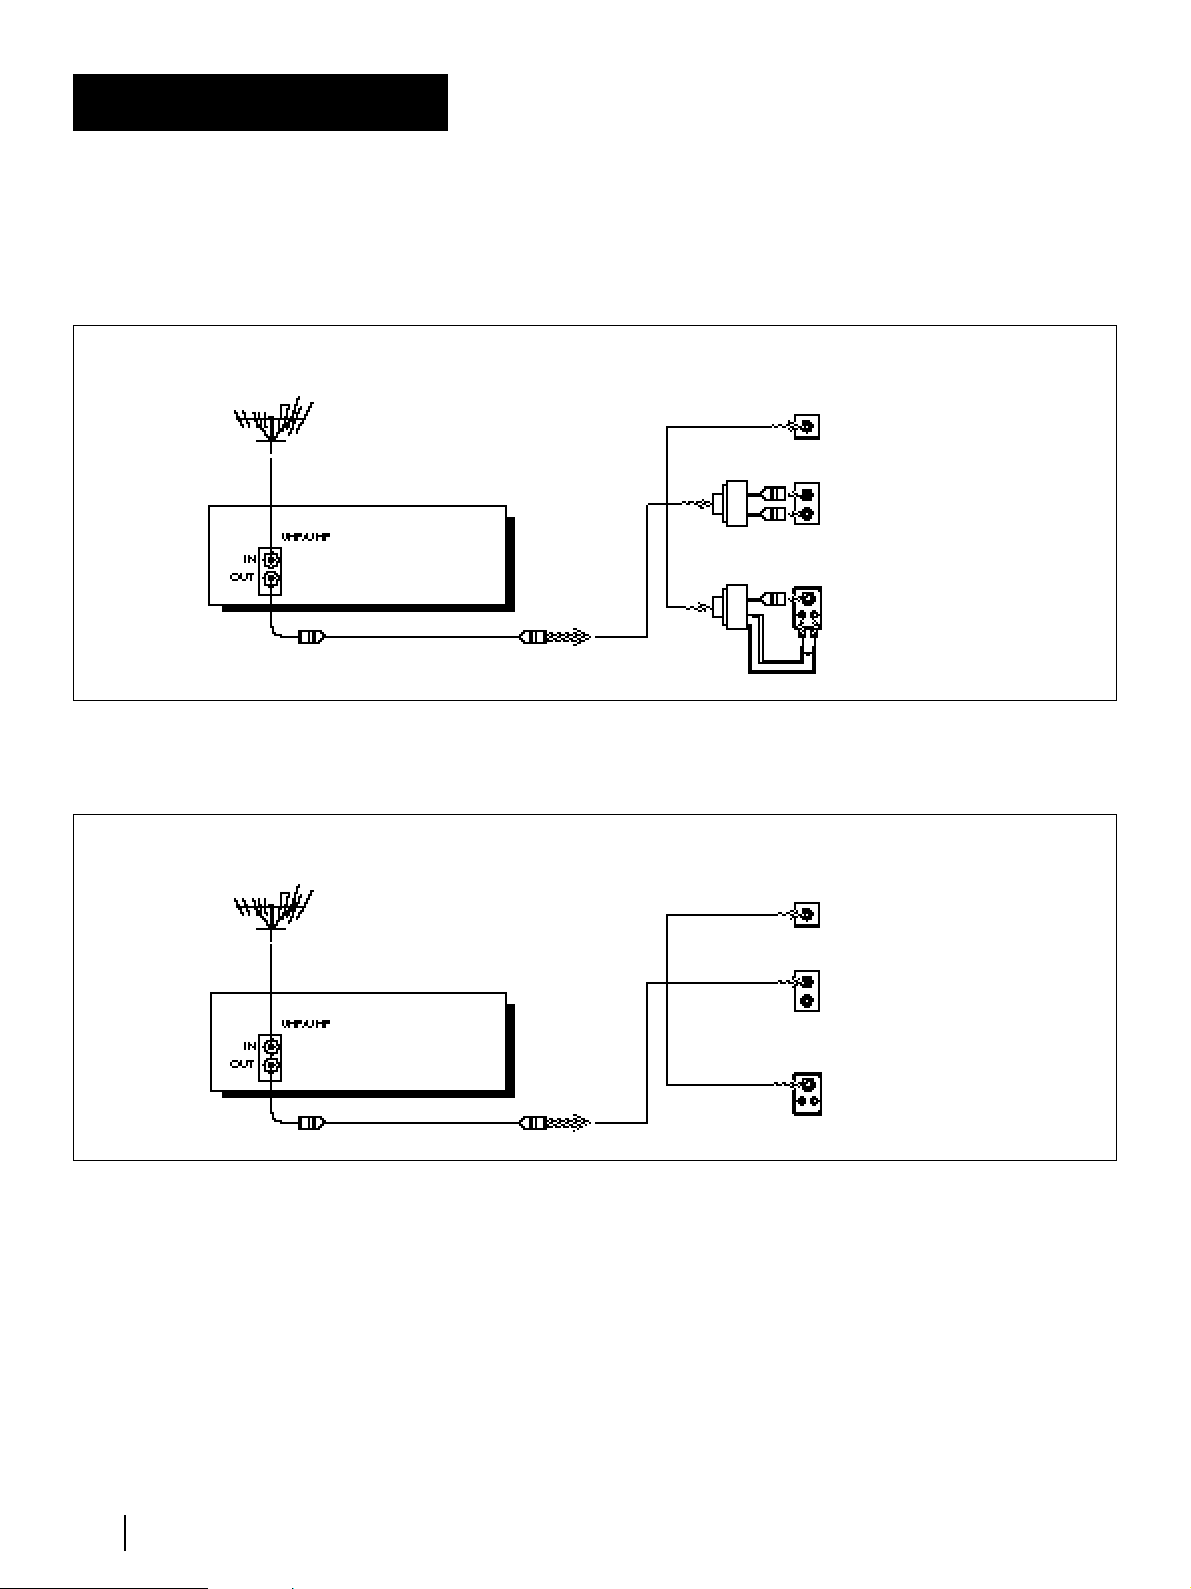
Getting Started
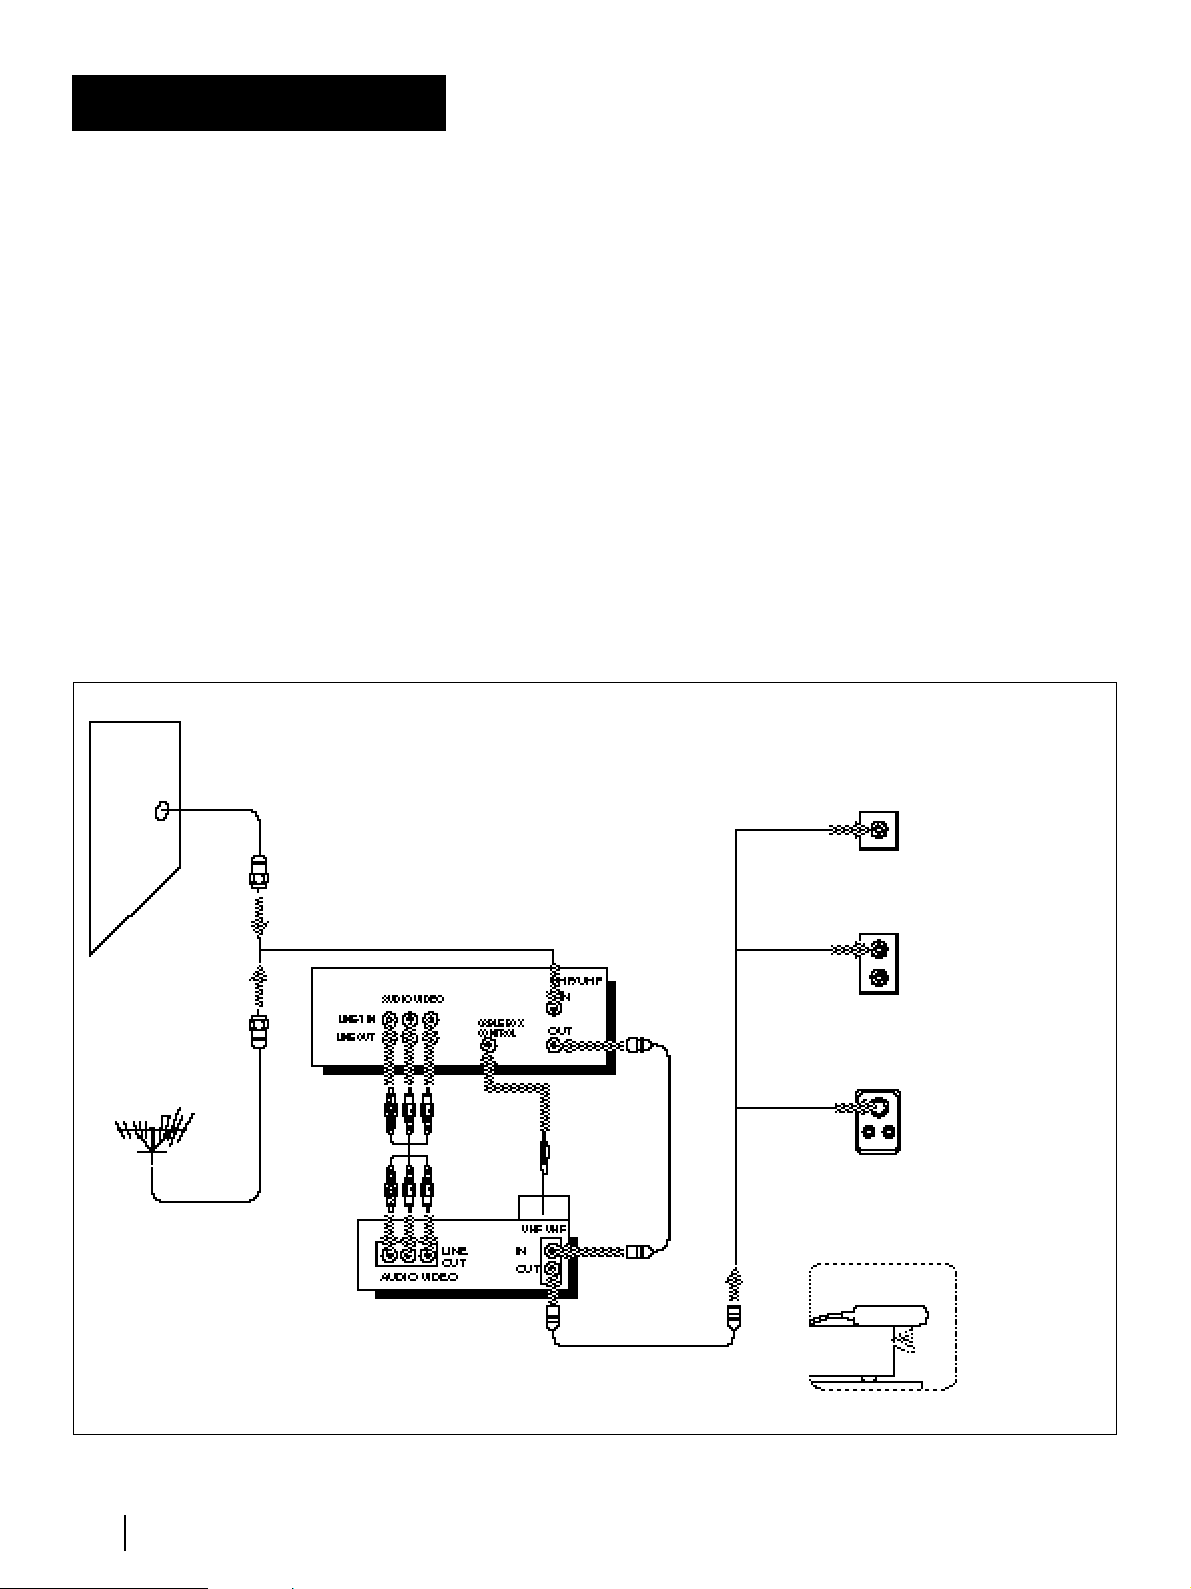
Hookup 1
Recommended use
You should use this hookup if you have a cable box, especially if your
cable system scrambles all or most channels. This hookup allows the
VCR’s cable box control feature to control the channel on the cable box,
simplifying the recording process. A list of compatible cable boxes is on
page 34.
What you can do with this hookup
• Record any channel using the VCR’s cable box control feature to
select channels on the cable box
What you can’t do with this hookup
• Record with the cable box turned off
• Record one channel while watching another channel
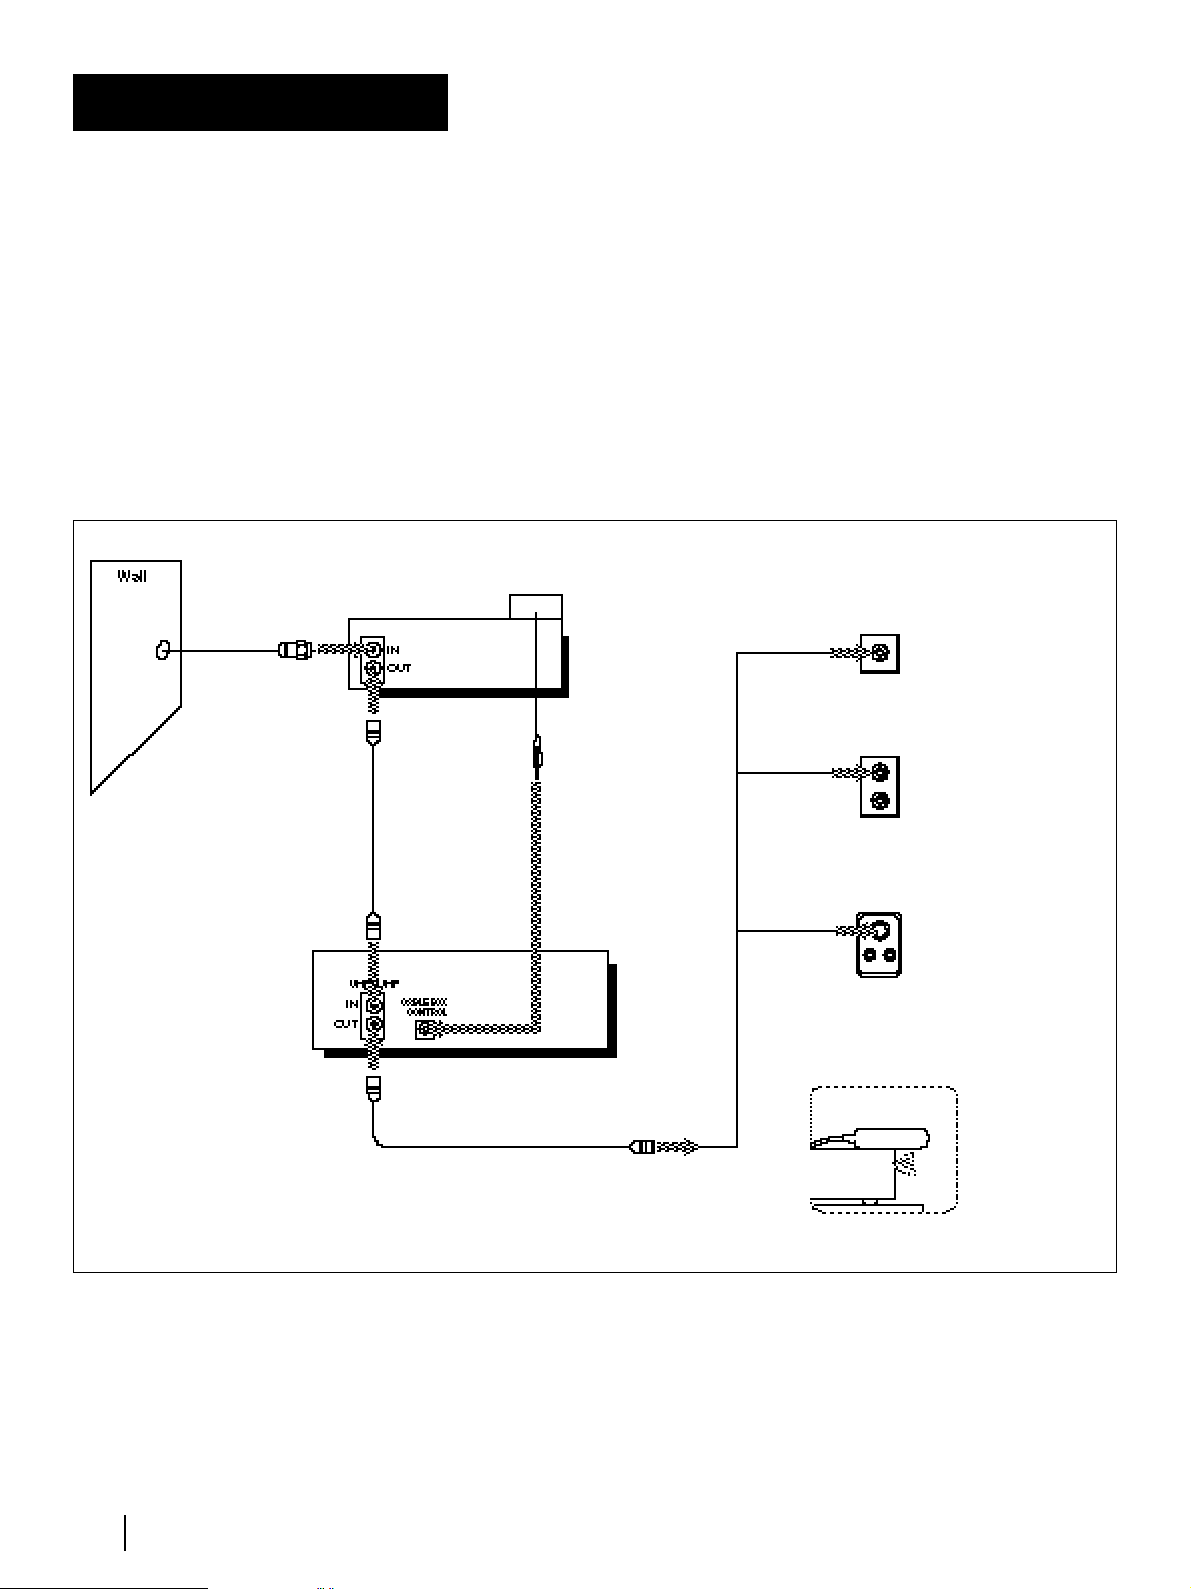
Using cable box
control
VCR
Cable Mouse
Rear of TV
Match the type of
connector on your
TV: A, B, or C.
or
or
UHF
VHF
Positioning the Cable Mouse
Place the Cable Mouse so that it
hangs out over the cable box front.
VHF
UHF
VHF/UHF
For connector types
B and C, no UHF
connection is
required.
A
C
B
Cable box
Side view
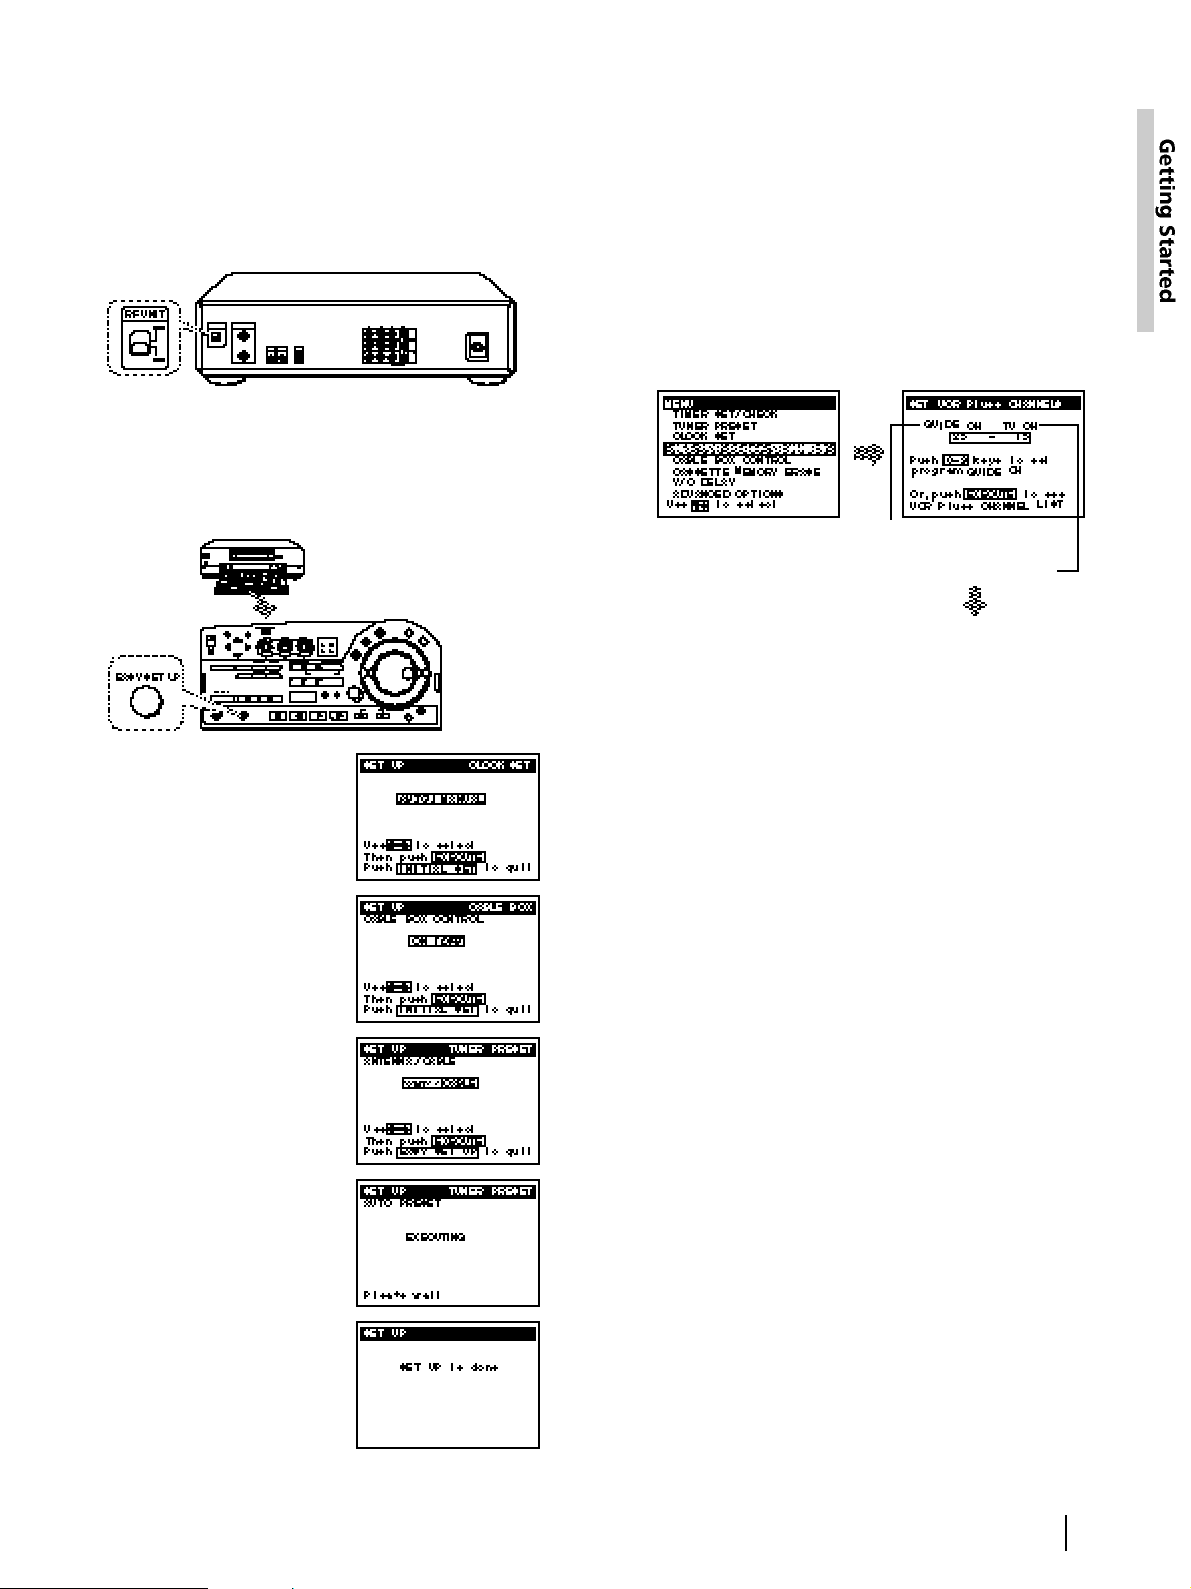
15
Getting Started
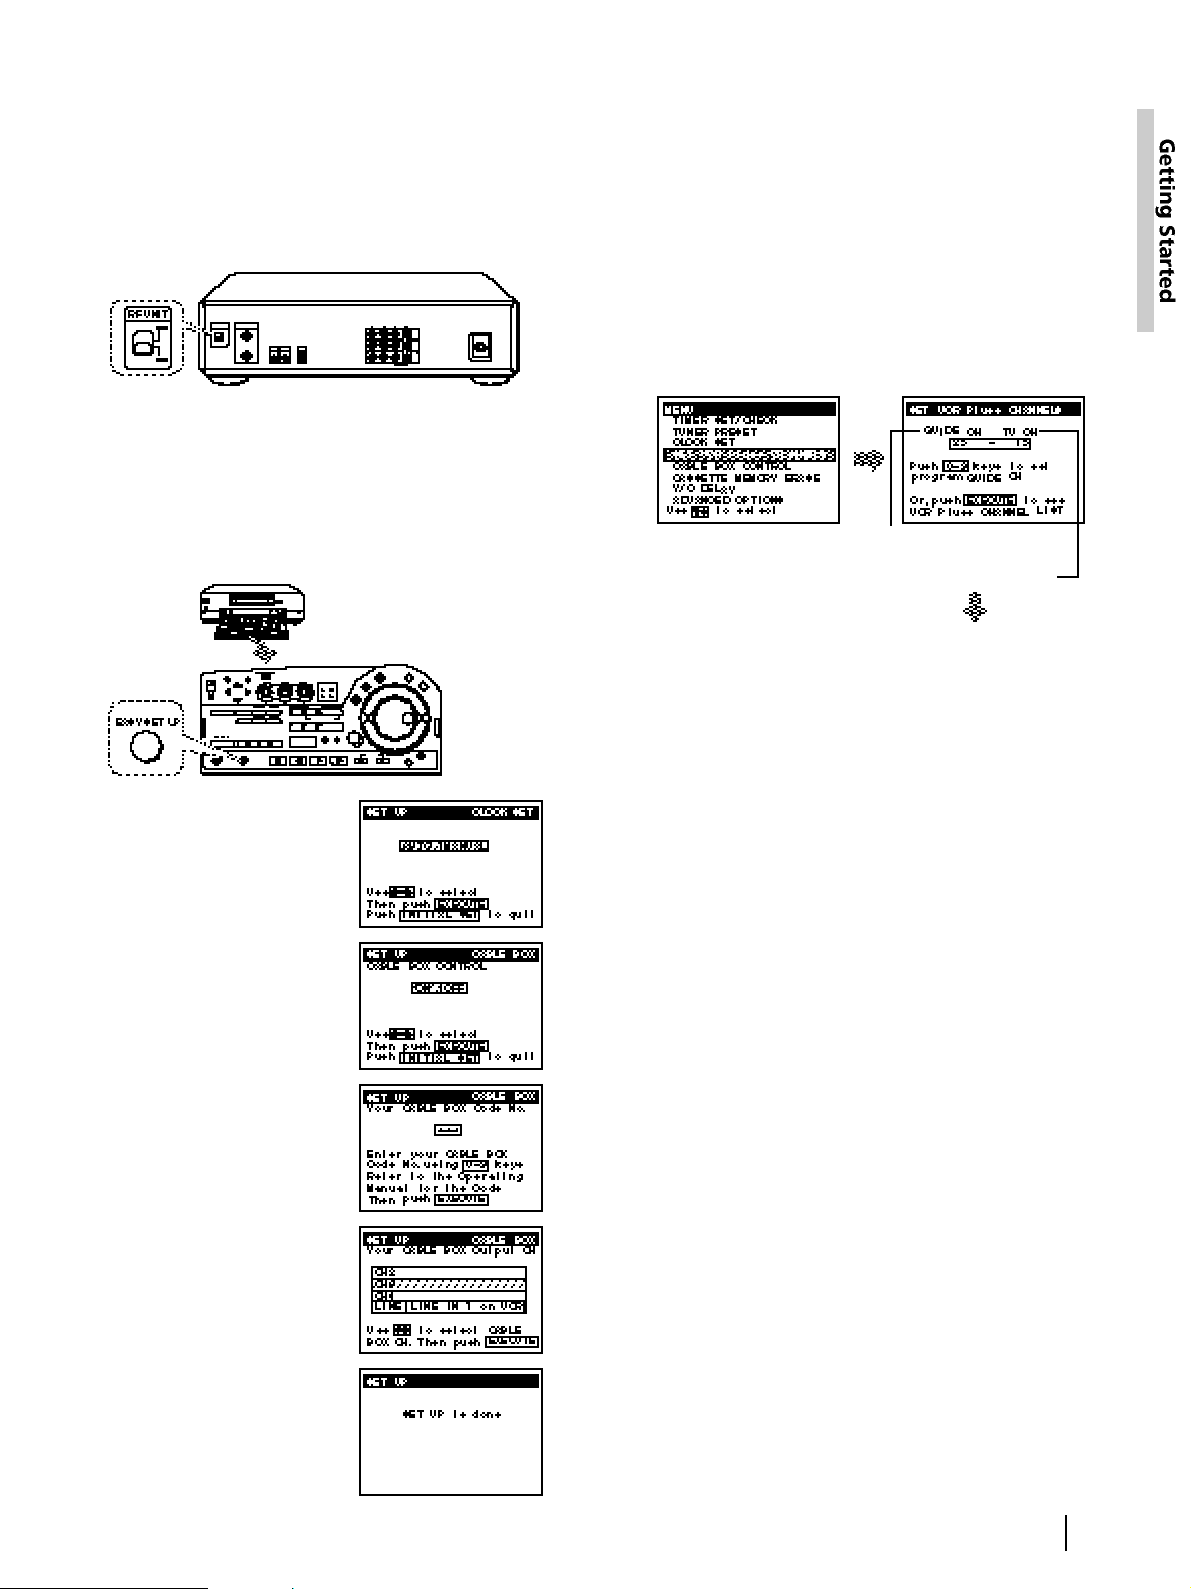
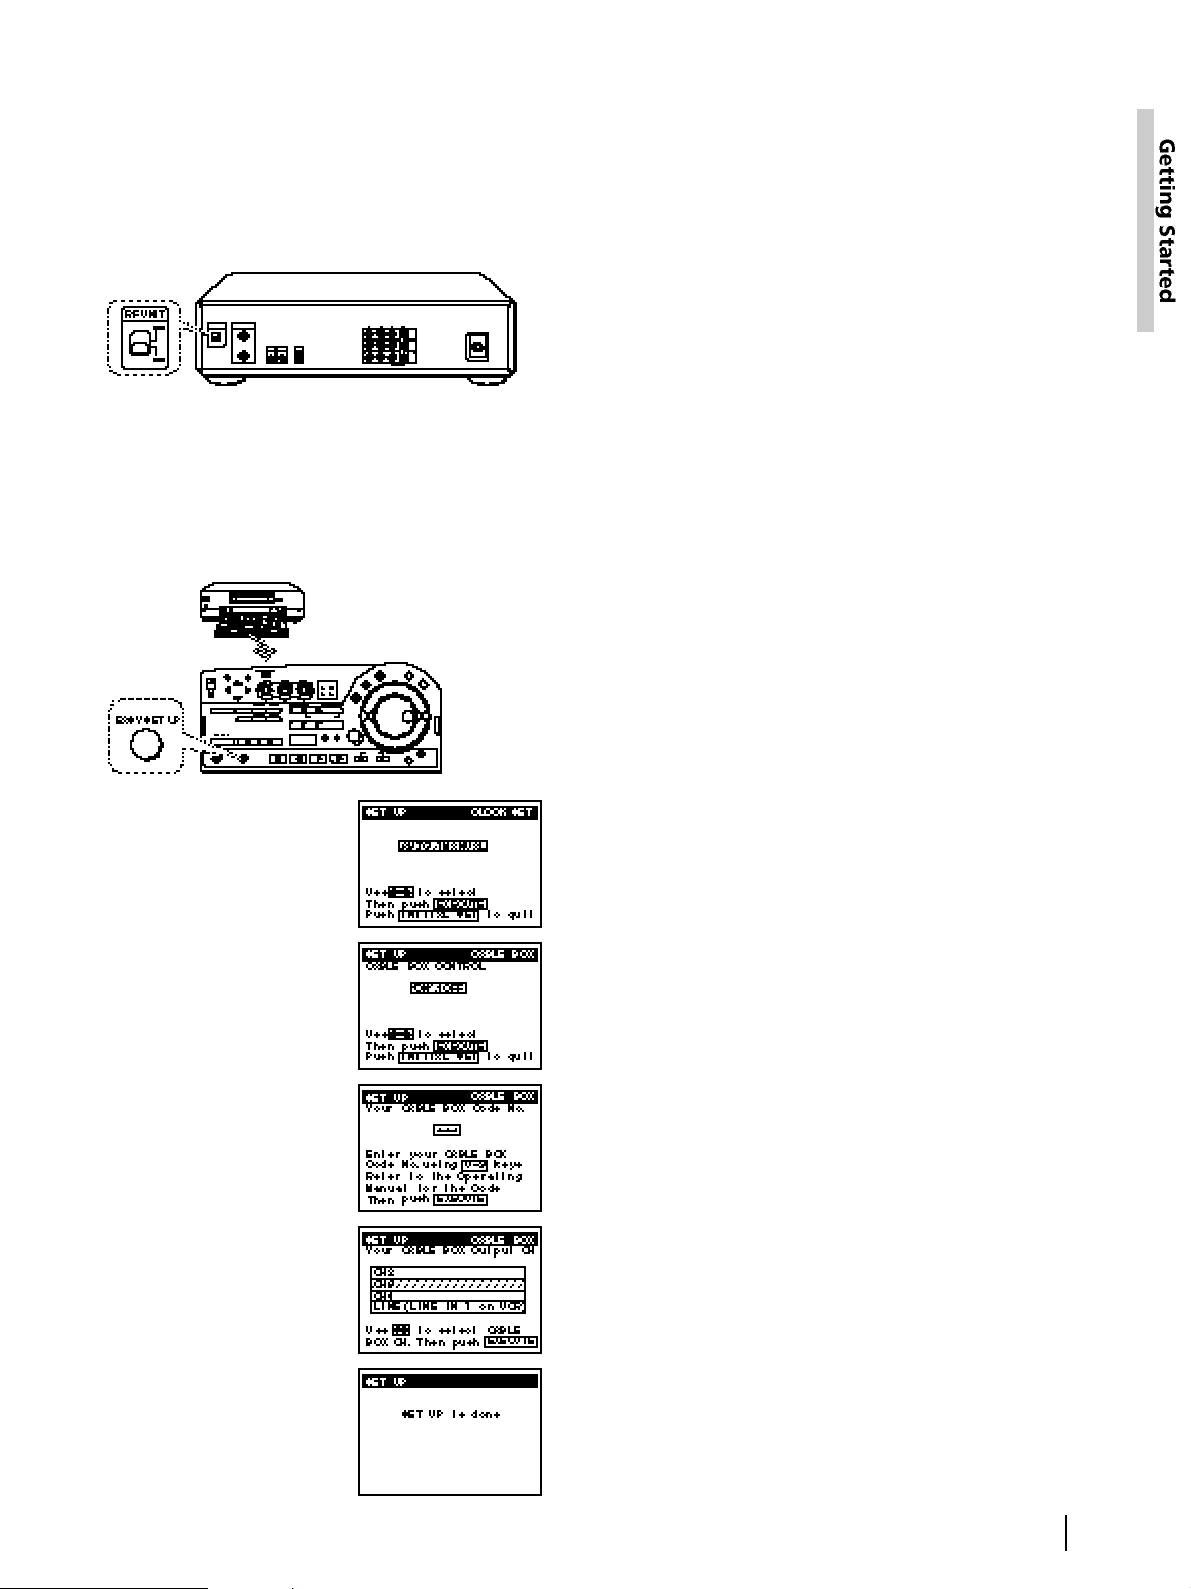
Hookup 1: VCR setup
1 Set the RF UNIT switch to CH 3 or CH 4, whichever
channel is not used in your area. If both are used,
set the switch to either channel.
If you made A/V connections (from page 12), you
can skip this step.
2 Turn on your cable box.
3 Press EASY SET UP on the VCR.
The SET UP menu appears.
For details, see page 92.
1 The CLOCK SET menu
appears. Select AUTO and
press EXECUTE.
For details, see page 27.
Normal display ?
4 Select your cable box
output channel and press
EXECUTE.
For details, see page 33.
3 Enter your cable box code
number and press
EXECUTE.
For details, see page 33.
2 The CABLE BOX menu
appears. Set CABLE BOX
CONTROL to ON and press
EXECUTE.
For details, see page 33.
Press MENU and select
SET VCR Plus+ CHANNELS.
Hookup 1: VCR Plus+ channel setup
1 Find the VCR Plus+ Channel Listing in your
program guide. For details on the VCR Plus+
Channel Listing, see page 36.
2 If the channels in the program guide are different
from the channels that you actually use on your TV,
set the channels that are different as follows:
Automatic clock setting
Once you’ve set up the VCR, it automatically sets the
clock the first time you turn off the VCR. After that,
whenever you turn off the VCR, it checks the time and
adjusts the clock, even for Daylight Saving Time.
The VCR sets the clock by picking up a time signal
that’s provided by some TV channels.
If you want to use the timer to record right away, or if
the channels in your area do not carry time signals, set
the clock manually. For details, see pages 27–29.
Note
• To use the automatic clock setting feature, leave the cable box
on.
• Depending on your area, the automatic clock setting feature
may not set the clock correctly. In this case, set the clock
manually according to the procedure on page 29.
Enter the program guide
channel, then the channel
you use on your TV.
Program guide channel
Your actual TV channel
Press EXECUTE.
For details, see page 37.

16
Getting Started
Recommended use
Use this hookup if you do not have a cable box. Also use this hookup if
your cable company cannot supply a cable box that is compatible with
the VCR’s cable box control feature, and your cable system scrambles
only a few channels.
What you can do with this hookup
• Record any unscrambled channel by selecting the channel on the
VCR
What you can’t do with this hookup
• Record scrambled channels that require a cable box
Hookup 2
No cable box
or
Incompatible cable
box with only a few
scrambled channels
VCR
Rear of TV
UHF
UHF
VHF
Match the type of
connector on your
TV: A, B, or C.
VHF
or
or
VHF/UHF
C
A
B
For connector types
B and C, no UHF
connection is
required.
Connect this cable directly to
your TV if you don't have a
cable box.
Cable box
Wall
17
Getting Started
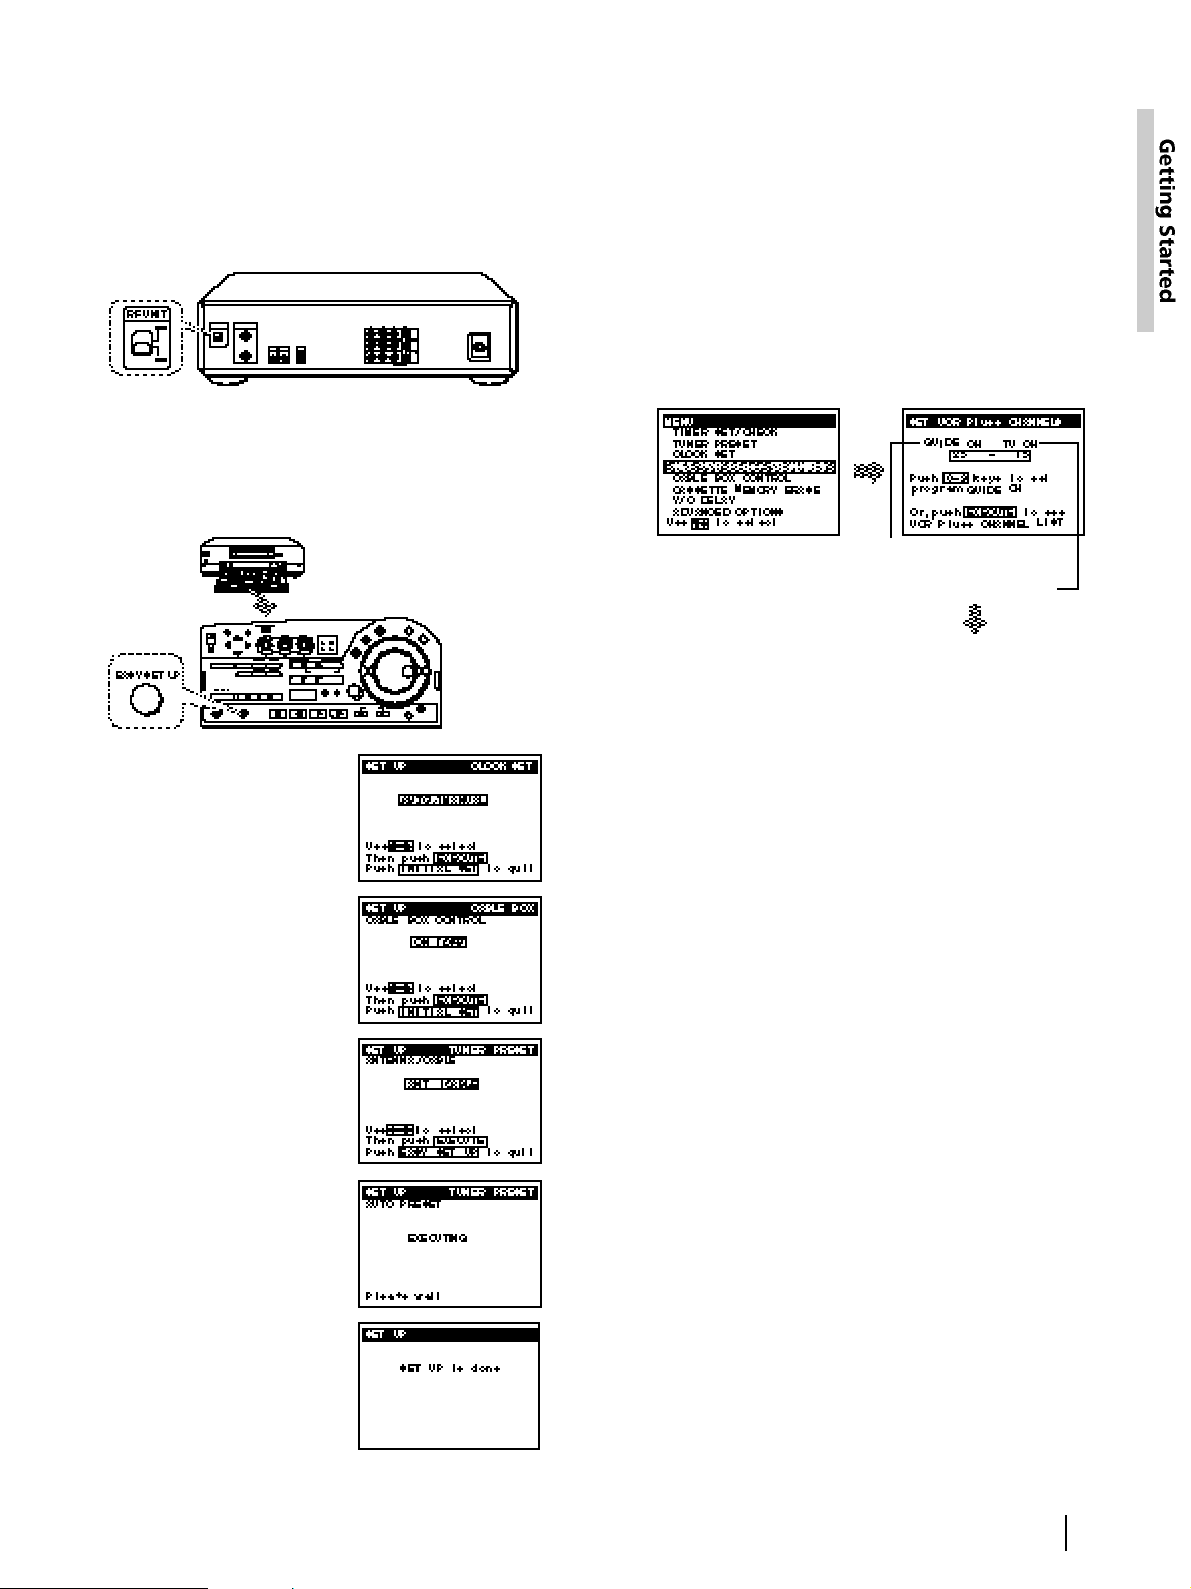
Hookup 2: VCR setup
1 Set the RF UNIT switch to CH 3 or CH 4, whichever
channel is not used in your area. If both are used,
set the switch to either channel.
If you made A/V connections (from page 12), you
can skip this step.
2 Press EASY SET UP on the VCR.
The SET UP menu appears.
For details, see page 92.
1 The CLOCK SET menu
appears. Select AUTO and
press EXECUTE.
For details, see page 27.
Normal display ?
4 The AUTO PRESET starts.
For details, see page 30.
3 The TUNER PRESET menu
appears. Set ANTENNA/
CABLE to CABLE and press
EXECUTE.
For details, see page 30.
2 The CABLE BOX menu
appears. Set CABLE BOX
CONTROL to OFF and
press EXECUTE.
For details, see page 33.
Hookup 2: VCR Plus+ channel setup
1 Find the VCR Plus+ Channel Listing in your
program guide. For details on the VCR Plus+
Channel Listing, see page 36.
2 If the channels in the program guide are different
from the channels that you actually use on your TV,
set the channels that are different as follows:
Automatic clock setting
Once you’ve set up the VCR, it automatically sets the
clock the first time you turn off the VCR. After that,
whenever you turn off the VCR, it checks the time and
adjusts the clock, even for Daylight Saving Time.
The VCR sets the clock by picking up a time signal
that’s provided by some TV channels.
If you want to use the timer to record right away, or if
the channels in your area do not carry time signals, set
the clock manually. For details, see pages 27–29.
Note
• To use the automatic clock setting feature, leave the cable box
on.
• Depending on your area, the automatic clock setting feature
may not set the clock correctly. In this case, set the clock
manually according to the procedure on page 29.
Press MENU and select
SET VCR Plus+
CHANNELS.
Enter the program guide
channel, then the channel
you use on your TV.
Program guide channel
Your actual TV channel
Press EXECUTE.For details, see page 37.
18
Getting Started
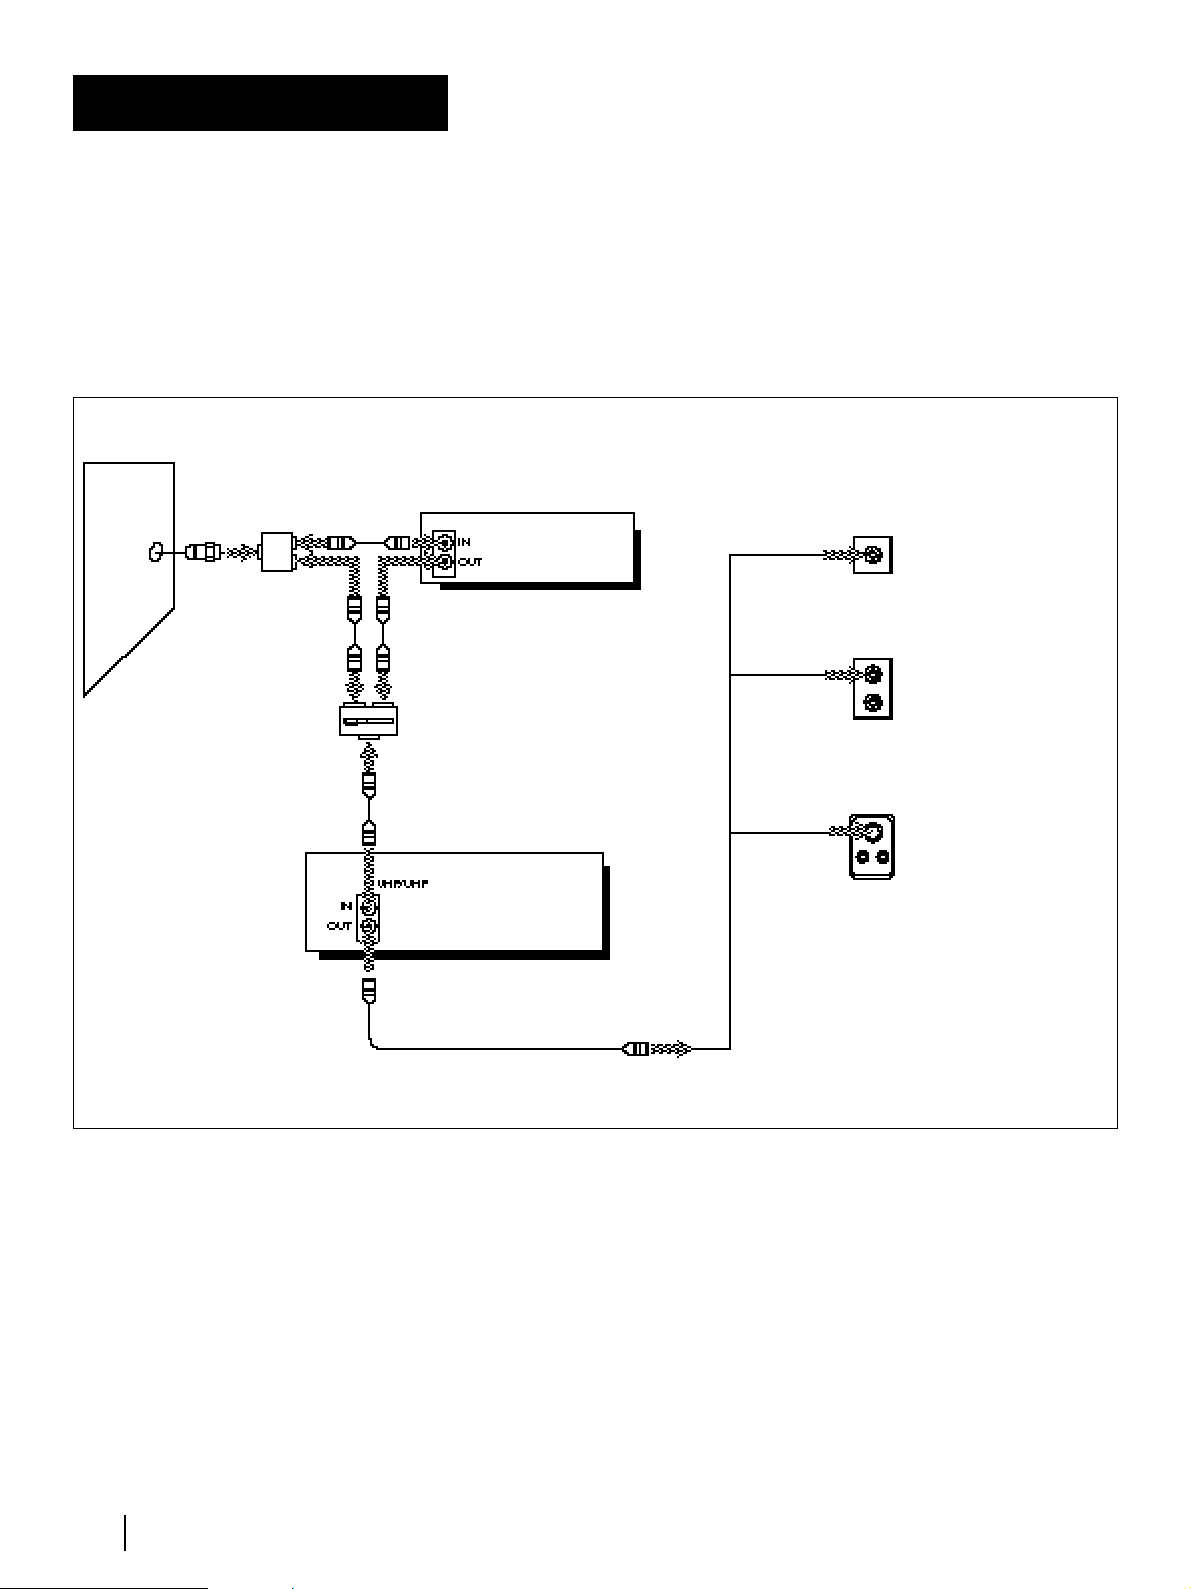
Hookup 3
Antenna hookup
Make the following connections if you’re using an antenna (if you don’t
have cable TV).
A Use this hookup if you’re using:
• VHF/UHF antenna (you get channels 2–13 and channels 14 and
higher)
• UHF-only antenna (you get channels 14 and higher)
• separate VHF and UHF antennas
B Use this hookup if you’re using a VHF-only antenna (you get
channels 2–13 only)
If you cannot connect your antenna cable to the VCR directly
If your antenna cable is a flat cable (300-ohm twin lead cable), attach an
external antenna connector (not supplied) so that you can connect the
cable to the VHF/UHF IN connector. If you have separate cables for
VHF and UHF antennas, you may use a U/V band mixer (not
supplied). For details, see page 92.
VCR
VHF/UHF
B
A
C
UHF
VHF
or
or
VHF
UHF
Rear of TV
Match the type of
connector on your
TV: A, B, or C.
VCR
VHF/UHF
VHF
or
or
UHF
VHF
UHF
C
B
A
Rear of TV
Match the type of
connector on your
TV: A, B, or C.
For connector types
B and C, no UHF
connection is
required.
19
Getting Started
Hookup 3: VCR Plus+ channel setup
1 Find the VCR Plus+ Channel Listing in your
program guide. For details on the VCR Plus+
Channel Listing, see page 36.
2 If the channels in the program guide are different
from the channels that you actually use on your TV,
set the channels that are different as follows:
Automatic clock setting
Once you’ve set up the VCR, it automatically sets the
clock the first time you turn off the VCR. After that,
whenever you turn off the VCR, it checks the time and
adjusts the clock, even for Daylight Saving Time.
The VCR sets the clock by picking up a time signal
that’s provided by some TV channels.
If you want to use the timer to record right away, or if
the channels in your area do not carry time signals, set
the clock manually. For details, see pages 27–29.
Note
• To use the automatic clock setting feature, leave the cable box
on.
• Depending on your area, the automatic clock setting feature
may not set the clock correctly. In this case, set the clock
manually according to the procedure on page 29.
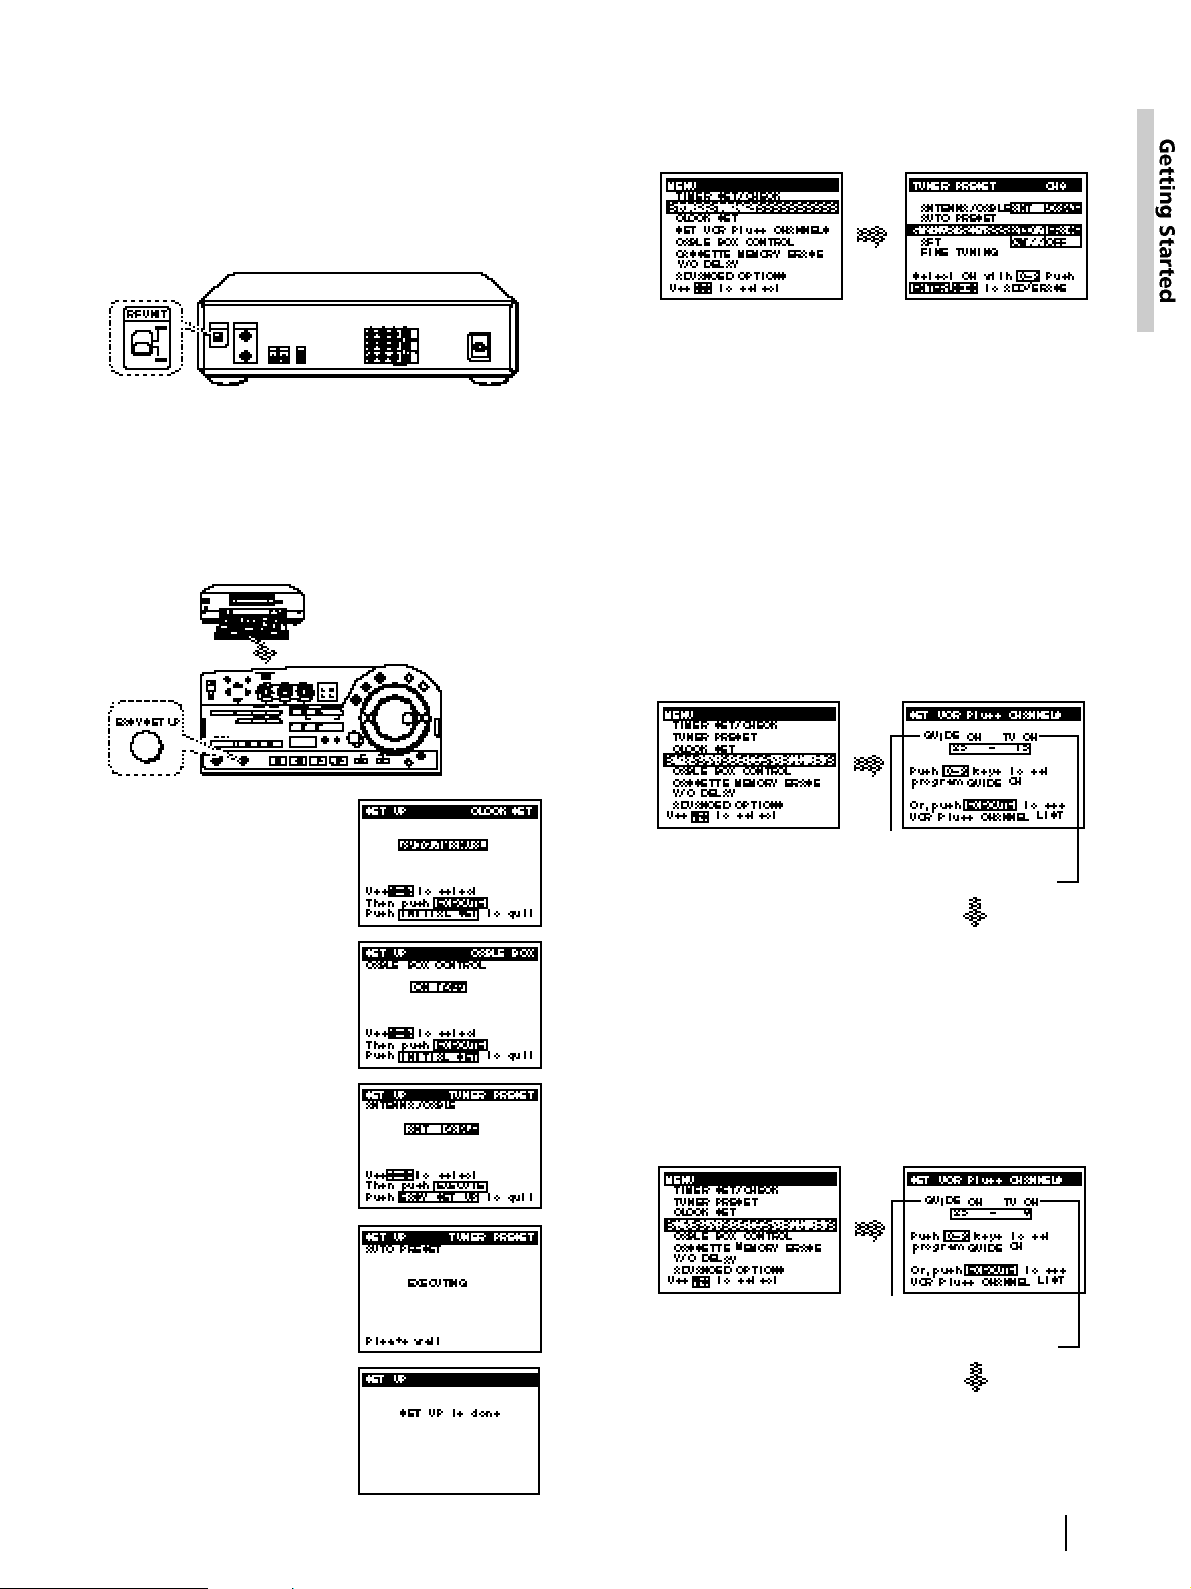
Hookup 3: VCR setup
1 Set the RF UNIT switch to CH 3 or CH 4, whichever
channel is not used in your area. If both are used,
set the switch to either channel.
If you made A/V connections (from page 12), you
can skip this step.
2 Press EASY SET UP on the VCR.
The SET UP menu appears.
For details, see page 92.
1 The CLOCK SET menu
appears. Select AUTO
and press EXECUTE.
For details, see page 27.
Normal display ?
4 The AUTO PRESET starts.
For details, see page 30.
3 The TUNER PRESET menu
appears. Set ANTENNA/
CABLE to ANT and press
EXECUTE.
For details, see page 30.
2 The CABLE BOX menu
appears. Set CABLE BOX
CONTROL to OFF and
press EXECUTE.
For details, see page 33.
Press MENU and select
SET VCR Plus+
CHANNELS.
Enter the program guide
channel, then the channel
you use on your TV.
Program guide channel
Your actual TV channel
Press EXECUTE.
For details, see page 37.
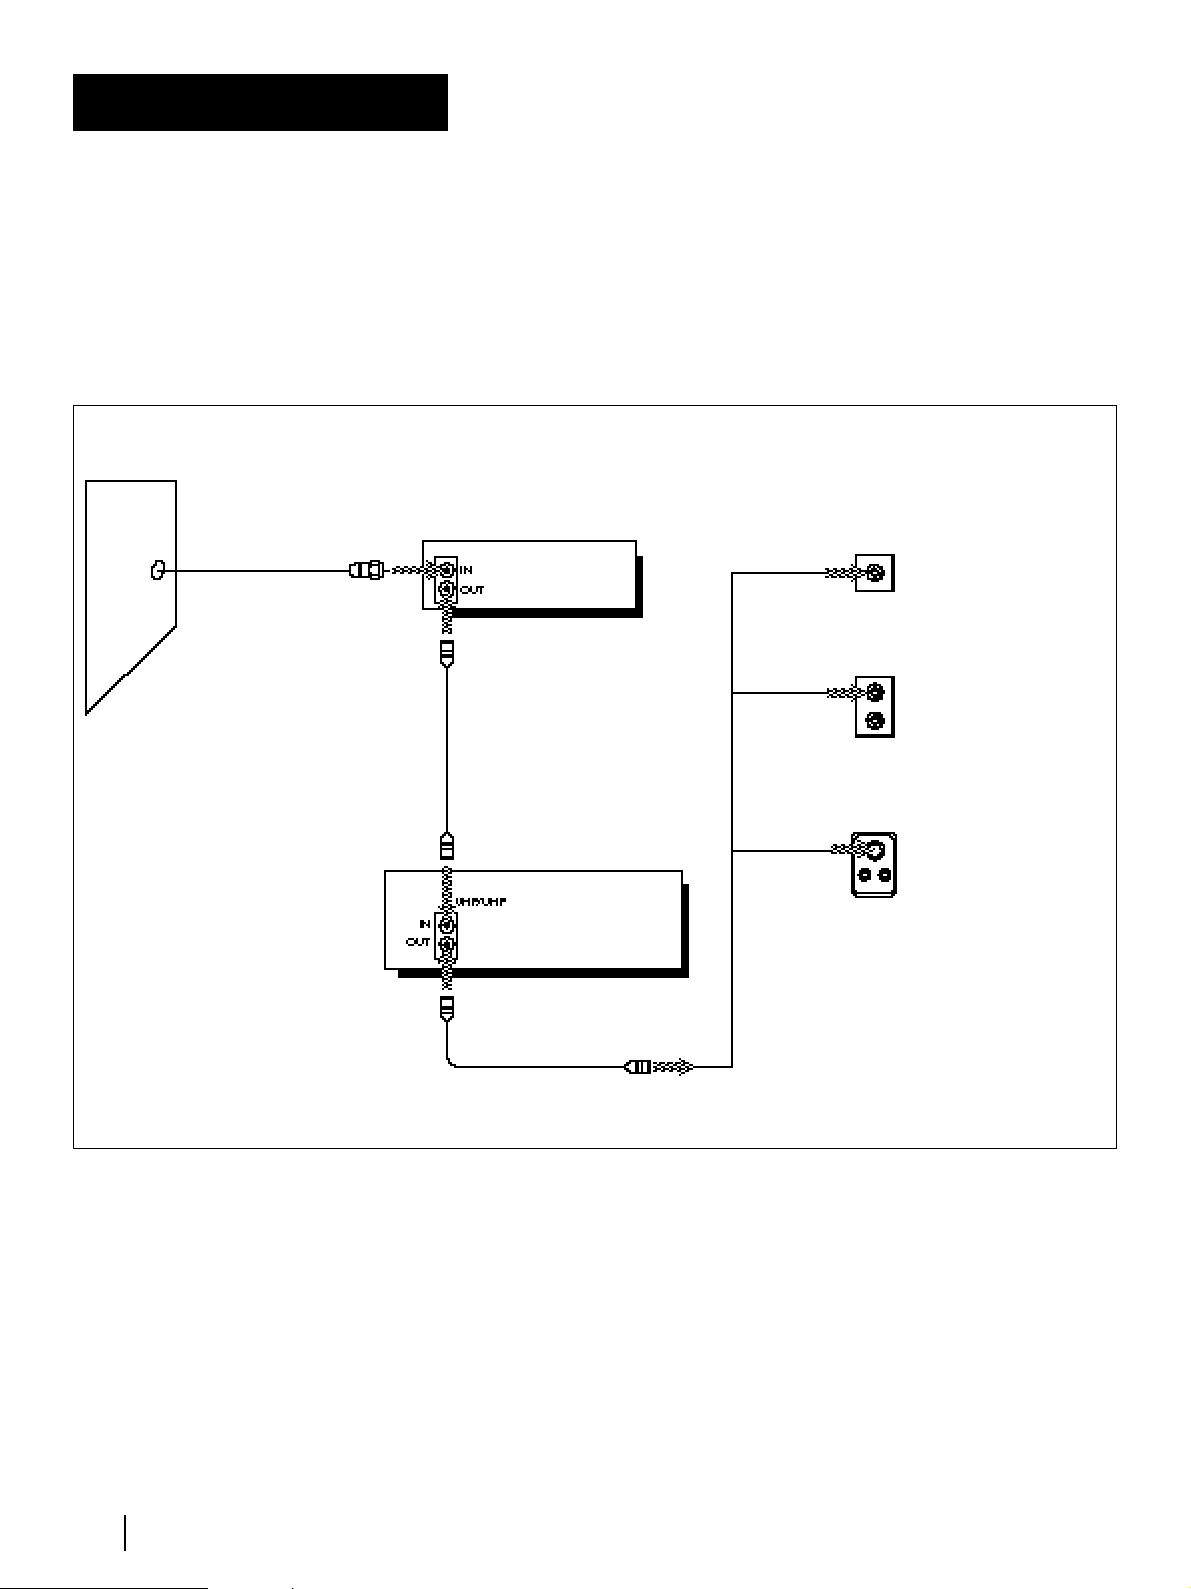
20
Getting Started
Hookup 4
Incompatible cable
box with many
scrambled channels
Recommended use
Use this hookup if your cable company cannot supply a cable box that is
compatible with the VCR’s cable box control feature, and your cable
system scrambles all, or most channels.
What you can do with this hookup
• Record any channel by selecting the channel on the cable box
What you can’t do with this hookup
• Record with the cable box turned off
• Record one channel while watching another channel
• Record by selecting channels directly with the VCR
Cable box
VHF/UHF
Rear of TV
A
B
C
Match the type of
connector on your
TV: A, B, or C.
or
or
UHF
UHF
VHF
VHF
For connector types
B and C, no UHF
connection is
required.
VCR
Wall
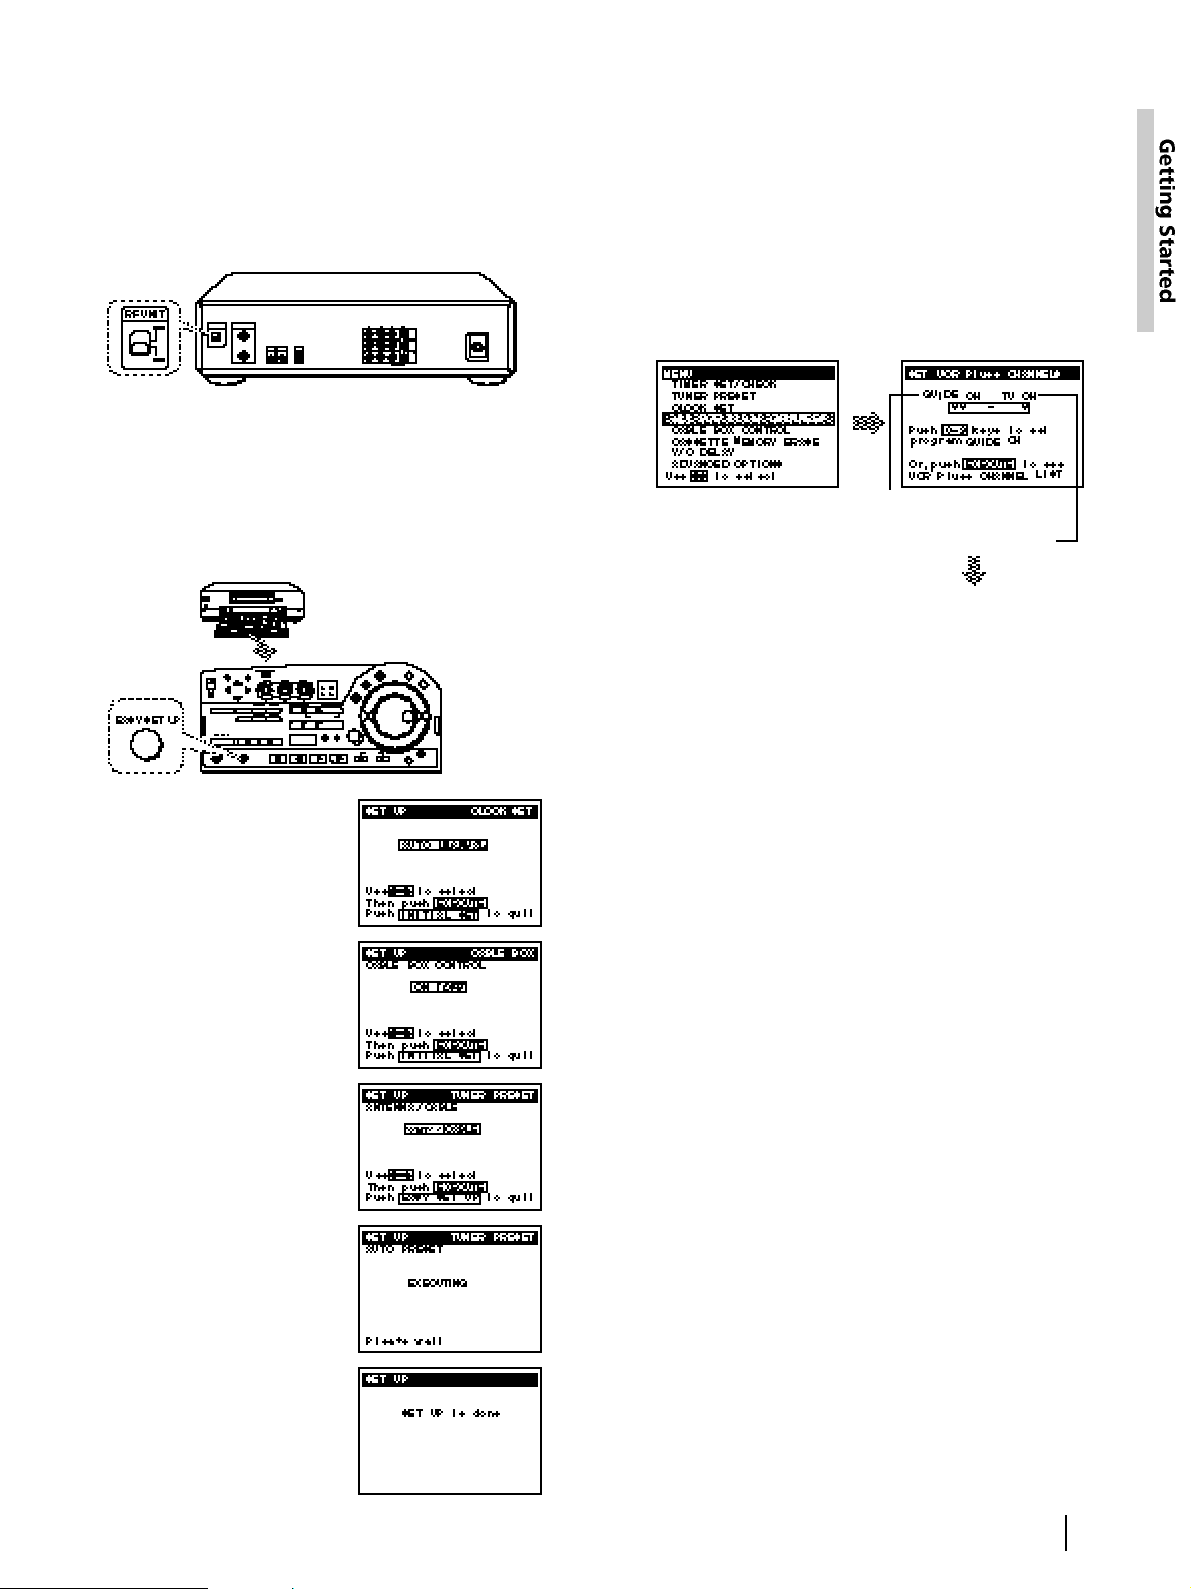
21
Getting Started
Hookup 4: VCR Plus+ channel setup
1 Find the VCR Plus+ Channel Listing in your
program guide. For details on the VCR Plus+
Channel Listing, see page 36.
2 Enter all the channels you want to record and the
cable box output channel (usually 2, 3, or 4):
Note
• You have to set the channel manually on the cable box for each
recording.
Automatic clock setting
To use the Auto Clock Set feature with this hookup,
you need to manually select a channel that carries a
time signal:
1 Tune the cable box to a channel that carries a time
signal.
2 Select AUTO in the CLOCK SET menu to turn on
the Auto Clock Set feature.
3 Turn off the VCR.
It automatically sets the clock and adjusts for
Daylight Saving Time by picking up the time
signal.
If you want to use the timer to record right away, or if
the channels in your area do not carry time signals, set
the clock manually. For details, see pages 27 – 29.
Note
• To use the automatic clock setting feature, leave the cable box
on.
• Depending on your area, the automatic clock setting feature
may not set the clock correctly. In this case, set the clock
manually according to the procedure on page 29.
Hookup 4: VCR setup
1 Set the RF UNIT switch to CH 3 or CH 4, whichever
channel is not used in your area. If both are used,
set the switch to either channel.
If you made A/V connections (from page 12), you
can skip this step.
2 Turn on your cable box.
3 Press EASY SET UP on the VCR.
The SET UP menu appears.
1 The CLOCK SET menu
appears. Select MANUAL
and press EXECUTE.
For details, see page 27.
For details, see page 92.
Normal display ?
4 The AUTO PRESET starts.
For details, see page 30.
3 The TUNER PRESET menu
appears. Set ANTENNA/
CABLE to ANT and press
EXECUTE.
For details, see page 30.
2 The CABLE BOX menu
appears. Set CABLE BOX
CONTROL to OFF and
press EXECUTE.
For details, see page 33.
Press MENU and select
SET VCR Plus+
CHANNELS.
Enter the program guide
channel, then the cable
box output channel.
Program guide channel
Your cable box channel
Press EXECUTE.For details, see page 37.
22
Getting Started
Recommended use
Use this hookup if you have a DSS receiver. It allows the VCR's cable
box control feature to control the channel on the DSS receiver,
simplifying the recording process. You should use this hookup if you
have a DSS receiver. A list of compatible DSS receivers is on page 34.
DSS (Digital Satellite System) is a satellite broadcast that provides
superior digital-quality video and crisp digital-quality audio. A variety
of program packages are available through your program providers. It
also has program guides that are sorted by program categories.
What you can do with this hookup
• Record any channel using the VCR's cable box control feature to
select channels on the DSS receiver
What you can‘t do with this hookup
• Record any channel from cable or an antenna
(To record channels from cable or an antenna, turn off the cable box
control feature.)
• Use a cable box
• Record programs with VCR Plus+
DSS (Digital Satellite
System) receiver
Hookup 5
For connector types
B and C, no UHF
connection is
required
Rear of TV
Match the type of
connector on your
TV: A, B or C
Wall
or
Cable
Mouse
DSS receiver
or
or
VCR
VHF
VHF
UHF
UHF
VHF/UHF
Positioning the Cable Mouse
Place the Cable Mouse so that it
hangs out over the DSS receiver front.
A
B
C
23
Getting Started
Hookup 5: VCR setup
1 Set the RF UNIT switch to CH 3 or CH 4, whichever
channel is not used in your area. If both are used,
set the switch to either channel.
If you made A/V connections (from page 12), you
can skip this step.
2 Turn on your DSS receiver.
3 Press EASY SET UP on the VCR.
The SET UP menu appears.
Automatic clock setting
If you connect an antenna or cable to the VCR, the Auto
Clock Set feature will function. It automatically sets
the clock and adjusts for Daylight Saving Time the first
time you turn off the VCR.
The VCR sets the clock by picking up a time signal
provided by some TV channels.
If you want to use the timer to record right away, or if
the channels in your area do not carry time signals, set
the clock manually. For details, see pages 27–29.
Note
• To use the automatic clock setting feature, leave the DSS
receiver on.
• Depending on your area, the automatic clock setting feature
may not set the clock correctly. In this case, set the clock
manually according to the procedure on page 29.
You are now ready to use your VCR
Procedures differ slightly depending on the hookup
used. Make a note of which hookup you used
(Hookup 5) so that you can always follow the correct
instructions.
Notes
• To successfully record a program from the DSS receiver,
proceed as follows:
– Leave the DSS receiver on all the time.
– Turn off the display (menu screen, channel number, etc.) of
the DSS receiver.
– To record or receive locked channels, unlock the channel
before the VCR starts recording.
• To set pay-per-view programs in the timer setting, order the
pay-per-view program before the VCR starts recording.
• Some programs are copy protected. You cannot record these
programs.
1 The CLOCK SET menu
appears. Select AUTO and
press EXECUTE.
For details, see page 27.
For details, see page 92.
5 The AUTO PRESET starts.
For details, see page 33.
Normal display ?
4 Select LINE (LINE IN 1 on
VCR) and press EXECUTE.
For details, see page 33.
3 Enter your DSS receiver
code number and press
EXECUTE.
For details, see page 33.
2 The CABLE BOX menu
appears. Set CABLE BOX
CONTROL to ON and press
EXECUTE.
For details, see page 33.
24
Getting Started
Recommended use
By using an A/B switch (not supplied), this hookup allows you to
record both scrambled and unscrambled channels conveniently.
What you can do with this hookup
• Record any unscrambled channel by selecting the channel directly on
the VCR (the A/B switch is set to A)
• Record any scrambled channel by selecting the channel on the cable
box (the A/B switch is set to B)
What you can‘t do with this hookup
• Record one scrambled channel while watching another channel
Incompatible cable
box with only a few
scrambled channels,
using an A/B switch
Hookup 6
Cable box
VHF/UHF
UHF
or
or
VHF
UHF
VHF
Rear of TV
A
B
C
B
A
A/B switch
VCR
Splitter
Match the type of
connector on your
TV: A, B, or C.
For connector types
B and C, no UHF
connection is
required.
Wall
25
Getting Started
4 Preset the cable box output channel (usually 2, 3 or 4).
Hookup 6: VCR Plus+ channel setup
1 Find the VCR Plus+ Channel Listing in your
program guide. For details on the VCR Plus+
Channel listing, see page 36.
2 For unscrambled channels, if the channels in the
program guide are different from the channels that
you actually use on your TV, set the channels that
are different as follows:
3 For scrambled channels, enter all the scrambled
channels you want to record and the cable box
output channel (usually 2, 3, or 4):
For details, see page 92.
Hookup 6: VCR setup
1 Set the RF UNIT switch to CH 3 or CH 4, whichever
channel is not used in your area. If both are used,
set the switch to either channel.
If you made A/V connections (from page 12), you
can skip this step.
2 Set the A/B switch to “A.”
3 Press EASY SET UP on the VCR.
The SET UP menu appears.
1 The CLOCK SET menu
appears. Select AUTO and
press EXECUTE.
For details, see page 27.
Normal display ?
4 The AUTO PRESET starts.
For details, see page 30.
3 The TUNER PRESET menu
appears. Set ANTENNA/
CABLE to CABLE and press
EXECUTE.
For details, see page 30.
2 The CABLE BOX menu
appears. Set CABLE BOX
CONTROL to OFF and
press EXECUTE.
For details, see page 33.
Press MENU and select
TUNER PRESET.
Set MANUAL SET to ADD
and press EXECUTE.
For details, see page 31.
Press MENU and select
SET VCR Plus+
CHANNELS.
Enter the program guide
channel, then the channel
you use on your TV.
Program guide channel
Your actual TV channel
Press EXECUTE.For details, see page 37.
Press MENU and select
SET VCR Plus+
CHANNELS.
Enter the program guide
channel, then the cable
box output channel.
Program guide channel
Your cable box channel
Press EXECUTE.
For details, see page 37.
(continued)

26
Getting Started
You are now ready to use your VCR
To record an unscrambled channel
1 Set the A/B switch to “A.”
2 Select channels on the VCR.
To record a scrambled channel
1 Set the A/B switch to “B.”
2 Select channels on the cable box (for details on the cable box,
see page 33).
To watch TV
1 Turn off your VCR, or press the VCR’s TV/VTR button until the VTR
indicator in the display window goes off.
2 Set the A/B switch to “B.”
3 Turn on your cable box.
4 Set the TV to the cable box output channel (usually 2, 3, or 4).
5 Set the cable box to the channel you want to watch.
Hookup 6 (continued)
27
Getting Started
Using the Auto Clock Set feature
Some TV and cable channels transmit time signals with their broadcasts.
Your VCR can pick up this time signal to automatically set the clock.
The Auto Clock Set feature works only if a channel in your area is
broadcasting a time signal. If broadcasters in your area are not yet
sending time signals, set the time manually (page 29).
Before you start…
• Turn on the VCR and the TV.
• Set the TV to the VCR channel (channel 3 or 4). If your TV is
connected to the VCR using A/V connections, set the TV to video
input.
• Press TV/VTR to display the VTR indicator in the VCR’s display
window.
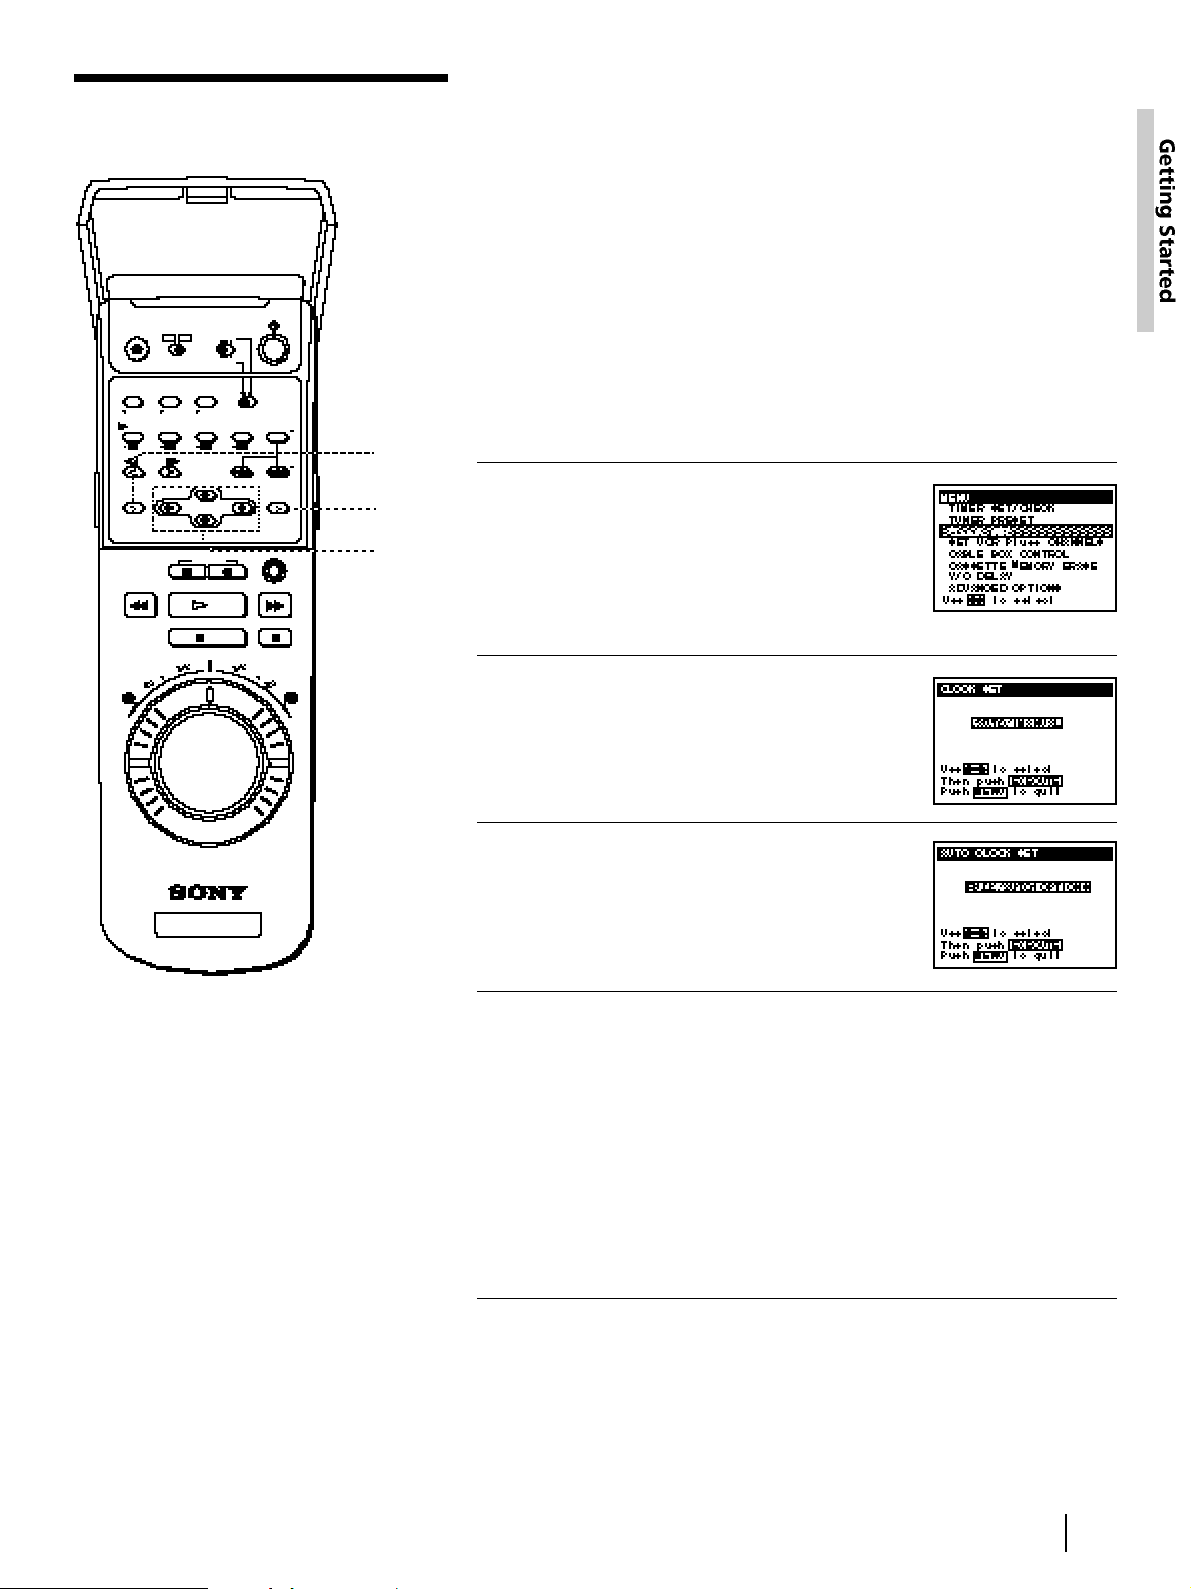
1 Press MENU, then press the
CURSOR (>/.) buttons to move
the cursor (❚) to CLOCK SET and
press EXECUTE.
When using the EASY SET UP
procedure, skip this step.
2 Press the CURSOR (?//) buttons
to select AUTO, then press
EXECUTE.
The AUTO CLOCK SET menu appears
on the TV screen.
3 Press the CURSOR (?//) buttons
to select FULL AUTO, then press
EXECUTE.
4 To activate the Auto Clock Set
function, turn the VCR off.
The VCR automatically sets the clock.
The VCR automatically searches for a
channel that carries a time signal and
sets your time zone and daylight saving
time (if applicable).
If your clock is set, but displays the
wrong time zone or daylight saving
time, you can adjust these settings
without turning off the Auto Clock Set
feature (page 28).
When the Auto CLock Set feature does not work well
Depending on your area, the automatic clock setting feature may not set
the clock correctly. In this case, set the clock manually according to the
procedure on page 29.
Setting the clock
Notes
• The clock cannot be set
automatically if the VCR
cannot receive a channel
that carries a time signal in
your area. If so, set the clock
manually (page 29).
• If there are only a few
channels in your area that
carry time signals, setting
the clock automatically may
take up to about 30 minutes.
If nothing happens even
after you wait about 30
minutes, set the clock
manually (page 29).
• If you use Hookup 1 or 4,
make sure you leave the
cable box on.
EXECUTE
CURSOR
MENU
(continued)
28
Getting Started
If the clock is not activated
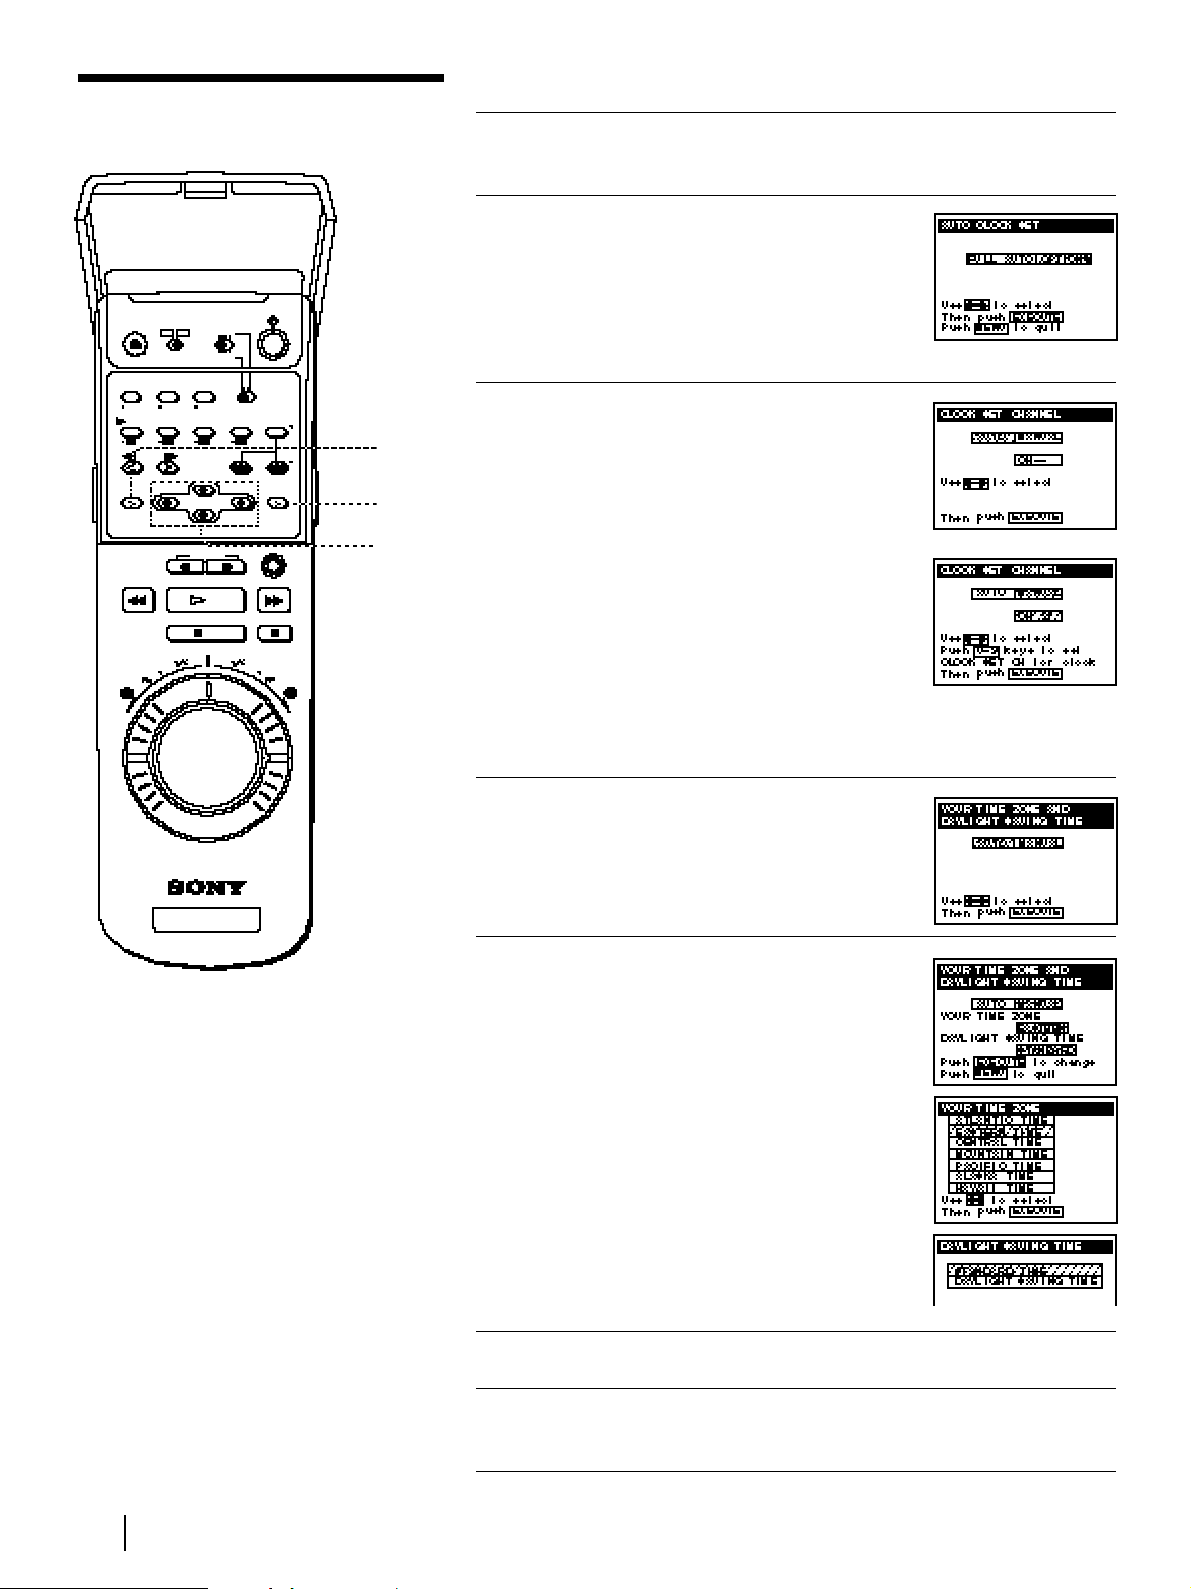
1 Follow steps 1 and 2 in “Using the
Auto Clock Set feature.”
2 Press the CURSOR (?//) buttons
to select OPTIONS in the AUTO
CLOCK SET menu, then press
EXECUTE.
The CLOCK SET CHANNEL menu
appears.
3 Press the CURSOR (?//) buttons
to select AUTO or MANUAL.
• If you select AUTO:
The VCR automatically searches for a
channel that carries a time signal.
• If you select MANUAL:
Set a channel that carries a time signal
using the number buttons.
Use this option if you know that
channel.
Most PBS member stations broadcast
a time signal.
For the fastest response, set the VCR
to your local PBS station.
4 Press EXECUTE.
The YOUR TIME ZONE AND
DAYLIGHT SAVING TIME menu
appears.
5 Press the CURSOR (?//) buttons
to select AUTO or MANUAL.
• If you select AUTO:
The VCR automatically sets your time
zone and daylight saving time
(if applicable).
• If you select MANUAL:
1 Press EXECUTE, then set the time
zone of your area using the
CURSOR (>/.) buttons.
2 Press EXECUTE, then select
STANDARD TIME or DAYLIGHT
SAVING TIME using the CURSOR
(>/.) buttons.
6 Press EXECUTE.
7 To activate the Auto Clock Set
function, turn the VCR off.
Note
• If you use both the cable box
control feature and the Auto
Clock Set feature, the VCR
automatically changes
channels on the cable box
until a channel that carries a
time signal is found
whenever you turn off the
VCR.
If you want to stop the
search, change the channel
of the cable box with the
channel buttons either on
the VCR or on the remote
commander.
Setting the clock (continued)
MENU
EXECUTE
CURSOR

29
Getting Started
Using the Manual Clock Set
1 Press MENU.
The main MENU appears on the TV
screen.
2 Press the CURSOR (>/.) buttons
to move the cursor (❚) to CLOCK
SET, then press EXECUTE.
3 Press the CURSOR (?//) buttons
to select MANUAL, then press
EXECUTE.
4 Set the month using the CURSOR
(>/.) buttons.
5 Press CURSOR / to highlight the
day and set the day using the
CURSOR (>/.) buttons.
The day of the week is set
automatically.
6 Press CURSOR / to highlight the
year and set the year using the
CURSOR (>/.) buttons.
7 Press CURSOR / to highlight the
hour and set the hour using the
CURSOR (>/.) buttons.
8 Press CURSOR / to highlight the
minutes and set the minutes
using the CURSOR (>/.) buttons.
9 Press EXECUTE to start the clock.
MENU
EXECUTE
CURSOR
30
Getting Started
Presetting channels
(Skip this section if you are using
cable box / DSS receiver control.)
This VCR is capable of receiving VHF channels 2 to 13, UHF channels 14
to 69 and unscrambled CATV channels 1 to 125. First, we recommend
that you preset the receivable channels in your area using automatic
presetting. Then, if there are any unwanted channels, disable them
manually. If you have decided which channels you wish to preset, set
them directly using manual presetting.
Before you start…
• Turn on the VCR and the TV.
• Set the TV to the video channel (channel 3 or 4). If your TV is
connected to the VCR using A/V connections, set the TV to video
input.
• Press TV/VTR to display the VTR indicator in the VCR’s display
window.
• Press INPUT SELECT so that a channel number appears in the VCR’s
display window.
Presetting all receivable channels automatically
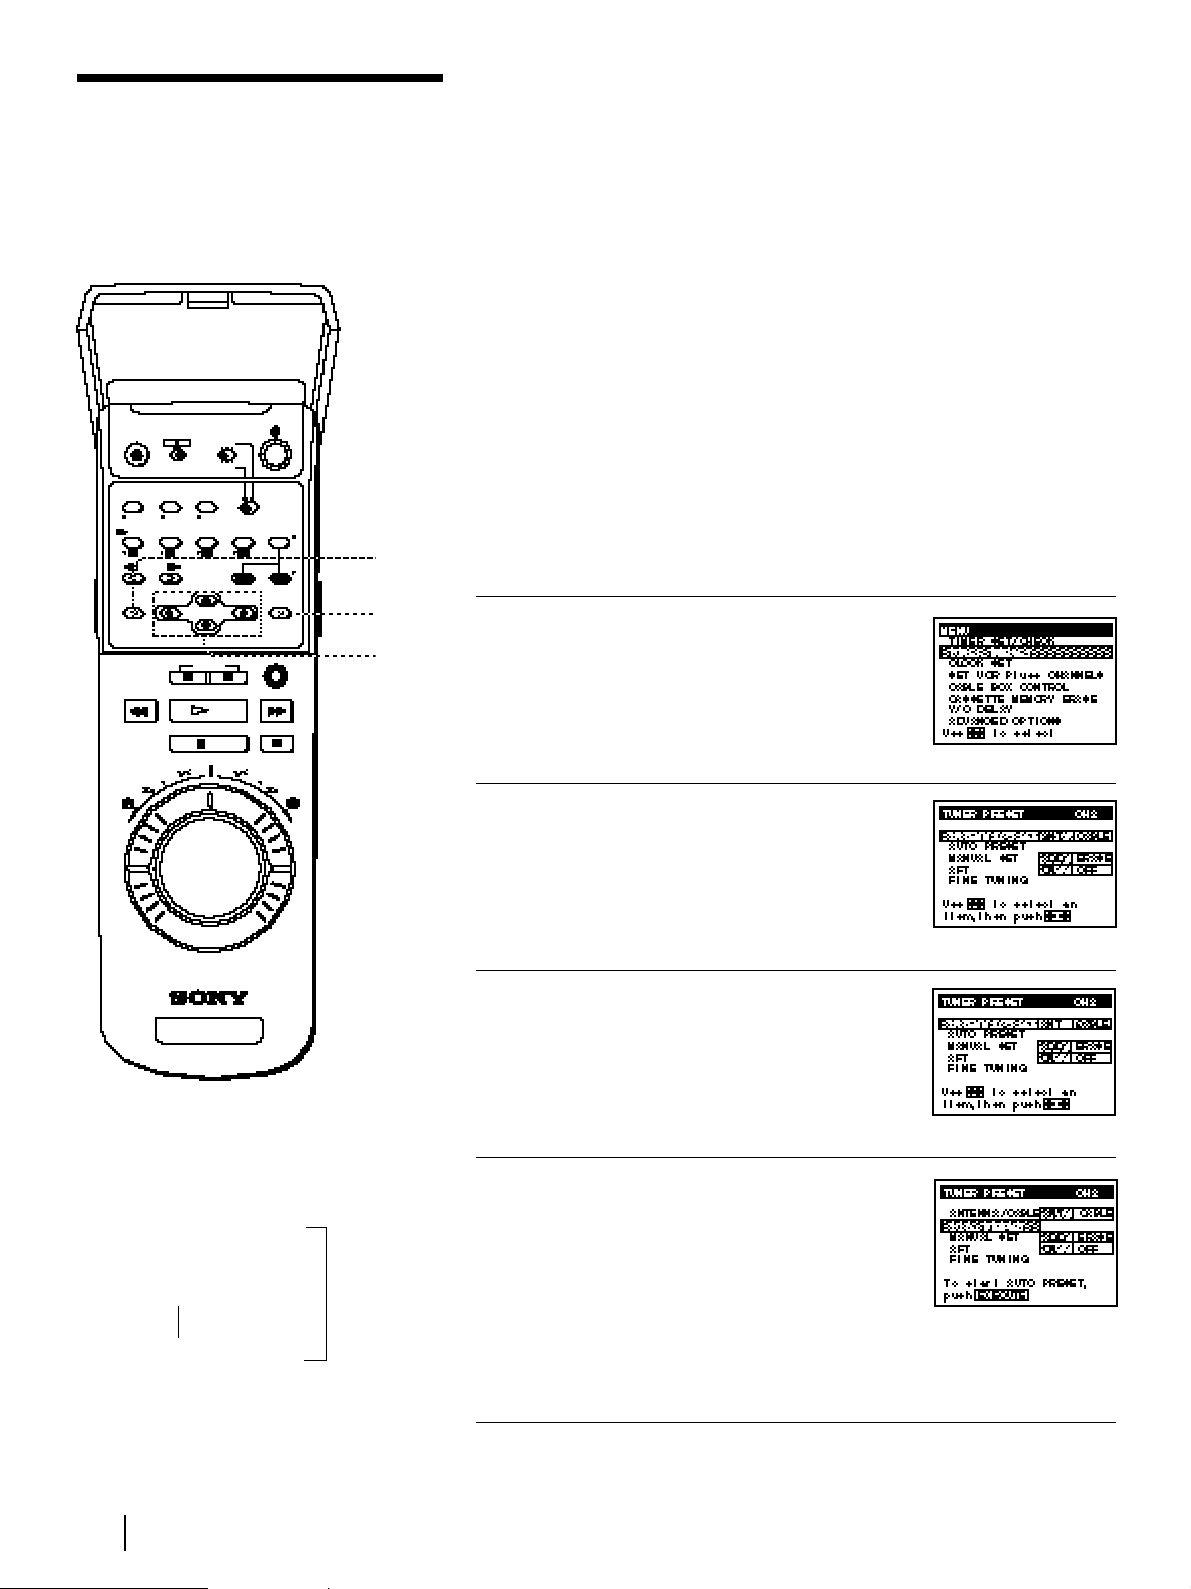
1 Press MENU, then press the
CURSOR (>/.) buttons to move
the cursor (❚) to TUNER PRESET
and press EXECUTE.
When using the EASY SET UP
procedure, skip this step.
2 Press the CURSOR (>/.) buttons
to move the cursor (❚) to
ANTENNA/CABLE.
3 Select ANT or CABLE using the
CURSOR (?//) buttons:
• To preset cable TV channels, select
CABLE.
• To preset VHF and UHF channels,
select ANT.
4 Press the CURSOR (>/.) buttons
to move the cursor (❚) to AUTO
PRESET, then press EXECUTE.
All receivable channels are preset in
numerical sequence. When no more
receivable channels can be found,
presetting stops and the picture from
the lowest numbered channel is
displayed on the TV screen.
$
Tip
• When receiving a VHF,
UHF or CATV channel, the
display changes as follows
each time you press the
DISPLAY button.
Channel number, program
name, and station’s call
letters (if the broadcaster
sends those services)
Date, time, remaining tape
length, and time counter
Z
MENU
EXECUTE
CURSOR
 Loading...