


3-868-101-22 (1)
Portable
CD Player
Operating Instructions
About the area code
The area code of the location in which you purchased the CD player is shown on upper left of the bar code label on the package.
For accessories supplied with your CD player, check the area code of your model and see “Accessories (supplied/optional).”
D-E770
D-EJ711
D-EJ715
2000 Sony Corporation

WARNING
To prevent fire or shock hazard, do not expose the unit to rain or moisture.
To avoid electrical shock, do not open the cabinet. Refer servicing to qualified personnel only.
CAUTION
The use of optical instruments with this product will increase eye hazard.
Owner’s Record
The model and the serial numbers are located at the rear. Record these numbers in the spaces provided below. Refer to them whenever you call upon your Sony dealer regarding this product.
Model No. ___________________
Serial No. ___________________
Certain countries may regulate disposal of the battery used to power this product. Please consult with your local authority.
For the customers in the USA and Canada
This mark is available in the USA and Canada only
RECYCLING NICKEL-CADMIUM BATTERIES
Nickel-Cadmium batteries are recyclable. You can help preserve our environment by returning your unwanted batteries to your nearest point for
collection, recycling or proper disposal. Note: In some areas the disposal of
nickel-cadmium batteries in household or business trash may be prohibited.
RBRC (Rechargeable Battery Recycling Corporation) advises you about spent
battery collection by the following phone number.
Call toll free number: 1-800-822-8837 (United States and Canada only)
Caution: Do not handle damaged or leaking nickelcadmium batteries.
INFORMATION
Listening for many hours at maximum volume may damage your hearing.
For the customers in the USA
This equipment has been tested and found to comply with the limits for a Class B digital device, pursuant to Part 15 of the FCC Rules. These limits are designed to provide reasonable protection against harmful interference in a residential installation. This equipment generates, uses, and can radiate radio frequency energy and, if not installed and used in accordance with the instructions, may cause harmful interference to radio communications. However, there is no guarantee that interference will not occur in a particular installation. If this equipment does cause harmful interference to radio or television reception, which can be determined by turning the equipment off and on, the user is encouraged to try to correct the interference by one or more of the following measures:
–Reorient or relocate the receiving antenna.
–Increase the separation between the equipment and receiver.
–Connect the equipment into an outlet on a circuit different from that to which the receiver is connected.
–Consult the dealer or an experienced radio/TV
technician for help.
You are cautioned that any changes or modifications not expressly approved in this manual could void your authority to operate this equipment.
For the customers in Australia
The supply cord of the AC power adaptor cannot be replaced; if the cord is damaged, the AC power adaptor should be discarded.
2

Table of Contents |
|
Getting started |
|
Locating the Controls .................................. |
4 |
Playing a CD |
|
1. Connect your CD player. ......................... |
7 |
2. Insert a CD. ............................................. |
7 |
3. Play a CD. ............................................... |
8 |
Playback options |
|
Playing tracks repeatedly (Repeat play) .... |
11 |
Playing a single track (Single play) ........... |
11 |
Playing tracks in random order |
|
(Shuffle play) ......................................... |
11 |
Playing tracks in your favorite order |
|
(PGM play) ............................................ |
12 |
Available features |
|
G-PROTECTION function ........................ |
13 |
Emphasizing the bass sound (SOUND) .... |
13 |
Protecting your hearing (AVLS) ................ |
14 |
Locking the controls (HOLD) ................... |
14 |
Turning off the operation beep sound ........ |
15 |
Connecting your CD player |
|
Connecting a stereo system ....................... |
16 |
Using your CD player in a car ................... |
17 |
Connecting a power source |
|
Using the rechargeable batteries ................ |
18 |
Using dry batteries ..................................... |
20 |
Notes on the power source ........................ |
20 |
Additional information |
|
Precautions ................................................ |
21 |
Maintenance .............................................. |
21 |
Troubleshooting ......................................... |
22 |
Specifications ............................................ |
24 |
Accessories (supplied/optional) ................ |
25 |
3
Getting started
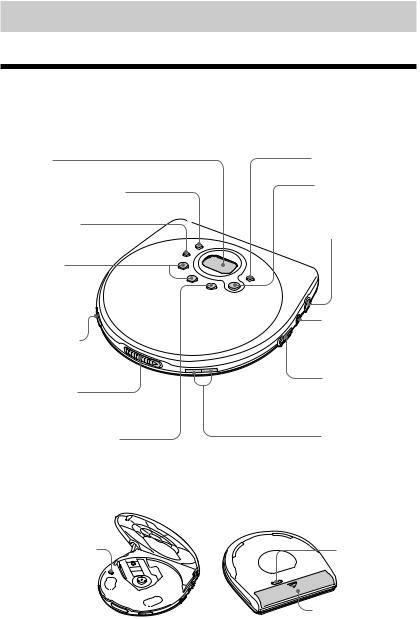
Locating the Controls
For details, see pages in parentheses.
CD player (front)
1Display
(pages 9, 11 - 14)
2REPEAT/ENTER button (pages 10 - 12)
3PLAY MODE button
(pages 10 - 12)
4 ./>
(AMS/search) buttons
(pages 8, 11, 12)
5 HOLD switch (page 14)
6OPEN switch (page 7)
7 x(stop)/CHG (charge) button
(pages 8, 15, 18)
CD player (inside)
qf G-PROTECTION switch
(page 13)
8SOUND button (page 13)
9 u(play/pause) button
(pages 8, 12)
q; DC IN 4.5 V (external power input) jack (pages 7, 18)
qaLINE OUT (OPTICAL) jack (page 16)
qsi/REMOTE jack (page 7)
qdVOLUME +/– buttons
(page 8)
CD player (rear)
qg AVLS switch (page 14)
qhBattery compartment (page 18)
4
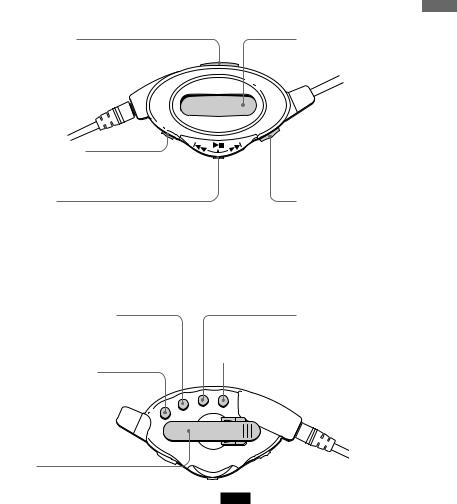
Remote control (for the customers supplied with the RM-CD11L remote
control)
(Front)
qjHOLD switch |
w; Display |
|||
(page 14) |
(pages 9, 11 - 14) |
|||
|
|
|
|
|
|
|
|
|
|
|
|
|
|
|
|
|
|
|
|
qk x(stop) button (pages 8, 15)
started Getting
ql Jog lever
u: play/pause (pages 8, 12)
./>: AMS/search (pages 8, 11, 12)
Press or slide the lever to operate your CD player.
(Rear)
ws P (play) MODE button (pages 10 - 12)
wd RPT (repeat)/ENT (enter) button (pages 10 - 12) 
wf Clip
You can turn and change the angle of the clip.
wa VOLUME +/– tab (page 8)
wg SOUND button (page 13)
wh DISPLAY button
Press to check the remaining time on the CD and the number of the tracks left.
Note
Use only the supplied remote control. You cannot operate this CD player with the remote control supplied with other CD players.
(Continued)
5
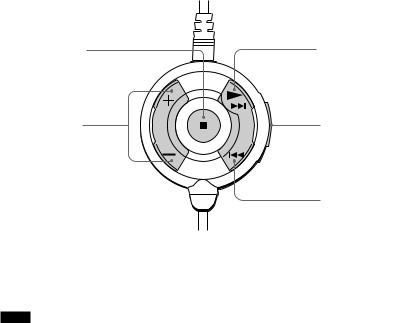
Remote control (for the customers supplied with the RM-CD6 remote
control)
wj x(stop) button |
wl N(play)•> |
(pages 8, 15) |
(AMS/search) |
|
button |
|
(pages 8, 11, 12) |
wk VOL (volume) |
e;HOLD switch |
+/– button |
(page 14) |
(page 8) |
|
|
ea .(AMS/ |
|
search) button |
|
(pages 8, 11, 12) |
Note
Use only the supplied remote control. You cannot operate this CD player with the remote control supplied with other CD players.
6

Playing a CD
You can also use rechargeable batteries, dry batteries and a car battery as a power source.
1. Connect your CD player.
1Connect the AC power adaptor.
2Connect the headphones/earphones.
For models supplied with the AC plug adaptor
If the AC power adaptor does not fit the AC outlet, use the AC plug adaptor.
to an AC outlet
AC power adaptor
u button |
|
For models supplied with the remote |
|
control. |
|
• Connect the plug of the headphones/ |
|
earphones to the remote control. |
|
• Connect the headphones/earphones to |
|
the remote control firmly. A loose |
to DC IN |
connection may cause noise during |
4.5V |
playback. |
|
|
Headphones |
to i/ |
or |
REMOTE |
Earphones |
a Playing
CD
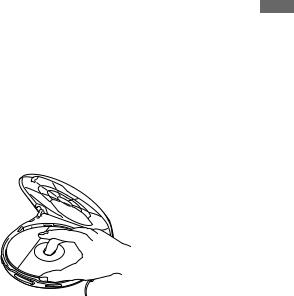
2. Insert a CD.
1Slide OPEN and raise the lid.
OPEN switch
2Place the CD on the tray and close the lid.
Label side
(Continued)
7
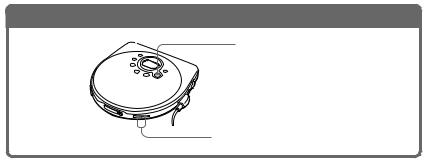
3. Play a CD.
Press u.
|
Adjust the volume by |
|
pressing VOLUME + or –. |
|
|
To |
Press |
Play/Pause |
u |
|
|
Stop |
x/CHG*2 |
Find the beginning of the current track (AMS*1) |
.once quickly*2 |
Find the beginning of the previous tracks (AMS) |
.repeatedly*2 |
Find the beginning of the next track (AMS) |
>once quickly*2 |
Find the beginning of the succeeding tracks (AMS) |
>repeatedly*2 |
Go backwards quickly |
Hold down .*2 |
Go forward quickly |
Hold down >*2 |
*1 Automatic Music Sensor
*2 These operations can be done during both play and pause.
8
About the display
•When you press uafter changing the CD or turning off and on the player, the total number of tracks in the CD and total playing time appear for about two seconds.
•During play, the track number and the elapsed playing time of the current track appear.
•Between tracks, the time to the beginning of the next track appears with the “-” indication.
•During pause, the elapsed playing time flashes.
If the volume level does not increase
Is AVLS set to “LIMIT”? Set AVLS to “NORM.” For details, see “Protecting your hearing (AVLS).”
Playback starts from the point you stopped
Your CD player can recall the playback point where you stopped and then resume playing from the same place (resume function). There is no ON/OFF switch of the resume function on this CD player.
Removing the CD
Remove the CD while pressing the pivot in the center of the tray.
a Playing
CD
9
 Loading...