


 i
i
This is the Internet version of the user's guide. © Print only for private use.
Contents
Getting to know your phone . . . . . . . . . . . . . . . . . . 6 Calling . . . . . . . . . . . . . . . . . . . . . . . . . . . . . . . . . . 28 Messaging . . . . . . . . . . . . . . . . . . . . . . . . . . . . . . . 38 Imaging . . . . . . . . . . . . . . . . . . . . . . . . . . . . . . . . . 45 Entertainment . . . . . . . . . . . . . . . . . . . . . . . . . . . . 49 Connectivity . . . . . . . . . . . . . . . . . . . . . . . . . . . . . . 57 More features . . . . . . . . . . . . . . . . . . . . . . . . . . . . 62 Troubleshooting . . . . . . . . . . . . . . . . . . . . . . . . . . . 70 Important information . . . . . . . . . . . . . . . . . . . . . . 73 Index . . . . . . . . . . . . . . . . . . . . . . . . . . . . . . . . . . . 90
This is the Internet version of the user's guide. © Print only for private use.1

Added dimensions - Accessories from Sony Ericsson
Portable Speakers MPS-60
Small yet powerful speakers that fit in your pocket.
Stereo Portable Handsfree
HPM-70
Deep bass with light in-ear design.
Music Cable MMC-70
Connects your music mobile phone to your stereo system.
2This is the Internet version of the user's guide. © Print only for private use.
Sony Ericsson
GSM 900/1800/1900
This User guide is published by Sony Ericsson Mobile Communications AB or its local affiliated company, without any warranty. Improvements and changes to this User guide necessitated by typographical errors, inaccuracies of current information, or improvements to programs and/or equipment, may be made by Sony Ericsson Mobile Communications AB or its local affiliated company at any time and without notice. Such changes will, however, be incorporated into new editions of this User guide.
All rights reserved.
©Sony Ericsson Mobile Communications AB, 2006
Publication number: EN/LZT 108 9170 R1B
Please note: Some of the services in this User guide are not supported by all networks. This also applies to the GSM International Emergency Number 112.
Please contact your network operator or service provider if you are in doubt whether you can use a particular service or not.
Please read the Guidelines for safe and efficient use and the Limited warranty chapters before you use your mobile phone.
Your mobile phone has the capability to download, store and forward additional content, e.g. ringtones. The use of such content may be restricted or prohibited by rights of third parties, including but not limited to restriction under applicable copyright laws. You, and not Sony Ericsson, are entirely responsible for additional content that you download to or forward from your mobile phone. Prior to your use of any additional content, please verify that your intended use is properly licensed or is otherwise authorized. Sony Ericsson does not guarantee the accuracy, integrity or quality of any additional content or any other third party content. Under no circumstances will Sony Ericsson be liable in any way for your improper use of additional content or other third party content.
PlayNow™ and PhotoDJ™ are trademarks or registered trademarks of Sony Ericsson Mobile Communications AB.
Memory Stick Micro™ and M2™ are registered trademarks of Sony corporation.
This is the Internet version of the user's guide. © Print only for private use.3
WALKMAN is a trademark of Sony corporation.
Microsoft® Windows® (Microsoft® Windows® Explorer) are either registered trademarks or trademarks of Microsoft Corporation in the United States and/or other countries/regions.
T9™ Text Input is a trademark or a registered trademark of Tegic Communications. T9™ Text Input is licensed under one or more of the following: U.S. Pat. Nos. 5,818,437, 5,953,541, 5,187,480, 5,945,928, and 6,011,554; Canadian Pat. No. 1,331,057, United Kingdom Pat. No. 2238414B; Hong Kong Standard Pat. No. HK0940329; Republic of Singapore Pat. No. 51383; Euro.Pat. No. 0 842 463(96927260.8) DE/DK, FI, FR, IT, NL, PT, ES, SE, GB; and additional patents are pending worldwide.
Java and all Java based trademarks and logos are trademarks or registered trademarks of Sun Microsystems, Inc. in the U.S. and other countries/regions. End-user license agreement for Sun™ Java™ JME™.
1Restrictions: Software is confidential copyrighted information of Sun and title to all copies is retained by Sun and/or its licensors. Customer shall not modify, decompile, disassemble, decrypt, extract, or otherwise reverse engineer Software. Software may not be leased, assigned, or sublicensed, in whole or in part.
2Export Regulations: Software, including technical data, is subject to U.S. export control laws, including the U.S. Export Administration Act and its associated regulations, and may be subject to export or import regulations in other countries/regions. Customer agrees to comply strictly with all such regulations and acknowledges that it has the responsibility to obtain licenses to export, re-export, or import Software. Software may not be downloaded, or otherwise exported or re-exported (i) into, or to a national or resident of, Cuba, Iraq, Iran, North Korea, Libya, Sudan, Syria (as such listing may be revised from time to time) or any country/region to which the U.S. has embargoed goods; or (ii) to anyone on the U.S. Treasury Department's list of Specially Designated Nations or the U.S. Commerce Department's Table of Denial Orders.
4
This is the Internet version of the user's guide. © Print only for private use.

3Restricted Rights: Use, duplication or disclosure by the United States government is subject to the restrictions as set forth in the Rights in Technical Data and Computer Software Clauses in DFARS 252.227-7013(c) (1) and FAR 52.227-19(c) (2) as applicable.
Part of the software in this product is copyright © SyncML initiative Ltd. (1999-2002). All rights reserved.
Other product and company names mentioned herein may be the trademarks of their respective owners.
Any rights not expressly granted herein are reserved.
You can find support, information and content downloads at www.sonyericsson.com/cn.
Note: Sony Ericsson advises users to backup their personal data information.
All illustrations are for illustration only and may not accurately depict the actual phone.
User guide symbols
The following instruction symbols appear in this User guide:
%See also page ...
}
Use the navigation key to scroll and select
% 16 Navigating the menus.
Note
This symbol indicates that a service or function is networkor subscriptiondependent. Because of this, all menus may not be available in your phone. Consult your network operator for more information.
This is the Internet version of the user's guide. © Print only for private use.5
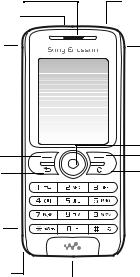
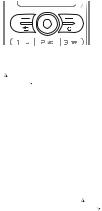
Getting to know your phone
Ear speaker |
On/off key |
Infrared port |
|
Walkman® |
Volume key |
key |
|
|
Navigation key |
Selection |
Selection key |
key |
C key |
Back key |
Memory Stick Micro™ (M2™)
Microphone
Stereo headset and charger connector
6
This is the Internet version of the user's guide. © Print only for private use.

Menu overview
PlayNow™* |
Internet |
Entertainment |
|
services* |
Online services* |
|
|
Games |
|
|
PhotoDJ™ |
|
|
MusicDJ™ |
|
|
Record sound |
Camera |
Messaging |
WALKMAN |
Write new
Inbox
My friends*
Call voicemail
Drafts
Outbox
Sent messages
Saved messages
Templates
Settings
This is the Internet version of the user's guide. © Print only for private use.7
File manager*** |
Contacts** |
Radio |
All files |
Options |
|
On Memory Stick |
Speed dial |
|
In phone |
My business card |
|
|
Groups** |
|
|
SIM contacts** |
|
|
Special numbers |
|
|
Advanced |
|
|
New contact |
|
Alarms |
Organizer |
Settings |
Alarm |
Calendar |
General |
Recurrent alarm |
Tasks |
Sounds & alerts |
Alarm signal |
Notes |
Display |
|
Calls |
Calls |
|
Calculator |
Connectivity |
|
Synchronization |
|
|
Timer |
|
|
Stopwatch |
|
|
Applications |
|
|
Code memo |
|
*Some menus are operator-, networkand subscription-dependent.
**The menu depends on whi ch contacts are selected as default.
***Use the navigation key to move across tabs in submenus. For more information % 16 Navigating the menus
8
This is the Internet version of the user's guide. © Print only for private use.

Status bar icons
Icon Description
GSM network signal strength.
GPRS is within range and can be used.
Battery status.
Battery charging.
Missed incoming call.
Call and messaging alerts are off, alarm is still on. Text message received.
Email message received.
Picture message received.
Voice message received.
Ongoing call.
Calendar reminder.
Task reminder.
The infrared port is on.
This is the Internet version of the user's guide. © Print only for private use.9
Assembling your phone
Insert the SIM card and charge the battery to use your phone.
SIM card
When you register as a subscriber with a network operator, you get a SIM (Subscriber Identity Module) card. The SIM card contains a computer chip that keeps track of your phone number, the services included in your subscription, and your contacts information, among other things.


 Save contacts on your SIM card before you remove
  it from another phone. Contacts may have been saved in the phone memory % 30 Contacts.
10
This is the Internet version of the user's guide. © Print only for private use.

To insert the SIM card and charge the battery
1Slide the cover open and lift it off.
2Insert the SIM card. Make sure the SIM card is placed under the silvery holders.
3Place the battery in the phone with the label side up and the connectors facing each other.
4Place the cover on the phone and slide it into place.
11
This is the Internet version of the user's guide. © Print only for private use.

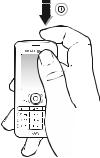
5Connect the charger to the phone. The symbol on the charger plug must face upwards.
6It may take 30 minutes for the battery icon to appear.
7Wait approximately 2.5 hours or until the battery icon indicates that the battery is fully charged. For an indication of charging, press  to activate the screen.
8Remove the charger by tilting the plug upwards.


 Some functions use more battery power than others
  and may cause a need for more frequent recharging. Talk-time and standby time may become noticeably shorter due to wear and you may have to replace your battery. Only use approved batteries from Sony Ericsson % 78 Battery.
Memory Stick Micro™ (M2™)
Your phone supports Memory Stick Micro™ (M2™). A memory card adds more storage space to your phone for, for example, music, ringtones, video clips and pictures. You can share your saved information by moving or copying it to other memory card compatible devices.
12
This is the Internet version of the user's guide. © Print only for private use.
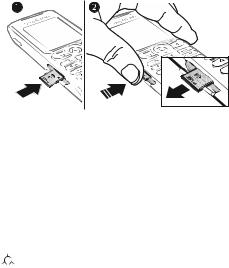
To insert and remove a Memory Stick Micro™ (M2™)
1Open the cover and insert the memory card (with the contacts facing down).
2Press the edge to release and to remove.
PIN
You may need a PIN (Personal Identification Number) from your network operator to activate the services in your phone. Each PIN digit appears as *, unless it starts with emergency number digits, for example, 112 or 911. This is so that you can see and call an emergency number without entering a PIN % 29 Emergency calls. Press  to correct mistakes.


 If you enter the wrong PIN three times in a row, the
  SIM card is blocked % 65 SIM card lock.
13
This is the Internet version of the user's guide. © Print only for private use.
To turn the phone on and off
1Press and hold  to turn on or off.
2Select whether you want to use the phone with all functionality or the Walkman® player only
% 15 Start up menu.
3Enter your SIM card PIN, if you have one.
4At first start-up, select the language for phone menus.
5Select Yes if you want the setup wizard to help you with instructions and tips or select No. The setup wizard is also available in the menu system } Menu } Settings
} General } Setup wizard.
Standby
After you have turned the phone on and entered your PIN, the name of your network operator appears on the screen. This is called standby mode.
14
This is the Internet version of the user's guide. © Print only for private use.

Start up menu
Each time you turn on the phone, you can select to listen to music only - instead of using the phone with full functionality. Music only means all transmitters of the phone are turned off, preventing disturbance of sensitive equipment, for example, in an airplane or in a hospital. You cannot make calls, receive calls, or send messages, but you can receive calendar and task reminders and the alarm sounds. You can only use the Walkman® player.

 Always follow regulations and any flight crew
  instructions with respect to onboard use of electronic devices.
To deactivate the start-up menu
1From standby select Menu } Settings } General } Start-up menu.
2Select Don´t show.
Making calls
To make and receive calls
Enter an area code and phone number } Call to make the call. } End call to end the call. When the phone rings
} Answer to answer the call.
15
This is the Internet version of the user's guide. © Print only for private use.
Navigating the menus
The main menus are shown as icons. Some submenus include tabs that appear on the screen.
•Press  (navigation key) to go to the main menu or to select items.
•Press  ,
,  ,
,  or
or  to move through menus and tabs.
•Press  to go back one level in the menus or to end a function or application.
•Press and hold  to return to standby.
•Press  to select the options shown immediately above these keys on the screen.
•Press  to delete items.
•} More to enter a list of options.
•} Info to get help on selected features.
Shortcuts
From standby, you can use  ,
,  ,
,  ,
,  to go directly to a function.
To create a standby shortcut
1If, for example,  has no predefined shortcut } Yes.
2Scroll to a function to create a shortcut to } Shortcut.
To edit a standby shortcut
1From standby select Menu } Settings } General
} Shortcuts and select an existing shortcut you want to edit } Edit.
2Scroll to and select a function } Shortcut.
16
This is the Internet version of the user's guide. © Print only for private use.
Shut down menu
Shut down the phone, lock keys, turn on silent mode or activate a profile. For more information about profiles
% 63 Profiles.
To open and close the shut down menu
Press  and select an option from the list.
File manager
Files such as pictures, videos, sounds, themes, games and applications are saved in folders in the phone memory or on the memory card.
To manage files and folders
1From standby select Menu } File manager and open a folder.
2Scroll to a file } More } Manage files and select an option.
3Select a folder or } New folder and name the folder } OK.
To select several files
1From standby select Menu } File manager and select a file } More } Mark, select Mark several or Mark all.
2Scroll and select more files by pressing Mark or
Unmark.
To check memory status
From standby select Menu } File manager } More } Memory status.
File information
View file information by highlighting a file } More
} Information. Copyright-protected files cannot be copied or sent.
17
This is the Internet version of the user's guide. © Print only for private use.

Synchronizing items
For more information % 59 Synchronizing.
Languages
Select the language for menus and when writing text.
To change the phone language
•From standby select Menu } Settings } General
} Language } Phone language and select a language.
•From standby, press:
 0000
0000  for English or
 0008
0008  for Chinese or
 8888
8888  for Automatic language (SIM-dependent).
To select writing languages
1From standby select Menu } Settings } General } Language } Writing language.
2Scroll and select languages by pressing Mark or Unmark. } Save to exit the menu.
Entering letters and characters
Enter letters in one of the following ways (text input methods), for example, when writing messages.
} Messaging } Write new } Text message.
To enter letters using multitap text input
•Press  –
–  until the desired character appears.
•To shift between capitals and lower-case letters, press
 .
.
•To enter numbers, press and hold  –
–  .
.
•To add a space, press  .
.
•For the most common punctuation marks, press  .
.
•To enter the + sign, press  .
.
18
This is the Internet version of the user's guide. © Print only for private use.
• To change input method, press and hold  .
.


 Multitap input only applies when latin characters are
  selected as writing language.
T9™ Text Input
The T9™ Text Input method uses a built-in dictionary to recognize the most commonly used word for each sequence of key presses. This way, you press each key only once, even if the letter you want is not the first letter on the key.
To enter letters using T9™ Text Input
1For example, if you want to write the word “Jane”, press
 ,
,  ,
,  ,
,  .
.
2If the word shown is the one you want, press  to
to
accept and add a space. To accept a word without
adding a space, press  . If the word shown is not the one you want, press
  or
or  repeatedly to view alternative words. Accept a word and add a space by pressing
  .
.
3Continue writing your message. To enter a full stop or
other punctuation marks, press  and then
  or
or  repeatedly. Accept and add a space by pressing
  .
.
To add words to the T9™ Text Input dictionary
1While entering letters } More } Spell word.
2Edit the word by using multitap input. Press  and
and  to navigate between letters. To delete a character, press
  . To delete an entire word, press and hold
  .
.
3When you have edited the word } Insert. The word is added to the T9™ Text Input dictionary. Next time you enter this word using T9™ Text Input, it will appear as one of the alternative words.
19
This is the Internet version of the user's guide. © Print only for private use.
Options when entering letters
} More to view options when entering letters.
Chinese input
This mobile phone has different input methods for entering Chinese characters:
•Stroke input
•Pinyin input
You can use these methods, for example, to enter Chinese names and Chinese short messages.
Switching between Chinese input methods
In the Chinese editing mode, you can select and switch quickly to another input method by pressing and
holding  .
.
General instructions
Regardless of which input method you choose, your phone has a function to speed up the entry of Chinese characters. Whenever you enter a stroke or a Pinyin letter, a candidate row of the most frequently used characters containing that stroke or relating to that letter appears at the bottom of the screen.
If the character you want is not displayed in the candidate row, press  to present another candidate row. Continue
pressing  until the character you want is displayed. Alternatively, you can enter the next stroke or Pinyin letter, and a new set of characters will immediately be displayed in the candidate row. To go back to the previous row, press
 . To select a character in the candidate row, press the navigation key or press and hold the key corresponding to the number above the character you want to enter.
20
This is the Internet version of the user's guide. © Print only for private use.
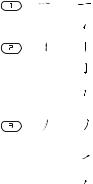
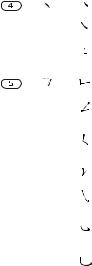
Stroke input
A Chinese character is built up of strokes. There are more than 30 basic strokes, which are grouped into 5 stroke categories. Each category is represented on the keypad by one of the keys  -
-  . The Wild Card key
  , is used when you are not sure of which stroke to use.
Stroke categories
The 5 stroke categories are defined in the table below:
Number |
Stroke |
Basic |
Stroke |
Character |
Key |
Category |
Stroke |
Name |
|
|
|
|
|
|
|
|
|
Over |
|
|
|
|
|
|
|
|
|
Lift |
|
|
|
|
|
|
|
|
|
Down |
|
|
|
|
|
|
|
|
|
Down- |
|
|
|
|
Hook |
|
|
|
|
|
|
|
|
|
Short |
|
|
|
|
Slope |
|
|
|
|
Down |
|
|
|
|
Long |
|
|
|
|
Left |
|
|
|
|
Slope |
|
|
|
|
|
|
|
|
|
Over |
|
|
|
|
Slope |
|
|
|
|
|
|
|
|
|
Short |
|
|
|
|
left |
|
|
|
|
Slope |
|
|
|
|
|
|
21
This is the Internet version of the user's guide. © Print only for private use.
Number |
Stroke |
Basic |
Stroke |
Character |
Key |
Category |
Stroke |
Name |
|
|
|
|
|
|
|
|
|
Dot |
|
|
|
|
|
|
|
|
|
Right |
|
|
|
|
Slope |
|
|
|
|
|
|
|
|
|
Down- |
|
|
|
|
Curved- |
|
|
|
|
Over |
|
|
|
|
|
|
|
|
|
Down- |
|
|
|
|
Over |
|
|
|
|
|
|
|
|
|
Left |
|
|
|
|
Slope- |
|
|
|
|
Over |
|
|
|
|
|
|
|
|
|
Left |
|
|
|
|
Slope- |
|
|
|
|
Dot |
|
|
|
|
Down- |
|
|
|
|
Lift |
|
|
|
|
|
|
|
|
|
Right |
|
|
|
|
Slope- |
|
|
|
|
Hook |
|
|
|
|
|
|
|
|
|
Down- |
|
|
|
|
Over- |
|
|
|
|
Hook |
|
|
|
|
|
|
|
|
|
Down- |
|
|
|
|
Over- |
|
|
|
|
Curved- |
|
|
|
|
Hook |
|
|
|
|
|
|
22
This is the Internet version of the user's guide. © Print only for private use.

Number |
Stroke |
Basic |
Stroke |
Character |
Key |
Category |
Stroke |
Name |
|
|
|
|
|
|
|
|
|
Down- |
|
|
|
|
Over- |
|
|
|
|
Down- |
|
|
|
|
Hook |
|
|
|
|
Down- |
|
|
|
|
Over- |
|
|
|
|
Down |
|
|
|
|
|
|
|
|
|
Over- |
|
|
|
|
Hook |
|
|
|
|
|
|
|
|
|
Over- |
|
|
|
|
Down |
|
|
|
|
|
|
|
|
|
Over- |
|
|
|
|
Down- |
|
|
|
|
Hook |
|
|
|
|
|
|
|
|
|
Over- |
|
|
|
|
Left |
|
|
|
|
Slope |
|
|
|
|
Over- |
|
|
|
|
Down- |
|
|
|
|
Over- |
|
|
|
|
Left |
|
|
|
|
Slope |
|
|
|
|
Over- |
|
|
|
|
Left |
|
|
|
|
Slope- |
|
|
|
|
Curved- |
|
|
|
|
Hook |
|
23
This is the Internet version of the user's guide. © Print only for private use.
Number Stroke Basic Stroke |
Character |
|
Key |
Category Stroke Name |
|
|
Over- |
|
|
Down- |
|
|
Over- |
|
|
Hook |
|
Over-
Down-
Over-
Down
CurvedHook
OverDownCurvedHook
Over- |
|
Down- |
|
Over |
|
? (Wild card key)
24
This is the Internet version of the user's guide. © Print only for private use.

Components
The basic building units of Chinese characters are components that are made up of strokes. After entering the first two strokes of the desired character, the component and character candidates that started with that stroke are displayed in the candidate row.
Using components is a fast method for entering complex characters.


 The smaller candidates surrounded by dotted
  frames are components, and the bigger candidates without dotted frames are characters.
For example, to enter " "
1Enter " ", "
", "  " and "
 ".
".
2Move the cursor to " ", press  .
.
3Move the cursor to " ", press  again to select " ".
Example of using the wild card key
The wild card key  , is used to supplement unclear strokes in entering characters. If you want to enter " ", but you only know that " " is the first and the last stroke of the character and that the total number of strokes is four, enter
 ,
,  ,
,  ,
,  . The character is displayed in the candidate row.
25
This is the Internet version of the user's guide. © Print only for private use.
Pinyin input
Press the keys containing the required Pinyin letters, and the phone will make various proposals on the screen, according to the pronunciation rules of Mandarin.
Below is the key mapping of Pinyin letters on the keypad.
Number Key Pinyin Letter
a b c
d e f
g h i
j k l
m n o
p q r s
t u ü
w x y z


 On the keypad, the letter ü is replaced by v.
26
This is the Internet version of the user's guide. © Print only for private use.
For example, to enter " " |
|
|
||||
1 |
Press |
, |
, |
. |
|
|
2 |
When "xin" is highlighted, press |
or |
and select |
|||
|
" ", then press . |
|
|
|
||
|
(If you want to enter any of the other suggested |
|||||
|
Pinyin combinations, scroll up or down to the desired |
|||||
|
combination, then press |
). |
|
|
||
3 |
Press |
again to select " ", When " " is highlighted. |
||||
Input punctuation, symbols and smilies
Under any Chinese input mode, press  , to see the table of punctuation marks, symbols and smilies. Use the
navigation key to make a selection.Press  to enter a space into the text.
27
This is the Internet version of the user's guide. © Print only for private use.

Calling
Making and receiving calls
Turn on the phone and make sure that you are within range of a network to make and receive calls % 14 To turn the phone on and off. If your subscription includes the Calling Line Identification service and the caller’s number is identified, the number is displayed. If the number is saved in Contacts, the name, number, and picture (if defined) are displayed. If the number is a restricted number, Withheld is displayed.
To make a call
Enter a phone number (with international country/region code and area code, if applicable) } Call to make the call. } End call to end the call.
To redial a number
If the connection failed, Retry? is displayed } Yes.


 Do not hold the phone to your ear while waiting.
  When a call connects, the phone gives a loud signal.
To answer or reject a call
} Answer to answer a call. } Busy to reject a call.
To change the ear speaker volume
Press the volume key to increase or to decrease the ear speaker volume during a call.
To select more options during a call
Press  and select an option.
To turn off the microphone
Press and hold  . To resume, press and hold
  again.
28
This is the Internet version of the user's guide. © Print only for private use.
 Loading...