


14,000 BTU Portable Air Conditioner
12,000 BTU Heat Pump
Operating Instructions
|
Model No. LX-140 |
® |
© 2006 Soleus Air International |

Thank you for choosing a Soleus Air LX-140 Portable Air Conditioner & Heat Pump. This owner’s manual will provide you with valuable information necessary for the proper care and maintenance of your new product. Please take a few moments to thoroughly read the instructions and familiarize yourself with all the operational aspects of your new Soleus Air Portable Air Conditioner with Heat Pump technology.
For your own records, please attach a copy of your sales receipt to this manual. Also, write the store name/location, date purchased, and serial number below:
Store Name: ____________________________________________________
Location: ______________________________________________________
Date Purchased: _________________________________________________
Serial Number (located on back of unit): ______________________________
IMPORTANT INSTRUCTIONS
Before installing and using your portable air conditioner, please read this owner’s manual carefully. Store this manual in a safe place for future reference.
1)Always place the unit on a level surface.
2)Never use or store gasoline or other flammable vapor or liquid near this unit unless instructed by this manual.
3)Maintain at least 10 inches (25 cm) clearance space around this unit. Do not block or cover air inlet or outlet grilles.
4)The unit must be connected to a correctly grounded power supply.
5)Do not start or stop the unit by inserting or pulling out the power plug.
6)Do not use an adapter plug or extension cord.
7)Do not use the unit in the immediate surroundings of a bath, a shower or a swimming pool.
8)Do not insert anything into the air outlet. Do not obstruct air inlet or outlet grills unless instructed by this manual.
9)Do not let children play near this unit.
10)Always inspect the cord for signs of damage before use. If the power cord is damaged, it must be replaced by the manufacturer or a qualified service technician.
11)When cleaning the unit, always turn the unit off and unplug the power cord.
2
PACKAGE CONTENTS
Portable Air Conditioner Exhaust Hoses (2) Hose Adapters (2) Window Kit Adapter (2) Remote Control
AAA Batteries (2)
Window Kit - 4 Sliding Panels (1 dual hose panel, 1 single hose panel, 2 extension panels) Air Intake and Outlet Covers (2)
Owner’s Manual
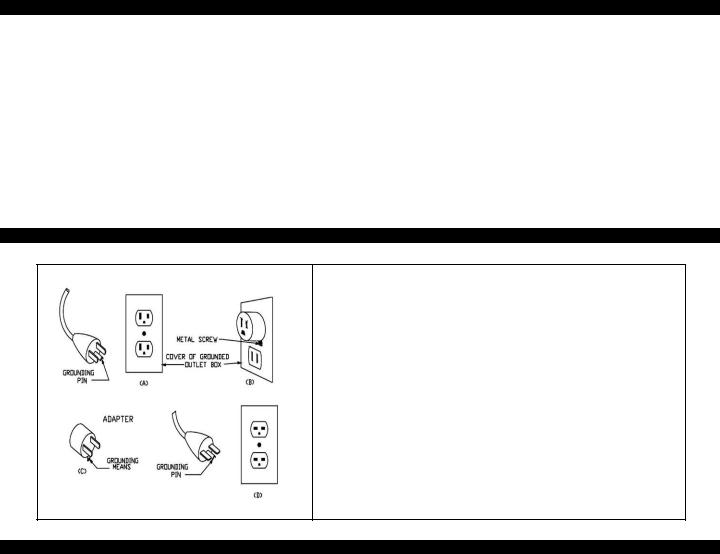
WARNING: This unit has a voltage rating of 115 volts. The cord has a plug as shown in A. An adapter as shown in C is available for connecting three-blade grounding-type plugs to two-slot receptacles. The grounding lug extending from the adapter must be connected to a permanent ground such as a properly grounded outlet box. The adapter should not be used if a three-slot grounded receptacle is available.
DO NOT DEFEAT THE SAFETY PURPOSE OF
THE GROUNDED PLUG.
SPECIFICATIONS
• The cooling capacity is meas- |
|
MODEL |
LX-140 |
|||
COOLING CAPACITY |
14,000 BTU/H |
|||||
ured at an ambient temperature |
||||||
of DB 86 °F, WB 78 °F. |
HEATING CAPACITY |
12,000 BTU/H |
||||
• Noise level is measured at a |
DEHUMIDIFYING CAPACITY |
60 pts/Day |
||||
distance of 3.28 ft away from |
POWER |
|
|
COOLING |
1350W |
|
the front of the unit, when the |
|
|
|
HEATING |
1350W |
|
unit is in cooling mode. |
|
|
|
|||
|
|
|
|
|
||
AIR FLOW VOLUME |
225 CFM |
|||||
|
||||||
• Power consumption is meas- |
|
|
|
|
|
|
|
|
|
|
115 V~ 60 HZ |
||
ured when the fan runs at the |
POWER SOURCE |
|||||
12/12 AMP HEATING/COOLING |
||||||
highest speed setting. |
|
|
|
|
||
|
|
|
|
|
||
SOUND PRESSURE LEVEL |
46 dB(A) |
|||||
|
||||||
• These specifications are for |
|
|
|
|
|
|
NET WEIGHT |
82 Lbs |
|||||
reference only. For actual data, |
||||||
OPERATING |
|
|
COOLING |
60.8 -108 |
||
please refer to the rating label |
|
|
||||
|
|
|
|
|||
on the back of the unit. |
TEMPERATURE |
|
|
HEATING |
23 -89.6 |
|
|
|
|
||||
|
|
|
|
|
|
|
• If the environment temperature |
DIMENSIONS |
|
|
ASSEMBLED |
17.7” W ×32.9” H ×18.9” D |
|
is higher than the max operat- |
|
|
|
|
||
|
|
PACKAGE |
19.9” W ×34.5” H ×22.5” D |
|||
ing temperature or lower than |
|
|
|
|||
|
|
|
|
|
||
the minimum operating tem- |
REFRIGERANT |
R22 |
||||
perature, the air conditioner |
||||||
|
|
|
|
|
||
|
|
|
|
|
||
may not work properly. |
|
|
|
|
|
|
|
|
|
|
|
|
|
|
|
|
|
|
3 |
|

PRODUCT DIAGRAM
 Control Panel
Louvers
Signal Receptor
 Casters
Filter Compartment
Air Intake Cover/Filter
4
PARTS & ASSEMBLY
PARTS
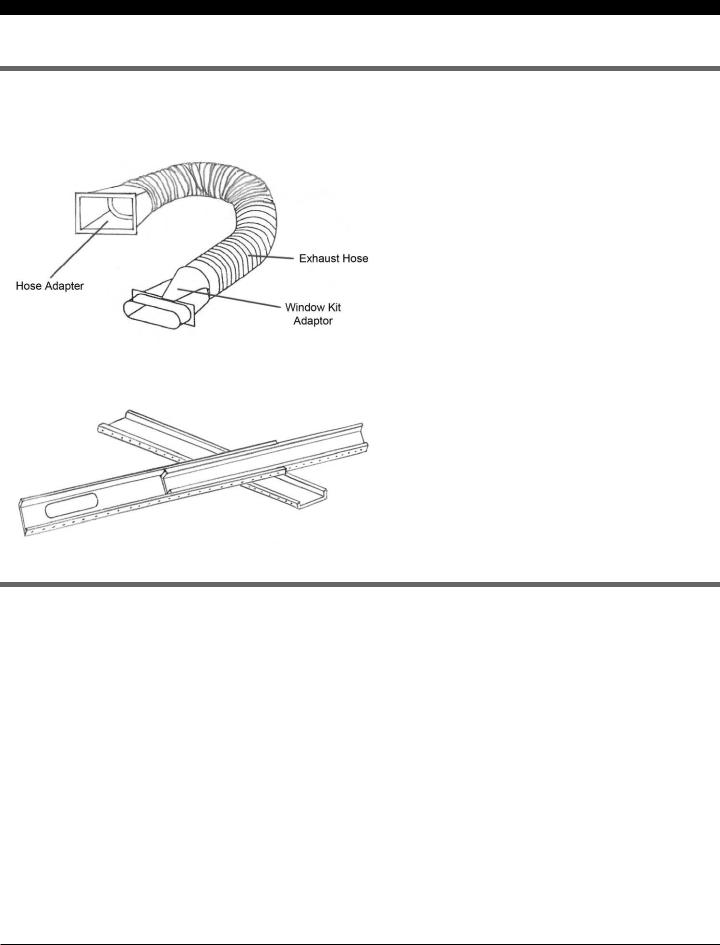
EXHAUST HOSE
WINDOW KIT
ASSEMBLY & INSTALLATION
INSTALLATION
When the unit is operating as an air conditioner, heater, or dehumidifier, the unit draws in fresh outdoor air and exhausts hot air (in AC or dehumidifier mode) or cool air (in Heat mode) out of the room to complete the air exchange. When the unit is operating in fan mode, no outdoor air exchange takes place. The window kit and exhaust hose do not need to be installed when the unit is used as a fan.
NOTE: The supplied window kit can be installed in sliding windows and sliding glass doors up to 8 ft. long (approximate length).
MOUNTING THE EXHAUST HOSES
•Choose a suitable location, near a grounded electrical outlet and suitable window or door. Remove packaging and locate components.
•Extend both ends of the exhaust hoses approximately 6 inches.
•Screw the window kit adapter onto one end of the exhaust hose clockwise. Screw the hose adapter onto the other end of the exhaust hose clockwise. Repeat on the other exhaust hose.
•Remove outlet covers from the back of the unit by screwing them counter-clockwise, then lifting up.
•Mount the exhaust hoses onto the back of the unit by locking the hose adapters into place.
5
 Loading...