


 Loading...
 TigerSwitch 10/100
Stackable Fast Ethernet Switch
24 10BASE-T/100BASE-TX RJ-45 ports
Auto MDI/MDI-X support on all ports
Optional 100BASE-FX or 1000BASE-X modules
Optional stack module for linking up to 16 units
8.8 Gbps of aggregate switch bandwidth
LACP and FEC port trunking support
Port mirroring for non-intrusive analysis
Port security
Full support for IEEE 802.1Q VLANs with GVRP
IP Multicasting with IGMP Snooping
Manageable via console, Web, SNMP/RMON
Management Guide
SMC6624M

TigerSwitch 10/100
Management Guide
From SMC’s Tiger line of feature-rich workgroup LAN solutions
6 Hughes |
July 2001 |
|
Irvine, CA 92618 |
||
Pub. # 150000001100A R01 |
||
Phone: (949) 707-2400 |
||
|
Information furnished by SMC Networks, Inc. (SMC) is believed to be accurate and reliable. However, no responsibility is assumed by SMC for its use, nor for any infringements of patents or other rights of third parties which may result from its use. No license is granted by implication or otherwise under any patent or patent rights of SMC. SMC reserves the right to change specifications at any time without notice.
Copyright © 2001 by SMC Networks, Inc.
6 Hughes
Irvine, CA 92618
All rights reserved. Printed in Taiwan
Trademarks:
SMC is a registered trademark; and EZ Switch, TigerStack and TigerSwitch are trademarks of SMC Networks, Inc. Other product and company names are trademarks or registered trademarks of their respective holders.
LIMITED WARRANTY
Limited Warranty Statement: SMC Networks, Inc. (“SMC”) warrants its products to be free from defects in workmanship and materials, under normal use and service, for the applicable warranty term. All SMC products carry a standard 90-day limited warranty from the date of purchase from SMC or its Authorized Reseller. SMC may, at its own discretion, repair or replace any product not operating as warranted with a similar or functionally equivalent product, during the applicable warranty term. SMC will endeavor to repair or replace any product returned under warranty within 30 days of receipt of the product.
The standard limited warranty can be upgraded to a Limited Lifetime* warranty by registering new products within 30 days of purchase from SMC or its Authorized Reseller. Registration can be accomplished via the enclosed product registration card or online via the SMC web site. Failure to register will not affect the standard limited warranty. The Limited Lifetime warranty covers a product during the Life of that Product, which is defined as the period of time during which the product is an “Active” SMC product. A product is considered to be “Active” while it is listed on the current SMC price list. As new technologies emerge, older technologies become obsolete and SMC will, at its discretion, replace an older product in its product line with one that incorporates these newer technologies. At that point, the obsolete product is discontinued and is no longer an “Active” SMC product. A list of discontinued products with their respective dates of discontinuance can be found at:
http://www.smc.com/smc/pages_html/support.html.
All products that are replaced become the property of SMC. Replacement products may be either new or reconditioned. Any replaced or repaired product carries either a 30-day limited warranty or the remainder of the initial warranty, whichever is longer. SMC is not responsible for any custom software or firmware, configuration information, or memory data of Customer contained in, stored on, or integrated with any products returned to SMC pursuant to any warranty. Products returned to SMC should have any customer-installed accessory or add-on components, such as expansion modules, removed prior to returning the product for replacement. SMC is not responsible for these items if they are returned with the product.
Customers must contact SMC for a Return Material Authorization number prior to returning any product to SMC. Proof of purchase may be required. Any product returned to SMC without a valid Return Material Authorization (RMA) number clearly marked on the outside of the package will be returned to customers at customer’s expense. For warranty claims within North America, please call our toll-free customer support number at (800) 762-4968. Customers are responsible for all shipping charges from their facility to SMC. SMC is responsible for return shipping charges from SMC to customer.
WARRANTIES EXCLUSIVE: IF AN SMC PRODUCT DOES NOT OPERATE AS WARRANTED ABOVE, CUSTOMER’S SOLE REMEDY SHALL BE REPAIR OR REPLACEMENT OF THE PRODUCT IN QUESTION, AT SMC’S OPTION. THE FOREGOING WARRANTIES AND REMEDIES ARE EXCLUSIVE AND ARE IN LIEU OF ALL OTHER WARRANTIES OR CONDITIONS, EXPRESS OR IMPLIED, EITHER IN FACT OR BY OPERATION OF LAW, STATUTORY OR OTHERWISE, INCLUDING WARRANTIES OR CONDITIONS OF MERCHANTABILITY AND FITNESS FOR A PARTICULAR PURPOSE. SMC NEITHER ASSUMES NOR AUTHORIZES ANY OTHER PERSON TO ASSUME FOR IT ANY OTHER LIABILITY IN CONNECTION WITH THE SALE, INSTALLATION, MAINTENANCE OR USE OF ITS PRODUCTS. SMC SHALL NOT BE LIABLE UNDER THIS WARRANTY IF ITS TESTING AND EXAMINATION DISCLOSE THE ALLEGED DEFECT IN THE PRODUCT DOES NOT EXIST OR WAS CAUSED BY CUSTOMER’S OR ANY THIRD PERSON’S MISUSE, NEGLECT, IMPROPER INSTALLATION OR TESTING, UNAUTHORIZED ATTEMPTS TO REPAIR, OR ANY OTHER CAUSE BEYOND THE RANGE OF THE INTENDED USE, OR BY ACCIDENT, FIRE, LIGHTNING, OR OTHER HAZARD.
LIMITATION OF LIABILITY: IN NO EVENT, WHETHER BASED IN CONTRACT OR TORT (INCLUDING NEGLIGENCE), SHALL SMC BE LIABLE FOR INCIDENTAL, CONSEQUENTIAL, INDIRECT, SPECIAL, OR PUNITIVE DAMAGES OF ANY KIND, OR FOR LOSS OF REVENUE, LOSS OF BUSINESS, OR OTHER FINANCIAL LOSS ARISING OUT OF OR IN CONNECTION WITH THE SALE, INSTALLATION,
i
LIMITED WARRANTY
MAINTENANCE, USE, PERFORMANCE, FAILURE, OR INTERRUPTION OF ITS PRODUCTS, EVEN IF SMC OR ITS AUTHORIZED RESELLER HAS BEEN ADVISED OF THE POSSIBILITY OF SUCH DAMAGES.
SOME STATES DO NOT ALLOW THE EXCLUSION OF IMPLIED WARRANTIES OR THE LIMITATION OF INCIDENTAL OR CONSEQUENTIAL DAMAGES FOR CONSUMER PRODUCTS, SO THE ABOVE LIMITATIONS AND EXCLUSIONS MAY NOT APPLY TO YOU. THIS WARRANTY GIVES YOU SPECIFIC LEGAL RIGHTS, WHICH MAY VARY FROM STATE TO STATE. NOTHING IN THIS WARRANTY SHALL BE TAKEN TO AFFECT YOUR STATUTORY RIGHTS.
* SMC will provide warranty service for one year following discontinuance from the active SMC price list. Under the limited lifetime warranty, internal and external power supplies, fans, and cables are covered by a standard one-year warranty from date of purchase.
SMC Networks, Inc.
6 Hughes
Irvine, CA 92618
ii

Contents
Contents
1 Selecting a Management Interface
Understanding Management Interfaces . . . . . . . . . . . . . . . . . . . . . . . . . 1-1
Advantages of Using the Menu Interface . . . . . . . . . . . . . . . . . . . . . . . . 1-2
Advantages of Using the CLI . . . . . . . . . . . . . . . . . . . . . . . . . . . . . . . . . . . 1-3
CLI Usage . . . . . . . . . . . . . . . . . . . . . . . . . . . . . . . . . . . . . . . . . . . . . . 1-3
Advantages of Using the Web Browser Interface . . . . . . . . . . . . . . . . 1-4
2 Using the Menu Interface
Starting and Ending a Menu Session . . . . . . . . . . . . . . . . . . . . . . . . . . . 2-2
How To Start a Menu Interface Session . . . . . . . . . . . . . . . . . . . . . . . . . 2-3
How To End a Menu Session and Exit from the Console: . . . . . . . . . . 2-4
Main Menu Features . . . . . . . . . . . . . . . . . . . . . . . . . . . . . . . . . . . . . . . . . . 2-6
Screen Structure and Navigation . . . . . . . . . . . . . . . . . . . . . . . . . . . . . . . 2-8
Rebooting the Switch . . . . . . . . . . . . . . . . . . . . . . . . . . . . . . . . . . . . . . . . . 2-11
Menu Features List . . . . . . . . . . . . . . . . . . . . . . . . . . . . . . . . . . . . . . . . . . . 2-13
Where To Go From Here . . . . . . . . . . . . . . . . . . . . . . . . . . . . . . . . . . . . . . 2-14
3 Using the Command Line Interface (CLI)
Accessing the CLI . . . . . . . . . . . . . . . . . . . . . . . . . . . . . . . . . . . . . . . . . . . . . 3-1
Using the CLI . . . . . . . . . . . . . . . . . . . . . . . . . . . . . . . . . . . . . . . . . . . . . . . . . 3-1
Privilege Levels at Logon . . . . . . . . . . . . . . . . . . . . . . . . . . . . . . . . . . . . . 3-2
Privilege Level Operation . . . . . . . . . . . . . . . . . . . . . . . . . . . . . . . . . . . . . 3-3
Operator Privileges . . . . . . . . . . . . . . . . . . . . . . . . . . . . . . . . . . . . . . 3-3
Manager Privileges . . . . . . . . . . . . . . . . . . . . . . . . . . . . . . . . . . . . . . . 3-4
How To Move Between Levels . . . . . . . . . . . . . . . . . . . . . . . . . . . . . . . . 3-6
Listing Commands and Command Options . . . . . . . . . . . . . . . . . . . . . . 3-7
Listing Commands Available at Any Privilege Level . . . . . . . . . . . 3-7
Command Option Displays . . . . . . . . . . . . . . . . . . . . . . . . . . . . . . . . 3-9
Displaying CLI “Help” . . . . . . . . . . . . . . . . . . . . . . . . . . . . . . . . . . . . . . . 3-10
Configuration Commands and the Context Configuration Modes . . 3-12
iii

Contents
CLI Control and Editing . . . . . . . . . . . . . . . . . . . . . . . . . . . . . . . . . . . . . . 3-15
4 Using the Web Browser Interface
General Features . . . . . . . . . . . . . . . . . . . . . . . . . . . . . . . . . . . . . . . . . . . . . . 4-2
Web Browser Interface Requirements . . . . . . . . . . . . . . . . . . . . . . . . . . 4-3
Starting a Web Browser Interface Session with the Switch . . . . . . 4-4
Using a Standalone Web Browser in a PC or UNIX Workstation . . . . 4-4
Tasks for Your First Web Browser Interface Session . . . . . . . . . . . . 4-6
Viewing the “First Time Install” Window . . . . . . . . . . . . . . . . . . . . . . . . 4-6
Creating Usernames and Passwords in the Browser Interface . . . . . . 4-7
Using the Passwords . . . . . . . . . . . . . . . . . . . . . . . . . . . . . . . . . . . . . 4-8
Using the User Names . . . . . . . . . . . . . . . . . . . . . . . . . . . . . . . . . . . . 4-9
If You Lose a Password . . . . . . . . . . . . . . . . . . . . . . . . . . . . . . . . . . . 4-9
Support/Mgmt URL Feature . . . . . . . . . . . . . . . . . . . . . . . . . . . . . . . . . . . 4-10
Support URL . . . . . . . . . . . . . . . . . . . . . . . . . . . . . . . . . . . . . . . . . . . . . . 4-10
Status Reporting Features . . . . . . . . . . . . . . . . . . . . . . . . . . . . . . . . . . . . 4-11
The Overview Window . . . . . . . . . . . . . . . . . . . . . . . . . . . . . . . . . . . . . . 4-11
The Port Utilization and Status Displays . . . . . . . . . . . . . . . . . . . . . . . 4-12
Port Utilization . . . . . . . . . . . . . . . . . . . . . . . . . . . . . . . . . . . . . . . . . 4-12
Port Status . . . . . . . . . . . . . . . . . . . . . . . . . . . . . . . . . . . . . . . . . . . . . 4-14
The Alert Log . . . . . . . . . . . . . . . . . . . . . . . . . . . . . . . . . . . . . . . . . . . . . . 4-15
Sorting the Alert Log Entries . . . . . . . . . . . . . . . . . . . . . . . . . . . . . 4-15
Alert Types . . . . . . . . . . . . . . . . . . . . . . . . . . . . . . . . . . . . . . . . . . . . 4-16
Viewing Detail Views of Alert Log Entries . . . . . . . . . . . . . . . . . . 4-17
The Status Bar . . . . . . . . . . . . . . . . . . . . . . . . . . . . . . . . . . . . . . . . . . . . . 4-17
5Configuring IP Addressing, Interface Access, and System Information
IP Configuration . . . . . . . . . . . . . . . . . . . . . . . . . . . . . . . . . . . . . . . . . . . . . . 5-2 Just Want a Quick Start? . . . . . . . . . . . . . . . . . . . . . . . . . . . . . . . . . . . . . 5-3 IP Addressing with Multiple VLANs . . . . . . . . . . . . . . . . . . . . . . . . . . . . 5-3 IP Addressing in a Stacking Environment . . . . . . . . . . . . . . . . . . . . . . . 5-4
Menu: Configuring IP Address, Gateway, Time-To-Live (TTL),
and Timep . . . . . . . . . . . . . . . . . . . . . . . . . . . . . . . . . . . . . . . . . . . . . . . . . . 5-4
CLI: Configuring IP Address, Gateway, Time-To-Live (TTL),
and Timep . . . . . . . . . . . . . . . . . . . . . . . . . . . . . . . . . . . . . . . . . . . . . . . . . . 5-6
iv

Contents
Web: Configuring IP Addressing . . . . . . . . . . . . . . . . . . . . . . . . . . . . . . . 5-9
How IP Addressing Affects Switch Operation . . . . . . . . . . . . . . . . . . . . 5-9 DHCP/Bootp Operation . . . . . . . . . . . . . . . . . . . . . . . . . . . . . . . . . . 5-10 Network Preparations for Configuring DHCP/Bootp . . . . . . . . . 5-13
Globally Assigned IP Network Addresses . . . . . . . . . . . . . . . . . . . . . . 5-14
Interface Access: Console/Serial Link, Web, and Inbound Telnet 5-15 Menu: Modifying the Interface Access . . . . . . . . . . . . . . . . . . . . . . . . . 5-16 CLI: Modifying the Interface Access . . . . . . . . . . . . . . . . . . . . . . . . . . . 5-17
System Information . . . . . . . . . . . . . . . . . . . . . . . . . . . . . . . . . . . . . . . . . . 5-20 Menu: Viewing and Configuring System Information . . . . . . . . . . . . . 5-21 CLI: Viewing and Configuring System Information . . . . . . . . . . . . . . 5-22 Web: Configuring System Parameters . . . . . . . . . . . . . . . . . . . . . . . . . 5-24
6Optimizing Port Usage Through Traffic Control and Port Trunking
Overview . . . . . . . . . . . . . . . . . . . . . . . . . . . . . . . . . . . . . . . . . . . . . . . . . . . . . 6-1
Viewing Port Status and Configuring Port Parameters . . . . . . . . . . . 6-1
Menu: Viewing Port Status and Configuring Port Parameters . . . . . . 6-4
CLI: Viewing Port Status and Configuring Port Parameters . . . . . . . . 6-5
Web: Viewing Port Status and Configuring Port Parameters . . . . . . . 6-8
Port Trunking . . . . . . . . . . . . . . . . . . . . . . . . . . . . . . . . . . . . . . . . . . . . . . . . . 6-9
SMC6624M Port Trunk Features and Operation . . . . . . . . . . . . . . . . . 6-10
Trunk Configuration Methods . . . . . . . . . . . . . . . . . . . . . . . . . . . . . . . . 6-11
Menu: Viewing and Configuring a Static Trunk Group . . . . . . . . . . . . 6-15 Check the Event Log (page 11-10) to verify that the trunked
ports are operating properly. . . . . . . . . . . . . . . . . . . . . . . . . . . . . . 6-17
CLI: Viewing and Configuring a Static or Dynamic Port Trunk
Group . . . . . . . . . . . . . . . . . . . . . . . . . . . . . . . . . . . . . . . . . . . . . . . . . . . . 6-17 Using the CLI To View Port Trunks . . . . . . . . . . . . . . . . . . . . . . . . 6-17 Using the CLI To Configure a Static or Dynamic Trunk Group . 6-19
Web: Viewing Existing Port Trunk Groups . . . . . . . . . . . . . . . . . . . . . 6-22
Trunk Group Operation Using LACP . . . . . . . . . . . . . . . . . . . . . . . . . . 6-23
Default Port Operation . . . . . . . . . . . . . . . . . . . . . . . . . . . . . . . . . . 6-24
LACP Notes and Restrictions . . . . . . . . . . . . . . . . . . . . . . . . . . . . . 6-25
Trunk Group Operation Using the “Trunk” Option . . . . . . . . . . . . . . . 6-26
Trunk Operation Using the “FEC” Option . . . . . . . . . . . . . . . . . . . . . . 6-26
v

Contents
How the Switch Lists Trunk Data . . . . . . . . . . . . . . . . . . . . . . . . . . . . . 6-27
Outbound Traffic Distribution Across Trunked Links . . . . . . . . . . . . 6-27
7Using Passwords, Port Security, and Authorized IP Managers To Protect Against Unauthorized Access
Using Password Security . . . . . . . . . . . . . . . . . . . . . . . . . . . . . . . . . . . . . . . 7-2
Menu: Setting Manager and Operator passwords . . . . . . . . . . . . . . . . . 7-3
CLI: Setting Manager and Operator Passwords . . . . . . . . . . . . . . . . . . . 7-5
Web: Configuring User Names and Passwords . . . . . . . . . . . . . . . . . . . 7-6
Configuring and Monitoring Port Security . . . . . . . . . . . . . . . . . . . . . . 7-7
Basic Operation . . . . . . . . . . . . . . . . . . . . . . . . . . . . . . . . . . . . . . . . . . . . . 7-7
Blocking Unauthorized Traffic . . . . . . . . . . . . . . . . . . . . . . . . . . . . . 7-8
Trunk Group Exclusion . . . . . . . . . . . . . . . . . . . . . . . . . . . . . . . . . . . 7-9
Planning Port Security . . . . . . . . . . . . . . . . . . . . . . . . . . . . . . . . . . . . . . . 7-9
CLI: Port Security Command Options and Operation . . . . . . . . . . . . 7-11
CLI: Displaying Current Port Security Settings . . . . . . . . . . . . . . 7-14
CLI: Configuring Port Security . . . . . . . . . . . . . . . . . . . . . . . . . . . . 7-15
Web: Displaying and Configuring Port Security Features . . . . . . . . . 7-20
Reading Intrusion Alerts and Resetting Alert Flags . . . . . . . . . . . . . . 7-20
Notice of Security Violations . . . . . . . . . . . . . . . . . . . . . . . . . . . . . 7-20
How the Intrusion Log Operates . . . . . . . . . . . . . . . . . . . . . . . . . . 7-21
Keeping the Intrusion Log Current by Resetting Alert Flags . . . 7-21
Menu: Checking for Intrusions, Listing Intrusion Alerts, and
Resetting Alert Flags . . . . . . . . . . . . . . . . . . . . . . . . . . . . . . . . . . . . 7-22
CLI: Checking for Intrusions, Listing Intrusion Alerts, and
Resetting Alert Flags . . . . . . . . . . . . . . . . . . . . . . . . . . . . . . . . . . . . 7-23
Using the Event Log To Find Intrusion Alerts . . . . . . . . . . . . . . . 7-25
Web: Checking for Intrusions, Listing Intrusion Alerts, and
Resetting Alert Flags . . . . . . . . . . . . . . . . . . . . . . . . . . . . . . . . . . . . 7-26
Operating Notes for Port Security . . . . . . . . . . . . . . . . . . . . . . . . . . . . . 7-26
Using IP Authorized Managers . . . . . . . . . . . . . . . . . . . . . . . . . . . . . . . 7-28
Access Levels . . . . . . . . . . . . . . . . . . . . . . . . . . . . . . . . . . . . . . . . . . . . . . 7-29
Defining Authorized Management Stations . . . . . . . . . . . . . . . . . . . . . 7-29
Overview of IP Mask Operation . . . . . . . . . . . . . . . . . . . . . . . . . . . 7-30
Menu: Viewing and Configuring IP Authorized Managers . . . . . . . . . 7-31
CLI: Viewing and Configuring Authorized IP Managers . . . . . . . . . . . 7-32
Listing the Switch’s Current Authorized IP Manager(s) . . . . . . . 7-32
Configuring IP Authorized Managers for the Switch . . . . . . . . . . 7-33
vi
Contents
Web: Configuring IP Authorized Managers . . . . . . . . . . . . . . . . . . . . . 7-34
Building IP Masks . . . . . . . . . . . . . . . . . . . . . . . . . . . . . . . . . . . . . . . . . . 7-34 Configuring One Station Per Authorized Manager IP Entry . . . . 7-34 Configuring Multiple Stations Per Authorized Manager IP
Entry . . . . . . . . . . . . . . . . . . . . . . . . . . . . . . . . . . . . . . . . . . . . . . . . . 7-35 Additional Examples for Authorizing Multiple Stations . . . . . . . 7-37
Operating and Troubleshooting Notes . . . . . . . . . . . . . . . . . . . . . . . . . 7-37
8 Configuring for Network Management Applications
SNMP Management Features . . . . . . . . . . . . . . . . . . . . . . . . . . . . . . . . . . 8-2
Configuring for SNMP Access to the Switch . . . . . . . . . . . . . . . . . . . . 8-3
SNMP Communities . . . . . . . . . . . . . . . . . . . . . . . . . . . . . . . . . . . . . . . . . . . 8-5
Menu: Viewing and Configuring SNMP Communities . . . . . . . . . . . . . 8-5 To View, Edit, or Add SNMP Communities: . . . . . . . . . . . . . . . . . . 8-5
CLI: Viewing and Configuring Community Names . . . . . . . . . . . . . . . . 8-7
Listing Current Community Names and Values . . . . . . . . . . . . . . . 8-7
Configuring Identity Information . . . . . . . . . . . . . . . . . . . . . . . . . . . 8-8
Configuring Community Names and Values . . . . . . . . . . . . . . . . . . 8-8
Trap Receivers and Authentication Traps . . . . . . . . . . . . . . . . . . . . . . 8-9
CLI: Configuring and Displaying Trap Receivers . . . . . . . . . . . . . . . . 8-10 Using the CLI To List Current SNMP Trap Receivers . . . . . . . . . 8-10 Configuring Trap Receivers . . . . . . . . . . . . . . . . . . . . . . . . . . . . . . 8-11
Using the CLI To Enable Authentication Traps . . . . . . . . . . . . . . . . . . 8-11
Advanced Management: RMON Support . . . . . . . . . . . . . . . . . . . . . . . 8-12
RMON . . . . . . . . . . . . . . . . . . . . . . . . . . . . . . . . . . . . . . . . . . . . . . . . . . . . 8-12
9 Configuring Advanced Features
Stack Management . . . . . . . . . . . . . . . . . . . . . . . . . . . . . . . . . . . . . . . . . . . . 9-2
Components of Stack Management . . . . . . . . . . . . . . . . . . . . . . . . . . . . 9-4
General Stacking Operation . . . . . . . . . . . . . . . . . . . . . . . . . . . . . . . . . . . 9-4
Operating Rules for Stacking . . . . . . . . . . . . . . . . . . . . . . . . . . . . . . . . . . 9-5 General Rules . . . . . . . . . . . . . . . . . . . . . . . . . . . . . . . . . . . . . . . . . . . 9-5 Specific Rules . . . . . . . . . . . . . . . . . . . . . . . . . . . . . . . . . . . . . . . . . . . 9-6
Overview of Configuring and Bringing Up a Stack . . . . . . . . . . . . . . . . 9-8 General Steps for Creating a Stack . . . . . . . . . . . . . . . . . . . . . . . . 9-10
vii

Contents
Using the Menu Interface To View Stack Status And Configure
Stacking . . . . . . . . . . . . . . . . . . . . . . . . . . . . . . . . . . . . . . . . . . . . . . . . . . 9-12
Using the Menu Interface To View and Configure a Commander
Switch . . . . . . . . . . . . . . . . . . . . . . . . . . . . . . . . . . . . . . . . . . . . . . . . 9-12
Using the Menu To Manage a Candidate Switch . . . . . . . . . . . . . 9-14
Using the Commander To Manage The Stack . . . . . . . . . . . . . . . . . . . 9-16
Using the Commander To Access Member Switches for
Configuration Changes and Monitoring Traffic . . . . . . . . . . . . . . 9-23
Converting a Commander or Member to a Member of Another
Stack . . . . . . . . . . . . . . . . . . . . . . . . . . . . . . . . . . . . . . . . . . . . . . . . . 9-24
Monitoring Stack Status . . . . . . . . . . . . . . . . . . . . . . . . . . . . . . . . . . . . . 9-25
Using the CLI To View Stack Status and Configure Stacking . . . . . . 9-29
Using the CLI To View Stack Status . . . . . . . . . . . . . . . . . . . . . . . 9-31
Using the CLI To Configure a Commander Switch . . . . . . . . . . . 9-33
Adding to a Stack or Moving Switches Between Stacks . . . . . . . 9-35
Using the CLI To Remove a Member from a Stack . . . . . . . . . . . 9-40
Using the CLI To Access Member Switches for Configuration
Changes and Traffic Monitoring . . . . . . . . . . . . . . . . . . . . . . . . . . . 9-42
SNMP Community Operation in a Stack . . . . . . . . . . . . . . . . . . . . . . . 9-44
Using the CLI To Disable or Re-Enable Stacking . . . . . . . . . . . . . . . . 9-45
Transmission Interval . . . . . . . . . . . . . . . . . . . . . . . . . . . . . . . . . . . . . . . 9-45
Stacking Operation with Multiple VLANs Configured . . . . . . . . . . . . 9-45
Web: Viewing and Configuring Stacking . . . . . . . . . . . . . . . . . . . . . . . 9-46
Status Messages . . . . . . . . . . . . . . . . . . . . . . . . . . . . . . . . . . . . . . . . . . . . 9-47
Port-Based Virtual LANs (Static VLANs) . . . . . . . . . . . . . . . . . . . . . . |
9-48 |
Overview of Using VLANs . . . . . . . . . . . . . . . . . . . . . . . . . . . . . . . . . . . |
9-51 |
VLAN Support and the Default VLAN . . . . . . . . . . . . . . . . . . . . . . |
9-51 |
Which VLAN Is Primary? . . . . . . . . . . . . . . . . . . . . . . . . . . . . . . . . |
9-51 |
Per-Port Static VLAN Configuration Options . . . . . . . . . . . . . . . . |
9-52 |
General Steps for Using VLANs . . . . . . . . . . . . . . . . . . . . . . . . . . . |
9-54 |
Notes on Using VLANs . . . . . . . . . . . . . . . . . . . . . . . . . . . . . . . . . . |
9-54 |
Menu: Configuring VLAN Parameters . . . . . . . . . . . . . . . . . . . . . . . . . . 9-55
To Change VLAN Support Settings . . . . . . . . . . . . . . . . . . . . . . . . 9-55
Adding or Editing VLAN Names . . . . . . . . . . . . . . . . . . . . . . . . . . . 9-57
Adding or Changing a VLAN Port Assignment . . . . . . . . . . . . . . . 9-58
CLI: Configuring VLAN Parameters . . . . . . . . . . . . . . . . . . . . . . . . . . . 9-60
Web: Viewing and Configuring VLAN Parameters . . . . . . . . . . . . . . . 9-66
VLAN Tagging Information . . . . . . . . . . . . . . . . . . . . . . . . . . . . . . . . . . 9-67
viii

Contents
Effect of VLANs on Other Switch Features . . . . . . . . . . . . . . . . . . . . . 9-71 Spanning Tree Protocol Operation with VLANs . . . . . . . . . . . . . 9-71 IP Interfaces . . . . . . . . . . . . . . . . . . . . . . . . . . . . . . . . . . . . . . . . . . . 9-71 VLAN MAC Addresses . . . . . . . . . . . . . . . . . . . . . . . . . . . . . . . . . . . 9-72 Port Trunks . . . . . . . . . . . . . . . . . . . . . . . . . . . . . . . . . . . . . . . . . . . . 9-72 Port Monitoring . . . . . . . . . . . . . . . . . . . . . . . . . . . . . . . . . . . . . . . . 9-72
VLAN Restrictions . . . . . . . . . . . . . . . . . . . . . . . . . . . . . . . . . . . . . . . . . . 9-73
Symptoms of Duplicate MAC Addresses in VLAN
Environments . . . . . . . . . . . . . . . . . . . . . . . . . . . . . . . . . . . . . . . . . . 9-73
GVRP . . . . . . . . . . . . . . . . . . . . . . . . . . . . . . . . . . . . . . . . . . . . . . . . . . . . . . . . 9-74
General Operation . . . . . . . . . . . . . . . . . . . . . . . . . . . . . . . . . . . . . . . . . . 9-75
Per-Port Options for Handling GVRP “Unknown VLANs” . . . . . . . . . 9-77
Per-Port Options for Dynamic VLAN Advertising and Joining . . . . . 9-79
GVRP and VLAN Access Control . . . . . . . . . . . . . . . . . . . . . . . . . . . . . . 9-80 Port-Leave From a Dynamic VLAN . . . . . . . . . . . . . . . . . . . . . . . . 9-80
Planning for GVRP Operation . . . . . . . . . . . . . . . . . . . . . . . . . . . . . . . . 9-81
Configuring GVRP On a Switch . . . . . . . . . . . . . . . . . . . . . . . . . . . . . . . 9-81 Menu: Viewing and Configuring GVRP . . . . . . . . . . . . . . . . . . . . . 9-81 CLI: Viewing and Configuring GVRP . . . . . . . . . . . . . . . . . . . . . . . 9-83 Web: Viewing and Configuring GVRP . . . . . . . . . . . . . . . . . . . . . . 9-86
GVRP Operating Notes . . . . . . . . . . . . . . . . . . . . . . . . . . . . . . . . . . . . . . 9-86
Multimedia Traffic Control with IP Multicast (IGMP) . . . . . . . . . . 9-88
IGMP Operating Features . . . . . . . . . . . . . . . . . . . . . . . . . . . . . . . . . . . . 9-89
CLI: Configuring and Displaying IGMP . . . . . . . . . . . . . . . . . . . . . . . . |
9-90 |
Web: Enabling or Disabling IGMP . . . . . . . . . . . . . . . . . . . . . . . . . . . . . 9-94
How IGMP Operates . . . . . . . . . . . . . . . . . . . . . . . . . . . . . . . . . . . . . . . . 9-94
Role of the Switch . . . . . . . . . . . . . . . . . . . . . . . . . . . . . . . . . . . . . . 9-95
Number of IP Multicast Addresses Allowed . . . . . . . . . . . . . . . . . 9-98
Spanning Tree Protocol (STP) . . . . . . . . . . . . . . . . . . . . . . . . . . . . . . . . 9-99
Menu: Configuring STP . . . . . . . . . . . . . . . . . . . . . . . . . . . . . . . . . . . . . 9-100
CLI: Configuring STP . . . . . . . . . . . . . . . . . . . . . . . . . . . . . . . . . . . . . . 9-102
Web: Enabling or Disabling STP . . . . . . . . . . . . . . . . . . . . . . . . . . . . . 9-105
How STP Operates . . . . . . . . . . . . . . . . . . . . . . . . . . . . . . . . . . . . . . . . 9-105 STP Fast Mode . . . . . . . . . . . . . . . . . . . . . . . . . . . . . . . . . . . . . . . . 9-106 STP Operation with 802.1Q VLANs . . . . . . . . . . . . . . . . . . . . . . . 9-107
10 Monitoring and Analyzing Switch Operation
Status and Counters Data . . . . . . . . . . . . . . . . . . . . . . . . . . . . . . . . . . . . 10-2
ix

Contents
Menu Access To Status and Counters . . . . . . . . . . . . . . . . . . . . . . . . . 10-3
General System Information . . . . . . . . . . . . . . . . . . . . . . . . . . . . . . . . . 10-4
Menu Access . . . . . . . . . . . . . . . . . . . . . . . . . . . . . . . . . . . . . . . . . . . 10-4
CLI Access . . . . . . . . . . . . . . . . . . . . . . . . . . . . . . . . . . . . . . . . . . . . . 10-4
Switch Management Address Information . . . . . . . . . . . . . . . . . . . . . . 10-5
Menu Access . . . . . . . . . . . . . . . . . . . . . . . . . . . . . . . . . . . . . . . . . . . 10-5
CLI Access . . . . . . . . . . . . . . . . . . . . . . . . . . . . . . . . . . . . . . . . . . . . . 10-5
Port Status . . . . . . . . . . . . . . . . . . . . . . . . . . . . . . . . . . . . . . . . . . . . . . . . 10-6
Menu: Displaying Port Status . . . . . . . . . . . . . . . . . . . . . . . . . . . . . 10-6
CLI Access . . . . . . . . . . . . . . . . . . . . . . . . . . . . . . . . . . . . . . . . . . . . . 10-6
Web Access . . . . . . . . . . . . . . . . . . . . . . . . . . . . . . . . . . . . . . . . . . . . 10-6
Viewing Port and Trunk Group Statistics . . . . . . . . . . . . . . . . . . . . . . |
10-7 |
Menu Access to Port and Trunk Statistics . . . . . . . . . . . . . . . . . . |
10-8 |
CLI Access To Port and Trunk Group Statistics . . . . . . . . . . . . . |
10-9 |
Web Browser Access To View Port and Trunk Group Statistics 10-9
Viewing the Switch’s MAC Address Tables . . . . . . . . . . . . . . . . . . . . 10-10
Menu Access to the MAC Address Views and Searches . . . . . . 10-11
CLI Access for MAC Address Views and Searches . . . . . . . . . . 10-13
Spanning Tree Protocol (STP) Information . . . . . . . . . . . . . . . . . . . . 10-14
Menu Access to STP Data . . . . . . . . . . . . . . . . . . . . . . . . . . . . . . . 10-14
CLI Access to STP Data . . . . . . . . . . . . . . . . . . . . . . . . . . . . . . . . . 10-15
Internet Group Management Protocol (IGMP) Status . . . . . . . . . . . 10-16
VLAN Information . . . . . . . . . . . . . . . . . . . . . . . . . . . . . . . . . . . . . . . . . 10-17
Web Browser Interface Status Information . . . . . . . . . . . . . . . . . . . . 10-19
Port Monitoring Features . . . . . . . . . . . . . . . . . . . . . . . . . . . . . . . . . . . 10-20
Menu: Configuring Port Monitoring . . . . . . . . . . . . . . . . . . . . . . . . . . 10-21
CLI: Configuring Port Monitoring . . . . . . . . . . . . . . . . . . . . . . . . . . . . 10-23
Web: Configuring Port Monitoring . . . . . . . . . . . . . . . . . . . . . . . . . . . 10-25
11 Troubleshooting
Troubleshooting Approaches . . . . . . . . . . . . . . . . . . . . . . . . . . . . . . . . . . 11-2
Browser or Console Access Problems . . . . . . . . . . . . . . . . . . . . . . . . . . 11-3
Unusual Network Activity . . . . . . . . . . . . . . . . . . . . . . . . . . . . . . . . . . . . 11-5 General Problems . . . . . . . . . . . . . . . . . . . . . . . . . . . . . . . . . . . . . . . 11-5 IGMP-Related Problems . . . . . . . . . . . . . . . . . . . . . . . . . . . . . . . . . 11-6 Problems Related to Spanning-Tree Protocol (STP) . . . . . . . . . . 11-7 Stacking-Related Problems . . . . . . . . . . . . . . . . . . . . . . . . . . . . . . . 11-7 Timep or Gateway Problems . . . . . . . . . . . . . . . . . . . . . . . . . . . . . 11-7 VLAN-Related Problems . . . . . . . . . . . . . . . . . . . . . . . . . . . . . . . . . 11-8
x

Contents
Using the Event Log To Identify Problem Sources . . . . . . . . . . . . . 11-10
Menu: Entering and Navigating in the Event Log . . . . . . . . . . . . . . . 11-11
CLI: . . . . . . . . . . . . . . . . . . . . . . . . . . . . . . . . . . . . . . . . . . . . . . . . . . . . . 11-12
Diagnostic Tools . . . . . . . . . . . . . . . . . . . . . . . . . . . . . . . . . . . . . . . . . . . . 11-13
Ping and Link Tests . . . . . . . . . . . . . . . . . . . . . . . . . . . . . . . . . . . . . . . . 11-13 Web: Executing Ping or Link Tests . . . . . . . . . . . . . . . . . . . . . . . 11-14 CLI: Ping or Link Tests . . . . . . . . . . . . . . . . . . . . . . . . . . . . . . . . . 11-15
Displaying the Configuration File . . . . . . . . . . . . . . . . . . . . . . . . . . . . 11-17
CLI: Viewing the Configuration File . . . . . . . . . . . . . . . . . . . . . . 11-17
Web: Viewing the Configuration File . . . . . . . . . . . . . . . . . . . . . . 11-17
CLI Administrative and Troubleshooting Commands . . . . . . . . . . . 11-18
Restoring the Factory-Default Configuration . . . . . . . . . . . . . . . . . 11-19 CLI: Resetting to the Factory-Default Configuration . . . . . . . . 11-19 Clear/Reset: Resetting to the Factory-Default Configuration . 11-19
ATransferring an Operating System or Startup Configuration File
Downloading an Operating System (OS) . . . . . . . . . . . . . . . . . . . . . . . A-1
Using TFTP To Download the OS File from a Server . . . . . . . . . . . . . A-2 Menu: TFTP Download from a Server . . . . . . . . . . . . . . . . . . . . . . A-3 CLI: TFTP Download from a Server . . . . . . . . . . . . . . . . . . . . . . . A-4
Switch-to-Switch Download . . . . . . . . . . . . . . . . . . . . . . . . . . . . . . . . . A-4
Menu: Switch-to-Switch Download . . . . . . . . . . . . . . . . . . . . . . . . A-4
CLI: Switch-To-Switch Download . . . . . . . . . . . . . . . . . . . . . . . . . A-5
Using Xmodem to Download the OS File From a PC . . . . . . . . . . . . . A-6 Menu: Xmodem Download . . . . . . . . . . . . . . . . . . . . . . . . . . . . . . . A-6 CLI: Xmodem Download from a PC or Unix Workstation . . . . . A-6
Troubleshooting TFTP Downloads . . . . . . . . . . . . . . . . . . . . . . . . . . . . A-8
Transferring Switch Configurations . . . . . . . . . . . . . . . . . . . . . . . . . . . A-9
B MAC Address Management
Determining MAC Addresses . . . . . . . . . . . . . . . . . . . . . . . . . . . . . . . . . . B-1
Menu: Viewing the Switch’s MAC Addresses . . . . . . . . . . . . . . . . . . . . B-2
CLI: Viewing the Port and VLAN MAC Addresses . . . . . . . . . . . . . . . . B-3
xi

Contents
C Switch Memory and Configuration
Overview of Configuration File Management . . . . . . . . . . . . . . . . . . C-1
Using the CLI To Implement Configuration Changes . . . . . . . . . . . C-3
Using the Menu and Web Browser Interfaces To Implement Configuration Changes . . . . . . . . . . . . . . . . . . . . . . . . . . . . . . . . . . . . . . . C-6
Using the Menu Interface To Implement Configuration Changes . . C-6
Using Save and Cancel in the Menu Interface . . . . . . . . . . . . . . . C-7
Rebooting from the Menu Interface . . . . . . . . . . . . . . . . . . . . . . . C-8
Using the Web Browser Interface To Implement Configuration
Changes . . . . . . . . . . . . . . . . . . . . . . . . . . . . . . . . . . . . . . . . . . . . . . . . . . C-9
D Daylight Savings Time
xii

1
Selecting a Management Interface
This chapter describes the following:
■Management interfaces for the SMC6624M switch
■Advantages of using each interface
Understanding Management Interfaces
Management interfaces enable you to reconfigure the switch and to monitor switch status and performance. The SMC6624M switch offers the following interfaces:
■Menu interface—a menu-driven interface offering a subset of switch commands through the built-in VT-100/ANSI console—page 1-2
■CLI—a command line interface offering the full set of switch commands through the VT-100/ANSI console built into the switch—page 1-3
■Web browser interface --a switch interface offering status information and a subset of switch commands through a standard web browser (such as Netscape Navigator or Microsoft Internet Explorer)—page 1-4
This manual describes how to use the menu interface (chapter 2), the CLI (chapter 3), the web browser interface (chapter 4), and how to use these interfaces to configure and monitor the switch.
Interface |
Management a Selecting |
|
|
1-1
Selecting a Management |
Interface |
|
|
Selecting a Management Interface
Advantages of Using the Menu Interface
Advantages of Using the Menu Interface
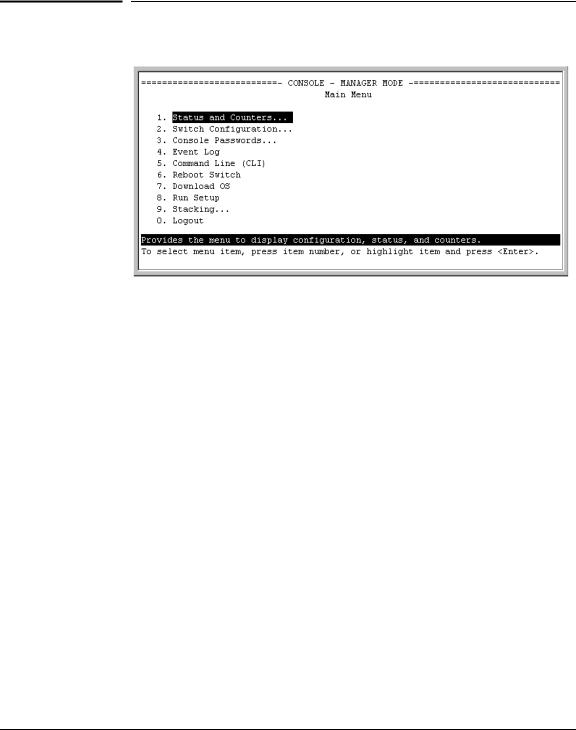
Figure 1-1. Example of the Console Interface Display
■Provides quick, easy management access to a menu-driven subset of switch configuration and performance features:
• |
IP addressing |
• |
Spanning Tree |
• |
VLANs |
• |
System information |
• |
Security |
• Passwords and other security features |
|
• |
Port and Static Trunk Group |
• |
SNMP communities |
• |
Stack Management |
|
|
The menu interface also provides access for:
• |
Setup screen |
• Switch and port statistic and counter |
|
• |
Event Log display |
|
displays |
• |
Switch and port |
• |
Reboots |
|
status displays |
• |
Software downloads |
■Offers out-of-band access (through the RS-232 connection) to the switch, so network bottlenecks, crashes, lack of configured or correct IP address, and network downtime do not slow or prevent access.
■Enables Telnet (in-band) access to the menu functionality.
■Allows faster navigation, avoiding delays that occur with slower display of graphical objects over a web browser interface.
■Provides more security; configuration information and passwords are not seen on the network.
1-2

Selecting a Management Interface
Advantages of Using the CLI
Advantages of Using the CLI
SMC6624M> |
Operator Level |
SMC6624M# |
Manager Level |
SMC6624M(config)# |
Global Configuration Level |
SMC6624M(<context>)# Context Configuration Levels (port, VLAN)
Figure 1-2. Example of The Command Prompt
■Provides access to the complete set of the switch configuration, performance, and diagnostic features.
■Offers out-of-band access (through the RS-232 connection) or Telnet (inband) access.
■Enables quick, detailed system configuration and management access to system operators and administrators experienced in command prompt interfaces.
■Provides help at each level for determining available options and variables.
CLI Usage
■For information on how to use the CLI, refer to chapter 3. “Using the Command Line Interface (CLI).”
■To perform specific procedures (such as configuring IP addressing or VLANs), use the Contents listing at the front of the manual to locate the information you need.
■To monitor and analyze switch operation, see chapter 10, “Monitoring and Analyzing Switch Operation.”
■For information on individual CLI commands, refer to the Index.
Interface |
Management a Selecting |
|
|
1-3

Selecting a Management |
Interface |
|
|
Selecting a Management Interface
Advantages of Using the Web Browser Interface
Advantages of Using the Web Browser
Interface
Figure 1-3. Example of the Web Browser Interface
■Easy access to the switch from anywhere on the network
■Familiar browser interface--locations of window objects consistent with commonly used browsers, uses mouse clicking for navigation, no terminal setup
■Many features have all their fields in one screen so you can view all values at once
■More visual cues, using colors, status bars, device icons, and other graphical objects instead of relying solely on alphanumeric values
■Display of acceptable ranges of values available in configuration list boxes
For specific requirements, see “Web Browser Interface Requirements” on page 4-3.
1-4
2
Using the Menu Interface
This chapter describes the following features:
■Overview of the Menu Interface (page 4-1)
■Starting and ending a Menu session (page 2-2)
■The Main Menu (page 2-6)
■Screen structure and navigation (page 2-8)
■Rebooting the switch (page 2-11)
The menu interface operates through the switch console to provide you with a subset of switch commands in an easy-to-use menu format enabling you to:
■Perform a “quick configuration” of basic parameters, such as the IP addressing needed to provide management access through your network
■Configure these features:
•Manager and Operator passwords
•System parameters
•IP addressing
•Ports
•One trunk group
•A network monitoring port
•Stack Management
•Spanning Tree operation
•SNMP community names
•IP authorized managers
•VLANs (Virtual LANs)
■View status, counters, and Event Log information
■Download new software system
■Reboot the switch
For a detailed list of menu features, see the “Menu Features List” on page 2-13.
Privilege Levels and Password Security. SMC strongly recommends that you configure a Manager password to help prevent unauthorized access to your network. A Manager password grants full read-write access to the switch. An Operator password, if configured, grants access to status and counter, Event Log, and the Operator level in the CLI. After you configure passwords on the switch and log off of the interface, access to the menu interface (and the CLI and web browser interface) will require entry of either the Manager or Operator password. (If the switch has only a Manager password, then someone without a password can still gain read-only access.)
Interface Menu the Using
2-1

Using the Menu Interface
Using the Menu Interface
Starting and Ending a Menu Session
Menu Interaction with Other Interfaces.
■A configuration change made through any switch interface overwrites earlier changes made through any other interface.
■The Menu Interface and the CLI (Command Line Interface) both use the switch console. To enter the menu from the CLI, use the menu command. To enter the CLI from the Menu interface, select Command Line (CLI) option.)
Starting and Ending a Menu Session
You can access the menu interface using any of the following:
■A direct serial connection to the switch’s console port, as described in the installation guide you received with the switch
■A Telnet connection to the switch console from a networked PC or the switch’s web browser interface. Telnet requires that an IP address and subnet mask compatible with your network have already been configured on the switch.
■The stack Commander, if the switch is a stack member
N o t e |
This section assumes that either a terminal device is already configured and |
|
connected to the switch (see the Installation Guide shipped with your switch) |
|
or that you have already configured an IP address on the switch (required for |
|
Telnet access). |
|
|
2-2

Using the Menu Interface
Starting and Ending a Menu Session
How To Start a Menu Interface Session
In its factory default configuration, the switch console starts with the CLI prompt. To use the menu interface with Manager privileges, go to the Manager level prompt and enter the menu command.
1.Use one of these methods to connect to the switch:
•A PC terminal emulator or terminal
•Telnet
(You can also use the stack Commander if the switch is a stack member. See “Stack Management” on page 9-2).
2.Do one of the following:
•If you are using Telnet, go to step 3.
•If you are using a PC terminal emulator or a terminal, press [Enter] one or more times until a prompt appears.
3.When the switch screen appears, do one of the following:
•If a password has been configured, the password prompt appears.
Password: _
Type the Manager password and press [Enter]. Entering the Manager password gives you manager-level access to the switch. (Entering the Operator password gives you operator-level access to the switch. See “Using Password Security” on page 7-2.)
•If no password has been configured, the CLI prompt appears. Go to the next step.
4.When the CLI prompt appears, display the Menu interface by entering the menu command. For example:
SMC TigerSwitch 10/100# menu [Enter]
results in:
Interface Menu the Using
2-3
Using the Menu Interface
Using the Menu Interface
Starting and Ending a Menu Session
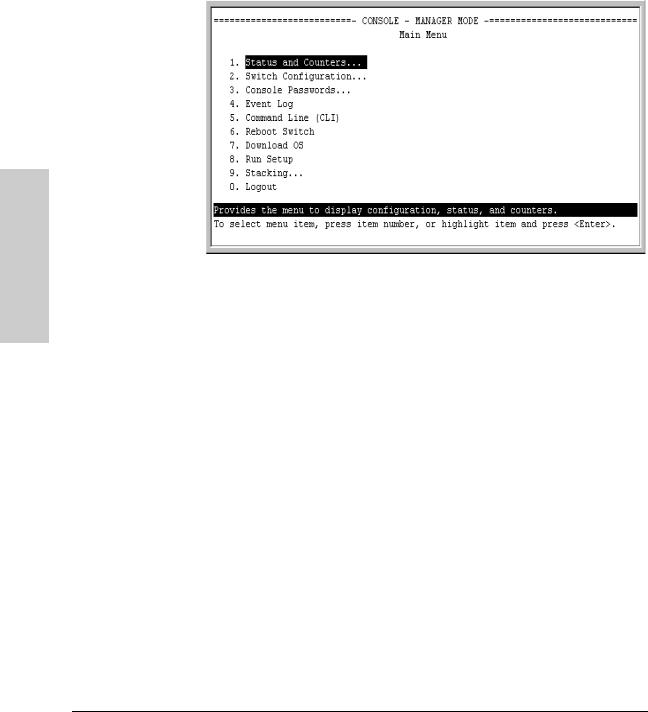
|
Figure 2-1. The Main Menu with Manager Privileges |
|
For a description of Main Menu features, see “Main Menu Features” on page |
|
2-6. |
|
|
N o t e |
To configure the switch to start with the menu interface instead of the CLI, go |
|
to the Manager level prompt, enter the setup command, and in the resulting |
|
desplay, change the Logon Default parameter to Menu. For more information, see |
|
the Installation Guide you received with the switch. |
|
|
How To End a Menu Session and Exit from the Console:
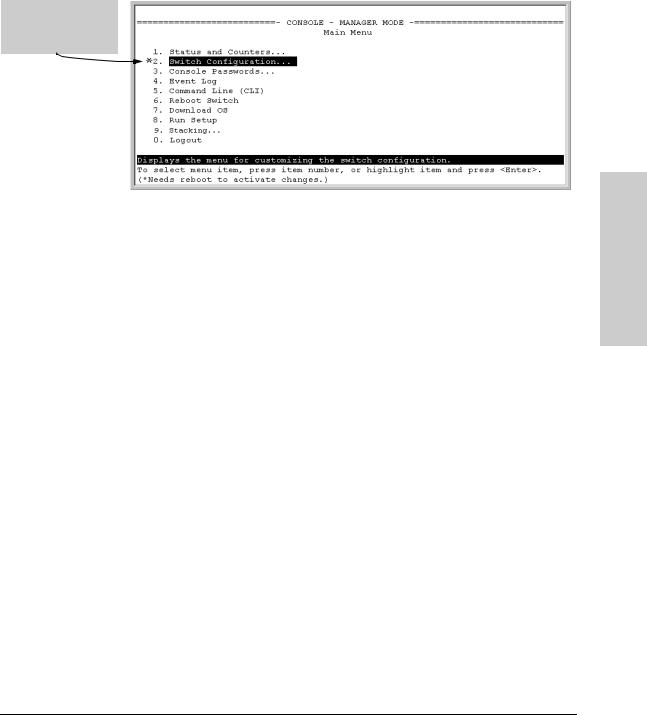
The method for ending a menu session and exiting from the console depends on whether, during the session, you made any changes to the switch configuration that require a switch reboot to activate. (Most changes need only a Save, and do not require a switch reboot.) Configuration changes needing a reboot are marked with an asterisk (*) next to the configured item in the Configuration menu and also next to the Switch Configuration item in the Main Menu.
2-4
Using the Menu Interface
Starting and Ending a Menu Session
Asterisk indicates a configuration change that requires a reboot to activate.
Figure 2-2. An Asterisk Indicates a Configuration Change Requiring a Reboot
1.In the current session, if you have not made configuration changes that require a switch reboot to activate, return to the Main menu and press [0] (zero) to log out. Then just exit from the terminal program, turn off the terminal, or quit the Telnet session.
2.If you have made configuration changes that require a switch reboot— that is, if an asterisk (*) appears next to a configured item or next to Switch Configuration in the Main menu:
a.Return to the Main menu.
b.Press [6] to select Reboot Switch and follow the instructions on the reboot screen.
Rebooting the switch terminates the menu session, and, if you are using
Telnet, disconnects the Telnet session.
(See “Rebooting To Activate Configuration Changes” on page 2-12.)
3.Exit from the terminal program, turn off the terminal, or close the Telnet application program.
Interface Menu the Using
2-5
Using the Menu Interface
Main Menu Features
Main Menu Features
Using the Menu Interface
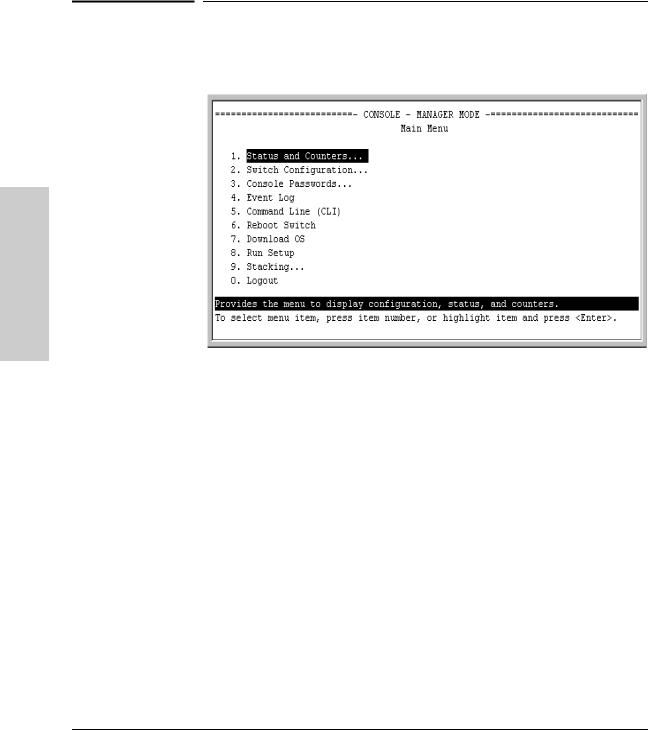
Figure 2-3. The Main Menu View with Manager Privileges
The Main Menu gives you access to these Menu interface features:
■Status and Counters: Provides access to display screens showing switch information, port status and counters, port and VLAN address tables, and spanning tree information. (See chapter 10, “Monitoring and Analyzing Switch Operation.”)
■Switch Configuration: Provides access to configuration screens for displaying and changing the current configuration settings. (See the Contents listing at the front of this manual.) For a listing of features and parameters configurable through the menu interface, see the “Menu Features List” on page 2-13.
■Console Passwords: Provides access to the screen used to set or change Manager-level and Operator-level passwords, and to delete Manager and Operator password protection. (See “Using Password Security” on page page 7-2.)
■Event Log: Enables you to read progress and error messages that are useful for checking and troubleshooting switch operation. (See “Using the Event Log To Identify Problem Sources” on page 11-10.)
2-6

Using the Menu Interface |
|
|
Main Menu Features |
|
|
■ Command Line (CLI): Selects the Command Line Interface at the same |
|
|
level (Manager or Operator) that you are accessing in the Menu interface. |
|
|
(See chapter 3, “Using the Command Line Interface (CLI).”) |
|
|
■ Reboot Switch: Performs a “warm” reboot of the switch, which clears |
|
|
most temporary error conditions, resets the network activity counters to |
|
|
zero, and resets the system up time to zero. A reboot is required to activate |
|
|
a change in the VLAN Support parameter. (See “Rebooting from the Menu |
|
|
Interface” on page C-8.) |
|
|
■ Download OS: Enables you to download a new software version to the |
|
|
switch. (See appendix A, “Transferring an Operating System or Configu- |
|
|
ration.”) |
|
|
■ Run Setup: Displays the Switch Setup screen for quickly configuring |
|
|
|
||
basic switch parameters such as IP addressing, default gateway, logon |
Using |
|
default interface, spanning tree, and others. (See the Installation Guide |
||
|
||
shipped with your switch.) |
the |
|
■ Stacking: Enables you to use a single IP address and standard network |
||
Menu |
||
cabling to manage a group of up to 16 switches in the same subnet |
||
|
||
(broadcast domain). See “Stack Management” on page 9-2. |
Interface |
|
■ Logout: Closes the Menu interface and console session, and disconnects |
||
|
||
Telnet access to the switch. (See “How to End a Menu Session and Exit |
|
|
from the Console” on page 2-4.) |
|
|
|
|
2-7
Using the Menu Interface
Using the Menu Interface
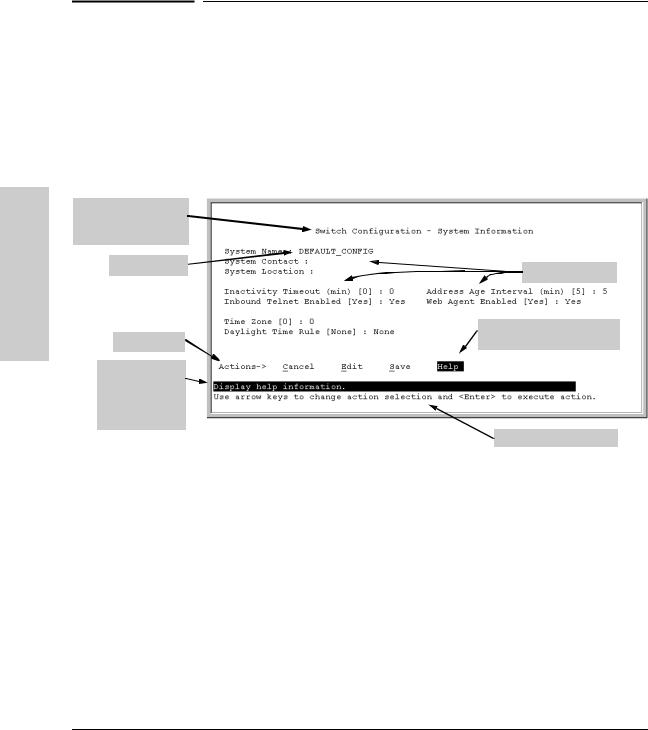
Screen Structure and Navigation
Screen title – identifies the location within the menu structure
System name
Actions line
Help line describing the selected action or selected parameter field
Screen Structure and Navigation
Menu interface screens include these three elements:
■Parameter fields and/or read-only information such as statistics
■Navigation and configuration actions, such as Save, Edit, and Cancel
■Help line to describe navigation options, individual parameters, and readonly data
For example, in the following System Information screen:
Parameter fields
Help describing each of the items in the parameter fields
Navigation instructions
Figure 4-1. Elements of the Screen Structure
“Forms” Design. The configuration screens, in particular, operate similarly to a number of PC applications that use forms for data entry. When you first enter these screens, you see the current configuration for the item you have selected. To change the configuration, the basic operation is to:
1.Press [E] to select the Edit action.
2.Navigate through the screen making all the necessary configuration changes. (See Table 4-1 on the next page.)
3.Press [Enter] to return to the Actions line. From there you can save the configuration changes or cancel the changes. Cancel returns the configuration to the values you saw when you first entered the screen.
2-8

Using the Menu Interface
Screen Structure and Navigation
Table 4-1. How To Navigate in the Menu Interface
Task: Actions:
Execute an action from the “Actions –>” list at the bottom of the screen:
Use either of the following methods:
•Use the arrow keys ( [<] ,or [>] ) to highlight the action you want to execute, then press [Enter].
•Press the key corresponding to the capital letter in the action name. For example, in a configuration menu, press [E] to select Edit and begin editing parameter values.
Reconfigure (edit) a |
1. |
Select a configuration item, such as System Name. (See figure |
parameter setting or a |
|
4-1.) |
field: |
2. |
Press [E] (for Edit on the Actions line). |
|
3. |
Use [Tab] or the arrow keys ([<], [>], [^], or [v]) to highlight the |
|
|
item or field. |
|
4. |
Do one of the following: |
|
|
– If the parameter has preconfigured values, either use the |
|
|
Space bar to select a new option or type the first part of your |
|
|
selection and the rest of the selection appears automatically. |
|
|
(The help line instructs you to “Select” a value.) |
|
|
– If there are no preconfigured values, type in a value (the Help |
|
|
line instructs you to “Enter” a value). |
|
5. |
If you want to change another parameter value, return to step 3. |
|
6. |
If you are finished editing parameters in the displayed screen, |
|
|
press [Enter] to return to the Actions line and do one of the |
|
|
following: |
|
|
– To save and activate configuration changes, press [S] (for the |
|
|
Save action). This saves the changes in the startup |
|
|
configuration and also implements the change in the |
|
|
currently running configuration. (See appendix C, "Switch |
|
|
Memory and Configuration.) |
|
|
– To exit from the screen without saving any changes that you |
|
|
have made (or if you have not made changes), press [C] (for |
|
|
the Cancel action). |
|
|
Note: In the menu interface, executing Save activates most |
|
|
parameter changes and saves them in the startup configuration |
|
|
(or flash) memory, and it is therefore not necessary to reboot the |
|
|
switch after making these changes. But if an asterisk appears |
|
|
next to any menu item you reconfigure, the switch will not |
|
|
activate or save the change for that item until you reboot the |
|
|
switch. In this case, rebooting should be done after you have |
|
|
made all desired changes and then returned to the Main Menu. |
|
7. |
When you finish editing parameters, return to the Main Menu. |
|
8. |
If necessary, reboot the switch by highlighting Reboot Switch in |
|
|
the Main Menu and pressing [Enter]. (See the Note, above.) |
|
|
|
Exit from a read-only |
Press [B] (for the Back action). |
|
screen. |
|
|
|
|
|
Interface Menu the Using
2-9
Using the Menu Interface
Using the Menu Interface
Screen Structure and Navigation
Highlight on any item in the Actions line indicates that the Actions line is active.
The Help line provides a brief descriptor of the highlighted Action item or parameter.
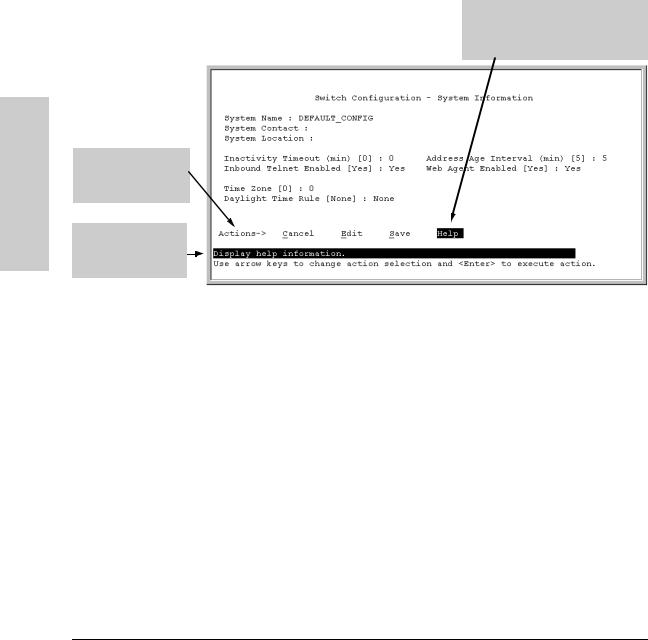
To get Help on individual parameter descriptions. In most screens there is a Help option in the Actions line. Whenever any of the items in the Actions line is highlighted, press [H], and a separate help screen is displayed. For example:
Pressing [H] or highlighting Help and pressing [Enter] displays Help for the parameters listed in the upper part of the screen
Figure 4-2. Example Showing How To Display Help
To get Help on the actions or data fields in each screen: Use the arrow keys ( [<], [>], [^], or [v]) to select an action or data field. The help line under the Actions items describes the currently selected action or data field.
For guidance on how to navigate in a screen: See the instructions provided at the bottom of the screen, or refer to “Screen Structure and Navigation” on page 2-8.)
2-10
Loading...