


Cable/DSL Broadband Router
Built-in 8-Port 10/100Mbps Switch and Integrated Print Server
USER GUIDE
SMC7008ABR
7008ABR – Manual
COMPLIANCES
FCC - Class B
This equipment has been tested and found to comply with the limits for a Class B digital device, pursuant to Part 15 of the FCC Rules. These limits are designed to provide reasonable protection against harmful interference in a residential installation. This equipment generates, uses, and can radiate radio frequency energy and, if not installed and used in accordance with instructions, may cause harmful interference to radio communications. However, there is no guarantee that the interference will not occur in a particular installation. If this equipment does cause harmful interference to radio or television reception, which can be determined by turning the equipment off and on, the user is encouraged to try to correct the interference by one or more of the following measures:
•Reorient the receiving antenna
•Increase the separation between the equipment and receiver
•Connect the equipment into an outlet on a circuit different from that to which the receiver is connected
EC Conformance Declaration - Class B
SMC contact for these products in Europe is:
SMC Networks Europe,
Edificio Conata II,
Calle Fructuós Gelabert 6-8, 2o, 4a,
08970 - Sant Joan Despí,
Barcelona, Spain.
This information technology equipment complies with the requirements of the Council Directive 89/336/EEC on the Approximation of the laws of the Member States relating to Electromagnetic Compatibility and 73/23/EEC for electrical equipment used within certain voltage limits and the Amendment Directive 93/68/EEC. For the evaluation of the compliance with these Directives, the following standards were applied:
RFI Emission:
•Limit class B according to EN 55022:1998
•Limit class A for harmonic current emission according to EN 61000-3-2/1995
•Limitation of voltage fluctuation and flicker in low-voltage supply system according to EN 61000-3-3/1995
Immunity:
•Product family standard according to EN 55024:1998
•Electrostatic Discharge according to EN 61000-4-2:1995 (Contact Discharge: ±4 kV, Air Discharge: ±8 kV)
•Radio-frequency electromagnetic field according to EN 61000-4-3: 1996 (80 - 1000MHz with 1kHz AM 80% Modulation: 3V/m)
2
7008ABR – Manual
COMPLIANCES
Industry Canada - Class B
This digital apparatus does not exceed the Class B limits for radio noise emissions from digital apparatus as set out in the interference-causing equipment standard entitled “Digital Apparatus,” ICES-003 of the Department of Communications.
Cet appareil numérique respecte les limites de bruits radioélectriques applicables aux appareils numériques de Classe B prescrites dans la norme sur le matériel brouilleur: “Appareils Numériques,” NMB-003 édictée par le ministère des Communications.
Japan VCCI Class B
Australia AS/NZS 3548 (1995) - Class B
SMC contact for products in Australia is:
SMC Communications Pty. Ltd.
Suite 18, 12 Tryon Road,
Lindfield NSW2070,
Phone: 61-2-94160437
Fax: 61-2-94160474
Electrical fast transient/burst according to EN 61000-4-4:1995(AC/DC power supply: ±1kV, Data/Signal lines: ±0.5kV)
•Surge immunity test according to EN 61000-4-5:1995(AC/DC Line to Line: ±1kV, AC/DC Line to Earth: ±2kV)
•Immunity to conducted disturbances, Induced by radio-frequency fields: EN 61000-4- 6:1996(0.15 - 80MHz with 1kHz AM 80% Modulation: 3V/m)
•Power frequency magnetic field immunity test according to EN 61000-4-8:1993(1A/m at frequency 50Hz)
•Voltage dips, short interruptions and voltage variations immunity test according to EN 61000-
4-11:1994(>95% Reduction @10ms, 30% Reduction @500ms, >95% Reduction @5000ms)
LVD:
•EN60950(A1/1992; A2/1993; A3/1993; A4/1995; A11/1997) COMPLIANCES
Safety Compliance
Underwriters Laboratories Compliance Statement
Important! Before making connections, make sure you have the correct cord set. Check it (read the label on the cable) against the following:
The unit automatically matches the connected input voltage. Therefore, no additional adjustments are necessary when connecting it to any input voltage within the range marked on the rear panel.
Wichtige Sicherheitshinweise (Germany)
1.Bitte lesen Sie diese Hinweise sorgfältig durch.
2.Heben Sie diese Anleitung für den späteren Gebrauch auf.
3.Vor jedem Reinigen ist das Gerät vom Stromnetz zu trennen. Verwenden Sie keine Flüssigoder
4.Aerosolreiniger. Am besten eignet sich ein angefeuchtetes Tuch zur Reinigung.
5.Die Netzanschlu ßsteckdose soll nahe dem Gerät angebracht und leicht zugänglich sein.
6.Das Gerät ist vor Feuchtigkeit zu schützen.
7.Bei der Aufstellung des Gerätes ist auf sicheren Stand zu achten. Ein Kippen oder Fallen könnte Beschädigungen hervorrufen.
8.Die Belüftungsöffnungen dienen der Luftzirkulation, die das Gerät vor Überhitzung schützt. Sorgen Sie dafür, daß diese Öffnungen nicht abgedeckt werden.
9.Beachten Sie beim Anschluß an das Stromnetz die Anschlußwerte.
3
7008ABR – Manual
10.Verlegen Sie die Netzanschlußleitung so, daß niemand darüber fallen kann. Es sollte auch nichts auf der Leitung abgestellt werden.
11.Alle Hinweise und Warnungen, die sich am Gerät befinden, sind zu beachten.
12.Wird das Gerät über einen längeren Zeitraum nicht benutzt, sollten Sie es vom Stromnetz trennen. Somit wird im Falle einer Überspannung eine Beschädigung vermieden.
13.Durch die Lüftungsöffnungen dürfen niemals Gegenstände oder Flüssigkeiten in das
Operating Voltage Cord Set Specifications
•120 Volts UL Listed/CSA Certified Cord Set
•Minimum 18 AWG
•Type SVT or SJT three conductor cord
•Maximum length of 15 feet
•Parallel blade, grounding type attachment plug rated 15A, 125V
•240 Volts (Europe only) Cord Set with H05VV-F cord having three conductors with minimum diameter of 0.75 mm2
•IEC-320 receptacle
•Male plug rated 10A, 250V
COMPLIANCES
Gerät gelangen. Dies könnte einen Brand bzw. elektrischen Schlag auslösen.
1.Öffnen sie niemals das Gerät. Das Gerät darf aus Gründen der elektrischen Sicherheit nur von authorisiertem Servicepersonal geöffnet werden.
2.Wenn folgende Situationen auftreten ist das Gerät vom Stromnetz zu trennen und von einer qualifizierten Servicestelle zu überprüfen:
a.Netzkabel oder Netzstecker sind beschädigt.
b.Flüssigkeit ist in das Gerät eingedrungen.
c.Das Gerät war Feuchtigkeit ausgesetzt.
d.Wenn das Gerät nicht der Bedienungsanleitung entsprechend funktioniert oder Sie mit Hilfe dieser Anleitung keine Verbesserung erzielen.
e.Das Gerät ist gefallen und/oder das Gehäuse ist beschädigt.
f.Wenn das Gerät deutliche Anzeichen eines Defektes aufweist.
3.Stellen Sie sicher, da? die Stromversorgung dieses Ger‰tes nach der EN 60950 gepr¸ft ist. Ausgangswerte der Stromversorgung sollten die Werte von AC 7,5-8V, 50-60Hz nicht ¸ber oder unterschreiten sowie den minimalen Strom von 1A nicht unterschreiten.. Der arbeitsplatzbezogene Schalldruckpegel nach DIN 45 635 Teil 1000 beträgt 70dB(A) oder weniger.
4
7008ABR – Manual
TABLE OF CONTENTS
COMPLIANCES
CHAPTER 1 | Introduction ……………………………………………………………… 6
Features and Benefits Package Contents Minimum Requirements
CHAPTER 2 | Getting to know the Barricade ……………………………………… 7
LED Indicators Resetting the Barricade
CHAPTER 3 | Getting Connected …………………………………………………….. 8
Basic Installation Procedure
3-Click Installation Wizard
CHAPTER 4 | Configuring your Computer …………………………………………. 9
Configuring Windows 95/98/Me Configuring Windows 2000 Configuring Windows XP Configuring a Macintosh Computer
CHAPTER 5 | Configuring the Barricade ……………………………………………. 13
Browser Configuration Disable Proxy Connection
Accessing the Barricade Management
CHAPTER 6 | Navigating the Web-based Administration ………………………. 15
Making Configuration Changes Setup Wizard
Advanced Setup
Chapter 7 | Setting up the Print Server …………………………………………….. 32
Install the SMC Printer Port Monitor
Configure the Print Server using the SMC Printer Port Monitor Configure LPR port on Windows 2000/XP
Confirm printer Connection
APPENDIX A | Troubleshooting ………………………………………………………………………….. 40 APPENDIX B | Technical Specifications ……………………………………………………………….. 43
5
7008ABR – Manual
CHAPTER 1 | Introduction
Congratulations on your purchase of a Barricade™ Broadband Router. SMC is proud to provide you with a powerful yet simple communication device for connecting your local area network (LAN) to the Internet. For those who want to surf the Internet at the lowest possible cost, the Barricade™ Broadband Router is the convenient, easy solution.
1.0| Features and Benefits
•Internet connection to DSL or cable modem via a 10/100 Mbps WAN port
•Local network connection via 10/100 Mbps Ethernet switch ports
•DHCP for dynamic IP configuration, and DNS for domain name mapping
•Firewall with Stateful Packet Inspection, client privileges, hacker prevention, DoS, and NAT
•NAT also enables multi-user access with a single-user account, and virtual server functionality (providing protected access to Internet services such as web, mail, FTP, and Telnet)
•Virtual Private Network support using PPTP, L2TP, or IPSec pass-through
•User-definable application sensing tunnel supports applications requiring multiple connections
•Parental controls allows the user to limit certain web sites
•Email alerts when the users network is being compromised
•Easy setup through a web browser on any operating system that supports TCP/IP
•Compatible with all popular Internet applications
1.1| Package Contents
Before installing the Barricade™ Broadband Router, verify that you have the items listed under “Package Contents.” Also be sure that you have the necessary cabling. If any of the items are missing or damaged, contact your local SMC distributor.
•Barricade Broadband Router
•Power adapter
•One CAT-5 Ethernet cable
•Four rubber feet
•CD with User Guide and EZ 3-Click Installation Wizard
•Quick Installation Guide
If possible, retain the carton and original packing materials in case there is a need to return the product.
Please remember to fill out and return the Warranty Registration Card to SMC, or register on SMC’s web site at www.smc.com to activate the Barricade Broadband Routers warranty.
1.2| Minimum Requirements
•Cable or DSL Modem with Ethernet Connection and Internet Access Internet access from your local telephone company or Internet Service Provider (ISP) using a DSL modem or cable modem.
•A computer equipped with a 10 Mbps, 100 Mbps, or 10/100 Mbps Fast Ethernet card, or a USB-to-Ethernet converter.
•Network Adapter with Ethernet (UTP CAT 5) Cabling and TCP/IP Protocol Installed per PC
•Internet Explorer 4.0 (or Higher) or Netscape Navigator 4.7 (or Higher) for Web-based Configuration of the Barricade
6

7008ABR – Manual
CHAPTER 2 | Getting to know the Barricade
The Barricade Broadband Router is the perfect solution for the office environment. This full-featured router offers:
•8 - 10/100 Mbps Auto-Sensing LAN ports
•1 - 10/100 Mbps WAN port
•1 - Printer Server Port
•1 - COM (RS232) port for ISDN or external dial-up modem
•Comprehensive LEDs for network status and troubleshooting
•Reset Button
2.1 | LED Indicators
The Barricade includes LED indicators on the front panel that simplify installation and network troubleshooting.
LED |
ON |
OFF |
FLASHING |
POWER |
Receiving power |
Not receiving power |
Initializing or upgrading |
|
|
|
firmware |
WAN |
Good WAN connection |
No WAN connection |
Transmitting or receiving |
|
detected |
detected |
traffic |
LINK/ACT |
Good LAN connection |
No LAN connection |
Transmitting or receiving |
|
detected |
detected |
traffic |
10/100 Mbps |
LAN port operating at |
LAN port operating at 10 |
N/A |
|
100 Mbps |
Mbps |
|
FDX/COL |
Full-Duplex connection |
Half-Duplex Connection |
Data Collision |
Resetting the Barricade
The Reset button is located on the front panel of the Barricade Broadband Router. This Reset button works 2 different ways depending on how long you hold the button down. Use a paper clip or a pencil tip to push the Reset button.
Reset
If the Router is having problems connecting to the Internet press and hold the Reset button for 1 second to reset the router. Resetting the router keeps all of the Router’s settings.
Restore Factory Defaults
If Resetting the router does not resolve your issue, then you can press the Reset Button and hold it down for 5 seconds to restore factory defaults and clear all of the Router’s settings, including settings such as IP addresses or a new password.
7

7008ABR – Manual
CHAPTER 3 | Getting Connected
The Barricade Broadband router is connected between the Cable/DSL Broadband Modem and your computers. If you have more then one computer to connect, simply plug the other computers into the LAN ports on the front of the router.
MODEM |
|
COMPUTER |
|
||
|
|
|
3.1| Basic Installation Procedure
1.Connect the LAN
Run an Ethernet cable from one of the LAN ports on the front of the Barricade to your computer’s network adapter.
2.Connect the WAN
Connect an Ethernet cable from your cable or DSL modem or the Barricade’s WAN port on the back on the router.
3.Power on
Connect the power cable to the Barricade.
Once you have completed connecting all of the hardware, simply insert the Barricade CD-ROM and the 3-Click EZ Installation Wizard will automatically connect you to the Internet.
For manual Configuration of the PCs see Chapter 4.
For advanced Configuration of the Barricade Broadband Router see Chapter 5.
8
7008ABR – Manual
CHAPTER 4 | Configuring your Computer
The information outlined in this chapter will guide you through the configuration for the following Operating Systems:
•Windows 95/98
•Windows Me
•Windows 2000
•Windows XP
•Apple Macintosh
For installation information on Windows NT, please see your Windows Manual.
4.1| Configuring Windows 95/98/Me
1.Access your Network settings by clicking [Start], then choose [Settings] and then select [Control Panel].
2.In the Control Panel, locate and double-click the [Network] icon.
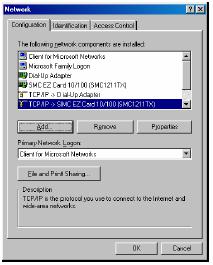
3.Highlight the TCP/IP line that has been assigned to your network card on the [Configuration] tab of the [Network] properties window.
9

7008ABR – Manual
4. Next, click the [Properties] button to view that adapters TCP/IP settings.
5.From the TCP/IP Properties dialog box click the [Obtain an IP address automatically] option.
6.Next click on the [Gateway] tab and verify the Gateway field is blank. If there are IP addresses listed in the Gateway section, highlight each one and click [Remove] until the section is empty.
7.Click the [OK] button to close the TCP/IP Properties window.
8.On the Network Properties Window, click the [OK] button to save these new changes.
NOTE: Windows may ask you for the original Windows installation disk or additional files. Check for the files at c:\windows\options\cabs, or insert your Windows CD-ROM into your CDROM drive and check the correct file location, ex., D:\win98, D:\win9x, etc. (if “D” is the letter of your CD-ROM drive).
9.Windows may prompt you to restart the PC. If so, click the [Yes] button. If Windows does not prompt you to restart your computer, do so anyways to insure your settings.
4.2| Configuring Windows 2000
1.Access your Network settings by clicking [Start], then choose [Settings] and then select [Control Panel]
2.In the Control Panel, locate and double-click the [Network and Dial-up Connections] icon
3.Locate and double-click the [Local Area Connection] icon for the Ethernet adapter that is connected to the Barricade. When the Status dialog box window opens, click the [Properties] button.
10
7008ABR – Manual
4.On the [Local Area Connection] Properties box, verify the box next to Internet Protocol (TCP/IP) is checked. Then highlight the Internet Protocol (TCP/IP), and click the Properties button.
5.Select Obtain an IP address automatically to configure your computer for DHCP. Click the [OK] button to save this change and close the Properties window.
6.Click the [OK] button again to save these new changes.
7.Reboot your PC.
4.3| Configuring Windows XP
The following instructions assume you are running Windows XP with the default interface. If you are using the Classic interface (where the icons and menus look like previous Windows versions), please follow the instructions for Windows 2000 outlined above.
1.Access your Network settings by clicking [Start], choose [Control Panel], select [Network and Internet Connections] and then click on the [Network Connections] icon.
2.Locate and double-click the Local Area Connection icon for the Ethernet adapter that is connected to the Barricade Router. Next, click the [Properties] button.
11
7008ABR – Manual
3.On the [Local Area Connection] Properties box, verify the box next to Internet Protocol (TCP/IP) is checked. Then highlight the Internet Protocol (TCP/IP), and click the Properties button.
4.Select Obtain an IP address automatically to configure your computer for DHCP. Click the [OK] button to save this change and close the Properties window.
5.Click the [OK] button again to save these new changes.
6.Reboot your PC.
4.4| Configuring a Macintosh Computer
You may find that the instructions here do not exactly match your screen. This is because these steps and screenshots were created using Mac OS 8.5. Mac OS 7.x and above are all very similar, but may not be identical to Mac OS 8.5.
1.Pull down the Apple Menu. Click [Control Panel] and select TCP/IP.
2.In the TCP/IP dialog box, make sure that [Ethernet] is selected in the [Connect Via:] field.
If [Using DHCP Server] is already selected in the [Configure] field, your computer is already configured for DHCP. Close the TCP/IP dialog box, and skip to Step 2 Disable HTTP Proxy (bottom of this page).
3.All the information that you need to record is on the [TCP/IP] dialog box. Use the space below to record the information.
4.Select [Using DHCP Server] in the [Configure] field and close the window.
5.Another box will appear asking whether you want to save your TCP/IP settings. Click [Save].
12

7008ABR – Manual
CHAPTER 5 | Configuring the Barricade
After you have configured TCP/IP on a client computer, use a web browser to configure the Barricade™ Broadband Router. The Barricade can be configured by any Java-supported browser including Internet Explorer 4.0 or above, or Netscape Navigator 4.0 or above. Using the web management interface, you may configure the Barricade and view statistics to monitor network activity.
NOTE: Before you attempt to configure your router, if you have access to the Internet please visit www.smc.com and download the latest firmware update to insure your router is running the latest firmware.
Before you attempt to log into the Barricades Web-based Administration, please verify the following:
1.Your browser is configured properly. (see below)
2.Disable any firewall or security software that may be running.
3.Confirm that you have a good “link” LED where your computer is plugged into the Barricade. If you don’t have a “link” light – then try another cable until you get a good link.
5.1| Browser Configuration
Confirm your browser is configured for a direct connection to the Internet using the Ethernet cable that is installed in the computer. This is configured through the options/preference section of your browser.
5.2 | Disable Proxy Connection
You will also need to verify that the “HTTP Proxy” feature of your web browser is disabled. This is so that your web browser will be able to view the Barricade configuration pages. The following steps are for Internet Explorer and for Netscape. Determine which browser you use and follow the appropriate steps.
Internet Explorer (5 or above)
1.Open Internet Explorer. Click [Tools], and then select [Internet Options].
2.In the [Internet Options] window, click the [Connections] tab.
3.Click the [LAN Settings] button.
4.Clear all the check boxes and click [OK] to save these LAN settings changes.
5.Click [OK] again to close the [Internet Options] window.
Netscape (4 or above)
1.Open Netscape. Click [Edit], and then select [Preferences].
2.In the [Preferences] window, under [Category], double-click [Advanced], then select the [Proxies] option.
3.Check [Direct connection to the Internet].
4.Click the [OK] button to save the changes.
13
7008ABR – Manual
5.3 | Accessing the Barricade Management
To access the Barricade’s web-based management screens follow the steps below:
1.Launch your web-browser.
NOTE: Your computer does not have to be ONLINE to configure the Barricade Router.
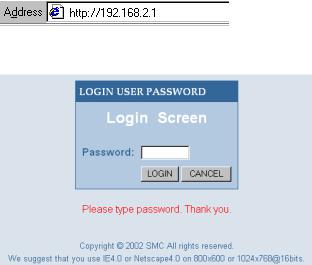
2.In the Address Bar, type: http://192.168.2.1
3.When the Barricades Login screen loads up, click the [Login] button to access the router. NOTE: The Barricade does not ship with a default password.
4.Once you have logged into the Barricade web-based admin screens you have 2 options, which are outlined in Chapter 6 | Navigating the Web-based Administration
14
 Loading...