


User Guide
Starmate 5
Dock & Play SIRIUS Radio

Here’s your new
SIRIUS® Starmate ST5
Dock & Play Radio
Your new SIRIUS Starmate ST5 Dock & Play Radio comes with everything you need to enjoy SIRIUS® in your car. And with available SIRIUS Universal Docking accessories you can use your Starmate ST5 just about anywhere.
Your new Starmate ST5 gives you powerful features:
>>SIRIUS Replay™ — Pause, rewind and replay up to 44 minutes of live radio.
>>Memo function — Store up to 30 favorite songs and artists plus a favorite sports team or NASCAR® car and get an alert whenever they’re playing on any channel.
>>Easy-to-read wide-angle 5-line display.
>>Built-in wireless FM transmitter so you can listen to SIRIUS through your car’s FM stereo. An FM Presets button makes transmitter frequency changes quick and easy.
>>Full-function wireless remote control
Use this manual to familiarize yourself with all of your SIRIUS Starmate ST5’s features and capabilities. For the latest information about your ST5 and other SIRIUS products and accessories, visit http://www.sirius.com.

Table of Contents
Table of Contents |
4 |
Warning and Safety Information |
6 |
FCC Information |
6 |
Canadian Compliance |
7 |
General Precautions |
7 |
Warnings |
9 |
Copyrights & Trademarks |
10 |
Package Contents |
1 1 |
Installation |
14 |
Installing the Vehicle Dock |
14 |
Installing the Magnetic Antenna |
21 |
Connecting the Cigarette Lighter Adapter |
37 |
Docking the Starmate ST5 |
38 |
Cable Separation and Routing |
39 |
Connecting the Starmate ST5 to Your Vehicle’s Audio System |
41 |
Subscribing to the SIRIUS Service |
65 |
Controls |
66 |
SIRIUS Starmate ST5 Front Panel |
66 |
Remote Control Buttons |
68 |
Vehicle Dock Reference Guide |
71 |
4 Table of Contents
Operation |
72 |
Display Screen Information |
72 |
Changing Channels and Categories |
7 3 |
My Channels Category |
74 |
Display Button (Disp) |
75 |
Selecting Channels Directly |
76 |
Channel Presets (Band Button) |
77 |
Memory (MEMO) and Song Seek (S-Seek) Functions |
79 |
Jump Button |
87 |
SIRIUS Replay |
89 |
Using SIRIUS Replay |
91 |
FM Presets Button |
93 |
Menu Options |
96 |
Sirius ID |
96 |
FM Transmitter |
97 |
Settings |
98 |
Parental Control |
104 |
Time Based Features |
106 |
Signal Indicator |
112 |
Factory Default |
1 1 3 |
Troubleshooting |
115 |
Specifications |
116 |
Sirius ID |
117 |
Table of Contents |
5 |

Warning & Safety Information
FCC Information
This device complies with part 15 of the FCC Rules. Operation is subject to the following two conditions:
1.This device may not cause harmful interference, and
2.This device must accept any interference received, including interference that may cause undesired operation.
Note: This equipment has been tested and found to comply with the limits for a CLASS B digital device, pursuant to Part 15 of the FCC Rules. These limits are designed to provide reasonable protection against harmful interference when the equipment is operated in a commercial environment. This equipment generates, uses, and can radiate radio frequency energy and, if not installed and used in accordance with the instructions, may cause harmful interference to radio communications. However, there is no guarantee that interference will not occur in a particular installation. If this equipment does cause harmful interference to radio or television reception, which can be determined by turning the equipment off and on, the user is encouraged to try to correct the interference by one or more of the following measures:
1.Reorient or relocate the receiving antenna.
2.Increase the separation between the equipment and the receiver.
3.Connect the equipment into an outlet on a circuit different from that to which the receiver is connected.
4.Consult the dealer or an experienced radio/TV technician for help.
6 |
Warning and Safety Information |

Warning
Changes or modifications not expressly approved by the manufacturer could void the user’s authority to operate the equipment.
Canadian Compliance
This Class B digital apparatus complies with Canadian ICES-003.
Cet appareil numérique de la classe B est conforme à la norme NMB-003 du Canada.
General Precautions
Liquid Crystal Precautions
If the LCD screen on the radio is damaged, do not to touch the liquid crystal fluid. If any of the following situations happen, take the action indicated:
1.If the liquid crystal fluid comes in contact with your skin, wipe the skin area with a cloth and then wash the skin thoroughly with soap and running water.
2.If the liquid crystal fluid gets into your eye, flush the eye with clean water for at least 15 minutes. Seek medical care.
3.If the liquid crystal fluid is ingested, flush your mouth thoroughly with water. Drink large quantities of water and induce vomiting. Seek medical care.
Safety Precautions
Be sure to observe the following warnings. Failure to follow these safety instructions and warnings may result in a serious accident.
•Do not operate your SIRIUS ST5 in a way that might divert your attention from driving safely. As a driver, you alone are responsible for safely operating your vehicle in accordance with traffic safety laws at all times.
Warning and Safety Information |
7 |
•Do not install the radio where it may obstruct your view through the windshield, or of your vehicle’s indicator displays.
•Do not install the radio where it may hinder the function of safety devices such as an airbag. Doing so may prevent the airbag from functioning properly in the event of an accident.
•Be sure the radio and accessories are installed as described in these installation instructions and the instructions which accompany each accessory kit. SIRIUS Satellite Radio is not responsible for issues arising from installations which were not installed according to the instructions.
•Before attaching the suction cup mount to your windshield, you should check your state and local laws for regulations regarding mounting this device on your windshield.
•To avoid short circuits, do not open the radio or accessories, and never put or leave any metallic objects (coins, tools, etc.) inside the radio.
•If the radio or accessories emit smoke or unusual odors, turn the power off immediately, and disconnect the radio from any power source.
•Do not drop the radio or subject it to strong shocks.
•If your ST5 doesn’t seem to be working properly, turn it off, wait 10 seconds and then turn it on again.
•The installation and use suggestions contained in this manual are subject to any restrictions or limitations that may be imposed by applicable law. The purchaser should check applicable law for any restrictions or limitations before installing and/ or operating this unit.
•Do not install the FM Extender Antenna where it will hinder or block your view. In some states it may be illegal to mount it on the windshield of your vehicle. Check applicable law for any restrictions or limitations before installing the FM Extender Antenna on your windshield.
8 |
Warning and Safety Information |

•Do not install the FM Extender Antenna where it may hinder the function of safety devices such as an airbag. Doing so may prevent the airbag from functioning properly in the event of an accident.
 Warnings
Notice To Drivers In California and Minnesota
State law prohibits drivers in California and Minnesota from using suction mounts on their windshields while operating motor vehicles. Other dashboard or friction mounting options should be used. SIRIUS does not take any responsibility for any fines, penalties, or damages that may be incurred as a result of disregarding this notice. (See California Vehicle Code Section 26708(a); Minnesota Statutes 2005, Section 169.71)
Operating Temperature
The radio is designed to operate between -20° to +85° C (-4° to +185° F). Avoid leaving the radio in a vehicle or elswhere where the temperature may fall outside this range. Extreme temperatures or extreme temperature fluctuations can degrade the performance of the LCD display screen, and possibly damage it.
Cleaning and Maintenance
If the radio or accessories become dirty, turn the power off and wipe it clean with a soft cloth. Do not use hard cloths, strong cleaning fluids, paint thinner, alcohol, or other volatile solvents to clean. These may cause damage to the radio.
Cigarette Lighter Adapter
The Vehicle Dock cannot be powered directly from a vehicle’s 12VDC power system. It must be powered from the vehicle’s cigarette lighter or similar power port using the included Cigarette Lighter Adapter or an equivalent DC power adapter (see your local electronics dealer). Connecting the Vehicle Dock directly to the vehicle’s 12VDC power system may result in damage to the Vehicle Dock or SIRIUS radio, or both.
Warning and Safety Information |
9 |

Copyrights & Trademarks
© 2008 SIRIUS Satellite Radio Inc. All Rights Reserved.
® “SIRIUS”, the SIRIUS dog logo, channel names and logos are trademarks of SIRIUS Satellite Radio Inc. All other trademarks, service marks, sports team names, album art, and logos are the property of their respective owners. All Rights Reserved.
™ “Starmate” is a trademark of SIRIUS Satellite Radio.
Portions of the software on this radio are licensed under the eCos License. Distribution of eCos requires that the eCos source code be made available to SIRIUS Satellite Radio customers. The eCos License and eCos source code are available to the public at http://www.sirius.com/ecoslicense.
SIRIUS Satellite Radio reserves all rights to all radio software not covered under the eCos license. This includes all portions of radio software that were not distributed to SIRIUS as part of the eCos operating system.
Hardware, subscription and activation fee required. For full Terms & Conditions, visit http://sirius.com. Prices and programming are subject to change. Not available in HI and AK. Equipment and subscription sold separately. Installation required with some equipment.
10 Copyrights & Trademarks
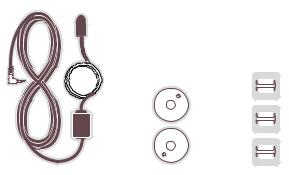
Package Contents
The following items are included with your SIRIUS Starmate ST5 radio:
|
|
|
|
|
|
|
|
|
|
|
|
|
|
|
|
|
|
|
|
|
|
|
|
|
|
|
|
|
|
|
|
|
|
Starmate ST5 Radio |
Remote |
|||||||||
|
|
|
|
|||||||||||
|
|
|
|
|||||||||||
|
|
|
|
|
|
|
|
|
|
|
|
|
|
Control |
|
|
|
|
|
|
|
|
|
|
|
|
|
|
|
|
|
|
|
|
|
|
|
|
|
|
|
|
|
|
|
|
|
|
|
|
|
|
|
|
|
|
|
|
|
|
|
|
|
|
|
|
|
|
|
|
|
|
|
|
|
|
|
|
|
|
|
|
|
|
|
|
|
|
|
|
|
|
|
|
|
|
|
|
|
|
|
|
|
|
|
|
|
|
|
|
|
|
|
|
|
|
|
|
|
|
|
|
|
|
|
|
|
|
|
|
|
|
|
|
Vehicle Dock
Package Contents |
11 |
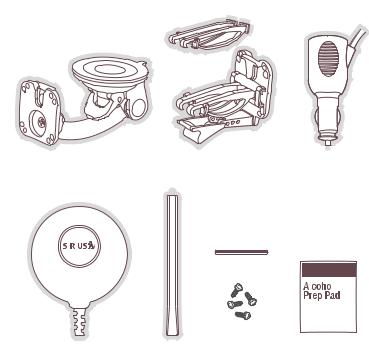
Suction Cup Mount |
Vent Mount & |
Cigarette Lighter |
|||||||||||
|
|
|
|
|
Extended Vent Hooks |
|
|
Adapter |
|||||
|
|
|
|
|
|
|
|
|
|
|
|
|
|
|
|
|
|
|
|
|
|
|
|
|
|
|
|
|
|
|
|
|
|
|
|
|
|
|
|
|
|
|
|
|
|
|
|
|
|
|
|
|
|
|
|
|
|
|
|
|
|
|
|
|
|
|
|
|
|
|
|
|
|
|
|
|
|
|
|
|
|
|
|
|
|
|
|
|
|
|
|
|
|
|
|
|
|
|
|
|
|
|
|
|
|
|
|
|
|
|
|
|
|
|
|
|
|
|
|
|
|
|
|
|
|
|
|
|
|
|
|
|
|
|
|
|
|
|
|
|
|
|
|
|
|
|
|
|
|
|
|
|
|
|
|
|
|
|
|
|
|
|
|
|
|
|
|
Magnetic Antenna |
Antenna |
Mounting Screws |
Alcohol Swab |
|
Cover/Tail |
|
|
12 Package Contents
|
|
|
|
|
|
|
|
|
|
|
|
|
|
|
|
|
|
|
|
|
|
|
|
|
|
|
|
|
|
|
|
|
|
|
|
|
|
|
|
|
|
|
|
|
|
|
|
|
|
|
|
|
|
|
|
|
|
|
|
|
|
|
|
|
|
FM Extender Antenna |
Suction Cups (2) |
Self Adhesive |
|||
|
|
|
Cable Guides (3) |
||
Unpack your SIRIUS Starmate ST5 radio carefully and make sure that everything shown is present. If anything is missing or damaged, or if your SIRIUS Starmate ST5 fails to operate, notify your dealer immediately. We recommended that you retain the original carton and packing materials in case you need to ship your radio in the future.
Package Contents |
13 |

Installation
SIRIUS suggests that you have your Starmate ST5 professionally installed in your vehicle. Professional installation provides an experienced technician to install this product in your vehicle, advice for selecting a suitable mounting location for the Vehicle Dock, installation of the antenna, and proper routing of all the necessary wires and cables. If the locations of your Starmate ST5 and your vehicle’s FM antenna make the performance the ST5’s built-in FM transmitter within your vehicle poor, a professional installer will have the necessary accessories to install an optional FM Direct Adapter or an audio cable to connect the audio output of the Vehicle Dock directly to your vehicle’s audio system. Ask your SIRIUS retailer if they provide professional installation services, or can recommend a professional installation service.
Installing the Vehicle Dock
When installing the Vehicle Dock in your vehicle, choose a location in your vehicle where it will not block your vision, interfere with the vehicle controls, or obstruct the air bag. The location should be easily accessible and provide good visibility of the display, and should not be located where it will be in direct sunlight which will affect the visibility of the display screen.
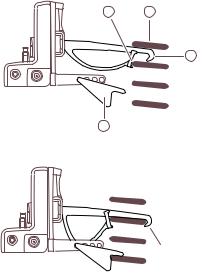
The mounting accessories necessary to install the Vehicle Dock in a vehicle are provided. Figure 1 shows two examples of the SIRIUS radio mounted in a vehicle: A is the suction cup mount method, and B is the vent mount method using the vent mount clip.
14 Installation

B.
A. |
B. |
Figure 1
Depending upon the mounting location you select in your vehicle, the mount should be attached to the vehicle dock and installed as described in the following sections.
Installation 15
Suction Cup Mount Method (A)
The suction cup mount may be attached to any smooth surface. Before attaching the suction cup mount to your windshield, you should check your state and local laws for regulations regarding mounting this device on your windshield.
Attach Dock to Mount with Included Screws
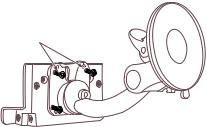
Figure 2
To mount the vehicle dock using the suction cup mount, assemble the mount as follows:
1.Attach the vehicle dock to the suction cup mount using the provided screws (see
Figure 2).
2.Clean the area where you are attaching the suction cup with the supplied alcohol wipe.
16 Installation

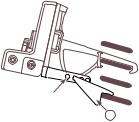
3.Be sure the cam lever is up (as shown in Figure 3) and position the suction cup mount on the windshield or other location you which have chosen. Press the cam lever all the way down towards the base of the mount until it locks to adhere the suction cup. (To unlock the suction cup, lift the lever up.)
Press Lever
Down To
Lock Mount
Figure 3
Installation 17
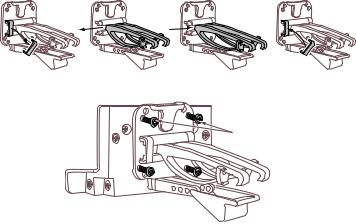
Vent Mount Method (B)
To mount the vehicle dock using the vent mount method, install the vent mount as follows:
1.If the vent louvers in your vehicle are recessed, you may need to use the longer vent hooks with the vent mount. Refer to Figure 4 and install the longer vent hooks into the vent mount. Be sure to observe the orientation of the vent hooks as shown.
2.Attach the vent mount to the vehicle dock using the provided screws (see Figure 5).
Remove |
Slide Short |
Slide Extended |
Replace |
End Cap |
Vent Hooks Out |
Vent Hooks In |
End Cap |
Figure 4
Attach Dock to Mount with
Included Screws
Figure 5
18 Installation
3.Refer to Figure 6 and attach the vent mount to a heating/air conditioning vent in your vehicle. Position the two tension springs A against a vent louver B. Then push the vent mount into the vent, far enough so that the hooks C drop down and hook the rear of the vent louver (see Figure 7). Once you are sure that the hooks have grasped a vent louver, the tension springs A will keep the vent mount hooked to the louver.
A B
PUSH
C
FM OUT |
ANT |
D
Figure 6
FM OUT |
ANT |
HOOKED
Figure 7
Installation 19
4.You can change he angle of the vehicle dock by changing the position of foot D on the vent mount to a different adjustment hole (see Figure 8).
FM OUT
ANT
ADJUSTMENT
HOLES
D
Figure 8
20 Installation
Installing the Magnetic Antenna
Caution
Because adhesive is used in the installation of the Rubber Antenna Cover/Tail, we recommend that you install the antenna at or above room temperature (68° F). The adhesive on the Rubber Cover/Tail may not adhere properly to the vehicle roof at temperatures lower than this. Warmer temperatures will also make it easier to route of the antenna cable through the rubber molding around the windows and in other areas in the vehicle. Maximum adhesion usually occurs within 72 hours at room temperature, so you should avoid car washes as well as other contact with the antenna and Rubber Cover/Tail during this 72-hour period.
Warning
Be sure not to cut, damage, or puncture the external jacket of the antenna cable during the installation procedure. Damage to the antenna cable can degrade the SIRIUS signal or make it unavailable, and can also cause water to intrude
via the cable into the antenna causing the antenna to fail.
Do not lengthen or shorten the antenna cable by cutting it. Doing so will cause the antenna to not function properly.
Installation
Installing the magnetic antenna consists of two steps:
•Mounting the magnetic antenna and Rubber Antenna Cover/Tail on the vehicle
•Routing the antenna cable through the vehicle to the Vehicle Dock
Installation 21
Antenna Mounting
The SIRIUS Magnetic Mount Vehicle Antenna has a strong magnetic mount designed to hold it in place during normal driving conditions (highway/city). This also makes the antenna easy to remove for transferring it to other vehicles.
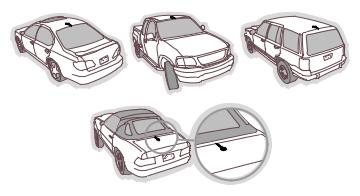
Figure 9 shows the optimal mounting location for the antenna on several types of vehicles. These mounting positions should be observed when installing the antenna:
Sedan/Coupe |
Pickup Truck |
SUV/Mini-Van |
Convertible
Figure 9
•Sedan/Coupe/SUV/Mini-Van: Install the antenna at the rear center of the roof, near the rear window.
•Pickup Truck: Install the antenna at the front center of the roof, near the windshield.
•Convertible: Install the antenna at the front center of the trunk lid, near the rear window.
22 Installation
The SIRIUS antenna needs to have an unobstructed area of 3 inches by 3 inches around it. It is important to mount the antenna where no obstructions will block the antenna from receiving the SIRIUS signal. Objects which can obstruct the antenna could be a roof rack, a sunroof, a roof-mounted cargo container, another antenna, etc. If your vehicle has a potential obstruction, be sure that the SIRIUS antenna is mounted at least 3 inches away from it (but no closer than 3 inches from the edge of the roof or trunk lid).
Note: Read the DO and DO NOT installation tips beginning on page 32 for additional antenna installation information.
Follow this procedure to mount the antenna:
1.Select an appropriate mounting position for your type of vehicle that has an unobstructed area of 3 inches by 3 inches around the antenna.
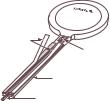
2.Attach the Rubber Cover/Tail to the antenna, as shown in Figure 10, and press the antenna cable into the rubber cover/tail. The Rubber Cover/Tail will help to position the antenna the correct distance from the edge of the roof or trunk lid.
Protective |
|
Strips |
Strain |
|
|
|
Relief |
Rubber Antenna
Cover/Tail
Cable
Magnetic Antenna
(Upside-Down)
Figure 10
3.Clean the surface area of the vehicle where you will be installing the antenna with the alcohol prep pad.
Installation 23
4.Peel the protective material from the adhesive strips (see Figure 10, on page 23) and press the rubber Cover/Tail firmly into place on the vehicle.
5.Double check that the location of the antenna and rubber cover/tail are correct, and continue to press firmly down on the Rubber Cover/Tail for another 30 seconds. At room temperature (68° F), maximum adhesion usually occurs within 72 hours. During this period, avoid car washes and other contact with the antenna and the Rubber Antenna Cover/Tail.
Cable Routing
After you have mounted the antenna you can route the antenna cable to the SIRIUS Vehicle Dock. Separate antenna cable routing procedures are provided for each type of vehicle: Sedan/Coupe, Pickup Truck, SUV/Mini-Van and Convertible.
Note that additional breakout illustrations for each step of the antenna cable routing procedures can be found on the SIRIUS website at http://www.sirius.com. Click on the
Install/Activate link and then follow the link for the Car Installation Tips.
24 Installation
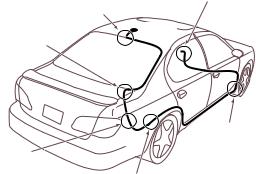
Sedan/Coupe Antenna Cable Routing Procedure
Figure 11 shows how the antenna cable should be routed from the antenna to your Starmate ST5 in a sedan/coupe.
1. Feed Cable Under |
6. Bring Cable Out To |
Rubber Molding |
SIRIUS Receiver |
Around Window |
Location |
2. Route Cable Out of |
|
Window Molding and |
ANTENNA |
Into Weatherstripping |
|
Around Trunk Opening |
|
3.Route Cable Along Trunk Wall and Into Cabin
5. Bring Cable out from Trim and Route Under Carpet to Dashboard or Console.
4.Route Cable from Trunk Under Interior Trim, into Cabin and Towards Front of Vehicle
Figure 11
Follow these detailed cable installation instructions:
1.Feed the cable from the antenna underneath the rubber molding around the rear window. Use a plastic putty knife or similar object to lift the rubber molding around the rear window and tuck the antenna cable underneath the molding. Route the antenna cable around and down the window to the lowest point. If your rear window does not have rubber molding, SIRIUS recommends consulting with a professional installer.
Installation 25
2.Route the antenna cable out of the window molding and into the rubber weather stripping around the trunk opening. Lift the weather stripping from the opening and tuck the cable inside it, then replace the weather stripping. To avoid sharp bends in the cable, run the cable inside of the weather stripping for a few inches, then remove the cable from the weather stripping inside of the trunk. Keep the cable away from hinges, gears, etc., that could damage it.
3.Route the cable out from the rubber weather stripping and along the trunk wall. Continue routing the cable into the cabin through a conduit or along an existing wiring harness.
4.Route the cable through the main cabin area under the interior trim, towards the front of the vehicle. Use the plastic putty knife to lift the plastic trim just enough to tuck the cableunderunderneath.Avoidsideairbaglocationsonbackpillarsandabovethedoors. (Airbag locations are marked with “SRS” logos.) Be careful not to crimp or cut the cable.
5.Bring the cable out from the trim near the firewall and route it under the carpet toward the dashboard or console. Coil any excess cable in a hidden location, such as under the carpet, keeping it away from any vehicle pedals or controls. Secure the excess cable with wire ties.
6.Bring the end of the cable out at the SIRIUS Vehicle Dock location. Leave yourself enough cable so you can easily connect it to the antenna connector on the Vehicle Dock.
26 Installation

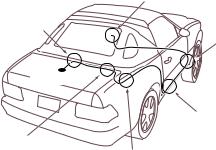
Pickup Truck Antenna Cable Routing Procedure
Figure 12 shows how the antenna cable should be routed from the antenna to your Starmate ST5 in a pickup truck.
ANTENNA 
1. Route Cable Under
Rubber Molding
Around Windshield
2. Continue Tucking Cable
Under Molding To
Bottom of Windshield
5. Bring Cable Out to SIRIUS Receiver Location
4.Bring Cable out from Weatherstripping and Route Under Carpet
3.Route Cable Out of Molding and Into Weatherstripping Around Door Opening. Continue to Bottom of Door Opening.
Figure 12
Follow these detailed cable installation instructions:
1.Use a plastic putty knife or similar tool to lift the rubber molding around the windshield and tuck the antenna cable underneath it.
2.Continue tucking the cable underneath the windshield molding around the windshield to the lowest corner.
Installation 27
3.At the lowest corner of the windshield, route the cable out of the windshield molding and into the rubber weather stripping around the door opening. Lift the weather stripping from the opening and tuck the cable inside it, then replace the weather stripping. Run the cable inside of the weather stripping to the bottom of the door opening.
4.Pull the cable out of the weather stripping at the bottom of the door opening and route it under the carpet toward the dashboard. Coil any excess cable in a hidden location, such as under the carpet, keeping it away from any vehicle pedals or controls. Secure the excess cable with wire ties.
5.Bring the end of the cable out at the SIRIUS Vehicle Dock location. Leave yourself enough cable so you can easily connect it to the antenna connector on the Vehicle Dock.
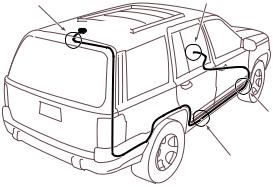
SUV/Mini-Van Antenna Cable Routing Procedure
Figure 13 (oppposite) shows how the antenna cable should be routed from the antenna to your Starmate ST5 in an SUV or a Mini-Van.
28 Installation
1. Feed Cable Under |
4. Bring Cable Out To |
Rubber Seal Around |
SIRIUS Receiver |
Hatch Opening |
Location |
|
ANTENNA |
3. Route Cable
Under Carpet
to Dashboard
2. Route Cable Under Interior
Trim, into Cabin and
Towards Front of Vehicle
Figure 13
Follow these detailed cable installation instructions:
1.Feed the antenna cable underneath the rubber weather stripping of the rear tailgate window/door and route the cable along the rear hatch. Lift the weather stripping from the opening and tuck the cable inside it, then replace the weather stripping. Pull the cable out from weather stripping and route it into the cabin under the interior trim. Avoid hinges or gears that could crimp or cut the cable.
2.Route the cable through the SUV’s main cabin area under the interior trim, towards the front of the vehicle. Use a plastic putty knife to lift the plastic trim just enough to tuck the cable under underneath. Avoid side airbag locations on back pillars and above the doors. (Airbag locations are marked with “SRS” logos.) Be careful not to crimp or cut the cable.
Installation 29
3.Bring the cable out from the trim near the firewall and route it under the carpet toward the dashboard or console. Coil any excess cable in a hidden location, such as under the carpet, keeping it away from any vehicle pedals or controls. Secure the excess cable with wire ties.
4.Bring the end of the cable out at the SIRIUS Vehicle Dock location. Leave yourself enough cable so you can easily connect it to the antenna connector on the Vehicle Dock.
Convertible Antenna Cable Routing Procedure
Figure 14 shows how the antenna cable should be routed from the antenna to your Starmate ST5 in a convertible.
6. Bring Cable Out To
SIRIUS Receiver Location
1.Bring Cable from Antenna Into Inside of Trunk Lid
5.Bring Cable out from Trim and Route Under Carpet to Dashboard or Console.
ANTENNA
2.Tape Cable Along Inside of Lid to Hinge Strut
3.Tie Cable to Hinge Strut, Allowing Slack for Lid to Open and Close. Route Cable Into Cabin
Through Existing Wire Channel.
Figure 14
4.Route Cable from Trunk Under Interior Trim, into Cabin and Towards Front of Vehicle
30 Installation
 Loading...