


4522
4522/452516605
6011/60142162411/6142
7011
SINGER
Congratulations
Enhorabuena
As
the
owner
of
a
new Singer
sewing
Como
propietario
de
una nueva
maquma
machine, you
are
about
to begin
an
do
coser
Singer,
oata
a
punto
de
comen-
exciting
adventure
in
creativity.
From
the
zar
una
apasionante
aventura de crea-
moment
you
first
use
your
machine,
you
tividad.
Desde
el
primer
momento,
sabra
will
know
you
are
sowing
on
one
of
the
que
esta
cosiendo
con
una
de
las
easiest
to
use
sowing machines
ever
maquinas
de
coser
mts
sencillas
do
made.
manejar
que
jamas
so
ha
fabricado.
in
addition
to
the
many famitiar
SINGER
Ademas do
las
muchas
exdusividades
exclusives, like
a
removable
extension
table
SINGER,
como
la
base
de
extensin
and
a
friction-free
spoot
holder,
this
machine
desmontable
y
et
tope del
portacarrete
de
ofters you
these
features:
friccb6n
libre, esta
maquina
le
of
rte
las
sigulentes
caracteristicas:
*
Zig-zag
stitching
for
butonholes,
mending
and decorative stitches.
*
Punto
zg-zag
para remiendos
y
adomnos.
.
Built-in 4-step
buttonholer
that
takes
the
*
Sistema Incorporado
para
hacer
oales
en
4
difculty
out
of
making
a
buttonhole.
(4525
tiempos,
lo
que
evita
la
diftcuitad
do
hacer
un
only). ojal.
(4525
solamente).
*
Blindstitching
for
Invisible
hems.
(4525
only).
.
Puntada
ciega
para costuras
invisibles. (4525
.
Easy
to
find
"Letter-Coded"
Acces-
soamente).
sories.
.
Accesorios
do
facil identiticaci6n
.
Drop
in
front
bobbin
for
easy,
quick
mediante
"cod*icaci6n
de
letras".
bobbin
replacement
*
Bobina
de
colocaci6n
frontal
para
*
Simple
stitch
length
dial
and push
recambio
sencillo
y
rtpido.
button
revers
stitching.
.
Dial
para
longitud
del
punto
y
bot6n
*
Snap-on
presser
feet
that
are
quickly
para
puntada
reversible.
removed
and
easily
replaced.
*
One-way
needle
insertion
that
makes
.
Prensatelas
de
colocaci6n
instan-
it
impossible
to
insert
the
needle
tenea.
que
se
quita
y
pone
con
rapidez
incorrectly.
y
facilidad.
May
we
recommend
that
before
you
start
*
Inserci6n
de
Ia
aguja
en
una
s61a
to
use
your
swing
machine,
you
discover
posici6n
que
hace
imposible
su
colo-
the
many
advantages and
the
ease
of
caci6n
incorrecta.
operabon
by
going
through
this
instuc-
Nos
pormitimos recomendarle
que
antes
tion
book,
step
by
step,
sated
at
your
do
comenzar
a
utilizar
su
maquina
de
machine.
coser,
descubra
todas
las
ventajas
y
Is
facilidad
del
manejo
al
hojear
eo
libro
de
instrucc,ones,
paso
a
paso,
sentada
delante
de
su maquina.
Con
el
fin
de
que
siempre
tenga las
To
ensure
that
you
are
always
provided
caracteristicas
de
costura
mas
moder-
with
the
most modern
sewing
capibilibes,
nas,
el
fabricante
se
reserva
eo
derecho
the
manufactur
rserves
the
right to
de
modificar
la
apariencia,
diseho
o
changetheappearance,designoracces-
accesorios
de
esta
maquina
de coser
sorles
of
this
sewing machine
when
cuando
lo
estime
necessarh.
considered
necessary.
%
'A d The
an
cOehs
Unms.
rde fit. r
.
hw
Se
rCw
cp
etecW
Ths SINGER
cOW4
R.id
ID W
the
SINGER
C
~r
A" ~ l tmel R
b_
thE r_ nrdf_
F060t~ns
0~
CAJO~
Ywo
M~MWW
"
kW
b~,r~ce
vbvs
voiel
pto~
ka
worfe,
you
ro~
Are
0~
Nu~
of
macilkle
a
coudw
069
is
~
youff
~h,4
m~
in
*m
~
~
qwoe
aaa
fit
"i*m
fa
plus
al~
de
yous
an
En
pk%
dos
ftn~
et
lb~#wkwo~
c~
N~on
s~
moo
m
:=z
poor
b~nn~
M~
et
ote~~powtos~(4m
La
smection
fa~
daa
sco~
os
E~
O~
grace
aux
W~
O~
sub~
*Lamlseohj~~dwtaca~
•
Le
disque
do
~ur
de
prAnt
at
te
bo~p~
id*M~
w~
0110
•
Los
p~
pr~
A en~ch~
0~90
diroct
m~
et
~3
0,
co
•
Le
pin~*&
fa
marts
unN"
quf
Wto
une
mew~miw
an
place
do
1,aigvol&
Nous
You*
ro~ni*~
avam
do
com~noor
A
coutim
de
life
bmchur^
~
P~
~m
do~
~400"
NO"
Vous
h)
At
no~w
A
00~
I~CO
A
tm
clw
de~s,ono"deb~
ro-
~ro
M~
a v~
tea
*ern**
00dootWmements
do
)a
to
*~(
so
r~
to
dmh
de
chargor
P~CO
dillow
4~0
de
00
M~
sivii
so
Ocea~
1~
f
do
bhd
W:
te
S*h FeS
.........
.
...
'
C'
1
.Siyblo
m
do
C
~l............
,,,1
Wbii ~~~~~~~.............
---
14
0~j
.............
A_l2
WF.~~~~~~~~~~~~~~~C
anch
do
------
;14
gsS~~~~~~~~~~~~2
. .
.....
do
Hb
y0
h
B
..............
d .
-ih_
...........
~~~~~~~~~...
t -i''
<24
Dlb3........4fit
3''"
~~~~~..........
... f.'.".
25
n
oS'do
'i
^^-"--"...a Z
.........
~.a
xw
n
26
t$iS
*s
-~....
.
de
~...
...
AF3!
1
1
28
J§,Fl*,IC.,,
..........
.......
,.,,
una
Zi~b
... s
._..
34
_~~~~~~~~~~~~~~~~W
.. .
_.,
........
... --
K...........
.
........
=~~3
Q
I
~
----
......
,=,_.....3 4Pn *''
S
~~~~~~~~~~~~~M4.
,.s,
. s.
..........
..........
saii3 dFEopt,3!
v!v+t+w~~~~~~~~~~~~~~~~~~~~~~~.wStMM.asv..........
+
¢
Z91*dlt1
s
>i
~~~~~~~~............
........ 2bqqu ,v!4
F P ,,f42,5,,.,,,,,
......................
4BPl1 a93''6
)
~
~ ~~~~...
7. C~S
Con
eOcg
e
A
....
_;:::::_'::X
..
7
_aCIb_D
.................
+*6
;t~~~~~~._..................,
_
......
-i,
.
Notn
pe~noloo
N~
pwwnyMbm
3.
.....
47
PM
2~
~
.........
.......
....
47
6.
C~
BE6M
7.
P~o~
............
......
P~
cbmw
l~------
....
........
~
=
I*
~ne-
.
......
POLC
19

1,
Getting
to
know
your
machine
Conocimiento
de
su
maquina
Faites
connaissance
avec
votre
machine
Principal
parts
Partes
Pieces
Principales
principales
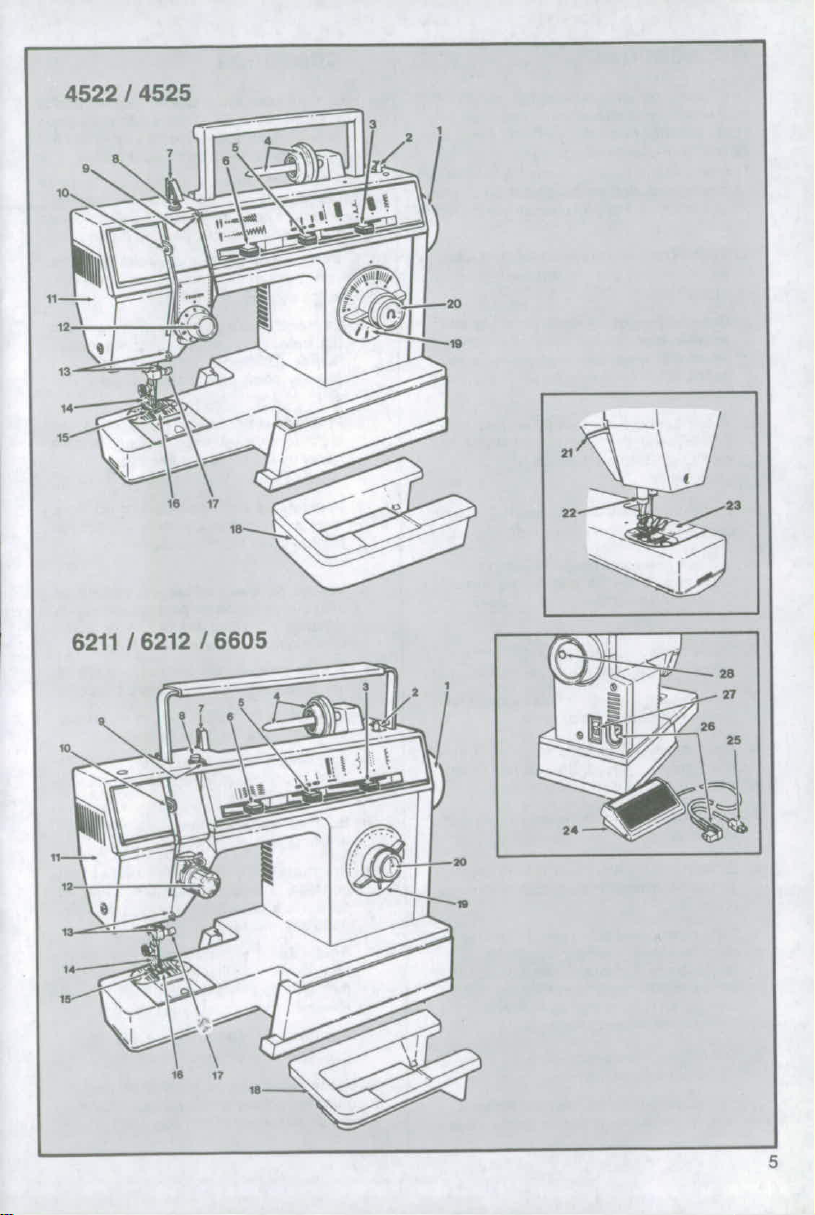
1.
Hand
wheel
2.
Bobbin
winder
1.
Volante
1.
Le
volant
3.
Pattern
selector
lever
2.
Devanador
2.
Devidolr
(4525
only)
33
Pa.a
*eWcclon
diseho
3
Seiecteur
de
point
3.
Palce
selction
lseAo(4525
seulement)
4.
Horizontal
spool
pin
(4525
solamente)
4.
Porte-boblen
horzontal
and
holder
4.
Tope
y
perno
portacanrte
et
Potri
ne
5.
Needle
position
selector
do
ticcion
libre
5.
Sbectour
do
position
6.
Stitch
width
lever
5.
Selector
posIcIon
aguja
d'aiguilo
7.
Snap-in
thread
guide
6.
Palanci
anchura
del
punto
6.
SdAecteur
do
lbrgeur
de
8
Bobbin
winder
tension
7.
Guib-hihl
por
insrtion
7
i
Gutde-t
i
tenb
dIsc
6.
DIsco
tension
del
8.
Tension
du
devidoir
9.
Thread
guide
dovanador
9.
Guide-fi
10.
Take
up
lever
9.
Gul-hilo
10.
Releveur
do
il
11.
Face
plate
10.
Palanca
tire-hiIs
12.
Plauen
don
12.
Needie
thread
tension
11.
Platc
frontal
13.
Guides-flil
dial
12.
Dial
tension
hil
deola
14.
Pied
preseurhoencin-
13.
Thread
guides
agujp
chement
dirct
14.
Snap
on
presser
loot
13.
Guis-hlo
15.
Gritb
d
entrainement
18.
Plaque
A
alguflie
15.
Feed
system
14.
PrenstOa
do
colocacion
17.
Pinto
aigulle
A
sen
16.
Hostile
plate
instantene
unique
16.
Oneedlye
plateclamp
St
do
eranastre
18.
Tablet#
amovibe
17.
One-way
noodle
clamp
516
Plencha
de
agula
19.
SMoour
do
longueur
18.
Removable
extension
do
point
table
17.
Sujetador
aguiae
20
Boutontdmarch*
19.
Stitch
length
dial
uncaarbr
19.
Sttch
lngth
hat18.
Base
do
axtention
21.
Releveur
dlu
pied
20.
Push
button
revene
d
emontabno
presseur
21.
Presser
toot
lifter
19.
Dial
longitud
del
punto
22.
Coupe
fil
22.
Thread
cutter
20.
Boton
puntb
reverible
23.
Plaque
glirriere
24.
Rh6iestat
23.
Slide
plate
21
ESndor
prennitebla
24.
Price
do
branchemeoi
24.
Foot
control
22.
Corta-hles
electrique
25.
Electrical
lad
23
Pe
cored
ra
26L
Fiche
de
branchement
26.
Machine
plug
24.
Controiedor
velocldad
lmpne
27.
Power
and
light
switch
25.
Cordon
28.
Debrayage
28.
Bobbin
winding
indent
26.
Enchuto
miqulna
27.
Intenupteor
te
y
luz
28.
MAldor
volante
pars
bobinado
4
45221
4525
12~~~~~~~~~~~~~~~
1S
7
i--
t5
t,g~~~~~~~~~~~~~~~~~~~~~~~~22
6211
1
6212
1
6605
2
28
I~~~~~~~~~~i
Accessories
Accesorios
The
following
accessories
furnished
with
Los
siguientes
accesorios,
suministrados
yoursewingmachinearedesignedtosimpliy
con
su
mhquina
do
coser,
estbn
disehados
your
sewing
projects
and
increase
the
para
simpliticar
sus
proyectos
de
costura
y
versatility
of
your
machine.
aumentar
la
versatilidad
de
su
maquina.
The
letter
in
a
circleadjacentto
the
illustrated
La
tetra
quo
observe
al
tado
de
la
parte
pafl
is
reproduced
on
the
part
itself
to
help
ilustrada
oat&
grebda
en
cl
accosoria
y
you
selectthecorrectattachmentforthetype
Setr
pare
oasergurarlo
que
ha
se
Prccionado
of
work
you
are
doing.
cl
accesorIo
adecuado
pare
su
prop6sito.
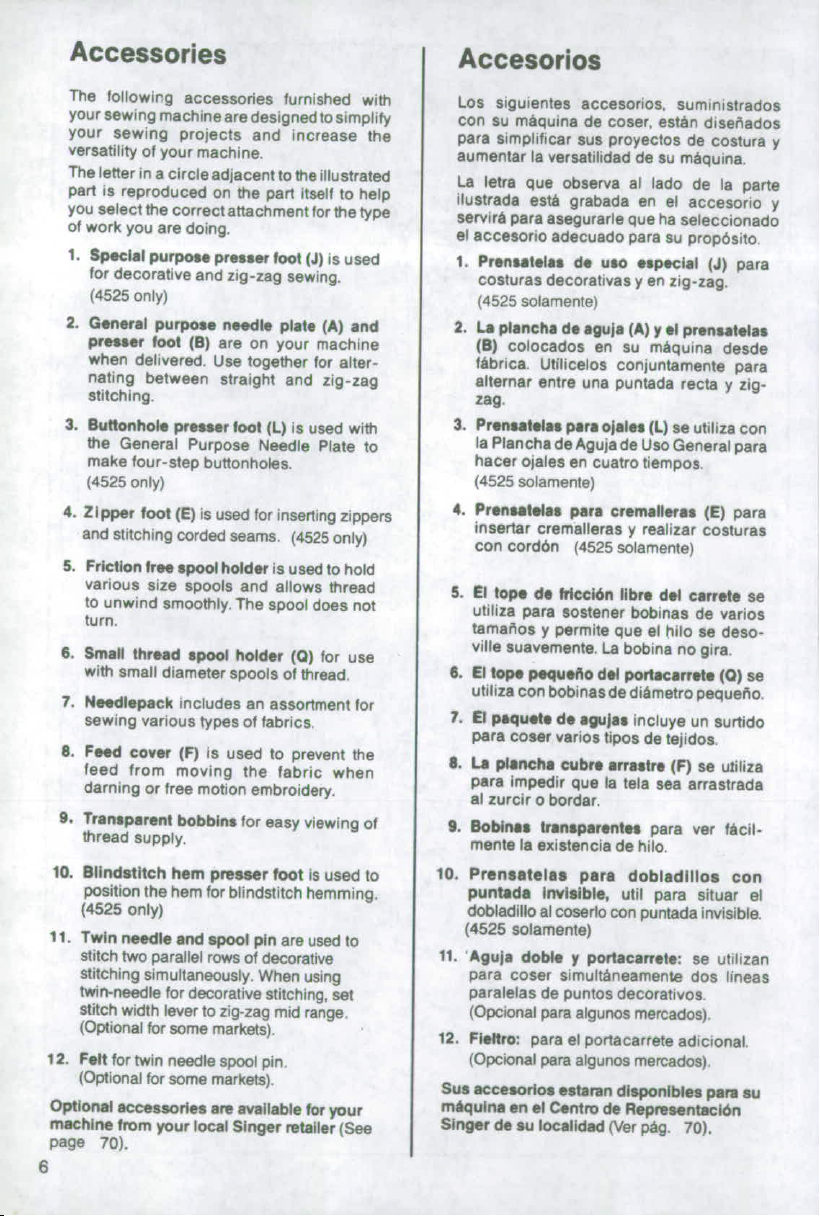
1.
Spaclalpurpepr
orfnt
(J)isuseeU
1.
Preonetiast
do
uto
epecial
(d)
para
for
decorative
and
uig-zag
sewing.
costuras
decorativas
y
en
zig-zag.
(4525
only)
(4525
solamente)
2.
Gnrals
purpohae
needle
plate
(A)
and
2.
LA
plancha
do
aguia
(A)
y
d
prensatetas
pre
foot
(B)
are
on
your
machine
(B)
colocados
en
su
mbquina
deade
when
delivered,
Use
together
for
alter-
fabrice.
Utilicelos
conjuntamente
para
nating
between
straight
and
zig-zag
eiternar
entre
una
puntada
recta
y
zig-
stitching.
zag
3.
Buttonhoek
prar
foott
(L)
is
used
with
3.
Pre~tal,.
pert
ou
(L)
so
utilize
con
the
General
Purpose
Needle
Plate
to
fa
Plancha
de
Aguja
de
Uso
General
pare
make
four-step
buttonholes.
hacer
opales
en
cuatro
tiempos.
(4525
only)
(4525
solamente)
4.
ZIpper
foot
(E)
is
used
for
inserting
Dppers
4.
Prentae
pea
cr
rurlwas
(E)
pare
and
stitching
corded
seams.
(4525
ony)
inserter
cremalleras
y
realizar
costuras
con
cordon
(4525
Woamente)
5.
Friton
tne
spool
hor
is
used
to
hold
various
size
spools
and
allows
thread
5.
El
tN
de
Mc6e,
fibre
dot
catoe
se
to
unwind
smoothly.
The
spool
does
not
utilize
pare
sostener
bobinas
do
varnos
turn.
tamailos
y
pormito
que
eo
hilo
se
deso-
6.
Sm~tt
thrttead
*po~i
holder
(O)
for
use
ville
suavemente.
La
bobina
no
gira.
with
small
diameter
spools
of
thread.
8.
El
to
pepqwhodt
por
t
brr
(0)
se
ubtize
con
bobintas
do
dihrnetro
pequeto.
7.
Needlepak
includes
an
assortment
for
sewing
various
types
of
fabrics.
7
El
ptiut.
d.
*uWas
incluye
un
surtido
pars
cater
verios
tipos
do
tejidos.
8.
Feed
cover
(F)
Is
used
to
prevent
the
P.ra
pOne
cbr
s
de
tesiF)so
feed
from
moving
the
fabric
when
8p
La
p
rht
cuo
tre
*trea
sFe
se
utiriza
darning
or
free
motion
embroidery.
par
impedir
que
r
.
la
sea
*nrstrada
S.
Transprent
bobbin,
for
easy
viewing
of
9
Boba
trnmpttrentee
para
eer
vn
cil-
thread
supply.
mente
ta
oxistencia
de
hilo
10.
Blindetitch
horn
pressr
foot
is
used
to
10.
Preneeteles
pare
dobladillos
con
position
the
hem
for
blindstitch
hemming.
puntd
ImnVible.
util
para
situar
el
(4525
only)
dobladillo
al
cosedo
con
puntada
invisible.
11.
Twin
noodle
and
spool
pin
are
used
to
(4525
solamente)
stitch
two
parallel
rows
of
decorative
11.
Aquja
deb.
y
portctarrtb
se
utilizan
stitching
simultaneously.
When
using
para
coser
simultaneitmente
dos
lineas
tvwin-nedle
for
decorative
stitching,
M
paralolas
do
puntos
decorativos.
stich
width
lever
to
zig-zag
mid
range,
(Opcional
para
algunos
menados).
(Optional
for
some
markets).
12.
F
i:
para
ei
portacarrete
adicional.
12.
Fet
for
twin
needle
spool
pin.
(Opoal
par
algunos
mercados).
(Optional
for
some
markets).
Sw
r_coso
sern
disponibi
pen
mu
Optional
acnceasonle*ra
av
Ilable
fr
your
mrnqul
en
-
tof
Cotro
do
Rimet
I
machine
ftrom
your
local
Singer
retailer
(See
Singer
do
su
iloktaId
(Vr
pg.
70).
Page
70).
6

Accessoires
Loa
accessoires
suivants
sont
foumis
avec
votue
machine
pour
faciliter
(a
couture
et
augmenter
les
possiblit6s
de
votre
machine.
La
letre
que
vous voyez
illustree
se
trouve
sur
la
piece
elle-meine
et
vous
permet
de
selectionner
rapidemenm
'accessoire
cor-
)1_0O
respondant
A
vos
besoins.
D
2 o.1
Pled
bourdon
(J):
vous
I'utiliserez
pour
lea
points
decoratifs
et
ceux
A
base
de
zig-zag
(bourdon).
(4525
seulement)
2.
Plaque
S
aiguille
untvtle
(A)
et
pled
Q
3
pr
tteur
unlvert
():
c'est
lV6quipe-
ment
de
votre
machine
lors
de
la
livraison.
Ces
deux
accessoires
sont
A
J S
<
~~~~~~~~~utiliser
conjointement pour
passer
rapidement
du
point
droit
au
point
de
_
~~~zig-zag.
NGSINCER
3
PM
dboutonnir
(L):
a
utiliseravecla
5paque
universelh
(A)
pour
realiser
lea
] | Lt
glL
~~boutonnieres
4
temps.
(4525
seulement)
4
Pled
ganseur
(E):
pour
poser
des
fermturs
4glisslAbre
et
des
ganses
en
|ameublement.
(4525
seemens
6
I
Grand
Hrter
maintient
en
place
Is
fn I
l
l l
ll
ll
1
1lbobines
sur le
porte-bobine.
Son
(SI
T
1
i
diametr
s'adapte
A
celui
des bobines
.6 Petit
Sibr
(0):
pour bloquer
les
lusettes
ou
petitos
bobines.
7
i.1 | oX
>
7 Atwrtiment
d'aIgutlle:
do
diHerentes
grosseurs
et
pour diffhrents
types
de
tissus.
8.
Couw.-gnl
(F)i
elimine
l'action
des
I i) I
-
j C
i
U
grilles
dantrainement
pour realiser
r
i
II
}
t
l
1reprlsesetbroderiesA
main
Iev6e
-
-rni
|
9.
Canodle
transparent~.
permettent
un
tF1
))
controle
facile
do
Ia quantite de
fit
disponible.
10.
Pled
point
cachS;
permet
de
bien
positionner
le
tissu
pour
la
couture
d'ouriets
au
point
cache.
(4525
seulement)
1, tI <
11.
Laiguille
jumnel
*t
I
port.
bobine
auxtlairr.
Ces
deux
accessoires
sont
utilises
pour
coudre
simultanement
A
deux
file.
Attention:
lors
de
la
couture
A
laiguille
1lumIele,
Ia
selection de largeur
de
point
ne
doit
pas
dipasser
le
milieu.
v
!
F
10
L
(Facultatifs
pour
certains
marchAs).
12.
Feutre
pour
le
porte-bobine auxillaire.
(Facultatits
pour
certains
marches).
Des
sacssoires
facultatfta
peuvent
vous
ite
foumlb
par
vot. teprtsentant
Singer
iVoz
page
71).
7
2^
Getting
ready
to
sew
Preparacion
para
coser
Pour
bien
coudre
Important
safeguards
1.
Unplug
the
machine
at
the
socket
when
changing
needles.
feet.
or
needle
plates,
or
when
leaving
the
machine
unattended.
This
eliminates
the
possibility
ol starling
the
machine
by
accidentatly
pressing
the
speed
controller,
2.
Before
removing
the
bobbin
case,
unplug
the
machine
at
the
socket.
3.
Because
of
the
up
and
down
movement of
the
needle, you
must
work
carefully
and
watch
the
sewing
area
when
operating
the
machine.
4.
Do
not
pull
the
fabric
while
you
are
stiching
as
this
may
deflect
the
needle,
causing
it
to
break.
5.
Before
cleaning
your
machine,
it
must
be
unplugged
at the
socket.
6.
Do
not attempt
to
adjust
the motor
belt.
Contact
your
nearest
Service
Centre
or
an
authorized
SINGER
dealer
should
any
adjustment
be
required.
7.
Before
changing
light
bulb,
make
sure
you
have removed
plug
from
socket
outlet.
Be
sure
to
replace
the
face
plate
which
covers
the
light
bulb
before
operating
the
machine.
8.
This
machine
Is
designed
to
use
a
1
5-watt
maximum
light
bulb.
This
product
is suppressed
for
radio
and
television
interference
with
the
International
Electro-
technical
Commission
requirements
of
the
CISPR.
Machines
for
Great
Britain and
some
other
countries
having
similar
wiring
standards
are
shipped
from
the
lactory
without
a
plug
for
connecton
to
the
mains.
The
wires
in
this
mains
lead
are
coloured
in
accordance
with
the
following
code:
Blue:
neutral
(N)
Brown:
live
(L)
As
the
colours
of
the
wires
in
the
mains
lead
of
this
appliance
may
not
correspond
with
the
coloured
markings
identifying
the
terminals
in
your
plug,
proceed
as
follows:
The
wire
which
is
coloured
blue
must
be
connected
to the
terminal
which
is
marked
with
the
letter
N
or
coloured
black.
The
wire
which
is
coloured
brown
must
be
connected
to
the
terminal
which
is
marked
with
letter
L
or
coloured
red.
It
a
13
Amp,
(BS
1363)
plug
is
used,
a
3
Amp.
fuse must
be
fitted,
or
if
any
other
type
of
plug
is
used,
a 5
Amp
fuse
must
be
fitted
either
in
the
plug
or
adaptor
or
at
the
distribution
board.
Neither
core
is
to
be
connected
to
the
earth
terminal
of
a
three-pin
plug.

Precauciones
importantes
1.
Desconrcte
la
mdquina
do
la
red
at
cambiar
las
aguias. pronsatelas
o
planchas de
agulas,
o
al
dejar
la
mdquina
dosatendida,
Esto
elimina
la
posibibdad
de
hacer
funcionar
la
miquina
al presionar
el
controlador
de
velocidad accidentalmente,
2.
Antes
de
sacar
la
caja
de
bobina,
desconecte
ia
miquina
de
la
red,
3.
Debido
at
movimiento
ascendente
y
descendente
de
la
aguia, debera
trabajar
cuidadosamente
y
observar
cl
Area
de
costura
al
manejar
la
mdquina.
4.
No
tire del
genero al
coser,
ya
que
esto
puede
desviar
la
aguja
y
producir
su rotura,
5
Antes
de
limpiar
su
miquina,
desconectela,
6
No
intnte
ajustar
fa
correa
del
motor.
P6ngase
en
contacto
con
el
taller
autorizado
mds
cercano
en
cl
caso
de
necesitar
cualquier
ajuste.
7
Antes
de
cambiar
la
bombilla,
asegorase
de
haber
desconectado
el
enchufe
de
la
red
Antes
de
accionar
la
mdquina,
asegurese de
haber
colocado
la
placa
Irontal
que
cubre
la
bombilla.
8
Esta
miquina
estb
disefiada
para
usar
bombillas
de
15
W.
como
miximo.
Este
producto
ha
sido suprimido
para
hacer
Irente
a
los
parasitos
de
la
radio
y
de
fa
television
de
contormidad con
las
exigencias
tormuladas
por
la
Comisicn
Etectrotecnica
lnternacional
de
la
CISPR,
Important
1.
Ddbranchez
la
machine
lorsque
vous
changez
d'aiguilles,
de
pieds
presseurs
ou
de
plaque
d
aiguille
ou
lorsquevous
abandonnez
votre
machine d'une
tac;on
inopinbe. Cette
precaution
elimine
une
mise
en
marche
accidentelles
2.
Avant
de
retirer
le
support
de
canetle,
debranchez
la
machine
3.
A
cause
du
mouvement
de
laiguille,
fates
attention
et
suveiltez
la
zone
de
travail.
4.
Ne
tirez
pas
le
tissu
pendant
Ia
couture,
celo
risque
de
torde
l'aiguille
ou
de
la
casser
5.
Avant
de
nenotyer
votre machine
debranchez-ta.
6,
N'essayez pas
d'ajuster
ta
courroie
du
moteur Ce
rg1agoe
sera
fait
par
votre
magasin
SINGER.
7
Avant
de changer
ltampoule,
dibranchez
votre
machine
et
replacez
la
plaque
do
protection
avant
de
remettre
la
machine
en
marche.
6,
Utilisez
pour
votre machine
des
ampoules
de
15
watts
maximum,
Co
materiel
est garanti
anti-parasit6
radio et
tetlvision
par
la
Commission
CISPR.
Operating
the machine Manejo de
la
maquina
Connecting
the machine
Conexi6n
de
fa
miquina
Push
plug
(1)
into
the
receptacle
(2)
at
the
Inserte
el
enchule
(1)
en
el
recepsacuio
(2)
right
end
of
the
machine.
Then
connect
plug
colocado
a
la
derecha
de
la
mAquina.
Luego
(3)
to
your
socket
outlet.
conecte
ia
clavija
(3)
en
la
toma
de
corriente
Accionamiento
de
la
Running
the
machine
maquina
To
turn on
machine
and
sewing
light,
press
Para
poner
la
maquina
en
marcha
y
encender
upper portion
of
power
switch
(4). To
turn
la
luz,
presionar
sobre
la
pale
superior
del
off
machine
and
light
press
lower
portion
'O
interruptor
(4).
Para
apagarla presionar
la
of
power
switch.
parte
interior
(0)
de
dicho
interruptor.
To
run
the
machine
and
contol
speed.
press
Para
accionar
la
maquina
y
controlar
la
the
foot
control
(5)
with
your foot
The
harder
velocidad,
presionar con
el
pie
el
controlador
you press,
the
faster
the
machine
will
sew.
de
velocidad
(5),
A
mayor
presi6n,
mayor
To
stop
machine. remove
toot
from
control
velocidad
de costura.
Pare
parar
la
maquina,
quite
el
pie
del
controlador.
Note:
Oonotoperatemachinewithoutfabric
Note: No
accionar
la
miquina
sin
tejido
under
the
presser
foot
as
this
may
damage
debajo
del
prensatetas
ya
que puede
dariarse
the
feed
and
the
presser
foot.
el
arrastre
y
et
prensatelas.
Choosing
and
changing
Selecci6n
y
cambio
de
needles
aguias
Important
For
best
results
from
your
sewing
Impo
tnt:
Para
bos
mejores
resutbdos
de
machine,
use
only
SlNGERneedIes.
Check
su
mhquina
de
coser.
utilice
s6bl
agujas
the
needle
package,
and
the
Fabric,
Thread
SINGER.
Revise
el
paquete
de
aguias
y
ia
and
Needle
Table on
page
16
for
the
correct
labla
de
tejidos,
hilos
y
agujas de
la
phgina
needle
and
fabric combination.
17
para
la
combinaci6n
correcta
de
.
Raise
needle
to
its
highest
position
aguia
y
teldo.
*Eleve
la
aguje
a
sui
posici6n
m&s
altb.
.
Loosen
needle clamp
screw
and
remove
needle.
*
Afloje
el
tornillo
y
saque
Ia
aguia.
*
With
flat
side
of
needle
to
the
back,
inse
*
Con
la
paee
plana
dle
I
aguja
mirando
new
needle
up
into
clamp
as
far
as
it
will
hacia
atras,
inserts
la
nues
aguja
haste
go.
Ileger
a
su
tope.
.
Tighten
needle clamp
screw
securely.
*
Ajusto
et
tornillo
fuertemente.
10
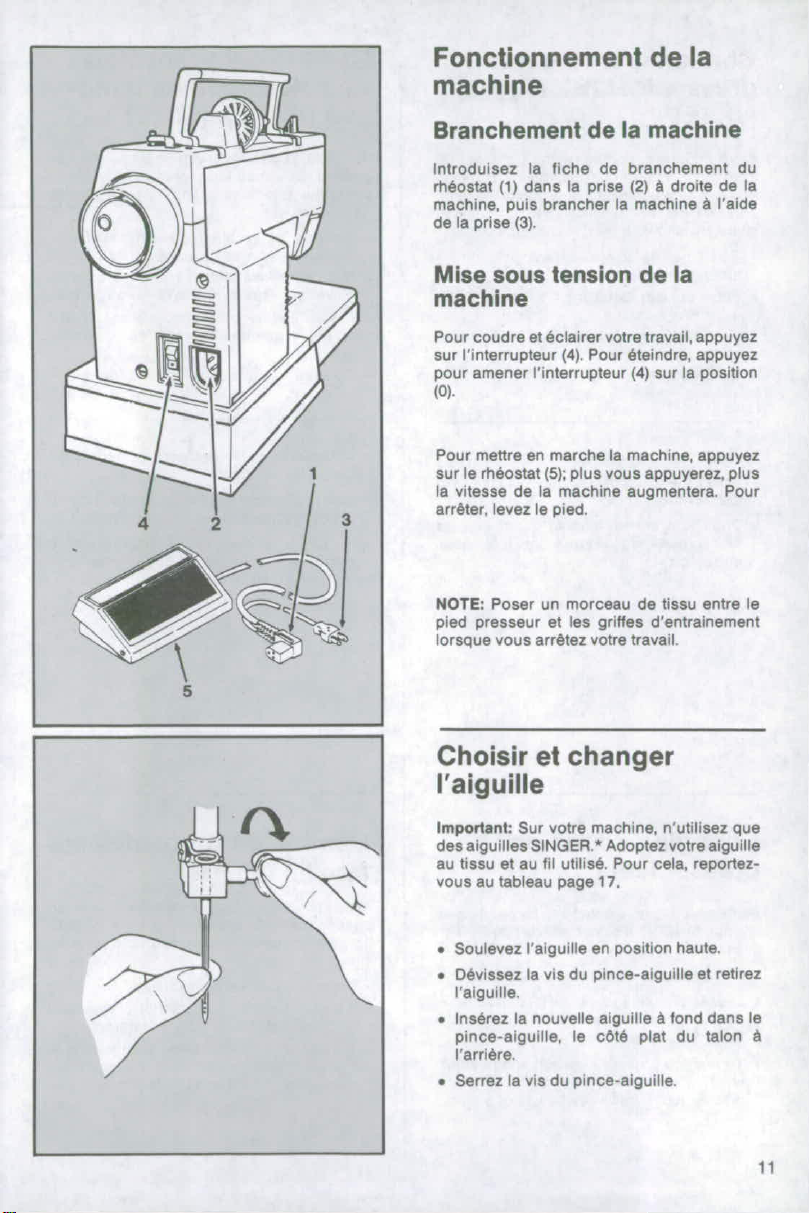
Fonctionnement
de
la
machine
Branchement
de
Ia
machine
lntrodulsez
la
fiche
de
branchement
du
rheostat
(1)
dans
la
prise
(2)
a
droite
de
la
machine,
puis
brancher
la
machine
A
I'aide
de
la
prise
(3).
Mise
sous
tension
de
la
machine
Pour
coudre
et
6ciairer
votre
travail.
appuyez
sur
l'interrupteur
(4).
Pour
6teindre,
appuyez
pour
amener
l'interrupteur (4)
sur
la
position
(0).
Pour
mettre
en
marche
la
machine,
appuyez
sur
le
rheostat
(5);
plus
vous
appuyerez,
plus
la
vitesse
de
la
machine
augmentera,
Pour
arr6ter.
levez le
pied.
NOTE:
Poser
un
morceau
de
tissu
entre
le
/
: ¢ii ~~~~pied
presseur
et
les
griHfes
d'entrainement
lorsque
vous arretez
votre
travail.
Choisir
et
changer
I'aiguille
g
^ It,
Important
Sur
vote
machine,
n'utilisez
que
des
aiguilles
SINGER.*
Adoptez
votre
aigullle
au
tissu
et
au
fit
utilise.
Pour
cela,
reportoz-
vous
au
tableau
page
17.
.Soulevez
laiguille
en
position
haute.
.
Devissez Ia
vis
du
pince-aiguille
et
retirez
1'aiguille.
.
Ins6rez
fa
nouvelle
aiguille
A
fond
dans
te
pince-aiguulle,
le
cot6
plat du
talon
A
Varribre.
.
Serrez
la
vis
du
pince-aiguille.
Changing
snap-on
Cambio
del
prensatelas
presser
feet
(B),
(D),
de
colocacd6n
instanta-
(J),
(L)
lnea
(B),
(D),
(J),
(L)
Your
machine
comes
with
the
General
Su
miquina
viene
con
el
prensatelas
de
uso
Purpose
Presser
Foot
(B)
already
attached,
general
(a).
Puede
facilmente
cambiar
dicho
You
can
easily
change
to
any
one
of
the
other
prensatelas
por
otro
bajo
las
siguientes
presser
feet
which
snap
onto
a
common
directrices.
shank
by
following
the
directions
below
*
Eleve
ta
aguja
a
su
Posici6n
mis
alta,
.
Raise
needle
to
its
highest
position
by
girando
el
volante
de
mano
hacia
Vd.
turning
hand
wheel
toward
you.
*
Suba
of
prenoatebas
utilizando
ia
pabanca
*
Raise
presser
foot using
presser
loot lifter
elevadora
situada
detras
de
la
mtquina.
at
back
of
machine.
*
Presione
cl
dedo
del
prensatelas
(1)
hacia
*
Push
toe
of
presserfoot
(1)
up,
until
it
snaps
arriba,
hasta
que
este
salga
de
su
anclaje
off
the
shank
(2).
(2).
.
Remove
toot
from
machine,
*
Ouite
cl
prensatceas
de
Ia
maquina,
*
Place new
foot
under
centre
of
shank.
.
Coloque
el
nuevo
prensatelas
debajo
del
*
Lower
presser
foot
lifter,
fitting
shank
over
centro
de
su
anclaje.
presser
foot
pin
(3).
.
Eaje
la
palanca
del
prensatelas
colocando
*
Don't
turn
screw.
Instead,
push
presser
el
anclaje
sobre
cl
eje
del
prensatelas
(3).
loot
screw
(4)
down,
firmly
until
foot
snaps
*
No
gire
cl
tornieo.
En
su
lugar,
presione
into
place,
el
tornillo
(4)
hacia
aba)o
firmemente
hasta
que
encaje
en
su
sitio.
Changing
screw-on
Cambio
de
prensatelas
a
presser
feet
(H),
(G)
tornillo
(H),
(G)
Some
special
presser
feet
can
be
purchased
Algunos
prensatelas
especiales
que
se
at
your
SINGER
stockist
which
have
built-
pueden
adquirir
en
su
centro
de costura
in
shanks
that
can
be
replaced
as
follows:
tienen
0l
anclaje
y
pueden
recambiarse
como
.
Raise needle
and
presser
foot
.
Eleve
la
aguja
y
el
prensatelas,
*
Loosen
presser
foot
screw
(1)and
remove
*
Afloje
el
tornillo
(1) y
quite
el
prensatelas
presser
foot
with
shank
(2),
guiding
it
(2)
a
uiindolo
hacia
Vd,
y
a
la
derecha
toward
you
and
to
the
right
.
Para
sustituir
Cl
prensatelas.
enganche
e0
*
To
replace presser
foot
with
shank,
hook
tronco
alrededor
de
la
barra
prensatelas
shank
around
the
presser
bar
and
tighten
y
ajuste
el
tornillo
con
una moneda.
presser
foot
screw
with
the
use
of
a
coin,
12
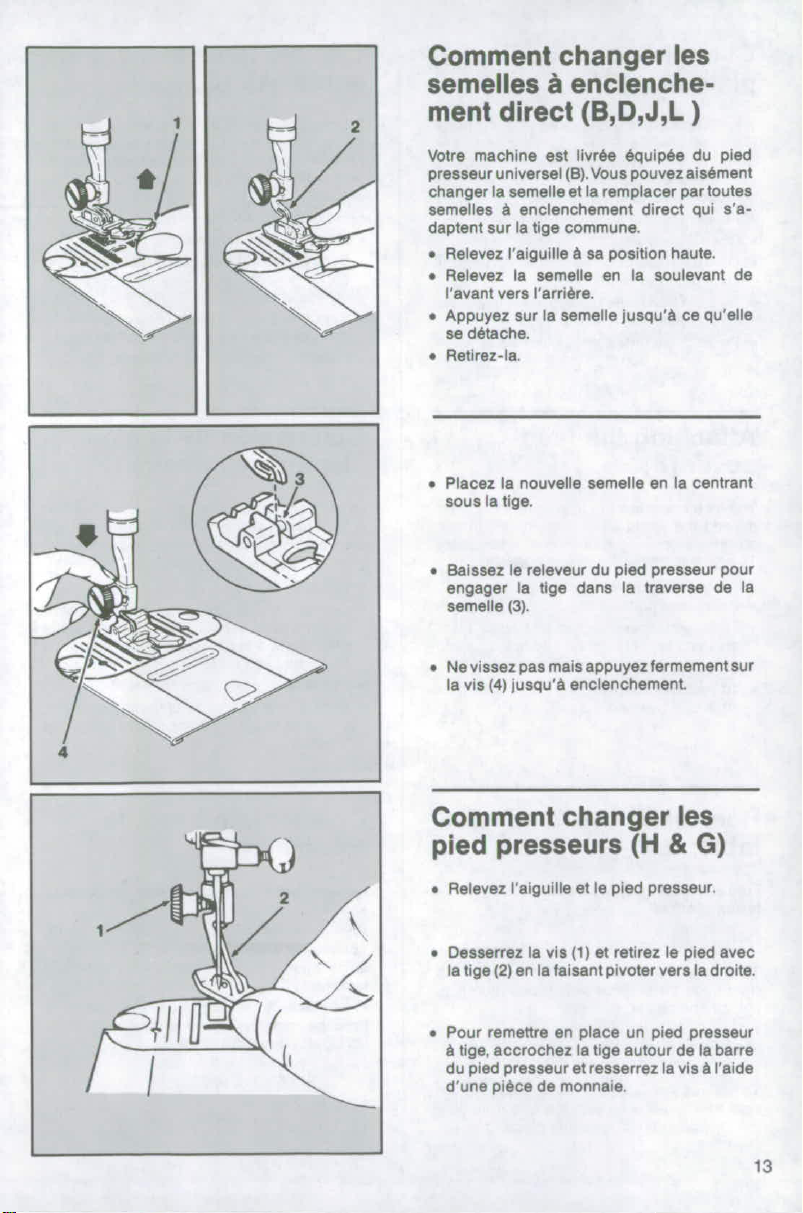
Comment
changer
les
semelles
A
enclenche-
iment
direct
(B,D,J,L
)
Votre
machine
eat
livree equipee
du
pied
presseur
universel
(i).
Vous
pouvez
alsement
changerlasemelle
t
aremplacerpartoutes
semelles
a
enclenchement
direct
qui
s'a-
daptent
sur (a
tige
commune.
.
Relevez
l'aiguille
A
sa
position
haute.
*
Retevez
Ia
semelle
en
fa
soulevant
de
I'avant
vers
larribre.
*
Appuyez
sur
la
semelle
jusqu'&
ce qu'elle
se
detache.
.
Retirez-la.
*
Placez
fa
nouvelle
semelle
en
fa
centrant
sous
fa tige.
•
Baissez
le releveur
du
pled
presseur
pour
engager
la
tge
dans
(a traverse
de
Ia
semelle
(3).
\IS
5
*
Nevissezpasmaisappuyezfermementsur
la
vis
(4)
jusqu'a
enclenchement
Comment
changer
les
pied
presseurs
(H
&
G)
*
Relevez
l'aguille
et
b
pied
presseur.
•
Desserrez
Is
via
(1)
et retirez
to
pled
avec
la
tige
(2)
en
la
taisant
pivoter
vyrs
la
droite.
.
Pour
rmettre
on
place
un
pied
presseur
A
tige,
accrochez
Ia
tige
autour
de
Is
barre
du
pied
presstur
et
resserrez
la
vis
A
l'aide
d'une
place
de
monnale.
13
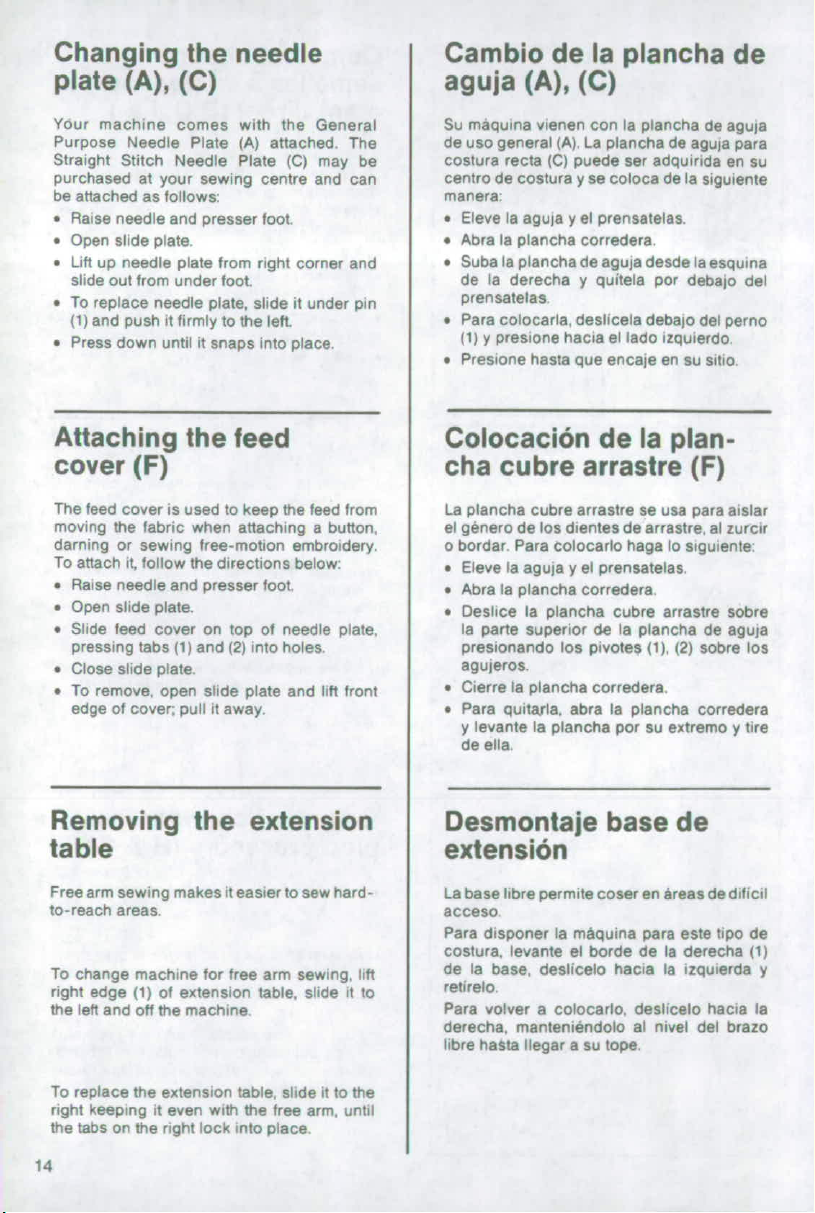
Changing
the
needle
Cambio
de
la
plancha
de
plate
(A),
(C)
aguja
(A),
(C)
Your
machine
comes
with
the
General
Su
maquina
vienen
con
la
plancha
de
aguja
Purpose
Needle
Plate
(A)
attached.
The
de
uso
general
(A),
La
plancha
de
agula
para
Straight
Stitch
Needle
Plate
(C)
may
be
costura
recta
(C)
puede
ser
adquirida
en
su
purchased
at
your
sewing
centre
and
can
centro
de
costura
y
se
coloca
de Ia
siguiente
be
attached
as
follows:
manera
.
Raise
needle
and
presser
foot
*
Eleve
la
aguja
y
el
prensatelas.
.
Open
slide
plate.
.
Abra
la
plancha
corredera.
.
Lift
up
needle
plate
from
right corner
and
.
Suba
la
plancha
de
aguja
desde
la
esquina
slide
out
from
under
toot
de
la
derecha
y
quitela
por
debajo
del
.
To
replace
needle
plate,
slide
it
under
pin
prensatelas
(1)
and
push
it
firmly
to
the
left.
.
Para
colocarla,
deslicela
debajo
del
perno
.
Press
down
until
it
snaps
into
place.
(t)
y
presione
hacia
el
lado
izquierdo.
.
Presione
hasta
que
encaje
en
su
sitio.
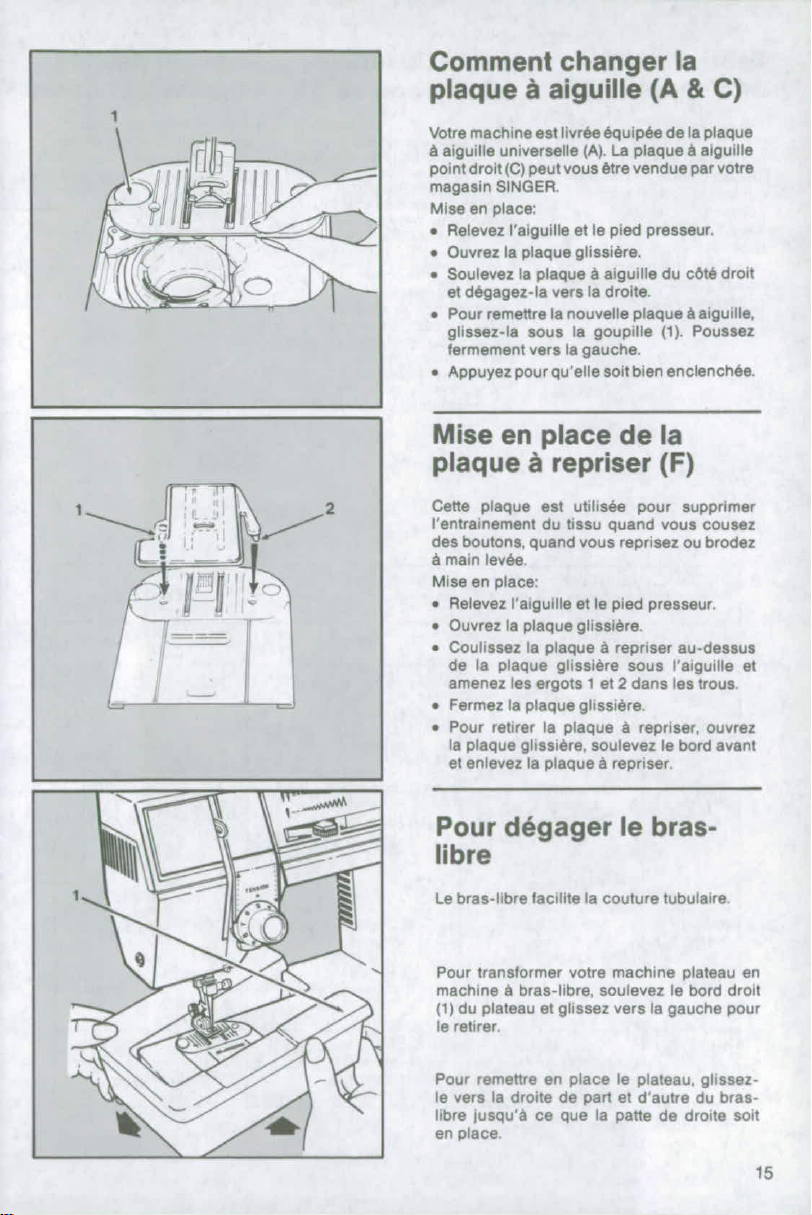
Attaching
the
feed
Colocaci6n
de
la
plan-
cover
(F)
cha
cubre
arrastre
(F)
The
feed
cover
is
used
to
keep
the
feed
from
La
plancha
cubre
arrastre
se
usa
para
aislar
moving
the
fabric
when
attching
a
button.
el
genero
de
los
dientes
de
arrastre,
al
zurcir
darning
or
sewing
free-motion
embroidery.
o
bordar.
Para
colocarlo
haga
to
siguiente:
To
attach
it,
follow
the
directions
below:
.
Eleve
la
aguia
y
el
prensatelas.
.
Raise
needle
and
presser
foot.
*
Abra
la
plancha
corredera,
*
Open
slide
plate.
*
Deslice
la
plancha
cubre
arrastre
sobre
.
Slide
feed
cover
on
top
of
needle
plate,
la
pane
superior
de
la
plancha
de
aguta
pressing
tabs
(I)
and
(2)
into
holes.
presionando
los
pivotes
(1),
(2)
sobre
los
.
Close
slide
plate.
agujeros.
.
To
remove,
open
slide
plate
and
lift
front
.
Cierre
la
plancha
corredera.
edge
of
cover,
pull
it
away.
.
Para
quitarla.
abra
Ia
plancha
corredera
y
levante
la
plancha
por
su
extremo
y
tire
do
ella.
Removing
the
extension
Desmontale
base
de
table
extensi6n
Free
arm
sewing
makes
it
easier
to
sew
hard-
La
base
libre
permite
coser
en
Areas
de
dificil
to-reach
areas.
acceso.
Para
disponer
la
miquina
para
este tipo
do
costura.
levante
et
borde
de
l
derecha
(1)
To
change
machine
for
tree
arm
sewing,
lift
de
la
base,
deslicelo
hacia
fa
izquierda
y
right
edge
(1)
of
extension
table,
slide
it
to
retirelo,
the
left
and
off
the
machine.
Para
volver
a
colocarto,
deslicelo
hacia
la
derecha,
manteni6ndolo
al
nivel
del
brazo
libre
hasta
llegar
a
su
tope.
To
replace
the
extension
fable,
slide
it
to
the
right
keeping
it
even
with
the
Iree
arm,
until
the
labs on
the
right
lock
into
place,
14
Comment
changer
la
plaque
a
aiguille
(A
&
C)
Votre
machine
est
llvr6e
quip6ede
a
plaque
A
aiguille
universelle
(A).
La
plaque
A
aiguille
point
droit
(C)
peut
vous
etrs
vendue
par
votre
magasin
SINGER.
Mise
en
place:
.
Relevez
l'alguill
et
Ie
pied
presweur.
.
Ouvrez
fa
plaque
glissiAre.
.
Soulevez
fa
plaque
A
aiguille
du
c6to
droit
et
deqagez-la
vers
Ia
droite.
*
Pour
remettre
Ia
nouvelte
plaque
a
aiguille,
glissez-Aa
sous
la
goupille
(1).
Poussez
termement
vers
(a
gauche
*
Appuyezpourquelle
soitbienenclench6e
Mise
en
place
de la
plaque
A
repriser
(F)
Cefte
plaque
eat
utilishe
pour
supprimer
_/entralnement
du
tlau
quand
vous
cousez
tr
r
des
boutons,
quand
vous
reprisez
ou
brodez
A
main
levee
ft
grXll
>
Mise
on
place:
jt
a 1
.
Relevez
l
algulil
et
le
pied
presseur.
N-
*
Ouvrez
la
plaque
glissiere.
-
Coulissez
la
plaque
a
repriser
au-dessus
de
la
plaque
glissiere
sous
I'aiguille
et
amenez
les
ergots
1
et
2
dans
les
trous
*
Fermez
la
plaque
glissiere.
.
Pour
retirer
Ia
plaque
a
repriser,
ouvrez
Ia
plaque
glissiere,
soulevez
le
bord
avant
et
enlevez
la
plaque
A
repriser
Pour
degager
le
bras-
\\ ~~~~~~libre
Le
bras-libre
facilite
Ia
couture
tubulaire.
Pour
transformer
votre
machine plateau
en
machine
A
bras-fibre,
soulevez
le
bord
droit
(1)
du
plateau
et
glissez
vers
la
gauche
pour
le
retirer,
X
/
-rt
Pour
remettre
en
place
le
plateau,
glissez-
le
vers
Ia
droite
de
part
et
d
autre
du
bras-
libre
jusqu
A
ce
que
la
patte
de
droite
soit
en
place.
15
Fabric,
thread
Tabla
de
tejidos,
Tableau
des
fils,
and
needle
table
hilos
y
agujas
aiguilles
et
tissus
The
needle
and thread
you
La
aguja
y
el
hlo
que
escoia,
Cest
en
fonction
du
tissu
choose
will
depend upon the
dependera
del genero
a
coser.
cousu
que
vous
ailez
chotsir
fabric
being
sewn,
La
siguiente
tabla
es una guia
Iaiguille
ol
le
fil
a
utiliser.
The
table
below
is a
practical
prrictica
de
seleccion
de
Le
tableau
ci-dessous
vous
guide
to
needle
and
thread
agulas
e
hilos.
RemRtase
guidera
dans
le
choix.
selwylion.
rempezar
un
proyanto
de
Consuitez-le
toujours
avant
de
Always
mler to
in
before
e
costura
Use
siempre
mismo
commencers
coudre.
Utilisez
beginning
a
sewmg
prqect.
Be
grosor
y
tipo
de
hilo
para
la
toujours
la
m6me
grosseur
de
sure
to
use
the same
size
and
aguia
y
la
bobina.
il
pour
leenfilage
sup4rieur
et
type
of
thread
in
both
needle
Utilice
cl
protector
d
dedos
la
cantte.
and
bobbin.
facilitado
con
su
msquina
para
todas
las costuras
en
recto
y
zig-zag.
Si
el
protector se
quita
para
realizar
otras
aplicaciones.
vuelva
a
colocario
en
la
msquina una
vez
instalado
el
prensatelas
normal.
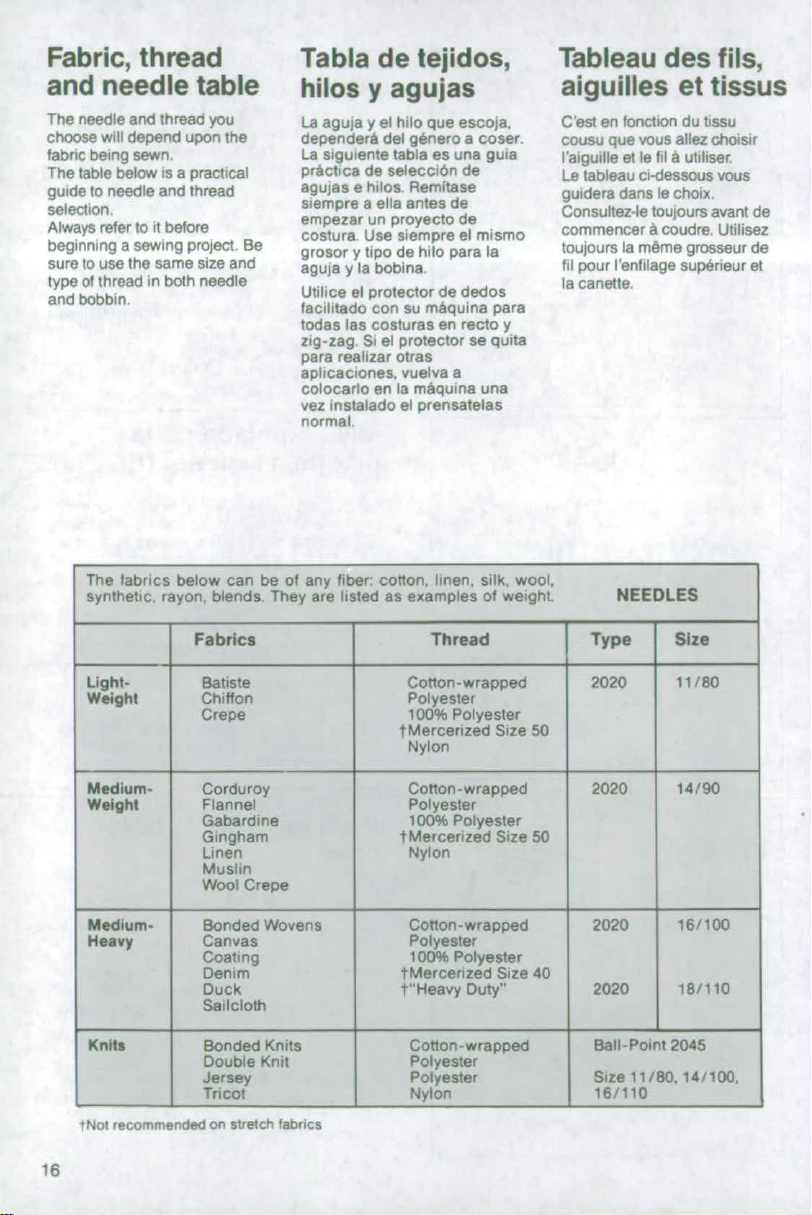
The
abrics
below
can
be
of
any
liber
cotton,
linen.
silik
wool,
synihetic.
rayon,
blendt,
They
are
listed
as
examples
of weight
NEEDLES
FaMcs
Thread
Type
Si2e
Light-
iemti"
Conon-wrapped
2020
11tfi
Weight
Chiffon
Polyester
Crept
100%
Polyeter,
tMercetized
Size
50
Nylon
Medumn
Corroy
Conon-wrappe~
2020
14/90
We4b3
Flannel
Polyester
Gabadine
100%
Polyestr
Gingham
tMercedzed
Size
50
Linen
Nylon
Muslin
wool
Crepe
Medium-
Bonded
Vtovens
ColMr
t-wrapped
2020
16/
tOt
Heavy
Canvas
Poyser"
C mating
100%*
Pdo.tetr
Denim
tUMererized
Size
40
Diuk
t
'Heavy
Ou
202
18/110
K"t#*
o
Knits
Ct-wrapped
Ball-Point
2045
ue
Knit
POlyeter
Jersey
P>oyester
Sute
¶1/80,
14/10r3
:
Tricot
Nylon
16/ttO
tN1o
recommernd
on
strerch
fabrics
16
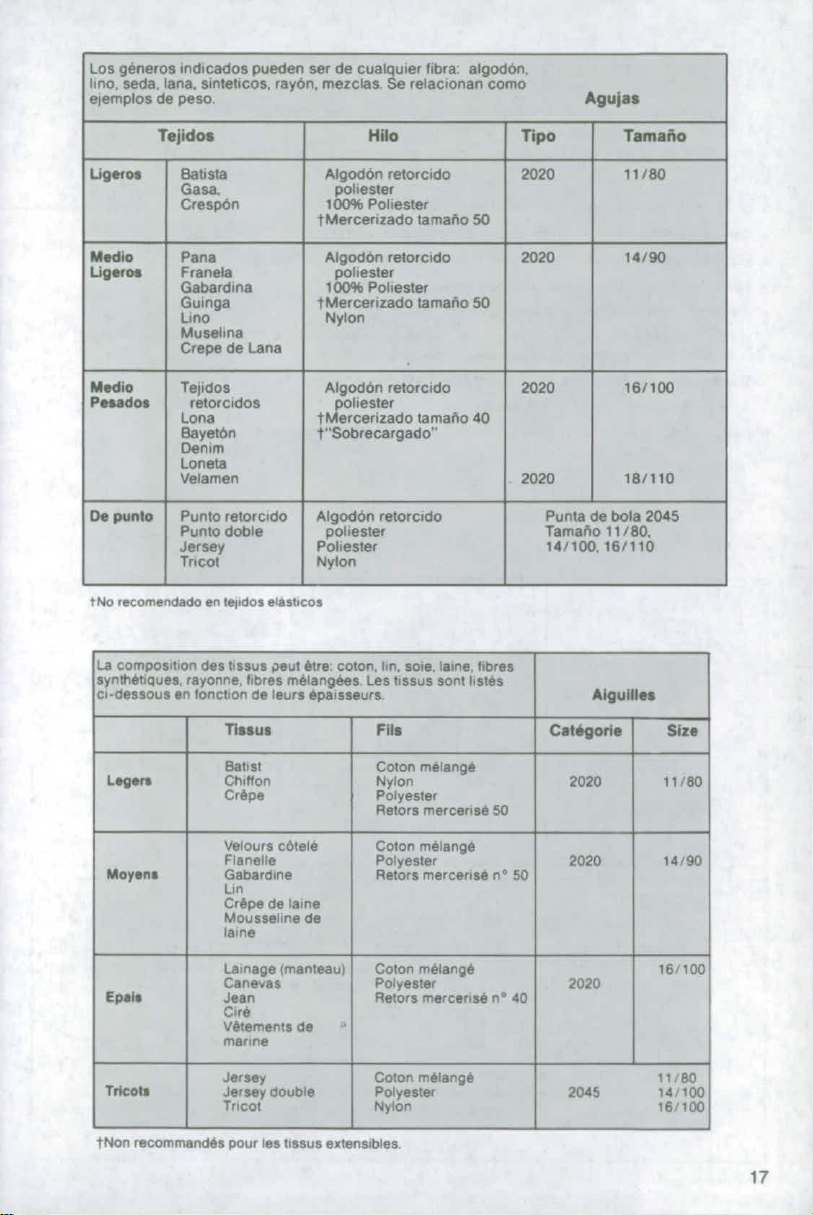
q~
*
indi~ib
~ $W
do
c
iff
fibra:
a~
hnooll,
= m
unllc
oe:~0o*w
~o~sn
0~
Tie~
mb
Thm
T~
U901M111
&Wsm
A~ M~
2M
11100
Gab&
~50
fe~
2020
14190
Up~
FM~
PORIMW
G~
W$8
100%
POI~
ou~
ta~
so
Mu~
de
um
t~o
P~
CC
doe
1Mater
L~
thFO=izado
ta~ft
40
Ba
r~
mado,
L~
V~
2=
isliio
cis
pwm
Pwft
r~cdo
A~ r~~ ^~
do
hota
2045
P~ d~
T&MOO
11M
141100,161110
N~
tNo,"o~n~
w ~s
"sbcos
La
comp~
d"
0"us
~
*w
c~.
4m
hdne,
fibm
tm
onim
~ W~
on
ton~
de
tours
*~
&
A~
Fft
%fist
C~
~
96
Chiffon
won
2020
litto
crapt
PO)~
MW""54
W
wiouro
~f4,
Coton
~no#
%rvmto
Polye*W
2020
14190
G~ine
so
Urt
Cr~
do
iaine
Mm~ln
16ine
m*i~
Alloo
PON~
~
2~
VM~
0
R4OfW$
M~*6
n-
40
cird
orimne
11180
2045
141100
loiloo
tNon
r~~~
pour
ses
basus
o,tm~,
17
Winding
a
bobbin
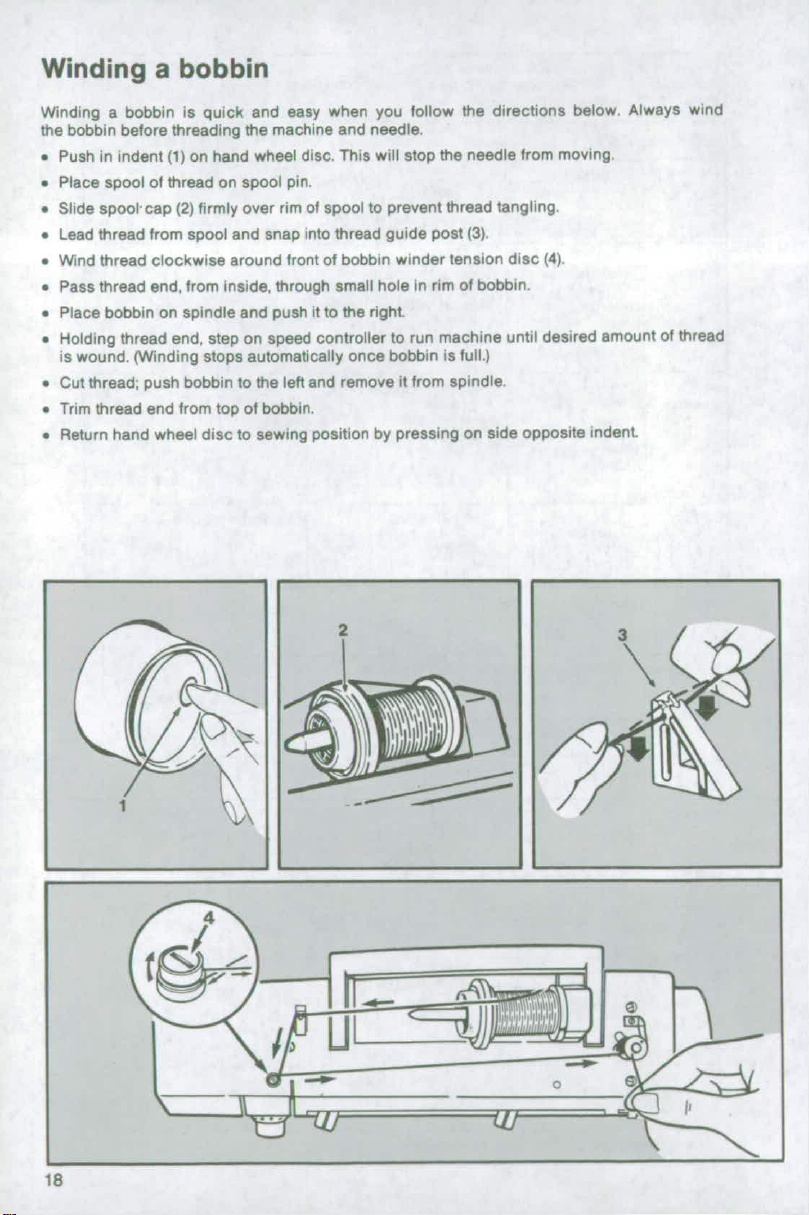
Winding
a
bobbin
is
quick
and
easy
when
you
follow
the
directions
below.
Always
wind
the
bobbin
before threading
the
machine
and
needle.
.
Push
in
indent
(1)
on hand
wheel
disc.
This
will
stop
the
needle
from
moving.
.
Place
spool
of
thread
on
spool
pin.
.
Slide
spool-
cap
(2)
firmly
over
rim
of
spool
to
prevent
thread
tangling.
.
Lead
thread
from
spool and snap
into
thread
guide
post
(3).
.
Wind
thread
clockwise
around
front
of
bobbin
winder tension
disc
(4).
.
Pass
thread
end, from
Inside,
through
small
hole
in
rim
of
bobbin.
*
Place
bobbin
on
spindle
and
push
it
to
the
right
.
Holding
thread end,
step
on
speed
controller
to
run
machine until
desired
amount
of
thread
is
wound.
(Winding
stops
automatically
once
bobbin is
flul)
.
Cut
thread;
push
bobbin
to
the
left and
remove
it
from
spindle.
.
Trim
thread
end
from
top
of
bobbin.
.
Return
hand
wheel
disc
to
sewing
position
by
pressing
on
side
opposite
indent.
/~~~~~2
~
b
l iii
0
18
Devanado
de
una
bobina
Devanar
una
bobina
es
rapido
y
facil
cuando
se
siguen
las
directrices
abaj
indicadas
Siempre
devane
la
bobina
antes
de
enhebrar
la
mAquina
V
la
aguoa.
*
Presione
hacia
adentro
el
disco
(1)
del
vOlante.
Esto
impedira
el
movimiento
de
ia
aguja.
.
Coloque
el
carrete
de
oilo
en
su
oce.
.
inserte
el
tope
(2)
lirmemente
contra
el
carrete
para
impedir
que
se
enrede
el
hilo.
.
Guie
ei
hilo
del
carrete
e
insertelo
en la
guia
(31.
Boomne
el
hilo
en
et
sentido
de
las
aguias
del
reloj
airededor
del
disco
de
tension
(4).
.
Pase
el
cabo
desde
dentro
por
ei
poequeho
agupero
del
borde
de
la
bobina.
.
Coloque
Ia
bobina
en
su
eje
y
empajelo
hacia
la
derecha.
.
Suietando
el
cabo.
presione
el
controlador
de
velocidad
hasta
tener
la
cantidad
de
hilo
deseada
en
la
bobina
lel
bobinado
se
detiene
automnticamente
ai
llenarse
la
bobina)
Coare
el
hilo
empuje
ia
bobina
hacia
la
izquierda
y
saquela
de
sU
eje.
Coate
el
cabo
inicial
del
hilo
de
la
bobina,
*
Ajuste
cl
volante
a
la
posicion
de
costura
presionando
el
boton
de
forma
opuestau
Remplissage
de
la
canette
En
suivant
les
conseils
ci-dessaous.
il
est
aiae
de
remplir
une
canene.
Contectionnez
toujours
la
canone
avant
d'enfitler
la
machine.
.
Appuyez
sur
10
aig)e
de
debrayage
(1)
pour
arriter
le
mouvement
de
l'alguille.
.
Meoez
en
place
fa
bobine
de
fil
sur
le
porte-bobine.
.
Bloquez
la
bobine
A
'aide
de
l*trier
(2)
pour
eviter
que
le
fil
s'emmele.
.
Tirez
le
n1
et
encbenchezr-le
dans
le
guldes-il(3).
.
Passez
Is
fil
entre
les
disques
de
tension
du
d6vidoir
(4)
en
le
croisant
dans
le
sons
montr6
par
les
fiches.
.
Passez
lextrimit4
du
fil
aD
travers
un
des
trous
do
Ia
canen..
de
lintbrieur
vers
lextiriour.
.
Engagez
la
canette
sur
Is
support
du
dividolr
et
poussoz-Ia
vers
la
droite.
.
Tenez
textrimit6
du
fil,
appuyez
sur
le
rheostat.
Remplissez
I
carnette
avec
la
quantiti
de
fil
disir6
(te
remplissage
s*art4tera
automatiquement
quand
Ia
canette
seta
plelne).
.
Coupez
le
fil
et
repoussez
l'axe
du
devidoir
vers
Ia
gauche
avant
de
retirer
la
canotte.
.
Coupez
l'extremite
du
fil
nur
le
dessus
de
la
canotte.
.
Rementez
en
place
le
disque
de
debrayage
en
appuyant
sur
le
cOtt
opposi
au
sigle.
19
Inserting
a
bobbin
Colocaci6n
de
fa
bobina
To
insert
a
bobbin,
follow
the
instructions
Para
colocar
la
bobina.
siga
las
siguientes
below:
instrucciones:
.
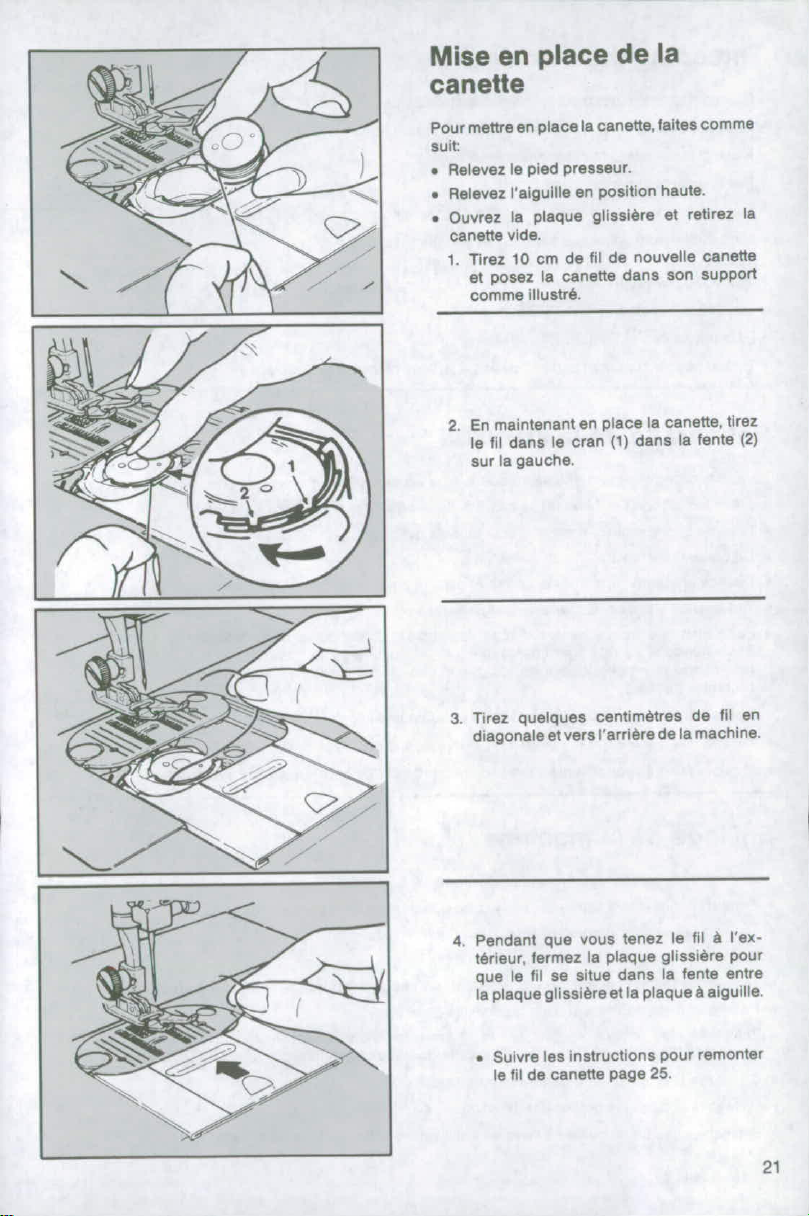
Raise
presser
foot.
Suba
el
prensatelas.
.
Turn
hand
wheel
toward
you
until
needle
.
Gire
el
volante
haciaVd.
hasta
que
la
aguja
is
in
its
highest
position.
se
halle
en
su
posicion
mAs
elevada.
*
Open
slide
plate
and
remove
empty
bobbin.
*
Abra
la
plancha
corredera
y
retire
la
bobina
1.
Pull
4'
(10cm)
of
thread
from
replacement
vacia,
bobbin
and
insert
bobbin
into
case,
as
1
Tire
10
cm.
de
hilo
de
la
bobina
de
shown.
recambio
e
insetela
en
su
alojamiento
como
se
muestra.
2.
Holding
bobbin
in
place,
guide
thread
into
2.
Sujetando
la
bobina,
guie
el
hilo
por
fa
notch
(1)
and
then
down
the
slot
to
the
rendija(l)yposteriormenteporlaaberura
left
and
guide
around
into
notch
(2).
de
la
izquierda,
guiAndolo
a
Ia
abentura
(21.
3.
Draw
several
inches
of
thread
diagonally
3
Tiredealgunoscm,dehilodiagonalmente
across
the
bobbin
toward
the
back
of
the
a
traves
de
la
bobina
hacia
la
parte
machine,
posterior
dre
a
maquina,
4.
While
holding
thread
on
outside,
close
the
4.
Suletando
el
hilo
por
tuera,
cierre
la
slide
plate,
allowing
thread
to
extend
plancha
corredera,apermitiendoqueelhilo
through
the
slot
between
the
slide
plate
salga
entre
la
rendija
de
la
plancha
and
needle
plate.
corredera
y
la
plancha
de
aguja.
.
Follow
directions
for
'Raising
~obbin
.
Siga
las
instrucciones
para
"Extracci6n
Thread'
on
page
24.
del
hilo
de
fa
bobina"
de
la
Pagina
24.
20
Mise
en
place
de
la
caneffe
Pour
mettre
en
place
la
canette,
taites
comme
suit
->
,
.*
Relevez
le
pied
presseur.
.
Relevez
I'aqgulle
en
position
haute.
.
Ouvrez
fa
plaque
glissiere
et
retirez
la
canette
vide.
1.
Tirez
10
cm
do
iil
de
nouvelle
canette
et
posez
a
canette
dans
son
support
comme
itlustrt.
2.
En
maintenant
en
place
la
canette,
tirez
le
fil
dens
ie
cran
(1)
dans
la
fente
(2)
sur
la
gauche.
/~~~~~
7~~~~~~~~~~~~
3.
Tirez
quelques
centimetres
de
lil
en
diagonale
et
vers
I'arriere
de
fa
machine.
A~~~~~~~
4.
Pendant
que
vous
tenez
le
fil
A
lox-
t6rieur,
fermez
la
plaque
glissiere
pour
que
le
fil
se
situe
dans
la
tente
entre
la
plaqueglisslereet
la
plaques
aiguille.
\
* .
Sulvre
les
instructions
pour
remonter
le
fil
de
canette
page
25.
21
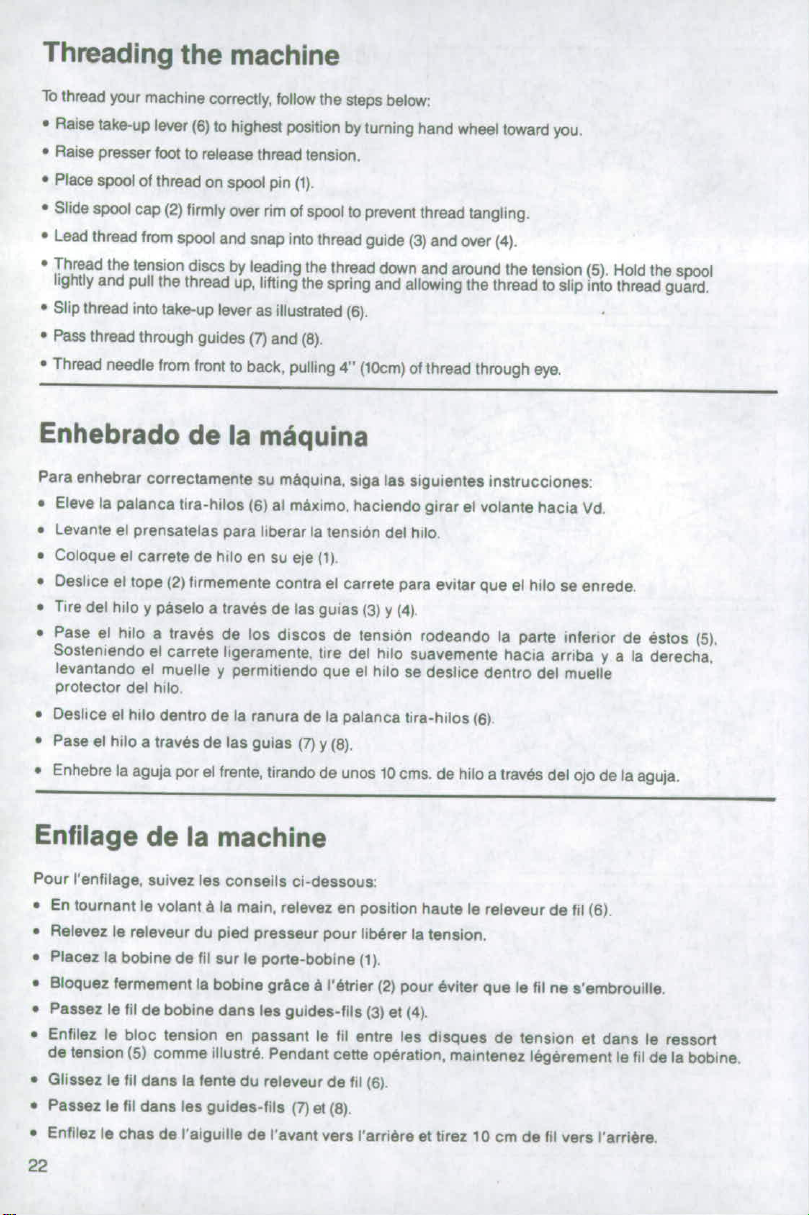
Threading
the
machine
To
thread
your
machine
corectly,
ftollw
the
steps
below:
.
Raise
take-up
lever
(6)
to
highest
position
by
tuming
hand
wheel
toward
you.
.
Raise
presser
foot
to
release
thread
tension.
.
Place
spool
of
thread
on
spool
pin
(1).
*
Slide
spool
cap
(2)
firmly
over
rim
of
spool
to
prevent
thread
tangling.
*
Lead
thread
from
spool
and
snap
into
thread
guide
(3)
and
over
(4).
.
Thread
the
tension
discs
by
leading
the
thread
down
and
around
the
tension
(5).
Hold
the
spool
lightly
and
pull
the
thread
up,
lifting
the
spring
and
allowing
the
thread
to
slip
into
thread
guard.
*
Slip
thread
into
take-up
lever
as
illustrated
(6).
.
Pass
thread
through
guides
(7)
and
(8).
.
Thread
needle
from
font
to
back,
pulling
4
(10cm)
of
thread
through
eye.
Enhebrado
de
fa
maquina
Para
enhebrar
correctamente
su
mtquina.
siga
las
siguientes
instrucciones:
*
Eleve
la
palanca
tira-hilos
i6)
al
mAximo,
haciendo
girar
el
volante
hacia
Vd.
.
Levante
el
prensatelas
para
liberar
'a
tension
del
hibe.
*Coloque
el
carrete
de
hib
en
su
ele
(1)
*
Deslice
el
tope
(2)
firmemente
contra
el
carrete
para
evitar
que
el
hilo
se
enrede.
.
Tire
del
hile
y
paselo
a
travis
de
las
guias
(3)
V (41
.
Pase
el
hilo
a
trav6s
de
los
discos
de
tension
rodeando
la
parte
inferior
de
estos
(5).
Sosteniendo
el
carrete
ligeramente,
tire
del
hilo
suavemente
hacia
arriba
y
a
la
derecha,
levantando
ol
muelle
y
permitiendo
que
el
tilo
se
deslice
dentro
del
muelle
protector
del
hiuo
.
Deslice
el
hilo
dentro
de
la
ranura
de
la
palanca
tira-hilos
(6)i
*Pase
et
hilo
a
traves
de
las
gulas
(7)
y
(8).
Enhetire
fa
aguja
por
ec
fente,
tirando
de
unos
10
cms.
de
hiio
a
traves
del
ojo
de
la
aguja.
Enfilage
de
fa
machine
Pour
l
enfilagoe,
suivez
les
consells
ci-dessous:
.
En
tournant
le
volant
a
la
main,
relevez
en
position
haute
to
releveur
do
il
(6),
.
Relevez
le
releveur
du
pied
presseur
pour
iibfbrer
la
tension,
.
Placez
la
bobine
de
fil
sur
le
porte-bobine
(1).
.
Bloquez
hermement
la
bobine
grace
b
lAtrier
(2)
pour
Aviter
que
le
fIl
ne
s
embrouille.
.
Passez
le
tii
de
bobine
dans
lea
guides-fibs
(3)
et
(4).
.
Enfilez
l0
bloc
tension
en
passant
le
il
entre
les
disquos
de
tension
et
dans
le
ressort
de
tension
(5)
comme
illustre.
Pendant
ceoe
opCration,
maintonez
l6ghrement
le
fil
de
fa
bobine,
.
Glissez
le
bil
dans
la
fwnte
du
relevour
do
fil
(6).
.
Passez
le
fit
dans
lhs
guides-file
i7)
et
(8).
Entliez
Is
chas
de
Ilaiguilbe
de
iavant
vyrs
Iarrihre
et
tirez
10
om
de
lil
vers
l
anrbre
22
 Loading...