


INSTRUCTION MANUAL NOTICE D’UTILISATION MANUAL DE INSTRUCCIONES
9910
9910EFSc.pm6 |
|
|
|
|
|
|
|
|
|
|
|
|
|
|
|
|
|
|
|
|
|
|
|
|
|
|
|
|
|
|
|
|
|
|
|
|
|
|
|
|
|
|
|
|
|
|
|
|
|
|
|
|
|
|
|
|
|
|
|
|
|
|
|
|
|
|
|
|
|
|
|
|
|
|
|
|
|
|
|
|
|
|
|
|
|
|
|
|
|
|
|
|
|
|
|
|
|
|
|
|
|
|
|
|
|
|
|
|
|
|
|
|
|
|
|
|
|
|
|
|
|
|
|
|
|
|
|
|
|
|
|
|
|
|
|
|
|
|
|
|
|
|
|
|
|
|
|
|
|
|
|
|
|
|
|
|
|
|
|
|
|
|
|
|
|
|
|
|
|
|
|
|
|
|
|
|
|
|
|
|
|
|
|
|
|
|
|
|
|
|
|
|
|
|
|
|
|
|
|
|
|
|
|
|
|
|
|
|
|
|
|
|
|
|
|
|
|
|
|
|
|
|
|
|
|
|
|
|
|
|
|
|
|
|
|
|
|
|
|
|
|
|
|
|
|
|
|
|
|
|
|
|
|
|
|
|
|
|
|
|
|
|
|
|
|
|
|
|
|
|
|
1 |
|
|
|
|
2003.9.10, 8:44 PM |
||
INSTRUCTION MANUAL 

This sewing machine is intended for household use.
IMPORTANT SAFETY INSTRUCTIONS
When using a sewing machine, basic safety precautions should always be followed, including the following.
Read all instructions before using.
 DANGER - To reduce the risk of electric shock:
1.Never leave unattended when plugged in. Always unplug this machine from the electric outlet immediately after using and before cleaning.
WARNING - To reduce the risk of burns, fire, electric shock, or injury to persons:
1.Do not allow to be used as a toy. Close attention is necessary when this sewing machine is used by or near children.
2.Use this sewing machine only for its intended use as described in this manual. Use only attachments recommended by the manufacturer as contained in this manual.
3.Never operate this sewing machine if it has a damaged cord or plug, if it is not working properly, if it has been dropped or damaged, or dropped into water. Return the sewing machine to the nearest authorized dealer or service center for examination, repair, electrical or mechanical adjustment.
4.Never operate the sewing machine with any air openings blocked. Keep ventilation openings of the sewing machine and foot controller free from the accumulation of lint, dust, and loose cloth.
5.Never drop or insert any object into any opening.
6.Do not use out doors.
7.Do not operate where aerosol (spray) products are being used or where oxygen is being administered.
8.To disconnect, turn the power switch to the off position (symbol “O”), then remove plug from outlet.
9.Do not unplug by pulling on cord. To unplug, grasp the plug, not the cord.
10.Keep fingers away from all moving parts. Special care is required around the sewing machine needle.
11.Always use the proper needle plate. The wrong plate can cause the needle to break.
12.Do not use bent needles.
13.Do not pull or push fabric while stitching. It may deflect the needle causing it to break.
14.Switch the sewing machine off (symbol “O”) when making any adjustments in the needle area, such as threading needle, changing needle, threading bobbin, or changing presser foot.
15.Always unplug sewing machine from the electrical outlet when removing covers, lubricating, or when making any other user servicing adjustments mentioned in the instruction manual.
16.Handle the foot controller with care and avoid dropping it on the floor. Be sure not to place anything on top of it.
17.Use only the handle to lift and move the machine.
18.Do not expose the machine or machine case to sunlight directly. Also, do not keep it in a very warm or damp place.
SAVE THESE INSTRUCTIONS
Servcing should be performed by an authorized service representative.
SINGER is a registered Trademark of The Singer Company Ltd.
9910EFSc.pm6 |
2 |
2003.9.10, 8:44 PM |
CONTENTS |
|
IMPORTANT SAFETY INSTRUCTIONS ............ |
2 |
MODEL 9910 ...................................................... |
8 |
FOR EUROPEAN AND SIMILAR TERRITORIES: ...... |
8 |
MAIN PARTS .................................................... |
10 |
ACCESSORIES ................................................ |
12 |
DUST COVER .................................................. |
12 |
EXTENSION TABLE ......................................... |
14 |
a. REMOVING THE EXTENSION TABLE ................................ |
14 |
b. OPENING THE ACCESSORY CASE ................................... |
14 |
CHANGING THE PRESSER FOOT ................. |
14 |
A. Changing the presser foot ..................................................... |
14 |
B. Removing the presser foot holder ......................................... |
14 |
INSERTING THE NEEDLE ............................... |
16 |
FABRIC, THREAD AND NEEDLE TABLE ........ |
16 |
CONNECTING THE MACHINE ........................ |
18 |
FUNCTION OF EACH PART ............................ |
20 |
A. REVERSE STITCH BUTTON ............................................... |
20 |
B. NEEDLE UP/DOWN BUTTON ............................................. |
20 |
C. TWIN NEEDLE BUTTON ...................................................... |
20 |
D. PRESSER FOOT LIFTER .................................................... |
20 |
E. DROP FEED LEVER ............................................................ |
20 |
F. PRESSURE REGULATOR ................................................... |
20 |
G. HAND WHEEL ...................................................................... |
20 |
H. TOP COVER ......................................................................... |
20 |
CONTROL PANEL ............................................ |
22 |
A. L.C.D. DISPLAY .................................................................... |
22 |
B. L.C.D. CONTRAST CONTROL ............................................ |
22 |
C. PATTERN CHART ................................................................ |
22 |
D. UTILITY STITCH BUTTON ................................................... |
22 |
E. LETTER STITCH BUTTON .................................................. |
22 |
F. MIRROR STITCH BUTTON .................................................. |
22 |
G. PATTERN SELECTION BUTTONS ...................................... |
22 |
H. STITCH MEMORY, CLEAR AND CHECK BUTTONS ........ |
22 |
I. STITCH WIDTH, LENGTH BUTTON .................................... |
22 |
BOBBIN SETTING ............................................ |
24 |
A. REMOVING THE BOBBIN .................................................... |
24 |
B. SETTING SPOOL OF THREAD ON SPOOL PIN ................ |
24 |
C. WINDING THE BOBBIN ....................................................... |
24 |
D. INSERTING THE BOBBIN .................................................... |
26 |
THREADING THE MACHINE ........................... |
28 |
A. PREPARING TO THREAD MACHINE ................................. |
28 |
B. SETTING SPOOL OF THREAD ON SPOOL PIN ................ |
28 |
C. THREADING THE UPPER THREAD ................................... |
28 |
D. THREADING THE NEEDLE EYE ......................................... |
30 |
E. DRAWING UP THE BOBBIN THREAD ................................ |
30 |
STARTING TO SEW ......................................... |
32 |
A. START AND END OF SEAM ................................................ |
32 |
B. REVERSE STITCHING ........................................................ |
32 |
C. TURNING CORNERS ........................................................... |
34 |
D. SEWING HEAVY FABRIC .................................................... |
34 |
E. SEWING OVER OVERLAPPED AREAS .............................. |
34 |
F. WIDTH OF SEAM ALLOWANCE ......................................... |
34 |
ADJUSTING THE THREAD TENSIONS .......... |
36 |
SELECTING UTILITY STITCH PATTERNS ..... |
38 |
A. SELECTING THE PATTERN ................................................ |
38 |
B. MIRROR STITCH ................................................................. |
38 |
C. SETTING STITCH WIDTH AND LENGTH ........................... |
38 |
WHERE TO USE EACH STITCH ..................... |
40 |
STRAIGHT STITCH SEWING .......................... |
42 |
ZIGZAG STITCH SEWING ............................... |
44 |
MULTI-STITCH ZIGZAG ................................... |
44 |
FREE ARM SEWING ........................................ |
44 |
QUILTING ......................................................... |
46 |
A. Joining the pieces of fabric ................................................... |
46 |
B. Quilting .................................................................................. |
46 |
C. Hand Look Quilting Stitch (No. 5) ......................................... |
46 |
ELASTIC STITCH SEWING ............................. |
48 |
CONTINUOUS DECORATIVE PATTERN ........ |
48 |
A. SEWING THIN FABRICS ..................................................... |
48 |
OVERCASTING-OVERLOCKING .................... |
50 |
A. USING THE OVERCASTING FOOT .................................... |
50 |
B. USING THE GENERAL PURPOSE FOOT ........................... |
50 |
C. NOTE: .................................................................................... |
50 |
BLIND HEM STITCHING .................................. |
52 |
PATCH WORK .................................................. |
54 |
APPLIQUE ........................................................ |
54 |
INSERTING ZIPPERS |
|
CENTERED INSERTION .................................. |
56 |
LAPPED INSERTION ....................................... |
58 |
A. TO OPEN THE ZIPPER WHILE STITCHING ....................... |
58 |
BUTTONHOLE SEWING .................................. |
60 |
AUTOMATIC BAR-TACK AND DARNING ....... |
64 |
SEWING ON BUTTONS ................................... |
66 |
A. Thread Shank ....................................................................... |
66 |
TWIN NEEDLE SEWING .................................. |
68 |
LETTER STITCH SEWING ............................... |
70 |
A. SELECTING LETTER STITCH ............................................. |
70 |
B. TO DELETE MEMORIZED LETTER .................................... |
70 |
C. TO CHECK MEMORIZED LETTERS ................................... |
72 |
D. SEWING THE MEMORIZED LETTERS ............................... |
72 |
E. TIPS ...................................................................................... |
72 |
MAINTENANCE ................................................ |
74 |
CLEANING ........................................................ |
74 |
HELPFUL HINTS .............................................. |
76 |
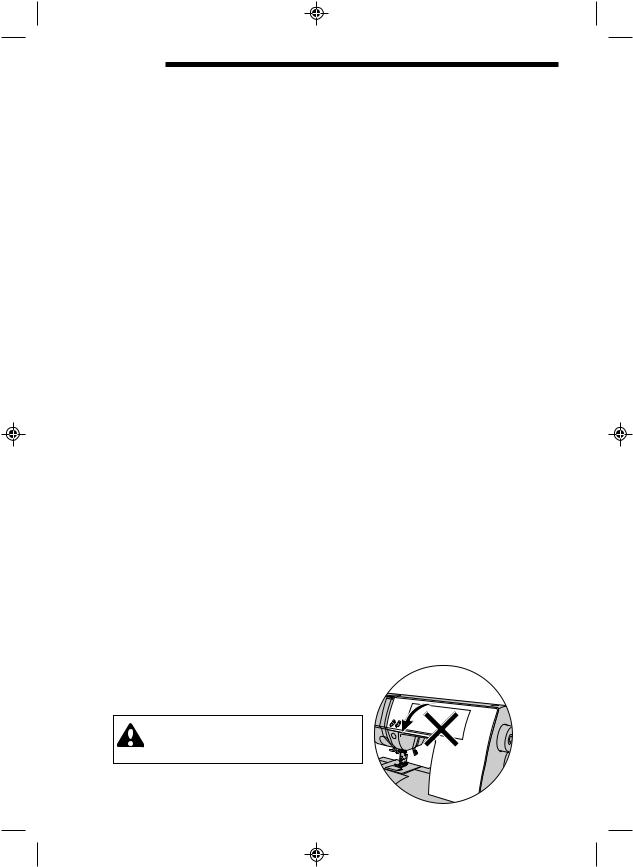
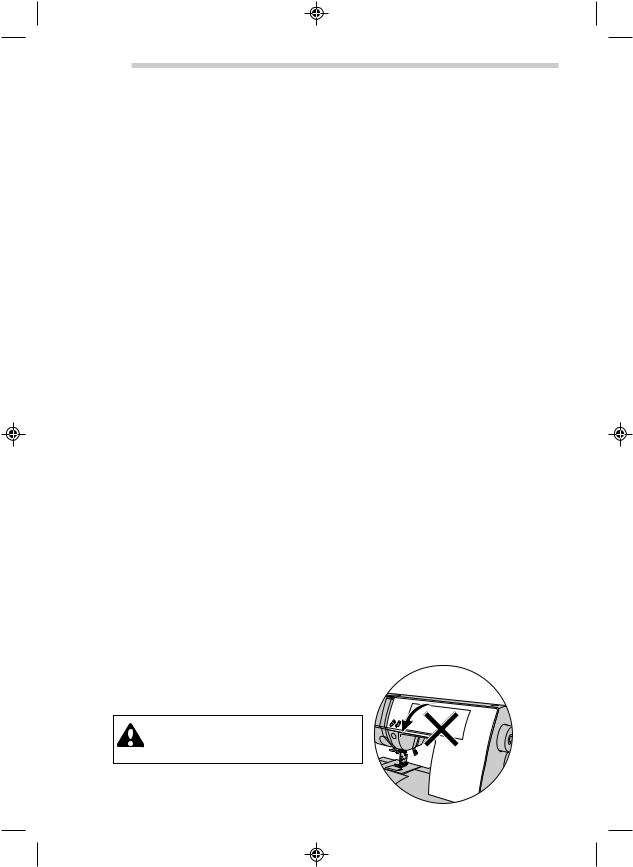
CAUTION: To prevent acceidents.
Do not pull out the front cover from the machine.
3
9910EFSt.pm6 |
3 |
2003.9.10, 8:45 PM |
NOTICE D’UTILISATION
La machine à coudre est exclusivement destinée à l’usage domestique.
CONSIGNES DE SÉCURITÉ IMPORTANTES
Il est important d’observer des précautions de sécurité élémentaires lors de l’utilisation de la machine à coudre et notamment celles qui suivent.
Veuillez lire l’ensemble de la notice avant l’utilisation.
 DANGER – Pour réduire les risques de décharge électrique :
1.Ne laissez jamais la machine branchée sans surveillance. Débranchez toujours la machine immédiatement après l’usage et avant le nettoyage.
 ATTENTION! – Pour réduire les risques de brûlure, d’incendie, de décharge électrique et de blessures corporelles :
1.Ne permettez pas que la machine à coudre soit utilisée comme un jouet. L’étroite surveillance d’un adulte est nécessaire quand la machine est utilisée par des enfants ou en présence d’enfants.
2.N’utilisez la machine à coudre que pour l’usage prescrit dans la présente notice. N’utilisez que les pièces conseillées par le constructeur et indiquées dans la présente notice.
3.N’utilisez jamais la machine à coudre si une fiche ou un fil électrique est défectueux, si la machine ne fonctionne pas correctement, si la machine est tombée ou endommagée, ni si elle a été immergée. Retournez la machine au distributeur agréé ou au centre de service après-vente le plus proche pour tout examen, réparation, réglage électrique et mécanique.
4.N’utilisez jamais la machine si une aire d’aération est obstruée. Veillez à ce que les ouvertures destinées à la ventilation de la machine ainsi que la pédale restent dégagées de peluches, de poussière et de fibres de tissus.
5.Veillez à ne rien laisser tomber ni insérer dans les ouvertures d’aération.
6.N’utilisez pas la machine en plein air.
7.N’utilisez pas la machine dans les lieux où des aérosols sont utilisés ou de l’oxygène administré.
8.Pour déconnecter la machine, tournez le bouton d’alimentation en position d’arrêt (O), puis débranchez la fiche électrique.
9.Ne débranchez pas la machine en tirant sur le câble d’alimentation. Pour débrancher, saisissez la fiche et non pas le câble.
10.Ne placez pas vos doigts près des parties en mouvement. Il est nécessaire de faire particulièrement attention dans la zone de l’aiguille de la machine à coudre.
11.N’utilisez que la plaque à aiguille correcte. Une autre plaque à aiguille pourrait casser l’aiguille.
12.N’utilisez pas d’aiguilles tordues.
13.Ne tirez pas et ne poussez pas le tissu pendant la couture. Ceci pourrait tordre l’aiguille et la casser.
14.Arrêtez la machine avant d’effectuer tout ajustement et réglage dans la zone de l’aiguille, par exemple pour enfiler l’aiguille, changer d’aiguille, enfiler la canette ou changer de pied presseur.
15.Veillez à toujours débrancher la machine avant de retirer des couvercles, de lubrifier la machine et d’effectuer toute opération d’entretien mentionnée dans la notice d'utilisation.
16.Maniez la pédale avec soin et évitez de la faire tomber. Veillez à ne rien poser dessus.
17.Pour soulever ou déplacer la machine, utilisez toujours la poignée.
18.N’exposez pas la machine ni la housse de protection à la lumière directe du soleil. De même, n’entreposez pas la machine dans un endroit très chaud ni très humide.
CONSERVEZ CETTE NOTICE D’UTILISATION
La maintenance de la machine doit être assurée exclusivement par un professionnel agréé.
4SINGER® est une marque déposée par The Singer Company Ltd.
9910EFSt.pm6 |
4 |
2003.9.10, 8:45 PM |
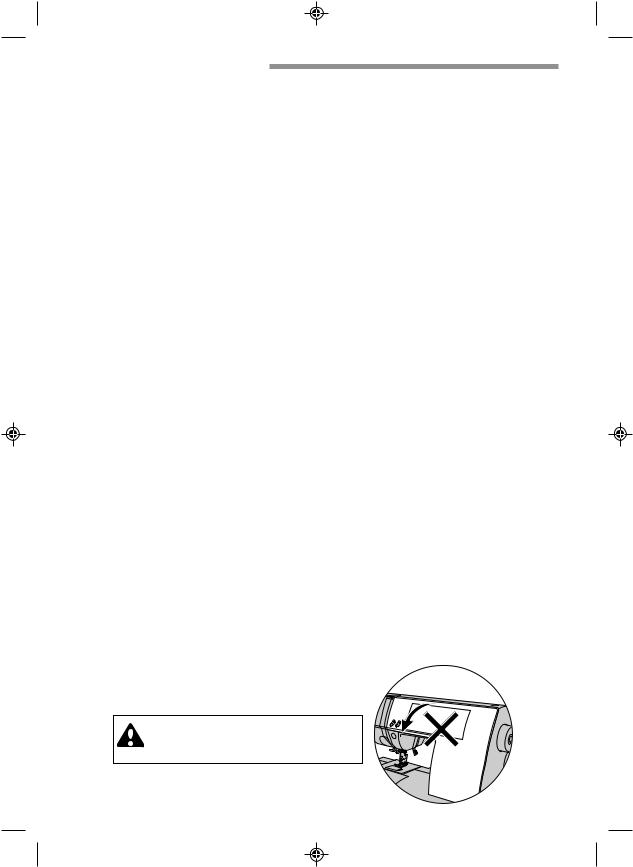
TABLE DES MATIÈRES |
|
CONSIGNES DE SÉCURITÉ IMPORTANTES |
.. 4 |
MODÈLE 9910 .................................................... |
9 |
POUR LES TERRITOIRES EUROPÉENS ET |
|
ASSIMILÉS ......................................................... |
9 |
PIÈCES PRINCIPALES .................................... |
11 |
ACCESSOIRES ................................................ |
13 |
HOUSSE DE PROTECTION SOUPLE ............. |
13 |
PLATEAU D’EXTENSION ................................ |
15 |
a. DÉGAGER LE PLATEAU D’EXTENSION ............................. |
15 |
b. OUVRIR LE COMPARTIMENT À ACCESSOIRES ............... |
15 |
CHANGEMENT DE PIED PRESSEUR ............ |
15 |
A. Changer de pied presseur ..................................................... |
15 |
B. Ôter le support du pied presseur ........................................... |
15 |
MISE EN PLACE DE L’AIGUILLE .................... |
17 |
TABLEAU DES TISSUS, FILS ET AIGUILLES 17 |
|
BRANCHEMENT DE LA MACHINE ................. |
19 |
FONCTION DES PIÈCES ET TOUCHES ........ |
21 |
A. TOUCHE DE MARCHE ARRIÈRE ........................................ |
21 |
B. TOUCHE DE POSITIONNEMENT DE L’AIGUILLE (HAUT/BAS) ... |
21 |
C. TOUCHE DE L’AIGUILLE JUMELÉE .................................... |
21 |
D. RELEVEUR DE PIED PRESSEUR ....................................... |
21 |
E. LEVIER DES GRIFFES ......................................................... |
21 |
F. RÉGULATEUR DE PRESSION ............................................. |
21 |
G. VOLANT ................................................................................ |
21 |
H. CARTER SUPÉRIEUR .......................................................... |
21 |
ÉCRAN D’AFFICHAGE .................................... |
23 |
A. ÉCRAN LCD .......................................................................... |
23 |
B. MOLETTE DE RÉGLAGE DU CONTRASTE ........................ |
23 |
C. TABLEAU DES POINTS ........................................................ |
23 |
D. TOUCHE DES POINTS UTILITAIRES .................................. |
23 |
E. TOUCHE DE LETTRES ........................................................ |
23 |
F. TOUCHE MIROIR .................................................................. |
23 |
G. TOUCHES DE SÉLECTION DES MOTIFS ........................... |
23 |
H. TOUCHE DE MÉMORISATION, D’ANNULATION ET DE |
|
VÉRIFICATION ...................................................................... |
23 |
I. TOUCHES DE LARGEUR DU POINT ET DE LONGUEUR DU |
|
POINT .................................................................................... |
23 |
CANETTE ......................................................... |
25 |
A. RETIRER LA CANETTE ........................................................ |
25 |
B. MISE EN PLACE DE LA BOBINE SUR LA TIGE À BOBINE 25 |
|
C. BOBINAGE DE LA CANETTE ............................................... |
25 |
D. MISE EN PLACE DE LA CANETTE ...................................... |
27 |
ENFILAGE DE LA MACHINE ........................... |
29 |
A. PRÉPARATION EN VUE DE L’ENFILAGE ........................... |
29 |
B. MISE EN PLACE DE LA BOBINE SUR LA TIGE À BOBINE 29 |
|
C. ENFILAGE DU FIL D’AIGUILLE ............................................ |
29 |
D. ENFILAGE DU FIL DANS LE CHAS DE L’AIGUILLE ........... |
31 |
E. REMONTER LE FIL DE CANETTE ....................................... |
31 |
DÉBUT DE LA COUTURE ................................ |
33 |
A. DÉBUT ET FIN DE LA COUTURE ........................................ |
33 |
B. MARCHE ARRIÈRE .............................................................. |
33 |
C. COUTURE DES ANGLES ..................................................... |
35 |
D. COUTURE DE TISSUS ÉPAIS ............................................. |
35 |
E. COUTURE DES SURÉPAISSEURS ..................................... |
35 |
F. LARGEUR DES RABATS ...................................................... |
35 |
RÉGLAGE DE LA TENSION DU FIL ................ |
37 |
SÉLECTION DES POINTS UTILITAIRES ........ |
39 |
A. SÉLECTION DU POINT ........................................................ |
39 |
B. POINT MIROIR ...................................................................... |
39 |
C. RÉGLAGE DE LA LARGEUR ET DE LA LONGUEUR DU |
|
POINT .................................................................................... |
39 |
DESCRIPTION DES POINTS ........................... |
41 |
COUTURE AU POINT DROIT .......................... |
43 |
COUTURE AU POINT ZIGZAG ........................ |
45 |
POINT ZIGZAG MULTIPLE .............................. |
45 |
COUTURE AVEC BRAS LIBRE ....................... |
45 |
QUILTING ......................................................... |
47 |
A. Assemblage des morceaux de tissu ...................................... |
47 |
B. Quilting ................................................................................... |
47 |
C. Point de quilting, apparence fait main (n°5) ........................... |
47 |
COUTURE DE POINTS ÉLASTIQUES ............ |
49 |
SÉQUENCE DE MOTIFS DÉCORATIFS ......... |
49 |
A. SUR LES TISSUS LÉGERS .................................................. |
49 |
SURJET – SURFILAGE .................................... |
51 |
A. AVEC LE PIED DE SURJET ................................................. |
51 |
B. AVEC LE PIED UNIVERSEL ................................................. |
51 |
C. REMARQUE .......................................................................... |
51 |
COUTURE D’OURLETS INVISIBLES .............. |
53 |
PATCHWORK ................................................... |
55 |
APPLIQUE ........................................................ |
55 |
FERMETURE À GLISSIÈRE - POSE BORD À |
|
BORD ................................................................ |
57 |
FERMETURE À GLISSIÈRE - POSE SOUS |
|
PATTE .............................................................. |
59 |
A. OUVRIR LA FERMETURE À GLISSIÈRE PENDANT LA |
|
COUTURE ............................................................................. |
59 |
COUTURE DE BOUTONNIÈRES .................... |
61 |
ARRÊT ET REPRISAGE AUTOMATIQUES .... |
65 |
COUTURE DE BOUTONS ............................... |
67 |
A. Bouton avec tige ..................................................................... |
67 |
COUTURE AVEC AIGUILLE JUMELÉE ........... |
69 |
COUTURE DE LETTRES ................................. |
71 |
A. SÉLECTION DES LETTRES ................................................. |
71 |
B. ANNULATION DES LETTRES |
|
MÉMORISÉES ...................................................................... |
71 |
C. POUR VÉRIFIER LES LETTRES MÉMORISÉES ................ |
73 |
D. COUTURE DES LETTRES MÉMORISÉES .......................... |
73 |
E. ASTUCES .............................................................................. |
73 |
ENTRETIEN ...................................................... |
75 |
NETTOYAGE .................................................... |
75 |
SOLUTION AUX PROBLÈMES COURANTS ... |
77 |
ATTENTION! Pour éviter les incidents :
N’ouvrez pas le panneau frontal.
5
9910EFSt.pm6 |
5 |
2003.9.10, 8:45 PM |

MANUAL DE INSTRUCCIONES
Esta máquina de coser está diseñada sólo para uso doméstico.
NORMAS DE SEGURIDAD IMPORTANTES
Cuando utilice la máquina de coser, debe seguir siempre unas normas básicas de seguridad, incluyendo las siguientes.
Lea todas las instrucciones antes de utilizar su máquina.
 PELIGRO - Para reducir el riesgo de descarga eléctrica:
1.La máquina nunca debe dejarse sola y encendida. Desenchufe siempre la máquina de la red inmediatamente después de usarla y antes de limpiarla.
 PRECAUCIONES - Para reducir el riesgo de quemaduras, fuego, cortocircuito o daños personales:
1.No permita que se emplee como un juguete. Tenga un cuidado especial cuando la máquina sea usada por niños o si éstos se encuentran cerca de ella.
2.Utilice esta máquina de coser correctamente, tal como se describe en este manual. Use solo los accesorios recomendados por el fabricante que aparecen el manual.
3.Nunca trabaje con esta máquina de coser si tiene el cable o el enchufe dañados, si no funciona adecuadamente, si ha sido golpeada o dañada o si se ha caído al agua. Lleve la máquina al comerciante o al centro de reparaciones autorizado más próximo para que la examinen, la reparen o realicen su ajuste eléctrico o mecánico.
4.Nunca trabaje con la máquina con alguna de las salidas de aire bloqueadas. Mantenga las ventilaciones de la máquina abiertas y el regulador de velocidad libre de acumulación de hilachas, polvo y trozos de tela.
5.Nunca deje caer ni inserte ningún objeto en las aberturas.
6.No la utilice en el exterior.
7.No trabaje donde se hayan utilizado aerosoles o donde se esté administrando oxígeno.
8.Para desconectar, gire el botón de encendido a la posición de apagado (O) y después desenchufe de la red.
9.No desenchufe la máquina tirando del cable. Para desenchufarla, tire del enchufe, no del cable.
10.Mantenga los dedos alejados de todas las partes giratorias. Es necesario que tenga especial cuidado con la aguja de la máquina de coser.
11.Utilice siempre la placa de aguja apropiada. Una placa incorrecta puede causar la rotura de la aguja.
12.No utilice agujas dobladas.
13.No tire o empuje el tejido mientras cose. Puede deformar la aguja y romperla.
14.Desconecte la máquina de coser cuando esté haciendo ajustes en el área de la aguja, como enhebrando la aguja, cambiándola, enhebrando la canilla o cambiando el prensatelas.
15.Desenchufe siempre la máquina de la red eléctrica cuando retire las cubiertas, la lubrique, o realice cualquier otro servicio de ajuste mencionado en el manual de instrucciones.
16.Maneje el pedal con cuidado y evite que golpee el suelo. Asegúrese de no situar nada sobre él.
17.Utilice el asa solamente para levantar y mover la máquina.
18.No exponga la máquina o la cubierta de la máquina directamente a la luz del sol. Tampoco la guarde en un lugar muy caliente o húmedo.
CONSERVE ESTAS INSTRUCCIONES
Las reparaciones deben ser realizadas únicamente por un servicio representativo autorizado.
6SINGER® es una marca registrada de The Singer Company Ltd.
9910EFSt.pm6 |
6 |
2003.9.10, 8:45 PM |
ÍNDICE |
|
NORMAS DE SEGURIDAD IMPORTANTES |
..... 6 |
MODELO 9910 ................................................... |
9 |
PARA EUROPA Y TERRITORIOS |
|
EQUIPARABLES: ............................................... |
9 |
PARTES PRINCIPALES ................................... |
11 |
ACCESORIOS .................................................. |
13 |
CUBIERTA ........................................................ |
13 |
EXTENSIÓN ..................................................... |
15 |
a. RETIRADA DE LA EXTENSIÓN .............................................. |
15 |
b. APERTURA DEL COMPARTIMENTO DE ACCESORIOS ..... |
15 |
CÓMO CAMBIAR EL PRENSATELAS ............. |
15 |
A. Cómo cambiar el prensatelas .................................................. |
15 |
B. Cómo retirar el portaprensatelas ............................................. |
15 |
INSERCIÓN DE LA AGUJA .............................. |
17 |
TABLA DE TEJIDOS, HILOS Y AGUJAS ......... |
17 |
CONEXIÓN DE LA MÁQUINA .......................... |
19 |
FUNCIÓN DE CADA UNA DE LAS PARTES ... |
21 |
A. BOTÓN DE PUNTADA EN RETROCESO .............................. |
21 |
B. BOTÓN DE SUBIDA/BAJADA DE LA AGUJA ........................ |
21 |
C. BOTÓN DE AGUJA DOBLE ................................................... |
21 |
D. PALANCA ALZAPRENSATELAS ........................................... |
21 |
E. PALANCA DE ARRASTRE ..................................................... |
21 |
F. REGULADOR DE PRESIÓN ................................................... |
21 |
G. VOLANTE MANUAL ............................................................... |
21 |
H. CUBIERTA SUPERIOR .......................................................... |
21 |
PANEL DE CONTROL ...................................... |
23 |
A. PANTALLA LCD ...................................................................... |
23 |
B. CONTROL DE CONTRASTE DE LA PANTALLA LCD ........... |
23 |
C. TABLA DE PUNTADAS .......................................................... |
23 |
D. BOTÓN DE PUNTADA UTILITARIA ....................................... |
23 |
E. BOTÓN DE PUNTADA PARA LETRAS .................................. |
23 |
F. BOTÓN DE PUNTADA INVERTIDA. ....................................... |
23 |
G. BOTONES DE SELECCIÓN DE PUNTADA ........................... |
23 |
H. BOTONES DE MEMORIA DE PUNTADA, BORRADO Y |
|
COMPROBACIÓN .................................................................. |
23 |
I. BOTONES DE ANCHO Y LARGO DE PUNTADA ................... |
23 |
AJUSTE DE LA CANILLA ................................. |
25 |
A. CÓMO SACAR LA CANILLA ................................................... |
25 |
B. COLOCACIÓN DEL CARRETE DE HILO EN EL |
|
PORTACARRETES ................................................................ |
25 |
C. DEVANADO DE LA CANILLA ................................................. |
25 |
D. COLOCACIÓN DE LA CANILLA ............................................. |
27 |
ENHEBRADO DE LA MÁQUINA ...................... |
29 |
A. PREPARACIÓN PARA ENHEBRAR LA MÁQUINA ............... |
29 |
B. COLOCACIÓN DEL CARRETE DE HILO EN EL |
|
PORTACARRETES ................................................................ |
29 |
C. ENHEBRADO DEL HILO SUPERIOR .................................... |
29 |
D. ENHEBRADO DEL OJO DE LA AGUJA ................................. |
31 |
E. EXTRACCÍON DEL HILO DE LA CANILLA ............................ |
31 |
COMENZAR A COSER .................................... |
33 |
A. PRINCIPIO Y FINAL DE UNA COSTURA .............................. |
33 |
B. PUNTADA EN RETROCESO ................................................. |
33 |
C. CÓMO GIRAR EN LAS ESQUINAS ....................................... |
35 |
D. CÓMO COSER TEJIDOS FUERTES ..................................... |
35 |
E. CÓMO COSER SOBRE ÁREAS SOLAPADAS ...................... |
35 |
F. ANCHO DEL MARGEN DE COSTURA .................................. |
35 |
AJUSTE DE LA TENSIÓN DE LOS HILOS ...... |
37 |
SELECCIÓN DE PUNTADAS UTILITARIAS .... |
39 |
A. SELECCIÓN DE LA PUNTADA .............................................. |
39 |
B. PUNTADA INVERTIDA ........................................................... |
39 |
C. AJUSTE DEL ANCHO Y LARGO DE LA PUNTADA .............. |
39 |
DÓNDE UTILIZAR CADA TIPO DE PUNTADA 41 |
|
PUNTADA RECTA ............................................ |
43 |
PUNTADA DE ZIG-ZAG ................................... |
45 |
PUNTADA MÚLTIPLE DE ZIG-ZAG ................. |
45 |
COSTURA CON BRAZO LIBRE ....................... |
45 |
ACOLCHADO ................................................... |
47 |
A. Cómo unir las piezas de tejido ................................................ |
47 |
B. Cómo coser acolchados .......................................................... |
47 |
C. Puntada de acolchado con aspecto artesanal (nº5) ................ |
47 |
PUNTADA ELÁSTICA ...................................... |
49 |
PUNTADAS DECORATIVAS CONTINUAS ..... |
49 |
A. COSTURA DE TEJIDOS FINOS ............................................. |
49 |
SOBREHILADO-REMALLADO ......................... |
51 |
A. CON EL PRENSATELAS PARA SOBREHILADO .................. |
51 |
B. CON EL PRENSATELAS UNIVERSAL .................................. |
51 |
C. NOTA ...................................................................................... |
51 |
DOBLADILLO DE PUNTADA INVISIBLE ......... |
53 |
LABORES DE PARCHEADO ........................... |
55 |
APLICACIONES ............................................... |
55 |
INSERCIÓN DE CREMALLERAS |
|
INSERCIÓN CENTRADA ................................. |
57 |
INSERCIÓN SOLAPADA .................................. |
59 |
A. PARA ABRIR LA CREMALLERA MIENTRAS SE COSE ....... |
59 |
CÓMO COSER OJALES .................................. |
61 |
PRESILLAS Y ZURCIDOS AUTOMATICOS .... |
65 |
CÓMO COSER BOTONES .............................. |
67 |
A. BOTONES CON TALLE .......................................................... |
67 |
CÓMO COSER CON AGUJA DOBLE .............. |
69 |
PUNTADAS PARA LETRAS ............................. |
71 |
A. SELECCIÓN DE PUNTADAS PARA LETRAS ....................... |
71 |
B. PARA BORRAR UNA LETRA MEMORIZADA ........................ |
71 |
C. PARA COMPROBAR LAS LETRAS MEMORIZADAS ........... |
73 |
D. COSTURA DE LAS LETRAS MEMORIZADAS ...................... |
73 |
E. CONSEJOS ............................................................................. |
73 |
MANTENIMIENTO ............................................ |
75 |
LIMPIEZA .......................................................... |
75 |
RECOMENDACIONES ÚTILES ....................... |
78 |
PRECAUCIÓN: Para prevenir accidentes
No abra la tapa delantera de la máquina.
7
9910EFSt.pm6 |
7 |
2003.9.10, 8:45 PM |
MODEL 9910
PREFACE
Thank you for your purchase of this sewing machine.
This machine intended for household use will provide you with excellent performance in sewing from light to heavy material (lawn to denim). Please refer to this booklet for proper use and optimum service. To get the most out of your sewing machine, read the entire instruction manual before attempting to operate the machine. Then familiarize yourself with the machine by following the instruction manual page by page.
To ensure that you are always provided with the most modern sewing capabilities, the manufacturer reserves the right to change the appearance, design or accessories of this sewing machine when considered necessary without notification or obligation.
Copyright © 2003 THE SINGER COMPANY All Rights Reserved Throughout The World.
FOR EUROPEAN AND SIMILAR TERRITORIES:
This product is suppressed for radio and television interference with the International Electrotechnical Commission requirements of the CISPR.
Machine for Great Britain and some other countries having similar wiring standards are shipped from the factory without a plug for connection to the mains. The wires in this mains lead are colored in accordance with the following code. Blue: neutral (N) Brown: live (L)
As the colors of the wires in the mains lead of this appliance may not correspond with the colored markings identifying the terminals in your plug, proceed as follows:
The wire which is colored blue must be connected to the terminal which is marked with the letter N or colored black. The wire which is colored brown must be connected to the terminal which is marked with letter L or colored red. If a 13 Amp. (BS 1363) plug is used, a 3 Amp. Fuse must be fitted, or if any other type of plug is used, a 5 Amp. fuse must be fitted either in the plug or adaptor or at the distribution board.
Neither cord is to be connected to the earth terminal of a three-pin plug.
8
This SINGER sewing machine, model 9910, has been tested by the Engineering Control Association TÜV according to European standards, and corresponds to the guidelines for electrical safety, radio interference and noise immunity. Conformity is documented by the GS symbol and the CE identification.
La machine à coudre SINGER, modèle 9910, a été testée par l’Association de contrôle d’ingénierie TÜV conformément aux normes européennes et répond aux directives de sécurité électrique, d’interférence radio et d’immunité sonore. Le symbole GS et l’identification CE confirme la conformité aux normes.
La máquina de cose SINGER, modelo 9910, ha sido probada por la Asociación de Control de Ingeniería TÜV según las Normas Europeas y cumple con las directrices relacionadas con la seguridad eléctrica, interferencias de radio e insonorización. Esta conformidad viene reflejada en el símbolo GS y la identificación CE.
9910EFSt.pm6 |
8 |
2003.9.10, 8:45 PM |

MODÈLE 9910
PRÉFACE
Merci d’avoir acheté cette machine à coudre.
La machine est destinée à l’usage domestique et vous procurera d’excellents résultats pour la couture de matériaux légers tout aussi bien qu’épais (de la batiste au jean). Veuillez vous référer au présent manuel pour une utilisation et un entretien corrects de la machine. Afin de tirer le meilleur parti de la machine, il est conseillé de lire l’ensemble de la notice avant de l’utiliser. Ensuite, familiarisez-vous avec la machine en suivant la notice d’utilisation page par page.
Afin de vous garantir une actualisation constante des fonctions de couture, le constructeur se réserve le droit de modifier l’apparence de la machine, son esthétique et ses accessoires quand jugé nécessaire, et ceci sans obligation ni notification préalable.
Copyright © 2003 THE SINGER COMPANY Tous droits réservés dans le monde entier.
MODELO 9910
PRÓLOGO
Gracias por la adquisición de esta máquina de coser.
Esta máquina ideada para uso doméstico le proporcionará un excelente resultado cuando cosa tejidos ligeros y pesados (desde linón a tela vaquera). Consulte este manual para su uso apropiado y servicio óptimo. Para conseguir el máximo rendimiento de su máquina de coser, lea por completo el manual de instrucciones antes de intentar trabajar con la máquina. Después familiarícese con la máquina siguiendo el manual de instrucciones página por página.
Para asegurarle que siempre pueda disponer de los más modernos adelantos para la costura, el fabricante se reserva los derechos de cambiar la apariencia, el diseño o los accesorios de su máquina de coser cuando lo considere necesario, sin obligación ni notificación previa. Reproducción © 2003 THE SINGER COMPANY. Reservados todos los derechos internacionales.
POUR LES TERRITOIRES EUROPÉENS ET ASSIMILÉS :
Les interférences radio et télévision sont supprimées conformément aux normes de la Commission internationale électrotechnique du CISPR.
Pour la Grande-Bretagne et les pays ayant des normes de branchements électriques similaires, les machines sont expédiées sans prise d’alimentation.
Les fils électriques du câble d’alimentation sont colorés suivant le code suivant :
Bleu : neutre (N) Marron : phase (L)
Si la couleur des fils dans le câble ne correspond pas aux couleurs des marquages identifiant les bornes de votre prise, veuillez procéder comme suit :
Le fil bleu doit être connecté à la borne marquée N ou colorée en noir. Le fil marron doit être connecté à la borne marquée L ou colorée en rouge. Si vous utilisez une prise de 13 ampères (BS 1363), il est nécessaire de placer un fusible de 3 ampères. Si vous utilisez tout autre type de prise, il est nécessaire de placer un fusible de 5 ampères. Le fusible peut être soit intégré à la prise, soit placé dans l’adaptateur ou dans le tableau de distribution.
Aucun fil ne doit être raccordé à une prise de terre à trois broches.
PARA EUROPA Y TERRITORIOS EQUIPARABLES:
Este producto está protegido contra las interferencias de radio y televisión de acuerdo con las normativas de CISPR de la Comisión Electrotécnica Internacional.
Las máquinas para Gran Bretaña y otros países que tienen cables estándar similares salen de la fábrica sin enchufe de conexión a la red principal. Los cables de esta conducción principal están coloreados de acuerdo al siguiente código:
Azul: neutral (N), Marrón: positivo (L).
Como los colores de los cables en la conducción principal de este producto pueden no corresponderse con las marcas coloreadas que identifican los terminales en su enchufe, proceda de la siguiente manera:
El cable que está coloreado de azul debe ser conectado al terminal que está marcado con la letra N o coloreado de negro. El cable que está coloreado de marrón debe ser conectado al terminal que está marcado con la letra L o coloreado de rojo. Si se utiliza un enchufe de 13 Amp. (BS 1363), debe incorporarse un fusible de 3 Amp, o si se utiliza cualquier otro tipo de enchufe, debe incorporarse un fusible de 5 Amp en el enchufe o adaptador o en la tabla de distribución.
No se debe conectar ningún cable al terminal de
tierra de un enchufe de tres clavijas.
9
9910EFSt.pm6 |
9 |
2003.9.10, 8:45 PM |

MAIN PARTS
1.Face Plate
2.Thread Take-Up Lever (Inside) 3.Pressure Regulator 4.Extension Table (Accessories) 5.Handle
6.Hand Wheel 7.Presser Foot Lifter 8.Thread Cutter 9.Buttonhole Lever
10.Needle Threader Lever
11.Needle Threader
12.Needle Thread Guide
13.Needle Clamp Screw
14.Needle
15.Presser Foot Thumb Screw
16.Presser Foot Holder
17.Presser Foot
18.Fabric Feed Dogs
19.Needle Plate
20.Bobbin Cover
21.Bobbin Cover Latch
22.Top Cover 23.Pattern Chart
24.Thread Tension Regulator
25.Thread Guides
26.Spool Stand
27.Bobbin Winder Thread Guide
28.Felt Washer
29.L.C.D. Contrast Control
30.Extra Spool Holder
31.Bobbin Winder Shaft
32.Bobbin Winder Stop
33.Reverse Stitch Button 34.Needle Up/Down Button
35.Twin Needle Button
36.Stitch Width Buttons 37.Liquid Crystal Display (L.C.D.)
38.Stitch Length Buttons 39.Pattern Selection Buttons
40.Mirror Stitch Button
41.Utility Stitch Button
42.Letter Stitch Button
43.Memory Read Button
44.Clear Button
45.Memory Button 46.Drop Feed Lever
47.Power Switch
48.Terminal Box
49.Controller Jack
50.Foot Controller
51.Power Line Cord
10
9910EFSt.pm6 |
10 |
1 |
5 |
|
|
2 |
|
3 |
|
4 |
|
|
6 |
|
7 |
8 9 10 11 12 13 14
15 |
16 |
|
|
17 |
18 |
|
19 |
20 |
21 |
|
|
|
|
|||||
22 |
|
|
23 |
24 |
25 |
26 |
|
27 28 29 30 31 32 |
|
|||||||||
|
|
|
|
|
|
|
|
|
|
|
|
|
|
|
|
|
|
|
|
|
|
|
|
|
|
|
|
|
|
|
|
|
|
|
|
|
|
|
|
|
|
|
|
|
|
|
|
|
|
|
|
|
|
|
|
|
|
|
|
|
|
|
|
|
|
|
|
|
|
|
|
|
|
|
|
|
|
|
|
|
|
|
|
|
|
|
|
|
|
|
|
|
|
|
|
|
|
|
|
|
|
|
|
|
|
|
|
|
|
|
|
|
|
|
|
|
|
|
|
|
|
|
|
|
|
|
|
|
|
|
|
|
40
41
42
|
|
43 |
|
|
44 |
33 |
34 35 3637 38 39 |
45 |
|
46
47
48
 49
49
50 51
2003.9.10, 8:45 PM
PIÈCES PRINCIPALES |
|
PARTES PRINCIPALES |
|
|
|
||
|
|
||
1.Plaque frontale |
1.Placa frontal |
||
2.Releveur de fil (à l’intérieur) |
2.Palanca tirahilos (interior) |
||
3.Régulateur de pression |
3.Regulador de presión |
||
4.Plateau d’extension (accessoires) |
4.Extensión (accesorios) |
||
5.Poignée |
5.Asa |
||
6.Volant |
6.Volante manual |
||
7.Releveur de pied presseur |
7.Palanca alzaprensatelas |
||
8.Coupe-fil |
8.Cortador de hilos |
||
9.Levier de boutonnière |
9.Palanca para ojales |
||
10.Levier d’enfile-aiguille |
10.Palanca del enhebrador de la aguja |
||
11.Enfile-aiguille |
11.Enhebrador de la aguja |
||
12.Guide-fil |
12.Guía del hilo de la aguja |
||
13.Vis du pince-aiguille |
13.Tornillo de fijación de la aguja |
||
14.Aiguille |
14.Aguja |
||
15.Vis de maintien du pied presseur |
15.Tornillo de mariposa del prensatelas |
||
16.Support du pied presseur |
16.Portaprensatelas |
||
17.Pied presseur |
17.Prensatelas |
||
18.Griffes |
18.Transportadores del tejido |
||
19.Plaque à aiguille |
19.Placa de aguja |
||
20.Couvercle de la canette |
20.Cubierta de la canilla |
||
21.Loquet d’ouverture du couvercle de la canette |
21.Seguro de la cubierta de canillas |
||
22.Carter supérieur |
22.Cubierta superior |
||
23.Tableau des points |
23.Tabla de puntadas |
||
24.Molette de réglage de la tension du fil |
24.Regulador de la tensión del hilo |
||
25.Guide-fils |
25.Guíahilos |
||
26.Porte-bobine |
26.Portacarretes |
||
27.Guide-fil du bobinoir |
27.Guía del hilo del devanador |
||
28.Rondelle de feutre |
28.Arandela |
||
29.Molette de réglage du contraste |
29.Control de contraste de la pantalla LCD |
||
30.Fixation du porte-bobine auxiliaire |
30.Portacarretes auxiliar |
||
31.Bobinoir |
31.Eje del devanador |
||
32.Arrêt du bobinoir |
32.Parada del devanador |
||
33.Touche de marche arrière |
33.Botón de puntada en retroceso |
||
34.Touche de positionnement de l’aiguille (haut/ |
34.Botón de subida/bajada de la aguja |
||
bas) |
35.Botón de aguja doble |
||
35.Touche de l’aiguille jumelée |
36.Botones de ancho de puntada |
||
36.Touches de largeur du point |
37.Pantalla LCD |
||
37.Ecran à cristaux liquides (L.C.D.) |
38.Botones de largo de puntada |
||
38.Touches de longueur du point |
39.Botones de selección de puntada |
||
39.Touches de sélection des motifs |
40.Botón de puntada invertida |
||
40.Touche miroir |
41.Botón de puntada utilitaria |
||
41.Touche de points utilitaires |
42.Botón de puntada para letras |
||
42.Touche de lettres |
43.Botón de lectura |
||
43.Touche de vérification |
44.Botón de borrado |
||
44.Touche d’annulation |
45.Botón de memoria |
||
45.Touche de mémorisation |
46.Palanca de arrastre |
||
46.Levier des griffes |
47.Interruptor de corriente |
||
47.Interrupteur marche/arrêt |
48.Terminal |
||
48.Prise du câble d’alimentation |
49.Toma del pedal |
||
49.Prise de la pédale |
50.Pedal |
||
50.Pédale |
51.Cable de toma de corriente |
||
51.Câble d’alimentation |
|
|
|
11
9910EFSt.pm6 |
11 |
2003.9.10, 8:45 PM |
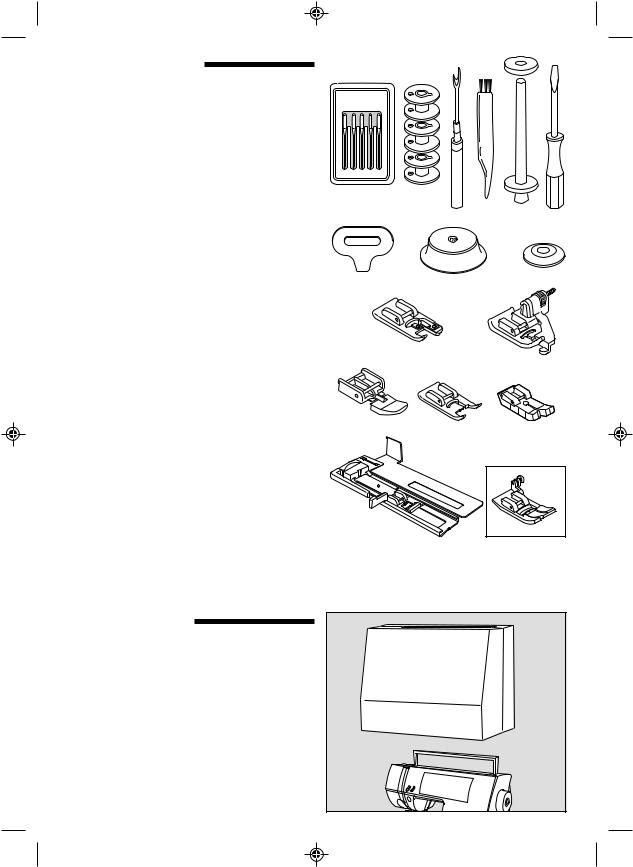
ACCESSORIES
Accessories are provided in the accessory case. (See next page, [EXTENSION TABLE])
1.Needle Pack (#11, #14, #16, Needle for knit and synthetic fabric #11, #14)
2.4 Bobbins ( 1 is in the machine)
3.Seam Ripper
4.Brushf
5.Auxiliary Spool Pin with Felt Washer
6.Screw Driver
7.Driver for Needle Plate
8.Thread Cap (On the machine when delivered)
9.Small Thread Cap
10.Overcasting Foot
11.Blind Foot
12.Zipper Foot
13.Satin Foot
14.Straight Stitch / Patch Quilting Foot
15.Buttonhole Foot and Under Plate
16.General Purpose Foot (On machine when delivered)
1 |
2 |
3 |
4 |
5 |
6 |
7 |
8 |
9 |
10 |
|
11 |
12 |
13 |
14 |
15 |
16 |
DUST COVER
Cover the machine with dust cover when it is not to be used.
12
9910EFSt.pm6 |
12 |
2003.9.10, 8:45 PM |
ACCESSOIRES ACCESORIOS
Les accessoires sont disposés dans le compartiment à accessoires (voire page suivante
«Plateau d’extension »)
1.Assortiment d’aiguilles (#11, #14, #16, aiguille pour mailles et tissus synthétiques #11, #14)
2.4 canettes (dont une placée sur la machine)
3.Découseur
4.Brosse
5.Tige à bobine auxiliaire avec rondelle de feutre
6.Tournevis
7.Tournevis pour la plaque à aiguille
8.Capuchon de bobine (placé sur la machine)
9.Petit capuchon de bobine
10.Pied de surjet
11.Pied ourlet invisible
12.Pied fermeture à glissière
13.Pied satin
14.Pied points droits et rapiéçage
15.Pied boutonnière et plaque pour boutonnières
16.Pied universel (placé sur la machine lors de la livraison)
Los accesorios se encuentran en el compartimento de accesorios (consulte la página siguiente, “EXTENSIÓN”)
1.Paquete de agujas (#11, #14, #16. Aguja para punto y tejido sintético #11, #14)
2.4 canillas (1 en la máquina)
3.Escarificador
4.Cepillo
5.Portacarretes auxiliar con arandela
6.Destornillador
7.Extractor de la placa de la aguja
8.Tope del hilo (en la máquina cuando se entrega)
9.Tope pequeño del hilo
10.Prensatelas para sobrehilado
11.Prensatelas para puntada invisible
12.Prensatelas para cremalleras
13.Prensatelas para realce
14.Prensatelas para acolchado de parches/ puntada recta
15.Prensatelas para ojales, con placa inferior
16.Prensatelas universal (en la máquina cuando se entrega)
HOUSSE DE PROTECTION SOUPLE
Couvrez la machine avec la housse de protection quand elle n’est pas utilisée.
CUBIERTA
Cubra la máquina con la cubierta cuando no la utilice.
13
9910EFSt.pm6 |
13 |
2003.9.10, 8:45 PM |
EXTENSION TABLE
a.REMOVING THE EXTENSION TABLE
Hook your finger to the bottom of extension table and slide it to the left. To attach, insert to the right.
b.OPENING THE ACCESSORY CASE
Hook your finger to the left side of accessory case and pull toward you.
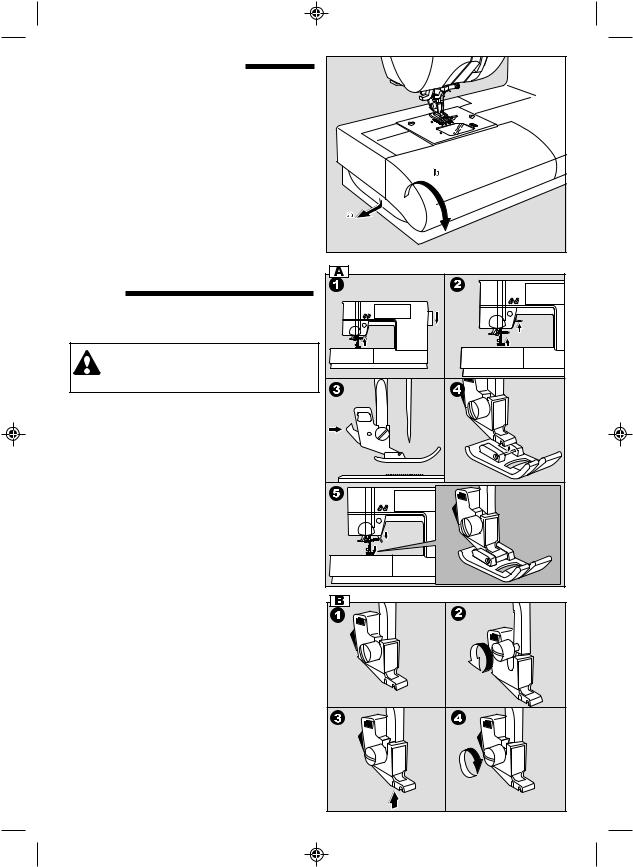
CHANGING THE PRESSER FOOT
The presser foot must be changed according to the stitch you sew, or work you do.
CAUTION: To prevent accidents.
Turn off the power switch before you change the presser foot.
A.Changing the presser foot
1.Turn the hand wheel toward you until the needle is at its highest point.
2.Raise the presser foot lifter.
3.Remove the presser foot by pushing the presser foot release lever toward you.
4.Place desired foot with its pin directly under the slot in presser foot holder.
5.Lower the presser foot lifting lever and the presser foot will snap into place.
B.Removing the presser foot holder
When attaching the special presser foot or cleaning the machine, you should remove the presser foot holder.
1.Remove the presser foot.
2.Loosen the presser foot thumb screw and remove the presser foot holder.
3.To replace the holder, pull up the holder as far as it will go from bottom of presser bar.
4.Tighten the thumb screw.
14
9910EFSt.pm6 |
14 |
2003.9.10, 8:45 PM
PLATEAU D’EXTENSION |
|
EXTENSIÓN |
|
||
|
a.DÉGAGER LE PLATEAU D’EXTENSION
Saisissez le plateau d’extension par-dessous avec le doigt et faites-le glisser vers la gauche. Pour le fixer, insérez-le dans son emplacement par la droite.
b.OUVRIR LE COMPARTIMENT À ACCESSOIRES
Saisissez le compartiment à accessoires par la gauche et tirez vers vous.
a.RETIRADA DE LA EXTENSION
Sujete el final de la extensión con los dedos y deslícela hacia la izquierda. Para colocarla, insértela hacia la derecha.
b.APERTURA DEL COMPARTIMENTO DE ACCESORIOS
Sujete la cavidad del compartimento de accesorios con los dedos y tire hacia usted.
CHANGEMENT DE PIED PRESSEUR
Le pied presseur doit être changé en fonction du point que vous désirez coudre ou de l’ouvrage que vous effectuez.
ATTENTION! Pour éviter les incidents :
Veillez à éteindre la machine avant de changer le pied presseur.
A.Changer de pied presseur
1.Tournez le volant vers vous jusqu’à ce que l’aiguille atteigne sa position supérieure.
2.Soulevez le releveur de pied presseur.
3.Dégagez le pied presseur en poussant le levier de dégagement du pied presseur vers vous.
4.Placez le pied voulu avec la tige exactement sous le cran du support du pied presseur.
5.Abaissez le levier du releveur de pied presseur. Le pied presseur s’enclenche ainsi dans la bonne position.
B.Ôter le support du pied presseur
Pour mettre en place un pied presseur spécial ou nettoyer la machine, il est nécessaire de retirer le support du pied presseur.
1.Retirez le pied presseur.
2.Desserrez la vis de maintien du pied presseur et retirer le support du pied presseur.
3.Pour remettre le support en place, poussez-le par la barre vers le haut le plus loin possible.
4.Serrez la vis de maintien du pied presseur.
CÓMO CAMBIAR EL PRENSATELAS
El prensatelas debe cambiarse según la puntada que vaya a coser o la labor que vaya a realizar.
PRECAUCIÓN: Para prevenir accidentes
Apague el interruptor de corriente antes de cambiar el prensatelas.
A.Cómo cambiar el prensatelas
1.Gire el volante manual hacia usted hasta que la aguja se sitúe en su posición más alta.
2.Levante la palanca alzaprensatelas.
3.Retire el prensatelas presionando la palanca liberadora del prensatelas hacia usted.
4.Coloque el prensatelas deseado con su perno justo bajo la ranura del portaprensatelas.
5.Baje la palanca alzaprensatelas, éste se encajará en su sitio.
B.Cómo retirar el portaprensatelas
Para acoplar el prensatelas especial o limpiar la máquina, antes debe retirar el portaprensatelas.
1.Desmonte el prensatelas.
2.Afloje el tornillo de mariposa y retire el portaprensatelas.
3.Para volver a colocar el portaprensatelas, tire de éste hacia arriba tanto como pueda desde la parte inferior de la barra del prensatelas.
4.Apriete el tornillo de mariposa.
15
9910EFSt.pm6 |
15 |
2003.9.10, 8:45 PM |
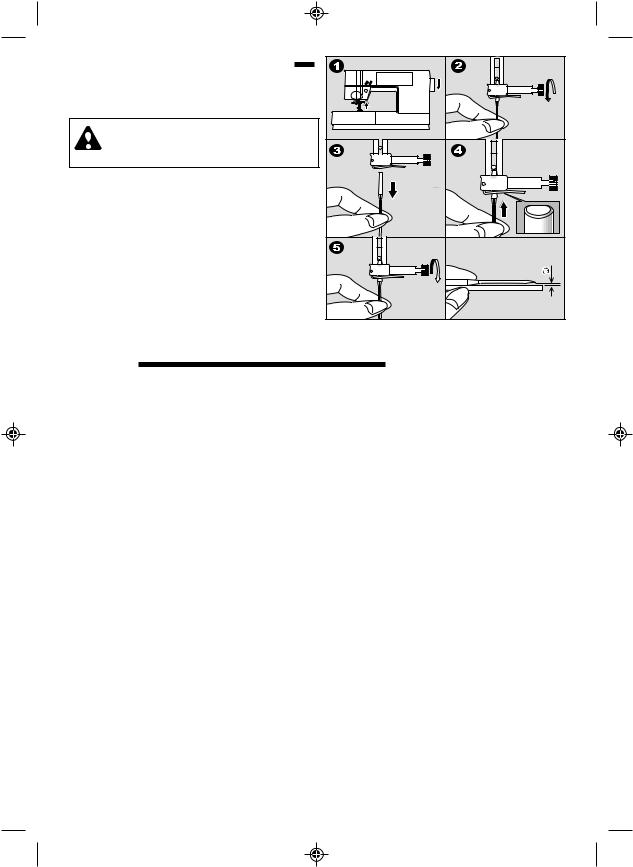
INSERTING THE NEEDLE
Select a needle of the right type and size for the fabric to be sewn.
CAUTION: To prevent accidents.
Turn off the power before removing the needle.
1. Turn the hand wheel toward you until the needle is at its highest point.
2. Loosen the needle clamp screw.
3. Remove the needle.
4. Insert new needle into needle clamp with the flat side to the back and push it up as far as it will go.
5. Tighten the needle clamp screw.
a. Do not use the bent or blunt needle. Place needle on a flat plate and check straightness.
FABRIC, THREAD AND NEEDLE TABLE
Select size of thread and needle in accordance with fabric to be sewn.
Type of Fabric |
Thread Size |
Needle |
Needle Size |
|
|
|
|
Type |
|
|
|
|
|
|
Light Weight - thin |
Ctn #80 -100 |
|
|
|
georgette, |
Silk 60 - |
80 |
2000 |
9/70-11/80 |
organdy, voile, |
Syn 80 - |
100 |
gray shank |
|
taffeta, silk, etc. |
|
|
|
|
|
|
|
|
|
Medium Weight - |
|
|
|
|
gingham, pique, |
Ctn 50 - |
80 |
2000 |
|
linen, cotton, |
Silk 50 |
|
gray shank |
11/80-14/90 |
satin, thin |
Syn 50 - |
80 |
|
|
corduroy, velvet |
|
|
|
|
|
|
|
|
|
Heavy Weight - |
Ctn 40 - 50 |
2000 |
|
|
gabardine, tweed, |
Silk 50 |
|
gray shank |
14/90-16/100 |
denim, corduroy |
Syn 50 - |
60 |
|
|
|
|
|
|
|
Stretch - double |
Syn 50 - |
80 |
2001 |
11/80-14/90 |
knit, tricot, |
Silk 50 |
|
green shank |
Needle for knit and |
spandex, jersey |
Polyester |
|
|
synthetic fabric |
|
|
|
|
|
Sweatshirt, Swim- |
|
|
2001 |
|
wear, Double Knit, |
Polyester |
|
green shank |
|
Sweater Knit |
|
|
|
|
|
|
|
|
|
Leather |
|
|
2032 Leather |
|
|
|
|
|
|
Use a Singer brand needle for better sewing results.
16
9910EFSt.pm6 |
16 |
2003.9.10, 8:45 PM |
MISE EN PLACE DE L’AIGUILLE
Choisissez une aiguille de la grosseur et de la catégorie appropriée pour le tissu que vous souhaitez coudre.
ATTENTION! Pour éviter les incidents :
Veillez à éteindre la machine avant de retirer l’aiguille.
1.Tournez le volant vers vous jusqu’à ce que l’aiguille atteigne sa position supérieure.
2.Desserrez la vis du pince-aiguille.
3.Dégagez l’aiguille en place.
4.Insérez l’aiguille de votre choix dans le pinceaiguille. Pour cela, positionnez le côté plat de l’aiguille vers l’arrière puis pousser l’aiguille vers le haut le plus loin possible.
5.Resserrez la vis du pince-aiguille.
a.N’utilisez pas d’aiguille tordue ni émoussée. Placez l’aiguille sur une surface plate pour vérifier qu’elle est bien droite.
INSERCION DE LA AGUJA
Seleccione la aguja del tipo y tamaño correctos para el tejido que vaya a coser.
PRECAUCION: Para prevenir accidentes
Apague el interruptor de corriente antes de retirar la aguja.
1.Gire el volante manual hacia usted hasta que la aguja se sitúe en su posición más alta.
2.Afloje el tornillo de fijación de la aguja.
3.Saque la aguja.
4.Inserte la nueva aguja en la abrazadera de la aguja por el lado plano y empújela hacia arriba tanto como pueda.
5.Apriete el tornillo de la aguja.
a.No utilice agujas dobladas o despuntadas. Sitúe la aguja sobre una superficie plana y compruebe que está recta.
TABLEAU DES TISSUS, FILS |
TABLA DE TEJIDOS, HILOS |
||
ET AIGUILLES |
|
Y AGUJAS |
|
|
|
||
|
|
||
Sélectionnez un fil et une aiguille dont la grosseur est appropriée au tissu que vous souhaitez coudre.
Seleccione el tamaño del hilo y de la aguja según el tipo de tejido que vaya a coser.
Tissu |
Fil |
Catégorie |
Grosseur |
|
|
d’aiguille |
d’aiguille |
|
|
|
|
Léger - crêpe fin, |
Ctn 80-100 |
|
|
organdi, voile, |
Soie 60-80 |
2000 talon |
9/70-11/80 |
taffetas, soie |
Synth. 80-100 |
gris |
|
|
|
|
|
Moyennement |
|
|
|
léger - Vichy, |
Ctn 50-80 |
|
|
pique, lin, coton, |
Soie 50 |
2000 talon |
11/80-14/90 |
satin, velours à |
Synth. 50-80 |
gris |
|
fines côtes, |
|
|
|
velours |
|
|
|
|
|
|
|
Épais - |
Ctn 40-50 |
|
|
gabardine, |
Soie 50 |
2000 talon |
14/90-16/100 |
tweed, jean, |
Synth. 50-60 |
gris |
|
velours côtelé |
|
|
|
|
|
|
|
Tissus |
|
|
11/80-14/90 |
extensibles - |
Synth. 50-80 |
|
Aiguille pour |
laine épaisse, |
Soie 50 |
2001 talon |
mailles et |
tricot, fibre |
Polyester |
vert |
tissus |
synthétique |
|
|
synthétiques |
élastique, jersey |
|
|
|
|
|
|
|
Sweat-shirt, |
|
|
|
maillots de bain, |
Polyester |
2001 talon |
11/80-14/90 |
laine épaisse, |
|
vert |
|
tricot |
|
|
|
|
|
|
|
Cuir |
|
2032 cuir |
|
|
|
|
|
Pour un résultat optimal, utilisez une aiguille Singer.
Tipo de tejido |
Tamaño |
Tipo de |
Tamaño |
|
del hilo |
aguja |
de la aguja |
|
|
|
|
Peso ligero - tela |
Alg 80-100 |
|
|
de seda delgada, |
Seda 60-80 |
2000 gris |
9/70-11/80 |
organdí,voile, |
Sin 80-100 |
|
|
seda, etc. |
|
|
|
|
|
|
|
Peso medio - |
|
|
|
guinga, piqué, |
Alg 50-80 |
|
|
lino, algodón, |
Seda 50 |
2000 gris |
11/80-14/90 |
satén, cordura |
Sin 50-80 |
|
|
delgada, |
|
|
|
terciopelo |
|
|
|
|
|
|
|
Peso fuerte - |
Alg 40-50 |
|
|
gabardina, |
Seda 50 |
2000 gris |
14/90-16/100 |
mezclilla, tela |
Sin 50-60 |
|
|
vaquera, cordura |
|
|
|
|
|
|
|
Elástico - doble |
Sin 50-80 |
2001 |
11/80-14/90 |
punto, tricot, |
Seda 50 |
verde |
Aguja para |
spandex, jersey |
Poliéster |
|
tricot y tejido |
|
|
|
sintético |
|
|
|
|
Sudaderas, ropa |
|
|
|
de baño, doble |
Poliéster |
2001 |
11/80 -14/90 |
punto, jersey de |
|
verde |
|
punto |
|
|
|
|
|
|
|
Cuero |
|
2032 |
|
|
|
cuero |
|
|
|
|
|
Utilice una aguja Singer para obtener los
mejores resultados.
17
9910EFSt.pm6 |
17 |
2003.9.10, 8:45 PM |
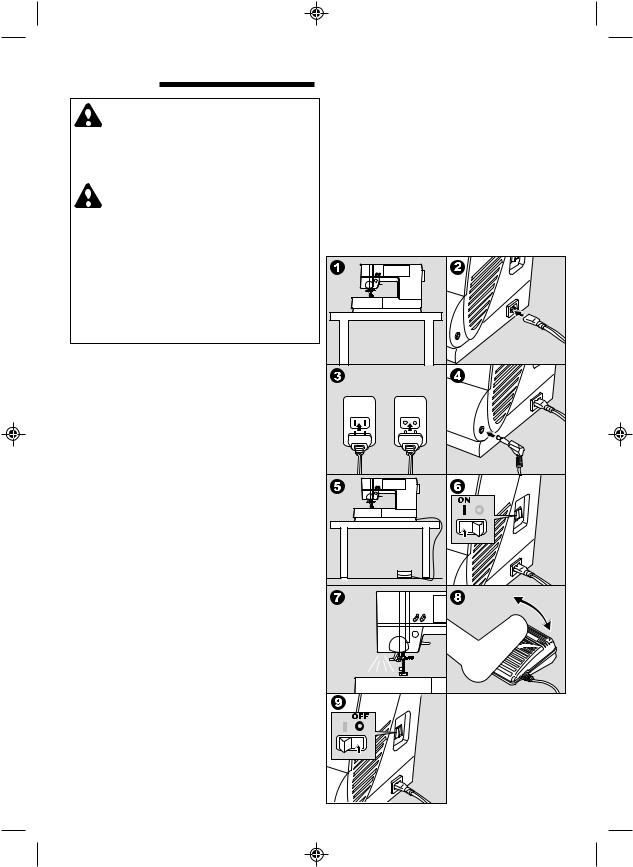
CONNECTING THE
MACHINE
DANGER: To reduce the risk of electric shock.
Never leave unattended when plugged in. Always unplug this machine from the electric outlet immediately after using and before maintenance.
WARNING: To reduce the risk of burns, fire, electric shock, or injury to persons.
1.Do not unplug by pulling on cord. To unplug, grasp the plug, not the cord. Place the machine
|
on a stable table. |
|
|
2. |
Turn off the power when connecting the foot |
|
|
|
controller to the machine. |
|
|
3. |
Handle the foot controller with care and avoid |
|
|
|
dropping it on the floor. Be sure not to place |
|
|
|
anything on top of it. |
|
|
4. |
Use only foot controller provided with this |
|
|
|
machine. (Type 4C-337B) |
|
|
1. |
Place machine on stable table. |
|
|
2. |
Connect the power line cord to the machine by |
|
|
|
inserting the 2-hole plug into the terminal box. |
|
|
3. |
Connect the power line plug to the electric |
|
|
|
outlet. |
|
|
4. |
Push foot controller plug into the jack on |
|
|
|
machine. |
|
|
5. |
Place foot controller at your feet. |
|
|
6. |
Turn on the power switch. |
|
|
7. |
A lamp will light up when switch is turned on. |
|
|
8. |
The harder you press the foot controller, the |
|
|
|
faster the machine will sew. The machine will |
|
|
|
stop when foot controller is released. |
|
|
9. |
To disconnect, turn the power switch to the off |
|
|
|
position (Symbol O), then remove plug from |
|
|
|
outlet. |
|
|
Note: |
|
|
|
* |
If presser foot is lifted, machine will not run. |
|
|
|
(see next page) |
|
|
FOR UNITED STATES AND CANADA USERS: |
|
||
POLARIZED PLUG INFORMATION |
|
||
This appliance has a polarized plug (one blade |
|
||
wider than the other). To reduce the risk of electric |
|
||
shock, this plug is intended to fit in a polarized |
|
||
outlet only one way. If the plug does not fit fully in |
|
||
the outlet, reverse the plug. If it still does not fit, |
|
||
contact a qualified electrician to install the proper |
|
||
outlet. Do not modify the plug in any way. |
|
||
18 |
|
|
|
9910EFSt.pm6 |
18 |
2003.9.10, 8:45 PM |
|
BRANCHEMENT DE LA MACHINE
DANGER - Pour réduire les risques de décharge électrique :
Ne laissez jamais la machine branchée sans surveillance. Débranchez toujours la machine immédiatement après l’usage et avant l’entretien.
ATTENTION! - Pour réduire les risques de brûlure, d’incendie, de décharge électrique et de blessures corporelles :
1.Ne débranchez pas la machine en tirant sur le câble. Pour débrancher, saisissez la fiche et non pas le câble. Placez la machine sur un support stable.
2.Eteignez la machine quand vous connectez la pédale à la machine.
3.Maniez la pédale avec soin et évitez de la faire tomber. Veillez à ne rien poser dessus.
4.N’utilisez que la pédale fournie avec la machine (type 4C-337B).
1.Placez la machine sur un support stable.
2.Connectez le câble d’alimentation à la machine en insérant la fiche à deux broches dans la prise d’alimentation.
3.Connectez le câble d’alimentation à la prise électrique.
4.Insérez la fiche de la pédale dans la prise de la pédale sur la machine.
5.Placez la pédale à votre pied.
6.Allumez la machine en appuyant sur l’interrupteur marche/arrêt.
7.Un signal lumineux s’allume quand la machine est allumée.
8.Plus vous appuyez sur la pédale, plus la machine coud rapidement. La machine s’arrête de coudre quand vous relâchez la pédale.
9.Pour déconnecter la machine, appuyez sur l’interrupteur marche/arrêt (O) puis débranchez la machine.
Remarque :
*La machine ne fonctionne pas tant que le pied presseur est relevé. (Voire page suivante)
POUR LES UTILISATEURS AUX ÉTATSUNIS ET AU CANADA : INFORMATIONS CONCERNANT LES FICHES POLARISÉES
Cet appareil est équipé d’une fiche polarisée (une lame est plus large que l’autre). Pour réduire les risques de décharge électrique, cette fiche ne peut être branchée dans la prise que dans une seule direction. Si la fiche ne peut pas être insérée entièrement dans la prise, tournez la prise. Si la fiche ne peut toujours pas entrer dans la prise, veuillez contacter un électricien qualifié afin qu’il vous installe la prise murale appropriée. Ne modifiez la fiche en aucun cas.
CONEXIÓN DE LA
MAQUINA
PELIGRO: Para reducir el riesgo de descarga eléctrica.
Nunca deje la máquina sola cuando esté encendida. Desenchufe siempre la máquina de la red inmediatamente después de usarla y antes de su mantenimiento.
PRECAUCION: Para reducir el riesgo de quemaduras, fuego, cortocircuito o daños personales.
1.No desenchufe la máquina tirando del cable. Para desenchufarla, tire del enchufe, no del cable.
2.Apague la máquina cuando conecte el pedal a la misma.
3.Maneje el pedal con cuidado y evite que golpee contra el suelo. Asegúrese de no situar nada sobre él.
4.Use el pedal suministrado con esta máquina. (Tipo 4C-337B)
1.Sitúe la máquina sobre una mesa estable.
2.Conecte el cable de toma de corriente a la máquina insertando la clavija de 2 agujeros en el terminal.
3.Conecte el enchufe a la toma de corriente.
4.Conecte la clavija del pedal a la toma de la máquina.
5.Coloque el pedal en el suelo.
6.Encienda el interruptor.
7.Cuando el interruptor esté conectado, se encenderá una luz.
8.Cuanto más fuerte presione el pedal, más rápida coserá la máquina. La máquina se detendrá cuando se suelte el pedal.
9.Para desconectar, gire el interruptor de corriente a la posición de apagado (O), luego extraiga el enchufe de la toma de la pared.
Nota:
*Si el prensatelas está subido, la máquina no coserá. (Consulte la página siguiente).
INFORMACIÓN REFERENTE AL ENCHUFE POLARIZADO, PARA LOS TERRITORIOS DE AMÉRICA DEL NORTE Y CANADÁ
Este electrodoméstico está equipado con un enchufe polarizado (note que una patita es más ancha que la otra). Para reducir el riesgo de choques eléctricos, este enchufe solamente puede ser usado en una toma de corriente polarizada. Si no puede insertar el enchufe completamente en la toma de corriente, déle la vuelta e inténtelo de nuevo. Si el enchufe no entra todavía correctamente, contrate a un electricista cualificado para que le instale la toma de corriente adecuada. No intente modificar el enchufe.
19
9910EFSt.pm6 |
19 |
2003.9.10, 8:45 PM |
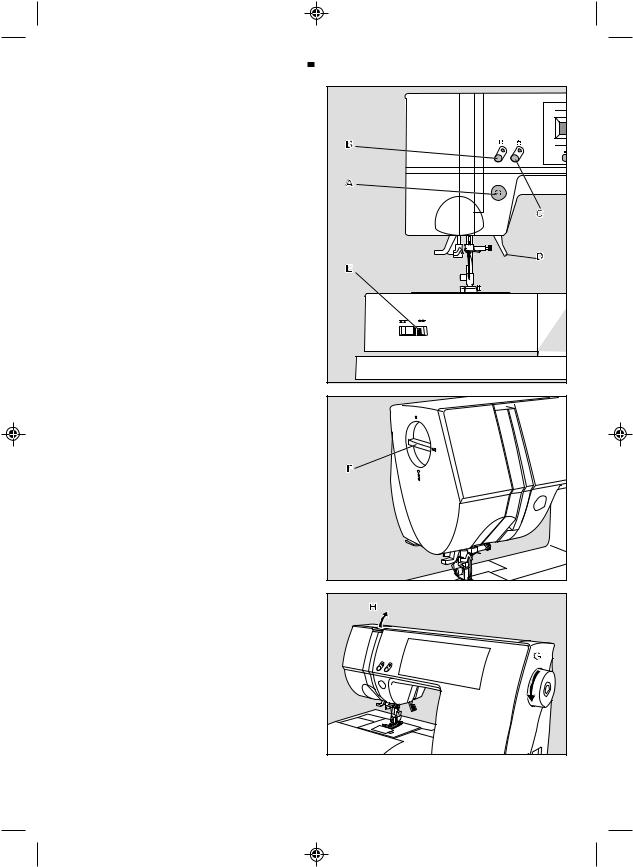
FUNCTION OF EACH PART
A.REVERSE STITCH BUTTON
The machine will sew in reverse (at low speed) while the button is pressed.
When released, machine will sew forward.
B.NEEDLE UP/DOWN BUTTON
Needle stop position will be changed up or down by pressing this button.
The indicator lamp will turn on when the needle is down position.
C.TWIN NEEDLE BUTTON
By pressing this button, the stitch width will reduce automatically for sewing with twin needle. (See page 68)
The indicator lamp will turn on.
D.PRESSER FOOT LIFTER
The presser foot is lifed up or down by this lever.
NOTE:
Machine will not start when the presser foot is lifted. (Except for bobbin winding)
E. DROP FEED LEVER
The fabric feed dogs project up through the needle plate, directly below the presser foot. Their function is to move the fabric being sewn. The drop feed lever controls the fabric feed dogs.
For ordinary sewing, move the lever to the right. This raises feed dogs to their highest position. For most sewing, the lever should be in this position. For darning or free motion embroidery or whenever fabric is to be moved by hand, move the lever to the left to lower the fabric feed dogs.
F. PRESSURE REGULATOR
The pressure on the presser foot is determined by the weight of fabric.
To increase the pressure, turn dial at 3. To decrease the pressure, turn dial at 1. For ordinary sewing, turn dial at 2.
G.HAND WHEEL
By turning the hand wheel, the needle will raise or lower. You should turn hand wheel toward you.
H.TOP COVER
To open the top cover, lift up the left side of cover.
20
9910EFSt.pm6 |
20 |
2003.9.10, 8:45 PM |
FONCTION DES PIÈCES ET TOUCHES
A.TOUCHE DE MARCHE ARRIÈRE
Tant que cette touche est enfoncée, la machine coud en marche arrière (au ralenti). Une fois que la touche est relâchée, la machine se remet à coudre vers l’avant.
B.TOUCHE DE POSITIONNEMENT DE L’AIGUILLE (HAUT/BAS)
Les positions d’arrêt de l’aiguille en haut ou en bas peuvent être modifiées quand vous appuyez sur cette touche.
Le signal lumineux s’allume quand l’aiguille est en position basse.
C.TOUCHE DE L’AIGUILLE JUMELÉE
Appuyez sur cette touche pour coudre avec l’aiguille jumelée. La largeur du point est automatiquement réduite, ce qui empêche l’aiguille de buter sur le pied presseur (voire page 69).
Le signal lumineux s’allume.
D.RELEVEUR DE PIED PRESSEUR
Ce levier permet de faire monter ou descendre le pied presseur.
REMARQUE :
La machine ne fonctionne pas tant que le pied presseur est relevé (sauf pour le bobinage de la canette).
E. LEVIER DES GRIFFES
Les griffes passent au travers de la plaque à aiguille directement sous le pied presseur. Elles servent à déplacer le tissu pendant la couture. Le levier des griffes contrôle les griffes.
Pour la couture ordinaire, placez le levier vers la droite. Ainsi, les griffes sont dans la position la plus élevée. Cette position est adaptée à la plupart des travaux de couture.
Pour le reprisage, la broderie libre ou si le tissu doit être déplacé à la main, placez le levier vers la gauche pour abaisser les griffes.
F. RÉGULATEUR DE PRESSION
La pression sur le pied presseur doit être déterminée selon l’épaisseur du tissu.
Pour augmenter la pression, réglez la pression sur 3. Pour diminuer la pression, réglez la pression sur 1. Pour la couture ordinaire, réglez la pression sur 2.
G.VOLANT
Quand vous tournez le volant, l’aiguille monte ou descend. Tournez toujours le volant vers vous.
H.CARTER SUPÉRIEUR
Pour ouvrir le carter supérieur, soulevez le côté gauche du carter.
FUNCIÓN DE CADA UNA DE LAS PARTES
A.BOTON DE PUNTADA EN RETROCESO
La máquina continuará cosiendo en retroceso (a baja velocidad) mientras el botón esté pulsado, y coserá hacia adelante cuando se suelte.
B.BOTON DE SUBIDA/BAJADA DE LA AGUJA
La posición de la aguja se puede cambiar pulsando este botón.
La luz indicadora se encenderá cuando la aguja esté en la posición baja.
C.BOTÓN DE AGUJA DOBLE
Pulse este botón cuando cosa con la aguja doble. El ancho de puntada se reduce automáticamente (consulte la página 69).
La luz indicadora se enciende.
D.PALANCA ALZAPRENSATELAS
Con esta palanca se sube o se baja el prensatelas.
NOTA: La máquina no se pondrá en marcha cuando el prensatelas esté subido (excepto para el devanado).
E. PALANCA DE ARRASTRE
Los transportadores se mueven desde la placa de la aguja, directamente por debajo del prensatelas. Su función es mover la tela que se está cosiendo. La palanca de arrastre controla el transporte del tejido.
Para trabajos de costura ordinarios, coloque la palanca a la derecha. Esto sube los transportadores a la posición más alta. La mayoría de costuras se realizan con el control en esta posición.
Para zurcir, bordar con movimiento libre o cuando el tejido deba moverse a mano, colocar la palanca a la izquierda para bajar los transportadores.
F. REGULADOR DE PRESIÓN
La presión sobre el prensatelas se ajusta dependiendo del peso del tejido.
Para aumentar la presión, gire la rueda hasta el nivel 3.
Para reducir la presión, gire la rueda hasta el nivel 1.
Para cosido normal, gire la rueda al nivel 2.
G.VOLANTE MANUAL
Al girar el volante manual, la aguja se eleva o desciende. Debe girar el volante hacia usted.
H.CUBIERTA SUPERIOR
Para abrir la cubierta superior, eleve el lado izquierdo de la cubierta.
21
9910EFSt.pm6 |
21 |
2003.9.10, 8:46 PM |

CONTROL PANEL
When you turn on the power, machine will select the straight stitch and indicate information of stitch on the L.C.D.
A.L.C.D. DISPLAY
Stitch infomation is indicated on this display. According to the pattern, information will be changed.
B.L.C.D. CONTRAST CONTROL
The contrast of L.C.D. is adjusted by turning this dial.
C.PATTERN CHART
Pattern chart is located inside of the top cover. All patterns and letters of this machine are indicated on this chart.
They are separated Utility stitch, and Letter stitch.
D.UTILITY STITCH BUTTON
By pressing this button, you can select utility stitch patterns.
FOR SELECTING AND SETTING UTILITY STITCH, SEE PAGE 38.
E. LETTER STITCH BUTTON
By pressing this button, you can select letter stitch patterns.
These letters are combined by using stitch memory function.
FOR SELECTING LETTER STITCH, SEE PAGE 70.
F. MIRROR STITCH BUTTON
In utility stitch mode, some patterns with Mirror indication mark are able to sew mirror image stitching by pressing this button.
G.PATTERN SELECTION BUTTONS
Using these buttons, you can select pattern number or letter.
H.STITCH MEMORY, CLEAR AND CHECK BUTTONS
In letter mode, letters are combined using these buttons.
I. STITCH WIDTH, LENGTH BUTTONS
In utility stitch mode, stitch length and width can be changed by using these buttons.
22
9910EFSt.pm6 |
22 |
2003.9.10, 8:46 PM |
ÉCRAN D’AFFICHAGE |
|
PANEL DE CONTROL |
|
||
|
Quand vous allumez la machine, celle-ci sélectionne le point droit et affiche les informations concernant le point sur l’écran LCD.
A.ÉCRAN LCD
Les informations concernant le point sont affichées sur cet écran. Les informations varient suivant le motif ou le mode.
B.MOLETTE DE RÉGLAGE DU CONTRASTE
Tournez ce bouton pour régler le contraste de l’affichage LCD.
C.TABLEAU DES POINTS
Le tableau des points est affiché à l’intérieur du carter supérieur.
Tous les points et lettres mémorisés dans la machine sont indiqués dans le tableau et classés en points utilitaires d’une part et lettres d’autre part.
D.TOUCHE DES POINTS UTILITAIRES
Appuyez sur cette touche pour sélectionner les points utilitaires.
POUR LA SÉLECTION ET LE RÉGLAGE DES POINTS UTILITAIRES, CONSULTEZ LA PAGE 39.
E.TOUCHE DE LETTRES
Appuyez sur cette touche pour sélectionner les motifs de lettres.
Vous pouvez facilement combiner les lettres grâce à la fonction de mémorisation des points.
POUR LA SÉLECTION DES LETTRES, CONSULTEZ LA PAGE 71.
F. TOUCHE MIROIR
En mode de point utilitaire, il est possible de coudre une image renversée (en miroir) des points pour lesquels une indication de miroir est affichée. Pour les renverser, appuyez sur la touche miroir.
G.TOUCHES DE SÉLECTION DES MOTIFS
A l’aide de ces touches, vous pouvez sélectionner le numéro du point ou de la lettre à coudre.
H.TOUCHE DE MÉMORISATION, D’ANNULATION ET DE VÉRIFICATION
En mode lettre, les lettres peuvent être combinées à l’aide de ces touches.
I.TOUCHES DE LARGEUR DU POINT ET DE LONGUEUR DU POINT
En mode de point utilitaire, appuyez sur ces touches pour modifier la longueur et la largeur des points.
Al encender la máquina, se seleccionará la puntada recta y se indicará la información de esa puntada en la pantalla LCD.
A.PANTALLA LCD
La información de la puntada se indica en esta pantalla. La información irá cambiando según la puntada o el modo.
B.CONTROL DE CONTRASTE DE LA PANTALLA LCD
El contraste de la pantalla LCD se ajusta con esta rueda.
C.TABLA DE PUNTADAS
La tabla de puntadas se encuentra en el interior de la cubierta superior. Todas las puntadas y letras de esta máquina están indicadas en la tabla.
Están separadas por puntadas utilitarias y puntadas para letras.
D.BOTÓN DE PUNTADA UTILITARIA
Al pulsar este botón podrá seleccionar las puntadas utilitarias.
PARA SELECCIONAR Y AJUSTAR LAS PUNTADAS UTILITARIAS, CONSULTE LA PÁGINA 39.
E.BOTÓN DE PUNTADA PARA LETRAS
Al pulsar este botón, podrá seleccionar diseños de puntada para letras.
Estas letras se combinan al utilizar la función de memoria de puntadas.
PARA SELECCIONAR Y AJUSTAR LAS PUNTADAS PARA LETRAS, CONSULTE LA PÁGINA 71.
F. BOTÓN DE PUNTADA INVERTIDA
En el modo para puntadas utilitarias, algunos diseños que tienen una marca indicadora de puntada invertida se pueden coser con este tipo de puntadas al pulsar este botón.
G.BOTONES DE SELECCIÓN DE PUNTADA
Con estos botones puede seleccionar un número de puntada o de letra.
H.BOTONES DE MEMORIA DE PUNTADA, BORRADO Y COMPROBACIÓN
En el modo para letras, éstas se combinan utilizando estos botones.
I. BOTONES DE ANCHO Y LARGO DE PUNTADA
En el modo para puntadas utilitarias, el ancho y largo de las puntadas puede cambiarse utilizando estos botones.
23
9910EFSt.pm6 |
23 |
2003.9.10, 8:46 PM |

BOBBIN SETTING
A.REMOVING THE BOBBIN
1. Pull the bobbin cover latch to the right and remove the bobbin cover.
2. Lift up the bobbin from the machine.
B.SETTING SPOOL OF THREAD ON SPOOL PIN
1. Pull up the left end of spool pin and set the spool of thread on spool pin.
2.Set the spool cap on spool pin as far as it will go.
a: Reverse spool cap direction according to the size of spool.
b. Use the small spool cap when you use cross wound thread. Leave small opening between cap and spool as illustration.
C.WINDING THE BOBBIN
1.Hold thread in both hands and hook thread to the guide from front opening.
2.Bring thread towards the read of the machine and pass through the thread guide from left to right.
3.Bring thread to the right and pass thread through the thread guide from rear side. Pass thread under tension disc in counter clockwise direction.
4.Insert thread through hole in bobbin and place the bobbin on bobbin winder spindle. Push bobbin to the right to engage bobbin winder.
5.Hold the end of the thread and start the machine by pressing foot controller pedal.
6.After the bobbin winds a few turns, stop the machine and cut the thread near hole.
7.Start the machine again.
8.The bobbin winding will stop when bobbin is full. Then release the pedal.
9.Push the bobbin and spindle to the left. 10.Remove the bobbin from the spindle and cut
the thread.
24
9910EFSt.pm6 |
24 |
2003.9.10, 8:46 PM |
 Loading...