


27 & 28
INSTRUCTIONS
FOR USING
SINGER*
SEWING MACHINE
NO. 27 & 28
VIBRATING SHUTTLE, FOR FAMILY USE
When requiring |
Look for the |
Needle, Oil, |
Red "S" |
Parts or Repairs, |
There are Singer |
for your Machine |
Shops in every City |
THE SINGER MANUFACTURING CO.

27 & 28
The Table of Contents
Warning
To all whom it may concern
Singer Service
It’s sew easy by electricity The Hand Attachment Stop Motion
To Operate the Hand Machine
To Ensure Perfect Action of the Machine To Set the Needle
To Thread the Needle
To Wind the Bobbin To Remove the Shuttle To Thread the Shuttle To Replace the Shuttle To Prepare for Sewing To Commence Sewing To Remove the Work
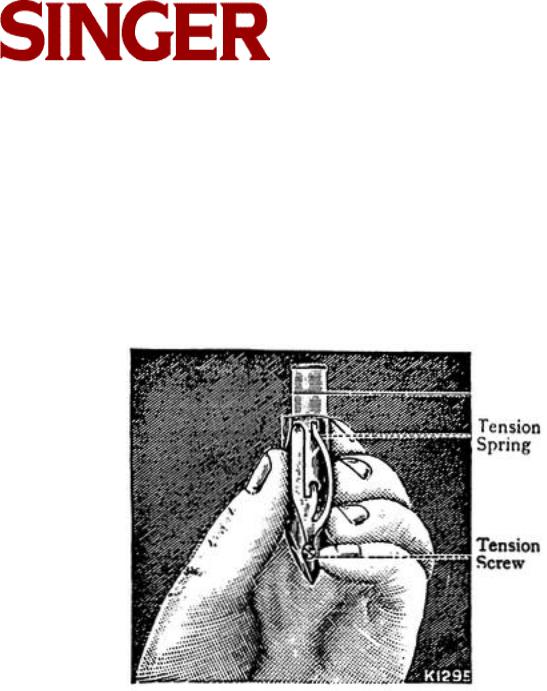
To Regulate the Tension To Alter the Length of Stitch
To Change the Pressure on Material To Turn a Corner
To Sew Flannel or Bias Seams To Oil Machine
Hints
Needles Breaking
Thread Breaking
Skipping Stitches
Stitches Looping
Material Puckering
Instructions for Using Attachments
Bias Gauge
The Binder - Binding
To Bind with Dress Braid To Make French Folds
The Adjustment and Operation of the Binder Binding Outside Curves
Binding Inside Curves The Quilter
The Foot Hemmer - Hemming Hemming and Sewing
on Lace in One Operation The Foot Hemmer - Felling The Adjustable Hemmer
The Adjsutable Hemmer - Wide Hemming The Under Braider - Braiding

27 & 28
WARNING
It is essential that your machine should be kept well oiled, in accordance with the instructions given on pages 13 and 14 of this book.
SINGER Oil, which is specially prepared for sewing machines, is supplied in tins which have the well-known SINGER Red "S" printed thereon.
SINGER Needles are stamped with the Trade Mark SIMANCO* and are sold in green packets which also bear the SINGER Red Letter "S."
Needles in Containers marked " For Singer Machines "
are not SINGER made needles.
Should your machine require overhauling or repair, apply only to a SINGER SEWING CENTRE or SINGER Salesman, otherwise you will risk its being irretrievably damaged.
Every description of sewing machine repaired,
To all whom it may concern:
The improper placing or renewal of the trademark "SINGER" or any other of the trademarks of The Singer Manufacturing Company (all of which are duly Registered Trademarks) on any machine that has been repaired, rebuilt, reconditioned, or altered in any way whatsoever outside a SINGER factory or an authorised SINGER agency is forbidden.
SINGER SERVICE
Now that you have purchased your new SINGER Sewing Machine we do not want you to feel that your relations with us have come to an end.
The following instructions are worded so that they may be easily understood by everyone, and we would suggest that you study them carefully in order that you may obtain the fullest use and pleasure from your sewing machine. If, however, you require further assistance we would ask you to call at the local SINGER SEWING CENTRE where advice will always be willingly given in the use of any SINGER Machine and its Attachments.
We hope, too, that you will make the SINGER SEWING CENTRE your headquarters for sewing supplies and service. Only there, or through SINGER authorized representatives, can you secure SINGER oil, cotton, needles, etc. all of which are so important in obtaining
3

27 & 28
4
27 & 28
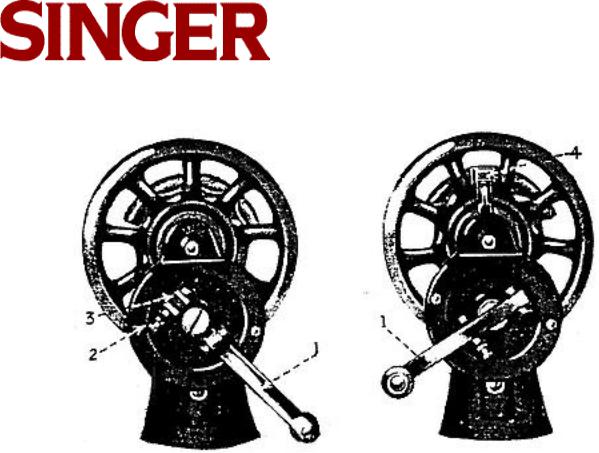
The Hand Attachment
FIG. 1 |
FIG. 2 |
When the cover is removed from the machine, the hand attachment will be found to be out of working position, as shown in Fig. 1.
To operate the machine, pull the small spring stud (2, Fig. 1) and turn the handle back until the lever (1, Fig. 1) enters the socket (3, Fig. 1); also see that the hinged finger (4, Fig. 2) is turned back between the spokes of the wheel. The machine will then be ready for working, as shown in Fig. 2.
Before replacing the cover, the lever should be
disengaged, and the handle placed in the position shown in Fig. 1.
5
27 & 28
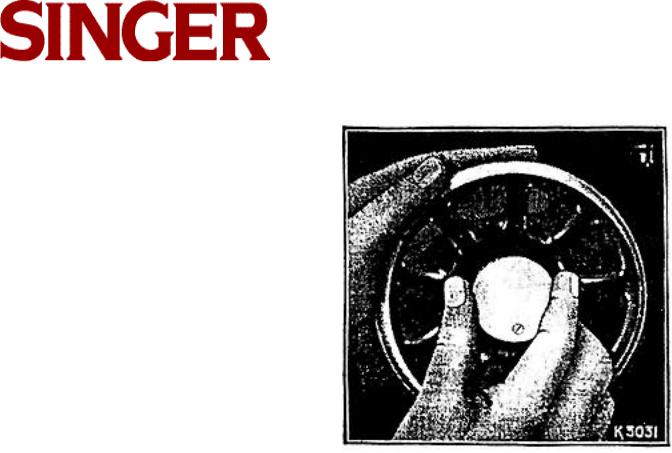
Stop Motion
This device a allows the hand wheel to run free, so that bobbins may be wound without operating the mechanism. To loosen the wheel hold it with the left hand and with the right hand turn the stop motion screw over towards you, as shown in Fig. 3.
To Operate the Hand Machine
Tighten the hand wheel (see Fig. 3) and place a piece of material under the presser foot (7, Fig. 5). Then lower the latter by means of the lifter (3, Fig. 5). Now turn the handle over from you to work the machine, without its being threaded, until you are accustomed to guiding the material with the left hand.
FIG. 3
6
27 & 28
To Ensure Perfect Action of the Machine
The hand wheel must always turn over towards you.
Do not work the machine with the presser foot lowered or with the shuttle and the needle threaded, except when sewing
Both slides over the shuttle must be kept closed.
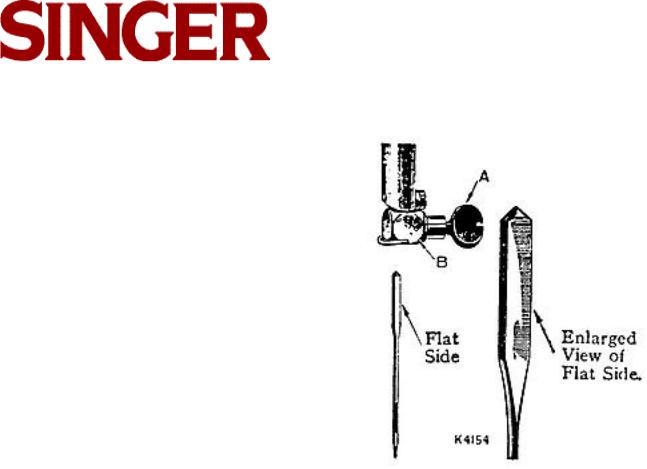
To Set the Needle
(See Fig. 4)
Raise the needle bar to its highest point and loosen the thumb screw.
(A). Hold the needle with the left hand and, with its flat side to the right, insert it into the needle clamp (B) as far as it will
go. Then retighten the thumb screw.
Fig. 4. Positioning Needle in Needle Clamp.
7

27 & 28
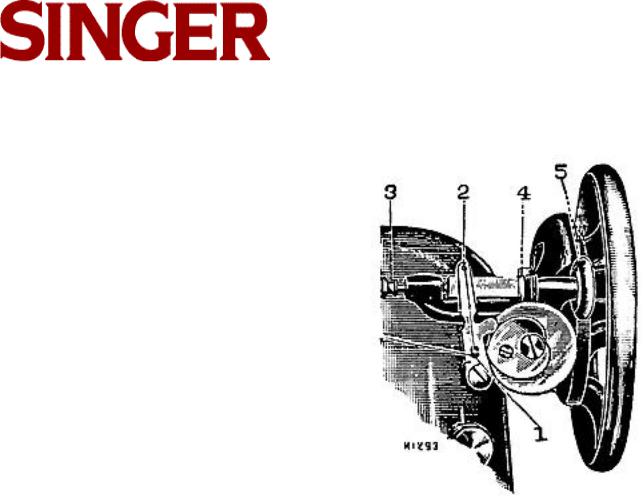
To Thread the Needle
(See Fig. 5)
Turn the hand wheel heel until the lever (2) is at its highest. Place a reel of thread on the spool pin and pass the thread through the notch (13) down, and from right to left under and between the tension discs (12), and up through the eyelet in the take-up spring (4). Then pass the thread from the front through the hole in the lever (2), down through the guard (5), into the guide (6), and from left to right through the eye of the needle. Draw about three inches of thread through the eye of the needle with which to commence sewing.
To obtain best results it is absolutely necessary that the needle used be of the size stated for the number of cotton, linen or silk, as shown on inside of back cover. If rough or uneven thread is used, or if it passes with difficulty through the eye of the needle, the machine will not function satisfactorily.
The SINGER Needle Threader saves time, trouble and patience, and is invaluable to those having defective sight.
FIG. 5
8
27 & 28
To Wind the Bobbin
(See Fig. 6)
Loosen the hand wheel (see Fig. 3) and push the top of the winder from you until its rubber ring (5) just touches the ledge of the hand wheel. Turn the latter over towards you until the thread guide (2) moves to the extreme right. Place a reel of thread on the spool pin; and pass the end of thread through the notch at top of the face plate (13, Fig. 5); then thread the winder by passing the thread upward through the eyelet (1) and into the notch (2). Draw the knob (3) to the left, and place an empty bobbin between the cup at the right (4) and the centre hole at the left. Now clamp the end of thread between the cup and the end of the bobbin, turn the hand wheel towards you and wind by operating the machine as when sewing. When nearly full remove the bobbin by pulling the knob (3) to the left, then withdraw the winder from the
ledge of the hand wheel and tighten the latter FIG. 6 by turning the stop motion screw from you.
9
27 & 28
To Remove the Shuttle
Open the front slide of the machine and turn the hand wheel towards you until the shuttle comes full under the opening. Press down the point of the shuttle with the thumb and lift out. Turn the open end of the shuttle downward and the bobbin will drop out.
NOTE: The shuttle should not be lifted out by the spring.
To Thread the Shuttle
Hold the shuttle, as in Fig. 7, and insert the bobbin so that the end of the thread draws from the left towards the right, as shown in the illustration.
FIG. 7
10
 Loading...