


, y l l a n i F
h
e
|
|
|
|
|
|
|
|
|
ents |
t |
|
|
|
|
|
|
|
|
|
|
r |
m |
|
|
|
|
|||
|
|
|
|
|
|
|
|
h |
|
|
|
|||
|
|
|
|
|
t |
u |
|
|
a |
|
|
|||
|
|
|
|
s |
|
|
|
|
|
|
t |
t |
|
|
|
|
|
n |
|
|
|
|
|
|
|
|
|
||
|
|
|
i |
|
|
|
|
|
|
|
|
|
a |
|
|
|
|
|
|
|
|
|
|
|
|
|
|
|
l |
|
|
|
g |
|
|
|
|
|
|
|
|
|
|
k |
|
|
|
|
|
|
|
|
|
|
|
|
|
t |
|
|
|
n |
|
|
|
|
|
|
|
|
|
|
||
|
i |
|
|
|
|
|
|
|
|
|
|
|
||
|
|
|
|
|
|
|
|
|
|
|
|
o |
||
a |
r |
|
|
|
|
|
|
|
|
|
|
|
|
a |
|
|
|
|
|
|
|
|
|
|
|
|
|
|
e |
|
|
|
|
|
|
|
|
|
|
|
|
|
|
c |
|
|
|
|
|
|
|
|
|
|
|
|
|
|
h |
|
|
|
|
|
|
|
|
|
|
|
|
|
|
o |
|
|
|
|
|
|
|
|
|
|
|
|
|
|
t |
|
|
|
|
|
|
|
|
|
|
|
|
|
|
h |
|
|
|
|
|
|
|
|
|
|
|
|
|
|
e |
|
|
|
|
|
|
|
|
|
|
|
|
|
|
r |
|
|
|
|
|
|
|
|
|
|
|
|
|
|
. |
ACURISTM S ACURISTM P
with e2e wireless TM
User Guide Behind-the-Ear System
s

Congratulations !
As the owner of a new hearing system, you may once again enjoy the sounds of your environment, and conversation with your family and friends.
These instructions as well as guidance from your hearing instrument specialist will help you understand how your new hearing system works. In this guide, you’ll find instructions about inserting, removing and use of your ACURIS TM hearing system. There are also tips and information on proper handling, cleaning, care and changing of the batteries. In addition, a troubleshooting section is offered for your reference.
Your hearing improvement with a hearing system depends on the fit of the hearing instruments, the type and degree of hearing loss, and proper diagnostic testing. Of course, a hearing system cannot restore normal hearing, and not everyone will benefit equally.
More than 80 percent of individuals with hearing loss have hearing loss in both ears. Studies show that even when a hearing loss is worse in one ear, most people with hearing loss in both ears will benefit from wearing two instruments.
Remember, a hearing system consists of finely-tuned devices that have been specially designed and expertly adjusted for your individual needs. Proper care and handling will ensure the best possible performance of your ACURIS hearing system.
2

Contents
Page
Your ACURIS TM BTE (behind-the-ear) hearing system |
4 |
-ACURIS S
-ACURIS P
Battery insertion and removal |
5 |
Battery compartment door lock |
8 |
|
|
Inserting and removing your ACURIS BTE |
9 |
|
|
Turning your ACURIS BTE on and off |
10 |
e2e wireless TM |
12 |
Using the program button |
14 |
|
|
Using the directional microphone system |
15 |
Using the volume control (ACURIS P) |
16 |
|
|
Audio input |
17 |
|
|
Using the telephone |
19 |
Maintenance and care |
20 |
|
|
Important notes |
21 |
Troubleshooting tips |
22 |
3
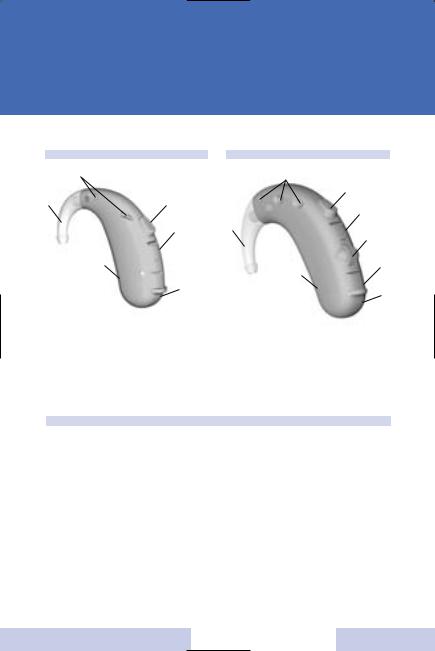
Your ACURIS BTE (behind-the- ear) hearing system
ACURIS S
s
a |
d |
g
j k  h
h
Hearing system for mild to moderate hearing loss
ACURIS P
s
d
g
a
f
j k h
Hearing system for severe hearing loss with manual or automatic volume control
Features
1.Earhook
2.Microphone openings
3.Program button
with ON/OFF function
4.Volume control (only ACURIS P)
5.Cover for programming socket
6.Battery compartment
7.Color-coded typeplate red = right instrument blue = left instrument
8.Audio input
To achieve optimum fitting, ACURIS P instruments are designed specifically for the left and right ears. Each is color-coded for your convenience.
4
Battery insertion and removal
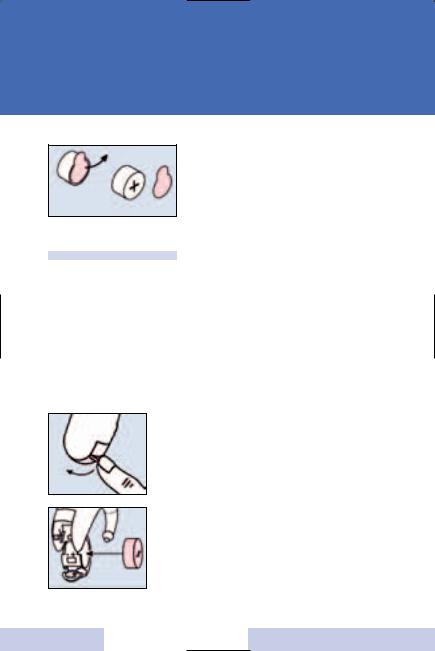
Handling the battery
The protective tab on your battery should only be removed when you are ready to use the battery.
Three useful tips:
•The positive (+) side of the battery is always the smooth side. You can recognize the negative (-) side by the colored ring.
•Always keep spare batteries with you
•If you feel you cannot change the battery yourself, ask someone to help you: a family member, friend or your hearing instrument specialist.
Inserting the battery
Open the battery compartment with your fingernail as shown in the illustration.
Swivel open the battery compartment door, if not already open. Place the proper size battery (Type 13) so that the "+” symbol on the battery coincides with the "+” marked on the battery compartment.
5
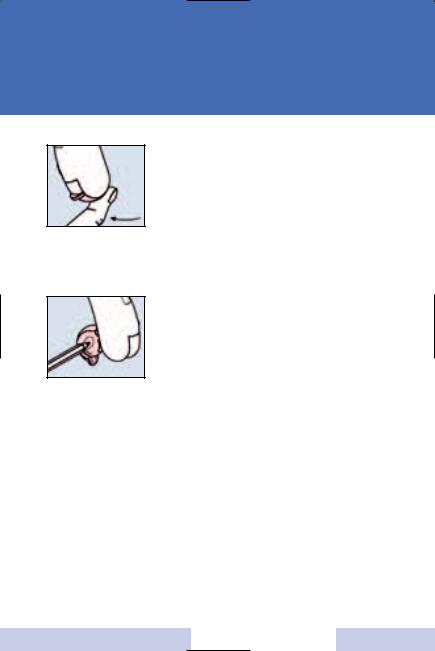
Gently close the battery compartment by pressing the bottom of the door upward with your finger tip. Do not force the door shut. If it does not close easily, check to see if the battery was inserted properly. When the battery door is completely closed, your hearing instrument is ready for use.
Removing the battery
Normally the battery drops out when the compartment is completely open. If the battery does not come out, lightly tap the system or push the battery out with a pencil as shown.
Low battery indicator
Your hearing system may be programmed to inform you when the battery should be replaced for best system performance. You may hear an intermittent series of beeps and/or experience low amplification power or volume. Change the battery when either of these occurs.
If you have an ePocket remote control, the battery status can be checked using the "data read out” function. (See the ePocket user guide for more information).
6

Caution:
Keep batteries and instruments away from the reach of small children.
Batteries can be harmful if swallowed.
If swallowed consult a physician or a hospital immediately.
Change the batteries when any of the following occur:
-volume becomes softer or weak
-you hear a battery signal beep
-you see empty battery status on the display of your ePocket.
Do NOT throw used batteries into household trash. Return them to your hearing instrument specialist for environmentally correct disposal.
7
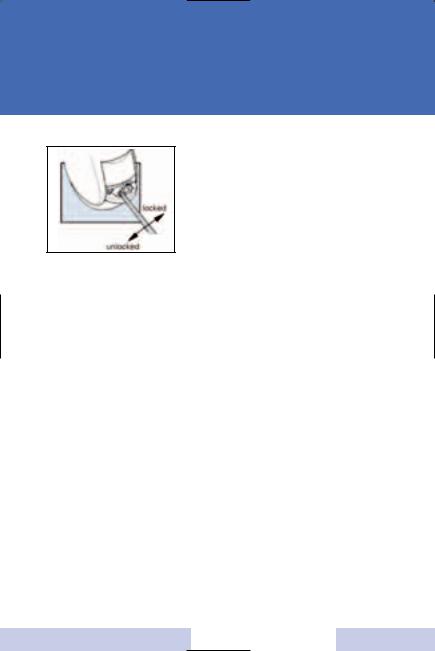
Battery compartment door lock
Your instruments are equipped with battery compartment door locks.
They are intended to prevent the unintentional removal of batteries from their compartment.
To lock the battery compartment, open the compartment door to the first stop. Push the slide to the right with a suitable tool.
To unlock the battery compartment again, open the compartment door to the first stop. Push the slide to the left with a suitable tool.
Your hearing instrument specialist can further instruct you on the use of this feature, if necessary.
8
 Loading...