


 Loading...
Siemens Mobility Toolkit for Java™ Development
User's Manual
Version 1.1, 05/2004
Copyright © 2004 Siemens AG
All rights reserved

Information and Communication Mobile
Copyright
This publication is protected by copyright and distributed under licenses restricting its use, copying and distribution. No part of this publication may be reproduced in any form by any means without prior written authorization of Siemens AG.
Offenders will be liable for damages. All rights are reserved in the event of the granting of a patent or the registration of a utility model.
The products and technologies described herein may be protected by one or more patents or patents pending in the United States or other countries.
Trademarks
Siemens AG is a registered trademark.
Sun, Java™, J2ME™, and all Java™-based marks are trademarks or registered trademarks of Sun Microsystems, Inc. in the U.S. and other countries. Borland® and JBuilder® are trademarks or registered trademarks of Borland Software Corporation. All other trademarks, third-party brands and names are the property of their respective owners.
Hyperlinks
This publication may contain hyperlinks to the Web pages of third parties. Siemens accepts no liability or responsibility for the contents of such Web pages and Siemens does not take over such Web pages as its own. The use of such pages shall be at the sole risk of the User.
Disclaimer
This publication is provided "AS IS", without a warranty of any kind. All express or implied representations and warranties, including any implied warranty of merchantability, fitness for a particular purpose or non-infringement, are hereby excluded.
Siemens AG may make any improvements or changes in the product(s) or the program(s) described in this publication at any time.
This document is subject to change without notice.
Siemens Mobility Toolkit |
Copyright © 2004 Siemens AG |
|
- 2 - |

Information and Communication Mobile
Table of Contents
1 -Introduction.................................................................................................................................. |
|
4 |
|
1.1 |
-Document's Purpose ........................................................................................................ |
|
4 |
1.2 |
-Naming Conventions ........................................................................................................ |
|
4 |
1.3 |
-Document's Overview....................................................................................................... |
|
4 |
2 -System Requirements ................................................................................................................. |
|
6 |
|
2.4 |
-Hardware Requirements................................................................................................... |
|
6 |
2.5 |
-Software Requirements .................................................................................................... |
|
6 |
3 -Siemens Mobility Toolkit............................................................................................................. |
|
8 |
|
3.1 |
-Architectural Overview of the Emulator ............................................................................ |
|
9 |
3.2 |
-SMTK Contents .............................................................................................................. |
|
10 |
|
3.2.1 -Launcher & Manager......................................................................................... |
|
10 |
|
3.2.2 -SMTK documentation........................................................................................ |
|
11 |
|
3.2.3 -J2ME™ API Library........................................................................................... |
|
12 |
|
3.2.4 -Preverifier .......................................................................................................... |
|
12 |
|
3.2.5 -Siemens Java™-enabled Mobile Phone Emulator Pack................................... |
12 |
|
3.3 |
-Siemens Mobility Toolkit (SMTK) Installation ................................................................. |
|
13 |
|
3.3.1 -SMTK Core Package Installation ...................................................................... |
|
13 |
|
3.3.2 -SMTK Emulator Pack Installation...................................................................... |
|
17 |
3.4 |
-Launcher Execution........................................................................................................ |
|
20 |
3.5 |
-"SMTK Configuration and Management Utility" Execution ............................................. |
|
21 |
|
3.5.1 -"Select target emulator" Page ........................................................................... |
|
21 |
|
3.5.2 -"SMTK management" Page .............................................................................. |
|
22 |
|
3.5.3 -"Integration with IDE’s" Page ............................................................................ |
|
23 |
3.6 |
-Application Management System (AMS) on the Emulator ............................................. |
|
23 |
|
3.6.1 -Installation of .jar Files Using .jad Files ............................................................. |
|
24 |
3.7 |
-Loading an Application onto Siemens Java™-enabled Mobile Phones ......................... |
25 |
|
|
3.7.1 -Local Loading of an Application onto the Mobile Phone ................................... |
25 |
|
|
3.7.2 -Installing the Siemens Data Suite (SDS)........................................................... |
|
26 |
|
3.7.3 -Loading the MIDlet into the Mobile Phone ........................................................ |
|
26 |
|
3.7.4 -Over the Air (OTA) Downloading....................................................................... |
|
27 |
|
3.7.5 -OTA Connection Scenarios............................................................................... |
|
29 |
|
3.7.6 -Using SMS for OTA Download (OTA Push Method)......................................... |
|
32 |
|
3.7.7 -OTA Status Codes ............................................................................................ |
|
33 |
3.8 |
-Running an Application on the Emulator ........................................................................ |
|
34 |
|
3.8.1 -Via Command Window...................................................................................... |
|
34 |
|
3.8.2 -Via Filesystem ................................................................................................... |
|
35 |
|
3.8.3 -Via Surf & Fun ................................................................................................... |
|
35 |
|
3.8.4 -Other Alternatives.............................................................................................. |
|
36 |
3.9 |
-Log Files ......................................................................................................................... |
|
36 |
3.10 -Command Line Parameters.......................................................................................... |
|
36 |
|
3.11 -Differences Between the Mobile Phone and the Emulator ........................................... |
|
39 |
|
|
3.11.1 -Performance Differences................................................................................. |
|
39 |
|
3.11.2 -Technical Differences...................................................................................... |
|
40 |
4 -IDE Integration ........................................................................................................................... |
|
41 |
|
4.1 |
-Sun ONE Studio Integration ........................................................................................... |
|
41 |
|
4.1.1 -Installing a new Emulator in Sun ONE Studio ................................................... |
|
41 |
|
4.1.2 -Creating a new Project ...................................................................................... |
|
42 |
|
4.1.3 -Coding an Application Program......................................................................... |
|
46 |
|
4.1.4 -Compiling, Preverifying and Testing.................................................................. |
|
47 |
|
4.1.5 -Debugging ......................................................................................................... |
|
50 |
4.2 |
-JBuilder Integration......................................................................................................... |
|
53 |
|
|
||
Siemens Mobility Toolkit |
Copyright © 2004 Siemens AG |
||
|
- 1 - |
|
|

Information and Communication Mobile |
|
|
|
4.2.1 -Setting the Emulator in JBuilder ........................................................................ |
53 |
|
4.2.2 -Creating a new Project ...................................................................................... |
55 |
|
4.2.3 -Compiling, Preverifying and Testing.................................................................. |
58 |
|
4.2.4 -Debugging ......................................................................................................... |
60 |
5 -General Features ....................................................................................................................... |
63 |
|
5.1 |
-Emulator Start-up ........................................................................................................... |
63 |
|
5.1.1 -Setting Up HTTP_PROXY and HTTP Profile .................................................... |
65 |
|
5.1.2 -Setting Up WAP ................................................................................................ |
67 |
5.2 |
-Filesystem Structure....................................................................................................... |
68 |
5.3 |
-Hot Keys ......................................................................................................................... |
69 |
5.4 |
-Commands ..................................................................................................................... |
69 |
5.5 |
-Additional Emulators Features ....................................................................................... |
71 |
|
5.5.1 -Change microedition.locale ............................................................................... |
71 |
6 -Specific Features ....................................................................................................................... |
73 |
|
6.1 |
-CF62 Emulator ............................................................................................................... |
73 |
|
6.1.1 -CF62 GUI Use / MMI Display ............................................................................ |
73 |
|
6.1.2 -Mobile Features................................................................................................. |
74 |
6.2 |
-C60 Emulator.................................................................................................................. |
76 |
|
6.2.1 -C60 GUI Use / MMI Display .............................................................................. |
76 |
|
6.2.2 -Mobile Features................................................................................................. |
77 |
6.3 |
-MC60 Emulator............................................................................................................... |
79 |
|
6.3.1 -MC60 GUI Use / MMI Display ........................................................................... |
79 |
|
6.3.2 -Mobile Features................................................................................................. |
80 |
6.4 |
-M55 Emulator ................................................................................................................. |
82 |
|
6.4.1 -M55 GUI Use / MMI Display.............................................................................. |
82 |
|
6.4.2 -Mobile Features................................................................................................. |
83 |
6.5 |
-SL55 Emulator................................................................................................................ |
85 |
|
6.5.1 -SL55 GUI Use / MMI Display ............................................................................ |
85 |
|
6.5.2 -Mobile Features................................................................................................. |
86 |
6.6 |
-S55 Emulator.................................................................................................................. |
88 |
|
6.6.1 -S55 GUI Use / MMI Display .............................................................................. |
88 |
|
6.6.2 -Mobile Features................................................................................................. |
89 |
6.7 |
-C55/C(T)56/2128 Emulator ............................................................................................ |
91 |
|
6.7.1 -C55 GUI Use / MMI Display .............................................................................. |
91 |
|
6.7.2 -Mobile Features................................................................................................. |
92 |
6.8 |
-M(T)50/M46/3118 Emulator............................................................................................ |
94 |
|
6.8.1 -M50 GUI Use / MMI Display.............................................................................. |
94 |
|
6.8.2 -Mobile Features................................................................................................. |
95 |
6.9 |
-Sl45i/6688i Emulator ...................................................................................................... |
97 |
|
6.9.1 -Sl45i GUI Use / MMI Display............................................................................. |
97 |
|
6.9.2 -Mobile Features................................................................................................. |
98 |
7 -Command Line Debug............................................................................................................. |
100 |
|
8 -Additional Resources.............................................................................................................. |
101 |
|
8.1 |
-Siemens Developer Portal............................................................................................ |
101 |
8.2 |
-CLDC and MIDP Specification ..................................................................................... |
101 |
8.3 |
-Sun J2ME™ Wireless Toolkit ....................................................................................... |
101 |
A -Abbreviations ......................................................................................................................... |
102 |
|
B -Application Source Code ....................................................................................................... |
103 |
|
Siemens Mobility Toolkit |
Copyright © 2004 Siemens AG |
|
- 2 - |

Information and Communication Mobile
Table of Figures
Figure 3.1:Siemens Mobility Toolkit architecture .................................................................................... |
|
9 |
Figure 3.2:Siemens Java™-enabled mobile phone architecture .......................................................... |
|
10 |
Figure 3.3:SMTK Core Installation Welcome screen ............................................................................ |
|
13 |
Figure 3.4:Core Installation License Agreement screen ....................................................................... |
|
14 |
Figure 3.5:SMTK Core Installation JDK Directory screen..................................................................... |
|
14 |
Figure 3.6:Core Installation Destination Folder screen......................................................................... |
|
15 |
Figure 3.7:SMTK Core Installation Start Menu Folder Selection screen .............................................. |
|
15 |
Figure 3.8:SMTK Core Installation Features Selection screen ............................................................. |
|
16 |
Figure 3.9:SMTK Core Installation Additional Tasks Selection screen................................................. |
|
16 |
Figure 3.10:Core Installation Ready to Install screen ........................................................................... |
|
17 |
Figure 3.11:SMTK Core Installation Information screen ....................................................................... |
|
17 |
Figure 3.12:SMTK Core Installation Finish screen ............................................................................... |
|
18 |
Figure 3.13:Emulator Pack Installation Welcome screen ..................................................................... |
|
19 |
Figure 3.14:SMTK Emulator Pack Installation License Agreement screen .......................................... |
19 |
|
Figure 3.15:SMTK Emulator Pack Installation Complete screen .......................................................... |
|
20 |
Figure 3.16:Launcher’s Window ........................................................................................................... |
|
20 |
Figure 3.17:"Select target emulator" window ........................................................................................ |
|
21 |
Figure 3.18:"SMTK management" window ........................................................................................... |
|
22 |
Figure 3.19:"Integration with IDE's" page ............................................................................................. |
|
23 |
Figure 3.20:Run a MIDlet from Surf&Fun ............................................................................................. |
|
24 |
Figure 3.21:Download a MIDlet ............................................................................................................ |
|
24 |
Figure 3.22:Finishing download and running ........................................................................................ |
|
24 |
Figure 3.23:Reinstall an application...................................................................................................... |
|
25 |
Figure 3.24:Windows Explorer accessing the Mobile ........................................................................... |
|
26 |
Figure 3.25:J2ME™ Application download screen ............................................................................... |
|
28 |
Figure 3.26:Destination Folder selection screen................................................................................... |
|
28 |
Figure 3.27:Application Name selection ............................................................................................... |
|
28 |
Figure 3.28:One dial-in number for WAP browsing .............................................................................. |
|
30 |
Figure 3.29:Two different dial-in number for WAP browsing ................................................................ |
|
31 |
Figure 3.30:Main screen ....................................................................................................................... |
|
31 |
Figure 3.31:Menu screen ...................................................................................................................... |
|
31 |
Figure 3.32:Setup screen...................................................................................................................... |
|
32 |
Figure 3.33:Connectivity screen ........................................................................................................... |
|
32 |
Figure 3.34:Data Services screen......................................................................................................... |
|
32 |
Figure 3.35:MMS, WAP Data service selection .................................................................................... |
|
32 |
Figure 3.36:MMS, WAP Data service rename ...................................................................................... |
|
32 |
Figure 3.37:MMS, WAP Data service configuration.............................................................................. |
|
32 |
Figure 3.38:Rename Confirmation Screen ........................................................................................... |
|
33 |
Figure 3.39:GPRS settings selection .................................................................................................... |
|
33 |
Figure 3.40:GPRS settings screen ....................................................................................................... |
|
33 |
Figure 3.41:Start an Application............................................................................................................ |
|
34 |
Figure 3.42:Filesystem menu item........................................................................................................ |
|
35 |
Figure 3.43:JAVA directory ................................................................................................................... |
|
35 |
Figure 3.44:Open a MIDlet.................................................................................................................... |
|
35 |
Figure 3.45:Surf&Fun menu item.......................................................................................................... |
|
35 |
Figure 3.46:Games & Fun..................................................................................................................... |
|
35 |
Figure 3.47:Open a Folder.................................................................................................................... |
|
36 |
Figure 4.1:"Runtime" in Explorer window.............................................................................................. |
|
41 |
Figure 4.2:Add Emulator.." menu.......................................................................................................... |
|
41 |
Figure 4.3:Emulator path selection screen ........................................................................................... |
|
42 |
Figure 4.4:Runtime Tab properly set .................................................................................................... |
|
42 |
Figure 4.5:"Project Manager" selection................................................................................................. |
|
42 |
Figure 4.6:"Project Manager" window................................................................................................... |
|
43 |
|
|
|
Siemens Mobility Toolkit |
Copyright © 2004 Siemens AG |
|
- 1 - |
|
|

Information and Communication Mobile
Figure 4.7:New Project name ............................................................................................................... |
43 |
Figure 4.8:Project Configuration screen ............................................................................................... |
43 |
Figure 4.9:Project Selection tab in Explorer window............................................................................. |
44 |
Figure 4.10:Filesystem selection .......................................................................................................... |
44 |
Figure 4.11:Select Local Directory screen ............................................................................................ |
45 |
Figure 4.12:Local Directory mounting last screen................................................................................. |
45 |
Figure 4.13:New File selection.............................................................................................................. |
46 |
Figure 4.14:"HelloWorld" Template choosing ....................................................................................... |
46 |
Figure 4.15:Directory choosing ............................................................................................................. |
47 |
Figure 4.16:Main Class menu ............................................................................................................... |
47 |
Figure 4.17:Main Class selection.......................................................................................................... |
48 |
Figure 4.18:Execute Project menu........................................................................................................ |
48 |
Figure 4.19:Emulator window example................................................................................................. |
49 |
Figure 4.20:Add Breakpoint menu ........................................................................................................ |
50 |
Figure 4.21:Add Breakpoint screen ...................................................................................................... |
50 |
Figure 4.22:Breakpoint highlight example............................................................................................. |
51 |
Figure 4.23:Debugging window ............................................................................................................ |
51 |
Figure 4.25:Continue debug menu ....................................................................................................... |
52 |
Figure 4.24:Reached breakpoint example ............................................................................................ |
52 |
Figure 4.26:Configure JDKs menu........................................................................................................ |
53 |
Figure 4.27:Configure JDKs screen...................................................................................................... |
54 |
Figure 4.28:Target emulator screen...................................................................................................... |
54 |
Figure 4.29:New Project menu ............................................................................................................. |
55 |
Figure 4.30:Project Wizard - Project name Screen............................................................................... |
55 |
Figure 4.31:Project Wizard - Project paths Screen............................................................................... |
56 |
Figure 4.32:Add Files/Packages menu ................................................................................................. |
57 |
Figure 4.33:Select class files screen .................................................................................................... |
57 |
Figure 4.34:Rebuild Project menu ........................................................................................................ |
58 |
Figure 4.35:Run Project menu .............................................................................................................. |
58 |
Figure 4.36:Set Main Class screen....................................................................................................... |
59 |
Figure 4.37:Emulator window launched................................................................................................ |
59 |
Figure 4.38:Select breakpoint ............................................................................................................... |
60 |
Figure 4.39:Toggle breakpoint .............................................................................................................. |
60 |
Figure 4.40:Breakpoint marked............................................................................................................. |
61 |
Figure 4.41:Debug Project menu .......................................................................................................... |
61 |
Figure 4.42:Breakpoint highlighted ....................................................................................................... |
62 |
Figure 4.43:Resume Program menu..................................................................................................... |
62 |
Figure 5.1:Lauching Emulator............................................................................................................... |
63 |
Figure 5.2:Selecting a Phone Model..................................................................................................... |
63 |
Figure 5.3:Inserting SIM Card............................................................................................................... |
64 |
Figure 5.4:“Commands” Window .......................................................................................................... |
64 |
Figure 5.5:Set "CSD only mode"........................................................................................................... |
65 |
Figure 5.6:Main Menu ........................................................................................................................... |
65 |
Figure 5.7:Setup screen........................................................................................................................ |
65 |
Figure 5.8:Connectivity screen ............................................................................................................. |
66 |
Figure 5.9:Data Services screen........................................................................................................... |
66 |
Figure 5.10: Mail,Java,Rms screen ...................................................................................................... |
66 |
Figure 5.11:Options screen................................................................................................................... |
66 |
Figure 5.12:Rename screen ................................................................................................................. |
66 |
Figure 5.13:Mail,Java,Rms screen with a HTTP Profile ....................................................................... |
66 |
Figure 5.14:Confirmation screen........................................................................................................... |
67 |
Figure 5.15:HTTP Profile setup screen................................................................................................. |
67 |
Figure 5.16:GPRS Settings screen....................................................................................................... |
67 |
Figure 5.17:Connectivity screen ........................................................................................................... |
67 |
Figure 5.18:Account settings screen..................................................................................................... |
67 |
Figure 5.19:Set Up WAP....................................................................................................................... |
68 |
|
|
Siemens Mobility Toolkit |
Copyright © 2004 Siemens AG |
- 2 - |
|

Information and Communication Mobile |
|
Figure 5.20:Set up WAP Homepage..................................................................................................... |
68 |
Figure 5.21:Launch WAP Browser........................................................................................................ |
68 |
Figure 5.22:Filesystem Structure .......................................................................................................... |
68 |
Figure 5.23:Commands Window........................................................................................................... |
69 |
Figure 5.24:SMS - TPDU Dialog Incoming Message............................................................................ |
70 |
Figure 5.25:Command window - locale................................................................................................. |
71 |
Figure 5.26:Change microedition.locale window .................................................................................. |
72 |
Figure 6.2:C65 Emulator....................................................................................................................... |
73 |
Figure 6.1: C60 Emulator...................................................................................................................... |
76 |
Figure 6.2:MC60 Emulator.................................................................................................................... |
79 |
Figure 6.3:M55 Emulator ...................................................................................................................... |
82 |
Figure 6.4:SL55 Emulator ..................................................................................................................... |
85 |
Figure 6.5:S55 Emulator ....................................................................................................................... |
88 |
Figure 6.6:C55 Emulator....................................................................................................................... |
91 |
Figure 6.7: M50 Emulator ..................................................................................................................... |
94 |
Figure 6.8:Sl45i Emulator ..................................................................................................................... |
97 |
Siemens Mobility Toolkit |
Copyright © 2004 Siemens AG |
|
- 3 - |

Information and Communication Mobile |
Introduction |
1 - Introduction
1.1 - Document's Purpose
This document is an operation guide for Siemens mobile phone emulators. It describes the emulators´ functionalities and how to use Siemens Mobility Toolkit.
1.2 - Naming Conventions
This document adopts the following naming conventions:
•File names and directory (folder) names are typed in bold characters.
•Names of user interface components (keys, menu items, specific windows etc.) are typed in double quotes (" ").
•Some words or phrases may be typed in italic to attract the special attention of the reader.
•References to books or other printed material are typed in bold and underlined.
1.3- Document's Overview
Chapter 1 - Introduction
This chapter describes this document's structure, as well as its purpose.
Chapter 2 - System Requirements
This chapter describes the requirements in terms of hardware and software requirements needed to run the emulator.
Chapter 3 - Siemens Mobility Toolkit
This chapter contains a description of the SMTK, including its components like J2ME™ documentation and the emulator itself.
Chapter 4 - IDE Integration
This chapter contains a description of how to integrate SMTK to two of the leading IDE tools, Sun ONE and JBuilder.
Chapter 5 - General Features
This chapter describes features and functionalities that are common to all Siemens' emulators.
Chapter 6 - Specific Features
This chapter describes each emulators’ specific features.
Chapter 7 - Command Line Debug
This chapter shows how to debug an application without the need of an IDE.
Chapter 8 - Additional Resources
Siemens Mobility Toolkit |
Copyright © 2004 Siemens AG |
|
- 4 - |

Information and Communication Mobile |
Introduction |
This chapter points to where to obtain more information about J2ME™ development tools and to obtain more Siemens mobile information.
Appendix A - Abbreviations
This chapter describe the meaning of the terms used in the document.
Appendix B - Application Source Code
The source code of an example application Hello.java.
Siemens Mobility Toolkit |
Copyright © 2004 Siemens AG |
|
- 5 - |

Information and Communication Mobile |
System Requirements |
2 - System Requirements
Development configuration comprising only Java 2 SDK and SMTK is intended for use on Windows™ 95, Windows™ 98 (1st or 2nd edition), Windows™ NT 4.0 (Service Pack 5 or higher), Windows™ 2000 Professional, Windows™ 2000 Server, or Windows™ 2000 Advanced Server operating systems running on Intel hardware. In non-English locales, only the Professional edition of Windows™ 2000 is supported.
2.4 - Hardware Requirements
This configuration is intended for use on Windows™ 98 (1st or 2nd edition), Windows™ NT 4.0 (Service Pack 5 or higher), Windows™ 2000 or Windows™ XP operating systems running on Intel hardware.
•Intel® Pentium® 166MHz or compatible processor
•128 MB RAM(minimum requirement)
•120-240 MB hard disk space
-50 MB – SMTK
-70 MB – J2SE™ SDK
-120 MB – J2SE™ SDK documentation
2.5- Software Requirements
Software basic requirements are:
•Windows™ 95, Windows™ 98 (1st or 2nd edition), Windows™ NT 4.0 (Service Pack 5 or higher), Windows™ 2000 Professional, Windows™ 2000 Server, or Windows™ 2000 Advanced Server
•Sun Java Standard Edition (J2SE) SDK, version 1.3.1 or above
In general it can be used any integrated development environment (IDE) that supports development of Java applications. To use the debugging capabilities of the SMTK PC-emulator, the IDE must support remote debugging. Borland™’s JBuilder 9 Mobile Edition and Sun Microsystems’ Sun ONE 5 (formely Forte for Java) Community Edition, both support integration with SMTK.
At Sun Microsystems' Java portal on the URL http://java.sun.com/j2se/1.4.2/ download.html is possible to get the SDK installation files. It is Just download one (as said, the minimal required version is 1.3.1, but a more stable version of the J2SE SDK is 1.4.2_04) and execute the installation files.
Siemens Mobility Toolkit |
Copyright © 2004 Siemens AG |
|
- 6 - |
Information and Communication Mobile |
System Requirements |
At Sun Microsystems' Sun ONE portal on the URL http://forte.sun.com/ffj/downloads.html is possible to get the Sun ONE Mobile Edition(release 4, update 1 is the last stable version, but SUN One Studio 5, early access release is also available). Download it and install.
Here is described the integration process with an earlier version (version 3), but the modus operandi of the integration process with version 4 and 5 is the same. At Siemens Developer Portal on the URL http://www.siemens-mobile.com/devel- oper, in the session Developer Village, in the topic Tools, it's possible to obtain the SMTK or a specific model. It's just needed to download the installation files and execute them.
At Borland™ site on the URL http://www.borland.com/products/downloads/ download_jbuilder.html it's possible to get both Jbuilder Personal Edition and its extension to J2ME™, called MobileSet. Download and install both. The JBuilder must be at version higher than 5.
Siemens Mobility Toolkit |
Copyright © 2004 Siemens AG |
|
- 7 - |

Information and Communication Mobile |
Siemens Mobility Toolkit |
3 - Siemens Mobility Toolkit
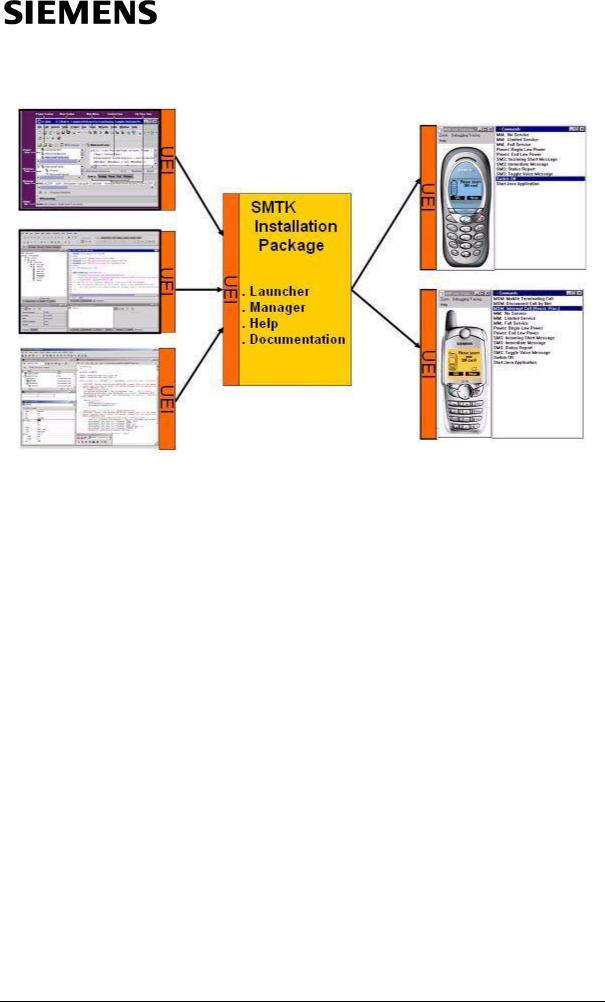
Siemens Mobility Toolkit (SMTK) brings several new features, improvements and documentation(see figure 3.1). These features include:
•Improved SMTK installation structure;
•Easier IDE integration; you no longer need to integrate every single SMTK; just integrate SMTK once and the rest is handled by the SMTK Manager tool delivered with SMTK;
•Single entry SMTK Launcher tool for launching the different installed SMTK Emulator Packs;
•Improved online documentation capabilities supporting Windows Help. Online Documentation available via Start Menu, SMTK Launcher and SMTK Manager;
•Context help available in Launcher and Manager.
SMTK structure is divided in a basic package, called SMTK Core, and the SMTK Emulator Packs.
NOTE: To use SMTK you have to download the SMTK Core installation package, plus at least one SMTK Emulator Pack installation package.
SMTK Core is the basic package. It contains basically integration tools and docs. SMTK Core comes with the following items:
•The Launcher utility;
•The "SMTK Configuration and Management Utility" called Manager;
•The preverify.exe utility;
•On-line help;
•Documentation, including Siemens API Javadocs.
Each SMTK Emulator Pack contains a Siemens Java™-enabled mobile phone emulator. Specific emulators are no longer launched directly from the IDE; instead of this, a Launcher utility is activated by the IDE, which then launches the emulator selected by the user.
The "SMTK Configuration and Management Utility" provides the following functionalities:
1.Select a target device (specific SMTK Emulator Pack) for compilation;
2.Obtain version information about any specific SMTK Emulator Pack installed;
3.Request un-installation of an SMTK Emulator Pack;
4.Obtain the status of the SMTK integration with different IDEs.
Siemens Mobility Toolkit |
Copyright © 2004 Siemens AG |
|
- 8 - |
Information and Communication Mobile |
Siemens Mobility Toolkit |
Figure 3.1: Siemens Mobility Toolkit architecture
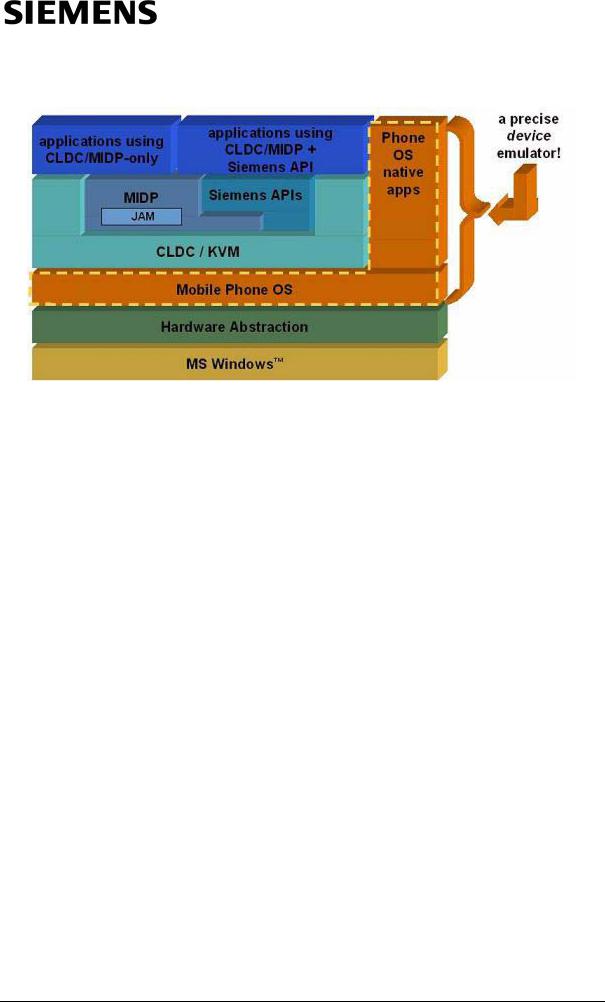
3.1 - Architectural Overview of the Emulator
The main development tool to test MIDlet applications on a J2ME™-enabled mobile phone is the PC/Windows-based emulator (PC emulator). This emulator not only mimics the behavior of the Java Virtual Machine (JVM) implemented in the mobile phone, but also the behavior of the mobile phone itself as a cell phone device - as far as this is possible without the corresponding hardware.
The PC emulator has a carefully designed multi-layer architecture(as shown in figure 3.2) and a realistic user interface. It offers application developers a behavior and a look-and-feel very close to that of a real Siemens mobile phone, with the exception of timing characteristics and of execution of some GSM-specific functions.
The emulator is built upon the same code base as that used to build the firmware of the Siemens mobile phone. To run the emulator on a PC, a hardware abstraction layer is introduced (i.e. an emulator of the mobile phone's hardware on a PC), which translates firmware routines of the Mobile Phone into appropriate PC routines. The abstraction layer also emulates real actions on mobile phones peripherals (actions such as pressing a key on the mobile phone, or visualizing a text or image on the mobile's display) by appropriate PC keyboard and mouse actions applied to a realistic image of the Siemens mobile phone on the PC monitor.
Siemens Mobility Toolkit |
Copyright © 2004 Siemens AG |
|
- 9 - |
Information and Communication Mobile |
Siemens Mobility Toolkit |
Figure 3.2: Siemens Java™-enabled mobile phone architecture
One feature of this abstraction layer is the mapping of the file system onto the PC file system (directory \filesystem of SMTK's installation).
3.2 - SMTK Contents
This section describes the main components of the SMTK. These include the components of the SMTK Core and the SMTK Emulator Packs, as well as their purposes and functionalities.
3.2.1 - Launcher & Manager
NOTE: The Launcher utility and the Manager utility are components of the SMTK Core package.
3.2.1.1 - Launcher
In a PC development context, J2ME™ applications are tested on a Java™-ena- bled mobile phone emulator. Siemens has an increasing number of mobile phone models that are Java™-enabled, and the Launcher utility provides a unique emulator launching tool for all the installed SMTK Emulator Packs.
When called, the Launcher calls the default Siemens Java™-enabled mobile phone emulator (if not specified a specific model), passing the necessary parameters.
NOTE: The Launcher executable file (emulator.exe) is located in the <<SMTK path>>\bin subfolder (replace <<SMTK path>> by the SMTK installation path).
Siemens Mobility Toolkit |
Copyright © 2004 Siemens AG |
|
- 10 - |

Information and Communication Mobile |
Siemens Mobility Toolkit |
3.2.1.2 - Manager
To manage SMTK configurations, the Manager utility (also called SMTK Configuration and Management Utility) performs the following groups of functions, represented on its graphical window by three tabs:
1.Selecting the target device (target phone emulator) for which applications will be compiled and executed.
2.SMTK management.
3.Display the current status of SMTK integration with IDEs.
NOTE: The Manager executable file (prefs.exe) is located in the <<SMTK path>>\bin subfolder (replace <<SMTK path>> by the SMTK installation path).
3.2.2 - SMTK documentation
SMTK comes with documents and Java source code of examples of Siemensspecific API usage. These are useful materials which developers can use to learn how to develop for Siemens Java™-enabled mobile phones.
NOTE: Siemens J2ME™ API Javadocs are now part of the SMTK Core package, as well as Siemens J2ME™ examples.
3.2.2.1 - Siemens J2ME™ API Javadocs
Siemens J2ME™ API implements CLDC 1.0 and MIDP 1.0 specifications. Besides the required packages by these specifications, Siemens Java™-enabled mobile phones also implement additional packages. These packages include better support for graphics, sound and communication. All these packages (as well as their classes and interfaces) are documented in the Javadoc format, and are shipped together with SMTK Core. This documentation consists of HTML pages containing the description of each class, with their methods and properties.
3.2.2.2 - Siemens J2ME™ Examples
SMTK delivers together with API documentation a set of J2ME™ examples, in the form of Java source code. Each example within SMTK implements a different usage of API packages and classes. General Siemens API usage examples are delivered with SMTK Core, and Siemens Java™-enabled mobile phone's specific functionality examples are delivered within each SMTK Emulator Pack. Together, they have the purpose of teaching the developers how to use Siemens API in reallife applications.
NOTE: Not all API methods and classes are covered with these examples
Siemens Mobility Toolkit |
Copyright © 2004 Siemens AG |
|
- 11 - |

Information and Communication Mobile |
Siemens Mobility Toolkit |
3.2.3 - J2ME™ API Library
SMTK includes the Siemens J2ME™ API library file. This file is a Java JAR file (named api.jar and located in <<SMTK path>>\lib path) containing the Java classes, interfaces and exceptions of Siemens API. This library is required in the process of compilation (both in command mode and by the IDEs) and execution of a MIDlet.
NOTE: Each individual SMTK Emulator Pack has its own J2ME™ API Library.
3.2.4 - Preverifier
The CLDC specification defines a new Java virtual machine (VM), called the K Virtual Machine, or KVM for short. The KVM is a complete new implementation of a Java virtual machine, designed from the start to work on resource-constrained devices.
For CLDC-based applications, there is a remaining task to be executed after compiling the Java source code. This task involves changing how classes are verified, or checked for correctness. Instead of running the complete verification process on the device itself, KVM assumes that most of the job is done offline. This offline task is performed by a tool called preverifier.
The preverifier does the actual verification and inserts extra information into the class files. (Note that the modifications are transparent to non-KVM virtual machines). When the application is launched, KVM looks for this information and uses it to perform a much simpler verification, based on the data collected by the preverifier.
NOTE: The preverifier is a component packed in the SMTK Core package.
3.2.5 - Siemens Java™-enabled Mobile Phone Emulator Pack
SMTK now requires each individual emulator (now called SMTK Emulator Pack) to be installed separately after installing the SMTK Core. After installing the SMTK Emulator Pack, the developer can instantly start creating and testing J2ME™ applications. To have a complete description of the available Siemens Java™-ena- bled mobile phone emulators, please refer to the document named "SMTK Emulator's Guide", available for download at Siemens Developer Portal in http:// www.siemens-mobile.com/developer.
Siemens Mobility Toolkit |
Copyright © 2004 Siemens AG |
|
- 12 - |
Information and Communication Mobile |
Siemens Mobility Toolkit |
3.3 - Siemens Mobility Toolkit (SMTK) Installation
This section describes the installation steps for the SMTK packages, which can be downloaded at the Siemens Developer's Portal (refer to chapter 8 - Additional Resources, section 8.1 - Siemens Developer Portal, for additional information). To use SMTK you have to download the SMTK Core installation package, plus at least one SMTK Emulator Pack installation package (refer to section 3.2 - SMTK Contents for additional information on SMTK structure).
NOTE: To run SMTK Core and the SMTK Emulator Pack, Java™ 2 Standard Edition Software Development Kit (J2SE™ SDK) version 1.3.1 or higher must be already installed.
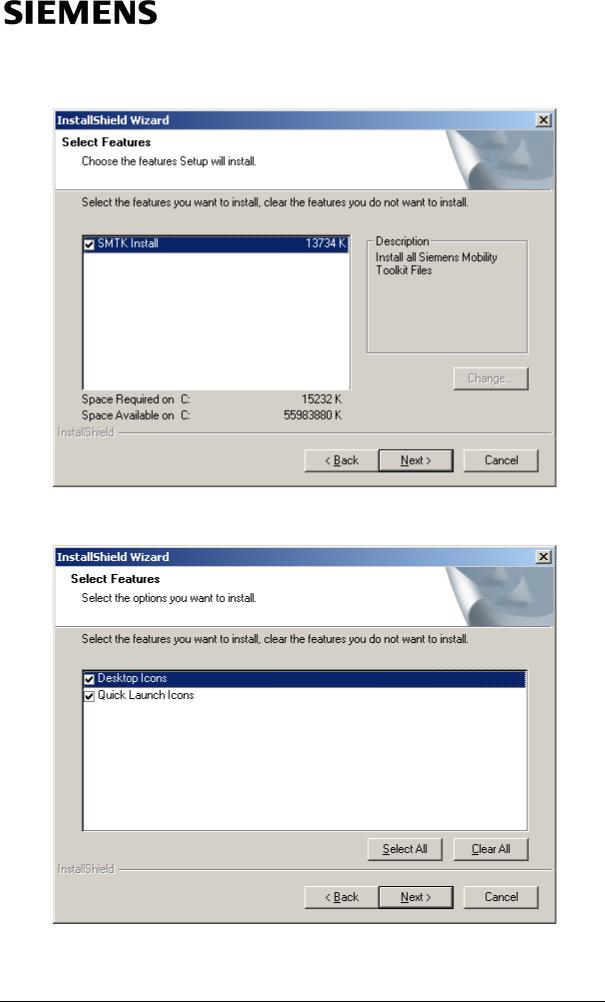
3.3.1- SMTK Core Package Installation
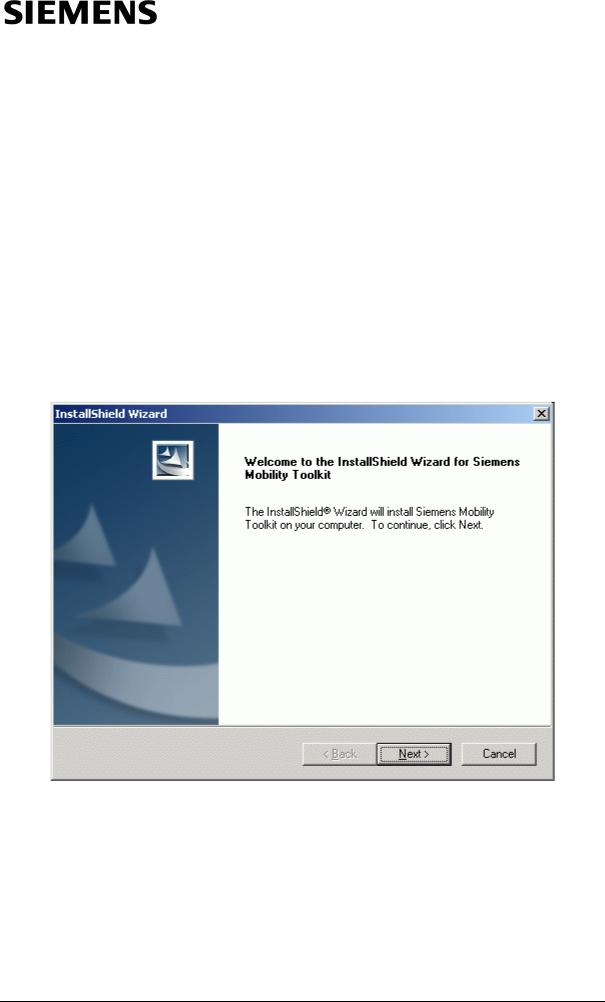
1.Start the SMTK Core installation by clicking "Next":
Figure 3.3: SMTK Core Installation Welcome screen
Siemens Mobility Toolkit |
Copyright © 2004 Siemens AG |
|
- 13 - |
Information and Communication Mobile |
Siemens Mobility Toolkit |
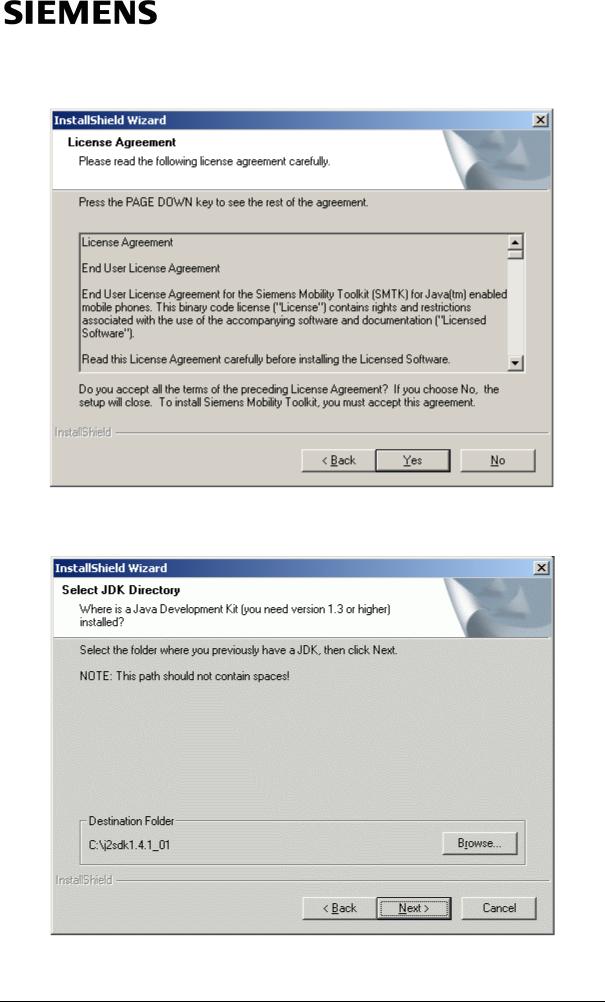
2. Accept the License Agreement (provided it is accepted):
Figure 3.4: Core Installation License Agreement screen
3. Select the JDK folder:
Figure 3.5: SMTK Core Installation JDK Directory screen
Siemens Mobility Toolkit |
Copyright © 2004 Siemens AG |
|
- 14 - |

Information and Communication Mobile |
Siemens Mobility Toolkit |
4. Select the destination folder:
Figure 3.6: Core Installation Destination Folder screen
5. Select Start Menu Folder, then click "Next":
Figure 3.7: SMTK Core Installation Start Menu Folder Selection screen
Siemens Mobility Toolkit |
Copyright © 2004 Siemens AG |
|
- 15 - |
Information and Communication Mobile |
Siemens Mobility Toolkit |
6. Select features to install:
Figure 3.8: SMTK Core Installation Features Selection screen
7. Select Additional Tasks:
Figure 3.9: SMTK Core Installation Additional Tasks Selection screen
Siemens Mobility Toolkit |
Copyright © 2004 Siemens AG |
|
- 16 - |
Information and Communication Mobile |
Siemens Mobility Toolkit |
8. Check if the installation settings are correct, then click "Next":
Figure 3.10: Core Installation Ready to Install screen
9.SMTK Core Installation tool informs that one emulator add-on (SMTK Emulator Pack) must be present before using the SMTK Core features. Click on the button "OK" to proceed:
Figure 3.11: SMTK Core Installation Information screen
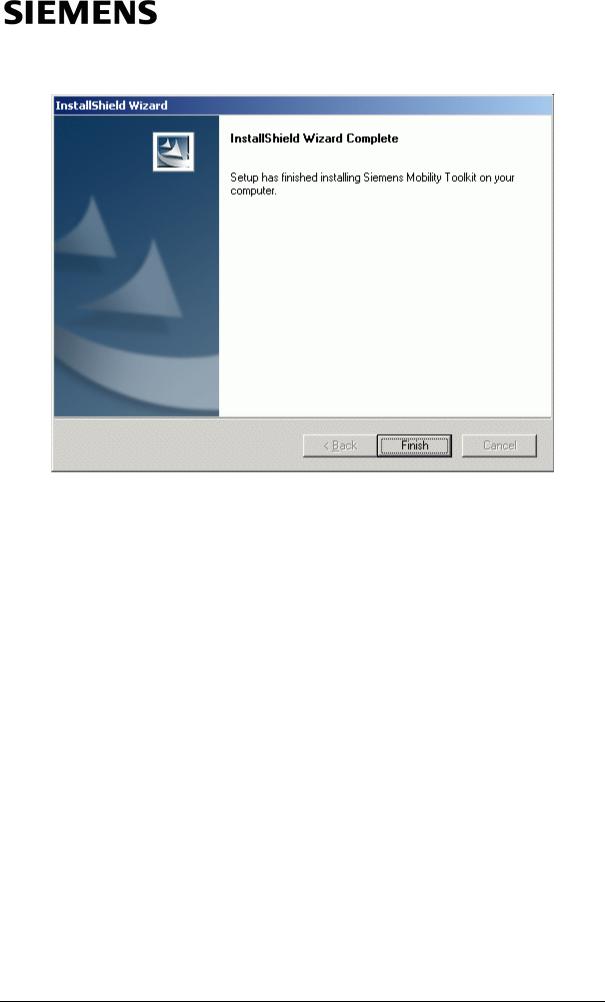
10.Finish the SMTK Core Installation:
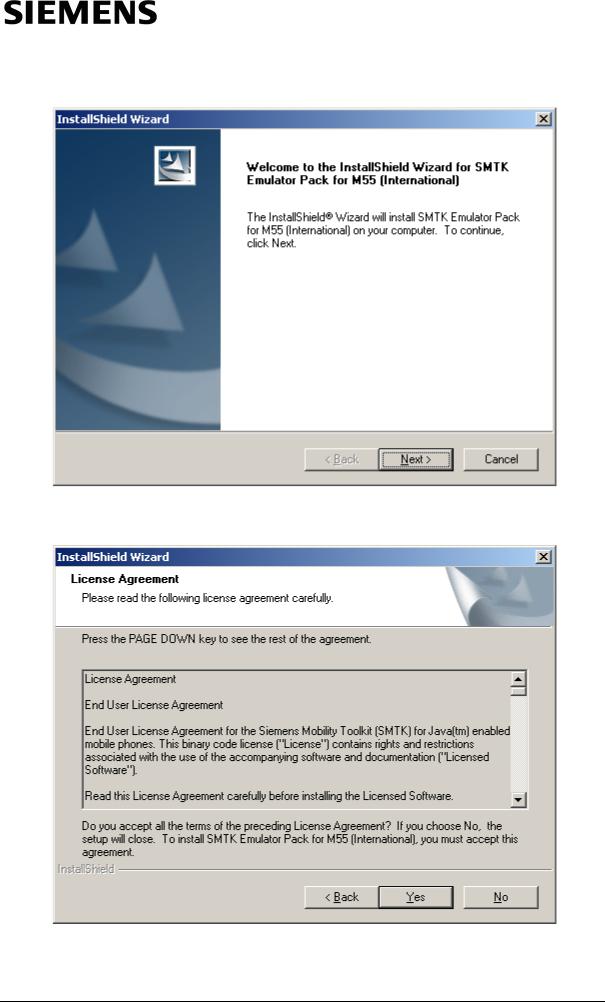
3.3.2- SMTK Emulator Pack Installation
NOTE: For this demonstration, it will be assumed that you have obtained at Siemens Developer Village portal on Web the SMTK M55 Emulator Pack installer, for instance. Any other SMTK Emulator Pack can be used instead.
Siemens Mobility Toolkit |
Copyright © 2004 Siemens AG |
|
- 17 - |
Information and Communication Mobile |
Siemens Mobility Toolkit |
Figure 3.12: SMTK Core Installation Finish screen
Siemens Mobility Toolkit |
Copyright © 2004 Siemens AG |
|
- 18 - |
Information and Communication Mobile |
Siemens Mobility Toolkit |
1. Start installing the SMTK Emulator Pack by clicking "Next":
Figure 3.13: Emulator Pack Installation Welcome screen
2. Accept the License Agreement (provided it is accepted):
Figure 3.14: SMTK Emulator Pack Installation License Agreement screen
Siemens Mobility Toolkit |
Copyright © 2004 Siemens AG |
|
- 19 - |
Information and Communication Mobile |
Siemens Mobility Toolkit |
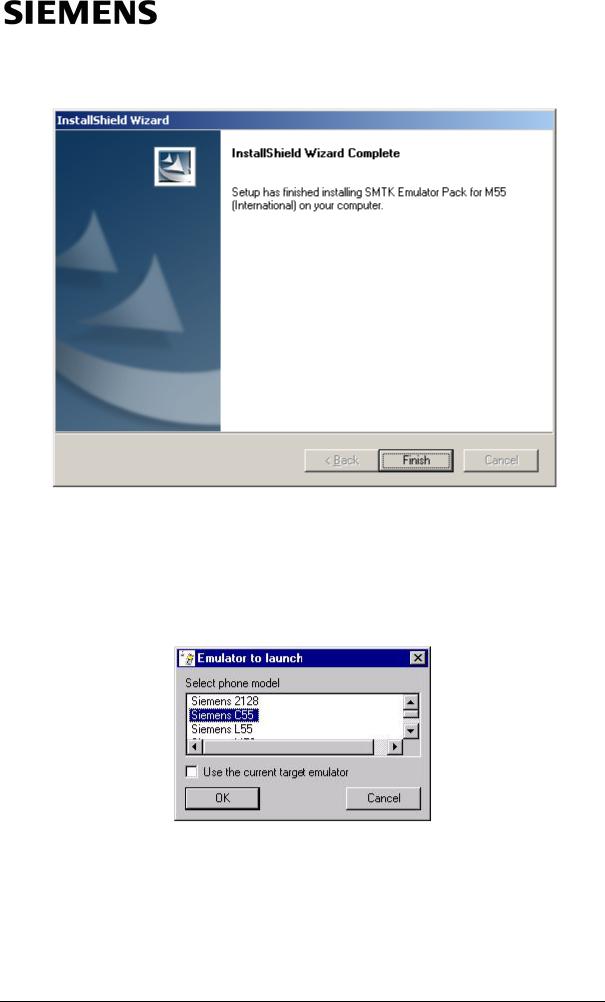
3. Finish the SMTK Emulator Pack installation:
Figure 3.15: SMTK Emulator Pack Installation Complete screen
3.4 - Launcher Execution
When the Launcher is started without specifying a phone emulator to launch, a window appears, asking for the user to specify it.
Figure 3.16: Launcher’s Window
This happens only when the two following conditions are both met: the launcher's command line has no -Xdevice argument, and the launcher had not been instructed to always use the target emulator as set by the SMTK Configuration and Management Utility.
Siemens Mobility Toolkit |
Copyright © 2004 Siemens AG |
|
- 20 - |

Information and Communication Mobile |
Siemens Mobility Toolkit |
The window displayed by the Launcher contains a list of all emulators installed, and a check-box labeled "Use the current target emulator". Two options are given:
•Select one of the emulators in the list, while leaving the check-box unchecked. This will result in launching the selected emulator for this execution only. The target emulator is highlighted in the list as a proposed initial selection, which may be modified by the user, or;
•Check the "Use the current target emulator" check-box. The current target emulator will be launched for this execution, and every subsequent invocation of the Launcher without specifying the "–Xdevice:<device_name>" argument will perform without displaying this window. Switching off this operation mode of the Launcher may only be done using the SMTK Configuration and Management Utility.
Starting the launcher without any installed SMTK Emulator Pack will lead Launcher to invoke a warning window, informing that there is no one registered emulator. In this case, download at least one SMTK Emulator Pack from Siemens Developer Portal and install it.
3.5 - "SMTK Configuration and Management Utility" Execution
Use this dialog for the following tasks:
•to set the target emulator for your applications compilation;
•to manage the SMTK emulators set;
•to manage the SMTK integration with IDEs.
3.5.1- "Select target emulator" Page
Figure 3.17: "Select target emulator" window
Siemens Mobility Toolkit |
Copyright © 2004 Siemens AG |
|
- 21 - |
Information and Communication Mobile |
Siemens Mobility Toolkit |
To select the target emulator for your applications compilation select the phone model from installed models list and press "Set target" button. The current target emulator is highlighted in the list by green background as shown in figure 3.17.
Use "Device info" button to see the device help information for selected model in the list.
With the "Use the current target emulator for MIDlet execution" checkbox you can control whether the current target model will be also used when the emulator is launched without explicitly specified phone model, or the "Emulator to launch" dialog will appear in such case.
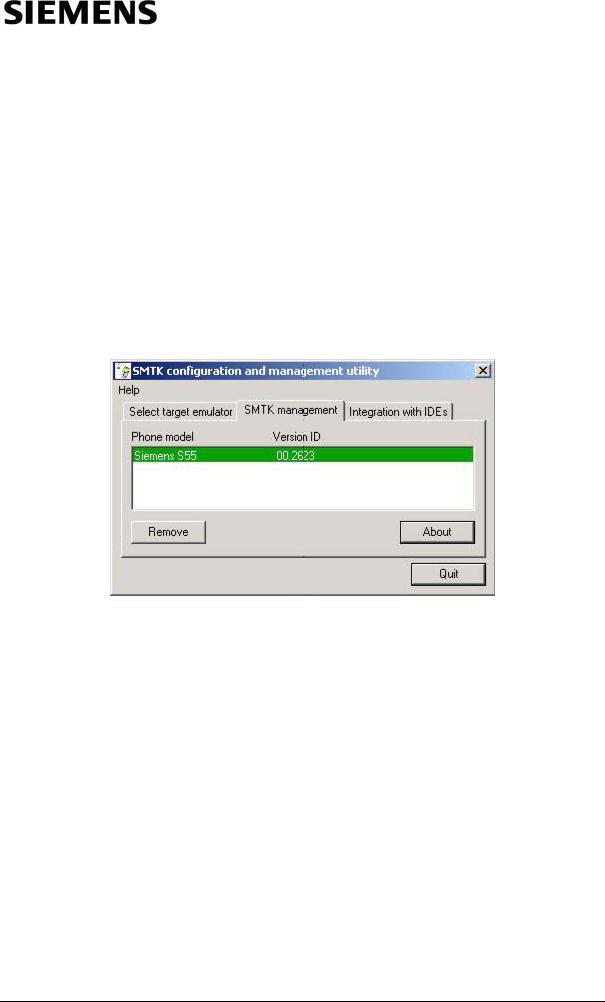
3.5.2 - "SMTK management" Page
Figure 3.18: "SMTK management" window
This page contains the installed phone models list with their emulators versions displayed. The current target emulator is highlighted by green background.
•Use the "About" button to see the release notes for the selected emulator.
•Use the "Remove" button to remove the selected emulator from the SMTK.
Siemens Mobility Toolkit |
Copyright © 2004 Siemens AG |
|
- 22 - |
Information and Communication Mobile |
Siemens Mobility Toolkit |
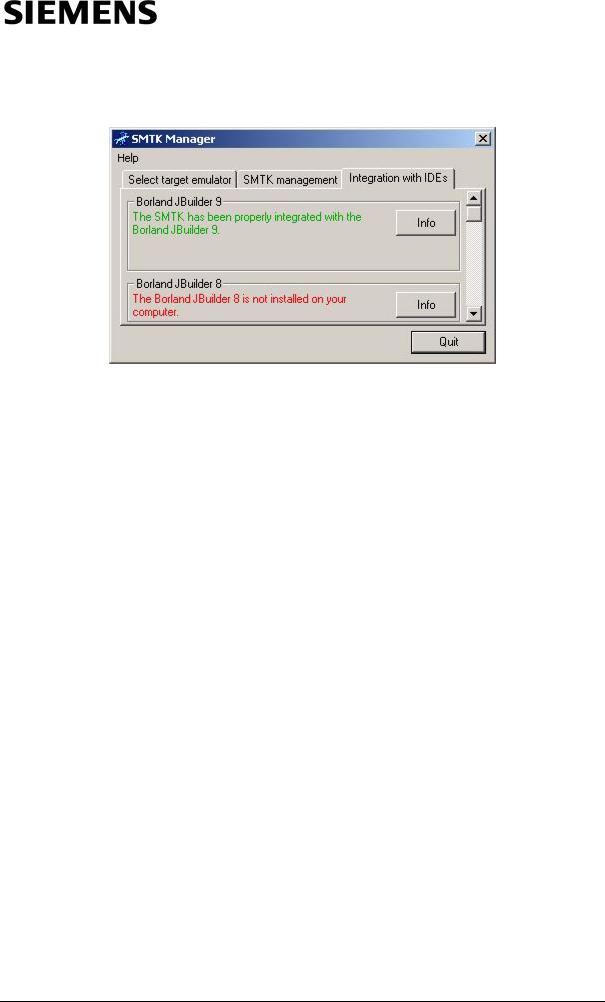
3.5.3 - "Integration with IDE’s" Page
Figure 3.19: "Integration with IDE's" page
This page contains the list of all IDEs supported by SMTK. Each list item has the current integration with IDE status description (IDE is not installed, IDE is installed but not integrated, IDE is integrated with SMTK). Also each item contains the buttons:
•"Info": Use this button to see the information about how to get IDE and about IDE integration hints.
•"Start": This button appears only when the installation pack for integration with IDE comes with SMTK. You may use this button to start the integration procedure.
3.6- Application Management System (AMS) on the Emulator
One of the emulator's features, already mentioned in section 3.1, is a mapping of the file system of the mobile phone's Flash File System (FFS) into the file system of the development PC. This means that the emulator's Application Management System (AMS) "sees" the subdirectory / under the emulator's installation directory as the "a:" device. This is done to imitate the real mobile phone's AMS, which also considers the FFS as the "a:" drive. So, if the .jad file contains a line
MIDlet-Jar-URL: file://a:/java/jam/Hello/Hello.jar
the emulator's AMS will look for a "Hello.jar" file in the \java\jam\Hello subdirectory under the emulator installation directory.
Siemens Mobility Toolkit |
Copyright © 2004 Siemens AG |
|
- 23 - |
Information and Communication Mobile |
Siemens Mobility Toolkit |
3.6.1 - Installation of .jar Files Using .jad Files
The following steps describe the process of installation of an application JAR (the
.jar file) file, in the situation where only the Descriptor file (the .jad file) is installed in the mobile device.
NOTE: The "Hello World" example from Appendix B is used here.
1.Create a new directory for the application under the /Java/jam folder in the emulator filesystem's installation directory, e.g. <<Filesystem path>>/Java/ jam/Hello. Copy the "Hello.jad" file into this new directory;
NOTE: Replace <<Filesystem>> for the /filesystem folder inside the emulator's installation path.
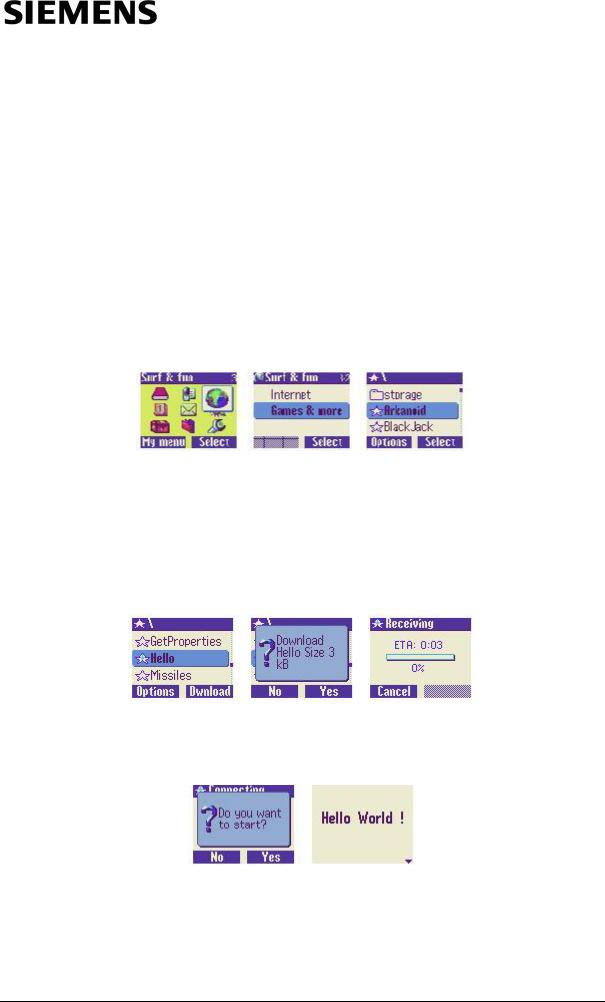
2.Start the emulator. Open the folder "Java", by using the right soft key and control keys;
Figure 3.20: Run a MIDlet from Surf&Fun
3.By navigating this screen, an item named Hello is seen marked with an icon (blue filled). This item represents the Hello.jad file inside the Hello folder under /Java/jam. Select it using the right soft key. This is understood as requesting for downloading the application's .jar file (the "Hello.jar" file in our case). The emulator's AMS will ask to confirm the request for download the application. If answered "Yes", AMS will copy the "Hello.jar" file into the / Java/jam/Hello directory.
Figure 3.21: Download a MIDlet
4.After finishing the download, the AMS ask the user if he wants to start running the application. If answered "Yes", the MIDlet starts running.
Figure 3.22: Finishing download and running
5.At this time, the icon displayed at the left of the Hello item will change from the star filled with blue to star not filled. This means that instead of having only downloaded the JAD file, the user accepted to download the JAR file with the application, and this MIDlet is persisted in the FFS.
Siemens Mobility Toolkit |
Copyright © 2004 Siemens AG |
|
- 24 - |

Information and Communication Mobile |
Siemens Mobility Toolkit |
To ensure correct reinstallation of the application in future, the URL in the application's .jad file must point to a correct JAR file URL location. At that location, any new version of the application will replace the previous one, and will thus be available for download by all mobile phones, without modifying the initial .jad file.
To reinstall an application, find its .jar file as above described; then open the "Options" pop-up window using the left soft key. Navigate the option list; select the "Reinstall" option using the right soft key.
Figure 3.23: Reinstall an application
NOTE: AMS merely copies the application's .jar file into the application's /Java/ jam directory. The same result may be obtained on the emulator by "manually" copying its .jad file and .jar file into that directory (e.g. by using the "Microsoft File Explorer" utility). However, doing it with AMS as described above is very useful as it gives a better idea of how it will be done on a real mobile phone, and what the user will see on the mobile phone's display.
If a HTTP-URL is specified in the .jad file of an application, AMS can install this application using an HTTP connection to that URL. To establish this HTTP connection, the emulator uses an existing Internet connection on the PC.
3.7 - Loading an Application onto Siemens Java™-enabled Mobile Phones
3.7.1 - Local Loading of an Application onto the Mobile Phone
To load an application into a Siemens Java™-enabled mobile phone from a local PC, the following components are needed:
•Siemens Java™-enabled mobile phone (for example, S55) with its communication port enabled (obtained via Siemens Developer Package);
•Serial data cable (obtained via Siemens Developer Package), IrDA port, USB or BlueTooth adapter;
•Siemens Data Suite (SDS) installed (obtained via Siemens Developer Package).
Consider the loading procedure in detail, taking the «Hello, World» application from Appendix B as an example.
Siemens Mobility Toolkit |
Copyright © 2004 Siemens AG |
|
- 25 - |
Information and Communication Mobile |
Siemens Mobility Toolkit |
Figure 3.24: Windows Explorer accessing the Mobile
3.7.2 - Installing the Siemens Data Suite (SDS)
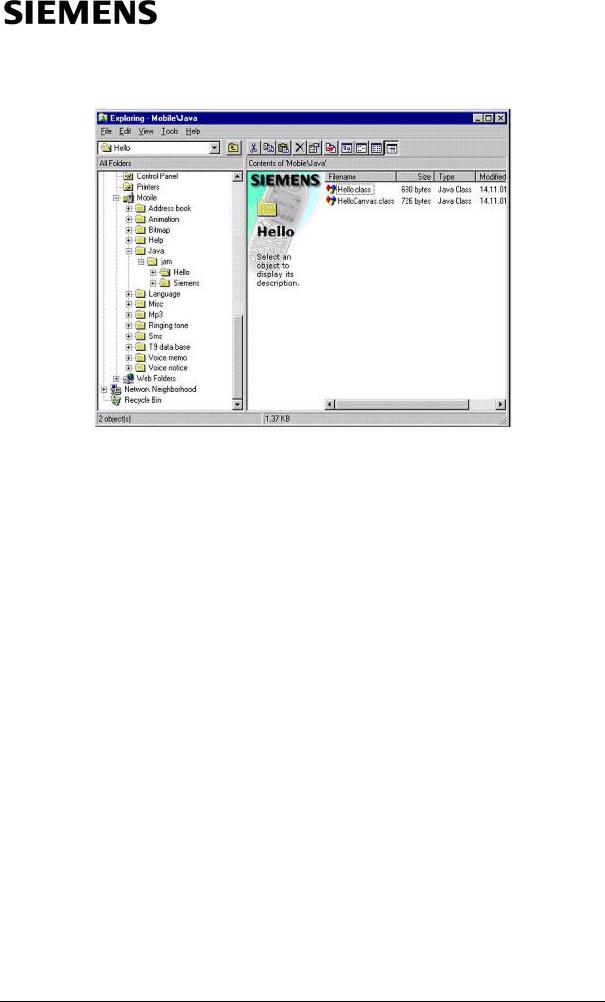
The SDS is part of the Siemens Developer Package. This package delivers a Siemens Java™-enabled mobile phone with its serial port enabled, a serial data cable (for connection between the mobile and the PC station) and a CD-ROM including SDS, SMTK, Developers Notes, Reference Manuals, White papers, IDEs and relevant product information. To obtain the Siemens Developer Package, access the Siemens Developer Portal at http://www.siemens-mobile.com/ developer.
Once obtained Siemens Developer Package, attach the serial data cable to the serial port of the PC and install the Siemens Data Suite (SDS). Plug in the mobile phone into the S55 serial data cable. It is possible to use Windows Explorer to gain access to the mobile's flash file system (FFS). The mobile phone will appear as a new drive in Windows Explorer, named Mobile. The Java applications are located under the path /Java/jam of this drive.
NOTE: The /Java/jam folder works as the root directory of the default classpath. In other words, the KVM will search in this directory for the classes and resources.
3.7.3 - Loading the MIDlet into the Mobile Phone
If you have used a JAR file to pack your application, just copy your JAR file to
/java/jam/<NewFolder>
Siemens Mobility Toolkit |
Copyright © 2004 Siemens AG |
|
- 26 - |
Loading...