


 Loading...
HiPath
optiPoint IP Phones Deployment Tool V1.2.33
Administrator Manual

Contents
Contents
Introduction. . . . . . . . . . . . . . . . . . . . . . . . . . . . . . . . . . .5
Supported Phones. . . . . . . . . . . . . . . . . . . . . . . . . . . . . . . . . . . . . . . . . . 5
Requirements . . . . . . . . . . . . . . . . . . . . . . . . . . . . . . . . . . . . . . . . . . . . . 6
Operating System . . . . . . . . . . . . . . . . . . . . . . . . . . . . . . . . . . . . . . . 6
Screen Resolution . . . . . . . . . . . . . . . . . . . . . . . . . . . . . . . . . . . . . . . 6
FTP Service . . . . . . . . . . . . . . . . . . . . . . . . . . . . . . . . . . . . . . . . . . . . 6
Installing and Running the Program. . . . . . . . . . . . . .7
Installing the Program . . . . . . . . . . . . . . . . . . . . . . . . . . . . . . . . . . . . . . . 7
Starting the Program . . . . . . . . . . . . . . . . . . . . . . . . . . . . . . . . . . . . . . . . 7
Listing Connected IP Phones . . . . . . . . . . . . . . . . . . . .8
Icons and Buttons . . . . . . . . . . . . . . . . . . . . . . . . . . . . . . . . . . . . . . . . . . 9 Creating a Device List . . . . . . . . . . . . . . . . . . . . . . . . . . . . . . . . . . . . . . 10 Specifying the Number of Scans . . . . . . . . . . . . . . . . . . . . . . . . . . . 11 Hiding List Columns. . . . . . . . . . . . . . . . . . . . . . . . . . . . . . . . . . . . . 11 Moving List Columns. . . . . . . . . . . . . . . . . . . . . . . . . . . . . . . . . . . . 12 Editing a Device List . . . . . . . . . . . . . . . . . . . . . . . . . . . . . . . . . . . . . . . 12 Starting a Scan. . . . . . . . . . . . . . . . . . . . . . . . . . . . . . . . . . . . . . . . . 12 Column Contents. . . . . . . . . . . . . . . . . . . . . . . . . . . . . . . . . . . . . . . 12 Stopping a Scan . . . . . . . . . . . . . . . . . . . . . . . . . . . . . . . . . . . . . . . . 14 Resetting the Scan Result . . . . . . . . . . . . . . . . . . . . . . . . . . . . . . . . 14 Deleting an Entry from the Device List . . . . . . . . . . . . . . . . . . . . . . 15 Selecting a Device Group . . . . . . . . . . . . . . . . . . . . . . . . . . . . . . . . 15 Saving a Deployment File . . . . . . . . . . . . . . . . . . . . . . . . . . . . . . . . 15 Loading the Deployment File . . . . . . . . . . . . . . . . . . . . . . . . . . . . . . . . 16
Configuration . . . . . . . . . . . . . . . . . . . . . . . . . . . . . . . .17
Preparation . . . . . . . . . . . . . . . . . . . . . . . . . . . . . . . . . . . . . . . . . . . . . . 17
Configuration . . . . . . . . . . . . . . . . . . . . . . . . . . . . . . . . . . . . . . . . . . . . . 17
Starting Configuration . . . . . . . . . . . . . . . . . . . . . . . . . . . . . . . . . . . 18
Editing a Configuration. . . . . . . . . . . . . . . . . . . . . . . . . . . . . . . . . . . 20
Transferring a Configuration. . . . . . . . . . . . . . . . . . . . . . . . . . . . . . . 22
Saving and Loading Device Groups. . . . . . . . . . . . . . . . . . . . . . . . . . . . 24
Saving Device Groups . . . . . . . . . . . . . . . . . . . . . . . . . . . . . . . . . . . 24
Loading Device Groups . . . . . . . . . . . . . . . . . . . . . . . . . . . . . . . . . . 25
2

Contents
optiPoint types . . . . . . . . . . . . . . . . . . . . . . . . . . . . . . 27
optiPoint 400 standard H450. . . . . . . . . . . . . . . . . . . . . . . . . . . . . . . . . 27 optiPoint 400 economy HFA . . . . . . . . . . . . . . . . . . . . . . . . . . . . . . . . . 27 optiPoint 400 standard HFA . . . . . . . . . . . . . . . . . . . . . . . . . . . . . . . . . 27 optiPoint 400 standard SIP . . . . . . . . . . . . . . . . . . . . . . . . . . . . . . . . . . 28 optiPoint 410 entry HFA, 410 economy HFA . . . . . . . . . . . . . . . . . . . . 30 optiPoint 410 standard HFA, 410 advance HFA . . . . . . . . . . . . . . . . . . 30 optiPoint 600 office HFA . . . . . . . . . . . . . . . . . . . . . . . . . . . . . . . . . . . . 31 optiPoint 600 officeUP0/E . . . . . . . . . . . . . . . . . . . . . . . . . . . . . . . . . . . 31 optiPoint 600 office SIP . . . . . . . . . . . . . . . . . . . . . . . . . . . . . . . . . . . . . 32
Help Functions . . . . . . . . . . . . . . . . . . . . . . . . . . . . . . . 33
Checking the Status . . . . . . . . . . . . . . . . . . . . . . . . . . . . . . . . . . . . . . . 33
Status Messages . . . . . . . . . . . . . . . . . . . . . . . . . . . . . . . . . . . . . . . 34
Log File . . . . . . . . . . . . . . . . . . . . . . . . . . . . . . . . . . . . . . . . . . . . . . . . . 35
Configuration Tab . . . . . . . . . . . . . . . . . . . . . . . . . . . . 36
Alert Indications . . . . . . . . . . . . . . . . . . . . . . . . . . . . . . . . . . . . . . . . 36 Audio/Visual Indications . . . . . . . . . . . . . . . . . . . . . . . . . . . . . . . . . . 36 Contacts. . . . . . . . . . . . . . . . . . . . . . . . . . . . . . . . . . . . . . . . . . . . . . 36 Country & Language . . . . . . . . . . . . . . . . . . . . . . . . . . . . . . . . . . . . 37 Dialling Codes . . . . . . . . . . . . . . . . . . . . . . . . . . . . . . . . . . . . . . . . . 37 Dial Plan . . . . . . . . . . . . . . . . . . . . . . . . . . . . . . . . . . . . . . . . . . . . . . 37 File Transfer . . . . . . . . . . . . . . . . . . . . . . . . . . . . . . . . . . . . . . . . . . . 38 Function Keys . . . . . . . . . . . . . . . . . . . . . . . . . . . . . . . . . . . . . . . . . 40 HTTP Settings . . . . . . . . . . . . . . . . . . . . . . . . . . . . . . . . . . . . . . . . . 40 Instant Messaging . . . . . . . . . . . . . . . . . . . . . . . . . . . . . . . . . . . . . . 40 IP Routing . . . . . . . . . . . . . . . . . . . . . . . . . . . . . . . . . . . . . . . . . . . . 41 Kerberos . . . . . . . . . . . . . . . . . . . . . . . . . . . . . . . . . . . . . . . . . . . . . 43 Keyset Operations . . . . . . . . . . . . . . . . . . . . . . . . . . . . . . . . . . . . . . 44 Key & Lamp Module 1/2 . . . . . . . . . . . . . . . . . . . . . . . . . . . . . . . . . 44 LDAP . . . . . . . . . . . . . . . . . . . . . . . . . . . . . . . . . . . . . . . . . . . . . . . . 44 Messaging Services. . . . . . . . . . . . . . . . . . . . . . . . . . . . . . . . . . . . . 44 Miscellaneous . . . . . . . . . . . . . . . . . . . . . . . . . . . . . . . . . . . . . . . . . 45 Passwords . . . . . . . . . . . . . . . . . . . . . . . . . . . . . . . . . . . . . . . . . . . . 45 Personal Directory . . . . . . . . . . . . . . . . . . . . . . . . . . . . . . . . . . . . . . 46 Presence . . . . . . . . . . . . . . . . . . . . . . . . . . . . . . . . . . . . . . . . . . . . . 46 Quality of Service. . . . . . . . . . . . . . . . . . . . . . . . . . . . . . . . . . . . . . . 47 Security . . . . . . . . . . . . . . . . . . . . . . . . . . . . . . . . . . . . . . . . . . . . . . 47 Selected_Dialing . . . . . . . . . . . . . . . . . . . . . . . . . . . . . . . . . . . . . . . 48 SIP Feature Configuration . . . . . . . . . . . . . . . . . . . . . . . . . . . . . . . . 48 SNMP . . . . . . . . . . . . . . . . . . . . . . . . . . . . . . . . . . . . . . . . . . . . . . . 48 Speech parameters . . . . . . . . . . . . . . . . . . . . . . . . . . . . . . . . . . . . . 49 Telephony Configuration . . . . . . . . . . . . . . . . . . . . . . . . . . . . . . . . . 50 Time. . . . . . . . . . . . . . . . . . . . . . . . . . . . . . . . . . . . . . . . . . . . . . . . . 52
3

Contents
WAP. . . . . . . . . . . . . . . . . . . . . . . . . . . . . . . . . . . . . . . . . . . . . . . . . 52
Parameters . . . . . . . . . . . . . . . . . . . . . . . . . . . . . . . . . .53
Description . . . . . . . . . . . . . . . . . . . . . . . . . . . . . . . . . . . . . . . . . . . . . . 53
Abbreviations and Technical Terms . . . . . . . . . . . .72
Administration Scenarios. . . . . . . . . . . . . . . . . . . . . .81
Configuring an FTP Server. . . . . . . . . . . . . . . . . . . . . . . . . . . . . . . . . . . 81
Installation and Configuration. . . . . . . . . . . . . . . . . . . . . . . . . . . . . . 81
Deployment Tool with TLS . . . . . . . . . . . . . . . . . . . . .83
Public Key (Asymmetric) Cryptography . . . . . . . . . . . . . . . . . . . . . . . . . 83 Certificates . . . . . . . . . . . . . . . . . . . . . . . . . . . . . . . . . . . . . . . . . . . . . . 83 TLS . . . . . . . . . . . . . . . . . . . . . . . . . . . . . . . . . . . . . . . . . . . . . . . . . . . . 84 Certificate File Formats . . . . . . . . . . . . . . . . . . . . . . . . . . . . . . . . . . . . . 84 Use of TLS by an IP Phone . . . . . . . . . . . . . . . . . . . . . . . . . . . . . . . . . . 85 Instructions for using the Deployment Tool with TLS . . . . . . . . . . . . . . 85
Operating the XML Management Interface over TLS . . . . . . . . . . . 85 Configuring the Deployment Tool for TLS . . . . . . . . . . . . . . . . . . . . 86 Installing the Deployment Tool . . . . . . . . . . . . . . . . . . . . . . . . . . . . 87 TLS Handshake Failure . . . . . . . . . . . . . . . . . . . . . . . . . . . . . . . . . . 87 Transferring Certificates to Phones . . . . . . . . . . . . . . . . . . . . . . . . . . . . 88 Selecting a File for Transfer . . . . . . . . . . . . . . . . . . . . . . . . . . . . . . . 89 Transferring a Server Key Material File . . . . . . . . . . . . . . . . . . . . . . 90 Transferring a Client Trusted Certificates File . . . . . . . . . . . . . . . . . 91
4

Introduction
Introduction
The purpose of the Deployment Tool is to allow the administrator to remotely configure optiPoint IP phones en-mass.
The primary occasion when this will be done is when a set of new devices is deployed for the first time. However, the tool may be used at any other time as a means of configuring a group of phones with a consistent set of data.
In general the Deployment Tool works on the principal that the same configuration is delivered to each device, with the exception of the terminal number (E.164 address). Every addressed device is assigned a separate terminal number.
Supported Phones
•optiPoint 400 standard Release 3
•optiPoint 400 standard HFA Release 2
•optiPoint 400 standard SIP V2.3/V2.4/V3.0
•optiPoint 400 economy HFA
•optiPoint 410 entry HFA
•optiPoint 410 economy HFA
•optiPoint 410 standard HFA
•optiPoint 410 advance HFA
•optiPoint 600 office UP0/E
•optiPoint 600 office HFA
•optiPoint 600 office SIP V2.3
•optiPoint 600 office SIP V2.4
5

Introduction
Requirements
Operating System
•Windows 98, ME
•Windows NT 4
•Windows 2000 or
•Windows XP.
Screen Resolution
Minimum screen resolution: 1024 x 768 pixels.
FTP Service
A correctly configured FTP server is always needed for exchanging data using Æ FTP. The server program must be running on a computer
(for example PC) in the same Æ LAN as the optiPoint phones you want to configure. To configure an FTP server, follow the instructions on
Æ page 81.
6

Installing and Running the Program
Installing and Running the Program
You should always use the latest version of the Deployment Tool. You can download the latest update file (for example fdt_optipoint_1047194.zip) from the following Internet address:
http://www.siemens.com/hipath → Downloads/Software.
Installing the Program
1.Unpack the file fdt_optipoint_1047194.zip in a random directory.
2.Open the install.htm file in this directory
A security warning appears. Close this warning with "Grant access for this session", for example“.
3.Click Start Installer for Windows....
4.Click Next.
5.Confirm the licensing agreement with Next.
6.Confirm the predefined installation directory for the Deployment Tool or select and confirm another directory.
7.Select a group and click Install.
8.Click Done to complete the installation routine.
Starting the Program
Start the program with Start → Program Files → Deployment Tool → Deployment Tool.
7
Listing Connected IP Phones
Listing Connected IP Phones
You must identify the phones you want to configure in the Deployment Tool before you can proceed with configuration. A scan function searches the network and creates a list of devices found. You can scan for an IP phone on the basis of its IP address or you can scan an IP address range for optiPoint phones.
When you activate the Deployment Tool, a blank Device List appears if you have not already saved a deployment file.
If the Deployment Tool opens with the last deployment file saved, you can create a new deployment file by selecting New from the Edit menu on the menu bar or by entering CTRL+N. You can also load a specific deployment fileÆ page 16.
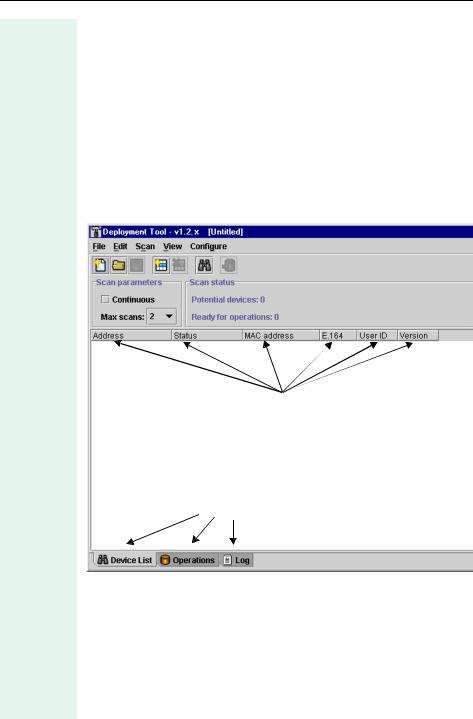
Menu bar
Toolbar
Column headers
Device List window
Selection boxes
8

Listing Connected IP Phones
Icons and Buttons
On-screen tips explain the meaning of interface icons or buttons when you point directly to an object. The tip appears briefly after two seconds.
Icons in the Device_List window
For the functions New, Open and Save in the File menu.
For the functions Add and Delete in the Edit menu.
For the functions Start and Stop in the Scan menu.
For the function Configure selected devices in the
Configure menu.
Icons in the Operations window
For the function Save in the File menu.
For the function Configure in the Operations menu.
For the functions Start and Stop in the Operations menu.
Buttons
Switch to the Device_List window.
Switch to the Operations window to configure individual devices or groups.
Switch to the Log window with the log file.
9
Listing Connected IP Phones
Creating a Device List
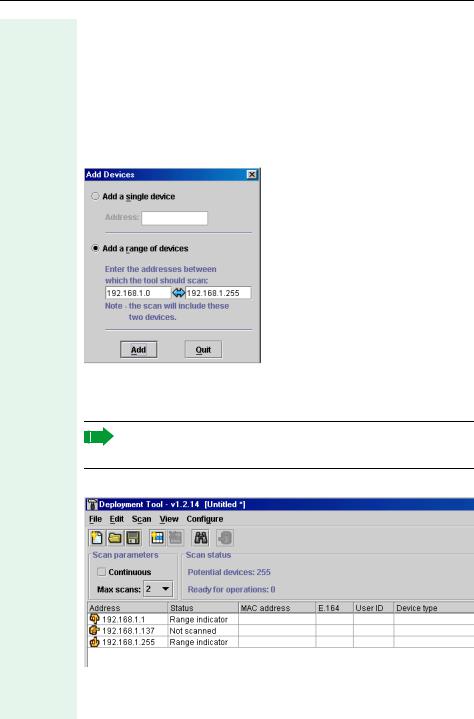
Before searching for optiPoint phones, you must specify the IP addresses in the Add Devices mask.
Call with
•Add from the Edit menu on the menu bar or
•CTRL+A or
•the Add devices icon on the toolbar (Æ page 9)
The following dialog appears:
Click the required dialog option, either Add a single device or Add a range of devices. Enter an IP address or an IP address range which you want to scan for devices. Confirm you input with Add.
Overlapping ranges are not permitted. However, you can enter an IP address as an address range, for example
192.168.1.105 to 192.168.1.105.
A table is displayed in the Device_List window.
Close the Add Devices dialog with Quit if you do not want to add any more IP addresses.
10
Listing Connected IP Phones
Specifying the Number of Scans
You can specify the number of scans for a LAN-based scan or mark the scan as continuous. Select the required option under Scan parameters.
You can select the maximum number of scans in the drop-down list or select "Continuous" for non-stop scanning.
There are two reasons for entering multiple scans:
1.An optiPoint is not fully installed or is in "Local mode" and is therefore unable to answer while the scan is in progress.
2.The scan process uses the UDP protocol that does not guarantee to forward the solicitation message or deliver a reply. Under these circumstances, multiple scans are more effective in certain network environments.
Hiding List Columns
You can hide and display columns before or after the scan. Click the View drop-down menu on the menu bar and select or deselect the required option.
The MAC address option is not selected in this example so the column is hidden.
11
Listing Connected IP Phones
Moving List Columns
To move a column in the list, click the column header and, holding the mouse button down, drag the column to the new position. For example, you could move the User ID column right and reposition it beside the Version column.
Editing a Device List
Starting a Scan
Call with
•Start from the Scan menu on the menu bar or
•the Scan Device list icon on the toolbar (Æ page 9)
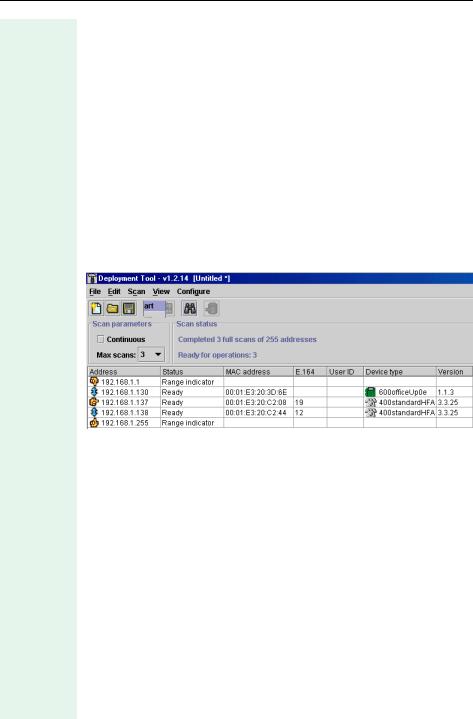
The device list is created while the scan is in progress. The number of columns depends on the options marked in the View list (Æ page 11).
The actual scan status is displayed in the table (see also Æ page 33).
Column Contents
The "scanned" entries are sorted by IP address. You can order the list differently by briefly pointing to the column header you want to use as the sort criteria for the table. For example, if you click the header of the Device type column, the table will be sorted by device type.
12

Listing Connected IP Phones
Address
The meaning of the icons in the address column is as follows:
Indicates an individual address.
Indicates the lower threshold of an IP address range.
Indicates the upper threshold of an IP address range.
Indicates a device found.
Status
The status column can contain the following values:
Not scanned |
The tool made no attempt to set up a connection to |
|
this device. |
|
|
Scanning... |
Temporary status during which the program tries to |
|
set up a connection to the device. |
|
|
No route |
There is no IP route to this address. |
|
|
No response |
There was no answer from the device. |
|
|
Unsuitable device |
An unrecognized device answered. |
|
|
Ready |
A recognized device answered. |
|
|
MAC address
This column contains the hardware address of the device.
E.164
This column contains the terminal number for calling up the device (for example not for the UP0/E device type).
User ID
H323 ID (not read out for HiPath 4000).
Version
Specifies the current software version of the device.
13
Listing Connected IP Phones
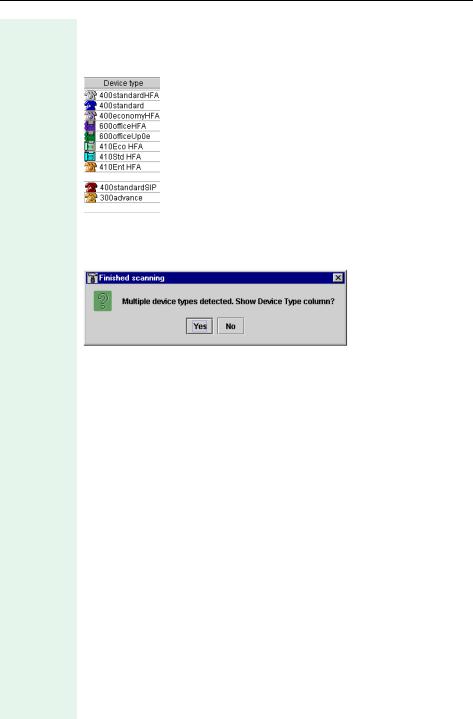
Device type
The Device type column lists the optiPoint devices each with an assigned icon. This column could look as follows in another network:
If you hid the Device type column (Æ page 11) and the list contains different device types, the following message will prompt you to display the column after the scan:
If you do not display the Device type column, you will be unable to configure any devices as the Configure Selected Devices function will not be available Æ page 17.
Stopping a Scan
You can interrupt a scan at any time. Call with Stop from the Scan menu on the menu bar.
Resetting the Scan Result
If the result is unsatisfactory, for example, or if you want to change or extend the IP address range, you can reset the values in the current device list. Call with Reset from the Scan menu on the menu bar.
14

Listing Connected IP Phones
Deleting an Entry from the Device List
If you are unable to configure a device in the list, you can delete this entry. Select the required entry in the list with a click.
Delete with
•Delete from the Edit menu on the menu bar or
•the Delete selected Device icon on the toolbar or (Æ page 9)
•the Delete key.
The entry is deleted without further confirmation.
Selecting a Device Group
You can select three groups or use the pointer to select individual entries at random in the device list for the operation you want to perform, such as deletion or the Configure Selected Devices function.
Select with
•Select all Ready from the Edit menu on the menu bar or
•CTRL+R or
•Select all No Response from the Edit on the menu bar or
•Select all from the Edit menu on the menu bar or
•click a device or
•click an initial device and, holding down CTRL key, click additional randomly listed devices or
•click an initial device and, holding down the SHIFT key, select multiple consecutive devices.
Saving a Deployment File
If you specified addresses or address range(s), you can save the result for future use.
Save with
•Save as... from the File menu on the menu bar if you want to save the deployment file under a specific name or Save if you want to save it under the current name (only when changing IP addresses), or
•the Save icon on the toolbar (Æ page 9) to save the file under the current name (only when changing the IP addresses) or
•CTRL+S (only when changing the IP addresses).
The tool only saves the contents of the Address and Status columns.
15

Listing Connected IP Phones
Loading the Deployment File
The Deployment Tool opens with the last deployment file saved and displays the device list with data in the Address and Status columns only. A blank window appears if there is no list available. You can load a specific list if there is more than one saved.
Call with
•Open from the File menu on the menu bar or
•CTRL+O or
•the Open icon on the toolbar (Æ page 9).
The open deployment file contains the following device list, for example:
Run a scan now to enter the devices Æ page 12.
16
Configuration
Configuration
Preparation
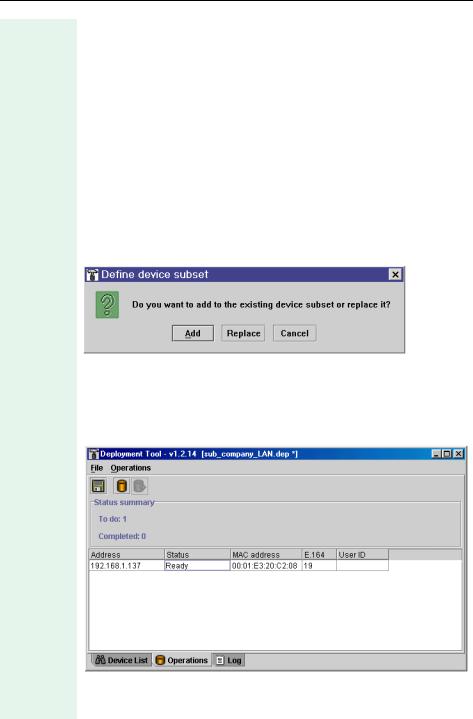
You can configure a single device or devices that belong to the same device type. Select one or more devices of the same type Æ page 15. These devices should be in Ready status (Æ page 13). Now, transfer the selected devices to the Operations window:
Call with
•Configure selected devices from the Configure menu on the menu bar or
•CTRL+C or
•the Configure selected devices icon on the toolbar (Æ page 9)
If you want to transfer additional devices to the window now, you are asked if you want to replace existing devices or add new ones.
Configuration
Press the Operations button now to switch to the Operations window (Æ page 9).
17
Configuration
Starting Configuration
Call with
•Configure from the Operations menu on the menu bar or
•CTRL+C or
•the Configure operations icon on the toolbar (Æ page 9).
The Operations Configuration dialog for this device type appears. It contains a number of function-specific tabs.
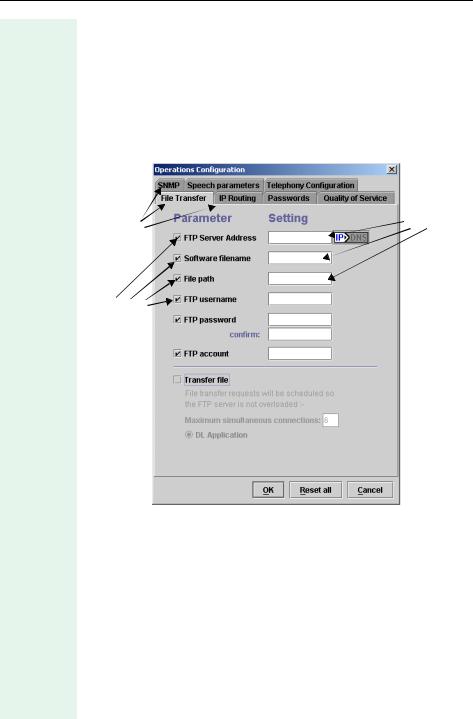
File Transfer tab:
|
Parame- |
Tabs |
ter value |
Options
The Deployment Tool cannot read out telephone data and consequently, does not display an existing configuration – only blank fields are shown.
18

Configuration
Dialogs for optiPoint telephones
Device-type dialogs are provided for the following optiPoint phones:
•optiPoint 400 standard Release 3 (Æ page 27)
•optiPoint 410 standard HFA (Æ page 27)
•optiPoint 400 standard SIP V2.3/V2.4/V3.0 (Æ page 28)
•optiPoint 400 economy HFA (Æ page 27)
•optiPoint 410 standard HFA (Æ page 30)
•optiPoint 410 advance HFA (Æ page 30)
•optiPoint 410 economy HFA Æ page 30
•optiPoint 410 entry HFA (Æ page 30)
•optiPoint 600 office UP0/E (Æ page 31)
•optiPoint 600 office HFA (Æ page 31)
•optiPoint 600 office SIP V2.x (Æ page 32)
19
Configuration
Editing a Configuration
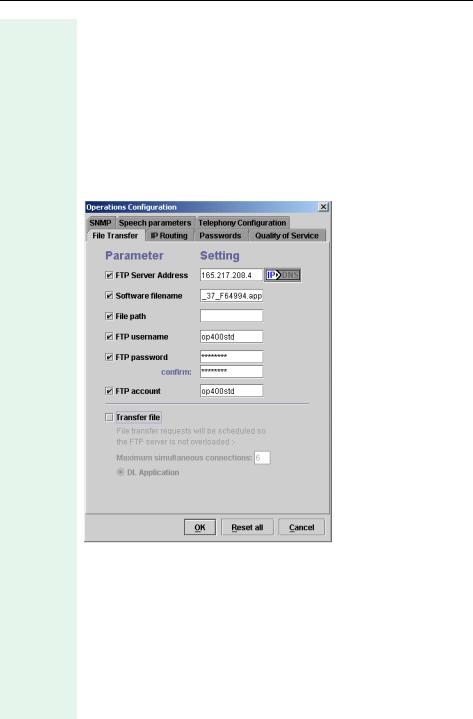
Call up the configuration of the selected optiPoint type. Before you can enter a value in a field in the Setting column, you must mark the matching option in the Parameter column. Values entered in the Setting column are not sent to the devices if you did not mark the matching option in the Parameter column.
Switch to a different tab by clicking the required tab header. For information on the tabs and parameters that you can process for a device type, see the section on optiPoint types Æ page 27 and the section on Tabs
Æ page 36.
Example:
Confirm the dialog with OK after entering the necessary parameter values for this device type in all tabs (Æ page 27).
Alternatively, you can use
•Reset all to delete all values in the Setting column and at the same time remove all markings in the Parameter column.
(Reset all applies to all tabs).
•Or quit the dialog with Cancel without applying the settings.
20
Configuration
Reset and delete actions do not effect the phone and are only performed locally on the computer.
Entries in the dialog only take effect when the data is sent to the devices.
Saving settings
Save your settings with Save or Save as... before you send the configuration to the devices.
Save with
•Save from the File menu on the menu bar to save the file under the current name or
•the Save icon on the tool bar (Æ page 9) or
•CTRL+S or
•Save as from the File menu on the menu bar to save the file under a new name or
•the F12 function key.
Depending on the terminal type, data from the "Operations Configuration" page (all directories) is included when you perform a save. For example, if you entered "anonymous" under "FTP username" for optiPoint 410 Standard, "test" may appear under optiPoint 410 eco. You can consequently create a deployment file .dep for different terminal types.
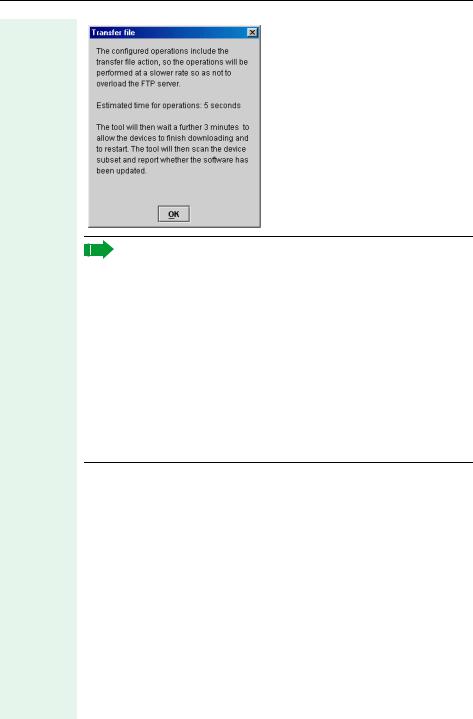
Transfer file
You can perform file transfer when the Deployment Tool is active, for example, to update software at multiple devices simultaneously.
To do this, enter the necessary parameters for downloading the update in the File Transfer tab and mark the option Transfer file. Specify if you want to transfer an application or an LDAP template if applicable. Enter the number of devices for the download operation and press OK.
Proceed as described under Starting transmission Æ page 23 and confirm the following dialog:
21
Configuration
The software update activates a timer. This timer is needed to determine the update status.
The timer has different runtimes depending on the telephone type.
•3 minutes for: optiPoint 400 standard optiPoint 400 standard HFA
optiPoint 400 advance HFA optiPoint 400 economy HFA optiPoint 400 standard SIP optiPoint 410 standard HFA optiPoint 410 economy HFA optiPoint 410 entry HFA
•5 minutes for:
optiPoint 600 office UP0/E optiPoint 600 office HFA
•10 minutes for: optiPoint 300 advance
Transferring a Configuration
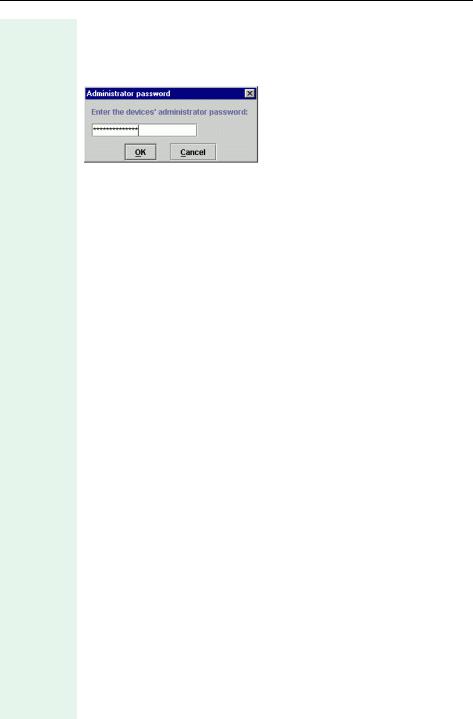
Administrator password
You must enter the administrator password before you can transfer the configuration to the optiPoint devices for the first time after starting up the program.
22
Configuration
Call with
•Enter admin password from the Operations menu on the menu bar or
•CTRL+P
The following dialog appears:
Enter the password (default is 123456) and confirm your entry with OK.
Starting transfer
Start with
•Start from the Operations menu on the menu bar or
•the Perform operations icon on the toolbar (Æ page 9).
If you have not already entered the administrator password, you are now prompted to do so (Æ page 22).
The data is sent to the devices in consecutive packets. Following transmission, completed appears in the Status column for every device. Upgrading appears in the status bar if you mark the Transfer file option under File Transfer, for example, and perform a software update.
Stopping transfer
You can stop the transfer to devices in the network at any time.
Stop with
•Stop from the Operations menu on the menu bar or
•the Stop (Start) icon on the toolbar (Æ page 9).
Log file
An event log records actions performed with the Deployment Tool and is saved in the "Deployment Tool\Log files" directory.
The current contents are displayed in the Log window. Use the key provided to switch to the Log window.
Verification
You can spot-check the transfer result at the individual devices using their Web servers. To do this, open your Internet browser and enter the IP address. You can check random entries over the Administrator and Administrator Settings links.
23

Configuration
Saving and Loading Device Groups
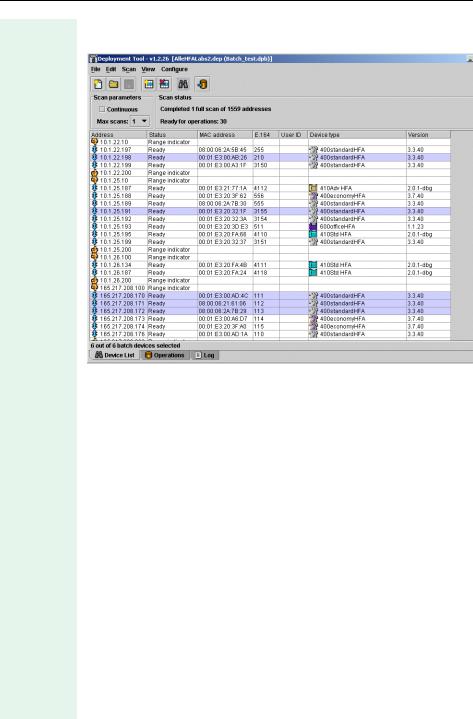
Once you have selected a device group, you can save it in a Batch File. At a later stage, you can select and further process this particular device group via the Batch File in the device list.
The following shows some of the device groups available in the Operations window.
Saving Device Groups
Call with
•Save Batch... in the File menu on the menu bar or
•Ctrl+B
The following dialog appears:
24

Configuration
Select a directory and assign a name to the Batch File. Then click Save. You can create several Batch Files for different groups.
Loading Device Groups
Create a device list or (Æ page 10) load a deployment file (Æ page 16) and execute a scan Æ page 12). A device list similar to that displayed here appears:
Call with
•Open Batch... in the File menu on the menu bar or
•Ctrl+B
The following dialog appears:
Select a stored Batch File with the extension ".dpb" and click Open.
25
Configuration
The relevant device group is automatically selected for further processing in the device list.
26

optiPoint types
optiPoint types
optiPoint 400 standard H450
(Device type: 400standardH450)
Settings are made in the following tabs:
•Passwords Æ page 45
•File Transfer Æ page 38
•IP Routing Æ page 41
•Country & Language Æ page 37
•Dialling Codes Æ page 37
•Messaging Services Æ page 44
•Quality of Service Æ page 47
•Selected_Dialing Æ page 48
•SNMP Æ page 48
•Speech parameters Æ page 49
•Telephony Configuration Æ page 50
•Time Æ page 52
•Function Keys Æ page 40
optiPoint 400 economy HFA
(Device type: 400economyHFA)
Settings are made in the following tabs:
•Speech parameters Æ page 49
•Telephony Configuration Æ page 50
•Quality of Service Æ page 47
•SNMP Æ page 48
•File Transfer Æ page 38
•IP Routing Æ page 42
•Passwords Æ page 45
optiPoint 400 standard HFA
(Device type: 400standardHFA)
Settings are made in the following tabs:
•Speech parameters Æ page 49
•Telephony Configuration Æ page 50
•Quality of Service Æ page 47
•SNMP Æ page 48
•File Transfer Æ page 38
•IP Routing Æ page 42
•Passwords Æ page 45
27

optiPoint types
optiPoint 400 standard SIP
(Device type: 400 standard SIP V2.3)
Settings are made in the following tabs:
•Audio/Visual Indications Æ page 36
•Function Keys Æ page 40
•Selected_Dialing Æ page 48
•Country & Language Æ page 37
•SNMP Æ page 48
•Speech parameters Æ page 49
•Telephony Configuration Æ page 51
•Time Æ page 52
•File Transfer Æ page 38
•IP Routing Æ page 42
•Messaging Services Æ page 44
•Passwords Æ page 45
•Quality of Service Æ page 47
(Device type: 400 standard SIP V2.4)
Settings are made in the following tabs:
•Alert Indications Æ page 36
•Keyset Operations Æ page 44
•Dial Plan Æ page 37
•Country & Language Æ page 37
•Function Keys Æ page 40
•Speech parameters Æ page 49
•Telephony Configuration Æ page 51
•SIP Feature Configuration Æ page 48
•Time Æ page 52
•File Transfer Æ page 38
•IP Routing Æ page 42
•Messaging Services Æ page 44
•Passwords Æ page 45
•Quality of Service Æ page 47
•Security Æ page 47
•SNMP Æ page 48
28
Loading...