


s
Gigaset USB Adapter 300
Gigaset
Contents
Contents
Safety precautions . . . . . . . . . . . . . . . . . . . . . . . . . . . 5 Notes on secure operation . . . . . . . . . . . . . . . . . . . . 5 Your contribution to the environment (ECO) . . . . . 5
The Gigaset USB Adapter 300 . . . . . . . . . . . . . . . . . . 7
Wireless LAN basics . . . . . . . . . . . . . . . . . . . . . . . . . . . . . . . . . . . . . . . . . . . . . . . . . . . . 7 Local Area Network (LAN) . . . . . . . . . . . . . . . . . . . . . . . . . . . . . . . . . . . . . . . . . . . . 7 Ad-hoc network . . . . . . . . . . . . . . . . . . . . . . . . . . . . . . . . . . . . . . . . . . . . . . . . . . . . 8 Infrastructure network . . . . . . . . . . . . . . . . . . . . . . . . . . . . . . . . . . . . . . . . . . . . . . . 8 Security in the wireless network: Encryption . . . . . . . . . . . . . . . . . . . . . . . . . . . . . . . . 9 WEP encryption . . . . . . . . . . . . . . . . . . . . . . . . . . . . . . . . . . . . . . . . . . . . . . . . . . . . 9 WPA encryption . . . . . . . . . . . . . . . . . . . . . . . . . . . . . . . . . . . . . . . . . . . . . . . . . . . . 9 WPS . . . . . . . . . . . . . . . . . . . . . . . . . . . . . . . . . . . . . . . . . . . . . . . . . . . . . . . . . . . . 10 Reach of wireless connections over WLAN . . . . . . . . . . . . . . . . . . . . . . . . . . . . . . . . . 10
Installing the Gigaset USB Adapter 300 . . . . . . . . |
11 |
System requirements . . . . . . . . . . . . . . . . . . . . . . . . . . . . . . . . . . . . . . . . . . . . . . . . . . 11 Contents . . . . . . . . . . . . . . . . . . . . . . . . . . . . . . . . . . . . . . . . . . . . . . . . . . . . . . . . . . . . 11 Installation process . . . . . . . . . . . . . . . . . . . . . . . . . . . . . . . . . . . . . . . . . . . . . . . . . . . 11 Running installation . . . . . . . . . . . . . . . . . . . . . . . . . . . . . . . . . . . . . . . . . . . . . . . . 12 Connecting the Gigaset USB Adapter 300 . . . . . . . . . . . . . . . . . . . . . . . . . . . . . . . 13 Installing the driver software . . . . . . . . . . . . . . . . . . . . . . . . . . . . . . . . . . . . . . . . . 15 Checking installation and establishing a connection . . . . . . . . . . . . . . . . . . . . . . . . . 16 Reading the connection quality on the icon . . . . . . . . . . . . . . . . . . . . . . . . . . . . . 18 Status indicators . . . . . . . . . . . . . . . . . . . . . . . . . . . . . . . . . . . . . . . . . . . . . . . . . . . . . 18
Configuring the Gigaset USB Adapter 300 . . . . . . 19
The Gigaset WLAN Adapter Monitor . . . . . . . . . . . . . . . . . . . . . . . . . . . . . . . . . . . . . . 19 Opening the monitor . . . . . . . . . . . . . . . . . . . . . . . . . . . . . . . . . . . . . . . . . . . . . . . 19 Deactivating Autostart . . . . . . . . . . . . . . . . . . . . . . . . . . . . . . . . . . . . . . . . . . . . . . 20 Operating the Gigaset WLAN Adapter Monitor . . . . . . . . . . . . . . . . . . . . . . . . . . . 20 Closing the Monitor . . . . . . . . . . . . . . . . . . . . . . . . . . . . . . . . . . . . . . . . . . . . . . . . 21
Configuration . . . . . . . . . . . . . . . . . . . . . . . . . . . . . . . . . . . . . . . . . . . . . . . . . . . . . . . . 21 Configuration with WPS . . . . . . . . . . . . . . . . . . . . . . . . . . . . . . . . . . . . . . . . . . . . . 21 Configuration – Manual . . . . . . . . . . . . . . . . . . . . . . . . . . . . . . . . . . . . . . . . . . . . . 27 Configuration – Security . . . . . . . . . . . . . . . . . . . . . . . . . . . . . . . . . . . . . . . . . . . . 31 Configuration – Profile . . . . . . . . . . . . . . . . . . . . . . . . . . . . . . . . . . . . . . . . . . . . . . 35
Status . . . . . . . . . . . . . . . . . . . . . . . . . . . . . . . . . . . . . . . . . . . . . . . . . . . . . . . . . . . . . . 37 IP settings . . . . . . . . . . . . . . . . . . . . . . . . . . . . . . . . . . . . . . . . . . . . . . . . . . . . . . . . . . . 39 Site Monitor . . . . . . . . . . . . . . . . . . . . . . . . . . . . . . . . . . . . . . . . . . . . . . . . . . . . . . . . . 41 About . . . . . . . . . . . . . . . . . . . . . . . . . . . . . . . . . . . . . . . . . . . . . . . . . . . . . . . . . . . . . . 43
3
Contents
Uninstalling the Gigaset USB Adapter 300 . . . . . . 44
Uninstalling the software . . . . . . . . . . . . . . . . . . . . . . . . . . . . . . . . . . . . . . . . . . . . . . 44 Completing uninstall . . . . . . . . . . . . . . . . . . . . . . . . . . . . . . . . . . . . . . . . . . . . . . . . . . 44
Updating the device driver . . . . . . . . . . . . . . . . . . . 45
Appendix . . . . . . . . . . . . . . . . . . . . . . . . . . . . . . . . . . 46
Troubleshooting . . . . . . . . . . . . . . . . . . . . . . . . . . . . . . . . . . . . . . . . . . . . . . . . . . . . . . 46 Specifications . . . . . . . . . . . . . . . . . . . . . . . . . . . . . . . . . . . . . . . . . . . . . . . . . . . . . . . . 50 Software . . . . . . . . . . . . . . . . . . . . . . . . . . . . . . . . . . . . . . . . . . . . . . . . . . . . . . . . . 50 Hardware . . . . . . . . . . . . . . . . . . . . . . . . . . . . . . . . . . . . . . . . . . . . . . . . . . . . . . . . 51 Approval . . . . . . . . . . . . . . . . . . . . . . . . . . . . . . . . . . . . . . . . . . . . . . . . . . . . . . . . . . . . 52 Service (Customer Care) . . . . . . . . . . . . . . . . . . . . . . . . . . . . . . . . . . . . . . . . . . . . . . . 52
Glossary . . . . . . . . . . . . . . . . . . . . . . . . . . . . . . . . . . 53 Index . . . . . . . . . . . . . . . . . . . . . . . . . . . . . . . . . . . . . 60
4

Safety precautions
Safety precautions
uThe device is only allowed for operation in enclosed rooms (temperature range: 0 to 40°C). Do not use the device in a damp or wet environment, with dust or vapours.
u The device may affect medical equipment.
uMake sure you include the operating instructions and the CD-ROM when you pass on your device to somebody else.
Notes on secure operation
The Gigaset USB Adapter 300 supports WPS (Wi-Fi Protected Setup). This means that if your access point also supports WPS, you can set up all security settings automatically and connect with your access point very simply (see page 21).
If you are not using WPS, you should make some security settings on the wireless network as soon as you have installed the Gigaset USB Adapter 300 on your PC:
uChange the SSID for all wireless devices in your network (see "SSID (Service Set Identifier)" on page 28).
uEncrypt the communication over your wireless network (see "Configuration – Security" on page 31).
Your contribution to the environment (ECO)
We at Gigaset Communications GmbH make our products as environmentally compatible as possible. Our goal is a sustainable process that makes it easier for us to comply with the strict stipulations of the ISO standard 14001 for international environmental management.
Further advantages for the ecology
uThanks to a switched-mode power supply, all our routers and repeaters use up to 60% less power and so offer higher energy efficiency.
uYou can reduce the WLAN's transmitting power for all routers and repeaters and some WLAN clients – depending on the device in question and your PC's operating system.
u You can turn off the WLAN completely.
5

Your contribution to the environment (ECO)
Trademarks
Gigaset Communications GmbH is a trademark licensee of Siemens AG.
Microsoft, Windows 2000, Windows XP and Windows Vista are registered trademarks of Microsoft Corporation.
Note:
Brand or trade names that appear in this guide are used to indicate individual steps in operation and do not mean they are freely available. Brand and trade names always remain the property of their respective owners.
6

The Gigaset USB Adapter 300
The Gigaset USB Adapter 300
The Gigaset USB Adapter 300 is a WLAN network adapter, which is connected to your PC via USB (Universal Serial Bus). Gigaset data products make it very easy for you to set up a local wireless network without having to lay any cables (WLAN = Wireless Local Area Network).
You can use your Gigaset USB Adapter 300 to connect your PC to a wireless router, e.g. a Gigaset SE366 WLAN, so that you can access the Internet (infrastructure mode).
You can also connect your PC to other PCs that are equipped with wireless network adapters (ad-hoc mode).
Since the PCs communicate with each other over radio waves, it does not matter where they are located, as long as they are within range of the wireless network. Mobile PCs such as notebooks can link up to the WLAN from various positions without any difficulty. This enables you to use all the files and printers on the network. The Gigaset USB Adapter 300 operates in compliance with the IEEE 802.11n transmission standard (draft, see note below) and is downwards compatible with the previous IEEE 802.11g and IEEE 802.11b standards. For network security, wireless transmission can be encrypted using the WPA standard or 64/128-bit WEP.
Note:
Transmission standard IEEE 802.11n is still pending approval, which is likely to
be granted in the second half of 2008. Your Gigaset USB Adapter 300 is ready to comply with the new transmission standard. You might have to update the software for your device (page 45).
This user guide instructs you on how to set up a WLAN and gives you important information on installation and configuration of your Gigaset USB Adapter 300.
Wireless LAN basics
This section describes some of the basic principles of wireless LANs to show how the Gigaset USB Adapter 300 functions when you set up a wireless network.
Local Area Network (LAN)
A LAN is a network that exists in a limited area. By a network we mean two or more PCs that are connected to each other and share files and peripheral devices, e.g. printers.
The Gigaset USB Adapter 300 allows you to communicate with other PCs without having to lay any network cables. You can therefore also take your PC to another location without losing the link to the network or the Internet.
7

The Gigaset USB Adapter 300
You can use the Gigaset USB Adapter 300 in two different ways. Firstly, you can set up a direct connection to one or more PCs with wireless network adapters. This is called an ad-hoc network. Secondly, you can establish a connection to an access point, which gives you access to an existing wired LAN (infrastructure network).
The SSID (Service Set Identifier) is the name of a wireless network. It must be identical for all components of this network.
Ad-hoc network
In an ad-hoc network, PCs communicate with each other via wireless connections. An ad-hoc network is set up by participants as and when required. All the PCs involved must have a wireless network adapter installed, e.g. a Gigaset USB Adapter 300 or a Gigaset PC card 300. Ad-hoc networks are used wherever communications networks have to be set up quickly and without any existing network infrastructure, and where participants are on the move.
Infrastructure network
In an infrastructure network, connections are set up between participants over one or more access points. An access point serves as the basis for the wireless network. It controls connections between the connected participants and can also establish links from the PCs in a wireless network to a wired LAN (Ethernet) or to the Internet.
Roaming
Several access points can be installed to extend the range of a wireless network. Participants in the wireless network can move freely between the various access points without losing contact with the network. As soon as there is a risk of losing contact, the PC automatically looks for another access point with a stronger signal. All access points and wireless network adapters must have the same SSID. All access points must be connected to the same Ethernet network.
8

The Gigaset USB Adapter 300
Security in the wireless network: Encryption
Any network, be it wired or wireless, is exposed to the risk of eavesdropping.
Connecting your local network to the public network exposes your data and applications to some considerable risk. In the same way as with an individual connection, you should always install a virus scanner to protect your PCs against malicious covert external attacks, e.g. via e-mail.
These virus scanners, however, do not provide any protection against unauthorised access from outside (hackers). To counter this risk, Gigaset data products offer various encryption procedures that largely rule out unauthorised access (hacking) to your wireless network.
WEP encryption
WEP encryption (Wired Equivalent Privacy) encodes data for sending using a key that you have defined. On the recipient's side, the same key is used to re-arrange the data so that it is available in the same format as it was prior to transmission. Recipients who do not know this key cannot read the content of this data stream or can only read it with a great deal of technical effort.
There are two security levels for calculating the encryption key: u 64-bit mode
u 128-bit mode
WPA encryption
WPA is a new standard-compliant solution for greater security in wireless networks. WPA is intended to replace the existing WEP standard (Wired Equivalent Privacy) and offers more reliable encryption and authentication methods.
With your Gigaset USB Adapter 300 you can use WPA encryption independently of the operating system you have in use. WPA encryption is particularly recommended where the highest security is required.
9

The Gigaset USB Adapter 300
WPS
Wi-Fi Protected Setup (WPS) makes it easier to establish a wireless network. A wireless network has a name (SSID) and requires encryption of data traffic against the risk of eavesdropping. The access point requires authentication with an SSID and key to allow a WLAN adapter to access the services.
Devices with WPS automatically create a SSID and a WPA encryption key (Pre-Shared Key) and synchronise with each other.
WPS provides two possibilities:
uPush Button Configuration (PBC)
This is the registration mode Without PIN (Apply) on your Gigaset USB Adapter 300. A WPS button is provided on the access point (e g. Gigaset SE 366) and a Registration button on Gigaset devices. After pressing this button, the device is ready for registration for two minutes. The first time you press the button, the device automatically creates an SSID and a Pre-Shared Key. If a client (WLAN adapter) activates its WPS function within these two minutes, the security data is interchanged and a connection is established. It is ensured that only one client can synchronise within the two minutes.
uPersonal Identification Number (PIN)
This is the registration mode Enter partner device PIN or Send own PIN respectively on your Gigaset USB Adapter 300. A PIN is generated on one device (access point or client) and has to be entered on the other device. The security data is then synchronised.
When you use an access point without WPS in your network, you can configure the security settings (SSID and key) for the Gigaset USB Adapter 300 manually. You cannot use WPS for networks with WEP encryption.
The Gigaset USB Adapter 300 supports WPS. For further information, see chapter "Configuration with WPS" on page 21.
Reach of wireless connections over WLAN
Outdoor reach is up to 300 m. In buildings, the reach is up to 50 m. Depending on the environmental conditions, features of the rooms and buildings, the reach may be considerably less. You can increase the reach of your wireless network by changing the alignment of the antenna, positioning your device at another place or installing a repeater, e.g. the Gigaset SE365 WLAN, at the point where your current reach expires.
10
Installing the Gigaset USB Adapter 300
Installing the Gigaset USB Adapter 300
System requirements
To operate the adapter, you need:
uA PC running at a minimum of 466 MHz and one of the following operating systems: Windows Vista, Windows XP or Windows 2000
u 64 MB RAM, more memory is recommended u Minimum free hard drive capacity of 30 MB u A free USB slot
u A CD-ROM drive or a DVD drive
Contents
The package contains the following components: u One Gigaset USB Adapter 300
u One USB cable and a stand for the adapter
uOne CD-ROM with installation and configuration software, the detailed user guide and Adobe Reader, which you will need to read the user guide
u One Quick Start Guide
Installation process
Note:
Only connect the Gigaset USB Adapter 300 to a free USB port on your PC when the Install Shield prompts you to do so.
First, the software included in delivery must be installed. This software contains both the driver software for the device and the tool for configuring and monitoring the
Gigaset WLAN Adapter Monitor.
Only this software has been tailored precisely to the Gigaset USB Adapter 300. Similar drivers are included with the Windows driver databases. However, such drivers do not usually offer the full range of features or function in a completely different way.
Do not connect the Gigaset USB Adapter 300 to your PC until you are prompted to do so. If you insert the Gigaset USB Adapter 300 on your PC before the software is installed, Windows recognises the device automatically and displays a dialog window prompting the appropriate drivers. Click Cancel to close the dialog box. Remove the Gigaset USB Adapter 300 from the PC and start again by installing the software.
Note:
You may require administrator rights on your PC for the installation process.
11

Installing the Gigaset USB Adapter 300
Running installation
ìClose all running programs.
ìInsert the CD-ROM that is included in delivery into the CD-ROM or DVD drive on your PC and wait until the start window is displayed. If the start window does not appear automatically on your PC, start the installation manually:
–Open Windows Explorer.
–Select the CD-ROM or DVD drive.
–Double-click the program start.exe.
The language selection screen appears. ì Select your language.
A window with a list of the CD-ROM contents appears.
Installation |
Installs the software for your Gigaset USB Adapter |
|
300. |
User guide |
This opens the detailed user guide on the CD-ROM. |
|
If you cannot open the detailed user guide on the |
|
CD-ROM, you must first install AdobeReader, |
|
which is included on the CD. |
Installing Adobe Reader |
Installs Adobe Reader. |
Searching the CD |
If you are looking for a particular file on the |
|
CD-ROM, you can display the CD-ROM contents in |
|
an Explorer window. |
Back |
The program returns to the language selection |
|
screen. |
Exit |
This closes the program. |
ì Click Installation. |
|
Note:
The windows in the different operating systems differ only very slightly. Installation is largely automatic, apart from a few mouse clicks and restart processes.
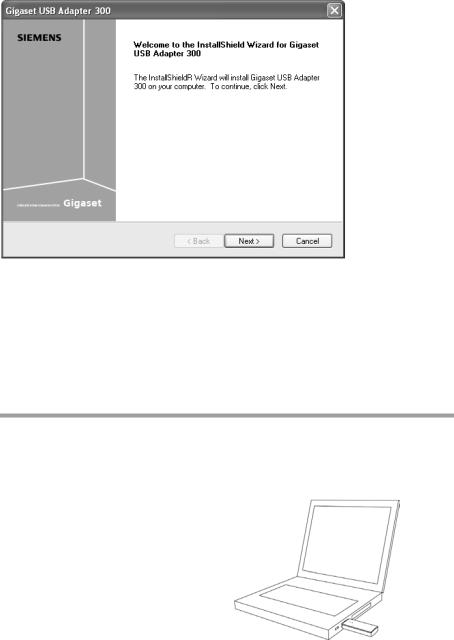
The InstallShield Wizard appears on the screen.
12
Installing the Gigaset USB Adapter 300
ì Click Next to continue installation.
In the next screen, choose the directory for the installation.
ìClick Browse, if you want to select another directory. Click Next to continue installation.
During installation, the InstallShield Wizard uses the setup progress window to show the action that is currently executing and the progress made in installation.
Connecting the Gigaset USB Adapter 300
ìOnly connect the Gigaset USB Adapter 300 to a free USB port on your PC when the Install Shield prompts you to do so.
For this purpose you have the following options:
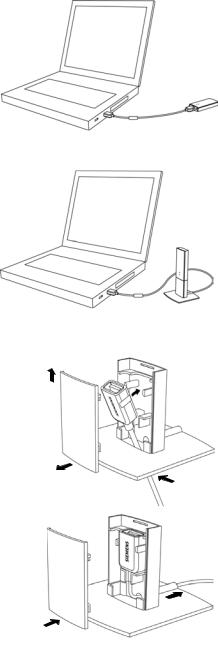
uYou can connect the Gigaset USB Adapter 300 as a stick directly to a free USB port on your PC.
13
Installing the Gigaset USB Adapter 300
uYou can connect the Gigaset USB Adapter 300 to a free USB port on your PC via the USB cable supplied.
uTo optimally adjust the Gigaset USB Adapter 300 for operation in a fixed location you can install it with the supplied stand.
Operating the Gigaset USB Adapter 300 with the stand
ìOpen the stand. To do this, pull the front of the stand about 2 mm upwards (1) and then
remove it forwards (2). |
|
|
ì Push the USB cable from below through the |
1 |
4 |
|
||
stand (3). |
|
|
ìPress the USB plug between the fixtures in the direction of the arrow. Make sure that the logo on the plug is pointing forward (4).
2
3
ì Close the stand. Make sure that the clamps on the front of the stand snap in (5).
ì Pass the cable through the channel in the bottom and insert it in a free USB port on your PC
(6).
6
 5
5
14
Installing the Gigaset USB Adapter 300
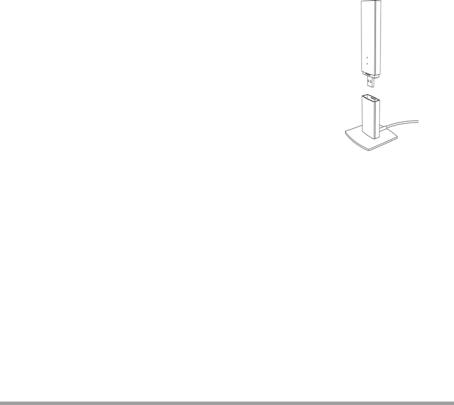
ìPut the Gigaset USB Adapter 300 in the stand with the LEDs facing forward (7).
 7
7
Proceed in the reverse order to disassemble the stand.
About the installation location
Select the location in a way that allows as few obstacles as possible to interrupt the radio waves. Protect the Gigaset USB Adapter 300 from damp.
The Gigaset USB Adapter 300 should not be placed directly next to other electrical devices. Electrical equipment can mutually affect each other. The radio waves may impair the function of other devices.
Install the Gigaset USB Adapter 300 on an even, non-slip ground. Protect especially sensitive surfaces.
For greater reach, we recommend setting the WLAN component up in a central, open position. For example, avoid installation in recesses, cubbyholes, under a desk or behind cupboards.
Installing the driver software
Once you have connected the Gigaset USB Adapter 300, the installation will continue automatically. The operating system's automatic hardware recognition function opens in order to install the drivers for the Gigaset USB Adapter 300.
Note for installation on Windows XP
If Windows XP SP1 is installed on your system, a query window will open.
ì Select the option Installing the software automatically and click Next.
If Windows XP SP2 is installed on your system, the Windows Update function offers to search for a suitable program for you.
ìSelect the option No, not this time and click Next.
ìThen select the option Installing the software automatically and click Next.
15

Installing the Gigaset USB Adapter 300
Note for installation on Windows Vista
Depending on the Windows Vista version on your PC, a newer version of the driver for Gigaset USB Adapter 300 may be on your computer.
ìClick YES to use this driver (recommended).
Click No to overwrite it with the driver from the CD-ROM.
ìSelect the option Finish in the next window to close the hardware wizard.
ìIf you are prompted to restart the PC, select this option and click Finish. The installation will be finished.
Checking installation and establishing a connection
If installation was successful, you can now use the Gigaset WLAN Adapter Monitor. Use the Gigaset WLAN Adapter Monitor to configure your Gigaset USB Adapter 300 and establish a connection to other network adapters or to an access point.
The Gigaset WLAN Adapter Monitor is represented by an icon in the status area of the taskbar. This icon shows you if there is a connection to a connection partner and the quality of the connection.
A connection is only possible if you have configured the security setting for your Gigaset USB Adapter 300 beforehand either via WPS (see page 16) or manually (see page 31).
16
Installing the Gigaset USB Adapter 300
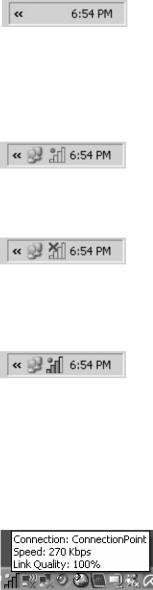
The following may be displayed in the status area of the taskbar:
u
The Gigaset WLAN Adapter Monitor icon is not displayed.
ìFirst try to open it manually, see the section entitled "Opening the monitor" on page 19.
If this fails, then something went wrong during installation.
ìUninstall the software, see the section entitled "Uninstalling the software" on page 44.
ìThen install the software again, see the section entitled "Running installation" on page 12.
The Gigaset WLAN Adapter Monitor icon is displayed in the taskbar with a grey ball above the icon:
The Gigaset WLAN Adapter Monitor is installed. The Gigaset USB Adapter 300 is not, or is not yet, correctly inserted.
ì Check the position of the adapter.
The icon is displayed in the taskbar with a red cross above the icon:
The Gigaset WLAN Adapter Monitor is installed and active. A connection to the local network has not yet been established.
ìGo to the section entitled "Configuring the Gigaset USB Adapter 300" on page 19.
The icon is displayed in the taskbar with a green ball above the icon:
The Gigaset WLAN Adapter Monitor is installed and active. A connection to the local network has been established. The number of green bars displayed in the icon shows the connection quality.
Please refer to the section entitled "Notes on secure operation" on page 5.
Show QuickInfo for the connection
If you point the mouse over the icon in the taskbar, you will see a small window that displays the connection properties.
The following properties are shown:
u SSID (Service Set Identifier) in the Connection line u The transmission rate (in Mbps) in the Speed line
u The transmission quality (in %) in the Link quality line
17

Installing the Gigaset USB Adapter 300
If no connection is currently active, a red cross appears above the icon and Disconnected appears in the QuickInfo.
Reading the connection quality on the icon
The icon changes gradually depending on the current connection quality. The better the connection quality, the higher the transmission speed.
With reasonable to poor connection:
ì If possible, move your PC closer to the connection partner for greater field strength.
No WLAN available (red cross over bar)
There is no LAN available to which you could establish a connection within the reach of your Gigaset USB Adapter 300.
ìCheck the configuration of the access point and adjust the settings for the Gigaset USB Adapter 300 accordingly.
OR
ì Change your location to reduce the distance to a connection partner.
Status indicators
The Gigaset USB Adapter 300 has two status indicators (LEDs). They are used to indicate the
u Operating status (Power), green
u Transmission status (Link/Act), green
LED |
State |
Meaning |
|
|
|
|
|
|
On |
The Gigaset USB Adapter 300 was installed successfully |
|
Power |
on your PC and is ready for operation. |
||
|
|||
|
|
|
|
|
Off |
The device is not ready. |
|
|
|
|
|
|
On |
There is no connection to the wireless network. |
|
WLAN |
|
|
|
Blinking |
Data is being transmitted. |
||
|
|
|
|
|
Off |
There is currently no data traffic. |
|
|
|
|
18
Configuring the Gigaset USB Adapter 300
Configuring the Gigaset USB Adapter 300
The Gigaset WLAN Adapter Monitor
You use the Gigaset WLAN Adapter Monitor to configure and monitor your Gigaset USB Adapter 300.
Opening the monitor
In the standard setting, the Gigaset WLAN Adapter Monitor is started automatically in the background when you launch your PC. The Gigaset WLAN Adapter Monitor icon is displayed in the status area of the taskbar.
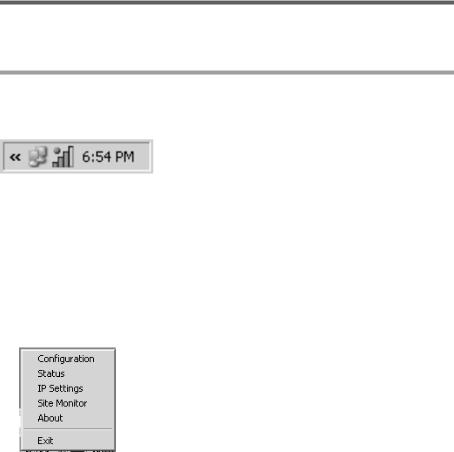
ìDouble-click the Gigaset WLAN Adapter Monitor icon in the status area of the taskbar to open the monitor's user interface.
OR
ìRight-click the Gigaset WLAN Adapter Monitor icon in the status area of the taskbar.
The available tabs and the Exit option are displayed in the pop-up menu.
ìIn the pop-up menu, click the appropriate tab to open the monitor user interface and display this tab directly. Use the Exit option to close the Gigaset WLAN Adapter Monitor.
Launching the monitor manually
If you do not see the Gigaset WLAN Adapter Monitor icon in the status area of the taskbar, you will have to run the program first:
ìIn the start menu, click Start – Programs – Gigaset USB Adapter 300 – Gigaset WLAN Adapter Monitor.
The program is launched. The Gigaset WLAN Adapter Monitor icon is displayed in the status area of the taskbar.
19
Configuring the Gigaset USB Adapter 300
Deactivating Autostart
The Gigaset WLAN Adapter Monitor is opened automatically every time you launch your PC. If you do not need the monitor all the time, you can deactivate Autostart.
ìSelect Start - Programs - Autostart.
ìRight-click the Gigaset WLAN Adapter Monitor entry.
ìSelect Delete to remove the link to Gigaset WLAN Adapter Monitor from Autostart.
Since this means that the monitor will not be launched each time you start your PC, you will have to start it manually when required (see page 19).
Operating the Gigaset WLAN Adapter Monitor
In the Gigaset WLAN Adapter Monitor user interface, you will find various settings and status displays for your network adapter on various tabs, which are described in detail in the following section.
Buttons
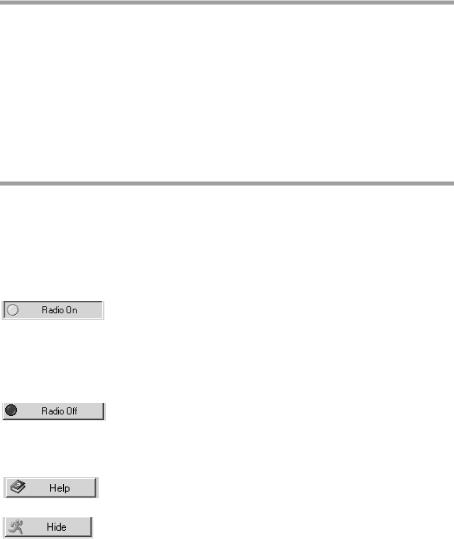
Click the buttons beneath each tab to use one of the following options:
Wireless operation is activated for the network adapter (green icon). The PC is available on the network.
ìClick Radio On to deactivate wireless mode on the network adapter.
Radio Off is displayed. The PC is no longer available on the network.
Wireless mode is deactivated for the network adapter (red icon). The PC is not available on the network.
ì Click Radio Off to activate the network adapter's radio mode. Radio On is displayed. The PC is available on the network.
Use the Help button to open the Gigaset WLAN Adapter Monitor help file.
Use the Hide button to close the user interface of the Gigaset WLAN Adapter Monitor.
The icon in the status area on the taskbar indicates that the monitor is still active in the background.
ìDouble-click this icon if you want to open the Monitor user interface again.
20
 Loading...