


 Loading...
s
HiPath 3000
Hicom 150 E/150 H
Gigaset 4000 Comfort
Operating Instructions
Warning
Please read the safety notes before putting the device into service.

Safety notes
Telephone
 Danger:
•Do not use the telephone in environments where there is danger of explosion.
•Do not use the telephone in damp environments. The units are not splashproof.
•Your telephone emits transmit power, see page 52. Local safety regulations must be observed.
 Note:
Note:
•For people with hearing aids: radio signals may interfere with hearing aids.
•If you lend your telephone to someone else, please make sure that you include the operating instructions with it.
Batteries
 Caution:
•Only use permitted batteries, see page 10.
•Do not use conventional batteries. These could damage the unit (e.g. risk of explosion).
•Avoid contact with water and fire.
•Only use the plug-in power supply unit provided.
 Note:
Note:
Please dispose of batteries, the telephone and the charging shell in accordance with the environmental specifications.
I

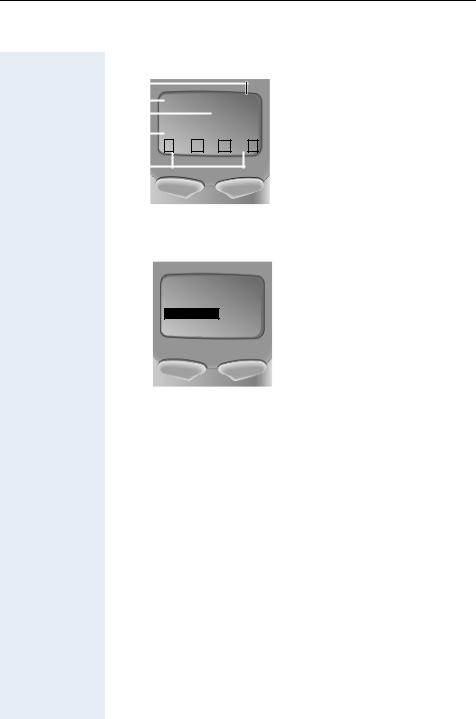
Unit parts
1
2
3
4
5 
6
7
8
9
10
11
12
13
14
15
16
1 |
Status LED |
9 |
Missed calls list |
2 |
Receiver inset |
10 |
Lock key |
3 |
Display |
11 |
Star key |
4 |
Display keys |
12 |
NET key |
5 |
Control key |
13 |
Microphone |
6 |
Talk key |
14 |
Attachment clip |
7 |
On-hook and on/off key |
15 |
Ringer loudspeaker |
8 |
Speakerphone key |
16 |
Battery compartment lid |
II

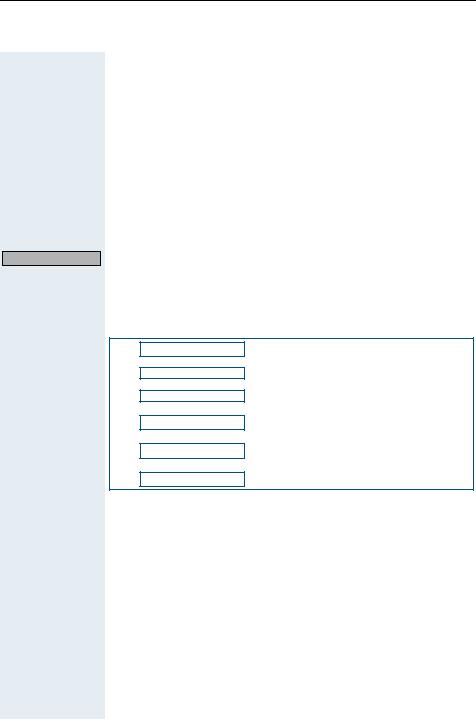
Quick reference guide
Activating or deactivating the mobile telephone
Hold down the on/off key.
Activating or deactivating the keypad lock
A Hold down the hash key.
Starting a call
"/-+ * Press the talk or speakerphone key and dial the phone number.
or
*+ "/- Enter the phone number and press the talk or speakerphone key.
Opening the telephone directory
Press the control key.
Activating or deactivating speakerphone mode
- Press the speakerphone key.
Ending a call
or ( Press the on-hook key or place the mobile telephone in the charging shell.
Answering a call
"/-or ( Press the talk or speakerphone key or remove the mobile telephone from the charging shell (only if "Auto Answer" is active, see page 30).
III

Contents |
|
Safety notes |
I |
Telephone ...................................................................... |
I |
Batteries......................................................................... |
I |
Unit parts .................................................................. |
II |
Quick reference guide .......................................... |
III |
Keys, function selection and display |
1 |
Function keys................................................................ |
1 |
Control key.................................................................... |
2 |
Display keys .................................................................. |
2 |
Operating status display ............................................... |
3 |
Function selection......................................................... |
4 |
Function selection using menus............................... |
4 |
Function selection in call status................................ |
5 |
Useful information about mobile telephones |
6 |
Features ........................................................................ |
6 |
Environmental conditions.............................................. |
7 |
Radio range ................................................................... |
7 |
Displaying the radio range ........................................ |
7 |
Leaving the radio network........................................ |
7 |
Putting the mobile telephone into service |
8 |
Removing the protective cover ..................................... |
8 |
Inserting the batteries ................................................... |
8 |
Charging and using the batteries .................................. |
9 |
Operating and charging times ................................ |
10 |
Permitted batteries................................................. |
10 |
Fitting the attachment clip .......................................... |
10 |
Activating/deactivating the mobile telephone ............. |
11 |
Setting the language ................................................... |
11 |
IV

Registering the mobile telephone at the |
|
telephone system........................................................ |
12 |
Overview................................................................. |
12 |
Preparing for registration ........................................ |
12 |
Registering at the system for the first time............ |
13 |
Activating/deactivating the keypad lock....................... |
13 |
Conducting calls |
14 |
Internal/external dialling............................................... |
14 |
Dialling via the telephone directory or NET |
|
carrier list ..................................................................... |
16 |
Answering a call .......................................................... |
16 |
Speakerphone mode ................................................... |
17 |
Number redial |
18 |
Overview ..................................................................... |
18 |
Manual number redial.................................................. |
18 |
Automatic redial........................................................... |
18 |
Functions..................................................................... |
19 |
Telephone directory and NET carrier list |
20 |
Overview ..................................................................... |
20 |
Telephone directory functions ..................................... |
21 |
Dialling with the telephone directory or NET |
|
carrier list ..................................................................... |
22 |
Sending and receiving text messages |
23 |
Overview ..................................................................... |
23 |
Selecting texts............................................................. |
24 |
Text messages........................................................ |
24 |
Automatic advisory messages ................................ |
24 |
Creating text messages............................................... |
25 |
Sending text messages ............................................... |
25 |
Opening incoming text messages............................... |
25 |
V

Settings |
26 |
Overview..................................................................... |
26 |
Default state ............................................................... |
27 |
Setting the sound setting functions ............................ |
28 |
Menus .................................................................... |
28 |
Activating/deactivating the warning tone ............... |
30 |
Setting the auto answer function................................ |
30 |
Resetting the defaults................................................. |
30 |
Selecting a base.......................................................... |
31 |
Enhanced functions |
32 |
Room monitor and walkie-talkie mode........................ |
32 |
Overview ................................................................ |
32 |
Using as a room monitor ........................................ |
32 |
Configuring and deactivating ............................. |
32 |
Deactivating with another telephone................. |
33 |
Operating in walkie-talkie mode ............................. |
33 |
Prerequisites...................................................... |
33 |
Activating and deactivating ................................ |
33 |
Making and Answering Calls ............................. |
34 |
Performing the time functions .................................... |
35 |
Overview ................................................................ |
35 |
Functions................................................................ |
36 |
Switching functions |
37 |
On or message status................................................. |
37 |
Overview ................................................................ |
37 |
Functions................................................................ |
38 |
Using the system telephone directory............... |
38 |
Using the missed calls list ................................. |
38 |
Using call forwarding ......................................... |
38 |
VI

Dial or call status ......................................................... |
39 |
Overview................................................................. |
39 |
Functions ................................................................ |
40 |
Saving a callback ................................................ |
40 |
Setting up an enquiry during a call ..................... |
40 |
Transferring a call .............................................. |
40 |
Toggle – switching between two users ............. |
40 |
Adding callers to a conference ........................... |
40 |
Switching function codes ............................................ |
41 |
Entering text |
48 |
Character table ............................................................ |
48 |
Key utilisation .............................................................. |
49 |
Appendix |
50 |
Troubleshooting........................................................... |
50 |
Cleaning the mobile telephone ................................... |
51 |
Technical data.............................................................. |
52 |
Hicom cordless EM................................................. |
52 |
Mobile telephone.................................................... |
52 |
Accessories ................................................................. |
52 |
List of abbreviations .................................................... |
53 |
Index |
54 |
VII

Keys, function selection and display
Function keys
The following function keys are available:
Key |
Name |
Use |
|
|
|
|
|
|
On-hook and |
• |
End a call |
|
on/off key |
• |
Cancel functions |
|
|
• Jump back to the previous menu |
|
|
|
• Switch the mobile telephone to |
|
|
|
|
idle status; activate or deactivate |
|
|
|
(see page 11) |
|
|
|
|
" |
Talk key |
• |
Answer a call |
|
• Dial a phone number |
||
|
|
• Switch from speakerphone mode |
|
|
|
|
to handset mode |
|
|
• Access telephone system func- |
|
|
|
|
tions |
|
|
|
|
- |
Speakerphone |
• |
Answer a call |
|
key |
• Dial a phone number |
|
|
|
• Switch from handset to speaker- |
|
|
|
|
phone mode |
|
|
• Access telephone system func- |
|
|
|
|
tions |
|
|
|
|
|
Missed calls |
Access message lists |
|
|
list |
|
|
5 |
Star key |
Activate/deactivate the ringer |
|
|
|
|
|
4 |
Hash key |
Activate/deactivate keypad lock |
|
|
|
|
|
|
NET key |
• Open the NET carrier list |
|
|
|
|
|
1

Control key
The control key is assigned different functions depending on the operating situation:
Control |
In idle status |
In lists and |
In an input |
Key |
|
menus |
field |
|
|
|
|
|
|
Next menu level |
Move the cursor |
|
up |
up one line |
|
|
|
|
|
|
Open the tele- |
Next menu level |
Move the cursor |
phone directory |
down |
down one line |
|
|
|
|
|
|
Open the menu |
Select an entry |
Move the cursor |
|
(OK) |
right |
|
|
|
|
|
|
|
Next menu level |
Move the cursor |
|
up, cancel |
left |
|
|
|
|
|
|
|
|
|
Note:
Some functions associated with the right display key can also be performed with the control key.
Display keys
The left display key can be programmed with two functions, whereas the right display key can be programmed with only one function. Display key programming depends on the operating status. A function can be represented by text or an icon. The following icons exist:
Icon |
Name |
Use |
|
|
|
@ |
Menu |
Open the general menu |
|
|
|
|
Delete |
Delete inputs from right to left |
|
|
|
0 |
Redial |
Open a list of the last five phone |
|
|
numbers called |
|
|
|
|
Missed calls |
Open the missed calls list |
|
list |
|
|
|
|
P |
Go back |
Next menu level up, |
|
|
cancel |
|
|
|
|
Left/right |
Select a function (dial or call status |
|
|
only, see page 3) |
|
|
|
|
OK |
Confirm selected function |
|
|
|
2
Icon |
Name |
Use |
|
|
|
|
Service menu |
Open the service menu (only during |
|
|
a call in Hicom cordless EM V2.2 or |
|
|
later, see page 41) |
|
|
|
Operating status display
The following operating statuses are available:
Operating status |
Display |
|
|
Off status |
Blank display – calls cannot be received. |
|
|
On or message sta- |
The user interface of the mobile telephone is |
tus |
displayed. The base name is visible. This op- |
|
erating status is a prerequisite for all func- |
|
tions. |
|
|
Dial status |
The user interface of the telephone system is |
|
displayed. The telephone system functions |
|
are visible. |
|
|
Call status |
The user interface of the telephone system is |
|
displayed. The internal phone number and |
|
possibly the name of the user and the func- |
|
tions of the telephone system are visible. |
|
|
|
|
Note:
The display language set by default is English. For information on changing the language, please see pages 11 and 26.
3
On or message Example for on or message status display:
status |
|
|
|
|
|
|
|
|
|
|
|
|
|
|
|||
1 |
|
|
|
|
|
|
|
|
|
|
|
|
|
|
|
|
|
|
|
|
Q |
1 |
Charging status |
||||||||||||
2 |
|
|
|
|
|||||||||||||
|
|
|
|
||||||||||||||
3 |
|
|
|
|
|
|
|
|
|
|
|
|
|
|
|
2 |
Receive field strength |
|
|
|
|
|
|
|
|
|
|
|
|
||||||
|
|
|
|
|
|
|
|
|
|
|
|
|
|||||
4 |
|
|
|
|
|
|
|
Base 1 |
|
|
|
|
3 |
Current base display |
|||
|
|
|
|
22.09.01 |
|
|
|
06:25 |
|||||||||
|
|
|
|
|
|
||||||||||||
5 |
|
|
|
|
|
0 |
|
|
|
|
@ |
|
|
4 |
Date and time |
||
|
|
|
|
|
|
|
|
|
|
|
|
||||||
|
|
|
|
|
|
|
|
|
|
|
|
|
|
|
|||
|
|
|
|
|
|
|
|
|
|
|
|
|
|
|
|||
|
|
|
|
|
|
|
|
|
|
|
|
|
|
|
5 |
Current functions of the dis- |
|
|
|
|
|
|
|
|
|
|
|
|
|
||||||
|
|
|
|
|
|
|
|
|
|
|
|
|
|
|
|
||
play keys
Call status Example for call status display:
1 Internal phone number and/or name of the user
1 123456789
2 2 Available function
 Consultation?
Function selection
Function selection using menus
The mobile telephone functions are listed in the menus. Overviews of these menus are displayed, e.g.:
|
%On or message status |
|
|
|
|
|
|
or |
|
P |
|||
|
@ |
. , |
||||
|
|
Main menu |
|
|
|
|
|
Family/Fun |
|
|
|
|
|
|
|
Calendar/Clock |
|
|||
|
|
Sound Settings |
||||
|
|
H/Set Settings |
|
|
H/Set Settings |
|
|
|
|
||||
|
|
Base Settings |
Auto Answer |
|
||
|
**************** |
Language |
|
|||
|
|
|
|
|
Register H/Set |
|
|
|
|
|
|
Select Base |
|
|
|
|
|
****************Reset Handset |
|
|
|
|
|
||||
|
|
|
|
|
|
|
4
To select a function or a supplementary menu, please follow the overview for the relevant section and press the function and display keys shown:
@Press the menu key.
or Mark the function or the supplementary menu you want by pressing
the control key.
Confirm with OK.
P or
Go Back
A line of stars indicates the end of a menu. If you scroll further, the first function in the menu is marked again.
If you press one of the two display keys when the star line is selected, the system jumps to the next menu level up or to on or message status.
Function selection in call status
You can scroll between the following functions in call status:
Consultation?
.,
Save number?
.,
Start conference?
.,
Start transfer?
.,
Directory?
.,
Send Message?
Proceed as follows to select a function:
or Mark the function you want by pressing the display key.
Confirm with OK.
5

Mobile telephone
Hicom cordless EM
Useful information about mobile telephones
These operating instructions describe your mobile telephone in connection with Hicom cordless EM at Hicom 150 E/150 H/HiPath 3000.
Note:
Please contact your system administrator if some functions are not available on your mobile telephone.
Features
Amoungst the features of your mobile telephone are:
•Mobile telephone registration and operation at up to four DECT telephone systems
•Automatic call acceptance on removal from the charging shell
•Speakerphone mode
•Number redial for the last five numbers
•Protection against inadvertent key activation
•Telephone directory for 200 entries
Hicom cordless EM is a cordless DECT telephone system and comprises the following components:
•Radio exchange for Hicom 150 E/150 H/HiPath 3000
•Bases (transmitter/receiver)
•Mobile telephones
•Charging shells
Hicom cordless EM offers the following features:
•Internal and external calls in the entire Hicom cordless EM radio network
•Internal and external availability at one telephone number throughout the entire radio network (roaming)
•Automatic handover between bases
•Call forwarding to internal users
•Automatic callback for internal and external calls
•Consultation during a call
•Conference for up to five users
6
Environmental conditions
For safety information, see page I. Permitted temperature range, see page 52.
Note:
Do not install the mobile telephone in the vicinity of electronic equipment to avoid mutual interference.
Radio range
Displaying the radio range
Connection The strength of the incoming signal is displayed by the "receive field quality strength" icon in on or message status:
1 |
no receive field strength |
|
|
S |
low receive field strength |
|
|
R |
50% receive field strength |
|
|
Q |
100% receive field strength |
|
|
Range problems The radio range is different indoors and outdoors, see page 52.
Note:
Please consult your system administrator in the event of range problems.
After leaving the radio network
Re-registering
Leaving the radio network
The base name flashes on the display. The mobile telephone attempts repeatedly to synchronise with a base. The intervals between synchronisation attempts increase on account of the integrated power saving function.
Note:
If you do not require the date and the time to be displayed (see page 41), you can switch your mobile telephone off to save the batteries.
Switch off the mobile telephone and switch it back on again.
7
Opening the battery compartment
Inserting
batteries
Putting the mobile telephone into service
Removing the protective cover
Remove the protective cover from the display before putting the mobile telephone into service.
Inserting the batteries
Note:
The batteries supplied are not charged. They are only charged in the mobile telephone.
 Note:
Note:
•Please observe the safety notes on page I.
•Only use permitted batteries, see page 10.
•Always change both batteries at the same time and only use batteries of the same type and produced by the same manufacturer.
•Open the battery compartment in a dust-free environment only.
•Your telephone directory entries, all settings and your PIN remain stored even if you remove the batteries. The date and time settings, however, are lost.
Press the ridged area and slide back the battery compartment lid.
Insert the permitted batteries observing correct polarity as indicated in the battery compartment.
8
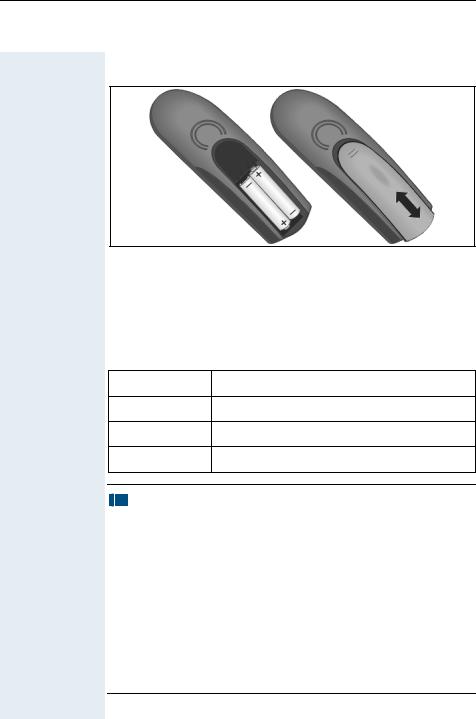
Closing the battery compartment
Replace the lid and slide it back over the battery compartment until it locks.
Charging and using the batteries
To charge the batteries, insert the mobile telephone into the charging shell with the keypad facing forwards.
The charging status is indicated by the charge status display. This flashes during charging:
Batteries empty
#Batteries 33% charged
Batteries 66% charged
Batteries 100% charged
 Note:
Note:
•Initial charging: charge the batteries for at least 16 hours, irrespective of the charging status icon. Without replacing it in the charging shell, use the mobile telephone until the battery low beep is heard. This action aligns the charge status display with the battery operating times.
•To achieve full operating and charging times (see page 10), let the mobile telephone discharge a number of times without replacing it in the charging shell until the battery low beep sounds.
•For future charging: you can place your mobile telephone in the charging shell each time it is used. Charging is electronically controlled which ensures that the battery is charged optimally.
9

Operating and charging times
The operating times are only achieved after several charging and discharging cycles.
Capacity |
Standby mode |
Talk time |
Charging time |
(mAh) |
(hours) |
(hours) |
(hours) |
|
|
|
|
700 |
up to 150 |
over 10 |
approx. 5.5 |
|
|
|
|
1200 |
up to 250 |
over 17 |
approx. 9 |
|
|
|
|
1600 |
up to 350 |
over 23 |
approx. 12 |
|
|
|
|
Permitted batteries
The following batteries are permitted for the mobile telephone:
Nickel-Cadmium (NiCd) |
Nickel-Metal-Hydride (NiMH) |
|
|
Sanyo N-3U (700 mAh) |
Saft VHAAH 1300 (1300 mAh) |
|
|
Mobile Power 700 (700 mAh) |
YDT 1200 (1200 mAh) |
|
|
Panasonic P-60AA DT |
Panasonic HHR-110 AA |
(600 mAh) |
(1100 mAh) |
|
|
Emmerich 700 (700 mAh) |
Sanyo HR-3U (1600 mAh) |
|
|
|
GP GP130 AA HC (1300 mAh) |
|
|
|
Emmerich 1300 (1300 mAh) |
|
|
Fitting the attachment clip
Press the attachment clip onto the back of the mobile telephone until the protrusions on the side of the clip slot into the holes provided on the mobile telephone.
10
@or
H/Set Settings
or:
H/Set Settings
Language
or:
Language
or
Activating/deactivating the mobile telephone
Press the on-hook key until the activation or deactivation is confirmed by a crescendo tone sequence.
See page 3 for display when the handset is on or in message status.
Note:
•The mobile telephone can only be fully switched off when removed from the charging shell.
•The mobile telephone is automatically set to on or message status if it is placed in the charging shell, see page 3.
Setting the language
Open the main menu.
Select the menu item.
Confirm your selection.
Select the menu item.
Confirm your selection.
Select the required language.
Confirm your selection.
Note:
English is set by default as the mobile telephone language. For information on resetting the mobile telephone’s default language, see page 26.
11
Registering the mobile telephone at the telephone system
Note:
When the telephone system is put into service, the system administrator provides you with mobile telephones which have already been registered. You only have to register new mobile telephones when extending the telephone system.
Overview
On or message status
or
@ . , P
Main menu
|
Family/Fun |
|
|
|
|
|
|
|
|
|
Calendar/Clock |
|
|
|
|
|
|
|
|
|
Sound Settings |
|
P |
|
|
||||
|
H/Set Settings |
|
|
H/Set Settings |
|
|
|||
|
|
P |
P |
||||||
|
Base Settings |
Auto Answer |
|
||||||
**************** |
Language |
||||||||
|
|
|
|
Register H/Set |
|
|
Register H/Set |
|
|
|
|
|
|
|
|
||||
|
|
|
|
|
|||||
|
|
|
|
Select Base |
Base 1 |
|
PIN |
||
|
|
|
|
|
|||||
|
|
|
Reset Handset |
|
|
Base 2 |
|
|
|
|
|
**************** |
|
|
Base 3 |
|
|
||
|
|
|
|
|
|
****************Base 4 |
|
|
|
|
|
|
|
|
|
|
|
|
|
Preparing for registration
•Ask your system administrator for the following information:
–Phone number of the mobile telephone
–Mobile telephone PIN (8 digits)
•Enter the following data here:
System administrator
System administrator phone number
Mobile telephone phone number
•Ask your system administrator to activate the logon window on the telephone system.
12
Loading...