


Issued by
Siemens Home and Office Communication Devices GmbH & Co. KG Schlavenhorst 66
D-46395 Bocholt
© Siemens Home and Office Communication Devices GmbH & Co. KG 2006 All rights reserved. Subject to availability.
Rights of modification reserved.
Gigaset
www.siemens.com/gigaset |
S450 IP |
|
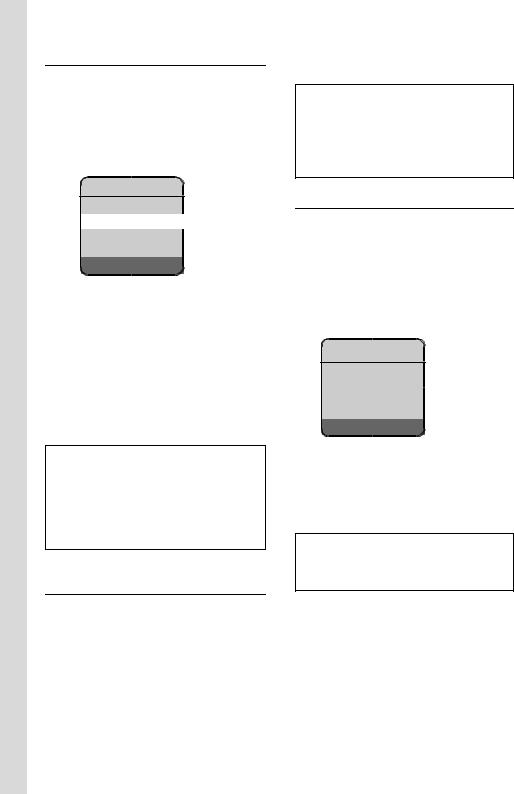
The handset at a glance
15 |
|
|
|
|
|
|
|
|
|
|
|
1 |
||||||
|
|
Ð |
|
|
|
V |
|
|
||||||||||
|
|
|
|
2 |
||||||||||||||
|
|
|
|
INT 1 |
|
|
|
|
|
|
|
|
|
|
|
|||
|
|
|
|
|
|
|
|
|
|
|
|
|
|
|
|
|||
|
|
|
|
10.18.06 09:45 AM |
|
|
|
|
|
|
|
|
|
|||||
|
|
|
|
FixedLine |
IP |
|
|
|
|
|
|
|
|
|
||||
14 |
|
|
|
|
|
|
|
|
|
|
|
|
3 |
|||||
|
|
|
|
|
|
|
|
|
|
|
|
|||||||
|
|
|
|
|
|
|
|
|
|
|
|
|
|
|
|
|
|
|
|
|
|
|
|
|
|
|
|
|
|
|
|
|
|
|
|
|
|
|
|
|
|
|
|
|
|
|
|
|
|
|
|
|
|
|
||
13 |
|
|
|
|
|
|
|
|
|
|
|
|
|
4 |
||||
|
|
|
|
|
|
|
|
|||||||||||
|
|
|
|
|
|
|
|
|
|
|
|
|
||||||
12 |
|
|
|
|
|
|
|
|
|
|
|
5 |
||||||
|
|
|
|
|
|
|
|
|
|
|||||||||
11 |
|
|
|
|
|
|
|
|
|
|
|
|
|
|
|
|
6 |
|
|
|
|
|
|
|
|
|
|
|
|
|
|
|
|
|
|||
10 |
|
|
|
|
|
|
|
|
|
|
|
|||||||
|
|
|
|
|
|
|
|
|
|
|||||||||
|
|
|
|
|
|
|
|
|
|
|
|
7 |
||||||
|
|
|
|
|
|
|
|
|
|
|
|
|
|
|
|
|||
9 |
|
|
|
|
|
|
|
|
|
|
|
8 |
||||||
|
|
|
|
|
|
|
|
|
|
|
||||||||
Base station at a glance
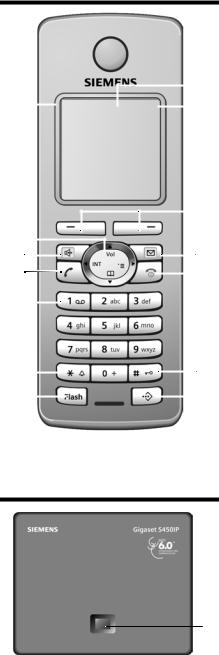
1
The handset at a glance
Handset keys
1Display in idle status (example)
2BatteryeVchargeU status
= (1/3 charged to fully charged) eflashes:VUbattery nearly empty
flashes: battery charging
3Display keys (page 18)
4Message key
Opens calls and message lists Flashes: new message
5End call key, On/Off key
End call, cancel function, go back one menu level (press briefly), back to idle status (press and hold), activate/deactivate handset (press and hold in idle status)
6Connection socket for headset
7Pound key (#)
Keypad lock on/off (press and hold, page 17)
Switch between upper/lower case letters and numbers for text entry
8Last number redial key
Open the last number redial list (press briefly)
9Flash key (not for VoIP) Enter flash (press briefly)
Insert a pause (press and hold)
10 Star key
Ringer tones on/off (press and hold in idle status)
Open special characters table for text entry
11 Key 1 (press and hold) Call the network mailbox
12 Talk key
Accept a call, select connection type and start dialing (press briefly/press and hold after entering the number, page 16)
13 Handsfree key
Switch between earpiece/handsfree mode Lights up: handsfree talking activated Flashes: incoming call
14 Control key (page 18)
15 SignalÒÑstrengthi
| (low to high) flashes: no reception
Base station key
1Paging key
Lights up: LAN connection active (phone is connected to router)
Flashes:
data transfer to LAN connection Press briefly: start paging Press and hold:
set base station to registration mode
1
Contents |
|
Contents |
|
The handset at a glance . . . . . . . |
1 |
Base station at a glance . . . . . . . . |
1 |
Safety precautions . . . . . . . . . . . . |
3 |
Gigaset S450 IP – |
|
More than just a telephone . . . . . |
4 |
VoIP – Making calls via |
|
the Internet . . . . . . . . . . . . . . . . . . |
5 |
First steps . . . . . . . . . . . . . . . . . . . . |
5 |
Pack contents . . . . . . . . . . . . . . . . . . . . 5 Setting up the handset for use . . . . . . . 6 Installing the base station . . . . . . . . . . 8 Connecting the base station . . . . . . . . 9 Making settings for VoIP telephony . . 11
Menu tree . . . . . . . . . . . . . . . . . . 14
Making calls with VoIP and the fixed network . . . . . . . . . . . . . . . 16
Making an external call . . . . . . . . . . . 16 Ending a call . . . . . . . . . . . . . . . . . . . . 16 Accepting a call . . . . . . . . . . . . . . . . . 16 Waiting calls . . . . . . . . . . . . . . . . . . . . 17 Switching between earpiece and handsfree mode . . . . . . . . . . . . . . . . . 17 Dialing emergency numbers . . . . . . . 17
Operating the handset . . . . . . . . 17
Activating/deactivating the
handset . . . . . . . . . . . . . . . . . . . . . . . . 17 Activating/deactivating the
keypad lock . . . . . . . . . . . . . . . . . . . . . 17 Control key . . . . . . . . . . . . . . . . . . . . 18 Display keys . . . . . . . . . . . . . . . . . . . . 18 Reverting to idle status . . . . . . . . . . . . 18
Using the directory and lists . . . 19
Directory . . . . . . . . . . . . . . . . . . . . . . . 19 Last number redial list . . . . . . . . . . . . 19 Opening lists with the message key . 20 Dialing from the directory/list . . . . . . 20
E-mail notifications . . . . . . . . . . . 21
Entering access data for the
incoming e-mail server . . . . . . . . . . . . 21 Opening the incoming message list . 21
Messenger . . . . . . . . . . . . . . . . . 22
Establishing a connection,
going online . . . . . . . . . . . . . . . . . . . . 22 Opening the buddy list and
chatting . . . . . . . . . . . . . . . . . . . . . . . . 22 Receiving messages . . . . . . . . . . . . . . 23 Writing/sending messages . . . . . . . . . 23 Calling a buddy . . . . . . . . . . . . . . . . . . 23 Disconnecting, going offline . . . . . . . 23
Handset/base station
settings . . . . . . . . . . . . . . . . . . . . 24
Changing the handset display keys . . 24 Adjusting the loudspeaker volume . . . 24 Setting ringer tones . . . . . . . . . . . . . . 24 Activating/deactivating advisory
tones . . . . . . . . . . . . . . . . . . . . . . . . . . 25 Setting the alarm clock . . . . . . . . . . . . 25 Changing the system PIN on
the base station . . . . . . . . . . . . . . . . . 25 Setting default connection . . . . . . . . . 25 Checking the base station
MAC address . . . . . . . . . . . . . . . . . . . . 26
Web configurator . . . . . . . . . . . . 26
Connecting the PC to the Web configurator . . . . . . . . . . . . . . . . . . . . 26 Deregistering . . . . . . . . . . . . . . . . . . . . 26 Web configurator functions . . . . . . . . 26
Appendix . . . . . . . . . . . . . . . . . . 28
Care . . . . . . . . . . . . . . . . . . . . . . . . . . . 28 Contact with liquid . . . . . . . . . . . . . . . 28 Questions and answers . . . . . . . . . . . . 28 Specifications . . . . . . . . . . . . . . . . . . . 28 FCC / ACTA Information . . . . . . . . . . . . 29 Industry Canada Certification . . . . . . . 31 Safety precautions . . . . . . . . . . . . . . . 31 END-USER LIMITED WARRANTY . . . . . 33 Gigaset S450 IP – free software . . . . . 36
2

Safety precautions
Safety precautions |
* |
! |
|
|
|
|
|
|
Warning:
Read the safety precautions and the operating instructions before use.
Explain their contents and the potential hazards associated with using the telephone to your children.
$ Only use the power supply unit supplied, as indicated on the underside of the device.
Only insert approved rechargeable batteries of the same type.
Never use ordinary (non-rechargeable) batteries as they may pose a health hazard or cause injury.
‹Make sure the rechargeable battery is inserted the right way round.
ŒUse the battery specified in these operating instructions.
The phone may affect medical equipment so always switch your phone off before entering hospitals or doctors’ practices.
The handset may cause an unpleasant humming noise in hearing aids.
Do not operate the phone in places where there is a risk of explosion (such as paint workshops).
Do not install the base station in bathrooms or shower rooms. The handset and base station are not splash-proof (see page 28).
Drivers must not use the phone while driving.
The phone must be switched off at all times in an aircraft. Make sure it cannot be switched on accidentally.
ƒIf you give your Gigaset to someone else you should also give them the operating instructions.
Dispose of batteries and the phone carefully. Do not pollute the environment.
Emergency numbers cannot be dialed if the keypad lock is activated!
* see also page 31
3

Gigaset S450 IP – More than just a telephone
Gigaset S450 IP –
More than just a telephone
Your phone lets you make calls both via the fixed network and (cost effectively) via the Internet (VoIP) without using a PC.
And your phone can do much more besides:
uPress a button each time you make a call to indicate whether you want to make a call via the fixed network or via the Internet (page 16). During a call, the display color indicates whether your call is being made via VoIP (blue) or via the fixed network (orange).
uRegister up to six handsets on your base station. Your base station allows you to use one handset to make a call via the fixed network and another to make a call via the Internet at the same time.
uConfigure the phone connection for VoIP without a PC. Your phone's connection assistant downloads general data about your VoIP provider from the Internet and guides you through entering your personal data (VoIP/SIP account). This makes it easy for you to start using VoIP (page 11).
uIf necessary, make any further
VoIP settings on a PC. The phone has a Web interface (Web configurator) that can be accessed via your PC's Web browser (page 26).
uAssign your own password (system PIN) to protect your device and the Web configurator from unauthorized access (page 25).
uUse instant messaging on your handset. Go online and see which of your messenger contacts (buddies) are also online. Chat with your buddies, send and receive text messages, or phone them (page 22).
uUse your phone to obtain information about new e-mail messages in your mailbox without a PC (page 21).
uSave up to 150 numbers and names in your handset (page 19).
uDownload your Outlook contacts from a PC into your handset. Or back up the handset directory on your PC.
uYou can program the keys of your phone with important phone numbers. The phone number is then dialed by simply pressing the respective key (page 19).
uKeep your hands free while making calls. Use the handsfree function on your handset or use a convenient headset (accessory, not included).
uKeep your phone completely up to date. Find out about firmware updates on the Internet and download them into your phone.
uUse your handset as an alarm clock (page 25).
For a full description of all functions on your Gigaset S450 IP, please see the complete user guide on the Internet at: www.siemens.com/gigaset
Your Gigaset S450 IP has a protected operating system that offers increased security against viruses from the Internet.
Have fun using your new telephone!
4

VoIP – Making calls via the Internet
With VoIP (Voice over Internet Protocol), your calls are not made via a fixed connection as in the telephone network, but rather transmitted via the Internet in the form of data packets.
You can take advantage of all the benefits of VoIP with your phone:
uYou can make cost-effective calls with high voice quality with subscribers on the Internet, the fixed network or the mobile phone network.
uYour SIP provider will give you personal numbers with which you can be reached from the Internet, the fixed network and any mobile phone network.
To be able to use VoIP, you need the following:
uA broadband Internet connection (such as DSL) with flat rate (recommended) or volume-based price
uInternet access, meaning that you need a router that will connect your phone to the Internet. You can find a list of recommended routers on the Internet at:
http://www.siemens.com/gigaset
uAccess to the services of a VoIP provider. Open up to four accounts with one VoIP provider.
VoIP – Making calls via the Internet
First steps
Pack contents
The pack contains:
u one Gigaset S450 IP base station u one Gigaset S45 handset
u one power adapter for the base station
uone charging cradle incl. power adapter
u one phone cord
u one Ethernet cable (LAN cable) u two batteries
u one battery cover u one belt clip
u one quick guide
Documentation
You will find a detailed description of your Gigaset S450 IP and its Web configurator online at:
www.siemens.com/gigaset
This complete description is in PDF format. You will need Adobe® Reader® to view these documents. You can find Adobe® Reader® on the Internet at www.adobe.com.
5
First steps
Setting up the handset for use
The display is protected by a protective plastic film.
Please remove the protective film!
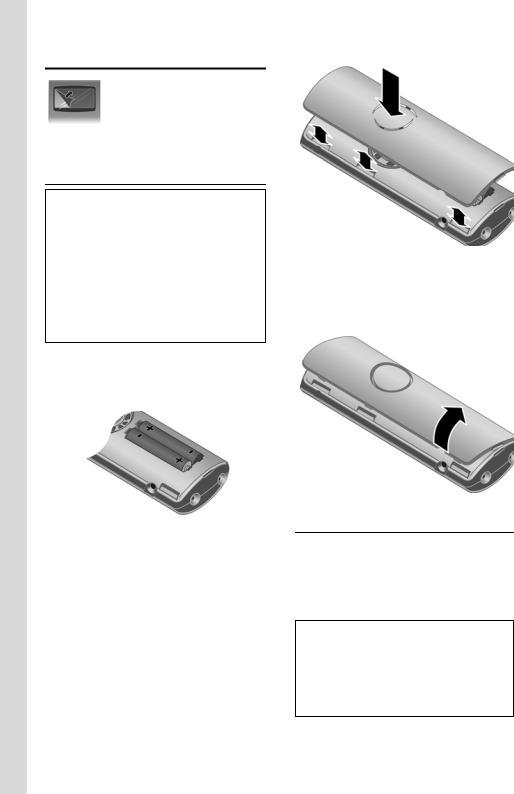
Inserting the batteries
Warning:
Use only the rechargeable batteries recommended by Siemens on page 28! This means that you must not use conventional (nonrechargeable) batteries or other types of batteries. If you do, serious damage to health and property cannot be ruled out: for example, the outer casing of the batteries could be destroyed or the batteries could explode. The phone could also malfunction or be damaged as a result of using batteries that are not of the recommended type.
¤Insert the batteries the right way round (see figure).
The polarity is indicated in/on the battery compartment.
The handset turns on automatically. You will hear a confirmation tone.
Closing the battery cover
¤First, align the notches on the side of the battery cover with the protrusions on the inside of the housing.
¤Then press the cover until it clicks into place.
Opening the battery cover
¤If fitted, remove the belt clip.
¤Place your finger in the headset socket cavity and pull the battery cover upwards.
Connecting the charging cradle
Connecting up the charging cradle and mounting it on the wall (if required) is described at the end of this user guide.
¤To charge the batteries, leave the handset in the charging cradle.
Notes:
–Only place the handset in the charging cradle that is intended for it.
–If the handset has turned itself off because the batteries are flat and it is then placed in the charging cradle, it will turn itself on automatically.
6

Initial charging and discharging of batteries
Battery charging is indicated in the top right of the display by a flashing battery icon e, Vor U. During handset operation, the battery icon indicates the charge status of the batteries (page 1).
The correct charge status can only be displayed when the batteries are first fully charged and discharged through use.
¤To do this, leave the handset in the charging cradle without interruption until the battery icon stops flashing in the display (approx. 13 hours).
¤Once the batteries are fully charged, remove the handset from the charging cradle and do not put it back again until the batteries are fully discharged.
Note:
After the first battery charge and discharge, you may replace your handset in the charging cradle after every call.
Please note:
uAlways repeat the charging and discharging procedure if you remove the batteries from the handset and reinsert them.
uThe batteries may warm up as they are charging. This is not dangerous.
uAfter a while the charge capacity of the batteries will decrease for technical reasons.
Note:
You will find explanations of the icons and typographical conventions used in this user guide in the detailed user guide for your Gigaset S450 IP available online at www.siemens.com/gigaset.
First steps
Setting the date and time
If the date and time are not yet set on the phone, the display key §Time§ is displayed. You can set the date and time later via the menu v¢ ÐSettings ¢ Date/Time.
¤Press §Time§ or open the menu.
¤Change multiple line input:
Date:
Enter month, day and year in 6-digit format.
Time:
Enter hours and minutes as 4 digits (e.g. QM15for 07:15 am
If you have selected the 12-hour time format, use the display key §am/pm§ to switch between am and pm.
Time Mode:
Choose between 12 and 24-hour time format.
§Save§ Press the display key.
The date and time are shown in the handset's idle display (page 1).
Area codes
In order to call back a caller using the calls list (page 20), your phone's area code ("local area code") must be stored. If your phone is in a "multiple area code" area, the extra codes for this area must also be stored.
Area Code |
|
|
v |
¢ ÐSettings ¢ Telephony |
|
~ |
¢ Area Code |
|
|
Enter local area code. |
|
§Save§ |
Press the display key. |
|
a |
|
Press and hold (idle status). |
Extra Codes |
||
v |
¢ ÐSettings ¢ Telephony |
|
q |
¢ Extra Codes |
|
|
Select an entry and press §Edit§. |
|
~ |
|
Enter extra code. |
§Save§ |
Press the display key. |
|
7
First steps |
|
|
Repeat the above steps until all extra |
Wall mounting the base station |
|
codes for your area have been entered. |
|
|
A maximum of 5 extra codes can be |
|
|
stored. |
|
|
a |
Press and hold (idle status). |
|
Registering the handset to the base station
Your handset is registered to the base station by default.
Instructions on how to register further handsets to the base station and make free internal phone calls is described in the detailed user guide available online at www.siemens.com/gigaset.
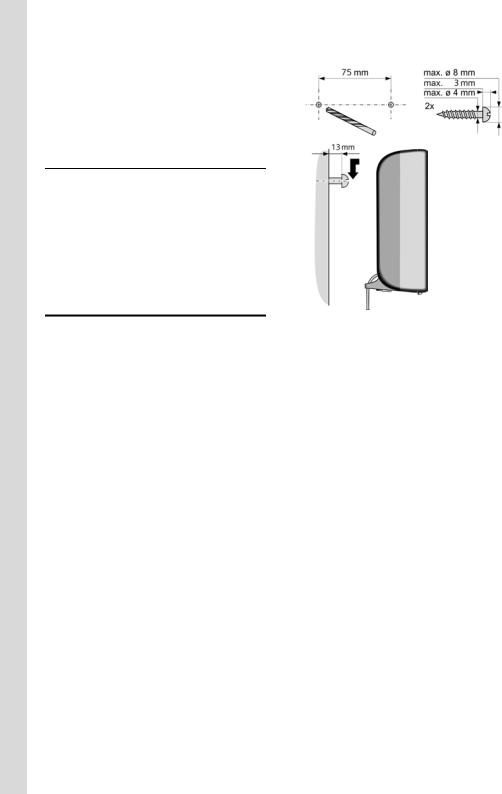
Installing the base station
The base station is designed for use in closed, dry rooms with a temperature range of +41°F to +113°F.
¤Set up or wall mount the base station at a central point in the apartment or house.
Please note:
uNever expose the phone to heat sources, direct sunlight or other electrical appliances.
uProtect your Gigaset from moisture, dust, corrosive liquids and vapors.
8
First steps
Connecting the base station
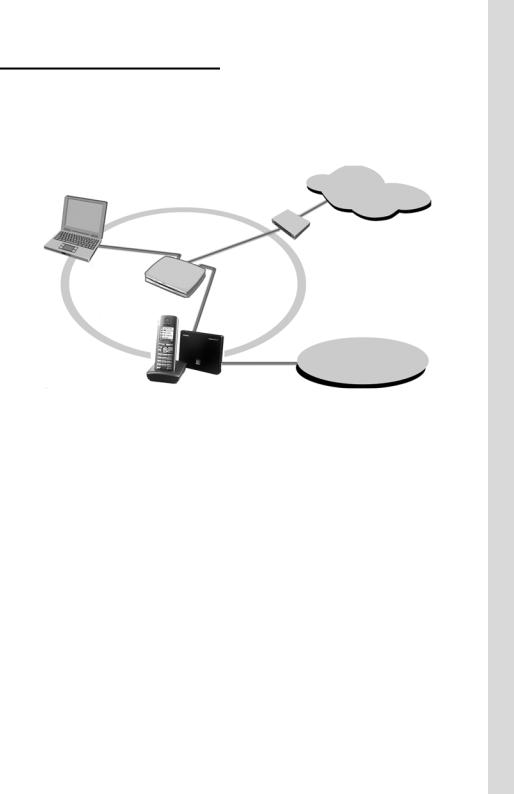
In order to be able to make calls with your phone via the fixed network and via VoIP, you must connect the base station to the fixed network and the Internet, see Figure 1.
Internet
4
LAN |
1 |
|
1
Fixed network
3
2
Figure 1 Connecting the phone to the fixed network and the Internet
1Internet connection:
router and modem (illustrated) or router with integrated modem
2Gigaset S450 IP base station
3Gigaset S45 handset
4PC in LAN
Follow the steps in the order given below:
1.Connect the base station with the phone connection
2.Connect the base station with the electrical power supply
3.Connect the base station with the router
9
First steps
Connecting the base station with the fixed network and the electrical power supply
¤Please first connect the phone jack and then the power adapter, as shown below.
1 |
3 |
2
1Phone jack with phone cord
2Underside of the base station
3Power adapter 110 V
Please note:
uKeep the power adapter plugged in at all times for operation, as the phone does not work without a supply of electricity.
uIf you buy a replacement phone cord from a retailer, ensure that the phone jack is connected correctly.
Correct phone jack assignment
3 |
|
|
|
4 |
1 unused |
||||
2 |
|
|
|
|
|
5 |
2 unused |
||
1 |
|
|
|
|
|
|
|
6 |
3 a |
|
|
|
|
|
|
|
4 b |
||
|
|
|
|
|
|
|
|
|
|
|
|
|
|
|
|
|
|
|
5 unused |
|
|
|
|
|
|
|
|
|
|
|
|
|
|
|
|
|
|
|
6 unused |
|
|
|
|
|
|
|
|
|
|
|
|
|
|
|
|
|
|
|
|
You can now use your phone to make calls via the fixed network and can be reached at your fixed network number!
Connecting the base station with the router
For Internet access you need a router connected to the Internet via a modem (if necessary, this can be integrated in the router).
3
1 3
2
1Side view of the base station
2Network plug (LAN) with network cable
3Router network plug
As soon as the cable connecting the phone and router is plugged in, the paging key lights up on the front of the base station (page 1).
10

Making settings for VoIP telephony
Before you can use the Internet (VoIP) to phone any other users on the Internet, the fixed network or the mobile phone network, you need the services of a VoIP provider who supports the VoIP SIP standard.
Precondition: You have registered (for example via your PC) with such a VoIP provider and set up at least one VoIP account.
The following phone settings are necessary in order for you to use VoIP. You will receive all information from your VoIP provider.
uYour user name with the VoIP provider, if this is required by the VoIP provider
u Your registration name
u Your password with the VoIP provider u VoIP provider general settings
The connection assistant will help you with the settings.
Starting the connection assistant
Precondition: The base station is connected to the electrical power supply and the router. Your router is connected to the Internet (page 10).
Tip: If VoIP is activated as the default connection for your phone (default setting page 25), the phone will attempt to make a direct connection to your VoIP provider's server after the connection assistant is closed. If incorrect/incomplete information means that the connection cannot be made, messages will be displayed (page 13).
Note:
Your phone is preconfigured for dynamic assignment of the IP address. In order for your router to "recognize" the phone, dynamic IP address assignment must also be activated on the router, meaning that the router's DHCP server is activated.
First steps
As soon as the handset battery is sufficiently charged, the message key fon the handset will flash (around 20 minutes after you have put the handset in the charging cradle). Press the message key fto start the connection assistant.
You will see the following display:
Connection Assist.
Start assistant for entry of VoIP connection data?
No |
Yes |
§Yes§ |
Press the display key to start |
|
the connection assistant. |
|
The settings are configured in |
|
several steps. |
~ |
Enter system PIN (the default |
|
setting is "0000"). |
Note:
The connection assistant will also start automatically if you try to establish a connection via the Internet, before you have configured the necessary settings.
You can also call up the connection assistant at any time via the menu (page 14).
11
First steps
Downloading VoIP provider data
The phone establishes a connection with the Siemens server on the Internet. Profiles with general access data for various VoIP providers can be downloaded here.
After a short time the following is displayed:
Select Country
Germany
England
France
Netherlands, the
ÝOK
q |
Select country (press up/down |
|
on the control key) and press |
|
§OK§. The VoIP providers are |
|
shown for which VoIP profiles |
|
are available. |
q |
Select your VoIP provider and |
|
press §OK§. |
The necessary general access data for your VoIP provider is downloaded and saved on the phone.
If the data for your VoIP provider is not offered as a download, press the display key ”. You can then carry out the following steps as instructed by the connection assistant.
You must then configure the necessary settings for the VoIP provider using the Web configurator (page 27). Your VoIP provider will supply you with this information.
Entering user data for your
VoIP account
Enter the VoIP user data for your VoIP account. Your VoIP provider will supply you with this information.
Username:
If required by your provider, enter the user name and press
§OK§.
Authent. Name:
Enter the registration name and press §OK§.
Authent. Password:
Enter password and press §OK§.
Note:
Please note when making these entries that the VoIP user data is case sensitive. When entering text, the first letter is capitalized as standard. Press and hold the #key to switch between upper/lower case text and numerical entry.
Completing the VoIP settings
Once you have made all of the necessary entries, the message "Connection data complete" is displayed. The handset returns to idle status.
If all of the settings are correct and if the phone can make a connection to the VoIP server, then the internal name of the handset will be displayed (example):
ÐV
INT 1
10.18.06 09:45 AM
FixedLine IP
You can now use your phone to make calls via the fixed network (fixed line) and the Internet! Callers can reach you on your fixed network number and your VoIP number!
Note:
To ensure that you can always be reached via the Internet, the router must be permanently connected to the Internet.
12

No connection to the Internet/VoIP server
If one of the following messages is displayed instead of the internal name after the connection assistant is closed, then a fault has occurred:
Server not accessible!
The phone has no connection to the Internet.
¤Check the cable connection between the base station and the router (the LED on the base station must light up) and the connection between the router and the Internet connection.
¤Check whether the phone is connected to the LAN. It might not have been possible to assign an IP address to the phone or the IP address has already been assigned to another LAN subscriber and cannot be changed.
¤Find the IP address using the handset menu:
v¢ Ð Settings ¢ Base
¢Local Network
¤Start the Web configurator with the IP address.
¤If no connection can be established, change the settings on the router (activate DHCP server) or the phone's IP address.
Provider registration failed!
uYour personal data for registering with the VoIP provider may have been entered incompletely or incorrectly.
¤Check your entries for Username,
Authent. Name and Authent. Password. In particular, check your use of upper and lower case.
To do this, open the following menu
on your handset:
v¢ Ð Settings ¢ Telephony ¢ VoIP ¢ Provider Registr.
First steps
uThe server address for the VoIP server has not yet been entered, or has been entered incorrectly.
¤Start the Web configurator.
¤Open Settings ¢ Telephony ¢ Connections Web page.
¤Edit the server address if necessary.
Note:
If port forwarding is activated on your router for the ports that have been registered as the SIP port (Standard 5600) and the RTP port (Standard 5004), then it makes sense to switch off DHCP and assign the phone a static IP address (otherwise you may not be able to hear the other party during VoIP calls):
– Via the¢handset menu:¢
v Ð Settings Base ¢ Local Network
Or
– Via¥ the Web configurator:¢
Open Settings IP configuration
¥Web page.
Select IP address type.
Please note that the IP address and subnet mask depend on the router's address block.
You must also specify the default gateway and DNS server. The IP address for the router is generally entered here.
13
 Loading...