


14.8.98 |
BK_FRONT.FM |
Gigaset 2010, UEB/engl.: A30852-X1100-E301-3-7619 |
s
The cordless digital DECT telephone system expandable to 6 handsets
Operating instructions
Before starting up the equipment, please read these operating instructions with the safety notes!
Gigaset 2010
ACHTUNG! Schnittkante ggf. auf Titelseite U1 nach außen versetzen wg. Falz-Ausklappseite

14.8.98 |
KAP00.FM5 |
Gigaset 2010, UEB/engl.: A30852-X1100-E301-2-7619 |
Gigaset® 2010
Wegweiser
Making the first call
Using additional handsets
The quickest way
Switching the telephone on ( page 1). Making a call ( page 24).
Registering new handsets at the base station ( page 49).
Internal calls ( page 28).
Quick reference guide ( page 57).
In addition to these signposts, the table of contents and index at the beginning and end of this manual will provide further help in the optimum use of this device.
U2
14.8.98 |
KAP00.FM5 |
Gigaset 2010, UEB/engl.: A30852-X1100-E301-2-7619 |
Overview: Gigaset 2010
1
|
|
|
|
|
|
|
|
|
|
|
|
|
|
|
|
|
17 |
|
|
|
|
|
|
|
|
|
|
|
|
|
|
|
|
|
|
|
|
2 |
|
|
|
|
|
|
|
|
|
|
|
|
|
19 |
||||
|
|
|
|
|
|
|
|
|
|
|
|
|
|
|
|
|
|
|
3 |
|
|
|
|
|
|
|
11 |
|
|
18 |
|
||||||
|
|
|
|
|
|
|
|
|||||||||||
4 |
|
|
|
|
|
|
|
|
|
|
|
|
12 |
|
|
|
||
|
|
|
|
|
|
|
|
|
|
|
|
|
|
|
|
|
||
5 |
|
|
|
|
|
|
|
|
|
|
||||||||
|
|
|
|
|
|
|
|
|
||||||||||
6 |
|
|
|
|
|
|
|
|
|
|
|
|
13 |
|
|
|
|
|
|
|
|
|
|
|
|
|
|
|
|
|
|
|
|
|
|
||
|
|
|
|
|
|
|
|
|
|
|
|
|
|
|
|
|
||
7 |
|
|
|
|
|
|
|
|
|
|
|
|
|
|
|
|
||
|
|
|
|
|
|
|
|
|
|
|
|
14 |
|
|
|
|
|
|
|
|
|
|
|
|
|
|
|
|
|
|
|
|
|
|
|
||
8 |
|
|
|
|
|
|
|
|
|
|||||||||
|
|
|
|
|
|
|||||||||||||
|
|
|
|
|
|
|
|
|
|
|
|
15 |
|
|
|
|
|
|
|
|
|
|
|
|
|
|
|
|
|
|
|
|
|
|
|||
|
|
|
|
|
|
|
|
|
|
|
|
|
|
|
|
|||
9 |
|
|
|
|
|
|
|
|
|
|
|
|
16 |
|
|
|
|
|
|
|
|
|
|
|
|
|
|
|
|
|
|
|
|
|
|
||
|
|
|
|
|
|
|
|
|
|
|
|
|
|
|
|
|
||
10
20 
21
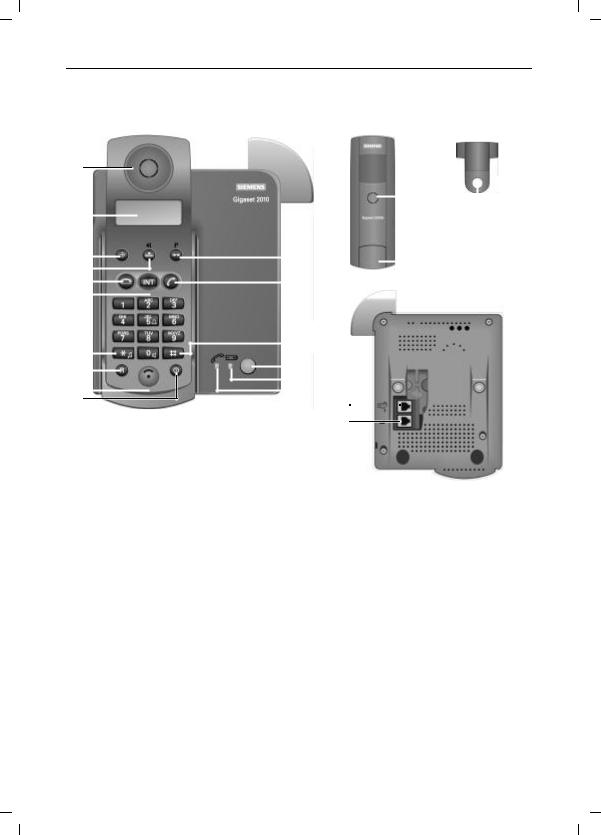
1 |
Earphone |
13 |
Pound key |
2 |
Display |
14 |
Paging key (calling mobile untis) |
3 |
Store key |
15 |
Battery LED (On when charging battery, |
4 |
Speed dial (delete) key |
|
Off when not charging battery) |
5 |
On-hook key |
16 |
Trunk LED (lights up when the connection to the |
6 |
Intercom key |
|
trunk is seized – after pressing the phone key) |
7 |
Star key |
17 |
Ringer loudspeaker |
8 |
Recall key |
18 |
Battery compartment/cover |
9 |
Microphone |
19 |
Carrying clip |
10 |
ON/OFF/PROTECTED key |
20 |
Jack for power supply unit |
11 |
Last Number Redial |
21 |
Jack for trunk |
12 Off-hook key
U3

14.8.98 |
KAP00.FM5 |
Gigaset 2010, UEB/engl.: A30852-X1100-E301-2-7619 |
Overview: Keys
Keys on the base station
Green paging key to call all handsets or to register new
?handsets.
Keys on the Gigaset 1000S mobile unit
BMemory key to initialize procedures.
CSpeed dial and delete key.
O Redial key (also used for procedures).
1to 0, *and # Dialling keys.
R Signal key.
I Internal key to dial internal numbers.
h ON/OFF/PROTECTED key. c Off-hook key to dial a number.
a On-hook key to finish a call or to cancel a procedure.
U4

14.8.98 |
KAP00.FM5 |
Gigaset 2010, UEB/engl.: A30852-X1100-E301-2-7619 |
Overview: Key functions and display symbols
uPzAHn-8888888cc
Af Nb EFG H
Display Symbols (top line)
u
P
All digits and characters are displayed on the top line, while the symbols for various operating modes are displayed on the bottom line.
Display after briefly pressing the signal key, Rkey.
Manual dialing pause.
A |
Exchange code (only used when connected to telephone |
||
systems). |
|
||
|
|
||
H |
Main exchange code (only used when connected to tele- |
||
phone systems). |
|||
|
|||
z |
Memory empty. |
||
n |
Display of star key, * key. |
||
- |
Display of pound key, #key. |
||
c |
Volume of incoming speech, level 2. |
||
cc |
Volume of incoming speech, level 3. |
||
Display symbols (bottom line) |
|
|
|
A |
Indicates that the mobile unit is in save mode and is not |
||
ready for dialing. Activated by pressing theBkey. |
|||
|
Battery symbol flashes for approximately 5 to 10 minutes |
||
j before the batteries are empty. |
|||
i Batterie is |
33% charged. |
||
g Batterie is |
66% charged. |
||
f Batterie is 100% charged. |
|||
N |
ON symbol. Activated by pressing the h key. This sym- |
||
bol flashes if the mobil unit is out of range of the base |
|||
|
station. |
|
|
|
Phone symbol indicates that the mobil unit is in off-hook |
||
b mode. Activated by pressing the c key. |
|||
E |
Indicates that the dialing mode has been temporarily |
||
switched from dial pulsing to DTMF signaling. |
|||
F |
station.Indicates that an external call is in progress via the base |
||
G |
station.Indicates that an internal call is in progress via the base |
||
H |
Indicates that the mobile unit is locked. |
||
|
|
A1 |
|
A1
14.8.98 |
KAP00.FM5 |
Gigaset 2010, UEB/engl.: A30852-X1100-E301-2-7619 |
Overview: Meaning of symbols
B#*5 Press keys in this sequence.
?Press key from the base station.
Q Delete function of the speed dial key.
1... 6
o
Press one of the following keys.
Enter number.
If it is necessary you will see a display symbol:
:
3 z
P fN
Attention, this is an important hint!
Additional information.
page 2 (cross-reference to a related topic).
A2
A2
14.8.98 |
KAP01.FM5 |
Gigaset 2010, UEB/engl.: A30852-X1100-E301-3-7619 |
Safety precautions
Only use approved nickel-cadmium (NiCd) and nickel-metal-hydride (NiMH) batteries! ( page 6).
Never use other batteries or ordinary (non-re- chargeable) batteries! These batteries can short circuit or destroy the battery unit (dangerous). The following labels are found on the battery compartments of the handset and charging unit:
+ |
_ |
Only use rechargeable batte- |
|
B |
|
|
ries with the poles aligned as |
|
|
|
shown! |
|
|
|
Type according to instruc- |
|
|
|
tions |
●Do not submerge batteries in water; do not throw them into fire.
●Do not dispose of old, defective batteries with normal household garbage.
●Batteries become warm during charging. This is normal and not dangerous
●Do not use any third-party charging units. The batteries could be damaged.
●Only the plug-in power supply unit supplied (details on the underside of the device) may be used.
Check that the socket into which you insert the plug-in power unit has the correct voltage. If your plug-in power unit does not have the right voltage, please contact Siemens.
●Do not confuse the plugs of the base station. Abnormally high voltages could be imposed across the charging contacts for brief intervals, such as during thunder storms.
●The handset may not be operated in rooms with explosion hazards.
Research has demonstrated that cordless telephones (DECT) which are switched on can interfere with the operation of medial equipment.
Thus, you should maintain a minimum distance of one meter between the telephone and medical equipment. When using a mobile telephone in medical institutions, the regulations of the institution in question must be observed.
A3
A3

14.8.98 |
KAP01.FM5 |
Gigaset 2010, UEB/engl.: A30852-X1100-E301-3-7619 |
Certification and CE marking
Siemens Gigasetâ 2010 was certified according to EU guideline 91/263/EEC (CTR 6, CTR 10). Anyone is permitted to connect this telephone to a telephone jack and use it.
This telephone fulfils the requirements of the following
EU guidelines:
89/336/EEC |
“Electromagnetic compatibility” |
73/23/EEC |
“Electrical resources used within |
|
specific voltage ranges” |
The CE marking confirms the telephone is in compliance with the above-mentioned guidelines (CE 0188 X)
A4
A4

12.3.98 |
GIGA2010.IVZ |
Gigaset 2010, UEB/engl.: A30852-X1100-E301-2-7619 |
|
Contents |
Signposts |
|
Overviews |
|
Safety precautions |
|
Stepwise startup .......................................................................................................................... |
1 |
Step 1: Observe the safety precautions ......................................................................................... |
1 |
Step 2: Check the contents of the package ................................................................................... |
1 |
Step 3: Connecting the base station ................................................................................................ |
2 |
Step 4: Inserting the batteries into the handset ............................................................................... |
3 |
Step 5: Charging the batteries ....................................................................................................... |
3 |
Step 6: Check signaling method .................................................................................................... |
4 |
Notes on operation ...................................................................................................................... |
5 |
Installing the base station ............................................................................................................... |
5 |
Notes on operating the handset ....................................................................................................... |
6 |
Maintenance notes ........................................................................................................................ |
8 |
Connecting the telephone socket .................................................................................................. |
8 |
Technical data .................................................................................................................................. |
9 |
Third party use/disposal ............................................................................................................... |
10 |
Warranty ....................................................................................................................................... |
10 |
Procedure in the case of malfunctions ........................................................................................... |
11 |
Overview: Signal tones .................................................................................................................. |
13 |
Operating modes ....................................................................................................................... |
14 |
ON/OFF/PROTECTED modes ...................................................................................................... |
14 |
Signaling method ........................................................................................................................... |
16 |
Operating in a telephone system ................................................................................................... |
17 |
Exchange codes ............................................................................................................................. |
18 |
Changing the system code, changing the PIN ............................................................................. |
19 |
Resetting the base station to factory defaults ............................................................................. |
20 |
Resetting the Gigaset 2000S handset to factory defaults ............................................................ |
21 |
Incoming calls ............................................................................................................................ |
22 |
Accepting calls ............................................................................................................................. |
22 |
External call-waiting during internal calls ........................................................................................ |
23 |
Ending an internal call .................................................................................................................. |
23 |
Switching off the microphone (mute function) ...................................................................... |
23 |
External outgoing calls .............................................................................................................. |
24 |
Calling external subscribers ......................................................................................................... |
24 |
No answer or line busy ................................................................................................................ |
25 |
Redial ........................................................................................................................................... |
25 |
Dialing speed dial numbers ............................................................................................................ |
26 |
Device control using dual-tone multifrequency signaling (DTMF) .................................................. |
27 |
Dialing a DSS number from a locked handset .............................................................................. |
27 |
Ending a call ................................................................................................................................. |
27 |
Collective ringing and internal calls ......................................................................................... |
28 |
Making collective calls to all handsets from the base station ...................................................... |
28 |
Making collective calls from one handset to all other handsets ................................................... |
28 |
Making internal calls ..................................................................................................................... |
28 |
Allowing internal parties to listen in on a call ............................................................................... |
29 |
Ending an internal call .................................................................................................................. |
29 |
A5

12.3.98 |
GIGA2010.IVZ |
Gigaset 2010, UEB/engl.: A30852-X1100-E301-2-7619 |
Contents |
|
Internal consultation calls and transferring calls ................................................................... |
30 |
Consultation calls ......................................................................................................................... |
30 |
Transferring calls .......................................................................................................................... |
31 |
Base station settings ................................................................................................................. |
32 |
Switching the base station ringer off and setting the ringer volume ........................................... |
32 |
Setting the base station ringer tone ............................................................................................... |
33 |
Switching music-on-hold on/off .................................................................................................... |
33 |
Individual settings on the Gigaset 2000S mobile unit ........................................................... |
34 |
Setting the ringer volume ............................................................................................................. |
34 |
Setting the ringer tone ................................................................................................................. |
34 |
Setting the handset volume ........................................................................................................... |
35 |
Activating/deactivating notification and warning tones ................................................................ |
35 |
Activating/deactivating automatic call acceptance ....................................................................... |
37 |
Speed dial numbers ....................................................................................................................... |
38 |
Activating/deactivating the call duration display ................................................................... |
40 |
The Gigaset 2010 lock functions .............................................................................................. |
41 |
Activating/deactivating the Gigaset 2010 lock for outgoing calls ................................................. |
41 |
Emergency calls when the Gigaset 2010 is locked ...................................................................... |
41 |
Barred numbers for handsets ........................................................................................................ |
43 |
Activating/deactivating the call number lock ................................................................................ |
44 |
Setting trunk access for the handsets ............................................................................................ |
45 |
Lock functions on the handset ................................................................................................. |
46 |
Activating/deactivating the handset lock ...................................................................................... |
46 |
DSS number for handset lock ...................................................................................................... |
46 |
Handset display with active lock .................................................................................................... |
48 |
Registering/de-registering more than one handsets at the base station ............................ |
49 |
Registering a Gigaset 2000S handset at a base station ............................................................... |
49 |
De-registering a handset from a base station .............................................................................. |
50 |
Operating more than one handset ........................................................................................... |
51 |
Ring priority for incoming calls ..................................................................................................... |
51 |
Operation at more than one base station ............................................................................... |
53 |
Procedure for operating at more than one base station ............................................................... |
53 |
Activating/deactivating base station number display on handset ................................................. |
54 |
Selecting the best station ............................................................................................................ |
54 |
Automatic search for a base station if the preferred base station cannot be reached ................. |
55 |
Reset the factory default ................................................................................................................ |
56 |
Quick reference guide handset Gigaset 2000S ....................................................................... |
57 |
Index ............................................................................................................................................ |
58 |
A6
14.8.98 |
KAP02.FM5 |
Gigaset 2010, UEB/engl.: A30852-X1100-E301-3-7619 |
Stepwise startup
Stepwise startup
Before you can operate with your handset you have to connect the base station Gigaset 2010.
Follow the installation and setup instructions “step by step” as described.
Step 1: Observe the safety precautions
It is essential that you read the safety precautions at the begining of this manual before startup!
Step 2: Check the contents of the package
The factory package contains:
●a Gigaset 2010 base station,
●a Gigaset 2000S handset,
●a phone cord,
●a power cord with RJ-11 plug and plug-in power supply,
●cover for handset battery compartment,
●carrying clip for the handset,
●two batteries,
●instructions.
1

14.8.98 |
KAP02.FM5 |
Gigaset 2010, UEB/engl.: A30852-X1100-E301-3-7619 |
Stepwise startup
Step 3: Connecting the base station
Plug-in power supply socket
power cord |
|
|
|
phone cord |
|
|
|
cord channel for power and phone
cords
power cord RJ-11 plug 
power cord RJ-11 plug 
Underside of base station case
Phone cord
Insert the RJ-11 plug on your phone cord into the base station. The jack on the bottom of the base station is marked with the following symbol:
Insert the phone plug on your phone cord into your phone socket.
Power cord
Insert the RJ-11 plug on your power cord into the base station. The jack on the bottom of the base station is marked with the following symbol:
Insert the power cord plug-power supply into a socket.
For safety reasons, the phone must only be operated with the supplied Siemens adapter.
2
14.8.98 |
KAP02.FM5 |
Gigaset 2010, UEB/engl.: A30852-X1100-E301-3-7619 |
Stepwise startup
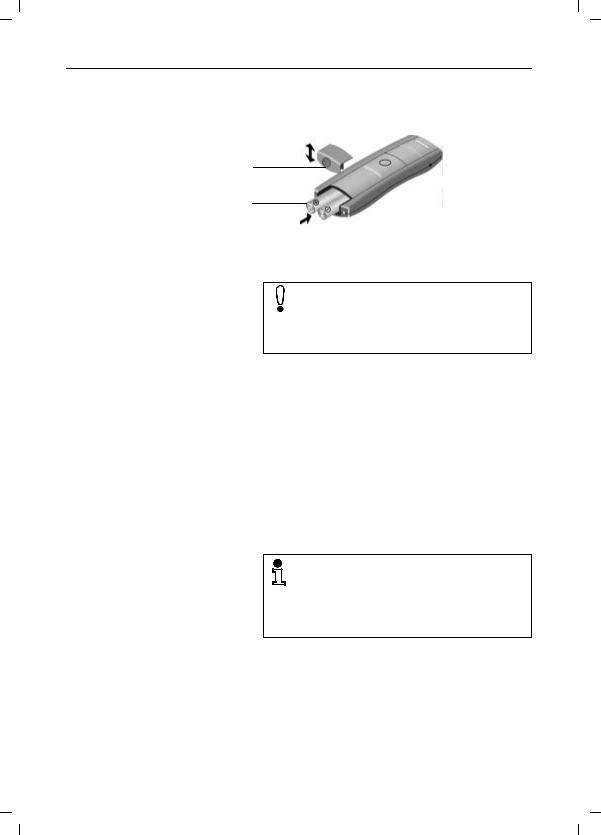
Step 4: Inserting the batteries into the handset
The handset is powered by two batteries.
Batt. compartment cover
Batt. comp. and batteries
Hold the handset with the keypad side facing down.
Slot the batteries into the battery compartment.
Make sure that the +/– battery poles are aligned correctly. The +/– marks on the plate must be aligned with the +/– marks on the batteries.
The handset will not work if the batteries are incorrectly inserted and it may be damaged.
Slide the cover of the battery compartment from above into the grooves in the handset and close the compartment.
Step 5: Charging the batteries
To charge the batteries, place the handset in the handset rest on the base station. The charging contacts on the bottom of the handset must come into contact with the bottom of the base station and its charging contacts. It does not matter whether the keypad is facing up or down.
If you have correctly inserted the mobile unit for charging, the LED under the battery symbol on the base station will light up.
You must charge the batteries before you can make any calls or settings. We recommend that the batteries be charged for 16 hours without interruption, e.g. overnight, for the initial startup.
For more information on the use of the batteries ( page 6).
3

14.8.98 |
KAP02.FM5 |
Gigaset 2010, UEB/engl.: A30852-X1100-E301-3-7619 |
Stepwise startup
Step 6: Check signaling method
Telephone lines can use the following signaling methods:
●dial pulsing (DP)
●dual-tone multifrequency signaling (DTMF)
The factory default for your Gigaset 2010 is DTMF.
Checking your own telephone’s signalling method
Press the off-hook key (corresponds to picking up the
chandset on an ordinary phone). You will hear the dial tone.
Press any digit, e.g. 2. If you can still hear the dial tone
o
you will have to set the signaling method to dial pulsing (DP).
Setting the phone to dial pulsing (DP)
B#1 Start the setting procedure.
o |
Enter the four-digit base code (factory default:”0000“) |
( page 19). |
|
O033B Set dial pulsing (DP). |
|
|
|
|
The other signaling method settings are inten- |
|
ded for the operation of the Gigaset 2010 in |
|
telephone systems ( page 17 ). |
|
|
|
You can now make external calls with your Gigaset 2010. |
4

18.11.98 |
Kap03.fm5 |
Gigaset 2010, UEB/engl.: A30852-X1100-E301-3-7619 |
Notes on operation
Notes on operation
Installing the base station
Installation site/installation area
●A 220/230V power socket must be located at the installation site.
●In order to avoid interference, the base station should not be in the direct vicinity of other electronic equipment such as HiFi, office or microwave equipment.
●Place the base station on a level, non-slip surface. The device feet do not normally leave any unsightly marks. However, due to the variety of varnishes and polish used on furniture, the possibility of marks cannot be entirely ruled out.
●Radio transmission between the base station and handsets complies with the DECT standard. Gigaset 2010 thus observes all relevant regulations. However, if there is interference to the picture or sound of your satellite equipment, consult your specialist satellite dealer.
●Depending on ambient conditions, the maximum radio range between the base station and the handset is approx. 300 m outdoors, and approx. 50 m indoors. If the range warning is activated for the handset
( page 36), a signal will sound when you move outside the radio range.
Temperature/ambient conditions
●The base station is designed for operation in protected areas with a temperature range from +5 °C to +45° C.
●The base station should not be installed in damp areas (such as bathrooms or laundry rooms), or close to heat sources, or in direct sunlight.
5
18.11.98 |
Kap03.fm5 |
Gigaset 2010, UEB/engl.: A30852-X1100-E301-3-7619 |
Notes on operation
Notes on operating the handset
For users who wear hearing aids
If you wear a hearing aid, please note that radio signals can interfere with hearing aids, and if sufficiently loud, can cause a very unpleasant humming sound.
Using rechargeable batteries
The following should be noted when using rechargeable batteries:
●Only use the rechargeable battery types supplied (AA nickel-cadmium batteries). When replacing rechargeable batteries, the following can be used:
Panasonic P-60 AA/1P, Philips R6 NC-P, UCAR RC6, Eveready XC6, DAIMON ACCU 1000, Sanyo N-3U, Varta Rechargeable Accu Plus Ni-Cd 1.2V, No. 5006.
●Nickel-metal-hydride (NiMH)
rechargeable batteries can significantly increase the time for which Gigaset 2000C Tango can be used. The following products are authorized:
Sanyo HR-3U (1300 mAh), GP GP120 AAHC, Emmerich CE R 6, Energizer EMH-1100AAC, Varta VH1101AA,
Once the NiMH rechargeable batteries have been inserted, the following should be observed to ensure maximum lasting power from your batteries: Once the batteries have been fully charged for the first time, the handset prematurely indicates that the batteries are running low (i). In order to deep discharge the batteries, continue to use the handset until the battery symbol jappears and the batt. low beep sounds (caution: max. operating time remaining is 10 minutes). In this way the handset recognizes the extended capacity of the rechargeable batteries and will in future display the correct battery charging status.
Opening the battery compartment resets the display to the capacity of the batteries delivered with the telephone.
●Using other battery types or non-rechargeable batteries may cause malfunctions or even damage the equipment. The manufacturer shall assume no liability in this case.
Never use ordinary batteries.
6

18.11.98 |
Kap03.fm5 |
Gigaset 2010, UEB/engl.: A30852-X1100-E301-3-7619 |
Notes on operation
When installing and using the rechargeable batteries, please follow the rules below:
●Initially charge the batteries thoroughly. We recommend charging the batteries for approximately 16 hours without interruption (overnight for example). During the first week of operation, continually replace the handsets in the charging unit for recharging.
●New batteries do not usually reach their full capacity (i.e. maximum time when the telephone is in use and standby time) until they have been in normal use for several days. Although the battery LED indicates that the rechargeable batteries of a handset have been charged (LED off), you must assume during this initial phase that the capacity may not reach that of maximum time when the telephone is in use, or that of standby time.
●After they have initially been thoroughly charged, the rechargeable batteries are fully operative. For normal operation, we recommend that the handsets are not placed in the charging unit each time a call is completed. The rechargeable batteries should be discharged from time to time.
Caution: partially discharged batteries only offer limited operating time.
●Make sure that the contacts do not touch metal or oily objects.
●Battery charging times
–Charging time in the handset
NiCd rechargeable batteries |
approx. 4–5 hours |
NiMH rechargeable |
|
batteries 1100 mAh |
approx. 8–9 hours |
–Charging time in the charging unit backup battery compartment
NiCd rechargeable battery |
approx. 24 hours |
NiMH rechargeable |
|
battery 1100 mAh |
approx. 40 hours |
●The LED display lights up occasionally to indicate that float charging is taking place.
7
18.11.98 |
Kap03.fm5 |
Gigaset 2010, UEB/engl.: A30852-X1100-E301-3-7619 |
Notes on operation
Mounting the carrying clip onto the handset
If required, you can mount the carrying clip supplied with the handset, e.g. if you wish to carry the handset in your pocket.
Hold the handset with the keypad facing the palm of your hand. You will see two small holes on the sides, level with the display. Place the clip in one hole and then insert it into the opposite hole until it clicks into place.
Maintenance notes
Simply wipe the handset and base station with a damp cloth or an antistatic wipe.
Never use a dry cloth as this causes static discharge.
Connecting the telephone socket
Only use a Siemens telephone connecting cable. Cables by other manufacturers may have a different pin assignment.
The telephone cable socket is connected on the underside of the base station as follows:
3 |
|
|
|
4 |
1 |
Free |
||||
2 |
|
|
|
|
|
|
|
5 |
2 |
Free |
|
|
|
|
|
|
|
|
|
3 |
a |
|
|
|
|
|
|
|
|
|
||
1 |
|
|
|
|
|
|
|
6 |
4 |
b |
|
|
|
|
|
|
|
||||
|
|
|
|
|
|
|
||||
|
|
|
|
|
|
|
|
|
5 |
Free |
|
|
|
|
|
|
|
|
|
6 |
Free |
|
|
|
|
|
|
|
|
|
|
|
8

18.11.98 |
Kap03.fm5 |
Gigaset 2010, UEB/engl.: A30852-X1100-E301-3-7619 |
Notes on operation
Technical data
Standard: DECT = Digital Enhanced Cordless Telecommunications GAP = Generic Access Profile (standard adhered to
by most manufacturers for DECT radio transmission)
Number of channels:
Radio frequency range:
Duplex method:
Channel grid:
Bit rate:
Modulation:
Voice coding:
Transmitted power:
Range:
Base station power supply:
Base station power consumption:
Handset operating times (with fully charged battery):
In standby mode with NiCd NiMH, 1100 mAh NiMH, 1300 mAh
When the telephone is in use with NiCd with NiMH, 1100 mAh
with NiMH, 1300 mAh
Charging time in base station:
120 duplex channels
1880 MHz to 1900 MHz
Time-division multiplexing, 10 ms frame length
1728 kHz
1152 kbit/s
GFSK
32 kbit/s
10 mW, average output per channel
up to 300 m outdoors, up to 50 m in buildings
220/230V (AC adapter)
In standby mode and when the telephone is in use approx. 3 W, during charging approx. 5 W
up to 70 hours up to 110 hours up to 130 hours
up to 7 hours up to 11 hours up to 13 hours
NiCd rechargeable batteries (approx. 4–5 hours) NiMH rechargeable batteries, 1100 mAh (approx. 8–9 hours)
Permitted ambient conditions |
+5 °C to +45 °C |
for operation: |
20 % to 75 % relative humidity |
Signaling method: |
DP (dial pulsing) / DTMF (dual tone multifrequency) |
Signal key function: |
Flash |
Base station dimensions: |
approx. 146 x 117 x 70 mm (L x W x H) |
Handset dimensions: |
approx. 160 × 55 × 25 mm (L × W × H) |
9

18.11.98 |
Kap03.fm5 |
Gigaset 2010, UEB/engl.: A30852-X1100-E301-3-7619 |
Notes on operation
Weight: |
Base station 210 g |
|
Handset with rechargeable batteries approx. 165 g |
Cable lengths: |
Telephone connecting cord approx. 3 m |
|
Power cord approx. 3 m |
Plugs: |
TSV 6/4 (phone cord) |
|
TSV 6/4 (power cord) |
Third party use/disposal
Gigaset 2010 telephone should only be passed onto third parties if the instructions for use are included.
When the system or batteries have reached the end of their service life, they should be disposed of in an environmentally friendly manner in accordance with relevant legislation.
Warranty
This equipment is guaranteed by Siemens for a period of 6 months from the date of purchase. Please keep your sales receipt as proof of this date!
During this period, Siemens will rectify all equipment or manufacturing defects. Siemens will decide how the warranty shall be implemented: repair or replacement of the defective equipment.
The warranty excludes any damage resulting from incorrect use, wear and tear, or actions carried out by third parties. The warranty covers neither consumables nor any defects having only a minimal effect on the value or use of the equipment.
The Siemens product which you have purchased meets the technical requirements relating to connection to the public telephone network.
You can exercise your warranty rights directly with your supplier.
10
18.11.98 |
Kap03.fm5 |
Gigaset 2010, UEB/engl.: A30852-X1100-E301-3-7619 |
Notes on operation
Procedure in the case of malfunctions
Not every malfunction means that there is an actual defect in your telephone. In some situations you may save time and money if you can eliminate the cause of simple faults yourself. The information below will help you do this.
Symptom |
Cause |
Remedy |
|
|
|
No display appears |
Handset is not switched on. |
Switch on the handset. |
|
Battery is empty. |
Replace the battery with a backup |
|
|
battery or recharge it. |
|
|
|
Cannot seize the dial-up line; |
The plug on the power cord |
Check the plug on the base station |
no dial tone |
is not connected properly. |
and telephone socket; if necessary |
|
|
remove it and plug it back in |
|
|
( page 2). |
|
The plug on the power cord |
Check the plug on the base station |
|
is not connected properly. |
and the socket; if necessary |
|
|
remove it and plug it back in |
|
|
( page 2). |
|
The dial-up line is being used |
Wait until the dial-up line is free. |
|
by another handset. |
|
|
|
|
Cannot set up a radio link to |
Handset is not registered. |
Register the handset at the base |
the base station – symbol on |
|
station ( page 49). |
the handset flashes. |
|
|
|
The plug on the AC power |
Check the plug on the base station |
|
adapter cord is not connec- |
and the socket; if necessary re- |
|
ted properly. |
move it and plug it back in. |
|
|
|
Base station or handset does |
Ringer volume is set to low. |
Adjust the base station |
not ring. |
|
( page 32) or handset |
|
|
( page 34) ringer volume. |
|
The ring assignment is not |
Adjust the ring assignment |
|
set correctly. |
( page 51). |
|
|
|
No connection after dialing a |
Wrong signaling method. |
Reset the signaling method |
call number; dial tone can |
|
( page 16). |
still be heard. |
|
|
|
|
|
No connection after a con- |
Wrong signaling method. |
Switch the signaling method |
nection has been set up; dial |
|
( page 18). |
tone can still be heard. |
|
|
|
|
|
11

18.11.98 |
Kap03.fm5 |
Gigaset 2010, UEB/engl.: A30852-X1100-E301-3-7619 |
Notes on operation
Symptom |
Cause |
Remedy |
|
|
|
With telephone systems: |
Exchange code not entered |
Enter exchange code ( page 18). |
no connection or wrong con- |
|
|
nection after dialing from a |
|
|
memory. |
|
|
|
|
|
System code entered is re- |
System code entered does |
If you have forgotten your changed |
jected. |
not correspond with the |
system code, please contact your |
|
changed code. |
specialist dealer. |
|
|
|
PIN entered is rejected. |
PIN entered does not corre- |
If you have forgotten your changed |
|
spond with the changed PIN. |
PIN, please contact your specialist |
|
|
dealer. |
|
|
|
12
 Loading...